by Contributed | Jan 6, 2021 | Technology
This article is contributed. See the original author and article here.
Today’s companies are dealing with data of many different types, in many different sizes, and coming in at varying frequencies. These companies are looking beyond the limitations of traditional data architectures to enable cloud scale analytics, data science, and machine learning on all of this data. One architecture pattern that addresses many of the challenges of traditional data architectures is the lakehouse architecture.
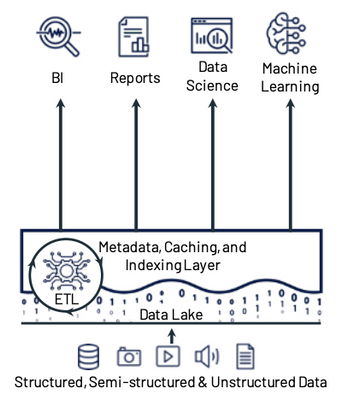
Lakehouses combine the low cost and flexibility of data lakes with the reliability and performance of data warehouses. The lakehouse architecture provides several key features including:
- Reliable, scalable, and low-cost storage in an open format
- ETL and stream processing with ACID transactions
- Metadata, versioning, caching, and indexing to ensure manageability and performance when querying
- SQL APIs for BI and reporting along with declarative DataFrame APIs for data science and machine learning
Lakehouse Principles and Components

When building a lakehouse architecture, keep these 3 key principles and their associated components in mind:
- A data lake to store all your data, with a curated layer in an open-source format. The data lake should be able to accommodate data of any type, size, and speed. The format of the curated data in the lake should be open, integrated with cloud native security services, and it should support ACID transactions.
- A foundational compute layer built on open standards. There should be a foundational compute layer that supports all of the core lakehouse use cases including curating the data lake (ETL and stream processing), data science and machine learning, and SQL analytics on the data lake. That layer should also be built on open standards that ensure rapid innovation and are non-locking and future proof.
- Easy integration for additional and/or new use cases. No single service can do everything. There are always going to be new or additional use cases that aren’t a part of the core lakehouse use cases. These new or additional use cases often need specialized services or tools. This is why easy integrations between the curated data lake, the foundational compute layer, and other services and tools are key requirements.
Let’s look at how Azure Databricks along with Azure Data Lake Storage and Delta Lake can help build a lakehouse architecture using these 3 principles.
Open, Transactional Storage with Azure Data Lake Storage + Delta Lake

One part of the first principle is to have a data lake to store all your data. Azure Data Lake Storage offers a cheap, secure object store capable of storing data of any size (big and small), of any type (structured or unstructured), and at any speed (fast or slow). The second part of the first principle is to have the Curated data in the data lake be in an open format that supports ACID transactions. Companies often use Delta Lake to build this curated zone of their data lake. Delta Lake is simply an open file format based on Parquet that can be stored in Azure Data Lake Storage. Among other things, it supports ACID transactions (UPDATE, DELETE, and even MERGE), time travel, schema evolution/enforcement, and streaming as a source and a sync. These features make the Delta Lake format used in Azure Data Lake Storage an ideal component for the first principle of the lakehouse architecture.
Azure Databricks for Core Lakehouse Use Cases

The 2nd principle discussed above is to have a foundational compute layer built on open standards that can handle all of the core lakehouse use cases. The Photon-powered Delta Engine found in Azure Databricks is an ideal layer for these core use cases. The Delta Engine is rooted in Apache Spark, supporting all of the Spark APIs along with support for SQL, Python, R, and Scala. In addition, Azure Databricks provides other open source frameworks including:
- Always the latest and greatest version of Spark which is ideal for ETL/ELT, stream processing, distributed data science and ML, and SQL analytics on the data lake
- Optimized compute for the Delta Lake file format which includes data skipping and data source caching capabilities for faster queries
- A machine learning runtime with pre-installed, optimized libraries for model development and training. This also includes the open-source Koalas, which provides data scientists the ability to work on big data with a Pandas API that runs on top of Apache Spark
- Tightly integrated MLflow to help develop, train, and operationalize (batch, stream, or API) data science and machine learning models
Azure Databricks also provides a collaborative workspace along with the Delta Engine that includes an integrated notebook environment as well as a SQL Analytics environment designed to make it easier for analysts to write SQL on the data lake, visualize results, build dashboards, and schedule queries and alerts. All of this makes Azure Databricks and the Delta Engine and ideal foundational compute layer for core lakehouse use cases.
Integrated Services for Other/New Use Cases

The final principle focuses on key integrations between the Curated data lake, foundational compute layer, and other services. This is necessary because there will always be specialized or new use cases that are not “core” lakehouse use cases. Also, different business areas may prefer different or additional tools (especially in the SQL analytics and BI space). A lakehouse built on Azure Data Lake Storage, Delta Lake, and Azure Databricks provides easy integrations for these new or specialized use cases.
- Azure Data Lake Storage is a storage service that is supported by all of the data and AI services in Azure.
- Delta Lake is an open source storage format with supported interfaces for Spark, Hive, Presto, Python, Scala, and Java. It also has native connectors in Azure services like Azure Synapse and Data Factory and it can be used with other services like Power BI, HDInsight, and Azure Machine Learning.
- Azure Databricks is tightly integrated into the rest of the Azure ecosystem with optimized, secure connectivity to services like Azure Data Factory, Power BI, and Azure Synapse. The service also includes REST API, Command Line, and JDBC/ODBC interfaces allowing for integrations with just about any tool or service.
To conclude, the lakehouse architecture pattern is one that will continue to be adopted because of its flexibility, cost efficiency, and open standards. Building an architecture with Azure Databricks, Delta Lake, and Azure Data Lake Storage provides the foundation for lakehouse use cases that is open, extensible, and future proof.
To learn more about Lakehouse architecture, check out this research paper and blog from Databricks and join an Azure Databricks event.
by Contributed | Jan 6, 2021 | Technology
This article is contributed. See the original author and article here.
Introduction
Technologies such as Intune and Endpoint Configuration Manager (used manage enterprise devices) are becoming more robust, and these tools can also now be used for virtual devices such as those used by Microsoft’s Windows Virtual Desktop service in Azure.
Windows Virtual Desktop (WVD)
Overview
As a desktop and app virtualization service in Azure, Windows Virtual Desktop allows administrators to set up a scalable, multi-session Windows 10 deployments using virtualized desktops as well as virtualized Microsoft 365 and other apps in multi-user virtual scenarios.
Deploying and managing WVDs in Azure can also be accomplished with multiple options for management of host pools, app groups, user assignment and resource publishing.
Requirements
The following requirements are needed to setup and connect WVDs and apps.
Requirements
|
Description
|
Supported OS
|
· Window 10 Enterprise (including multi-session)
· Windows 7 Enterprise
· Windows Server 2012 R2, 2016, 2019
|
Azure Active Directory (AAD)
|
Tenant required
|
Windows Server AD (in sync with AAD)
|
Only Hybrid Azure AD joins are supported
|
Azure Subscription
|
Parented to same AAD tenant and connected to the Windows Server AD or Azure AD DS instance
|
Users
|
· Users must be sourced from same AD connected to AAD
· UPN to subscript to WVD must exist in the AD domain the VM is joined.
NOTE: WVDs do not support Azure AD guest user accounts
|
Azure WVDs (Intune prerequisites)
|
· Windows 10 (1809) or later
· Hybrid AD-joined (no AAD-joined)
· Configured as personal remote desktops in Azure
· Enrolled in Intune using either AD group policy to auto-enroll hybrid-AAD joined devices, ECM co-management or user self-enrollment via Azure AD join.
NOTE: Intune treats WVD personal VMs the same as physical Win10 Enterprise desktops.
|
Supported RD clients
|
· Windows Desktop
· Web
· macOS and iOS
· Android
· Microsoft Store Client
NOTE: RemoteApp, RADC or the Remote Desktop Connection (MSTSC) client are NOT supported
|
Multi-session
Windows 10 Enterprise multi-session is a new Remote Desktop Session Host that allows multiple concurrent interactive sessions. Multi-session varieties of Windows 10 also:
- Cannot run in on-premises production environments
- Will not activate against on-premises Key Management Services (KMS)
- Only support hybrid Azure AD joined configurations
Microsoft recommends Endpoint Configuration Manager (Current Branch, 1906/newer releases) when managing deployed multi-session WVDs.
Hybrid Azure AD Join
One of the requirements for managing your Windows 10 WVD environment with Endpoint Manager is the use of Hybrid Azure AD join. When you configure your devices to Hybrid join Azure AD, these devices will be visible and manageable in both your on-premises AD as well in Azure AD.
Requirements, Support and Considerations
- Credentials of a global administrator for the Azure AD tenant and an Enterprise Administrator account for the on-prem forest are required.
- Domain Controller should be at least Windows Server 2008 R2
- Server 2016 or Server 2019 are recommended
- Server Core does NOT support any type of device registration
NOTE: A single forest should sync identities to only one Azure tenant. Single forest syncing of identity data to multiple Azure AD tenants is NOT supported.
- Client devices as old as Windows 8.1 are supported
- Latest release of Windows 10 is recommended
- Older operating systems (pre-Windows 10 and pre-Server 2016) using credential roaming, user profile roaming, or mandatory profiles are NOT supported
- When using Sysprep for pre-Windows 10 1809 reference images that are used for deployments, make sure the image isn’t from a device that is already registered in Hybrid Azure AD.
- Ensure that VM snapshots, used to create new VMs, are not from a virtual machine that is already registered with Hybrid Azure AD.
- Enabling Unified Write Filter and similar technologies prior to Hybrid Azure AD join will result in the device getting unjoined on every reboot, so do not apply them until after the device is joined.
- Windows 10 releases older than 1803, which are already Azure AD registered, must have this registration removed before enabling Hybrid Azure AD; otherwise, a dual state condition will exist.
- Support for FIPS-compliant TPM 2.0
- TPM 1.2 is not supported and considered not existent.
Hybrid Azure AD join requires devices have access to the following Microsoft resources inside your organization’s network:
https://enterpriseregistration.windows.net
https://login.microsoftonline.com
https://device.login.microsoftonline.com
https://autologon.microsoftazuread-sso.com (seamless SSO)
NOTE: Azure AD Connect provides a wizard to configure hybrid Azure AD join, which significantly simplifies the configuration process.
Managed vs. Federated Environments
In depth information for these two topics are out of the scope of this document; however, a few key components are worth mentioning, and exploring more for a full understanding of each.
- A managed environment can be deployed either through Password Hash Sync (PHS) or Pass Through Authentication (PTA) with Seamless Single Sign On. These configurations don’t require a federation server for authentication.
Note: Azure AD does not support smartcards or certificates in managed domains
- Federated Environments should have an identity provider that supports the following requirements, which are already supported by Active Directory Federated Services (AD FS).
- WIAORMULTIAUTHN claim: Needed for hybrid Azure AD join for Windows down-level devices.
- Down-level devices are pre-Windows 10 and pre Windows Server 2016
- WS-Trust protocol: Needed authentication between Windows current hybrid Azure AD joined devices and Azure AD. AD FS environments must enable the following WS-Trust endpoints:
- /adfs/services/trust/2005/windowstransport
- /adfs/services/trust/13/windowstransport
- /adfs/services/trust/2005/usernamemixed
- /adfs/services/trust/13/usernamemixed
- /adfs/services/trust/2005/certificatemixed
- /adfs/services/trust/13/certificatemixed
Example: Using AAD Connect to Perform Hybrid join
Step
|
Description
|
1)
|
Start Azure AD Connect and click the Configure button
|
2)
|
Click Configure Device Options from the list of Additional Tasks
|
3)
|
Review the Overview page and click Next
|
4)
|
Enter the credentials for an Azure AD global administrator account, and click Next
|
5)
|
Select Configure Hybrid Azure AD join and click Next.
|
6)
|
Select the Device OS configuration (current Windows 10 or older “down-level” operating systems) which will be supported and click Next.
|
7)
|
Service Connection Points (SCP) are used by devices to discover their Azure AD tenant information, and one must be configured for EACH forest.
Click on the Edit button and fill in your Enterprise Administrator credentials and click on Next.
NOTE: As stated in the Wizard, a configuration PowerShell script (ConfigureSCP.ps1) can be provided to, and run manually by, an Enterprise Administrator in the organization in the event that the person using AD Connect does not have the permissions.
|
8
|
Click on Configure to begin the process.
|
9)
|
When the Configuration Complete message displays, the Wizard can be exited.
|
Synchronizing Session Hosts and Confirming Status
Computer accounts from the local Active Directory must synchronize with Azure AD before registration can be completed
Using the dsregcmd /status command line on a client is a quick way of verifying registration status. The AzureAdJoined attribute of Device State should be YES
NOTE: It can usually take 15 minutes or more for the registration process to complete.
Intune Enrollment
When a device is enrolled, it is issued an MDM certificate. This certificate is used to communicate with the Intune service.
NOTE: Licenses must be assigned to an administrator’s account before that administrator can enroll devices to Intune. (more information)
Enable Automatic Enrollment
Automatic enrollment allows users to enroll their Windows 10 devices in Intune by adding their work account to their personally owned devices, or join corporate-owned devices to Azure Active Directory. The device then registers, joins Azure AD and becomes managed with Intune.
Step
|
Description
|
1)
|
From the Azure Portal, navigate to Azure Active Directory > Mobility (MDM and MDM).
|
2)
|
Open the Microsoft Intune item
NOTE: Some tenants might have both Microsoft Intune and Microsoft Intune Enrollment under Mobility. Make sure that your auto-enrollment settings are configured under Microsoft Intune (not Microsoft Intune Enrollment).
|
3)
|
Verify MDM discovery URL during auto-enrollment
· https://enrollment.manage.microsoft.com/enrollmentserver/discovery.svc (Home > Mobility (MDM and MAM))
|
4)
|
Ensure automatic enrollment is enabled for the users (All or Some (group membership)) who will self-enroll devices into Intune.
|
5)
|
Make any other desired changes and then apply the new settings.
|
Auto-enroll Using Group Policy
Starting in Windows 10, version 1607, once the enterprise has registered its local Active Directory with Azure AD, a domain-joined Windows device will be automatically registered in Azure AD.
Once the group policy is created and enabled on the local Active Directory, a task is created in the background that initiates the enrollment using the existing MDM service configuration from the Azure AD information of the user, and without their interaction.
NOTE: If multi-factor authentication is enabled, the user will be prompted for additional authentication.
Example Group Policy Configuration (Single Device)
Complete the steps below to configure a group policy to enroll a single device into Intune.
Step
|
Description
|
1)
|
Enter gpedit into the Windows Search bar to open the Group Policy Editor (Edit group policy)
|
2)
|
Navigate to Administrative Templates > Windows Components > MDM in the Editor.
|
3)
|
Open Enable automatic MDM enrollment using default Azure AD credentials (previously called Auto MDM Enrollment with AAD Token in Windows 10, version 1709).
|
4)
|
Click Enable and select User Credential from the dropdown Select Credential Type to Use, then click OK.
Note: The MDM.admx file was updated in Windows 10 (1903) to include the Device Credential option, which only affects Windows 10, version 1903 clients.
Older Windows releases revert to User Credential, and Device Credential is not supported for enrollment type when you have an Endpoint Configuration Manager agent on the device.
|
After a group policy refresh, a scheduled task (Schedule created by enrollment client for automatically enrolling in MDM from AAD) will be created, and run every 5 minutes for the duration of one day.
If two-factor authentication is required, you will be prompted to complete the process.
Example Group Policy Configuration (Group)
Complete the steps below to configure a group policy for enrolling a group of devices into Intune.
Step
|
Description
|
1)
|
Download Administrative Templates (.admx) for Windows 10:
|
2)
|
Install the package on the Domain Controller.
|
3)
|
Navigate to folder (depends on version):
C:Program Files (x86)Microsoft Group PolicyWindows 10…
- …April 2018 Update (1803) v2
- …October 2018 Update (1809) v2
- …May 2019 Update (1903) v3
- …November 2019 Update (1909)
- …May 2020 Update (2004)
|
4)
|
Rename the extracted Policy Definitions folder to PolicyDefinitions.
|
5)
|
Copy PolicyDefinitions folder to C:WindowsSYSVOLdomainPolicies
|
6)
|
Restart the Domain Controller to make the policy available.
|
7)
|
1. Create a Group Policy Object (GPO) and enable the Group Policy Computer Configuration > Policies > Administrative Templates > Windows Components > MDM > Enable automatic MDM enrollment using default Azure AD credentials.
|
8
|
2. Create a Security Group for the PCs.
|
9)
|
3. Link the GPO and filter using security groups
|
Bulk Enrollment
Create a provisioning package to bulk enroll devices for the Azure AD tenant using the Windows Configuration Designer (WCD) app. When the package is applied to corporate-owned devices they join to the Azure AD tenant and enroll into Intune for management.
Create Provisioning Package
Step
|
Description
|
1)
|
Open the Windows Configuration Designer (can be downloaded from the Microsoft Store), and select Provision desktop devices
|
2)
|
Specify the following in the New project window:
· Name – A name for your project
- Project folder – Save location for the project
- Description – An optional description of the project
|
3)
|
Enter unique names for devices.
· Names can include a serial number (%SERIAL%) or a random set of characters.
Other configuration options include:
· Product key if upgrading the edition of Windows
· Configure the device for shared use
· Remove pre-installed software.
|
4)
|
Optionally, you can configure the Wi-Fi network devices connect to when they first start. If the network devices aren’t configured, a wired network connection is required when the device is first started.
|
5)
|
Select Enroll in Azure AD, enter a Bulk Token Expiry date, and then select Get Bulk Token.
|
6)
|
Provide your Azure AD credentials to get a bulk token.
|
7)
|
In the Stay signed in to all your apps page, select No, sign in to this app only.
|
8
|
Click Next when Bulk Token is fetched successfully.
|
9)
|
Optionally, you can Add applications and Add certificates. These apps and certificates are provisioned on the device.
|
10)
|
Optionally, you can password protect your provisioning package. Click Create.
|
Provision Devices
The steps below will help provision devices using the bulk enrollment provisioning package. Detailed step-by-step instructions for applying these packages are out of the scope of this document, but can be found here (Apply a provisioning package)
Step
|
Description
|
1)
|
Access the provisioning package in the location specified in Project folder specified in the app.
|
2)
|
Choose how to apply the provisioning package to the device, which can be done one of the following ways:
- Place the provisioning package on a USB drive, insert the USB drive into the device you’d like to bulk enroll, and apply it during initial setup
- Place the provisioning package on a network folder, and apply it after initial setup
|
3)
|
After you apply the package, the device will automatically restart in one minute.
|
4)
|
When the device restarts, it connects to the Azure Active Directory and enrolls in Microsoft Intune.
|
Publishing the Remote Desktop Client Package
Creating the WVD Package
Complete the steps below to create the wrapper package that will be deployed to the necessary devices.
NOTE: If successful, there will be a .intunewin file with the contents of the Win32 Content Prep tool.
Configuring App Policy Using the MEM Admin Center
Complete the steps below to create the app policy for the new WVD wrapper package created in the previous section.
Step
|
Description
|
1)
|
From the MEM Admin Center, navigate to Apps > Windows
|
2)
|
Click +Add button and select Windows app (Win32)
|
3)
|
Click Select app package file, and browse to the .intunewin package created above.
|
4)
|
Customize the App Information (name, desc., logo) as needed.
|
5)
|
Configure the Program installation command lines and restart behavior
|
6)
|
Configure the Requirements (architecture, OS).
|
7)
|
Configure Detection Rules
|
8
|
Skip Dependencies
|
9)
|
Assign the app to the necessary AAD group(s)
|
10)
|
Review the configuration and then Create the App policy
|
© 2021 Microsoft Corporation. All rights reserved. This document is provided “as-is.” Information and views expressed in this document, including URL and other Internet Web site references, may change without notice. You bear the risk of using it. This document does not provide you with any legal rights to any intellectual property in any Microsoft product. You may copy and use this document for your internal, reference purposes. You may modify this document for your internal, reference purposes.
by Contributed | Jan 6, 2021 | Technology
This article is contributed. See the original author and article here.
Many of us are working in a hybrid cloud environment, combining the power of the Azure, multi-cloud environments, and on-premises infrastructure and services to deal with data sovereignty or network latency. However, this adds some complexity when it comes to management of all these hybrid resources. That is where Azure Arc can help. Azure Arc simplifies governance and management by delivering a consistent multi-cloud and on-premises management platform. Azure Arc enables you to manage your entire environment, with a single pane of glass, by projecting your existing resources into Azure Resource Manager. You can now manage virtual machines, physical servers, Kubernetes clusters, and databases as if they are running in Azure. To make it easier for you to learn more about Azure Arc, we now have a Microsoft Learn Learning Path, called “Manage hybrid infrastructure with Azure Arc“.
In this learning path you will how to work with Azure Arc enabled servers and Azure Arc enabled Kubernetes.
Manage hybrid infrastructure with Azure Arc on Microsoft Learn
You can check out the full learning path on Microsoft Learn.
Modules in this learning path
 Learn about Azure Arc and Hybrid Cloud Management on Microsoft Learn
I hope this learn module helps you to get started with Azure Arc and hybrid cloud infrastructure management.
If you want to learn more about Hybrid Cloud, I recommend that you check out the blog posts of our team:
Also, check out our YouTube channel IT Ops Talk! :television:
by Contributed | Jan 6, 2021 | Technology
This article is contributed. See the original author and article here.
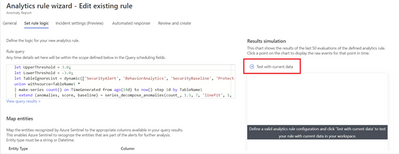
Rule tuning is a delicate and continuous process of balancing between detecting all threats and reducing false and benign positives. The more accurate and less noisy the rules are, the better the detections. To support this goal, we are delighted to announce improvements to the “Preview Graph” feature now in public preview.
The Preview Graph runs a simulation against the last 50 evaluations of an existing scheduled analytic rule and outputs a graph indicating the number of alerts that the rule generated based on the average number of alerts expected per day. This data can then help you tune your rules by predicting the average number of alerts the rule is expected to generate and for existing rules, the data will help you get a sense of the detection efficacy of those rules.
How to use the feature
To try out this feature, navigate to the Analytics blade in the Azure Sentinel Overview page, select an existing analytic rule.
Once you define the KQL query behind your rule you are now ready to get a preview of the results. To do so, click on the arrow next to “Test with current data”.
Upon evolution of the last 50 runs of the analytic rule a graph similar to the one below will appear, giving you an indication of the level of alerts to expect if you were to use the evaluated configuration of the rule. On the Y-axis you have the number of alerts generated while on the X-axis you have the period of time within which the last 50 evaluations of the rule occurred. The “Threshold” value is obtained from the “Set rule logic” section of Analytic rule wizard and it is used to specify the number of query results needed to trigger an alert while the “Alerts per day” denotes the average number of alerts generated across the time period indicated on the x-axis for the last 50 evaluations of the rule.

To visualize the raw events at a specific point in time on the graph, hover over a particular data point and the graph will adjust to show you what the number of events was at that particular point in time as shown below:

Get started today!
We encourage you to use the new Preview Graph to improve the accuracy of your analytic rules and reduce alert noise.
Try it out, and let us know what you think!
You can also contribute new connectors, workbooks, analytics and more in Azure Sentinel. Get started now by joining the Azure Sentinel Threat Hunters GitHub community.
@Jeremy Tan @Ron Marsiano thanks for your input and review comments
by Contributed | Jan 5, 2021 | Technology
This article is contributed. See the original author and article here.
Configuration Manager is localized and released in eighteen server languages and twenty-two client languages. As we implement new features in each update release, new user interface (UI) elements are created and new strings are added and translated into our localized languages.
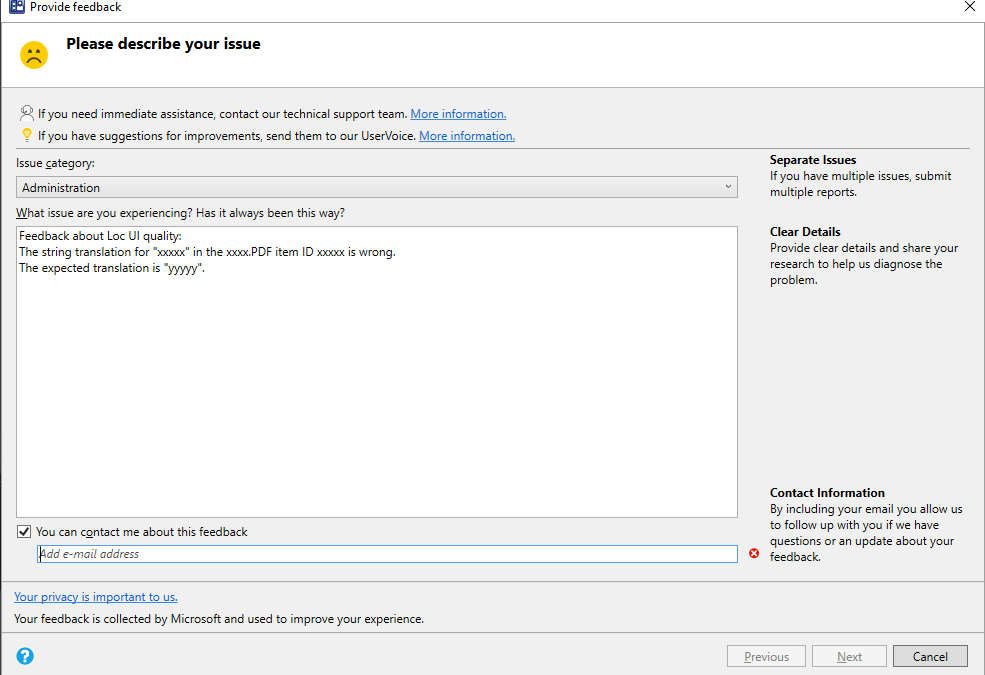
Thank you for your previous feedback on our language quality in Configuration Manager current branch. To continue this review process in Configuration Manager current branch 2010 we have uploaded PDF files that contain the new UI changes for Configuration Manager current branch 2010 for each language.
To review:
- Download the CM2010 Localized UI review cab file and extract the files.
- Select the PDF for the language you would like to review. See the language reference below.
- Read through the screenshots of the new UI and the highlighted changed areas on the existing UI.
- Send us feedback from Configuration Manager console.
- In the description include:
- the PDF filename you are reviewing
- the item ID for that UI surface
- The string you are giving feedback on
- Your comments or proposed replacement string
- Add a screenshot if needed to help clarify the issue.

Language reference
Chinese (PRC) – chs
Chinese (Taiwan) – cht
Czech – csy
Danish – dan
Dutch (Netherlands) – nld
English (USA) – enu
Finnish – fin
French – fra
German – deu
Greek- ell
Hungarian – hun
Italian – ita
Japanese – jpn
Korean – kor
Norwegian (Bokmal) – nor
Polish – plk
Portuguese (Brazil) – ptb
Portuguese – ptg
Russian – rus
Spanish (Modern) – esn
Swedish – sve
Turkish – trk
We ask for structured reviews as new releases are available. But feedback about the language quality in the Configuration Manager user interfaces, is always appreciated at any time.
Thanks for your help!
The Configuration Manager Team
by Contributed | Jan 5, 2021 | Technology
This article is contributed. See the original author and article here.
This last year has been full of change, and Yammer has continued to evolve to meet the needs of customers and enterprises. We’ve listened to your feedback and appreciate your contributions and ideas. Here are some of the many improvements we brought to Yammer this past year.
20. Groups were renamed communities.
19. Interactive emails come directly to your Outlook inbox.

18. Reactions made available and are also soon to be inclusive by letting your employees choose their preferred skin tone.

17. Embed and SharePoint web parts are updated to reflect the new Yammer.


16. Virtual event experiences in Yammer are more immersive and engaging.

15. Brand new mobile apps for iOS and Android.

14. Customers, like this software company, Volvo and Co-op, share their Yammer experiences at events around the world in 2020.

13. We improved the publisher on both web and mobile to make it easier to ask questions, post a poll, or praise a colleague.

12. Style any post as an announcement, be it a poll, praise, or question.

11. Bring your communities and conversations into Microsoft Teams with the Communities app for Teams, including on your mobile devices.

10. Add custom cover photos to create a visual connection to the community.

9. All Company can now be branded to reflect your company’s culture. Also, we’ve provided additional controls that allow you to restrict All Company posts to only admins.

8. Manage Yammer conversations in new ways like converting a conversation into a question, close a conversation, or pin a conversation within a conversation.

7. Mark best answer for questions and filter unanswered questions to organize knowledge being shared within communities.

6. New Insights for communities, and questions are rolling out..

5. Topics and hashtags in Yammer were redesigned to include deeper integrations with Project Cortex.

4. You can now favorite communities as one of the ways to curate your Yammer feed and community experience.

3. Native mode comes to Yammer.

2. Guest Access with Azure B2B is now in preview.

1. The new Yammer is made generally available worldwide.

Additional Resources
Many of these improvements and more are included in “What’s new for Yammer”. View and share this presentation to your organization and keep them up to date on the improvements from this past year!
Curious about what’s coming next for Yammer? Stay tuned for some new experiences landing this month and watch this video to hear from the Yammer Product Team on what’s coming.
If you are interested in learning about what Yammer features are rolling out and when, bookmark the Microsoft 365 Roadmap to keep a pulse on the status.
What’s your favorite Yammer improvement?
by Scott Muniz | Jan 5, 2021 | Security, Technology
This article is contributed. See the original author and article here.
The National Security Agency (NSA) has released a Cybersecurity Information (CSI) sheet on eliminating obsolete Transport Layer Security (TLS) configurations. The information sheet identifies strategies to detect obsolete cipher suites and key exchange mechanisms, discusses recommended TLS configurations, and provides remediation recommendations for organizations using obsolete TLS configurations.
CISA encourages administrators and users to review NSA’s CSI sheet on Eliminating Obsolete TLS Protocol Configurations for more information.

by Contributed | Jan 5, 2021 | Technology
This article is contributed. See the original author and article here.

TLDR; this article gives you a high-level view of configuration management for ASP .NET. It teaches you about various sources, providers and how to read config data. It also shows you how to make your config data type safe.
Why do we need configuration? Well, the answer is that we need our app to perform differently without necessarily recompile it. The reason for that is to make it flexible for different environments. It should be enough to just change a config value to get the app to go towards a completely new endpoint for example. ASP.NET has our back, it knows config data can come from a million different places, files, like JSON or ini, environment variables or even Azure. ASP .NET has a set of services, so called providers that reads out this config data for us.
What we need to know to work efficiently with it, is to know what providers exist (so we know where we can place our config data) and in what order the data is read, so we know what data will take effect. Also, it’s helpful to know that all data are key-value pairs. It doesn’t stop the data from being nested though. Don’t worry there are two different ways we can deal with nesting, untyped and typed.
Let’s just stress one more time some important dimensions on configuration management:
Config data can come from many sources. Data can be read from a number of different sources like JSON files, environment variables, Azure Services and more. Here’s a list of all the different sources:
- Settings files, such as appsettings.json
- Environment variables
- Azure Key Vault
- Azure App Configuration
- Command-line arguments
- Custom providers, installed or created
- Directory files
- In-memory .NET objects
Config data is read in a certain order. Host configuration is the first thing to be read followed by JSON data found in appsettings.json and an environment specific version. The complete read order looks like so:
ChainedConfigurationProvider : Adds an existing IConfiguration as a source. In the default configuration case, adds the host configuration and setting it as the first source for the app configuration.
App setttings JSON file. There’s an appsettings.json that is read using the JSON configuration provider.
Environment specific app settings JSON. After the initial appsettings.json is read it looks read from an environment specific app settings file. So essentially it’s looking for a file on this format appsettings.Environment.json using the JSON configuration provider. For example, appsettings.Production.json or appsettings.Development.json.
App secrets. If you are running in a dev environment it tries to read secrets next.
Environment variables. After that it reads any environment variables using the Environment Variables configuration provider.
Command-line arguments. Lastly it reads command line arguments using the Command-line configuration provider.
NOTE, if the same key exist in two different sources it’s the latter one that gets applied. For example i a key exist in appsetttings.json, that value will be overwritten if it also exist as an environment variable.
- Don’t place sensitive data as config data. You need to know what data is sensitive or not. As a rule of thumb, place sensitive data in a service like Azure Key Vault, avoid placing such data in configuration files! You can still read from Azure Key Vault using a configuration manager, so in theory it’s as straight forward as reading the data from a JSON file for example.
References
I’ve left some hopefully useful links so you can learn more about all the different providers and options. Hopefully this article gives you a good foundation to continue learning.
Read data
To read configuration data lets turn our attention to Program.cs and it’s constructor that should look like this:
public Startup(IConfiguration configuration)

{

    Configuration = configuration;

}
Here we are injecting an instance of IConfiguration. It will attempt to read data from appsettings.json file, so how do we access it? Looking at the content of appsettings.json we see that it looks like so:
{

  “Logging”: {

    “LogLevel”: {

      “Default”: “Information”,

      “Microsoft”: “Warning”,

      “Microsoft.Hosting.Lifetime”: “Information”

    }

  },

  “AllowedHosts”: “*”

}
To read a non-nested value like AllowedHosts we can type like so:
Configuration[“AllowedHosts”] // *
However, if we need a nested value like Logging->LogLevel->Default we need to access it with : as separator. We instead type like so:
var value = Configuration[“Logging:LogLevel:Default”];

Console.WriteLine(value); // Information
NOTE, you are likely to want to access this kind of data when setting up services so you are more likely to read from Configuration instance in ConfigureServices() method rather than the constructor, as is demonstrated above. With that said, all you need to do is to inject IConfiguration in any constructor where you might need it, like a controller for example, like so:
public IndexModel(ILogger<IndexModel> logger, IConfiguration configuration )

{

    _logger = logger;

    _configuration = configuration;
    var serviceConfig = new ServiceConfiguration();

    _configuration.GetSection(serviceConfig.Services).Bind(serviceConfig);

    Console.WriteLine(serviceConfig.CartServiceUrl);

    Console.WriteLine(serviceConfig.ProductsServiceUrl);

}
Demo, override a value
We stated earlier that the last provider to be read is the one that decided the value on the config data. Lets demo this by placing a setting API like so in appsetting.json:
“API”: “http://localhost:3000/api”
and now place a slightly different entry in appsettings.Development.json like so:
“API”: “http://localhost:5000/api”
Change the code in the Startup constructor to read API, like so:
var value = Configuration[“API”];

Console.WriteLine(value); // http://localhost:5000/api
As you can see, the last read source, appsettings.Development.json decided the value.
Bind data, make it type safe
At some point, you might loose track of what configuration you have. You might have 10-20 different keys, or more, at various levels of nesting. The problem with that is that it’s starting to get messy. Knowing what keys are actually used could be a combination of looking into JSON files, environment variables or even the source code. So how do you approach and manage such a mess?
The way to manage it is how you manage most things in .NET and C#, type it. The idea is to have variables or structures like classes for most things you plan to use, your config data shouldn’t be any different. So how do we type our config data then – use a class.
Let’s assume you have a few endpoints ProductsServiceUrl and CartServiceUrl that you want to keep track of and that they should be set to different values in different environment. You can create a class for that, like so:
class ServiceConfiguration

{

  public const string Services = “Services”;

  public string ProductsServiceUrl { get; set; }

  public string CartServiceUrl { get; set; }

}
The next thing we want to do is to tell ASP .NET to bind an instance of the above class to a specific section of our config. Imagine you know have a section in appsettings.json that looks like this:
“Services” : {

  “ProductsServiceUrl”: “http://localhost:3000/products”,

  “CartServiceUrl”: “http://localhost:3000/cart”

}
Once you’ve created a class for this and added the config data it’s time to read out the data. We can read the data like by locating the constructor of Startup class in Startup.cs and add the following code:
var serviceConfig = new ServiceConfiguration();

Configuration.GetSection(serviceConfig.Services).Bind(serviceConfig);

Console.WriteLine(serviceConfig.CartServiceUrl); // http://localhost:3000/cart

Console.WriteLine(serviceConfig.ProductsServiceUrl); // http://localhost:3000/products
The use of GetSection() enables us to drill down into the part of the config that’s interesting for us. Using bind() we bind the sections content to an instance of ServiceConfiguration and thereby populate the instance with the values from the config section.
Summary
You learned how config data can exist in various sources. You also learned how ASP .NET was able to read from these sources. Furthermore, you were shown various ways to read nested and un nested data. Lastly you looked at how to make your config data more type safe.
by Contributed | Jan 5, 2021 | Technology
This article is contributed. See the original author and article here.
It’s 2021. Want to learn webdev?
Here’s your chance. Microsoft created 24 lessons on Web Development. It covers HTML, CSS and JavaScript. There are also quizzed and challenges.
Web-Dev-For-Beginners
There are various projects in there so you can dive deeper on things such as:
- Typing game, this puts your skills to the test as it teaches you how to programmatically change CSS, keep track of time and also ensure you understand how HTML, CSS and JavaScript work together
- Space Game, it teaches you game development, using the Canvas and patternsns like pub-sub and composition
- Banking app, it’s possible to develop a SPA like application without a single framework using the template tag and more.
- Browser extension, have you ever considered writing an extension? It’s easier than it sounds.
by Contributed | Jan 5, 2021 | Technology
This article is contributed. See the original author and article here.
Why Use Tagging?
One important feature which often isn’t utilised correctly is the use of tags within Microsoft Defender for Endpoint. This is a functionality that was introduced to allow you to apply a granular level of control over how you manage your devices. In this blog we wanted to cover not only the primary uses for the tagging functionality, but also to explain some tips and tricks around how to effectively use this within your organisation. We have split this into three parts to cover the basics but also some advanced scenarios for how to use tagging in your environment, so make sure to stay tuned to the blog for the full series.
Role Based Access Control – RBAC
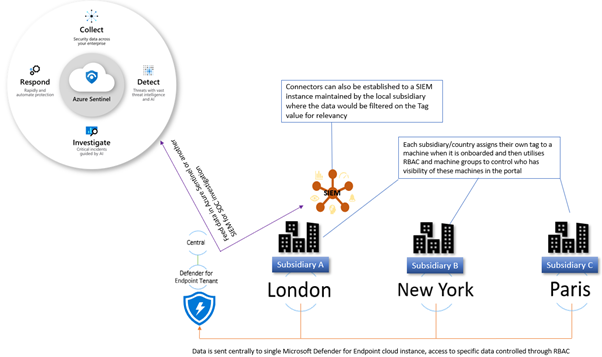
The primary use for tagging is to allow you to create machine groups that can then be used for applying RBAC permissions. Really the purpose of this is to enable a level of control such that different users can log into the portal and see only the machines that they are responsible for. For example, in a large organisation spanning multiple geos rather than each geo having their own instance of Microsoft Defender for Endpoint, you would have a single instance where access is controlled through the use of roles and machine groups. Having a single instance means that threat hunting and automation has full visibility of all devices across the entire organisation which is critical when a threat is hitting multiple endpoints.
The diagram below shows how you would break this down, and how you could further utilise this information to feed data into a SIEM where your SOC analysts can track threats across multiple areas of the infrastructure.
Later in this blog we will talk about the different ways you can apply tags to managed devices, but in order to utilise these tags you first need to create a machine group in Microsoft Defender Security Center portal and then apply specific security groups containing the user accounts of the devices you wish you manage. This is simple to do and the setting up of these machine groups is something you would typically do early on in the setup of the tenant, before you actually start doing any onboarding. This means that each time a machine is onboarded it goes straight into the appropriate group and only the correct people have visibility straight away.

Filtering
One of the great benefits of tagging is using them in machine views to present different views of machine lists. Below are some examples of why you would use tags in filtering include:
- Lab Machines – There is really no reason to have a separate tenant just for testing when the endpoints that report into Microsoft Defender for Endpoint can exist anywhere without any ties to a specific Azure AD or domain. In this scenario, you might want to identify the specific lab machines with a tag:

By using this tag to create a machine group you can then exclude these machines from your threat reports or from threat and vulnerability management.
- Decommissioned machines – Something we hear a lot from customers is that they have machines that they have decommissioned which they no longer want to see in their console; however, there is a very good reason why we don’t allow machines to be deleted. Just suppose there is a threat detected on the environment that originated some time back on a machine that had been decommissioned, if you deleted this from the tenant then you would have no way of understanding the source and techniques used in the breach. To address this, a machine record will remain in the tenant until the data retention period of the tenant expires.
We do understand though that you may not want to see these machines in the device list or have them show in the threat reports or threat and vulnerability management and so through the use of tags, and also machine groups, it is possible to effectively make these machines invisible.
The first stage of this would be to apply a tag against the machines, in the example below we have two machines tagged as “Decommissioned”. Once you have set this tag you can then use the filters to exclude these tagged devices from the Device Inventory view:

Using this method is a quick and simple way to filter on your device inventory but you cannot use tag-based filtering in your reports or in threat and vulnerability management. For this, you need to use machine groups so the next phase would be to create a machine group based on this tag, as described in the RBAC section above, at which point you can then exclude these groups from the threat and vulnerability management assessment:

It should be noted though that inactive machines are automatically excluded from threat and vulnerability management after 30 days anyway.
The use of machine groups in this scenario does open up another option which would then give you the desired result of removing a machine from the tenant whilst still maintaining the record for historical threat analysis; effectively hiding it.
To achieve this, create a user group with no members and then assign it to the Machine Group:

As there are no users assigned to this group, then any users who log into the portal (with the exception of Global Admin or Security Admin) will automatically have their view of any machines with the Decommissioned tag removed from all views, including threat and vulnerability management and reporting. Plus, simply adding the Decommissioned tag to a machine will effectively “delete” the machine from the portal.
Methods of Tag allocation
To utilise tags for RBAC and filtering you first need to make sure that the relevant machines have the tags applied and there are a number of methods to achieve this.
Registry tagging
This is via direct editing of the registry. By setting the tag value in the DeviceTagging key (HKLM:SOFTWAREPoliciesMicrosoftWindows Advanced Threat ProtectionDeviceTagging) you are assigning a value to the machine that is picked up by Microsoft Defender for Endpoint telemetry.

There are a couple of points to be aware of when you are using the registry to tag a machine:
- The tag is fixed and cannot be changed through the portal, it can only be changed by modifying the registry.
- Only one tag can be specified in the registry.
In the image above, you can see the relevant key as displayed in Regedit; however, if you are modifying the registry to assign tags to production machines it is unlikely that it is Regedit you will use to set this value. Instead, you are likely to use a script. Obviously when using a script, you can add a lot of variables to determine what the tag value should be, meaning you could have a single script for all tag values you want to create or have multiple scripts that you then use another method with to define the logic.
What we have seen with several large organisations is utilising the onboarding script and adding a “REG ADD” command to the script and then using different onboarding scripts for different groups of machines. The value that would need to be added is:
REG ADD “HKEY_LOCAL_MACHINESOFTWAREPoliciesMicrosoftWindows Advanced Threat ProtectionDeviceTagging” /v Group /t REG_SZ /d TAGNAME /f
You could use this script and have it as part of a GPO where you target it against an OU or use it in System Center Configuration Manager and target the script at different Collections.
However, if you wanted to keep the tagging separate from the onboarding then you may instead want to utilise a Powershell script which again you could apply via System Center Configuration Manager or another management tool.
To either have a specific script, or to add to another script, the lines you would need are:
New-Item -Path “HKLM:SOFTWAREPoliciesMicrosoftWindows Advanced Threat Protection” -Name DeviceTagging -force
New-ItemProperty -Path “HKLM:SOFTWAREPoliciesMicrosoftWindows Advanced Threat ProtectionDeviceTagging” -Name “Group” -Value “TAGNAME” -PropertyType “String”
Setting the tag via Intune
When using Intune, it is possible to utilise a custom policy to set the machine tag value in the registry via the WindowsAdvancedThreatProtection CSP (https://docs.microsoft.com/en-us/windows/client-management/mdm/windowsadvancedthreatprotection-csp)
This diagram shows the provider:

When setting the values in Intune you configure a custom profile and then define the URI to set the device tag.
These are the steps for configuring this:
- Create Custom profile:

- Give the profile a name and then add the URI value (./Device/Vendor/MSFT/WindowsAdvancedThreatProtection/DeviceTagging/Group), set a data type of “String” and then define the tag you want:

- Now you assign the profile. By assigning it to a specific group in Azure AD it means that you can base your tagging, and therefore RBAC and filtering on existing device groups you may already have in Azure AD:

- You can add Applicability Rules if you want, to target it at specific Windows versions/editions, but this shouldn’t really be necessary in the case of Machine Tagging. So then it is simply a case of reviewing the profile and applying it:

Manual tagging
One of the easiest ways to tag a device is to simply add a tag value through the machine page in the portal. Through this method you can add multiple tags or remove existing tags (although not if they have been defined in the registry).
Clicking onto the device page presents you with an option to “Manage Tags” where you can add and remove as required:

Tagging via API
While manual tagging is great and allows you to specify multiple tags against a device to assist with RBAC and filtering, however what if you have 100’s or 1000’s of devices that you want to assign the same tag value to? In this scenario, you can use the API to mass-assign tags, we will be covering this advanced use case in Part 3 of our blog.
Setting the tag on macOS
Obviously, you may not just be managing Windows endpoints in your environment. Microsoft Defender for Endpoint also supports tagging macOS machines. To apply tags on this platform, you can utilise the manual method or the API method. However, if you want to automate this process, then you can push out the settings as part of a Configuration Profile (a .plist file).
When you are creating the .plist file, you would need to add the following entry in order to configure the tag:
<dict>
<key>tags</key>
<array>
<dict>
<key>key</key>
<string>GROUP</string>
<key>value</key>
<string>ExampleTag</string>
</dict>
</array>
</dict>
You can find details of how to do that here: https://docs.microsoft.com/en-us/windows/security/threat-protection/microsoft-defender-atp/mac-jamfpro-policies#step-3-configure-microsoft-defender-atp-settings
This concludes Part 1 of our blog series on how to use tagging effectively. Please join us for Part 2 where Miriam Wiesner will guide you through applying tags based upon the Organisational Unit placement of the device within Active Directory.
We welcome your feedback and questions on this or any of the other parts of this tagging blog and look forward to hearing from you.
Steve Newby (@steve_newby) and Miriam Wiesner (@miriamxyra)
Program Managers @ Microsoft Defender for Endpoint Product Group

Recent Comments