by Contributed | Jan 31, 2021 | Technology
This article is contributed. See the original author and article here.
Here is our official documentation on how to use Azure AD to authenticate service fabric connection endpoint. It uses PowerShell script to create two applications in the Azure AD resource.
https://docs.microsoft.com/en-us/azure/service-fabric/service-fabric-cluster-creation-setup-aad
We can also do these steps manually with UI in Azure Portal.
Abstract at the beginning of the blog
The service fabric cluster here will be treated as an AAD web app. When users access it with browser, it will pop the sign in box and navigate back to the provided reply URL after authentication just like any web OAuth process.
When user access it with client tool like SF PowerShell module, the AAD client app here will sign in the user, then use the exposed API from AAD web app to validate if the user has the Admin role.
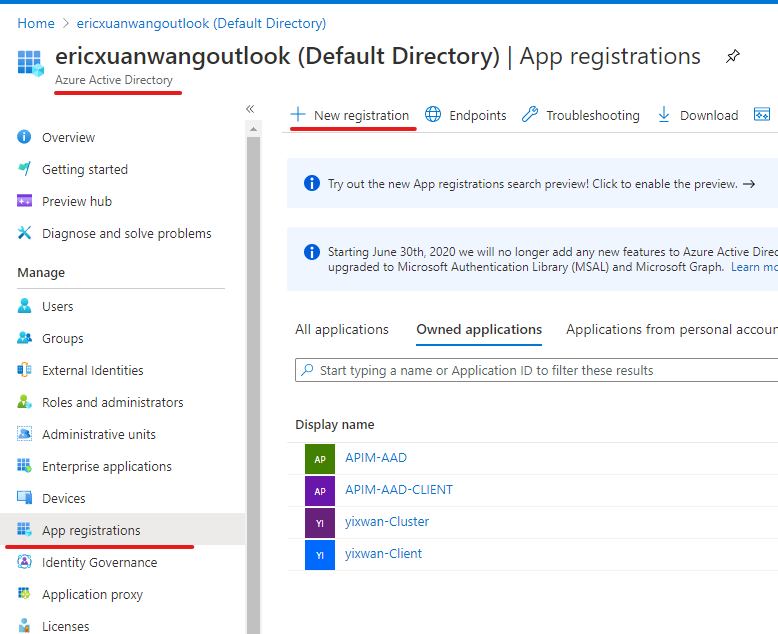
Application registration:
1) AAD web app
The first application we need to register in Azure AD is a web app, represents the cluster.
In authentication blade, we will configure like this:
Redirect URLs
Implicit grant and hybrid flows
- ID tokens (used for implicit and hybrid flows)
Supported account types:
- Accounts in this organization directory only (Single tenant)
Allow Public client flows:

User Role assignment:
We need to create an Admin App-Role for the AAD web app.

In App roles blade, we create app role with below configurations.
Display name:
Allowed member types:
Value
Description:

Then we will go to Enterprise applications blade of Azure AD. Go to overview the page of the applications we created. In Getting started section, we will see “Assign users and groups.”
We will add a user as Admin so that user can access SF connection endpoint with Azure AD.


Expose API
We need to expose the authentication API of the web app so that the client app like PowerShell can use it to sign in the admin user.


Steps are done for the AAD web app here.
2) AAD client app
The second application we need to register in Azure AD is a Desktop/Native app, it represents tools like SF PowerShell module. (Connect-ServiceFabricCluster)
In the authentication blade, we will configure like this:
Redirect URLs
Supported account types:
- Accounts in this organization directory only (Single tenant)
Allow Public client flows:

Add API Permission
AAD client needs this config so it can call the API we just exposed on AAD web app.
Add a permission => My APIs => your cluster web app => user_impersonation

Steps are done for the AAD client app here.
Done
Now you should be able to use AAD to connect service fabric cluster. And the browser will not prompt the certificate list for SFX.

If the process does not go as smoothly as expected, there is a troubleshooting section in the doc.
https://docs.microsoft.com/en-us/azure/service-fabric/service-fabric-cluster-creation-setup-aad#troubleshooting-help-in-setting-up-azure-active-directory
You can also read the PowerShell script provided in our official documentation to understand what has been done. This is a steps-by-steps guide for users who prefer Azure Portal.
by Contributed | Jan 31, 2021 | Technology
This article is contributed. See the original author and article here.
Let’s say you’ve got a YouTube channel uploading videos in a regular cadence. When a new video is published, you want to cross-post it to other social media channels that you’re running. What could be the best way to do so? There are hundreds of commercial tools on the market for online content marketing. There are hundreds of companies to help you, and those companies have their proprietary solutions for it. It could make sense to utilise those tools or companies. However, with various reasons or circumstances, what if you need to build your own one? What if the existing tools don’t fulfil your requirements? Then, it’s a good time to build the solution by yourself, isn’t it?
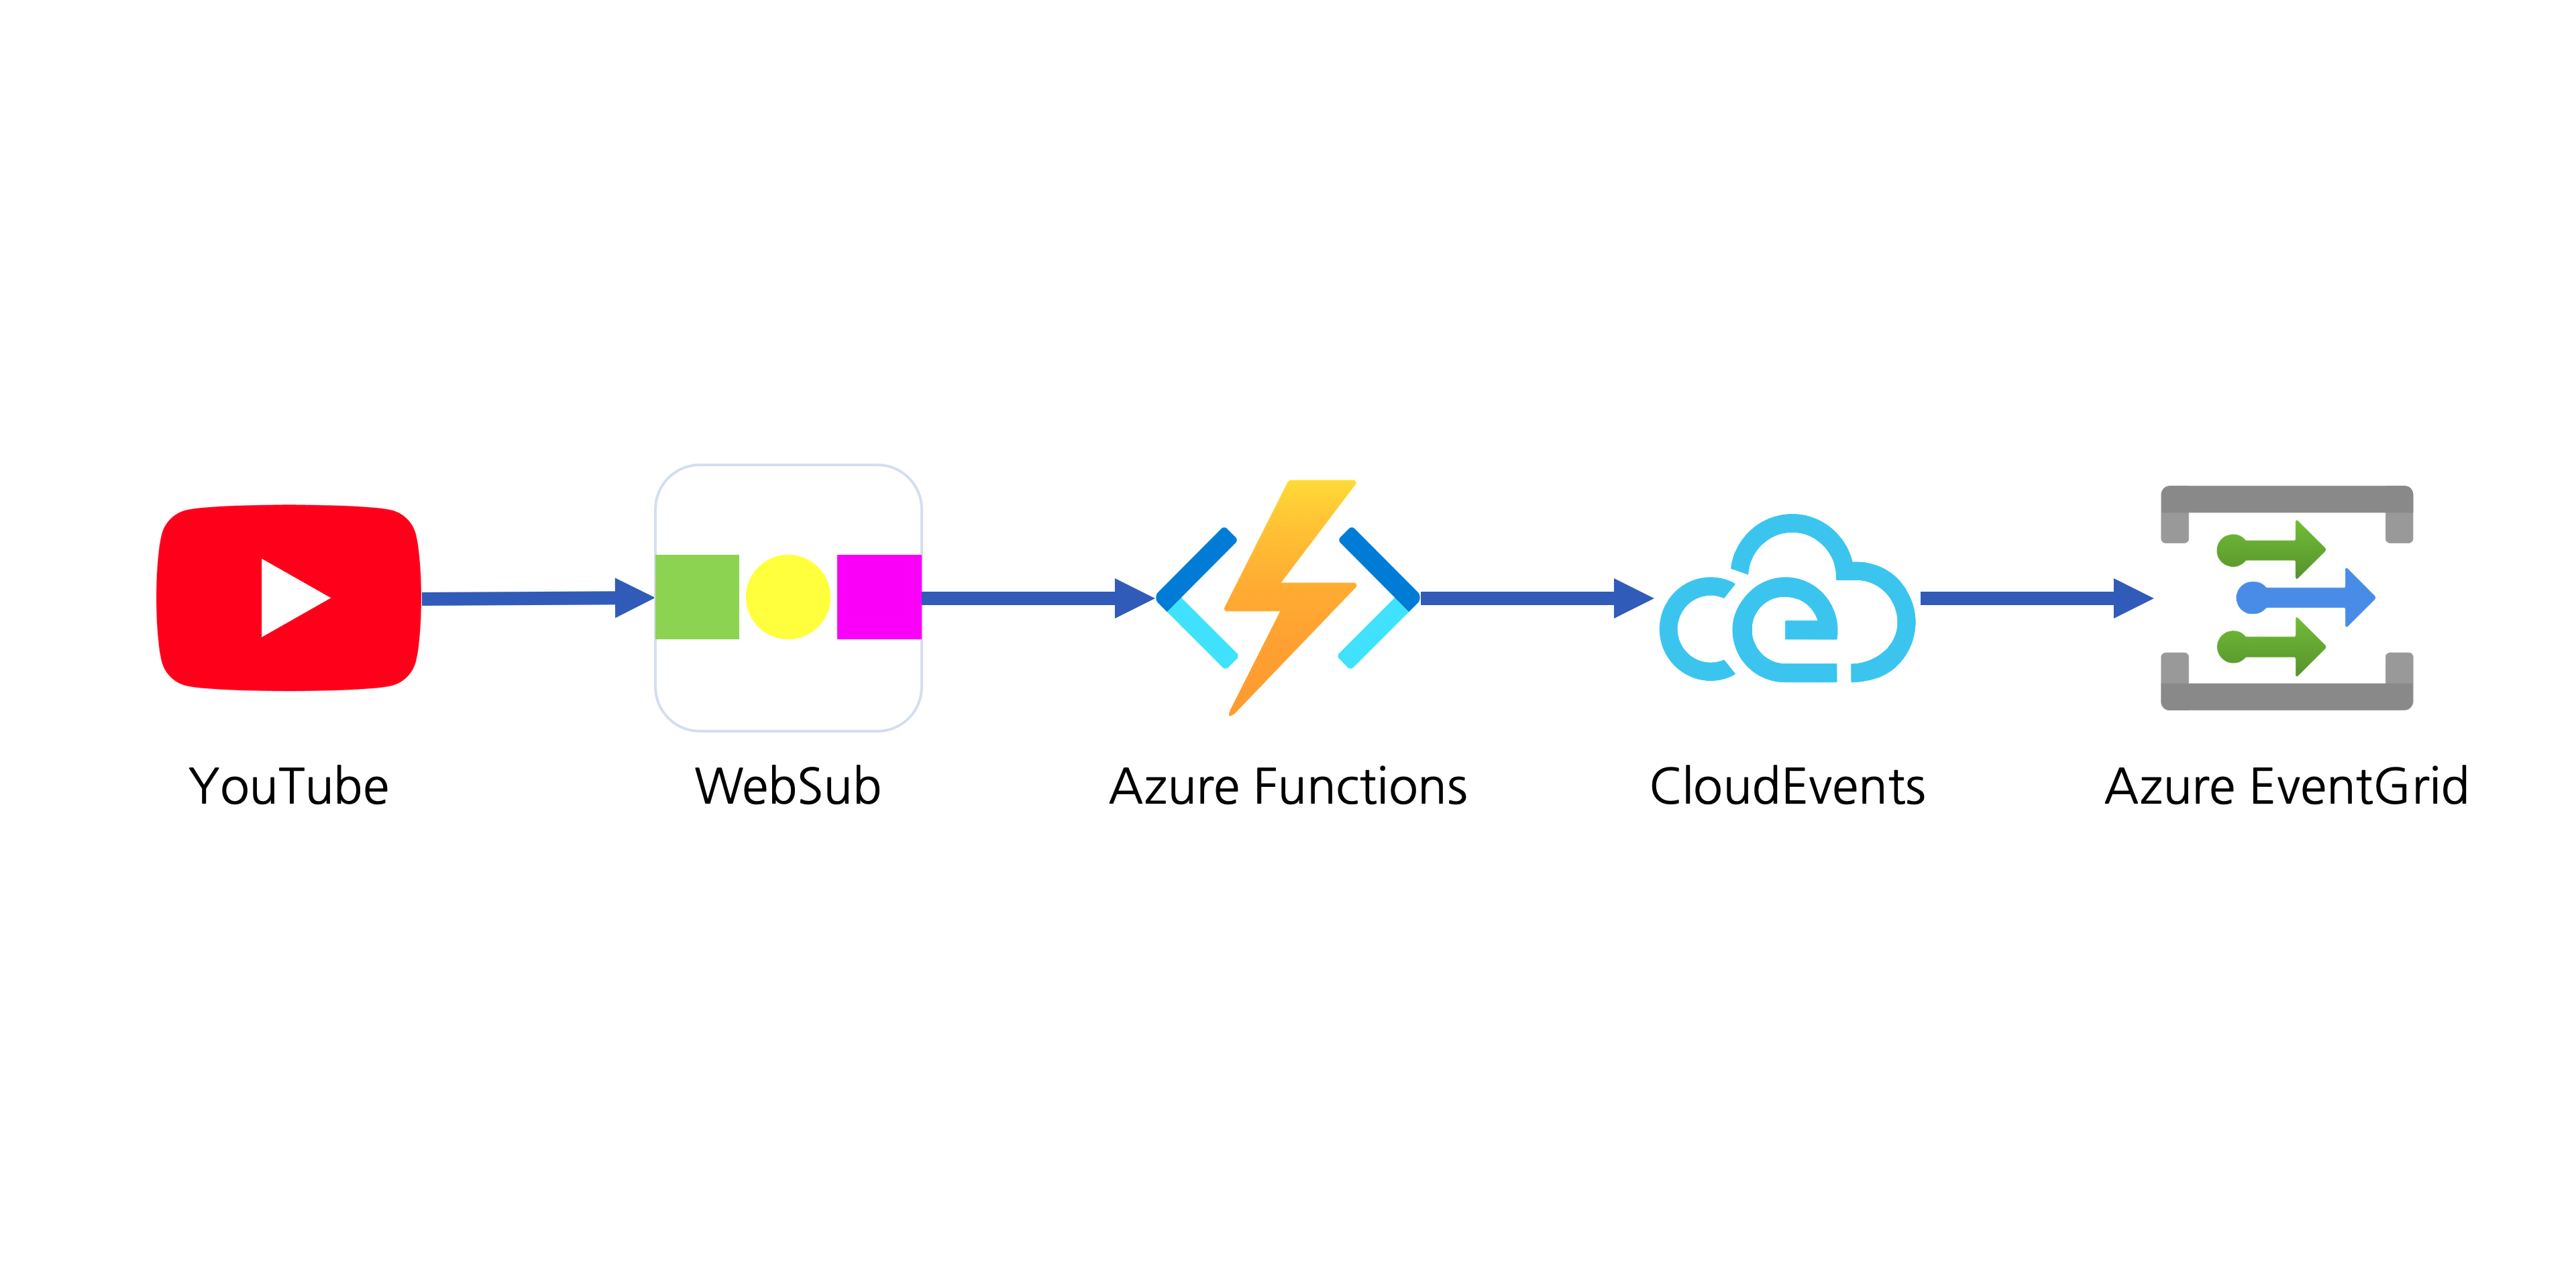
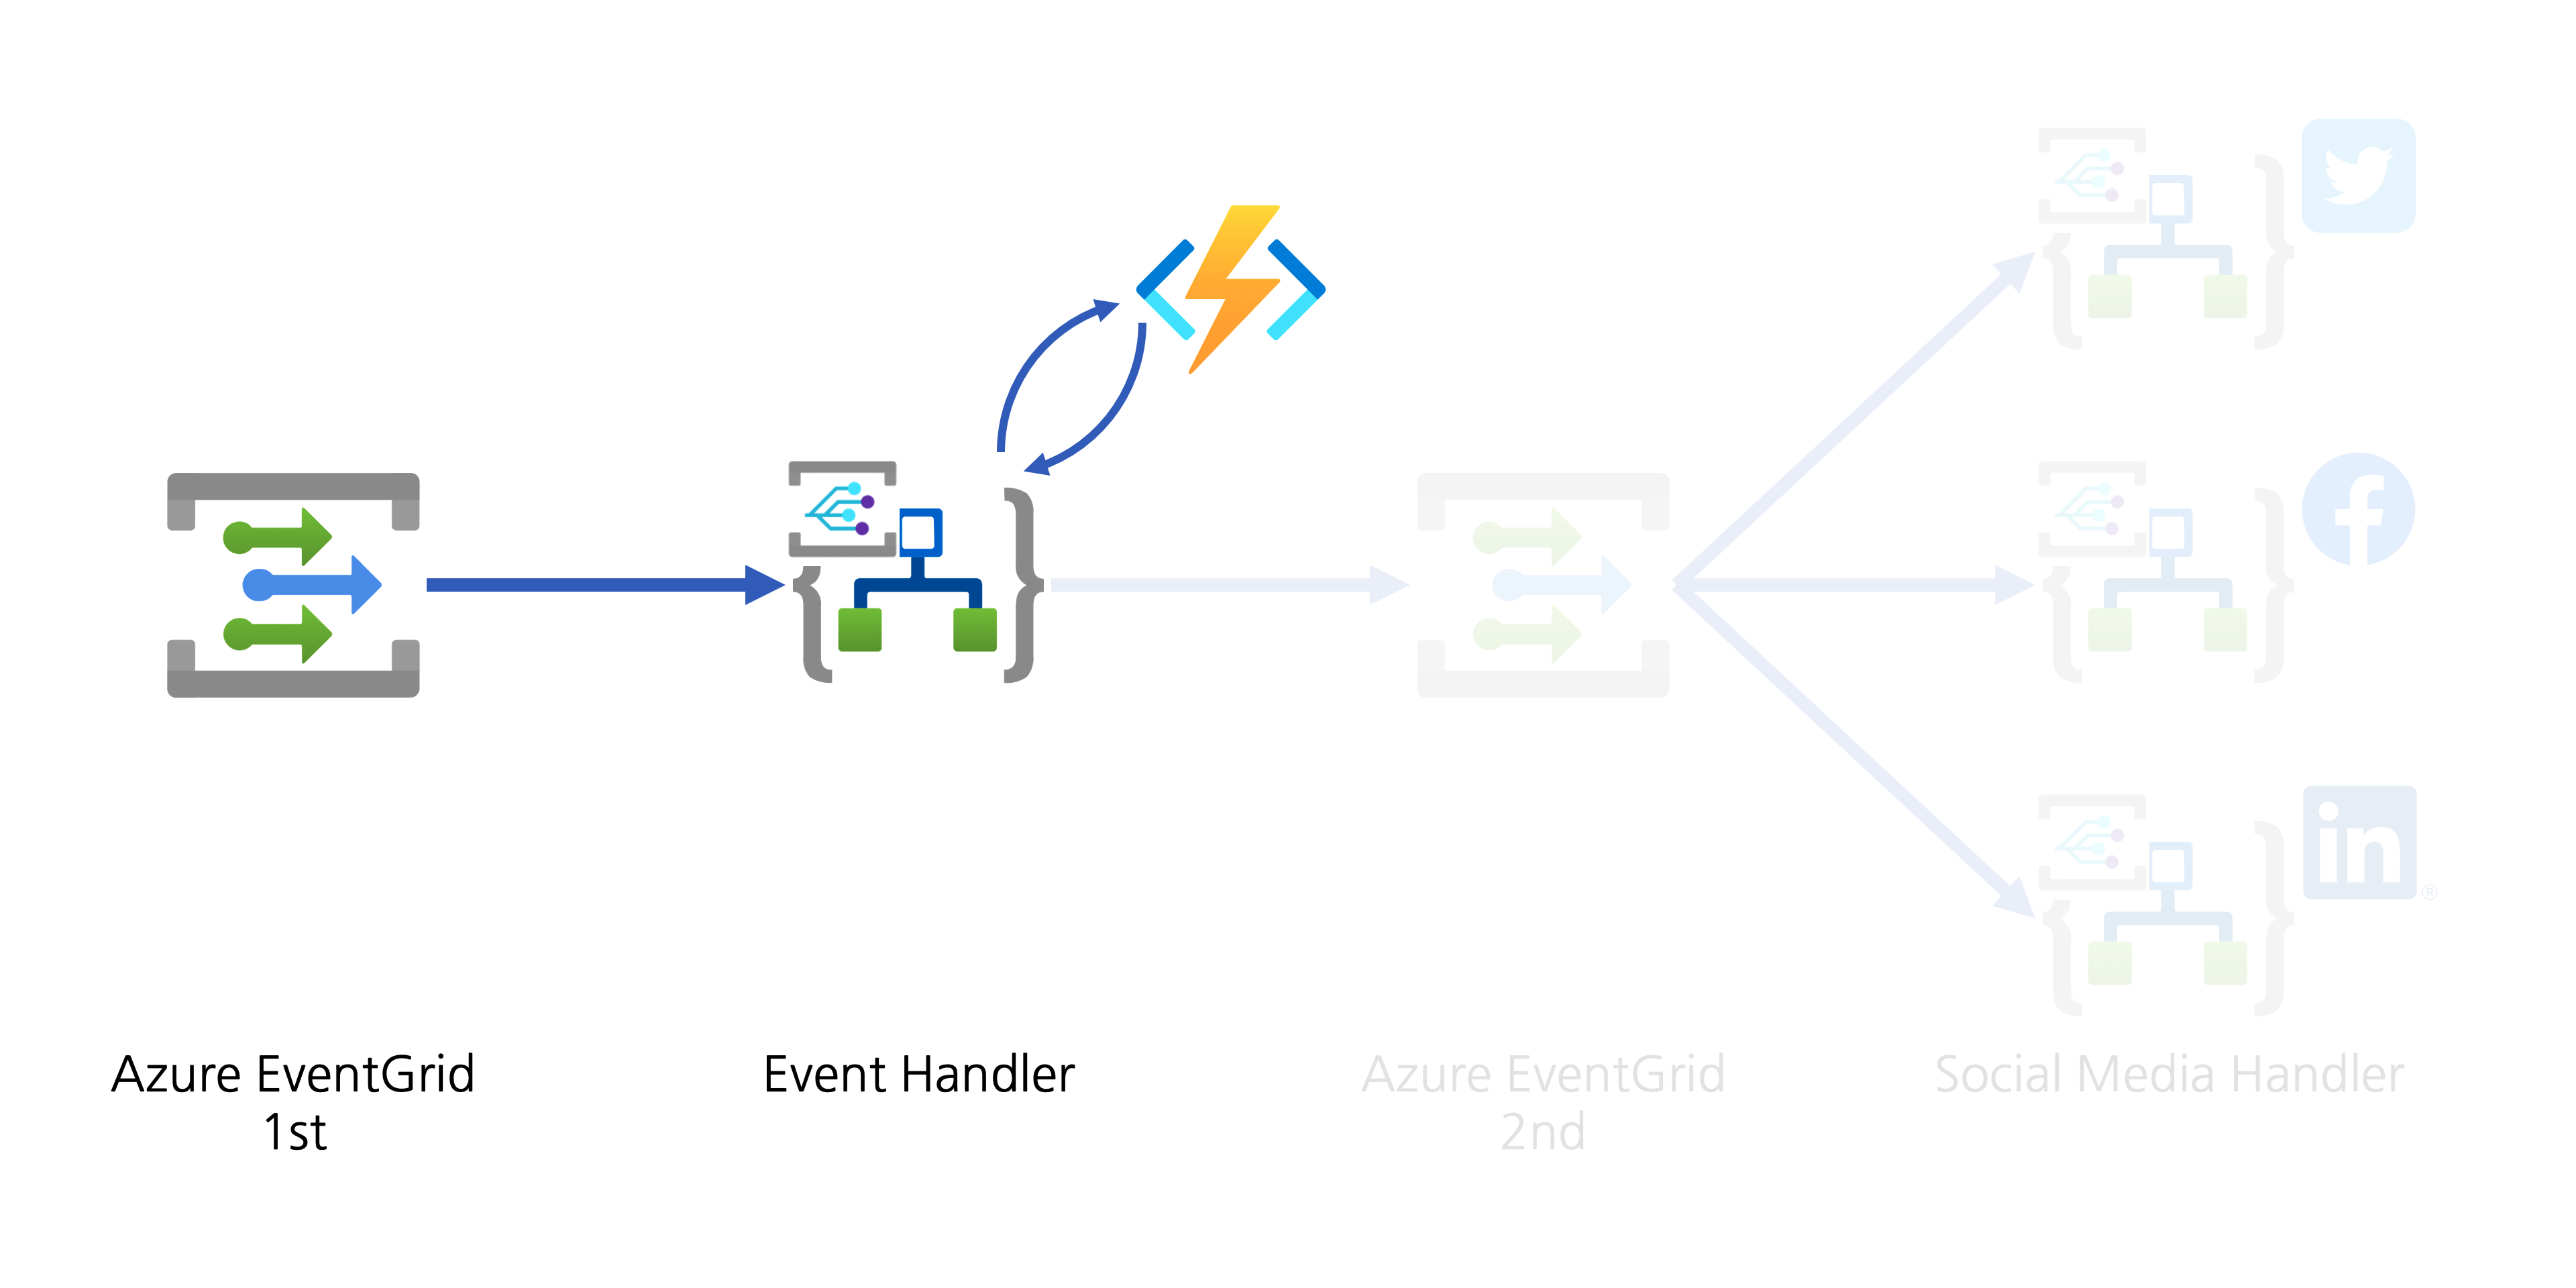
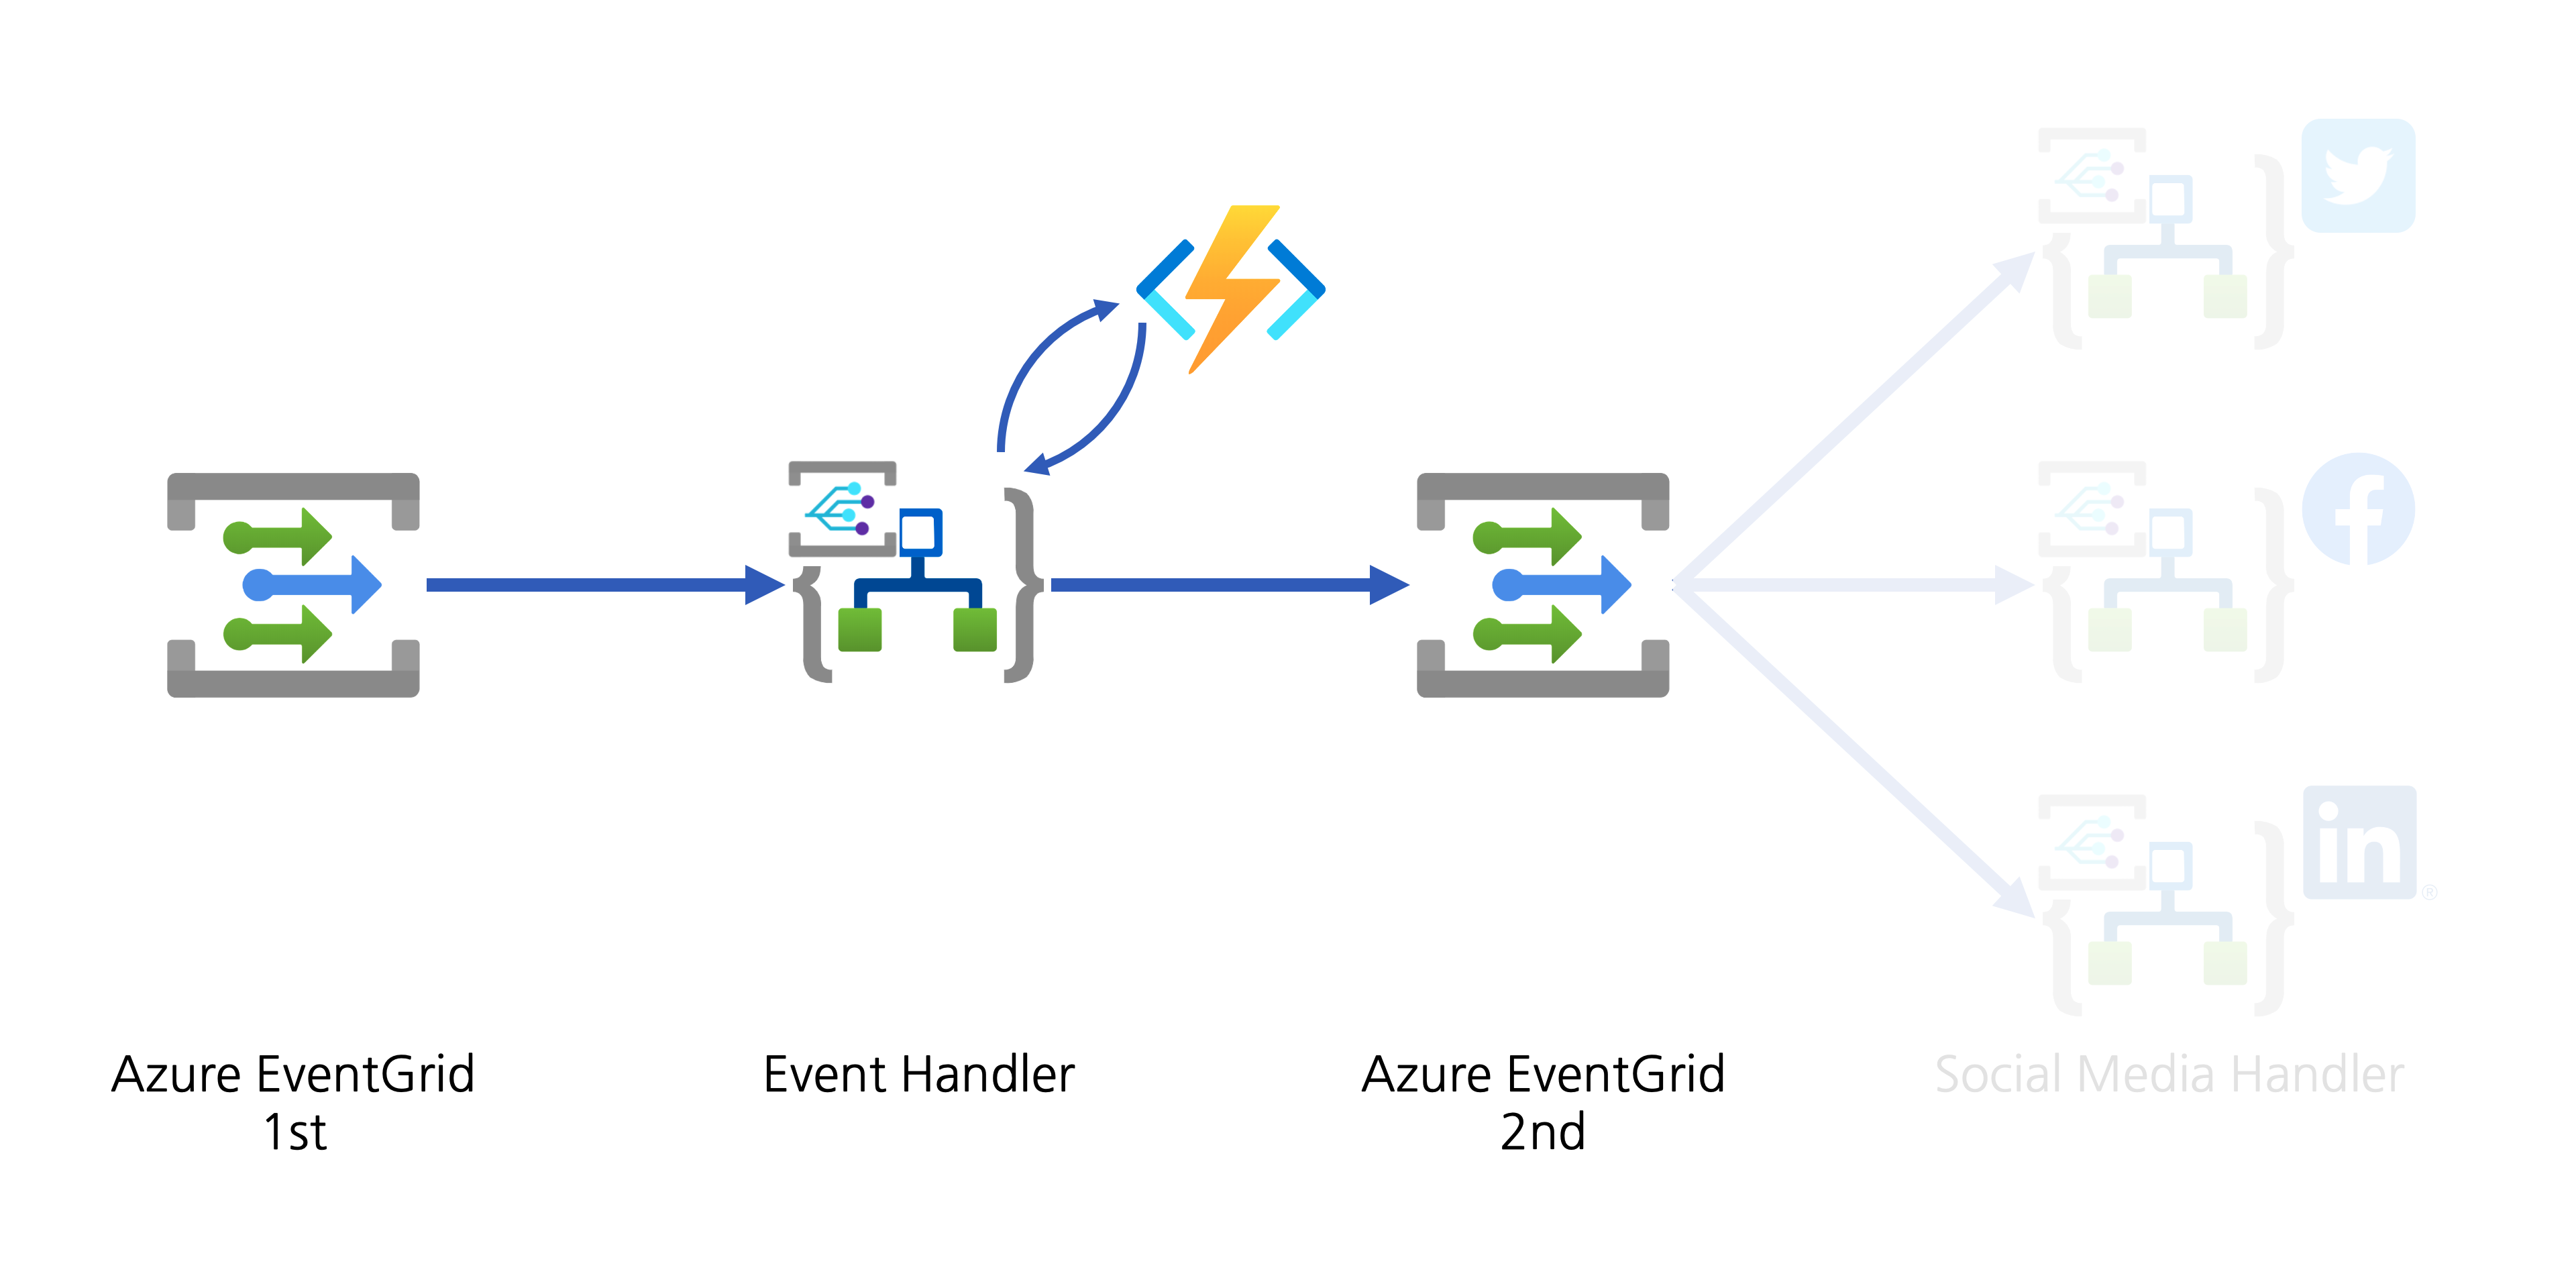
This post will discuss an end-to-end workflow story, from YouTube video update to other social media exposure. For the workflow, let’s use Azure serverless services like Azure EventGrid, Azure Functions and Azure Logic Apps.
If you like to see the source codes of the solution, find this GitHub repository. It’s completely open-source, and you can use it under your discretion with care.
Subscribing YouTube Notification Feed
YouTube uses a protocol called PubSubHubbub for its notification mechanism. It’s now become a web standard called WebSub since 2018, after the first working draft in 2016.
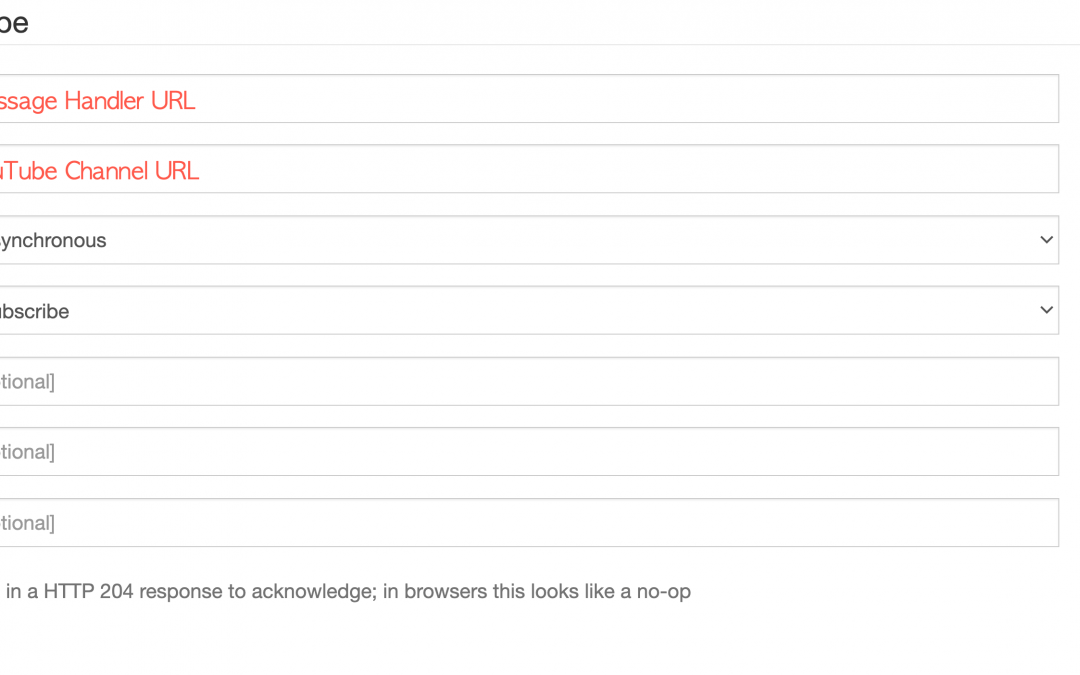
Google registers all YouTube channels to their WebSub Hub. Therefore, if you want to get the update notification from a specific channel, you can simply send a subscription request to the Hub. To subscribe, enter the message handler URL and YouTUbe channel URL and click the Do It! button. Too easy!
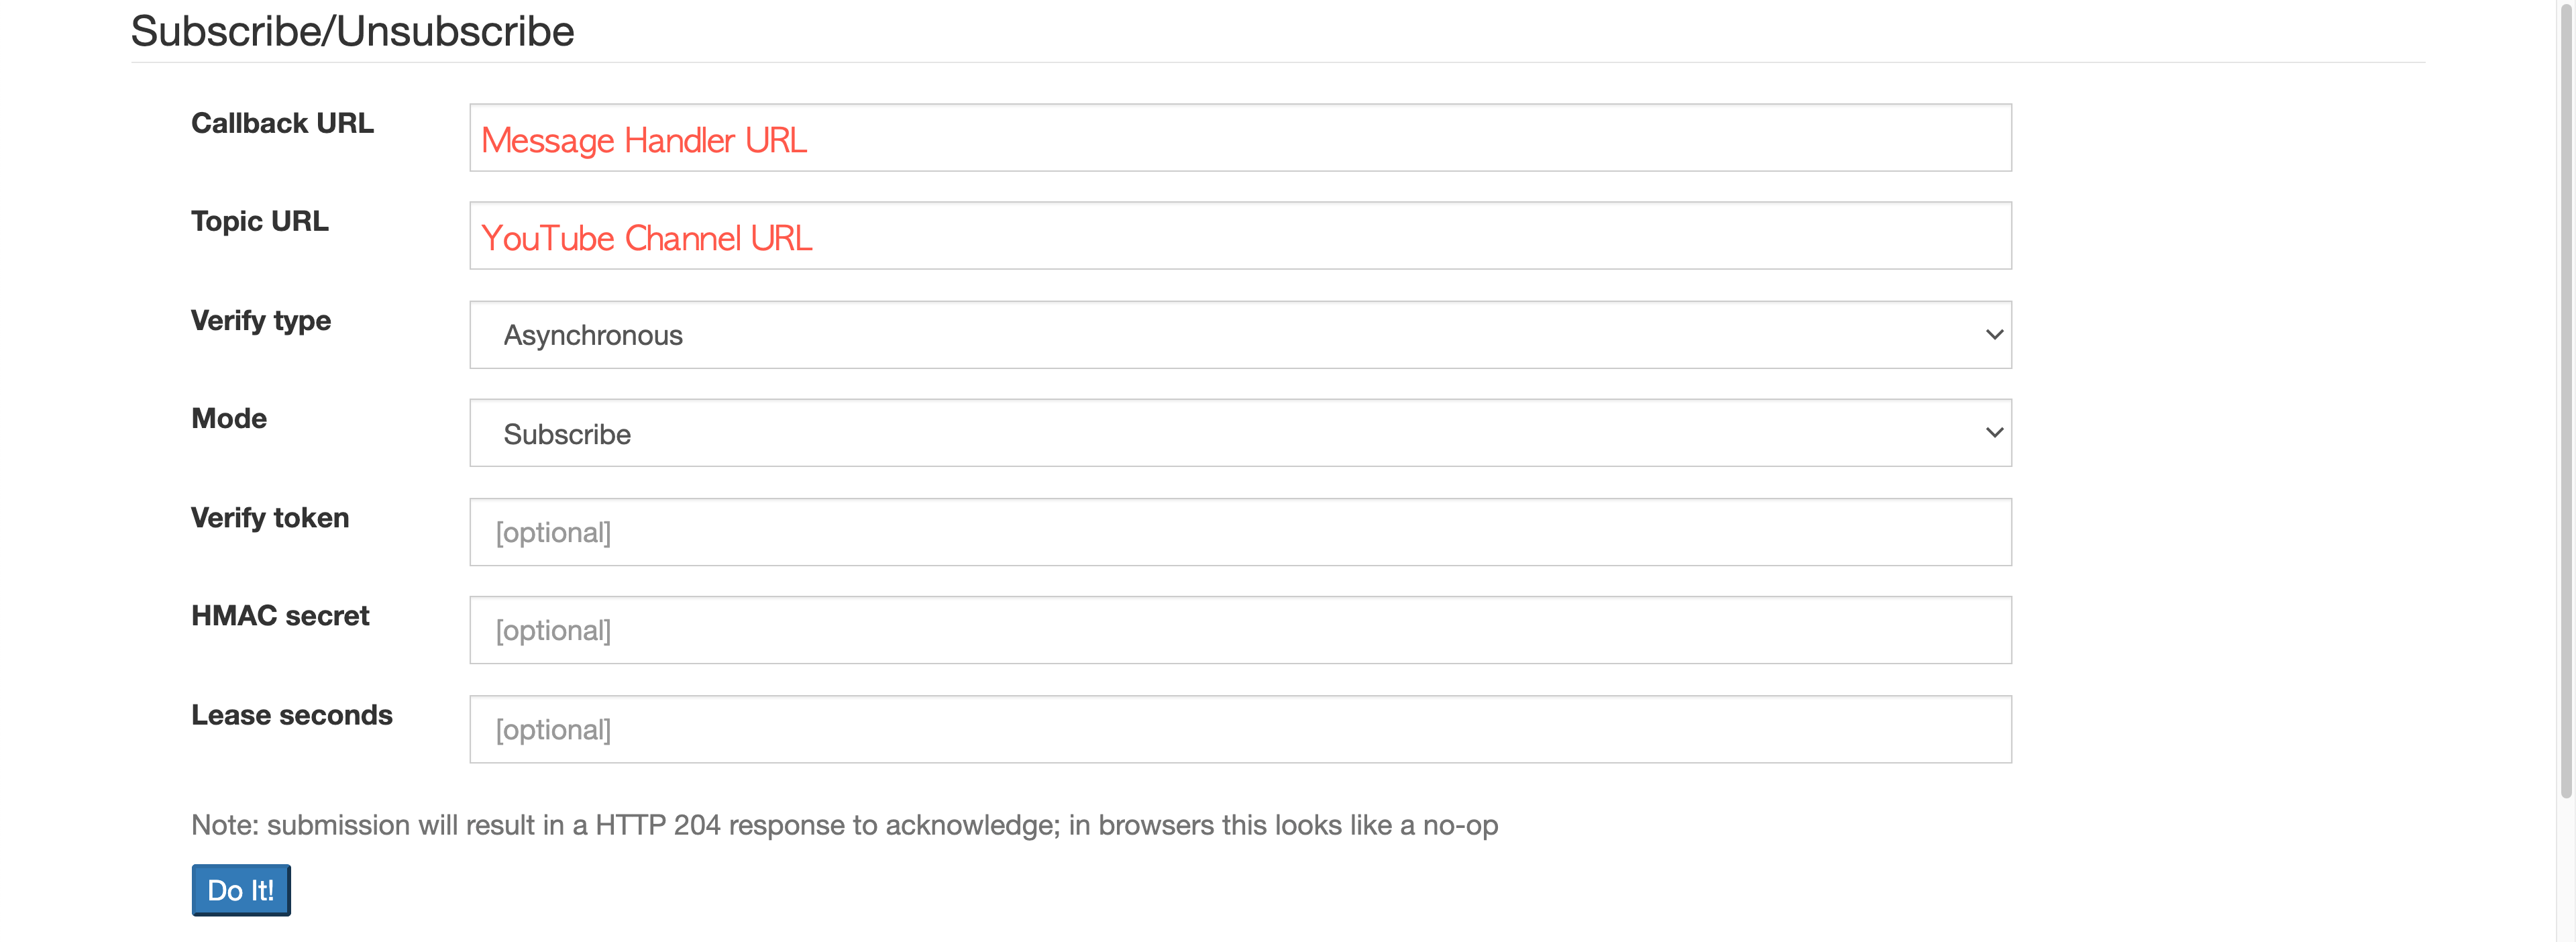
Please ensure that the subscription process is completed only after passing the message handler verification request.
Verifying WebSub Subscription Request
To verify the WebSub subscription request, the WebSub Hub sends an API call to the message handler. When it arrives, the handler MUST deal with the following.
- The verification request sends a
GET request with the following query parameters:
hub.mode: The subscribe string.
hub.topic: The YouTube channel URL.
hub.challenge: A random string generated by the WebSub Hub, used for the verification.
hub.lease_seconds: The validation period in seconds from the time of the request. The request will be void unless the request is not verified within this period.
- The response of the verification request MUST include the
hub.challenge value to the response body, with the HTTP status code of 200:
- If the response body includes anything other than the
hub.challenge value, the WebSub Hub won’t accept it as the valid response.
Here’s the verification request handling logic in the Azure Function method:
    [FunctionName(“CallbackAsync”)]

    public async Task CallbackAsync(

        [HttpTrigger(AuthorizationLevel.Function, “GET”, “POST”, Route = “callback”)] HttpRequest req,

        ILogger log)

    {

        if (HttpMethods.IsGet(req.Method))

        {

            string challenge = req.Query[“hub.challenge”];

            var result = new ObjectResult(challenge) { StatusCode = 200 };
            return result;

        }
Once the message handler is verified, the WebSub Hub keeps sending the notification message to the handler whenever a new video update is made, from the subscribed channel.
Converting WebSub Notification Feed
As the mechanism of WebSub follows the same Publisher/Subscriber (Pub/Sub) pattern, it’s not that new. The only difference of WebSub is the event data that makes use of the existing ATOM feed format. Therefore, as long as any subscriber understands the feed format, it should be OK. In other words, the subscriber has a strong dependency on the event data format the publisher sends. In the modern application environments, we recommend decoupling between the publisher and subscriber as much as we can, so that each can organically grow independently. In other words, the subscriber don’t have to know the ATOM feed format. How can we make them decoupled, then? The event data format or message format needs to be canonicalised. Then, converting the canonical data into the subscriber-specific format should be done by the subscriber’s end.
Therefore, we are going to use CloudEvents as the canonical data format. There are two steps for the conversion–1) canonicalisation and 2) domain-specific conversion. Let’s have a look.
1. Canonicalisation: WebSub Feed :right_arrow: CloudEvents
The purpose of this step is to decouple between WebSub Hub and your application. The XML data delivered from the WebSub Hub is just wrapped with the CloudEvents format. When a new video is updated onto YouTube, it sends a notification to the WebSub Hub, which looks like the following:
  <feed xmlns:yt=”http://www.youtube.com/xml/schemas/2015″ xmlns=”http://www.w3.org/2005/Atom”>

    <link rel=”hub” href=”https://pubsubhubbub.appspot.com”/>

    <link rel=”self” href=”https://www.youtube.com/xml/feeds/videos.xml?channel_id=[channel_id]”/>

    <title>YouTube video feed</title>

    <updated>2021-01-27T07:00:00.123456789+00:00</updated>

    <entry>

      <id>yt:video:[video_id]</id>

      <yt:videoId>[video_id]</yt:videoId>

      <yt:channelId>[channel_id]</yt:channelId>

      <title>hello world</title>

      <link rel=”alternate” href=”http://www.youtube.com/watch?v=<video_id>”/>

      <author>

       <name>My Channel</name>

       <uri>http://www.youtube.com/channel/[channel_id]</uri>

      </author>

      <published>2021-01-27T07:00:00+00:00</published>

      <updated>2021-01-27T07:00:00.123456789+00:00</updated>

    </entry>

  </feed>
As the message handler takes this request through POST, it is stringified like this:
        var payload = default(string);

        using (var reader = new StreamReader(req.Body))

        {

            payload = await reader.ReadToEndAsync().ConfigureAwait(false);

        }
The request header also contains the following Link information:
Link: <https://pubsubhubbub.appspot.com>; rel=hub, <https://www.youtube.com/xml/feeds/videos.xml?channel_id=[channel_id]>; rel=self
As it includes the YouTube channel URL as the message source, you need to extract it.
        var headers = req.Headers.ToDictionary(p => p.Key, p => string.Join(“|”, p.Value));

        var links = headers[“Link”]

                    .Split(new[] { “,” }, StringSplitOptions.RemoveEmptyEntries)

                    .Select(p => p.Trim().Split(new[] { “;” }, StringSplitOptions.RemoveEmptyEntries))

                    .ToDictionary(p => p.Last().Trim(), p => p.First().Trim().Replace(“<“, string.Empty).Replace(“>”, string.Empty));
        var source = links[“rel=self”];
Then, set the event type and content type like the following.
        var type = “com.youtube.video.published”;

        var contentType = “application/cloudevents+json”;
As I mentioned in my previous post, at the time of this writing, the Azure EventGrid Binding for Azure Function currently has a limitation to support the CloudEvents format. Therefore, you should handle it manually:
        var @event = new CloudEvent(source, type, payload, contentType);

        var events = new List<CloudEvent>() { @event };
        var topicEndpoint = new Uri(“https://<eventgrid_name>.<location>-<random_number>.eventgrid.azure.net/api/events”);

        var credential = new AzureKeyCredential(“eventgrid_topic_access_key”);

        var publisher = new EventGridPublisherClient(topicEndpoint, credential);
        var response = await publisher.SendEventsAsync(events).ConfigureAwait(false);
        return new StatusCodeResult(response.Status);

    }
So far, the WebSub data is canonicalised with the CloudEvents format and sent to EventGrid. The canonicalised information looks like this:
    {

      “id”: “c2e9b2d1-802c-429d-b772-046230a9261e”,

      “source”: “https://www.youtube.com/xml/feeds/videos.xml?channel_id=<channel_id>”,

      “data”: “<websub_xml_data>”,

      “type”: “com.youtube.video.published”,

      “time”: “2021-01-27T07:00:00.123456Z”,

      “specversion”: “1.0”,

      “datacontenttype”: “application/cloudevents+json”,

      “traceparent”: “00-37d33dfa0d909047b8215349776d7268-809f0432fbdfd94b-00”

    }
Now, you have cut the dependency on the WebSub Hub.
Let’s move onto the next step.
2. Domain-Specific Conversion: WebSub XML Data Manipulation
At this step, the XML data is actually converted into the format we’re going to use for social media amplification.
The WebSub XML data only contains bare minimum information like the video ID and channel ID. Therefore, you need to call a YouTube API to get more details for social media amplification. An event handler should be registered to handle the published event data on Azure EventGrid. Like the WebSub subscription process, it also requires delivery authentication. One of the good things using Azure Logic Apps as the event handler is that it automatically does all the verification process internally. Therefore, you just use the Logic App to handle the event data.
The Logic App handler’s first action is to verify whether the event data is what you are looking for–it should meet your channel ID and event type of com.youtube.video.published. If either channel ID or the event type is different, this handler stops processing.
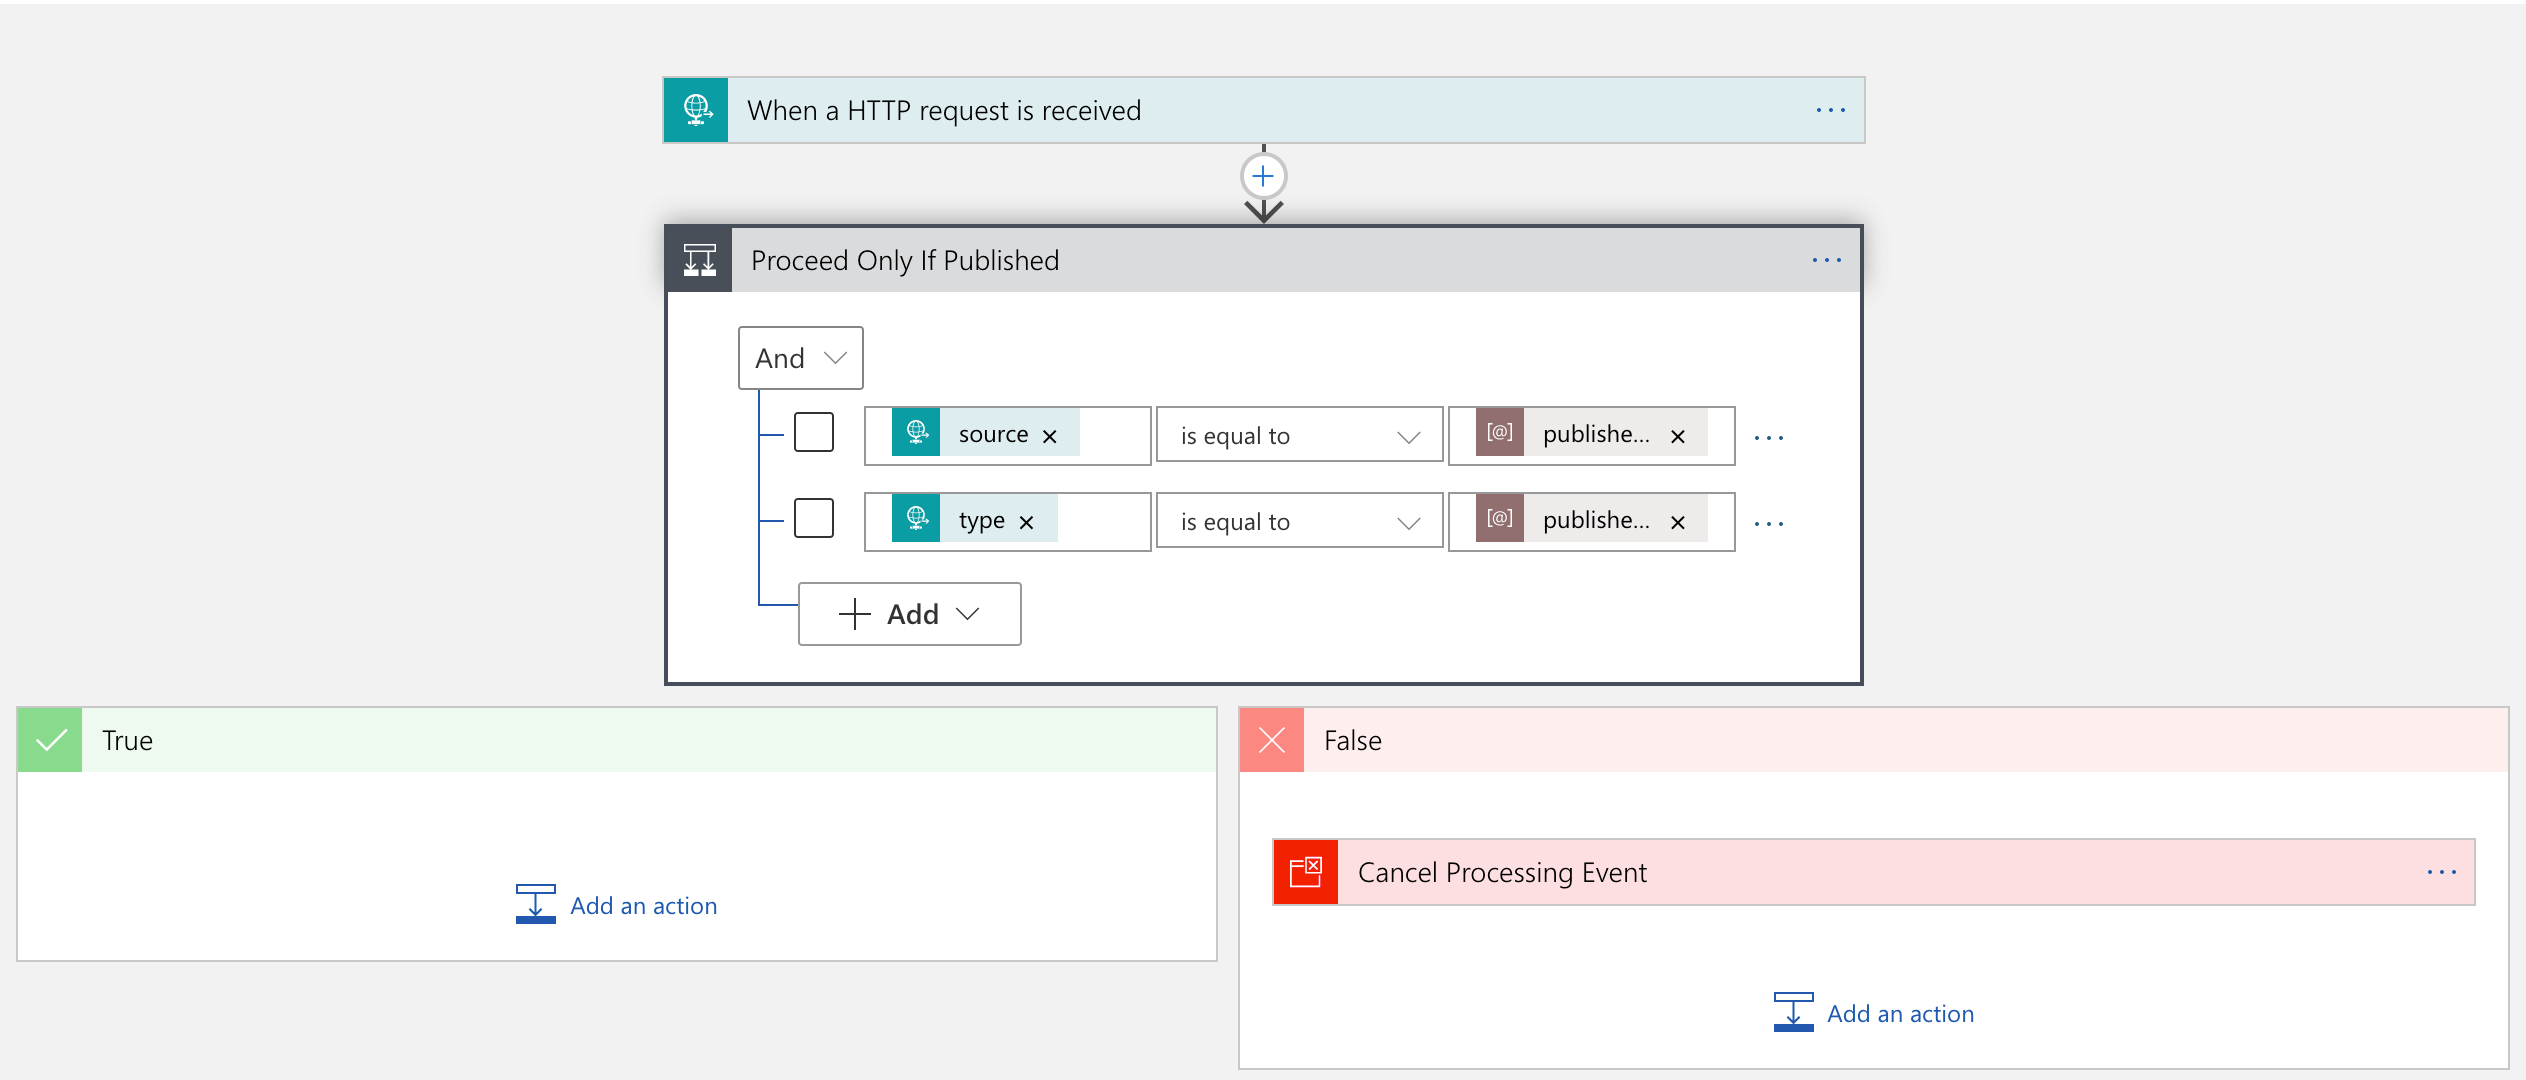
If the event data is what you are looking for, the handler passes it to Azure Functions for further manipulation.

The Azure Functions app calls the YouTube API to get more details of the video, manipulates them, and turns it back to Logic App. The converted data looks like:
    {

      “channelId”: “<channel_id>”,

      “videoId”: “<video_id>”,

      “title”: “hello world”,

      “description”: “Lorem ipsum dolor sit amet, consectetur adipiscing elit. Duis malesuada.”,

      “link”: “https://www.youtube.com/watch?v=<video_id>”,

      “thumbnailLink”: “https://i.ytimg.com/vi/<video_id>/maxresdefault.jpg”,

      “datePublished”: “2021-01-27T07:00:00+00:00”,

      “dateUpdated”: “2021-01-27T07:00:00+00:00”

    }
YouTube data has been massaged for our purpose.
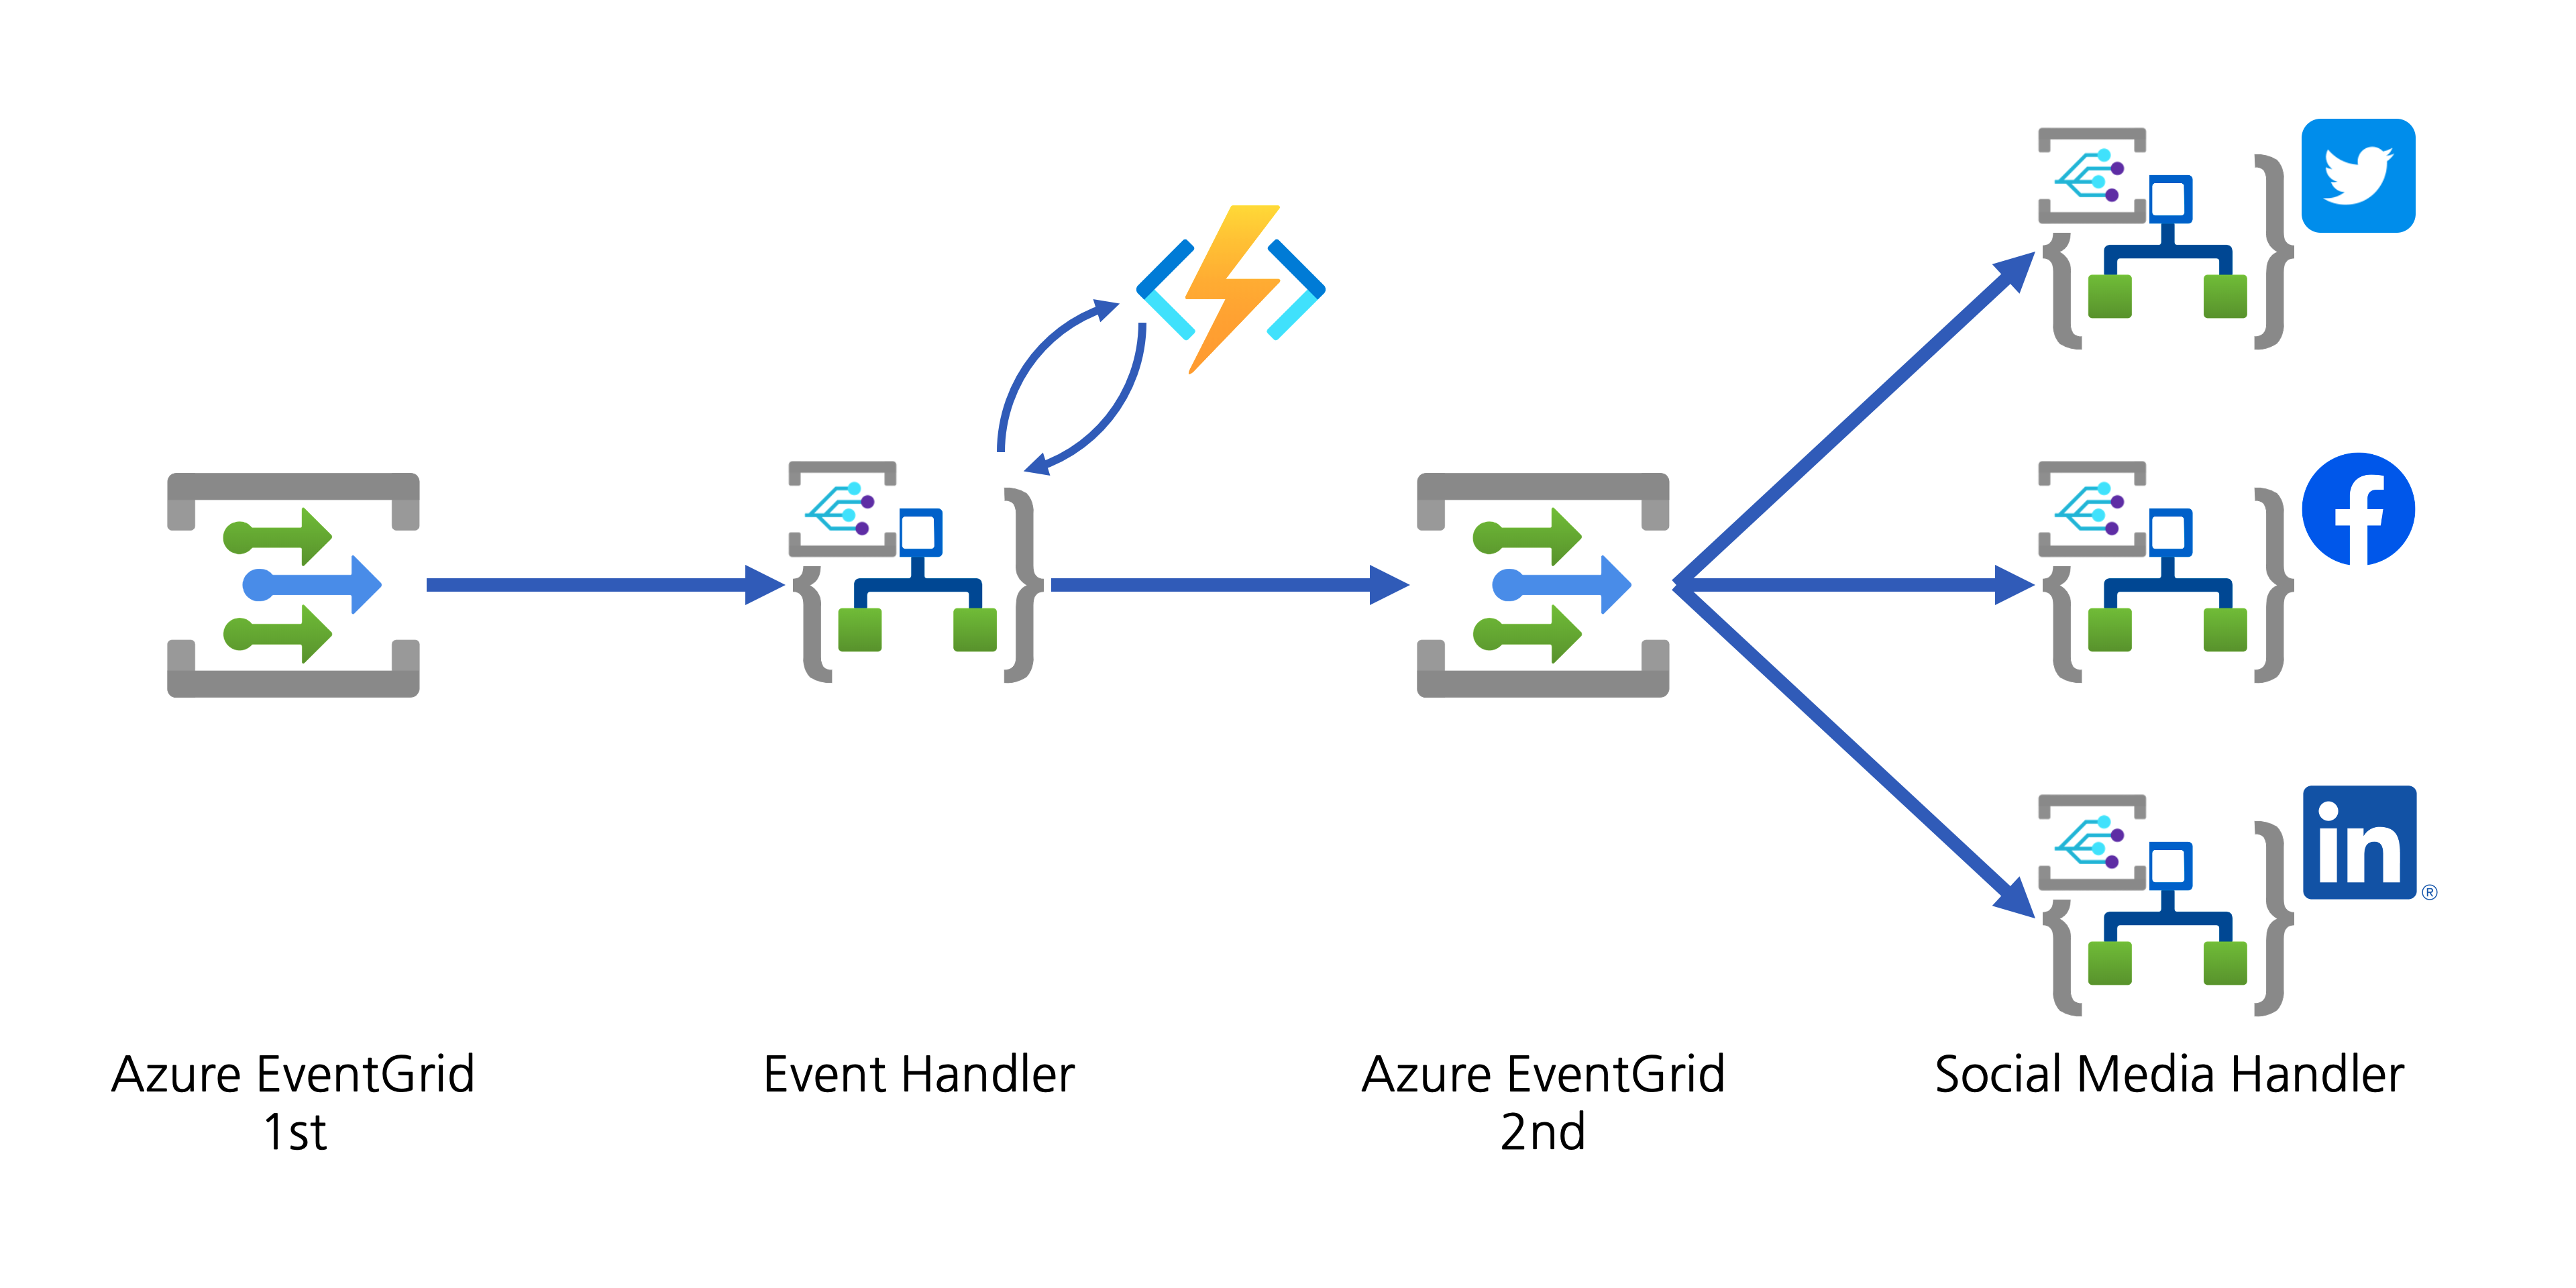
Social Media Exposure
The event handler now needs to help spread the YouTube video update to the world through designated social media. There are two approaches:
- The event handler directly connects to APIs of individual social media, or
- The event handler publishes another event to Azure EventGrid for other event handlers takes care of social media amplification.
Although both approaches are valid, the first one has strong coupling between the handler and amplifiers. If you need to add a new amplifier or remove an existing one, the Logic App handler must be updated, which is less desirable, from the maintenance perspective. On the other hand, The second approach publishes another event containing the converted data. All social media amplifiers act as event handlers, and they are all decoupled. I chose the second one.
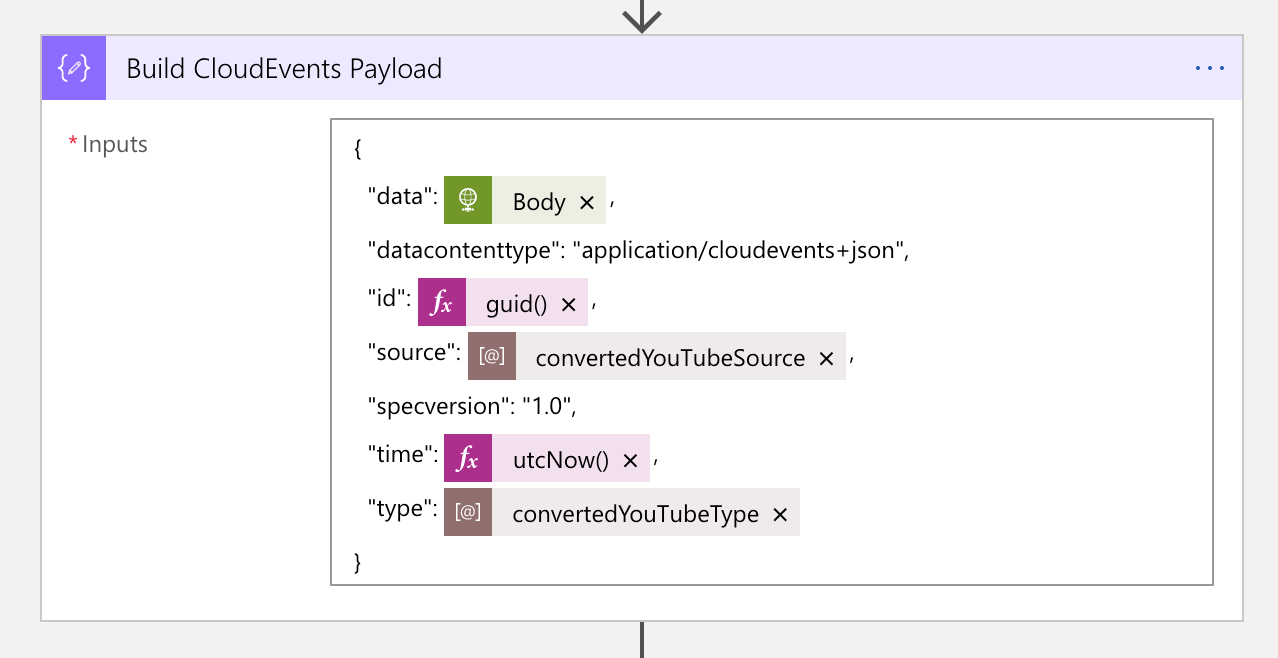
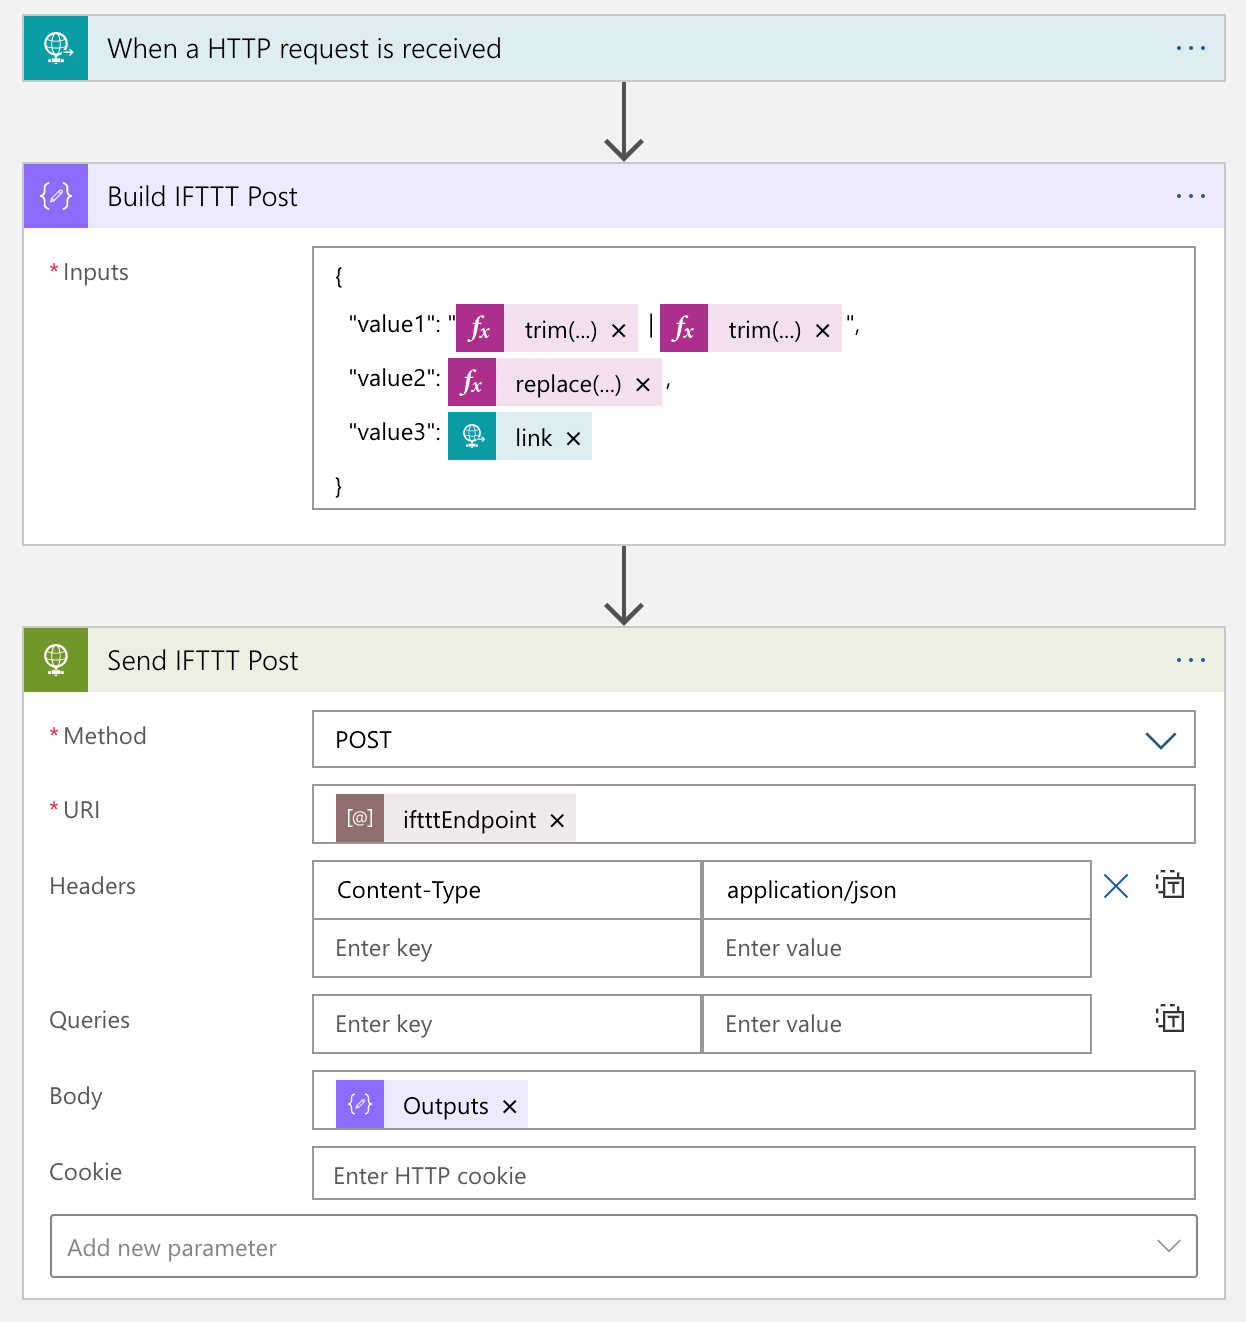
1. Event Publish: Converted YouTube Video Details
In order to publish the converted YouTube video details to Azure EventGrid, the data needs to be wrapped with the CloudEvents format. The screenshot shows the action on how to wrap the video details data with CloudEvents. This time, the event type will be com.youtube.video.converted.
The next action is to send an HTTP request to Azure EventGrid, with the CloudEvents payload. You can notice that many metadata headers are starting with ce-, defined in the cross reference check spec over HTTP.
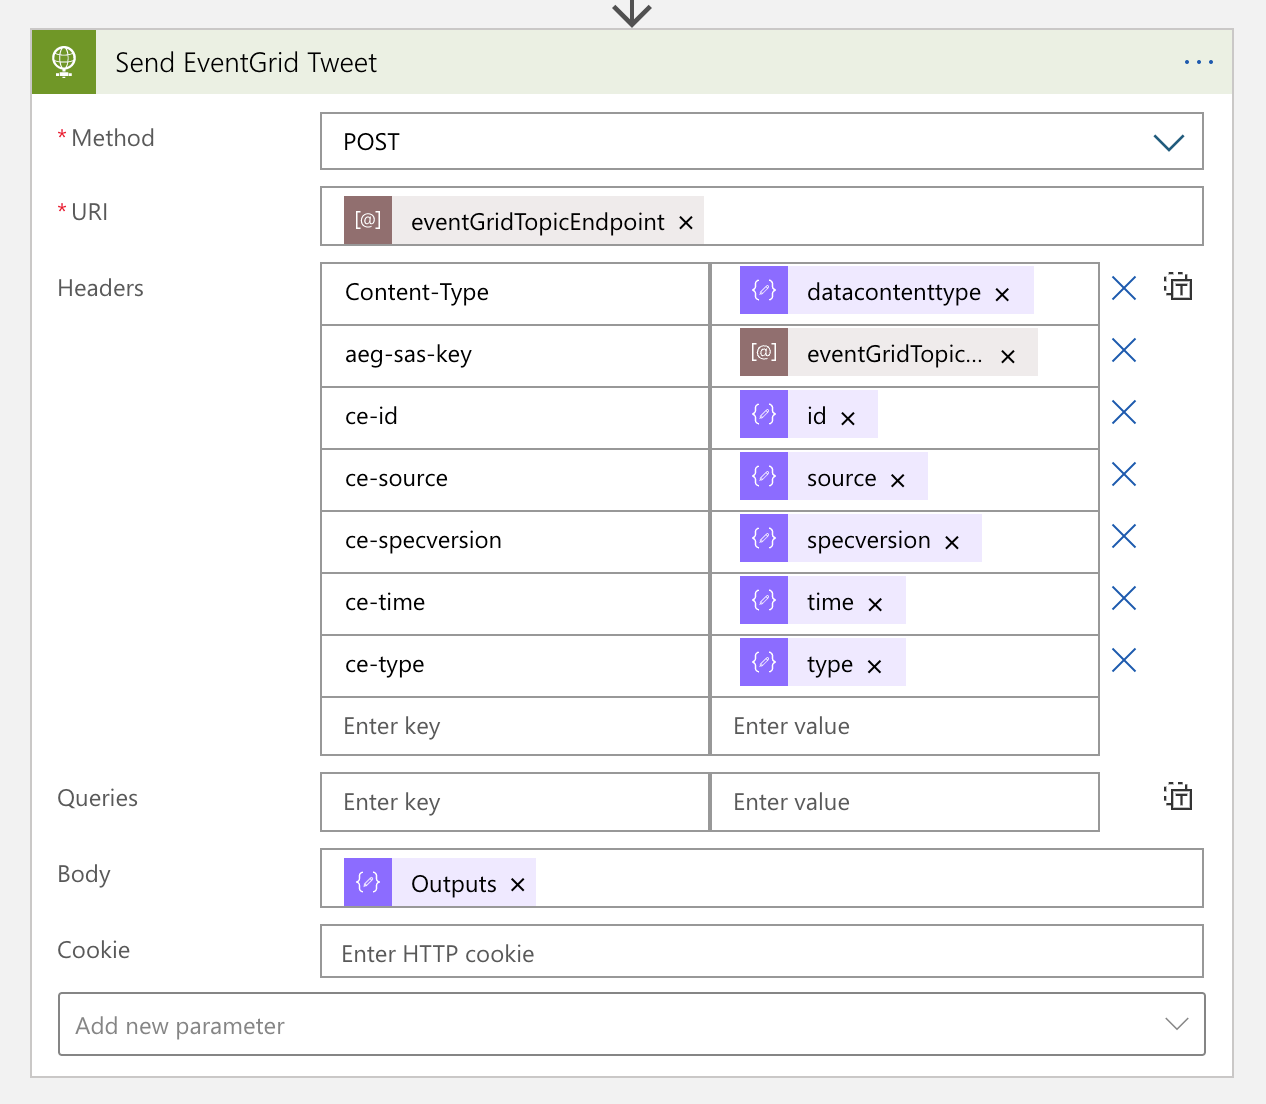
The message handler now completes its workflow. From now on, each social media handler takes care of the new event data.
2. Event Handlers: Social Media Amplification
YouTube video details are now ready for amplification! Each social media handler takes care of the event data by adapting their circumstances. The event data received from EventGrid looks like this:
    {

      “id”: “4cee6312-6584-462f-a8c0-c3d5d0cbfcb1”,

      “specversion”: “1.0”,

      “source”: “https://www.youtube.com/xml/feeds/videos.xml?channel_id=<channel_id>”,

      “type”: “com.youtube.video.converted”,

      “time”: “2021-01-16T05:21:23.9068402Z”,

      “datacontenttype”: “application/cloudevents+json”,

      “data”: {

        “channelId”: “<channel_id>”,

        “videoId”: “<video_id>”,

        “title”: “hello world”,

        “description”: “Lorem ipsum dolor sit amet, consectetur adipiscing elit. Duis malesuada.”,

        “link”: “https://www.youtube.com/watch?v=<video_id>”,

        “thumbnailLink”: “https://i.ytimg.com/vi/<video_id>/maxresdefault.jpg”,

        “datePublished”: “2021-01-27T07:00:00+00:00”,

        “dateUpdated”: “2021-01-27T07:00:00+00:00”

      }

    }
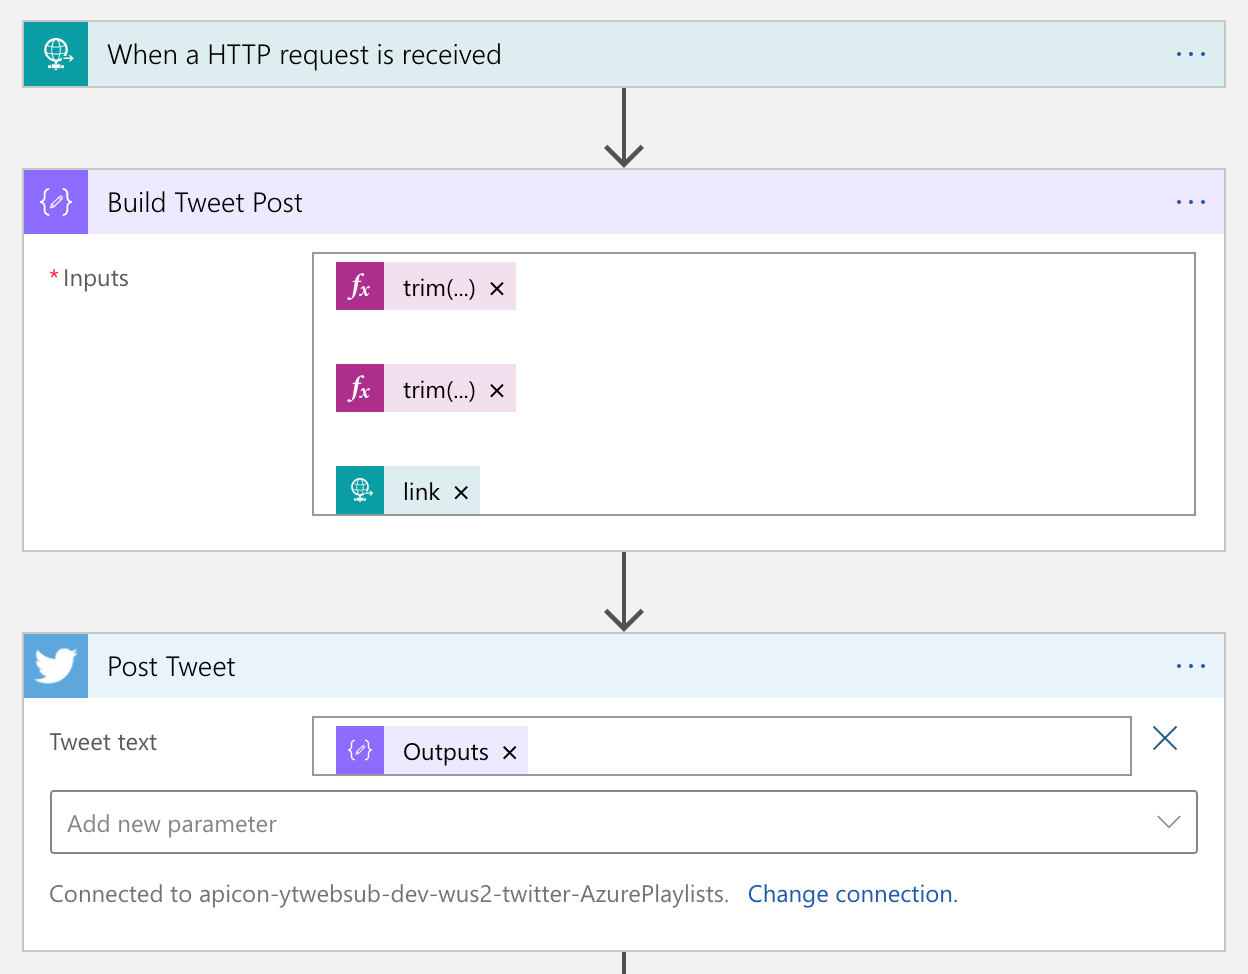
Twitter Amplification
As Logic Apps provides the Twitter connector out-of-the-box, you don’t need to use the API by yourselves. Therefore, simply use the actions like below:
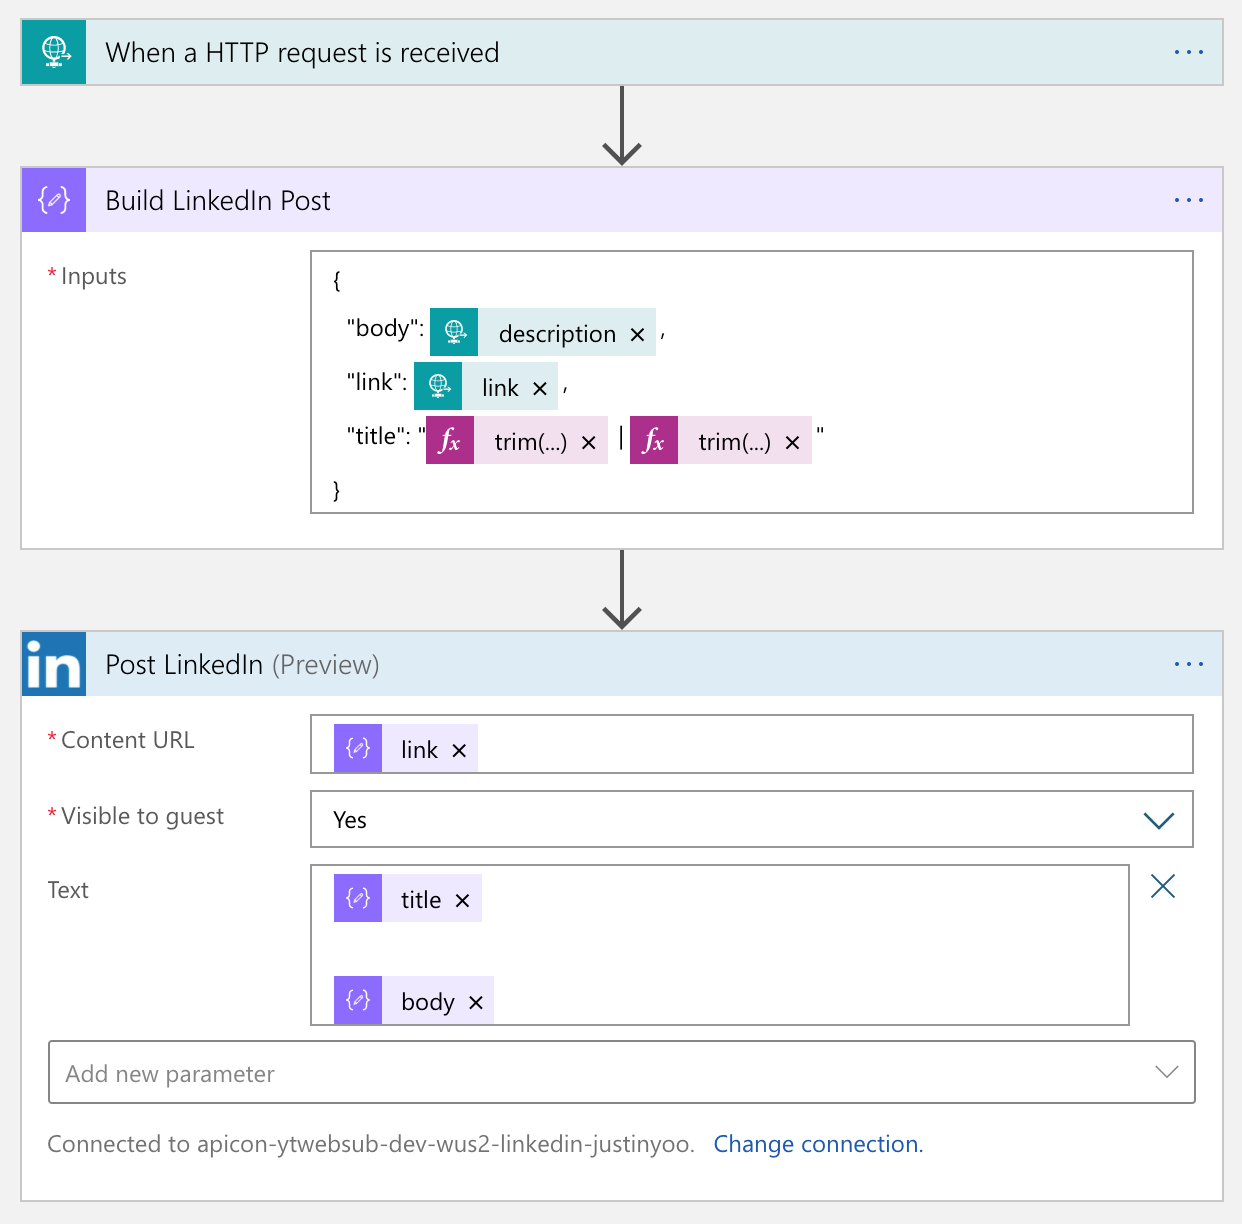
LinkedIn
Logic Apps also provides a built-in LinkedIn connector. So, simply you use it.
Facebook
Unlike the other two connectors, the Facebook connector has been deprecated. Instead, it’s now become an open-source project. So, you should use this open-sourced custom connector or something else. Fortunately IFTTT provides the Facebook Page connector, so you just use it.
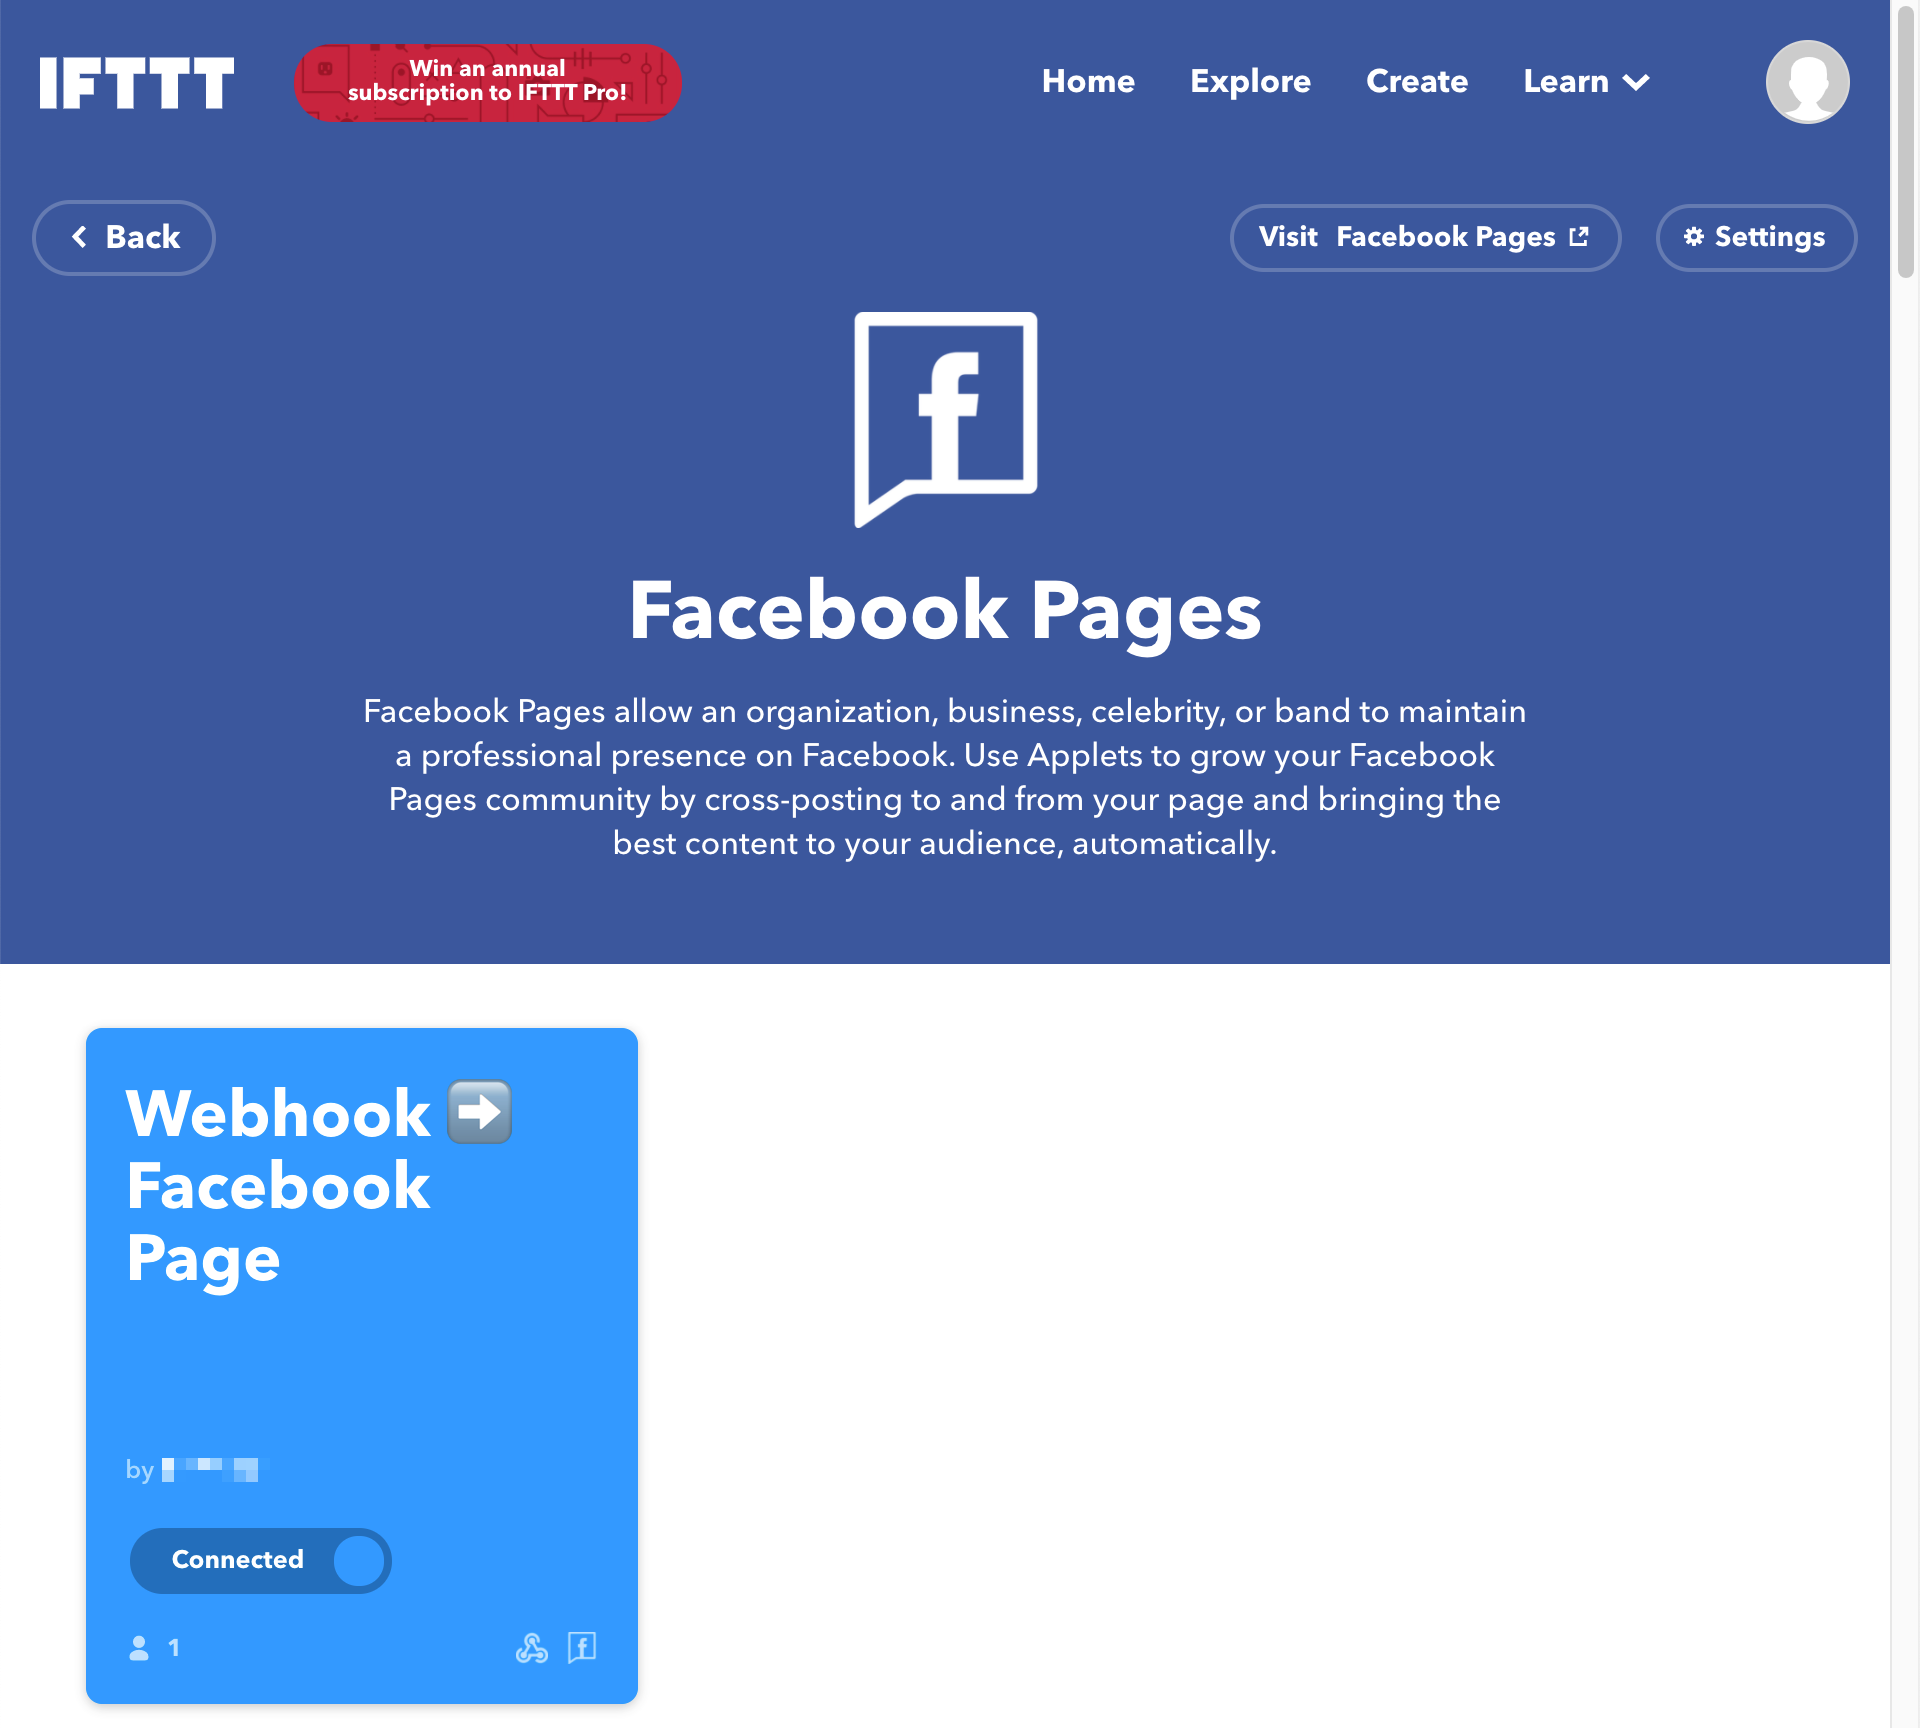
From the Logic App point of view, calling IFTTT is just another HTTP call. So it’s not that tricky. The only thing to remember is that the request payload can only include no more than value, value2 and value3.
The actual process result in the IFTTT end looks like this:
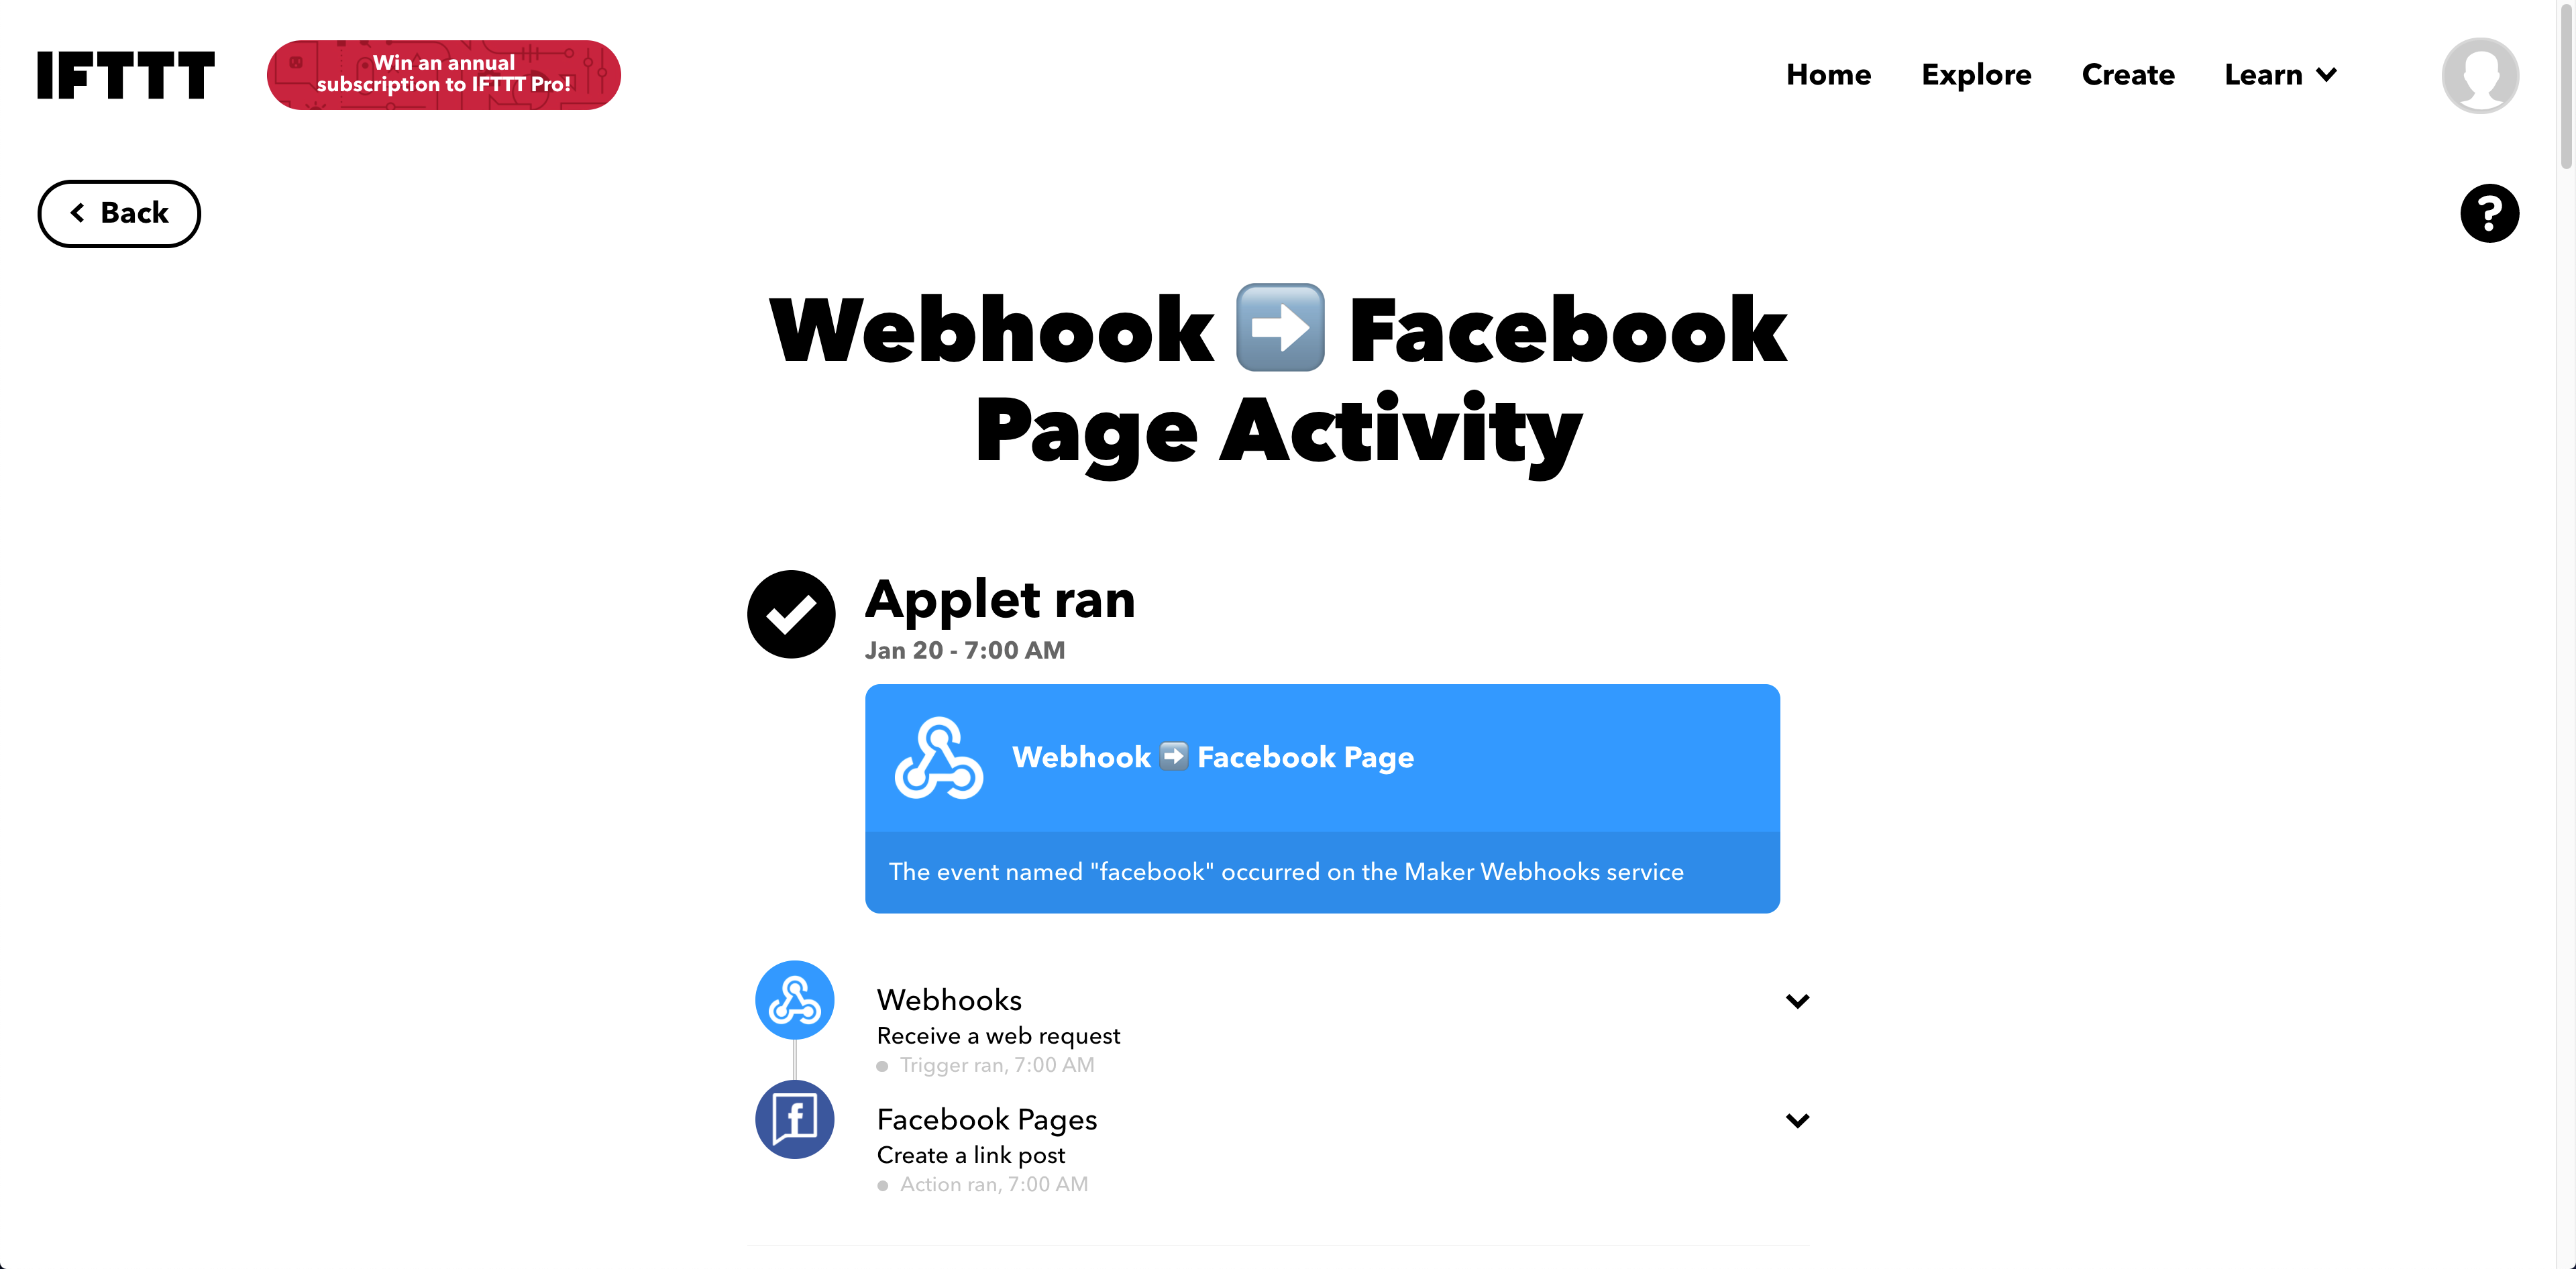
We’ve amplified to social media of Twitter, LinkedIn and Facebook.
If you want to add another social media, you can simply add another Logic App as the event handler.
So far, we’ve implemented a workflow solution that posts to designated social media platform when a new YouTube video update is notified through WebSub, by using CloudEvents, Azure EventGrid, Azure Functions and Azure Logic Apps. As steps are all decoupled, we don’t need to worry about the dependencies during the maintenance phase. In addition to that, although a new social media platform is planned to add, it wouldn’t impact on the existing solution architecture.
If you or your organisation is planning online content marketing, it’s worth building this sort of system by yourself. And it would be an excellent opportunity to make a well-decoupled and event-driven cloud solution architecture.
This article was originally published on Dev Kimchi.
by Contributed | Jan 31, 2021 | Technology
This article is contributed. See the original author and article here.
News this week includes:
Yammer Reactions are now inclusive
New transactable offers from CIS, DataVisor, and SPIN Analytics in Azure Marketplace
Microsoft Lists adoption for Government
ibrahimambodji is our member of the week and a fgreat contributor in the Azure Community.
View the Weekly Roundup for Jan 25-29th in Sway and attached PDF document.
https://sway.office.com/s/UOItp0p6MPEnBW2L/embed

by Contributed | Jan 31, 2021 | Technology
This article is contributed. See the original author and article here.
We made it to 2021, and we are back with the monthly summary for the Healthcare and Life Sciences Blog! Check out the highlights for January below:
Webcasts Recorded:
- Nursing Hackathon Delivered Innovative Solutions Designed to Reimagine Care Delivery: The HLS Blog carried a special webcast covering the nursing hackathon presented by Allscripts, MATTER, Microsoft and ARC that delivered innovative solutions designed to reimagine care delivery. Check it out here.
- Mid-Day Cafe Webcast:
- Tentative Schedule: Check out the Mid-Day Cafe Schedule for the new Monday webcast taking place at 12 noon EST/9 am Pacific. We look forward to you joining us live, as well as watching and sharing the posted recordings and resources. Drop us a line in our mailbag!
- Microsoft Teams Voice: We kicked off the first HLS Mid-Day Cafe and featured Microsoft’s Raj Gopalakrishnan, Senior Director and Principal Program Manager, Enterprise Engineering, Microsoft Teams. Check out Microsoft News, Events, and the new updates on Microsoft Teams Voice.
- Health and Life Sciences In the Age of Digitization with Adobe Sign and MSFT Teams: We partnered with Adobe to demonstrate how Adobe Sign can help support Virtual Consults by bringing patients and clinicians together to sign important documents like HIPAA consent forms. Click here for the recording and resources..
Upcoming Webcasts:
- Mid-Day Cafe – COVID Vaccine Health Bot: Join us tomorrow, February 1st at 12 noon EST for Mid-Day Café where Microsoft’s Gregory Lisiak and Nikita Pitliya will be covering the Microsoft COVID Vaccine Health Bot to assist organizations in implementing, and leveraging, the bot. Click here for more information.
- Microsoft Teams 101 – Hospital Case Study: Want to learn practical tips on how to use Microsoft Teams effectively at your hospital? Join Mary Buonanno, Healthcare Chief Technology Officer at The Ergonomic Group, and Margaret Campbell, Director at HealthNET Consulting, as they share their real-world experience with Microsoft Teams during COVID-19 in a multi-facility acute care hospital environment. Join us on Wednesday, February 10th from 2-3 PM EST. Click here to register!
Best Practice Resource:
- Microsoft 365 Resources for Architecture – Data Resiliency – Deletion and Retention – Data Restore: Wondering how your data in M365 is safeguarded when it comes to resiliency, retention and recovery? Microsoft’s Principal Technical Specialist Michael Gannotti supplies the documentation relevant to all three of those areas on this resource page.
January’s HLS Blog Contributors:

Shelly Avery, Senior Technical Specialist, Microsoft Teams

Michael Gannotti, Principal Technical Specialist, Microsoft Teams
Thanks for reading and let us know how else our Microsoft team can help!
.jpg")
Sam Brown, Technical Specialist, Microsoft Teams
by Contributed | Jan 31, 2021 | Technology
This article is contributed. See the original author and article here.
In many use cases Machine Learning models are built and applied over data that is stored and managed by Azure Data Explorer (ADX). Most ML models are built and deployed in two steps:
- Offline training
- Real time scoring
ML Training is a long and iterative process. Commonly, a model is developed by researchers/data scientists. They fetch the training data, clean it, engineer features, try different models and tune parameters, repeating this cycle until the ML model meets the required accuracy and robustness. To improve accuracy, they can:
- Use a big data set, if available, that might contain hundreds of millions of records and plenty of features (dimensions and metrics)
- Train very complex models, e.g., a DNN with dozens of layers and millions of free parameters
- Perform a more exhaustive search for tuning the model’s hyper parameters
Once the model is ready, it can be deployed to production for scoring.
ML Scoring is the process of applying the model on new data to get predictions/regressions. Scoring usually needs to be done with minimal latency (near real time) for batches of streamed data.
Azure Data Explorer (ADX) supports running inline Python scripts that are embedded in the KQL query. The Python code runs on the existing compute nodes of ADX, in distributed manner near the data. It can handle Data Frames containing many millions of records, partitioned and processed on multiple nodes. This optimized architecture results in great performance and minimal latency.
Specifically, for ML workloads, ADX can be used for both training and scoring:
- Scoring on ADX is the ultimate solution for data that is stored on ADX, as
- Processing is done near the data, which guarantees the fastest performance
- Embedding the scoring Python code in KQL query is simple, robust and cheap, relative to the usage of an external scoring service that requires management, networking, security, etc.
Scoring can be done using the predict_fl() library function
- Training on ADX can be done in case the full training data set is stored in ADX, the training process takes up to few minutes and doesn’t require GPUs or other special hardware
Still in many scenarios training is done on Big Data systems, such as Spark/Databricks. Specifically, ML training on these systems is preferred in case that:
- The training data is not stored in ADX, but in the data lake or other external storage/db
- The training process is long (takes more than 5-10 minutes), usually done in batch/async mode
- Training can be accelerated by using GPUs
- ADX production workflows must not be compromised by lengthy, CPU intensive, training jobs
So we end up in a workflow that uses Spark/Databricks for training, and ADX for scoring. But the problem is that training on these Spark platforms is mostly done using the Spark ML framework, that is optimized for Spark architecture, but not supported by plain vanilla Python environment like ADX Python. So how can we still score in ADX?
We present a solution which is built from these steps:
- Fetch the training data from ADX to Azure Databricks using ADX Spark Connector
- Train an ML model in Azure Databricks
- Convert the model to ONNX
- Serialize and export the model to ADX using the same Spark connector
- Score in ADX using onnxruntime
Prerequisite
- Enable Python plugin on your ADX cluster (see the Onboarding section of the python() plugin doc)
- Create a workspace in Azure Databricks
- Install the Spark connector in that workspace as explained here
- Install onnxmltools in that workspace
In the following example we build a logistic regression model to predict room occupancy based on Occupancy Detection data, a public dataset from UCI Repository. This model is a binary classifier to predict occupied/empty room based on Temperature, Humidity, Light and CO2 sensors measurements. The example contains code snips from Databricks notebook showing for the full process of retrieving the data from ADX, building the model, convert it to ONNX and push it to ADX. Finally the KQL scoring query to be run using Kusto Explorer.
1. Load the data from ADX to Databricks
from pyspark.sql import SparkSession
pyKusto = SparkSession.builder.appName("kustoPySpark").getOrCreate()

cluster = 'https://demo11.westus.kusto.windows.net'
db = 'ML'
query = 'OccupancyDetection'

AppId = '***** Your App Id *****'
AppSecret = '***** Your App Secret *****'
AuthorityId = '***** Your Authority Id *****'

# Read the data from the kusto table with default reading mode

s_df  = pyKusto.read.
    format("com.microsoft.kusto.spark.datasource").
    option("kustoCluster", cluster).
    option("kustoDatabase", db).
    option("kustoQuery", query).
    option("kustoAadAppId", AppId).
    option("kustoAadAppSecret", AppSecret).
    option("kustoAadAuthorityID", AuthorityId).
    load()

s_df.take(4)
Out[37]: [Row(Timestamp=datetime.datetime(2015, 2, 4, 17, 51), Temperature=23.18, Humidity=27.272, Light=426.0, CO2=721.25, HumidityRatio=0.004792988, Occupancy=True, Test=False),

 Row(Timestamp=datetime.datetime(2015, 2, 4, 17, 51), Temperature=23.15, Humidity=27.2675, Light=429.5, CO2=714.0, HumidityRatio=0.004783441, Occupancy=True, Test=False),

 Row(Timestamp=datetime.datetime(2015, 2, 4, 17, 53), Temperature=23.15, Humidity=27.245, Light=426.0, CO2=713.5, HumidityRatio=0.004779464, Occupancy=True, Test=False),

 Row(Timestamp=datetime.datetime(2015, 2, 4, 17, 54), Temperature=23.15, Humidity=27.2, Light=426.0, CO2=708.25, HumidityRatio=0.004771509, Occupancy=True, Test=False)]
2. Train the ML model in Azure Databricks
s_df.groupBy('Test', 'Occupancy').count().show()
+-----+---------+-----+
| Test|Occupancy|count|
+-----+---------+-----+
| true|    false| 9396|
| true|     true| 3021|
|false|    false| 6414|
|false|     true| 1729|
+-----+---------+-----+
# Prepare the input for the model

# Spark Logistic Regression estimator requires integer label so create it from the boolean Occupancy column
s_df = s_df.withColumn('Label', s_df['Occupancy'].cast('int'))

# Split to train & test sets
s_train = s_df.filter(s_df.Test == False)
s_test = s_df.filter(s_df.Test == True)

# Create the Logistic Regression model
from pyspark.ml.feature import VectorAssembler
from pyspark.ml.classification import LogisticRegression

# The Logistic Regression estimator expects the features in a single column so create it using VectorAssembler
features = ('Temperature', 'Humidity', 'Light', 'CO2', 'HumidityRatio')
assembler = VectorAssembler(inputCols=features,outputCol='Features')
s_train_features = assembler.transform(s_train)
s_train_features.take(4)
lr = LogisticRegression(labelCol='Label', featuresCol='Features',maxIter=10)
s_clf = lr.fit(s_train_features)

# Predict the training set
s_predict_train = s_clf.transform(s_train_features)

# Predict the testing set
s_test_features = assembler.transform(s_test)
s_predict_test = s_clf.transform(s_test_features)
s_predict_test.select(['Timestamp', 'Features', 'Label', 'prediction']).show(10)
+-------------------+--------------------+-----+----------+
|          Timestamp|            Features|Label|prediction|
+-------------------+--------------------+-----+----------+
|2015-02-02 14:19:00|[23.7,26.272,585....|    1|       1.0|
|2015-02-02 14:19:00|[23.718,26.29,578...|    1|       1.0|
|2015-02-02 14:21:00|[23.73,26.23,572....|    1|       1.0|
|2015-02-02 14:22:00|[23.7225,26.125,4...|    1|       1.0|
|2015-02-02 14:23:00|[23.754,26.2,488....|    1|       1.0|
|2015-02-02 14:23:00|[23.76,26.26,568....|    1|       1.0|
|2015-02-02 14:25:00|[23.73,26.29,536....|    1|       1.0|
|2015-02-02 14:25:00|[23.754,26.29,509...|    1|       1.0|
|2015-02-02 14:26:00|[23.754,26.35,476...|    1|       1.0|
|2015-02-02 14:28:00|[23.736,26.39,510...|    1|       1.0|
+-------------------+--------------------+-----+----------+
only showing top 10 rows
# Calculate accuracy on the testing set

import pyspark.sql.functions as F
check = s_predict_test.withColumn('correct', F.when(F.col('Label') == F.col('prediction'), 1).otherwise(0))
check.groupby('correct').count().show()
accuracy = check.filter(check['correct'] == 1).count()/check.count()*100
print(f'Accuracy: {accuracy}')
+-------+-----+
|correct|count|
+-------+-----+
|      1|12271|
|      0|  146|
+-------+-----+

Accuracy: 98.8241926391238
3. Convert the model to ONNX
from onnxmltools import convert_sparkml
from onnxmltools.convert.sparkml.utils import FloatTensorType

initial_types = [('Features', FloatTensorType([None, 5]))]
onnx_model = convert_sparkml(s_clf, 'Occupancy detection Pyspark Logistic Regression model', initial_types, spark_session = pyKusto)
onnx_model
{'classlabels_ints': [0, 1],
 'coefficients': [0.2995554662269534,
                  0.08678036676466962,
                  -0.01768699375517248,
                  -0.005589950773872156,
                  19.092004694715197,
                  -0.2995554662269534,
                  -0.08678036676466962,
                  0.01768699375517248,
                  0.005589950773872156,
                  -19.092004694715197],
 'intercepts': [1.396631045353889, -1.396631045353889],
 'multi_class': 1,
 'name': 'LinearClassifier',
 'post_transform': 'LOGISTIC'}

(full print trimmed here)
4. Export the model to ADX
import datetime
import pandas as pd

smodel = onnx_model.SerializeToString().hex()
models_tbl = 'Databricks_Models'
model_name = 'Occupancy_Detection_LR'

# Create a DataFrame containing a single row with model name, training time and
# the serialized model, to be appended to the models table
now = datetime.datetime.now()
dfm = pd.DataFrame({'name':[model_name], 'timestamp':[now], 'model':[smodel]})
sdfm = spark.createDataFrame(dfm)
sdfm.show()
+--------------------+--------------------+--------------------+
|                name|           timestamp|               model|
+--------------------+--------------------+--------------------+
|Occupancy_Detecti...|2021-01-26 19:02:...|0807120b4f6e6e784...|
+--------------------+--------------------+--------------------+
# Write the model to Kusto
sdfm.write.format("com.microsoft.kusto.spark.datasource").
option("kustoCluster", cluster).
option("kustoDatabase", db).
option("kustoAadAppId", AppId).
option("kustoAadAppSecret", AppSecret).
option("kustoAadAuthorityID", AuthorityId).
option("kustoTable", models_tbl).
mode("Append").
save()
5. Score in ADX
Is done by calling predict_onnx_fl() You can either install this function in your database, or call it in ad-hoc manner:
let predict_onnx_fl=(samples:(*), models_tbl:(name:string, timestamp:datetime, model:string), model_name:string, features_cols:dynamic, pred_col:string)
{
    let model_str = toscalar(models_tbl | where name == model_name | top 1 by timestamp desc | project model);
    let kwargs = pack('smodel', model_str, 'features_cols', features_cols, 'pred_col', pred_col);
    let code =
    'n'
    'import binasciin'
    'n'
    'smodel = kargs["smodel"]n'
    'features_cols = kargs["features_cols"]n'
    'pred_col = kargs["pred_col"]n'
    'bmodel = binascii.unhexlify(smodel)n'
    'n'
    'features_cols = kargs["features_cols"]n'
    'pred_col = kargs["pred_col"]n'
    'n'
    'import onnxruntime as rtn'
    'sess = rt.InferenceSession(bmodel)n'
    'input_name = sess.get_inputs()[0].namen'
    'label_name = sess.get_outputs()[0].namen'
    'df1 = df[features_cols]n'
    'predictions = sess.run([label_name], {input_name: df1.values.astype(np.float32)})[0]n'
    'n'
    'result = dfn'
    'result[pred_col] = pd.DataFrame(predictions, columns=[pred_col])'
    'n'
    ;
    samples | evaluate python(typeof(*), code, kwargs)
};
//
OccupancyDetection
| where Test == 1
| extend pred_Occupancy=int(null)
| invoke predict_onnx_fl(Databricks_Models, 'Occupancy_Detection_LR', pack_array('Temperature', 'Humidity', 'Light', 'CO2', 'HumidityRatio'), 'pred_Occupancy')
| summarize correct = countif(Occupancy == pred_Occupancy), incorrect = countif(Occupancy != pred_Occupancy), total = count()
| extend accuracy = 100.0*correct/total
correct	incorrect	total	accuracy
12271	146	        12417	98.8241926391238
Summary
In this blog we presented how to train your ML model in Azure Databricks, and use it for scoring in ADX. This can be done by converting the trained model from Spark ML to ONNX, a common ML model exchange format, enabling it to be consumed for scoring by ADX python() plugin.
This workflow is common for ADX customers that are building Machine Learning algorithms by batch training using Spark/Databricks models on big data stored in the data lake. This new option to use this model for scoring directly on ADX is very appealing as it’s fast, simple and free.

Recent Comments