From an early age, I was in love with American Sign Language. It truly is visually beautiful. And the more you learn about it, the more you love it. Part of the beauty and interest of ASL is that you never finish learning. There are always more opportunities to further your education. In my experience, the more you understand it, the more you realize how much you have yet to learn about it. ASL goes beyond the hand shapes in motion. ASL requires your eyes, your mouth, your eyebrows, and even your tongue at a fluent level. It includes how you turn your body, the way you lean in or out, your eye gaze, and your head tilt (not to mention the deep-seated cultural aspects of the language)! Learning ASL opens doors of opportunity, and at its core, offers the possibility to help others.
Learning ASL The best way to learn is from those who are native to the language, such as the Deaf. Though this is not necessarily an option for all people who wish to learn the language, it is undoubtedly the best way to learn! If you do not have the opportunity to learn from the Deaf, there are thousands of existing resources at your disposal. There’s a Chinese proverb that says: “The best time to plant a tree was 20 years ago. The second-best time is now”. So why not start learning right now!
How to start Start small. One great educational resource is YouTube. This tool is especially great for learning ASL since the language does not translate well into pictures in a book. Instead, a video captures the motion and the direction of the sign. You can quickly type “learn ASL” into the search bar, and there are endless resources. Start by learning the essential signs. Such as: How are you? My name is… Good morning! Can you help me? Where is the restroom? In time, your fluency will grow.
Are you looking for a place to start? Check out this video, and let me know how you did in the comments below!
Email marketing is one of the top advertising channels. For every dollar you pay, you expect to receive a significant return on your investment. However, have you yet to achieve a high Return On Investment (ROI) from your email marketing efforts? If not, here are some tips to get on the right track to achieve high sales figures and big profits.
One crucial factor that plays an essential role in all email marketing strategies is the subject line. The subject line is one of the first few emails that will arrive in the recipients’ inboxes. Thus, your subject line must be catchy, attractive, eye-catching, and personalized to make sure that your emails stand out from the crowd. However, before you get into the subject line personalization, you must understand the benefits of doing so. This article will provide you with valuable tips that will help you personalize your emails and achieve high marketing conversion rates.
Personalization is the best way to differentiate your brand from the rest. Studies have shown that email marketing strategies that focus on offering customers personalization achieved better results and achieved higher levels of response and engagement. In fact, a recent study revealed that email marketing strategies that provide customers personalization gained twice the response rate as those which did not. So, in this case, personalization is not only about making your emails stand out from the crowd, but it is also about convincing your customers to give your emails a second look.
Personalization is also an important email marketing strategy to counter the “spam” problem. Studies show that spam messages often receive the worst open rates of any email marketing strategy. Therefore, you must take steps to ensure that your emails don’t end up in the spam folder. The easiest way to do this is to personalize your email marketing strategies.
Another email marketing strategy that many companies overlook is designing sponsorship email campaigns. Typically, sponsorship email campaigns are characterized by text-based content. However, plain text proves to be much more effective than the typical image-based email copy. A plain text sponsorship email campaign is often more compelling for your target audience because text is more informative and unique than the average image-based email copy. Furthermore, the text is more customizable, allowing you to design email copy that is specific to your target audience. Finally, one can enhance email campaigns designed for mobile devices with custom graphics and images. One reason why mobile email campaigns are much more successful is that these devices are easier to access and use on a regular basis. Because of this, you must invest time in ensuring that your email designs are accessible across all different types of mobile devices. By investing time and effort into making sure that your email campaigns are accessible across various mobile devices, you will be able to enjoy a higher level of revenue per customer.
Does your meeting room have rows of chairs, making it difficult to make eye contact? A rounded seating arrangement is more conducive for the deaf as they can see other’s faces. This format enables them to read lips if they wish, see and interpret the tone in which the person is speaking, and know who is talking. This small change can help reduce misunderstandings.
Set up a Video Relay Service (VRS) device.
A VRS device is a device used to enable a deaf person to make and receive phone calls through an interpreter. This innovation allows a deaf person to contact suppliers, clients or make any call required within their workspace.
Supply an Interpreter.
It may seem acceptable to work around having an interpreter by writing notes. This practice can cause many misunderstandings as English is not the native language of the Deaf. Providing an interpreter is essential for the work and the growth of deaf employees. These additional services will help increase the ease with which deaf employees can find information or communicate with co-workers.
Making the workplace an accessible space for deaf and hard-of-hearing individuals is an ongoing challenge and necessity for many employers. It is essential to have a well-developed strategy for ensuring that the workplace is easily adaptable to the specific needs of workers. One way to achieve this goal is through the development of a workplace accessibility plan, which should include policies, procedures, and guidelines for training and customizing workstations. While most organizations have policies in place for providing access to information in situations where such communication may be critical, they often fall short when it comes to providing reasonable accommodation for workers of all abilities. Thus, it is imperative to implement a comprehensive plan that considers deaf and hard-of-hearing employees’ unique needs.
It is crucial to train employees on how to make a workplace accessible to disabled individuals. Training should include how to handle emergencies, use ASL, and use electronic or mechanical devices. Employees who do not know how to make a workspace accessible may not perform on a team properly. It is also vital that managers provide cultural training and information to their employees to understand their team members and how to respect and encourage them. If your business offers deaf-accessible products or services, promote them!
Optimizing a website is not as easy as ABC. There are several factors to consider and implement to achieve a good user experience and maximize conversion rates. This article will provide you with some tips for a better website design, one of which is to ensure that all of the internal links on your website are working correctly. In this article, I present some tips for optimizing website functionality and building the best user experience.
The first of the user experience tips for a better website is to make sure that all internal links on your site are working correctly. When clicking an internal link, the user should see a loading indicator, either a green arrow with a red X or another similar indicator. If there is a loading indicator, but the page takes too long to load, or the page doesn’t fully load when the user tries to open it, then it’s likely that the page isn’t receiving a fast connection from its ISP. To solve this problem, you should contact the ISP and ask them to upgrade your internet connection speed. They’ll likely be happy to help you out!
The second tip for an improved user experience for a better website is to create clear navigation links between pages. For example, if your website has a search bar on the left side, you should have a navigation bar on the right side of the page that clicking on the appropriate links. Another navigation option is to use the header navigation links often provided with newsletters, blog posts, and product reviews. This gives the reader a good overview of what the author wants to convey with the rest of the content on that particular page.
A third tip is to minimize the number of browser crashes while viewing the page. You can do this by adding JavaScripts and frames to your page to speed things up and allow the viewer to interact with the page with ease. For example, if your web page has many flash elements, you should place them somewhere else on the page to cut down on browser crashes. Using frames also allows the reader to jump from one page to another quickly.
A fourth of the quick tips for a better website redesign involves using clear navigation links on each page of the website. For example, you should place your menu bar at the top of every page or the top left corner of every page. This makes it easy for the viewer to go from one page to another.
Finally, make sure that your website still looks clean and pleasant even after you’ve designed it. Many new websites have flashy designs, which often get people’s attention turned away from the site’s actual content. It would be best if you instead focused on making the essential features of your website very obvious. By doing this, you will be able to build a better reputation for your business online. After all, you won’t be able to do much to turn people off of your website if they don’t even know that it exists!
This article is contributed. See the original author and article here.
In this atypical year, many of us have discovered a new sense of appreciation for our computers as critical tools to get work done. Now more than ever, we are all looking for new ways to be productive on our laptops and desktops. At Microsoft, we are committed to delivering great Microsoft 365 experiences that help our customers work easier and faster on their favorite devices. With this in mind, we want to share some of the latest Microsoft 365 innovations that can make you even more productive on a Mac.
Universal app support for Macs with M1 is here
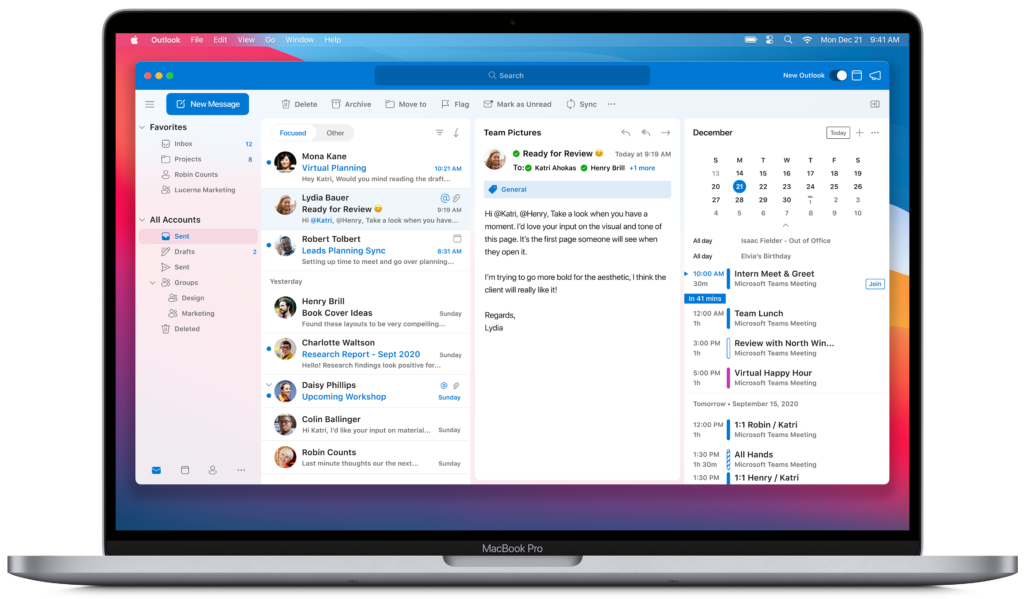
We are excited to announce that starting today we are releasing new versions of many of our Microsoft 365 for Mac apps that run natively on Macs with M1. This means that now our core flagship Office apps—Outlook, Word, Excel, PowerPoint, and OneNote—will run faster and take full advantage of the performance improvements on new Macs, making you even more productive on the latest MacBook Air, 13-inch MacBook Pro, and Mac mini. The new Office apps are Universal, so they will continue to run great on Macs with Intel processors. The apps are not only speedy, but they also look fantastic as they have been redesigned to match the new look of macOS Big Sur. Here is a peek at Outlook on the new 13-inch MacBook Pro.
If you have automatic updates turned on, you will start to receive these updates today. Otherwise, you can go to the Mac App Store and click the Updates tab, or with Microsoft AutoUpdate, you can go to your Office app’s Help menu and choose Check for Updates. Plus, find more commonly asked questions on our support page.
With more than 115M daily active users, Teams has become a critical part of the way many people are navigating the current situation. Teams allows you to meet, chat, call, and collaborate all in a single app. And, when people work in Teams, they all get the full breadth and depth of Microsoft 365. Microsoft Teams is currently available in Rosetta emulation mode on Macs with M1 and the browser. We are working on universal app support for M1 Macs and will share more news as our work progresses. Download the Teams app for your Mac here now.
Microsoft 365 experiences made for Mac
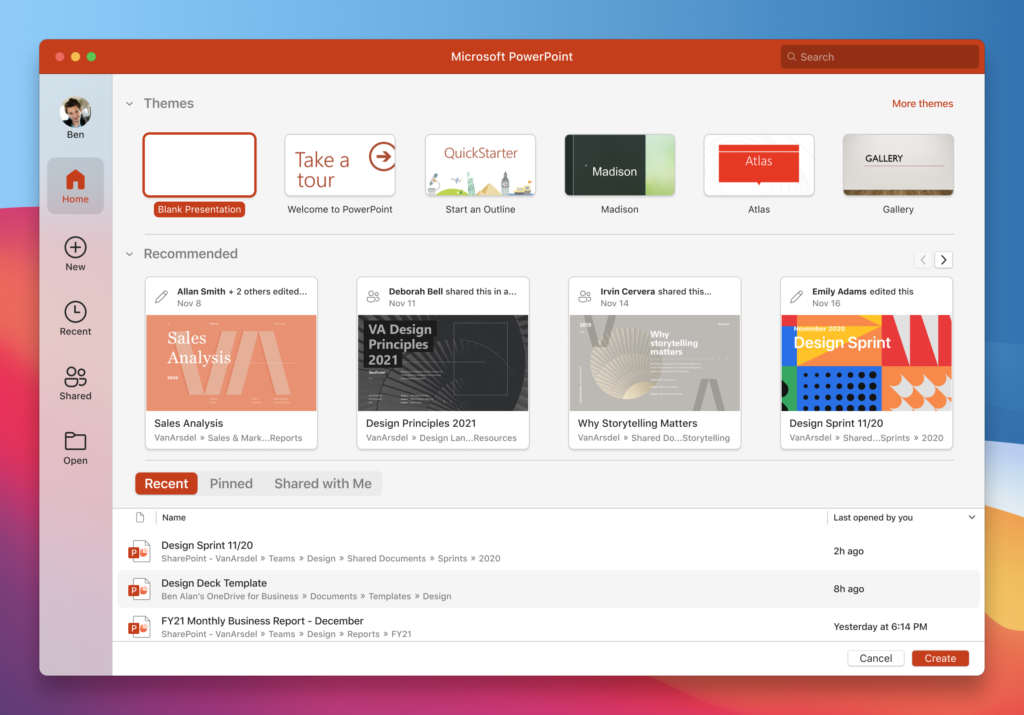
Over the past months, we have redesigned the experiences in our flagship apps for Mac with a focus on simplicity to improve ease of use. The new Outlook for Mac looks great with a redesign that matches the new look of macOS Big Sur, and an updated Office Start experience for Word, Excel, PowerPoint, and OneNote for Mac that incorporates the Fluent UI design system. This means that Microsoft 365 apps enable you to be more focused with immersive experiences that are easier to use right from the first screen. Experiences that feel both unmistakably Microsoft 365 and include elements that are native to the look of macOS so they are also unmistakably made for Mac. The new Office Start experience will be available next month.
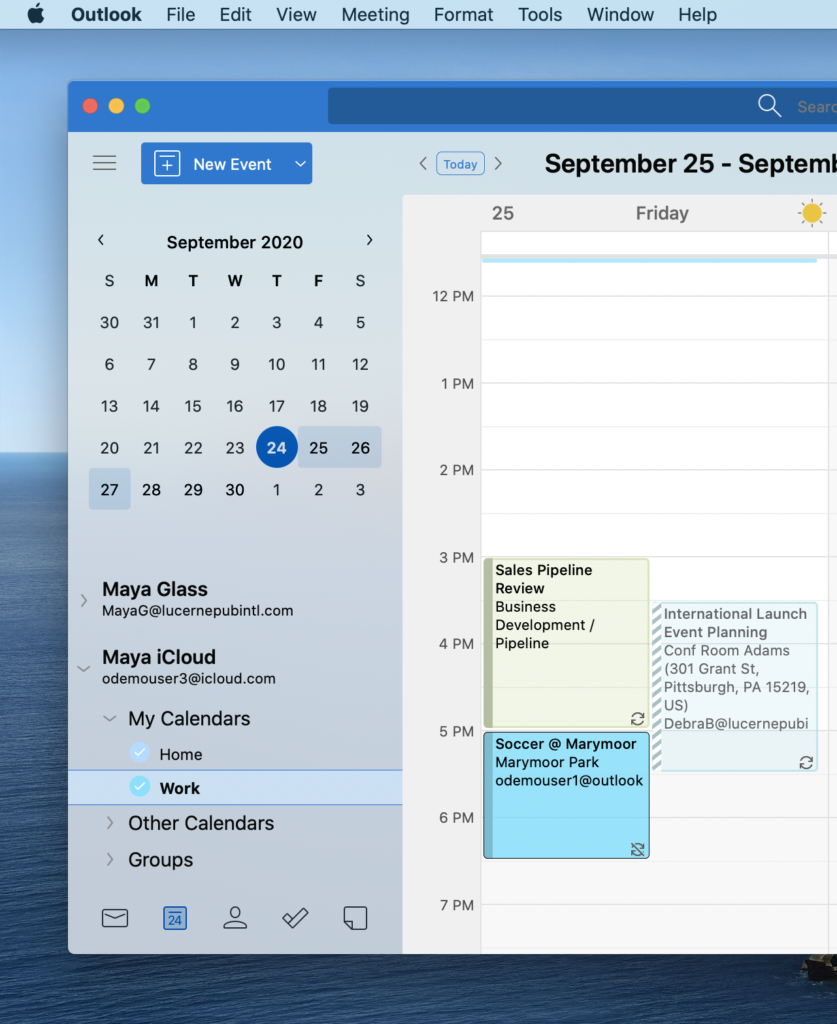
We continue to learn how customers want to use our products through continued feedback. So, thank you to each and every one of you who have shared your experiences with us. Today we are pleased to announce support for iCloud accounts in the new Outlook for Mac. This will enable you to organize work and personal emails, contacts, and calendars together in one app so it is easier for you to stay connected to what matters. We will start to roll this out using the new Outlook for Mac in the coming weeks.
Work your way
Another area of focus is to make our Microsoft 365 apps work the way you do. Through many new innovations on our Mac apps, our goal is to help you get work done in more simple and intuitive ways.
Tell Me is a search box that quickly gets you to the Office tools you need or actions you want to take by just typing what you are looking for in Word, Excel, PowerPoint, or OneNote for Mac. Microsoft Search in the new Outlook for Mac allows you to type out your query or question using language you use every day to find emails, events, and files—no fancy syntax needed. These capabilities help simplify how you use Microsoft 365 apps to achieve more and are now available to all Mac users.
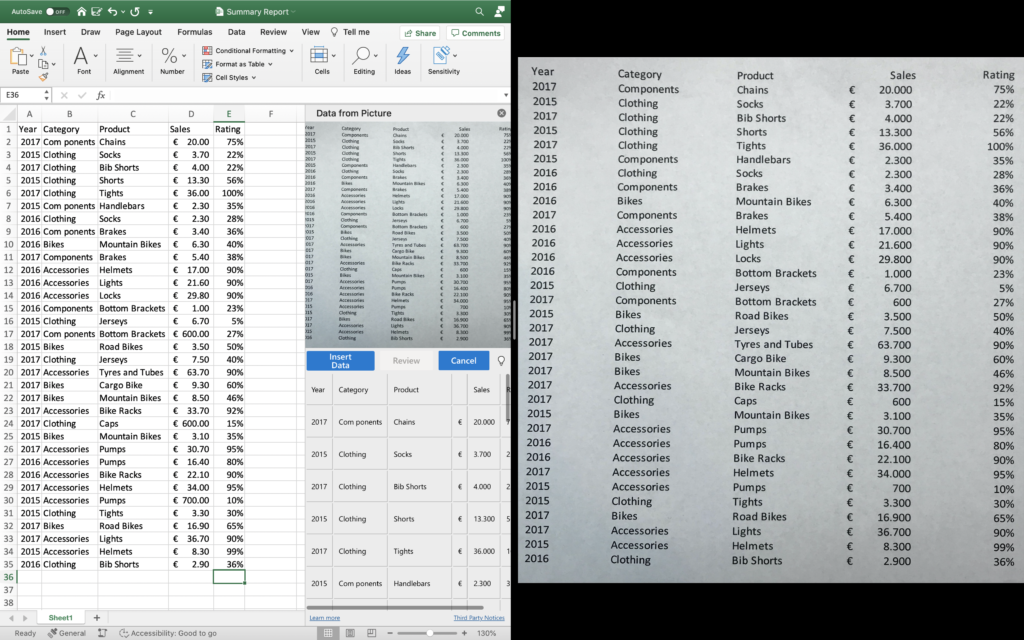
A commonly used productivity hack is to use your phone to capture images of important information you want to work on. With Data from Picture, you can take a photo of a table directly on your iPhone and turn it into data you can edit in Excel for Mac. This handy new feature uses Continuity Camera on your Mac and is also available now.
Voice input is a growing part of our digital lives and can be a great way to simplify your workflow. A new dictation toolbar with voice commands for creating content with your voice is coming to Word and Outlook for Mac. In addition, to help you check spelling, correct grammar, and get writing style suggestions, we will enable Microsoft Editor in Word for Mac. We plan to make these updates available to customers with access to Microsoft 365 for Insiders in early 2021.
New ways to work together
The shift to remote work highlights the need for teams to collaborate with agility, while ensuring sensitive data stays secure and meets compliance requirements. Our Microsoft 365 app teams have been busy getting modern collaboration and compliance capabilities ready so you can work from home more effectively on your Mac.
Sharing your calendars in Outlook with your co-workers helps you manage your time more efficiently. By giving access to participants’ calendars through simplified permissions, planning meetings and events is quick and easy. Based on the Microsoft sync technology and connected architecture, Outlook can provide reliable and faster synchronization of calendar events across Mac, Windows, iPhone, Android, and Web, keeping you on track of your time your way. The new Outlook for Mac will support shared calendars for customers subscribed to the Office Insider Mac Beta Channel in the first months of next year.
When creating new content as a team, the ability to collaborate around documents and presentations becomes especially valuable when your team is not in the same location. The new modern commenting experience in Word for Mac enables a contextual view of comments that allows you to focus on your content without missing active comments by contributors and reviewers. Modern commenting also includes improved @mentions in PowerPoint and Word for Mac that make it easier to reply to comments. The new @mentions experience is available now in PowerPoint for enterprise customers. Modern commenting for Word is in the Office Insider Beta Channel now and coming to Current Channel Preview in February 2021.
Have you ever collaborated with someone in a worksheet and suddenly your view changes and you are unable to finish your work? This can often happen when an active collaborator adds filters or sorts the data in a table of a shared worksheet. Excel sheet view is a new way to create customized views to sort and filter your data without disrupting what others see. This capability is an example of customer-driven product improvement and is now available on Excel for Mac.
Last, but certainly not least, Microsoft Information Protection sensitivity labels allow you to classify and protect your organization’s data with minimal effort through manual and automatic content labeling. Manual labeling is available on Word, Excel, PowerPoint, and Outlook for Mac. Automatic labeling is coming to these same apps for Microsoft 365 E5 customers in early 2021.
We are excited about the Microsoft 365 innovations we are delivering for our Mac user community and would love to hear your feedback about your experience using our latest features. If you want to try out new Office features first and make a difference in the products you use every day, please join the Office Insiders and check out the Mac channels.
Brought to you by Dr. Ware, Microsoft Office 365 Silver Partner, Charleston SC.
Retailers are already preparing for what they hope will be a successful shopping season. Because of COVID-19, it’s likely that we’ll be going online to look for those perfect buys. With so many deals around and what seem like eternal “Black Friday” sales, it’s important to keep some online shopping tips in mind.
So, if you plan to shop from the comfort of your home instead of heading out in person for those doorbuster deals, first, make sure your home computer has the latest antivirus software updated. This will help protect you from hackers and identity thieves. Read more computer safety tips here.
Once you’re ready to shop, make sure you:
Take time to compare products. To get the best deal, compare products. Do research online, check product comparison sites, and read online reviews.
Check out the seller. Confirm that the seller is legit. Look for reviews about their reputation and customer service, and be sure you can contact the seller if you have a dispute.
Look for coupon codes. Search the store’s name with terms like “coupons,” “discounts,” or “free shipping.”
Pay by credit card. Paying by credit card gives you added protections. Never mail cash or wire money to online sellers. If the seller asks you to pay this way, it could be a scam.
Use secure checkout. Before you enter your credit card information online, check that the website address starts with “https.” The “s” stands for secure. If you don’t see the “s,” don’t enter your information.
Keep records of online transactions until you get the goods, confirm you got what you ordered, and that you’re satisfied you won’t have to return the item.


Recent Comments