This article is contributed. See the original author and article here.
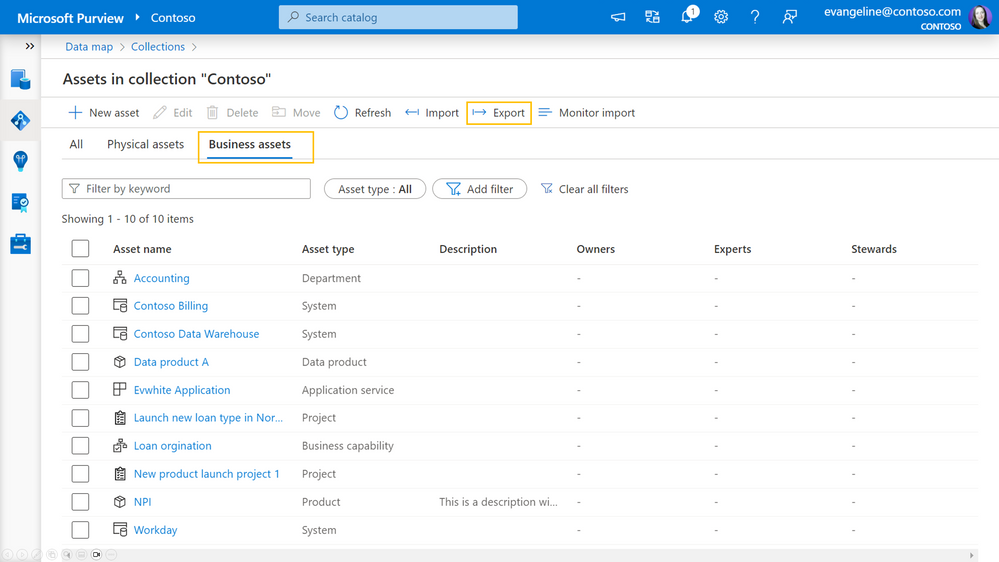
One of the easiest ways to curate metadata is to pull all the information you need into a csv file so you work quickly in a spreadsheet, then make updates in bulk by importing information. You can now do this in Microsoft Purview.
Right now, you can only export one asset type at a time, and this only works for business assets. We plan to offer import and export for data assets in the future.
Exporting assets is easy. Just go to any collection, select business assets, and export:
Select the asset type you want to export. Reminder, we only support one asset type at time:
You’ll get csv of your assets, their guides, and the fields you chose to export. To import, just update the file with the information you want, and import into the right collection.
This article is contributed. See the original author and article here.
Introduction:
Have you ever found yourself in a situation where you needed to stream Microsoft Defender for Cloud data to another system? Microsoft Defender for Cloud provides the option of streaming data like recommendations and security alerts, to a Log Analytics workspace, event hub, or another SIEM solution. This capability is called continuous export.
Imagine if the system you want to stream Microsoft Defender for Cloud data is located behind the firewall. How would you go about doing that? This article teaches you how to accomplish this scenario by configuring export as a trusted service.
To configure Continuous export as a trusted service, you need to perform the following steps in sequence:
Identify the destination event hub.
Add the relevant role assignments on the destination event hub.
Configure continuous export as a trusted service to use the destination event hub.
Verify data is being exported to the destination event hub.
The first step is identifying the event hub used to stream data from Defender for Cloud, to the system located behind the firewall.
Identify the destination event hub
Event hub provides you with a way to ingest data and integrate with other Azure services, like Defender for Cloud. For the purposes of configuring continuous export to stream data located behind a firewall you can either use an existing event hub or create a new one.
After you identify the event hub to be used as the destination for your Defender for Cloud data, you need to grant the continuous export service access the necessary permissions.
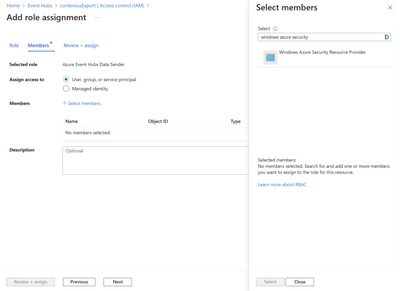
Add the relevant role assignment on the destination event hub
To add the necessary permissions, perform the following actions:
Navigate to the Event Hubs dashboard.
Click the destination Event Hub.
Select Access Control > Add role assignment > Azure Event Hubs Data Sender.
Click + Select members > Windows Azure Security Resource Provider (like in figure 1).
Select > Review + assign.
Figure 1. Adding the relevant role assignment on the destination event hub
After you add the relevant permissions to the event hub, you can proceed to the next step of configuring continuous export.
Configure continuous export as a trusted service to use the destination event hub
To configure continuous export, you need to have write permissions on the event hub policy. Imagine you wanted to stream data related to recommendations and security alerts in near real-time, to a system located behind a firewall. To achieve this scenario, perform the following actions:
Navigate to the Cloud for Cloud dashboard.
Select Environment settings.
Click the desired subscription.
On the left, select Continuous export.
Select Event hub.
Select Security recommendations and Security alerts.
Under Export frequency select streaming updates.
Ensure Export as a trusted service is selected (like in figure 2).
Choose the destination event hub.
Figure 2. Ensure that Export as a trusted service is selected
If you need further guidance on how to configure continuous export as a trusted service you can start here.
After you perform these actions, you can optionally verifying that data is being sent to the destination event hub.
Conclusion:
Configuring continuous export as a trusted service to event hub, allows you to stream Defender for Cloud data to a system located behind a firewall. For the purposes on this article, I focus on teaching you how to configure continuous export with the portal. However, for large organizations it’s recommended to use something like Azure policy to configure this scenario at scale. To configure continuous export as a trusted service to event hub you can use the following Azure policy: Deploy export to Event Hub as a trusted service for Microsoft Defender for Cloud data. The respective policy definition ID is af9f6c70-eb74-4189-8d15-e4f11a7ebfd4.
Reviewers:
Arik Noyman, Principal Group Software Engineering Manager,
This article is contributed. See the original author and article here.
In this blog post, we will show you how to get started on your journey with generative AI for Microsoft Dynamics 365 Business Central. Microsoft’s unique partnership with OpenAI allows us to bring the innovative power of large-scale language models (LLM) to the Business Central ecosystem in a unique, complete, and responsible way. Microsoft Azure OpenAI Service provides access to OpenAI’s advanced models such as GPT-4, GPT-3, Codex, and DALL-E with the security and enterprise features of Azure.
Over the last few months, we’ve listened to many community ideas on how generative AI can enrich existing features, or deliver entirely new customer value, and the follow-up question is always the same: how do I get started with AI in AL and Visual Studio Code? We’ve collected a few tips, including sample code, to make it easy for you to start exploring Azure OpenAI and share your learnings with the community.
New to generative AI?
We appreciate that there is much to learn about this new and exciting technology. If you’re new to this branch of machine learning and Azure OpenAI, these links are a great introduction to understand the basics.
Explore key Responsible AI guidelines and principles at https://aka.ms/RAI
How to get started with your AL code
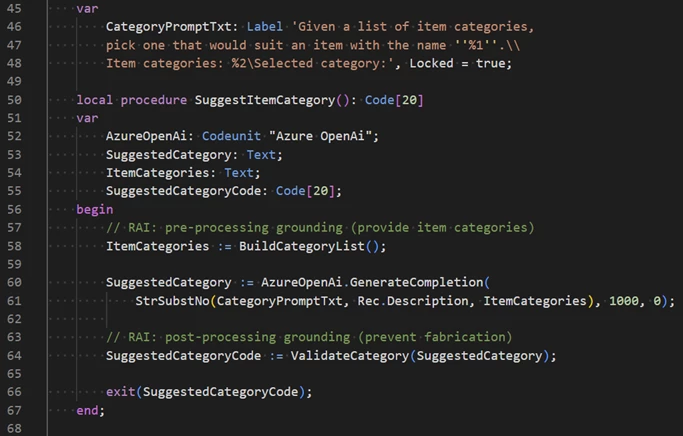
We’ve shared some sample code as an extension that enables you to explore the possibilities of LLM. This code is designed to simplify the process of setting up and running LLM experiments, starting with easily configuring and testing your connection to the Azure OpenAI service. After that, you can extend your AL logic to do more exciting things with this code.
The sample code uses Azure OpenAI to suggest an item category based on the item description field.
The extension’s source code is available at the Business Central BCTech repository on GitHub. You can get to it directly at https://aka.ms/BCStartCodingWithAI. You can either download or install the sample extension to your sandbox environment or clone the source code for your own projects.
How to get an Azure OpenAI key
To use Azure OpenAI Service, you need to have an Azure subscription and apply for access to the service. Azure OpenAI is generally available with a limited access policy to promote responsible use and limit the impact of high-risk use cases. Once you apply and are approved, you will receive an email with instructions on how to create an Azure OpenAI resource and get your API key.
How to use the Azure OpenAI playground
Azure AI Studio offers an Azure OpenAI playground: a web-based interface that allows you to explore the capabilities of generative AI models and try them out with your own prompts and data. You can access the playground from the Azure portal or from this link: Azure OpenAI Studio.
If you’re not a developer but have played around with ChatGPT or similar, you will find the playground to be a convenient place to experiment and assess whether ChatGPT is a suitable tool to solve the problem at hand. It’s perfect for product managers, designers and consultants looking to get their feet wet without having to write code or without having to build a deep understanding of the underlying technology.
And if you’re ready to dive into the more technical side of things, the playground lets you choose a model, a scenario, and a few shot learning examples to generate outputs. You can also modify the parameters such as temperature, top-p, frequency penalty, and presence penalty to control the randomness and diversity of the outputs.
How to get started with prompt engineering
Prompt engineering is the art of crafting effective inputs for generative models to produce desired outputs. Prompt engineering involves understanding the model’s capabilities and limitations, choosing the right format and tone for the input, providing relevant examples and instructions, and evaluating the output quality and reliability. Prompt engineering is a crucial skill for using Azure OpenAI Service effectively and responsibly. Here are some short links that can help you learn more about prompt engineering:
While Microsoft is hard at work bringing more generative AI to Business Central, we hope that these simple tips will get you started on your AI journey with Azure OpenAI. The product team is eager to hear your feedback on how we can support your use cases and help you design, build, and deliver AI solutions quickly and responsibly in the AI era: community partners are invited to join us at the Copilot and AI Innovation group on our Yammer partner community network. And if you’re looking for inspiration on how to enrich your features with generative AI, check out our 30 minute video where we present the details around our first generative AI feature in Business Central: Marketing Text Suggestions.
This article is contributed. See the original author and article here.
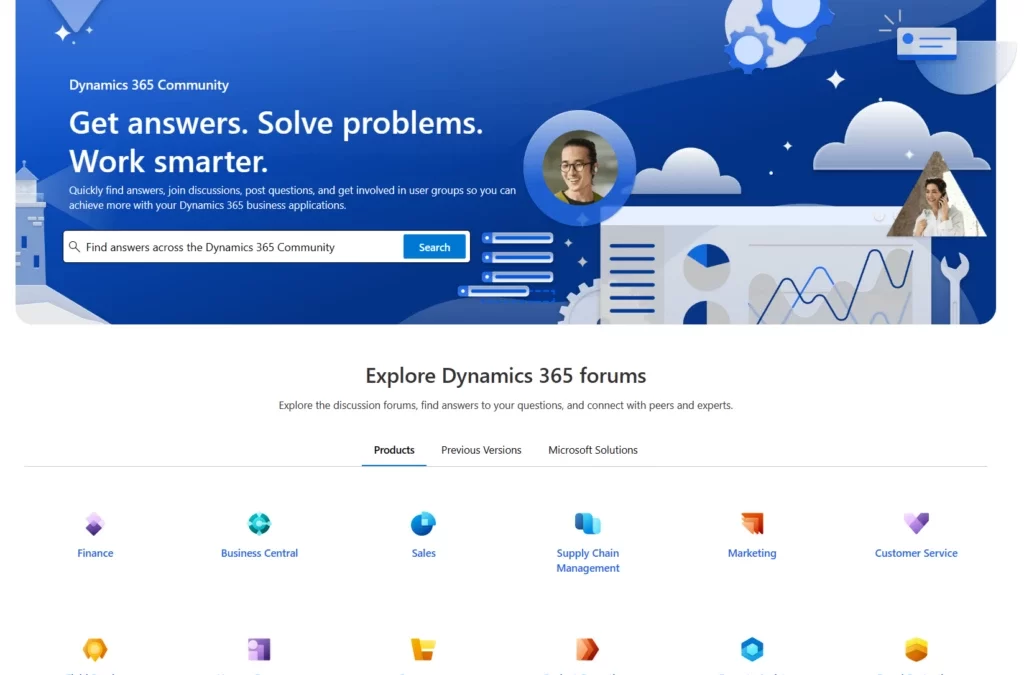
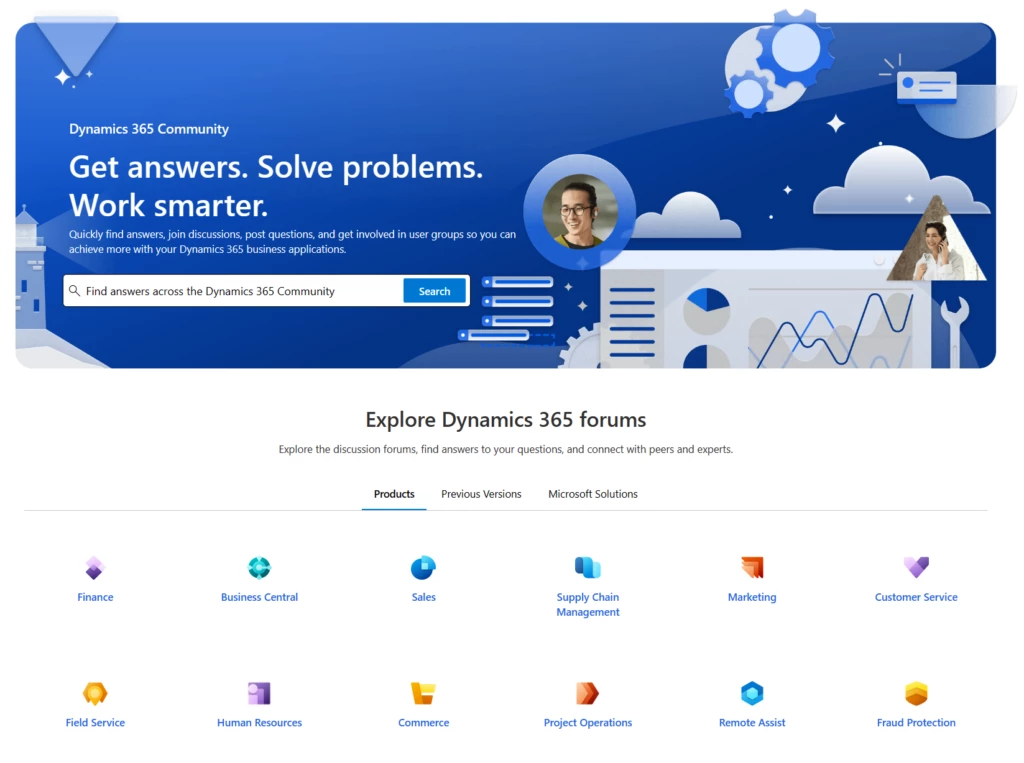
Microsoft is delighted to announce that the new Dynamics 365 Community is now live, marking a significant milestone in our journey of empowering users, fostering collaboration, and driving innovation.
With its fresh new look, streamlined experience, and a suite of powerful features, the new Dynamics 365 Community sets a new standard for user engagement and knowledge sharing. We have listened to your feedback, studied your needs, and made significant enhancements to ensure a seamless and immersive experience. Our aim is to create a platform that not only meets your present requirements but also inspires you to explore new possibilities and accelerate your success.
Here are the highlights of some of the new and future features of our new community:
Enhanced User Experience: Navigate through the community effortlessly and find the answers you need quickly. With intuitive search functionality, personalized recommendations, and a modern interface, your journey within the community has never been smoother.
Achievements Elements: Get ready for a fun and rewarding experience! Engage in community activities, earn badges, and unlock new levels as you contribute and grow. We believe that recognizing your valuable contributions is vital to building a thriving community.
AI-Powered Assistance: Our AI-assisted moderation ensures a safe and inclusive environment for all community members. By leveraging intelligent algorithms, we can maintain the quality and relevance of discussions while fostering a sense of belonging and respect.
This is just the beginning of an incredible journey! We are committed to continuous improvement and will be rolling out regular updates and new features to address your evolving needs. Your feedback and suggestions are invaluable to us, and we encourage you to share your thoughts to help shape the future of the Dynamics 365 Community.
As we embark on this exciting chapter together, we are excited to see the positive impact that this community will have on your professional growth, collaboration, and innovation. The Dynamics 365 Community is more than just a platform; it’s a catalyst for driving positive change in the world of business applications.
Microsoft would like to express our sincere gratitude to our incredible community members, MVPs, and User Group leaders who have played an instrumental role in shaping the Dynamics 365 Community. Your passion, expertise, and dedication continue to inspire us as we strive to create an inclusive and thriving ecosystem.
Thank you for being a part of this remarkable community. We invite you to explore the new Dynamics 365 Community at http://community.dynamics.com/ and embark on a journey of learning, collaboration, and success. Together, let’s unleash the full potential of Dynamics 365 and shape the future of business applications.
This article is contributed. See the original author and article here.
Before we start, please not that if you want to see a table of contents for all the sections of this blog and their various Purview topics, you can locate the in the following link:
This document is not meant to replace any official documentation, including those found at docs.microsoft.com. Those documents are continually updated and maintained by Microsoft Corporation. If there is a discrepancy between this document and what you find in the Compliance User Interface (UI) or inside of a reference in docs.microsoft.com, you should always defer to that official documentation and contact your Microsoft Account team as needed. Links to the docs.microsoft.com data will be referenced both in the document steps as well as in the appendix.
All of the following steps should be done with test data, and where possible, testing should be performed in a test environment. Testing should never be performed against production data.
Target Audience
The Information Protection section of this blog series is aimed at Security and Compliance officers who need to properly label data, encrypt it where needed.
Document Scope
This document is meant to guide an administrator who is “net new” to Microsoft E5 Compliance through.
We will be covering the recommendation of labels for new files and emails based on the Sensitive Information Type within those files and emails.
It is presumed that you already have a Sensitive Information Type that you want to use in your Information Protection policy. For the purposes of this document, I will be using a previously created Data Classification called “Recommended_Label_Contoso_medicine”. The keyword I am tracking within that data classifier is “Contoso_medicine”. I am doing this to avoid labeling any files by accident by using an out-of-the-box classifier. For information on how you create your own data classifier, refer back to “Part 1 – Sensitivity Information Types” of this blog series.
This document is only meant to be an introduction to the topic of multiple Sensitivity labels. Always refer back to official Microsoft documentation or your Microsoft account team for the latest information.
Out-of-Scope
This document does not cover any other aspect of Microsoft E5 Purview, including:
Data Classification
Data Protection Loss (DLP) for Exchange, OneDrive, Devices
Data Lifecycle Management (retention and disposal)
Records Management (retention and disposal)
eDiscovery
Insider Risk Management (IRM)
Priva
Advanced Audit
Microsoft Cloud App Security (MCAS)
Information Barriers
Communications Compliance
Licensing
It is presumed that you have a pre-existing of understanding of what Microsoft E5 Compliance does and how to navigate the User Interface (UI).
For details on licensing (ie. which components and functions of Purview are in E3 vs E5) you will need to contact your Microsoft Security Specialist, Account Manager, or certified partner.
We will not be covering the auto-labeling of data at rest. That will be covered in another blog post and those auto-labeling policies should not be done until after you have locked down your Sensitivity labeling of all “net new” data.
Overview of Document
Create a recommended Sensitivity Label
Create a recommended Sensitivity labeling policy
Verify that the user is prompted to apply the specific Sensitivity Label to a new file
Verify that the user is prompted to apply the specific Sensitivity Label to a new email
Use Case
The prompting of users to apply a Sensitivity Label when sensitive data is detected within a new file or email.
Definitions
Sensitivity Label – a metadata tag
Publish Label – making the metadata tag available to your tenant
Policy – The monitoring and applying of Sensitivity labels through the Microsoft tenant
Notes
Types of labels:
Automatic labels are applied to data at rest in Exchange mailboxes, SharePoint/Teams sites and users’ OneDrives.
Default labels are applied to data upon creation (and based on what is in the file/email).
Recommended labels do not label data, but appear when a specific piece of Sensitive Information Type (ex. Contoso_Medicine) are added to a file/email. It is up to the user to apply or not apply the recommended label.
Pre-requisites
You have read Parts 0, 1 and 2 of this blog series
You have a Sensitive Information Type (SIT) that will be tied to this automatic label.
Part 1 – Create a Recommended Sensitivity label
We will first set up our recommended label.
Give the label a name and description (and color marker, if you wish). Then click Next.
For the Scope, select Items and be sure that Files and Emails are selected. Then click Next.
Under the Items section of the wizard, select Apply or remove encryption and Apply content marking, then click Next.
We now arrive at Encryption. Click Configure encryption settings.
Assign Permissions now or let users decide? and chose Let users assign permissions when they apply the label.
For the purpose of this blog, under In Outlook, enforce one of the following restrictions -> Do Not Forward.
We want this label to be applied to MS Office related workloads. So, select In Word, Powerpoint, and Excel, prompt users to specify permissions.
Click for Apply content watermarking, I like to use the header option as it is the easiest because it is at the top of each electronic page. I will be using this watermark – “Contoso Medicine (Blog Recommended Label)”.
Next, we will Enable auto-labeling for files and emails.
At the top of this page, for the Content contains, we will select the SIT that we created previously. In my case, I am using the “Recommended_Label_Contoso_medicine”. The keyword I am tracking within that data classifier is “Contoso_medicine”.
At the bottom of this page, for the When content matches these conditions select Recommend that the users apply the label.
Note – this is the proverbial switch that needs to be flipped for a label to enable Recommend vs. Automatic vs Default labels.
We also want to provide an explanation in Word, Excel, etc. for the users. So in the field Display this message to users when the label is applied, type the message you want your user to see when the label is recommended. Then click Next.
On the protection settings for Groups and Sites, we will not be enabling anything as they are not applicable for this label and policy. Accept the defaults and click Next.
On the schematized data assets, we will leave this at the default of Off. Click Next.
Review your label and click Create Label.
Accept the defaults and then click Done and then Create Policy and then Close.
You are now ready to publish your policy.
Part 2 – Publish your Recommended Sensitivity label
We will now publish your label to your tenant.
On the left click on Information protection -> Label policies.
Click Publish label to start the publication wizard.
On the first step of the wizard, click Choose sensitivity labels to publish.
Select your recommended above label and click Add.
Note – you can publish (or republish) 1, many or all your labels in a Publish label wizard.
Click Next.
In the next step of the wizard, you can assign a specific administrative team to manage this policy. We will not be doing that in this blog. Click Next.
Next, you can decide who will see the published label. I will be using the default of all Users and groups, but I recommend you only use your own test user accounts here to limit the who will be seeing this label.
Under Policy Settings, you can leave all of these boxes blank. I will leave the first 3 boxes blankc and enter a URL into the last box (Provide users with a link to a customer help page). When you are ready, click Next.
On Default settings for documents, we will not be selecting any Default labels. Accept the default and click Next.
On Default settings for emails, leave things as the default of Same as docuemtn. Click Next.
On Default settings for meetings and calendar events, leave things as the default of None. Click Next.
On Default settings for Power BI content, leave things as the default of None. Click Next.
Now give your policy a name and description and click Next.
Tk Review your settings. When you are satisfied, click Submit and Done.
You are not ready to start the testing phase of this blog.
Note – it can take 24-48 hours for labels and policies to replicated within a tenant.
Part 3 – Test Recommended label on new file
Before we start our file and email tests, remember that labels and policies can take a while to replicate throughout your tenant. One hour is usually a good amount of time to wait, but it might be quicker or slow to populate based on several variables in your tenant we will not cover at this time.
Open Word, Excel or PowerPoint
Create a New File.
Type in the Sensitive Information Type that you have associated with your recommended Sensitivity label. I am using the compound word “contoso_medicine”.
When you do, you will see a Policy Tip bar appear at the top of your document. Here is an example.
Here is a magnification of the left side above.
Here is a magnification of the left side above.
This is the end of the file testing.
Part 4 – Test Recommended label on new email
We will now test this recommended label against a newly created email.
Open Outlook.
Create a New Email.
Type in the Sensitive Information Type that you have associated with your recommended Sensitivity label. I am using the compound word “contoso_medicine”.
When you do, you will see a Policy Tip bar appear at the top of your document. Here is an example.
Note: This solution is a sample and may be used with Microsoft Compliance tools for dissemination of reference information only. This solution is not intended or made available for use as a replacement for professional and individualized technical advice from Microsoft or a Microsoft certified partner when it comes to the implementation of a compliance and/or advanced eDiscovery solution and no license or right is granted by Microsoft to use this solution for such purposes. This solution is not designed or intended to be a substitute for professional technical advice from Microsoft or a Microsoft certified partner when it comes to the design or implementation of a compliance and/or advanced eDiscovery solution and should not be used as such. Customer bears the sole risk and responsibility for any use. Microsoft does not warrant that the solution or any materials provided in connection therewith will be sufficient for any business purposes or meet the business requirements of any person or organization.


Recent Comments