Our Use case Project – Content Manager Mobile App (Register Here)
What is this session about? When the marketing submits the content, they want to use as part of the marketing strategy they are normally using a traditional system of sending emails back and forth with documents of the content. We want to automate this process to make it easier for the Marketing Manager to have a summary of the content, the original content and review it to either approve/reject the content that will be posted on the company’s social media accounts.
Who is it aimed at? This session is aimed at anyone who wants to learn how to build AI powered apps and wants to learn more aboutAzure OpenAI
Solution Considerations before development
Before you build an application, you should have some thought and break down what you want to do before building. This process is often called “Solution Architecting“. While we will not be taking a lot of time doing this, I would like to introduce you to the basics of it.
Watch On Demand – Coming Soon
Speakers: Hadeel Shubair Hadeel is a Regional Cloud Advocate and Data Analytics Engineer for Microsoft, Middle East/Africa region. She holds a Master’s degree in Data Analytics and is passionate about learning and sharing her knowledge on tech topics including Data Analytics, AI, & ML. Before joining Microsoft, Hadeel held several appointments and roles including Google Women in Tech scholar through which she delivered several sessions to the community to motivate and empower young talents. Hadeel also served as part of the Data & Communications team overlooking the organization of the World Government Summit. On the other side, while at University, Hadeel chaired the Women in Engineering club, and was the Chief Editor of the Engineering Newsletter. As a Cloud Advocate for the Microsoft Reactor, Hadeel’s main goal is to take you on a journey to understand & learn more about Data and AI concepts and applications. She’s passionate about technology, education, & growing the Data & AI community across the region.
Someleze Diko Someleze is a young individual that is passionate about upskilling people from different communities using the different technologies at his disposal through being involved with initiatives that upskill and empower people. Today, he is an M365 and Power Platform Cloud Advocate at Microsoft focusing on upskilling students and communities through the Microsoft Power Platform. Before becoming a Cloud Advocate, Someleze was a Gold Microsoft Learn Student Ambassador in which he worked closely with other ambassadors to learn, upskill and empower students in different communities through hosting sessions that cover different Microsoft Technologies. He also served as a United Nations Peace Ambassador alongside his team from Artpeace.
This article is contributed. See the original author and article here.
As you may have heard; Windows LAPS feature is released to Public Preview in the last week of April. It has support for two main scenarios for backing up local administrator password such as storing passwords in Azure AD and Windows Server AD. It also has interoperability with legacy LAPS solution. This article on the other hand; will focus on native cloud deployment for Windows 10/11 clients that does not have legacy LAPS client installed, managed through Intune and either Hybrid Azure AD Joined or Azure AD Joined.
In this blog post, I’ll walk you through basic policy configuration and core Windows LAPS functionalities such as accessing local administrator passwords from different consoles and manually triggering password rotation.
Pre-requisites for enabling Windows LAPS may change in the future, so it is always a good idea to check online documentation first; but the tasks we will cover in this post are as follows:
Enabling local administrator password feature on tenant level
Creating a Windows LAPS Policy
Monitoring policy application
Accessing local administrator passwords that are backed up
Rotating local administrator passwords manually
Enable Azure AD Local Administrator Password Feature
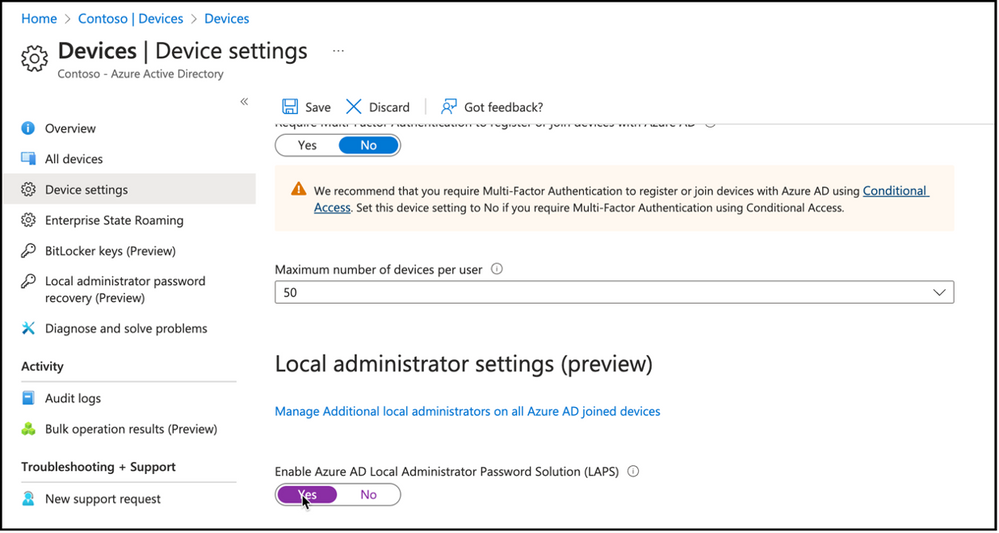
Enabling Local administrator password settings in tenant level can be done in Azure AD portal, Devices node, Device settings view. Option to enable Azure AD Local Administrator Password Solution (LAPS) will be available for configuration.
Snippet from Azure Active Directory Devices Node, Device Settings View
After enabling feature on the tenant level, we can proceed with policy creation.
Creating Local Admin Password Policy
Local Admin Password Solution policies can be configured from Endpoint Security Node, Account Protection view. Clicking on “Create Policy” button will present policy creation wizard.
Snippet from Endpoint Security, Account Protection View
First option will be selecting platform for the policy, and the second option will be policy type itself. As you notice, there are different account protection policy options such as Local User Group Membership or Account Protection as well as Local Admin Password Solution (Windows LAPS). Selecting Local admin password solution (Windows LAPS) from profile list will start policy creation wizard.
Snippet from Endpoint Security, Account Protection Node, Policy Creation View
As always, first step is naming policy as well as giving a description.
Snippet from Policy Creation – Naming Account Protection Policy
Next step is building the policy itself. As you see there are several options regarding Administrator account, password options as well as the directory to backup the local administrator password. Let’s take a deeper look at these options and prepare our Windows LAPS policy.
Snippet from Policy Creation, Configuration Settings View
Backup Directory:
First setting in creating Windows LAPS policy is defining the directory service that will be used to backup the local admin password on the endpoints. It is possible to use Windows Server Active Directory or Azure Active Directory as a means to store local admin passwords. You can also use “Disabled” option to remove existing configuration.
Snippet from Policy Creation, Backup Directory Options
There will be additional settings depending on the backup directory selected. Some of these will include Active Directory specific settings such as “AD Encrypted Password History Size”, “AD Password Encryption Principal” and “AD Password Encryption Enabled” if backup to Active Directory is selected.
Snippet from Policy Creation, Backup Directory Setting – Active Directory only
Only additional setting to configure will be Password Age Days when Azure AD selected as the directory service for backing up the local administrator password. Password Age Days option defaults to 30 days unless it is configured and it is possible to configure this option between 7 days & 365 days while backing up to Azure AD, and 1 day & 365 days while backing up to Active Directory.
Snippet from Policy Creation, Backup Directory Setting – Azure AD
Administrator Account Name: Another setting to configure is the Administrator account name to manage. Policy will use Built-In Administrator SID if not configured. Renaming built-in administrator account will not impact SID monitoring, so you can configure this option to define, if there is another local administrator account present on the endpoint to manage its password.
Snippet from Policy Creation, Administrator Account Name Setting
Password Complexity: Next setting that will require our attention will be Password Complexity. This is where we define how complex local administrator passwords will be on the endpoints. As you can see there are different options to use Large letters, small letters, numbers and special characters in the local administrator password.
Snippet from Policy Creation, Password Complexity Options
Password Length: Another important item to configure is the password length setting which will define the length of local administrator password created based on the complexity requirements defined earlier. It defaults to 14 characters unless defined, and has a minimum of 8 and maximum of 64 character limitation.
Snippet from Policy Creation, Password Length Setting
Post Authentication Actions: Post Authentication Actions will define what will happen to the password, user or device after logging on with the stored local admin credentials. Password will be reset at a minimum, managed account will be logged off or device will be rebooted after the expiry of grace period to make sure password rotation took place. Fort his configuration I will define my policy to reset the password and logoff the managed account upon expiry of the grace period.
Snippet from Policy Creation, Post Authentication Actions Setting
Post Authentication Reset Delay: Post authentication reset delay value will define the time in hours to execute the actions following authenticating with the managed identity as defined earlier. This setting defaults to 24 hours if not configured; and can be set between 0 (disables post authentication actions) and 24 hours.
Snippet from Policy Creation, Post Authentication Reset Delay Settings
Just like all the other device configurations that can be deployed by intune, next step in the policy wizard would be assigning a set of devices for policy application. In my environment i’ve used built in All devices group.
Snippet from Policy Creation, Group Assignment
Monitoring Policy Application
It is possible to monitor Windows LAPS policy application via Intune just like any other policy. One way would be pivoting from policy itself. It is possible to view check-in status per logged on user in the policy details.
Snippet from Windows LAPS Policy Properties, Check-In Status
It is also possible to pivot from a device; checking device configuration view from device properties and validating the policy application to the endpoint.
Snippet from Device Properties, Device Configuration View
When drilled through the device configuration applied, we can see per-setting level status as well. You may see the settings are successfully applied to our device in the following snippet.
Snippet from Device Configuration, Profile Settings View
Accessing Local Admin Passwords
Once the policy is applied on the endpoint, Windows LAPS will create a random local administrator password for the managed credential in the endpoint and will store this as an attribute that is accessible through either Azure AD, or Microsoft Intune. On the other hand, there are some requirements for accessing the local admin password.
Someone who needs to view local admin passwords should be granted with the following rights in Azure AD as stated in the RBAC document here.
An admin / operator user who has correct rights / roles assigned, can access to the local admin password recovery view either following Azure Local administrator password recovery view within Devices Node, ins Azure Active Directory console, or they can use “local admin password” view inside device properties within Microsoft Intune.
For Azure Active Directory, admin / operator can drill on the properties of the endpoint that its local administrator password is looked for; click on Local administrator password recovery link from the left hand side menu. This will bring information about the local administrator password such as when the last password rotation was and when the next password rotation will be, as well as an option to Show local administrator password.
Snippet from Azure Active Directory, Device Properties, Local Administrator Password Recovery View
When clicked on Show local administrator password task, a window will pop-up from the right side of the screen and will Show details about the managed identity such as Account name, SID information, password rotation details as well as local admin password hidden in asterisk with a “Show” button.
Snippet from Azure Active Directory, Local Administrator Password Retrieval
Clicking on Show button will reveal the current local administrator password for the endpoint. Admin / Operator user can then use Copy button to copy the local administrator password to clipboard and use it to do the tasks that require administrator privileges.
Snippet from Azure Active Directory, Local Administrator Password Retrieval
Once the password is used to authentication to the target system, actions defined in post authentication actions policy setting will be executed after a time period defined in post authentication actions delay policy setting. These actions may include rotating password, logging off the managed identity or rebooting the device.
It is also possible to manually trigger local administrator password rotation. Task for Windows LAPS password rotation can be found in the actions menu item for the given endpoint.
Snippet from Microsoft Intune Device Properties, Rotate Local Administrator Password Task
Once clicked, admin / operator user will get a confirmation message stating that old password will no longer be applicable and a new password will be generated after rebooting the device.
Snippet from Microsoft Intune, Local Administrator Password Rotation Confirmation
It is also possible to access local administrator password via Microsoft Intune device properties. Let’s check how and confirm that password for local administrator has changed with rotate local admin password task.
Snippet from Microsoft Intune, Local Administrator Password Rotation
Device properties for a given device has an option for Local admin password. Which has the information about last rotation time for local administrator password, next rotation time for local administration password as well as Show local administrator password task just like the one in Azure Active Directory. Clicking on Show local administrator password task will reveal a similar pop-up from right hand side, that is usable to copy the existing local administrator password for the device.
Wrap Up:
Windows LAPS feature is released to Public Preview while this post is written. It has native support for cloud scenarios such as Hybrid Azure AD Joined devices and Azure AD Joined devices as well as interoperability with legacy LAPS solution. Customers may use Intune to create and deploy Windows LAPS policies and may utilize Azure AD or Microsoft Intune portals to view local administrator password for a given device. It is also possible to utilize Graph API to do certain tasks which can be a subject of another post.
This article is contributed. See the original author and article here.
IT/DevOps personnel need access to database and system metadata so that they can keep critical database systems healthy, performing to expectations and secure. Microsoft Purview DevOps policies, a subset of Microsoft Purview access policies, are specifically designed to provide IT/DevOps personnel with the access they need so that they perform their crucial job, while at the same time helping reduce the insider threat.
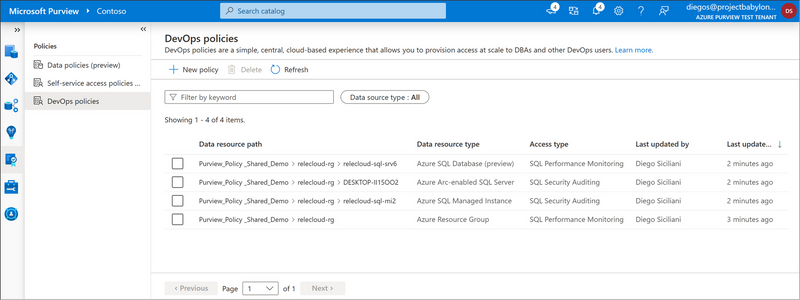
Microsoft Purview DevOps policies is a central, cloud-based experience. This is what the experience looks like:
Figure 1: Screenshot of DevOps policies
In prior blogs, we announced the launch into General Availability (GA) of Microsoft Purview DevOps policies, first for SQL Server 2022, and subsequently for Azure SQL Database. Today, we are pleased to introduce the expansion of permissions related to role “SQL Performance Monitor”. This is one of two roles that can be provisioned as part of the Microsoft Purview DevOps policies.
Up to this point, this role gave a user (or group) access to hundreds to DMVs/DMFs. These DMVs/DMFs allow the user to review system parameters, identify performance bottlenecks, currently running queries, blocking issues, memory usage, file and index usage, active user connections, internal tasks, procedure execution stats and use of the Query Store, among others.
With the expansion, Microsoft Purview can now be used to grant access to all the typical commands that a persona tasked with performance monitoring and analysis requires. The additional permission assignments enable the user (or group) that is assigned role SQL Performance Monitor to see data from most catalog views, which contain information about user objects and configurations. Furthermore, the user will now be able to run several DBCC commands that are used for system analysis and can even create and change Extended Event-sessions for system tracing for deeper analysis.
This capability will be rolled-out to all Azure regions that support Azure SQL and Microsoft Purview over the next few weeks.
Role definition detail
The following table lists the actions that are now part of the role definition for SQL Performance Monitor. The first four (in blue) were already part of the role and the ones that follow were recently added.
With that, we expect the SQL Performance Monitor role to cover all the typical scenarios where you need to provision access for dedicated support personnel to Azure SQL or SQL Server 2022 (Azure Arc-enabled), all from a simple, central and scalable experience.
Of course. we are always interested in which other scenarios you would like to see enabled via Microsoft Purview.
Recommended next steps
DevOps policies for Azure SQL MI (Private Preview): Clickhere to test-drive this new experience at no additional charge. Note, your Microsoft Purview account and Azure SQL MI will be allow-listed after you enroll.
DevOps policies for Azure SQL Database (GA) and SQL Server 2022 (GA):
This article is contributed. See the original author and article here.
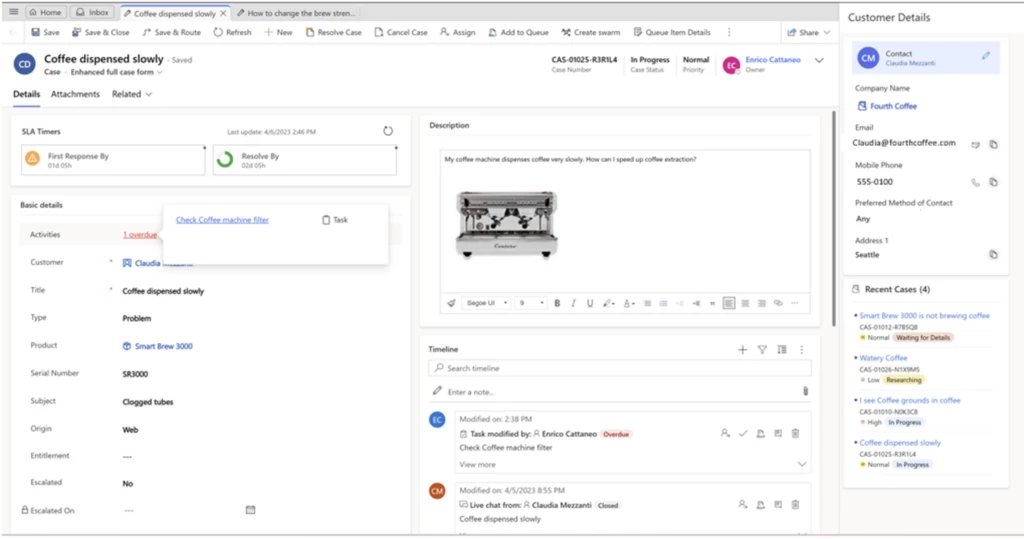
Customer service agents in a digital contact center handle multiple customer queries simultaneously and work on several support requests in a day. Often, they might spend extra time creating support cases, catching up on past activities, or performing simple case management processes. This leaves them with less time to focus on customer queries, which affects customer satisfaction. Enhanced case forms in Dynamics 365 Customer Service provide a streamlined layout to help agents expedite the case creation process and find relevant information quickly.
With enhanced case forms, agents spend less time creating a case or finding required information and more time helping customers. As a result, agents reduce case handling time, improve productivity, and drive better customer satisfaction.
To ensure agents can create cases quickly, Dynamics 365 Customer Service offers enhanced case forms. These forms allow agents to take quick notes before saving a case, add multiple attachments directly on the case, and access color coded priority and case status fields.
Enhanced quick case forms
The Enhanced quick case form in the side pane helps agents enrich the case with the relevant information, while keeping sight of the customer’s details, past cases, and previous interactions. They can verify and edit customer details without switching tabs, provide updates on existing cases without interrupting case creation flow, and avoid case duplication. Moreover, auto-filling case fields with an AI-generated conversation summary reduces agents’ manual efforts and saves time.
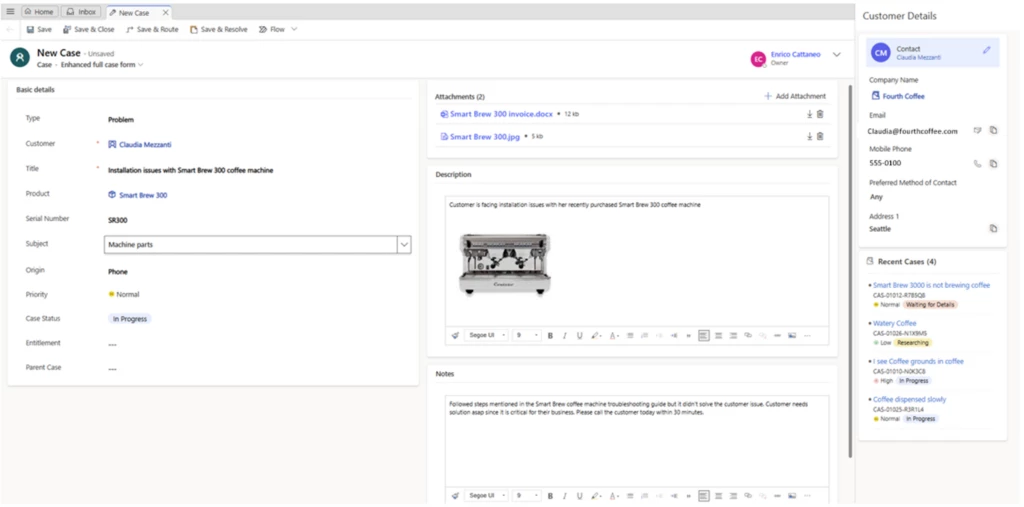
Enhanced full case forms
The Enhanced full case form offers a single-tab experience for simplified data entry while creating a case. Additionally, agents can enter formatted content on the Description field, including images and files. Agents can edit the customer details inline and view recent cases in context of the identified customer. This eliminates the need for screen navigation and reduces multiple clicks.
After saving a case, agents can use the SLA timer to identify overdue activities and take action to meet their deadlines. The SLA timer is available by default on the form. Agents can view the queue the case has been added to and modify the details with minimum clicks. Also, they can access all attachments associated with a case with the ability to preview and download them. Finally, they can access knowledge articles and similar cases linked to the case without switching tabs on the form.
Administrators can enable enhanced case forms for agents to use in the Customer Service workspace application. However, enhanced forms along with individual controls can be used in other applications using Power Apps maker portal.
This article is contributed. See the original author and article here.
Introduction
From same-day delivery to social commerce and self-service solutions, the modern-day supply chain is pushing retailers to keep pace with consumer expectations for near-instantaneous, omnichannel service. With Microsoft Dynamics 365 Intelligent Order Management, retailers can offer customers the best shipping and fulfillment options in real-time. Now, with the new Distributed Order Management (DOM) API, you can take advantage of the core capabilities of Intelligent Order Management well in advance of order orchestration in a platform-agnostic way.
What capabilities does the DOM API unlock?
Call the DOM API from any platform. Get the fulfillment source and shipping options for an order or cart items in real-time by making a call to the DOM API from any e-commerce, ERP, or marketplace platform. Configure the rules in your fulfilment optimization settings in Intelligent Order Management so that the API can search your stores and warehouses.
Get shipping rates and estimated delivery dates. The DOM API can call your shipping carrier’s APIs to get the rate and estimated delivery dates for the items in an order or cart. The API can even exclude any items eligible for free shipping when calling the APIs for shipping rates.
Use the working calendar to optimize order routing. With the introduction of the working calendar in Intelligent Order Management, you can establish working days and holidays for each of your fulfilment sources. Turn on the constraint “Respect warehouse timings” in your fulfilment optimization settings to route your orders only to the fulfilment sources that are working on the day or time of the request.
Use the carrier pickup schedule to send accurate pickup times to the carrier. With the introduction of the carrier pickup schedule in Intelligent Order Management, you can maintain up to five pickup slots for your shipping carriers. The API checks the schedule to send an accurate pickup slot to the carrier’s API to return the estimated delivery date.
Example request using the new Distributed Order Management API
Here’s an example of an API call to the FedEx API:
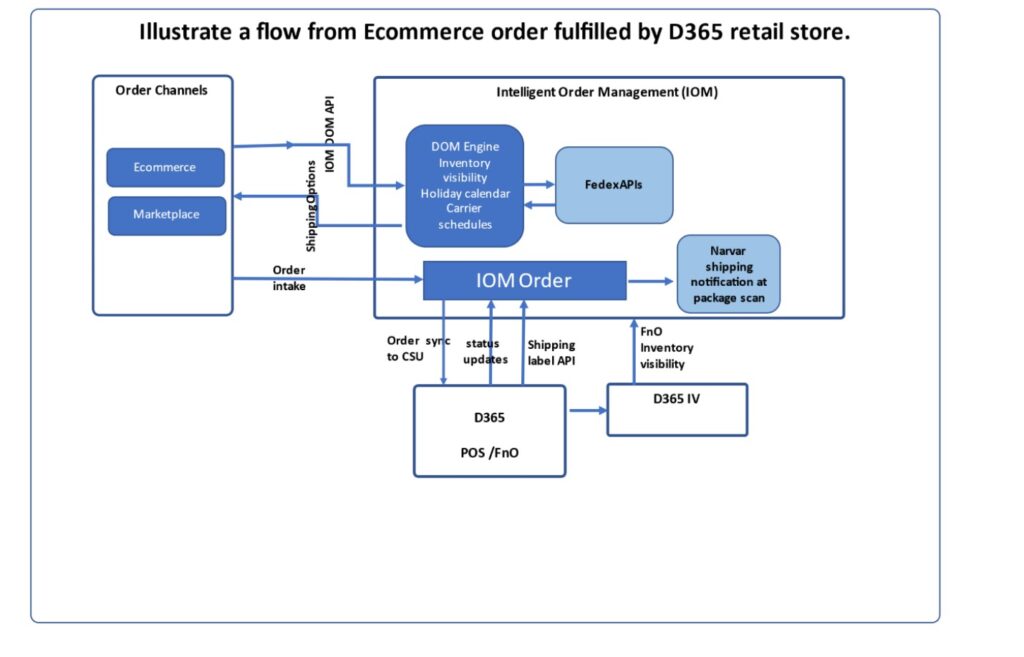
Watch Intelligent Order Management orchestrate an e-commerce order fulfilled by Dynamics 365 Commerce
Here’s a sample flow that illustrates the journey:
Call the DOM API from the e-commerce checkout flow to get shipping and fulfillment options powered by the real-time inventory visibility service and the FedEx carrier.
Create a sales order by building a custom order intake provider and orchestrate the order.
Synchronize the sales order through a custom Dynamics 365 cloud scale unit (CSU) provider.
Fulfil the sales order through Dynamics 365 point of sale.
View the order’s status through the Intelligent Order Management state framework in real-time as the retail store processes the order.
Call the shipping label API from the point of sale to print a FedEx shipping label at the store.
Trigger notifications to the customer as the order ships from the store through the Narvar provider in Intelligent Order Management.
View the last mile status of the shipment in the Intelligent Order Management fulfilment tracking entity as FedEx delivers the package.


Recent Comments