Microsoft Graph API is a superb way to leverage Microsoft 365 services as a developer. Before you start to wonder where all to get started from, this post is for you! Microsoft Graph Explorer Here’s how you can start using the Microsoft Graph API – Important Notes Here’s the official link to the Microsoft Graph … Continue reading Getting Started with Microsoft Graph API
Brought to you by Dr. Ware, Microsoft Office 365 Silver Partner, Charleston SC.
This article is contributed. See the original author and article here.
On December 14, 2023, The Ambassador Projects Demo Day was held at. The event brought together rising developers from all over the world to collaborate and create innovative solutions to real-world problems.
We would like to extend our sincerest thanks to the Gold Leads Amtaulla Bohara, Anushka Bhatnagar, Arpita Das, Hadil BenAmor, John Aziz, Mudasir Murtaza, Muhammad Samiullah, and Rohit Yadav for their hard work and dedication in putting together such an amazing event and leading this past cycle of the projects program. Without their tireless efforts, this event would not have been possible.
The winning team was Digital Digesters. Their project, YouTube Summarizer, was chosen as the winner because of its innovative approach to solving a real-world problem. YouTube Summarizer is an AI tool to transcribe YouTube videos. The judges were impressed with the team’s ability to work together and create a solution that was both practical and innovative. Congratulations to DANTON KIPKURUI, Ian Peter, Madhav Gaur, SHREYANSHI RATHI.
Other teams that participated in the Ambassadors Projects demo day included Onboarding Software, Catalyst, Data Sensei, and Inclusi-AI Vitality. Each team worked tirelessly to create innovative solutions to real-world problems. Although they did not win, their projects were impressive and showed great promise.
Onboarding software: – Build a healthy eco-community by integrating recruiting software that will aid in maintaining a diverse workforce and equip recruiters with the ability to hire talent from all over the world.
Data Sensei: – DataSensei-DBInsights is a dedicated project aimed at empowering individuals and businesses with the knowledge and skills essential for proficient database management and administration. In a world where data is a valuable asset, our mission is to provide clear and comprehensive guidance on database technologies, best practices, and real-world applications.
Team Catalyst: AI Chat Bot for The Microsoft Learn Student Ambassadors program. Powered by Chat GPT-4, Amy is not just any bot; she’s been meticulously trained with Student Ambassador Handbook. Whether you’re a new ambassador or a seasoned member, Amy is here to provide precise and insightful answers to all your MLSA (Microsoft Learn Student Ambassadors) Program-related queries.
Team Inclusi-AI-Vitality: A comprehensive mental well-being app powered by Flask, Next.js, OpenAI API, and Azure services. This project aims to provide users with a personalized mental well-being app that offers a range of features to support their emotional well-being. The app utilizes Flask as a backend framework, Next.js for a dynamic frontend, OpenAI API for natural language processing and conversational AI, and Azure services for cloud hosting and scalability.
Overall, this cycle of Ambassador Projects was a huge success. The event brought together some of the brightest minds in the industry and showcased some truly innovative solutions to real-world problems. We look forward to seeing what the future holds for these talented developers.
This article is contributed. See the original author and article here.
How to use Azure Maps to Build a Taxi Hailing Web App
Learn how simple it is to set up an Azure Maps Resource account and quickly create applications that have beautiful maps that can be used in a range of solutions. In this tutorial we are going to create a simple and fast taxi hailing Web application with only HTML, CSS and Vanilla JavaScript.
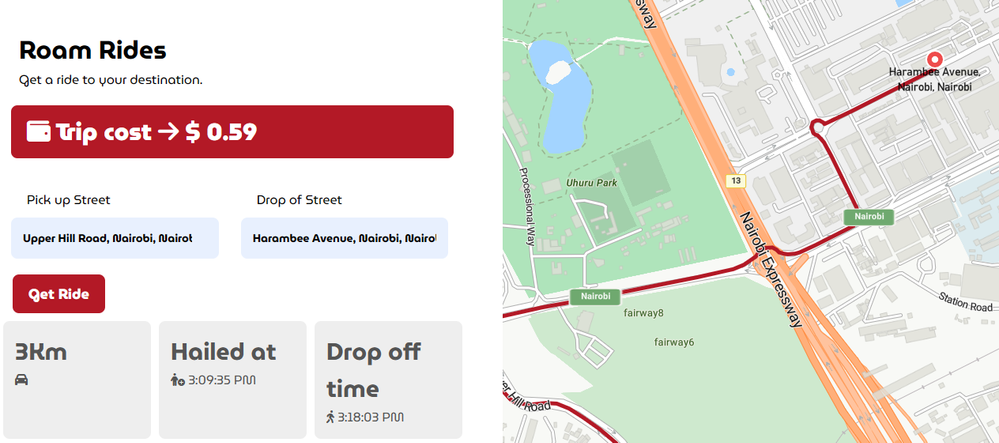
The Taxi Hailing Web Application
Roam Rides is a fictional company that wants to extend their static web application to have capability to offer route calculation and generate a price for a trip that must be made in that calculated route. In this tutorial we are going to add basic map functionalities and features using a CDN link that loads the Azure Maps SDK into our project.
In the search box, type in Azure Maps then select Azure Maps Accounts as show in the picture below.
Select +Create and in the Create an Azure Maps Account resource page create a new resource group or use a preferred resource group, enter name of the Azure Maps Resource you want to create, for example I will name the resource Roam, the name should be unique.
Click Review + Create.
After the deployment is done select Go to resource and on the left panel select Authentication and copy the Primary Key.
Build the Taxi Hailing Website and Add Azure Maps Map Control
This section introduces you to Azure Maps Map Control and gives you guidance on how you can directly use Azure Maps SDK CDN to start practicing and build an applications with Azure Maps in a fast, clean and easy way, just to get your feet wet. To show you this, we are going to build a taxi hailing app. To get all the code we are going to use for this tutorial, feel free to fork the repository azureMaps-roamrides from GitHub.
Create an index.html, index.css, map.js and index.js file.
In the index.html file add the following html code.
The html head code
Roam Rides
Notice the SDK files we have just imported into the project:
We first of all add references to the css style sheet of the map, which is a CDN link. We then add a global version of the Web SDK which is also served as a CDN.
We then add a reference for map.js as , in order for it to be loaded first.
Add the rest of the html code shown below.
Roam Rides
Get a ride to your destination.
let's go
Next let’s add some code to map.js.
The following code creates a GetMap() function that will create a map object.
let map, datasource, client;
function GetMap(){
            //Instantiate a map object
    var map = new atlas.Map('myMap', {
// Replace  with your Azure Maps subscription key. https://aka.ms/am-primaryKey
        authOptions: {
        authType: 'subscriptionKey',
        subscriptionKey: '<key in your primary subscription key here'
        }
    });
}
We then add this section to the function, this part of the code will create a data source and add map layers only when all resources are ready and have been all loaded.
//Wait until the map resources are ready.
    map.events.add('ready', function() {
    //Create a data source and add it to the map.
    datasource = new atlas.source.DataSource();
    map.sources.add(datasource);

    //Add a layer for rendering the route lines and have it render under the map labels.
    map.layers.add(new atlas.layer.LineLayer(datasource, null, {
        strokeColor: '#b31926',
        strokeWidth: 5,
        lineJoin: 'round',
        lineCap: 'round'
    }), 'labels');

    //Add a layer for rendering point data.
    map.layers.add(new atlas.layer.SymbolLayer(datasource, null, {
        iconOptions: {
            image: ['get', 'icon'],
            allowOverlap: true
    },
        textOptions: {
            textField: ['get', 'title'],
            offset: [0, 1.2]
        },
        filter: ['any', ['==', ['geometry-type'], 'Point'], ['==', ['geometry-type'], 'MultiPoint']] //Only render Point or MultiPoints in this layer.
    }));
In this other section, still under the GetMap() function, we are going to pick out the latitude and longitude from the input boxes that we have in the html document. The split method in JavaScript will be used to derive the coordinates from the input boxes. We can finally calculate the route and find necessary information.
//Create the GeoJSON objects which represent the start and end points of the route.
    //starting coordinates
    let start_lat=parseFloat(startLocation.value.split(':')[1].split(',')[0])
    let start_long=parseFloat(startLocation.value.split(':')[1].split(',')[1])
    var startPoint = new atlas.data.Feature(new atlas.data.Point([start_long,start_lat]), {

        title: `${startLocation.value.split(':')[0]}`,
        icon: "pin-red"
    });
    //destination coordinates

    let end_lat=parseFloat(endLocation.value.split(':')[1].split(',')[0])
    let end_long=parseFloat(endLocation.value.split(':')[1].split(',')[1])
    var endPoint = new atlas.data.Feature(new atlas.data.Point([end_long,end_lat]), {

        title: `${endLocation.value.split(':')[0]}`,
        icon: "pin-round-red"
    });

//Use MapControlCredential to share authentication between a map control and the service module.
    var pipeline = atlas.service.MapsURL.newPipeline(new atlas.service.MapControlCredential(map));
    //Construct the RouteURL object
    var routeURL = new atlas.service.RouteURL(pipeline);
    //Start and end point input to the routeURL
    var coordinates= [[startPoint.geometry.coordinates[0], startPoint.geometry.coordinates[1]], [endPoint.geometry.coordinates[0], endPoint.geometry.coordinates[1]]];
    //Make a search route request
    routeURL.calculateRouteDirections(atlas.service.Aborter.timeout(10000), coordinates).then((directions) => {
        //Get data features from response
        var data = directions.geojson.getFeatures();
        datasource.add(data);
    });
    });
Lastly, we add to the GetMap() function the following code. This code will create date formatter for your local region to display information on the pick up and drop off time. Finally it then appends the data and information of that route requested. How it does this? We use fetch API to get response from the Azure server that will serve us with the route calculation result. You can use Postman to test for some of these endpoints that have been shared in the code.
The following JavaScript code utilizes fetch api to suggest locations while typing into the text boxes. The getLocations() function does the job of getting this locations through the help of fetch api, that utilizes the end point specified above that returns a number of results as a response. The getLocations() function then appends these results to the data list specified as elements.
Now our last step is to open the index.html page and see if the web app works. If it works, it supposed to look like the one shown in the screenshot below.
Type in a pick up street and a drop street and observe let’s go label change to pricing.
There we have it. You have successfully helped Roam Rides to achieve their goal. Congratulations on implementing Azure Apps on a web application.
This article is contributed. See the original author and article here.
We continue to expand the Azure Marketplace ecosystem. For this volume, 164 new offers successfully met the onboarding criteria and went live. See details of the new offers below:
Get it now in our marketplace
Akamai Segmentation: Akamai Segmentation simplifies and accelerates segmentation projects, providing affordable and context-rich visibility into traffic across cloud, PaaS, on-prem, and hybrid environments. The infrastructure-agnostic tool manages policies, attaches policies to workloads, and provides an overlay segmentation solution that reduces friction and decreases convergence time.
Atlassian Migration Suite: Solidify’s Atlassian migration suite helps users easily migrate Jira issues, test data, and Confluence pages to Microsoft Azure DevOps. The migrator PRO tool allows for the migration of all issues, including attachments and comments, while maintaining issue hierarchy and links.
HumanSoft – HR Solution Built on Power Platform: HumanSoft is comprehensive HCM software for large or medium-sized organizations. It integrates with Microsoft Teams and covers the employee lifecycle from hiring to retirement. HumanSoft has a self-service portal, reporting and analytics, recruitment and onboarding/offboarding features, learning and development elements, and more.
Insight for Web Server (IWS): Insight for Web Server is a security solution that acts as a reverse proxy response scanner for HTTP/HTTPS endpoints, protecting against various types of information leakage and malicious attacks. It complements existing security systems by extending the protection profile to include protection against outgoing information leakage.
Jira Migrator Pro: This tool from Solidify streamlines the migration process from Jira to Microsoft Azure DevOps. It ensures comprehensive migration of all issues, attachments, comments, issue hierarchy, and links. The PRO version offers advantages such as custom mapping for objects and arrays, user mapping automation, and priority support. It also allows for easy configuration and workflow insights.
Kollective EdgeCache: EdgeCache is a video caching platform that streamlines bandwidth requests, groups streaming traffic to a central point, and limits concurrent connections to supercharge network efficiencies. It requires no additional hardware, and it can handle requests behind a firewall, enable backhaul network setups, and simplify tunneled remote worker scenarios.
RidgeBot: RidgeBot enables enterprises, governments, web app teams, and others to affordably and efficiently test their systems. The system automates the penetration testing process and emulates adversary attacks to validate an organization’s cybersecurity posture. RidgeBot provides a clearer picture of security gaps, which lets security experts devote more energy to research.
Go further with workshops, proofs of concept, and implementations
AI Leadership/Learn GPT: 2-Day Workshop: ACP’s workshop offers two phases of keynote speeches, knowledge transfer, and interactive elements. It aims to provide solutions to technical challenges and potential in your existing specialist areas, with a focus on the use of Microsoft Azure OpenAI Service for generative AI. The workshop also covers cost estimates, content transfer, and workflow creation.
AI Use Case Workshop (Generative AI/Microsoft 365 Copilot): This workshop from KPCS identifies opportunities for implementing generative AI in businesses. The solution proposal involves using AI services such as Microsoft 365 Copilot for enhancing productivity, Azure Cognitive Services for building intelligent apps, and other Microsoft AI services that align with business requirements.
Azure Cost Optimization: Intellias will identify areas of overspending and potential cost-saving opportunities for cloud-based systems. Intellias will assess Azure deployments, implement Azure Monitor and Azure Advisor, and prepare an optimization proposal based on cost-benefit analysis. You can expect reduced cloud computing platform bills, improved profitability and observability, optimized resource utilization, and enhanced performance.
Azure Networking: NW Computing will implement two Meraki vMX virtual appliances to extend your SD-WAN to Microsoft Azure in availability zones for redundancy and high availability. Azure Functions will be set up for automatic failover and updating of user-defined routes. Best-practice Azure security and management will be implemented.
Azure Virtual Desktop Basic Implementation: Chalkline will set up and manage Azure Virtual Desktop so your business can access desktops and applications from anywhere, with robust security and cost-efficient infrastructure. Start with a discovery call to ask questions and learn about Chalkline’s approach toward providing fully managed solutions.
Azure Virtual Desktop Proof of Concept: Chalkline will set up and manage Azure Virtual Desktop so your business can access desktops and applications from anywhere, with robust security and cost-efficient infrastructure. This proof of concept includes a discovery call, migration and modernization, a testing session, a review session, and a Q&A.
Azure Virtual Desktop Workshop for SMB: Chalkline will set up and manage Azure Virtual Desktop so your business can access desktops and applications from anywhere, with robust security and cost-efficient infrastructure. This workshop covers Azure Virtual Desktop basics, exploring benefits, security, cost optimization, customization, and migration.
BI4ALL Databricks Lakehouse Test Automation: 8-Day Implementation: This test framework from BI4ALL is designed for Microsoft Azure Databricks and detects errors and anomalies. The framework promotes transparency in data quality processes, fostering a culture of continuous improvement. It empowers data professionals to fortify the foundation of their analytical solutions and enhances the quality and reliability of data-driven endeavors.
CAF Workshop: The Microsoft Cloud Adoption Framework provides a set of practices and recommended steps to successfully adopt the cloud. Sii will use CAF to guide your business through strategy, planning, readiness, adoption, and secure governance and management. Topics include defining motivations, creating a cloud adoption plan, migrating to Microsoft Azure, and implementing best practices for security and compliance.
Cloud-Native AI-Infused Application Design: 2-Day Workshop: Reply offers AI-integrated applications for businesses to redesign customer experience, enable intelligent manufacturing processes, and improve knowledge management. Reply uses OpenAI services on Microsoft Azure and provides support from vision to product-ready implementation. This workshop will involve developing a common vision, analyzing use cases, and creating a detailed road map.
Community Training – Platform Support: Wipfli offers a platform for organizations to provide digital skills training across large regions. Wipfli contributes ongoing support for adoption and customer success, which includes answering functionality questions, coordinating with a Microsoft support team, and offering technology guidance.
Customer Service Gen AI Bot – 4 Week Implementation: Generative AI has revolutionized customer service by providing swift, accurate responses to inquiries, streamlining communication, and freeing up human agents for more complex tasks. Decision Inc. will implement a Customer Service Automation Bot for improved customer experiences, increased efficiency, and strengthened relationships.
Data Foundation Advisory Services: SoftwareOne offers enterprises a suite of services to establish, standardize, and optimize data infrastructure. This engagement includes envisioning, discovery, and adoption of required changes based on priorities from the discovery phase. Workshops and knowledge transfer sessions will be included.
Data Governance with Purview: Inetum offers a complete data governance solution based on Microsoft Purview. Its consultancy teams help organizations build data trust through collaborative data quality, offering consulting, coaching, data architecture, and deployment services. The approach combines tools to design and deploy governance with the efficiency provided by Microsoft Purview, saving time and improving business efficiency.
Demand Forecasting Accelerator: 8-Week Proof of Concept: LTIMindtree’s Demand Forecasting Accelerator uses machine learning models to predict future demand at a distributor SKU level, enabling better product planning and coordination in the supply chain. The solution identifies the best machine learning model for different product categories and logs different metrics for better tracking.
Demand Forecasting: 10-Week Implementation: Tiger’s forecasting solution on Microsoft Azure improves forecast accuracy, reduces inventory stockouts, controls sourcing and manufacturing, and facilitates labor planning. The solution can be scaled across categories and markets quickly and seamlessly. Key deliverables include harmonized data, finalized modeling dataset, and model documentation.
Gen AI ISO27001 Policy Bot: 4 Week Implementation: The ISO 27001 Policy Bot from Decision Inc. streamlines access to information, enhances productivity, and promotes a self-service culture. It ensures compliance and aligns employees with organizational goals, while also facilitating continuous learning.
Gen AI-Powered Strategy and Lateral Thinking Workshop: Brainstorm, a tool from Slalom, combines Microsoft Azure OpenAI and Slalom’s facilitation frameworks to generate 40 percent more ideas during client workshops. Kick-start innovation conversations and enable teams to continue ideating after this workshop session from Slalom, maintaining access to all ideas using Azure data storage solutions.
HCLTech’s PDOC Application Migration and Modernization Services: HCLTech helps enterprises move and update their legacy applications to modern cloud-native platforms and architectures. This service covers the entire lifecycle of cloud transformation, from assessment to optimization, and includes cloud re-platforming, re-architecting, re-engineering, and DevOps services.
HCLTech’s PDOC Data Modernization and Migration Services: HCLTech offers data modernization and migration services to help enterprises improve and maximize their data assets. This comprehensive approach covers the entire data lifecycle, from discovery to governance, and includes prebuilt tools and a flexible, scalable solution.
IBM Consulting Global Hybrid Retail (HC4R) – Store: IBM Hybrid Cloud for Retail is an integrated suite of assets that helps retailers create a unified store operating platform. It features AI-driven workflows, modern user experiences, and next-gen performance insights. The modular solution works alongside existing technology to deliver seamless omnichannel experiences, empowering associates and optimizing operations.
Infinity LAMPS: 4-Week Implementation: LAMPS is a platform for automating the migration of SAP workloads to Microsoft Azure. LTIMindtree’s deployment process involves setting up a secure Azure subscription, identifying use cases, creating process flow models, building workflows, and conducting end-user testing. Deliverables include deployment, automation of three workflows, validation, and a road map for automation.
LTIMindtree Assessment and Proof of Concept for Azure VMware Solution: LTIMindtree offers end-to-end migration solutions for on-premises infrastructure to Microsoft Azure using Microsoft Azure VMWare Solution. This offer includes assessment, design, migration, validation, management, and operation of client infrastructure.
LTIMindtree KenAI: 6-Week Proof of Concept: LTIMindtree KenAI is an integrated automation framework that helps accelerate MLOps on Microsoft Azure. It standardizes and streamlines the AI/ML journey by leveraging built-in components to operationalize models with speed and scalability. KenAI provides observability across models, insights around drift management, ground truth evaluation, and model explanations.
LTIMindtree REDAR Consulting: LTIMindtree REDAR is an AI-driven solution suite that helps manage product portfolios in e-commerce marketplaces. It provides actionable recommendations on pricing, new product opportunities, and promotional strategies. The suite is powered by Microsoft Azure and offers smarter and faster insights to decode market demand for a sustainable product portfolio.
Money in Motion: 6-Week Proof of Concept: Money in Motion, an AI/ML-driven data monetization solution using Microsoft Azure, helps banks tap into the immense value inherent in their payment transactions data, grow their customer base, and deepen product penetration. The solution from LTIMindtree also offers low-cost and sustainable funds, data-driven insights, and hyper-personalized recommendations.
Proof of Concept SAP on Azure Migration: Vnomic automates and engineers SAP landscape deployment and management on Microsoft Azure, reducing costs and time to value from months to hours. It meets SAP and Azure best practices, improves IT staff productivity, and accelerates cloud migration projects. The solution also optimizes infrastructure utilization.
SUSE Rancher Enterprise Kubernetes Management Platform: 3-Week Implementation: SUSE Rancher is an open-source enterprise computing platform for running Kubernetes clusters on-premises, in the cloud, and at the edge. This offer from Frontier Digital lets organizations operate Kubernetes with a NeuVector zero-trust container security platform for safeguarding cloud-native applications.
SUSE Rancher Enterprise Kubernetes Management Platform: 1-Week Proof of Concept: SUSE Rancher is an open-source enterprise computing platform for running Kubernetes clusters on-premises, in the cloud, and at the edge. Frontier Digital offers a code-first proof of concept that includes a NeuVector zero-trust container security platform.
This article is contributed. See the original author and article here.
Introduction
Migrating a full-stack application can be an intricate job, even if you are using the same technologies on different clouds. Some things need to be done in order to have a fully functional application. If both platforms support the programming language and version, then that’s one thing to put aside and start working on figuring out how to connect the database. Databases differ in the language they speak. You can use a universal dialect like SQLAlchemy that facilitates communication with multiple databases like MySQL. The last problem is to provide the application with the credentials it needs in a way it understands to establish a connection. Once you are done and the database is up and running. Here, comes the part where you look for a tool to import your data. Luckily, mysql CLI provides a command that you can use to import your data.
In this blog, you will go through a step-by-step guide, from preparing your Full-stack web application to be deployed to Azure and exporting your data from Google Cloud SQL to deploying your application to Azure App Service, migrating your MySQL database to Azure Databases for MySQL and connecting it to your application.
We have got you covered whether you already have a full-stack application working on Google or looking to bring your first full-stack application to the Internet. You’ll learn everything you need to do to deploy your website to Microsoft Azure.
What will you learn?
In this blog, you’ll learn to:
Export a database from Google Cloud SQL to Cloud Storage and save it locally.
Create an Azure Web App to host your application and a MySQL database to store your data.
Fork a GitHub repository and configure continuous deployment from GitHub to Azure App service.
Modify the application environment variables to bind the app with the database.
Import data to MySQL database using mysql CLI inside Azure App service SSH session.
What is the main objective?
Migrating a Full stack application from Google Cloud to Microsoft Azure including a Python web app and MySQL database.
Prerequisites
An Azure subscription.
If you don’t already have one, you can sign up for anAzure free account.
For students, you can use the freeAzure for Students offerwhich doesn’t require a credit card only your school email.
Step 2: Create an Azure Web App and a MySQL Database.
Step 3: Fork the Code and Configure Azure App Service Deployment.
Step 4: Configure Azure App Service with your Relational Database.
Step 5: Import your Data into Azure MySQL using Azure App Service.
Step 1: Export your Data from Google Cloud SQL
Google Cloud SQL provides you with the ability to export your database as a SQL dump file which can be used to recreate the whole database with all its tables and data anywhere you want.
In this step,you export your data from Cloud SQL to have a potable and reusable copy from your entire database.
Complete the following steps to export your data from Cloud SQL in Google Cloud:
2. Type cloud sql in the search bar at the top of the console page and select SQL from the options that appear.
3. Select the Instance ID of the Cloud SQL instances that you want to export.
4. Select Export from the top navigation menu to export your database.
5. Perform the following tasks to export data to Cloud Storage:
What
Value
File format
Select SQL.
Data to export
Select the name of the database that has your tables and data.
Destination
Select Browse to choose a cloud storage bucket. Currently, the only supported destination is Google Cloud Storage
6. Select the + icon to create a new bucket.
7. Enter a globally unique name for your bucket followed by selecting CREATE. Leave all the other options to the default values as you will delete this bucket later.
8. Select CONFIRM to proceed with the creation process. This prompt asks if you want to make the bucket open for public access or private, private will work for you.
9. Select the SELECT button to select the newly created bucket to save your data inside.
10. Select EXPORT to confirm your selection and initiate the data export process.
11. Select the name of the file from the notification pane at the bottom right of the screen to redirect you to the storage bucket that has the exported file.
12. Select the DOWNLOAD button to download the data locally to your device.
13. Select DELETE to delete the bucket after the download finishes as you no longer need it.
Congratulations! You successfully exported your database from Google Cloud SQL. The application source code is available on GitHub so, there is no need to do anything from the Application side. In the next step, you’ll create an Azure Web App and a MySQL database.
If you don’t have a database on Google Cloud and want to follow along you can use my data export file Cloud_SQL_Export_2023-10-15 (22_09_32).sql from john0isaac/flask-webapp-mysql-db . (github.com).
If you don’t have a database on Google Cloud and want to follow along you can use my data export file Cloud_SQL_Export_2023-10-15 (22_09_32).sql from john0isaac/flask-webapp-mysql-db . (github.com).
Step 2: Create an Azure Web App and a MySQL Database
Azure App Service is an HTTP-based service for hosting web applications, REST APIs, and mobile back ends. You can develop in your favorite language, be it .NET, .NET Core, Java, Node.js, PHP, and Python. Applications run and scale with ease on both Windows and Linux-based environments.
In this step, you create an Azure App service to host your Python application and a MySQL database to store the migrated data.
Complete the following steps to create an Azure Web App and a MySQL database in the Azure portal:
2. Type app services in the search bar at the top of the portal page and select App Service from the options that appear.
3. Select Create from the navigation menu followed by selecting Web App + Database.
4. Perform the following tasks:
In the Project Details section,
What
Value
Subscription
Select your preferred subscription.
Resource group
Select the Create new under (New) Resource group to create a new resource group to store your resources. Enter a unique name for the resource group followed by selecting OK.
Region
Select a region close to you for best response times.
In the Web App Details section,
What
Value
Name
Enter a unique name for your applications. This is the same subdomain for your deployed website.
Runtime stack
Select Python 3.8.
In the Database, Azure Cache for Redis, and Hosting sections,
What
Value
Engine
Select MySQL – Flexible Server.
Server name
Enter a unique name for your server. This is the place that will host your different database instances
Database name
Enter a unique name for your database. This is the instance that will store your tables and data
Add Azure Cache for Redis?
Select No. Azure Cache for Redis is a high-performance caching service that provides in-memory data store for faster retrieval of data but will incur more charges to your account.
Hosting Plan
Select Basic. You can scale it up later the difference between the two plans is their different capabilities and the cost per service you are receiving.
5. Select Review + create.
6. Save the Database details in a safe place as you need them to connect to your database. This is the only time that you have access to the database password.
7. Select Create to initiate the deployment process.
8. After the deployment finishes, selectGo to resourceto inspect your created resource. Here, you can manage your resource and find important information like the Deployment center and configuration settings for your website.
Congratulations! You successfully created a web application and a database with a single button this enables you to deploy your code and migrate your data later to them as the website and database are initially empty. In the next step, you will get the website code and deploy it to Azure App service.
Step 3: Fork the Code and Configure Azure App Service Deployment
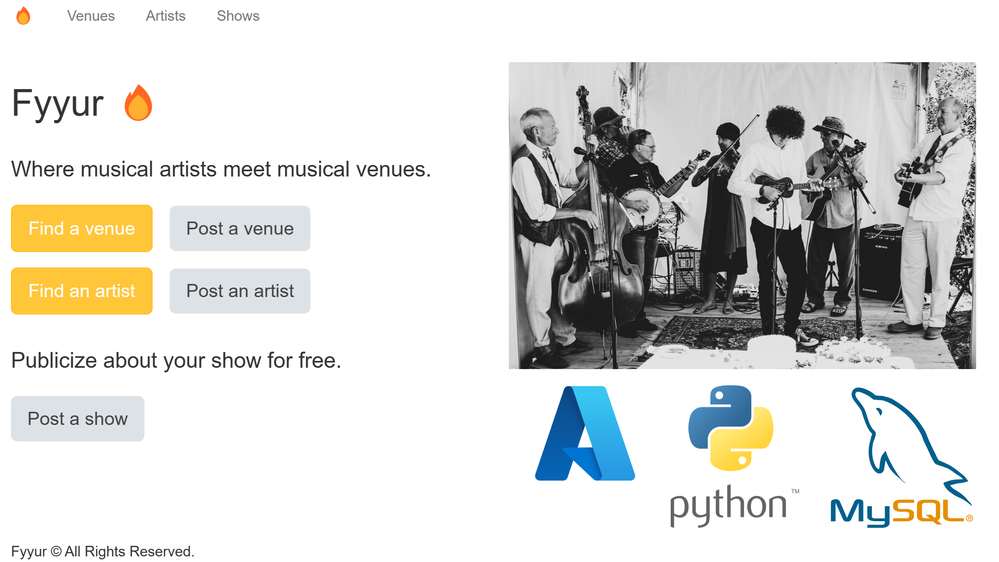
The sample code you are using is an Artists Booking Venues Web Application powered by Python (Flask) and MySQL Database.
In this step, you’ll:
Fork a GitHub repository on GitHub.
Configure continuous deployment from the Deployment center on Microsoft Azure.
2. Select Fork to create a copy from the source code to your own GitHub account.
3. Navigate back to your newly created deployment on Microsoft Azure. Select Deployment Center.
4. To link your GitHub repository with the Web App, Perform the following tasks:
What
Value
Source
Select GitHub.
Signed in as
Select your preferred Account.
Organization
Select your Organization. This is your GitHub username if you haven’t forked the repository to an organization.
Repository
Select the name of the forked repository flask-webapp-mysql-db.
Branch
Select main.
5. Select Save to confirm your selections.
6. Wait for the deployment to finish. You can view the GitHub Actions deployment logs by selecting the Build/Deploy Logs.
7. Once the deployment is successful, select the website URL from the deploy job to view the live website.
Congratulations! You successfully deployed a website to Azure App Service and as you can see the website works as expected.
But if you try to navigate to any page that needs to make a call to the database you get the following error.
Let’s go ahead and solve this error by configuring the database.
Step 4: Configure Azure App Service with your Relational Database
This web application uses SQLAlchemy ORM (Object Relational Mapping) capabilities to map Python classes defined in models.pyto database tables.
It also handles the initialization of a connection to the database and uses the create_all() function to initiate the table creation process.
But how do you trigger this function to make all of that happen?
If you navigate to the beginning of the app.py you will find that in order for the application to call the setup_db() function it needs an environment variable called DEPLOYMENT_LOCATION.
You may wonder, why are we using this? The answer is quite simple, different deployment locations require different database configurations.
Feel free to check out the difference in the environmentfolder.
Let’s go ahead and define this environment variable to start the database creation process.
1. Navigate back to your web app on Azure and select Configuration from the left side panel under the Settings label.
2. From the Configuration window, select + New application setting to add a new environment variable.
3. Add the following name and value in the input text fields followed by selecting Ok.
Name
Value
DEPLOYMENT_LOCATION
azure
4. Confirm that DEPLOYMENT_LOCATION is in the list of Application settings then, select Save followed by selecting Continue.
5. Wait a couple of seconds then, refresh the website to see the update.
Congratulations! It works but wait a minute… Where is the data? Everything is blank! You haven’t imported the database yet but now the website is connected to the database and the tables have been created, which means that you can insert new data from the website, update, and delete it but you don’t have access to the old data yet. In the next step, you will work on importing your data using the SSH feature from Azure App service.
Step 5: Import your Data into Azure MySQL using Azure App Service
This application and database are deployed to a virtual network so, you can’t access them unless you use a virtual machine deployed to the same virtual network and that’s why you are going to make use of the SSH feature in your web app to access the database through the web app and import your data.
To import the data you need a database dump or a .SQL file uploaded to your GitHub repository. If you don’t have that you can use my database export from the repository that you forked from here.
To import the data you need a database dump or a .SQL file uploaded to your GitHub repository. If you don’t have that you can use my database export from the repository that you forked from here.
Let’s go ahead and SSH into the website.
1. Navigate back to your web app and select SSH from the left side panel under the Developer Tools label.
2. Select Go -> to open the SSH session in a new window.
Inside the ssh session, perform the following tasks:
3. Execute this command to update the installed packages.
apt-get update
4. Execute this commandto install mysql as it doesn’t come preinstalled. If prompted Do you want to continue? type y and press Enter.
apt-get install default-mysql-server
5. Execute this command to import your .SQL file data to the MySQL database. The file referred to in this command was uploaded with the website data from GitHub.
mysql –host=$AZURE_MYSQL_HOST –user=$AZURE_MYSQL_USER –password=$AZURE_MYSQL_PASSWORD $AZURE_MYSQL_NAME<'Cloud_SQL_Export_2023-10-15 (22_09_32).sql' –ssl
Note that I had to clean up the exported SQL from Google Cloud a little bit but I didn’t add anything to it I just removed the unnecessary to avoid errors in the ssh session.
6. Navigate back to the website, refresh any page and you’ll find all the data there.
Congratulations!!! you have come a long way taking the data and web application from Google Cloud to Microsoft Azure through all the steps in this blog.
Clean Up
You can now safely delete the Google Cloud SQL database and disable your App Engine or even delete the whole project.
Once you finish experimenting on Microsoft Azure you might want to delete the resources to not consume any more money from your subscription.
You can delete the resource group and it will delete everything inside it or delete the resources one by one that’s totally up to you.
Conclusion
Congratulations, you have learned and applied all the concepts behind taking an existing Python web application and a MySQL database and migrating them to Microsoft Azure.
This gives you the ability to build your own web applications on Azure and explore other databases like Azure Cosmos DB or Azure Databases for PostgreSQL as you will find that at the end you just need a connection string to connect with a different database and a dialect to translate your code to a language that the database understands. You have also learned that you can deploy your website to Microsoft Azure by selecting your website’s programming language, no extra configuration is needed or creation of any file.


Recent Comments