
by Contributed | Oct 31, 2023 | Dynamics 365, Microsoft 365, Technology
This article is contributed. See the original author and article here.
Efficiently managing a contact center requires a fine balance between workforce engagement and customer satisfaction. The ability to create agent-specific capacity profiles in Dynamics 365 Customer Service empowers administrators and supervisors to fine-tune the work allocation based on an agent’s experience and expertise, optimizing agent performance and delivering tailored customer service.
Understand capacity profiles
Capacity profiles are at the core of Dynamics 365 Customer Service, defining the type and amount of work agents can handle, ensuring equitable work distribution. Profiles are even more beneficial when agents are blended across various channels. Agent-specific capacity profiles take this a step further, enabling customized work limits for individual agents based on their proficiency. Let’s explore this capability with an example.
A real-world scenario: Casey’s challenge
Meet Casey, a Customer Service administrator at Contoso Bank who aims to maximize the efficiency of her customer service team. She wants senior agents to handle more responsibilities, giving junior agents the time to focus on training and skill development.
Casey decides to use agent-specific capacity profiles for credit card inquiries in the North America region. She sets up a “Credit Card NAM” profile with a default limit of two concurrent conversations. She assigns it to Kiana, a seasoned agent, and Henry, a junior agent who recently joined Contoso.
Customize capacity limits
Casey recognizes that Kiana’s seniority and expertise warrant a different limit. With agent-specific capacity profiles, she can easily update Kiana’s limit to handle three conversations at a time. The immediate benefit of this approach is apparent. This balance allows junior agents like Henry to invest more time in training and development while experienced agents like Kiana manage a higher workload efficiently.
Flexibility in action
In the dynamic world of customer service, circumstances can change rapidly. Contoso Bank faces an unexpected surge in insurance-related queries. Casey needs to adapt to this evolving scenario promptly and this is where agent-specific capacity profiles truly shine.
Casey has Kiana take on the additional insurance queries alongside her credit card queries. She assigns the “Insurance” profile to Kiana. She also resets Kiana’s work limit for the “Credit Card NAM” profile back to the default amount, providing her the bandwidth to handle the increased workload efficiently.
The result: Optimal efficiency
This example showcases the flexibility and real-time adaptability that agent-specific capacity profiles offer. Casey is empowered to make agile and precise work distribution decisions, ensuring that agents’ expertise and experience are utilized optimally.
Conclusion
In the world of customer service, where every interaction matters, this feature is a game-changer. It helps organizations reduce agent stress, elevate customer satisfaction, and offer a flexible solution for modern customer service management. By embracing this feature, businesses can ensure that their customer service is optimized for excellence, regardless of changing circumstances.
Learn more about capacity profiles
Watch a short video introduction.
To learn more, read the documentation: Create and manage capacity profiles
The post Enhance agent efficiency and flexible work distribution with capacity profiles appeared first on Microsoft Dynamics 365 Blog.
Brought to you by Dr. Ware, Microsoft Office 365 Silver Partner, Charleston SC.

by Contributed | Oct 31, 2023 | Technology
This article is contributed. See the original author and article here.
Creating and deploying Docker containers to Azure resources manually can be a complicated and time-consuming process. This tutorial outlines a graceful process for developing and deploying a Linux Docker container on your Windows PC, making it easy to deploy to Azure resources.
This tutorial emphasizes using the user interface to complete most of the steps, making the process more reliable and understandable. While there are a few steps that require the use of command lines, the majority of tasks can be completed using the UI. This focus on the UI is what makes the process graceful and user-friendly.
In this tutorial, we will use a Python Flask application as an example, but the steps should be similar for other languages such as Node.js.
Prerequisites:
Before you begin, you’ll need to have the following prerequisites set up:
WSL provides a great way to develop your Linux application on a Windows machine, without worrying about compatibility issues when running in a Linux environment. We recommend installing WSL 2 as it has better support with Docker. To install WSL 2, open PowerShell or Windows Command Prompt in administrator mode, enter below command:
wsl –install
And then restart your machine.
You’ll also need to install the WSL extension in your Visual Studio Code.
Run “wsl” in your command prompt. Then run following commands to install python 3.10 (if you use Python 3.5 or a lower version, you may need to install venv by yourself):
sudo apt-get update

sudo apt-get upgrade

sudo apt install python3.10
You’ll need to install Docker in your Linux environment. For Ubuntu, please refer to below official documentation:
https://docs.docker.com/engine/install/ubuntu/
To create an image for your application in WSL, you’ll need Docker Desktop for Windows. Download the installer from below Docker website and run the downloaded file to install it.
https://www.docker.com/products/docker-desktop/
Steps for Developing and Deployment
1. Connect Visual Studio Code to WSL
To develop your project in Visual Studio Code in WSL, you need to click the bottom left blue button:

Then select “Connect to WSL” or “Connect to WSL using Distro”:

2. Install some extensions for Visual Studio Code
Below two extensions have to be installed after you connect Visual Studio Code to WSL.
The Docker extension can help you create Dockerfile automatically and highlight the syntax of Dockerfile. Please search and install via Visual Studio Code Extension.

To deploy your container to Azure in Visual Studio Code, you also need to have Azure Tools installed.

3. Create your project folder
Click “Terminal” in menu, and click “New Terminal”:

Then you should see a terminal for your WSL.
I use a quick simple Flask application here for example, so I run below command to clone its git project:
git clone https://github.com/Azure-Samples/msdocs-python-flask-webapp-quickstart
4. Python Environment setup (optional)
After you install Python 3 and create project folder. It is recommended to create your own project python environment. It makes your runtime and modules easy to be managed.
To setup your Python Environment in your project, you need to run below commands in the terminal:
cd msdocs-python-flask-webapp-quickstart

python3 -m venv .venv
Then after you open the folder, you will be able to see some folders are created in your project:

Then if you open the app.py file, you can see it used the newly created python environment as your python environment:

If you open a new terminal, you also find the prompt shows that you are now in new python environment as well:

Then run below command to install the modules required in the requirement.txt:
pip install -r requirements.txt
5. Generate a Dockerfile for your application
To create a docker image, you need to have a Dockerfile for your application.
You can use Docker extension to create the Dockerfile for you automatically. To do this, enter ctrl+shift+P and search “Dockerfile” in your Visual Studio Code. Then select “Docker: Add Docker Files to Workspace”

You will be required to select your programming languages and framework(It also supports other language such as node.js, java, node). I select “Python Flask”.
Firstly, you will be asked to select the entry point file. I select app.py for my project.
Secondly, you will be asked the port your application listens on. I select 80.
Finally, you will be asked if Docker Compose file is included. I select no as it is not multi-container.
A Dockefile like below is generated:

Note:
If you do not have requirements.txt file in the project, the Docker extension will create one for you. However, it DOES NOT contain all the modules you installed for this project. Therefore, it is recommended to have the requirements.txt file before you create the Dockerfile. You can run below command in the terminal to create the requirements.txt file:
pip freeze > requirements.txt
After the file is generated, please add “gunicorn” in the requirements.txt if there is no “gunicorn” as the Dockerfile use it to launch your application for Flask application.
Please review the Dockerfile it generated and see if there is anything need to modify.
You will also find there is a .dockerignore file is generated too. It contains the file and the folder to be excluded from the image. Please also check it too see if it meets your requirement.
6. Build the Docker Image
You can use the Docker command line to build image. However, you can also right-click anywhere in the Dockefile and select build image to build the image:

Please make sure that you have Docker Desktop running in your Windows.
Then you should be able to see the docker image with the name of the project and tag as “latest” in the Docker extension.

7. Push the Image to Azure Container Registry
Click “Run” for the Docker image you created and check if it works as you expected.

Then, you can push it to the Azure Container Registry (ACR). Click “Push” and select “Azure”.

You may need to create a new registry if there isn’t one. Answer the questions that Visual Studio Code asks you, such as subscription and ACR name, and then push the image to the ACR.
8. Deploy the image to Azure Resources
Follow the instructions in the following documents to deploy the image to the corresponding Azure resource:
Azure App Service or Azure Container App: Deploy a containerized app to Azure (visualstudio.com) Opens in new window or tab
Container Instance: Deploy container image from Azure Container Registry using a service principal – Azure Container Instances | Microsoft Learn Opens in new window or tab
by Contributed | Oct 30, 2023 | Technology
This article is contributed. See the original author and article here.
In this technical article, we will delve into an interesting case where a customer encountered problems related to isolation levels in Azure SQL Managed Instance. Isolation levels play a crucial role in managing the concurrency of database transactions and ensuring data consistency. We will start by explaining isolation levels and providing examples of their usage. Then, we will summarize and describe the customer’s problem in detail. Finally, we will go through the analysis of the issue.
Isolation Level
Isolation level is a property of a transaction that determines how data is accessed and modified by concurrent transactions. Different isolation levels provide different guarantees about the consistency and concurrency of the data. SQL Server and Azure SQL Managed Instance support five isolation levels: read uncommitted, read committed, repeatable read, snapshot, and serializable. The default isolation level for both platforms is read committed.
Read uncommitted allows a transaction to read data that has been modified by another transaction but not yet committed. This can lead to dirty reads, non-repeatable reads, and phantom reads. Read committed prevents dirty reads by only allowing a transaction to read data that has been committed by another transaction. However, it does not prevent non-repeatable reads or phantom reads. Repeatable read prevents non-repeatable reads by locking the data that has been read by a transaction until the transaction ends. However, it does not prevent phantom reads. Snapshot prevents both non-repeatable reads and phantom reads by using row versioning to provide a consistent view of the data as it existed at the start of the transaction. Serializable prevents all concurrency anomalies by locking the entire range of data that is affected by a transaction until the transaction ends.
The isolation level can be set for each connection using the SET TRANSACTION ISOLATION LEVEL statement or using the IsolationLevel property of the .NET TransactionScope class. The isolation level can also be overridden for individual statements using table hints such as (NOLOCK) or (READCOMMITTED).
Problem Description
The customer reported that they observed unexpected transaction isolation level changes when running distributed transactions using .NET Transaction Scope on Azure SQL Managed Instance, while the same application was behaving differently when using On premise SQL Server.
The customer was opening two connections to the same database under one transaction scope, one at a time, and they observed the transaction isolation level got reset after the second connection had been opened. For example, if they set the isolation level to repeatable read for the first connection, it would be changed to read committed for the second connection. This caused inconsistency and concurrency issues in their application.
The following code snippet illustrates the scenario:
TransactionOptions transactionOptions = new TransactionOptions
{
                IsolationLevel = System.Transactions.IsolationLevel.ReadUncommitted
};

string connectionStr = "Data Source=testwest.com;Initial Catalog=test;User id=sa;Password=;Connection Timeout=0";

using (TransactionScope ts = new TransactionScope(TransactionScopeOption.Required, transactionOptions))
{
                using (SqlConnection connection1 = new SqlConnection(connectionStr))
                {
                                SqlCommand cmd = new SqlCommand("SELECT transaction_isolation_level FROM sys.dm_exec_sessions where session_id = @@SPID", connection1);
                                connection1.Open();
                                SqlDataReader rs = cmd.ExecuteReader();
                                rs.Read();
                                Console.WriteLine(rs.GetInt16(0));
                                connection1.Close();
                }

                using (SqlConnection connection2 = new SqlConnection(connectionStr))
                {
                                SqlCommand cmd = new SqlCommand("SELECT transaction_isolation_level FROM sys.dm_exec_sessions where session_id = @@SPID", connection2);
                                connection2.Open();
                                SqlDataReader rs = cmd.ExecuteReader();
                                rs.Read();
                                Console.WriteLine(rs.GetInt16(0));
                                connection2.Close();
                }

                ts.Complete();
}
The customer stated that they are not using the “Pooling” parameter in their connection string, which means that connection pooling is enabled by default.
Problem Analysis
We investigated the issue and found that the root cause was related to how connection reset works on Azure SQL Managed Instance and cloud in general, compared to On-premise SQL Server.
Connection reset is a mechanism that restores the connection state to its default values before reusing it from the connection pool. Connection reset can be triggered by various events, such as closing the connection, opening a new connection with a different database name or user ID, or executing sp_reset_connection stored procedure.
One of the connection state attributes that is affected by connection reset is the transaction isolation level. Resetting the connection on Azure SQL Managed Instance will always reset the transaction isolation level to the default one, which is read committed. This is not true for on-premise SQL Server, where resetting the connection will preserve the transaction isolation level that was set by the application.
This difference in behavior is due to how Azure SQL Managed Instance implements distributed transactions using MSDTC (Microsoft Distributed Transaction Coordinator). MSDTC requires that all connections participating in a distributed transaction have the same transaction isolation level. To ensure this requirement, Azure SQL Managed Instance resets the transaction isolation level to read committed for every connection that joins a distributed transaction.
Since the customer is opening and closing the connection to the same database twice, only one physical connection will be created. The driver will use the same connection for both query executions, but the connection will be reset before being reused. The first connection reset will happen when the first connection is closed, and the second connection reset will happen when the second connection is opened under the same transaction scope. The second connection reset will override the isolation level that was set by the application for the first connection.
This explains why the customer observed unexpected transaction isolation level changes when running distributed transactions using .NET Transaction Scope on Azure SQL Managed Instance.
Conclusion
First and foremost, it is beneficial to emphasize that this is an expected behavior from a design perspective. The customer is advised to either disable connection pooling or explicitly set the transaction isolation level for every opened connection.
To disable connection pooling, they can add “Pooling=false” to their connection string. This will create a new physical connection for every logical connection, and avoid the connection reset issue. However, this will also increase the overhead of opening and closing connections, and reduce the scalability and performance of the application.
To explicitly set the transaction isolation level for every opened connection, they can use the SET TRANSACTION ISOLATION LEVEL statement or the IsolationLevel property of the .NET TransactionScope class. This will ensure that the isolation level is consistent across all connections participating in a distributed transaction, regardless of the connection reset behavior. For example, they can modify their code snippet as follows:
using (TransactionScope scope = new TransactionScope(TransactionScopeOption.Required, new TransactionOptions { IsolationLevel = IsolationLevel.RepeatableRead }))

{

    using (SqlConnection conn1 = new SqlConnection(connectionString))

    {

        conn1.Open();

        // Set the isolation level explicitly

        SqlCommand cmd1 = new SqlCommand("SET TRANSACTION ISOLATION LEVEL REPEATABLE READ", conn1);

        cmd1.ExecuteNonQuery();

        // Execute some queries on conn1

    }


    using (SqlConnection conn2 = new SqlConnection(connectionString))

    {

        conn2.Open();

        // Set the isolation level explicitly

        SqlCommand cmd2 = new SqlCommand("SET TRANSACTION ISOLATION LEVEL REPEATABLE READ", conn2);

        cmd2.ExecuteNonQuery();

        // Execute some queries on conn2

    }


    scope.Complete();

}
For additional information about database isolation settings, you can review the below documents.
SET TRANSACTION ISOLATION LEVEL (Transact-SQL) – SQL Server | Microsoft Learn
Transaction locking and row versioning guide – SQL Server | Microsoft Learn
System stored procedures (Transact-SQL) – SQL Server | Microsoft Learn
SQL Server Connection Pooling – ADO.NET | Microsoft Learn
I hope this article was helpful for you, please feel free to share your feedback in the comments section.
Disclaimer
Please note that products and options presented in this article are subject to change. This article reflects isolation level settings for Azure SQL Managed Instance in October, 2023.
by Contributed | Oct 29, 2023 | Technology
This article is contributed. See the original author and article here.
In this blog article, we will cover how to prevent and deny the automated backup retention days for Azure SQL database to be lower than X number of days.
We have received some service requests from customers that would like to ensure that they have for example 14 days as a retention period for their automated backup and would like to do this using a custom policy since they have multiple databases.
You can follow the steps below to create a custom policy and ensure this:
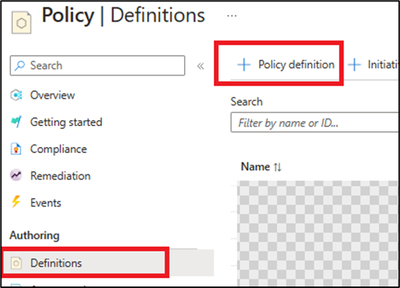
1) From the Azure portal, access Azure policy, then definitions blade.
2) Create a new policy definition.
3) Add the definition location (which subscription will be hosting this policy), Name, and description.
4) Set the category to use existing and select SQL (as below):

5) Then add the below policy definition into the rule field:
Note: you can adjust the below format to have tags or parameters as needed, also the below example is set to 14 days as retention period days.
{
  "mode": "All",
  "policyRule": {
    "if": {
      "allOf": [
        {
          "field": "type",
          "equals": "Microsoft.Sql/servers/databases/backupShortTermRetentionPolicies"
        },
        {
          "anyOf": [
            {
              "field": "Microsoft.Sql/servers/databases/backupShortTermRetentionPolicies/retentionDays",
              "exists": false
            },
            {
              "field": "Microsoft.Sql/servers/databases/backupShortTermRetentionPolicies/retentionDays",
              "less": 14
            }
          ]
        }
      ]
    },
    "then": {
      "effect": "deny"
    }
  },
  "parameters": {}
}
6) Then save the policy.
Now since the policy definition has been created, you can add an assignment that refers to which resource will have this policy applied on.
From Azure policies page, and access definitions blade -> select the created custom policy, and click assign policy (you can assign on the Subscription level or a specific resource group depending on your business requirements).

After the assignment, if you try to have the retention backup days below 14 days, you can expect the below error:


References
Automatic, geo-redundant backups – Azure SQL Database | Microsoft Learn
Tutorial: Create a custom policy definition – Azure Policy | Microsoft Learn
Disclaimer
Please note that products and options presented in this article are subject to change. This article reflects automated backups retention days custom policy for Azure SQL Database in October, 2023.
Closing remarks
I hope this article was helpful for you, please like it on this page and share it through social media. Please feel free to share your feedback in the comments section below.
I hope this article was helpful for you, please feel free to share your feedback in the comments section.
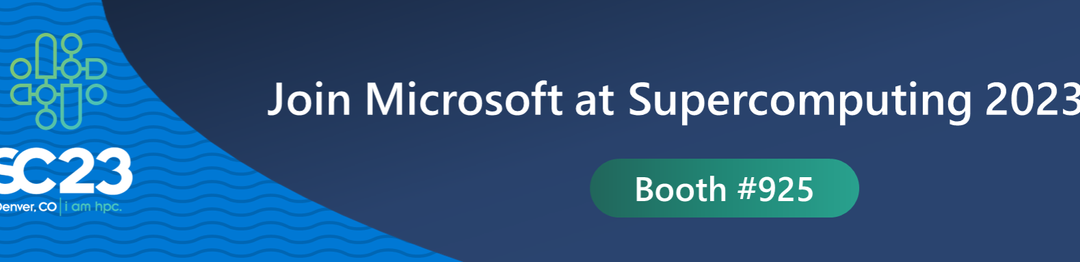
by Contributed | Oct 27, 2023 | Technology
This article is contributed. See the original author and article here.

Come visit Microsoft at Supercomputing 2023 (SC23) November 12 – 17 where we’ll deep dive into high-performance computing (HPC) and AI solutions during an exciting week of sessions, hands on experiences and peer connections. Learn how to unlock your AI and HPC innovation!
Held in Denver, Colorado this year, SC is an international conference for high-performance computing, networking, storage, and analysis. Here you can expand your knowledge, enrich your experiences, and network with others in the HPC community. Offering an unparalleled mix of thousands of scientists, engineers, researchers, educators, programmers, and developers, this is the event HPC enthusiasts.

Visit Microsoft at Booth #925, right near the entrance to the exhibitor hall.
- Engage with Microsoft Azure HPC and AI experts and our amazing partners.
- Learn the latest advancements during our in-booth sessions.
- Get hands-on with our demo pods for HPC, AI and Quantum.
- Enjoy our hardware bar featuring our newest technology.
- Take a break in our lounge area and enjoy coffee served by Artly, the barista bot.
- And enter for a chance to win Surface Earbuds along with other cool stuff!
Beyond our booth, join us for lightning sessions at Booth #2195 and after-hour events for food and fun!
Keep reading for all the details.

It simply would not be a Microsoft booth without a session theatre. Attend a session presented by Microsoft and partner experts in Booth #925 to learn the latest advancements for HPC and AI. Engage and ask questions.
Monday night
7:15 pm – 7:35 pm
|
Performance of Azure AI Infrastructure for Large Language Models at Scale
Azure empowers intelligent services like CoPilot and ChatGPT that have captured the world’s imagination. These services, facilitating various applications like Microsoft Office 365, chatbots and search engines with generative AI, owe their magic to Large Language Models (LLMs). In this session, we will explain the performance of Azure AI Infrastructure for LLMs through public benchmarking.
|
8:15 pm – 8:35 pm
|
Reduce CAE Simulation Time with TotalCAE on Azure
TotalCAE on Azure reduces simulation times for CAE applications by up to 80% in just a few clicks for hundreds of CAE applications. See how easy it is to adopt the latest Azure HPC technologies without being an IT expert. Case studies of how innovative companies receiving HPCwire 2023 nominations with TotalCAE are using Azure to accelerate their designs.
|
Tuesday
10:15 am -10:35 am
|
Introducing Azure Quantum Elements: Accelerating Scientific Discovery
In this session, Dr. Alexis Mills, Chemist and Microsoft Machine Learning Engineer, will present Azure Quantum Elements and explore how advancements in cloud technologies, artificial intelligence, high performance computing, and quantum computing are accelerating progress for scientists around the world. Dr. Mills will also be joined by a special guest from Pacific Northwest National Lab, Dr. Wendy Shaw, to highlight how Azure Quantum Elements will be used to help them accelerate their discoveries.
|
11:15 am – 11:35 am
|
Supercomputing on Azure for AI Workloads with Massive Scale and Performance
Join us as Microsoft dives into the latest Azure supercomputing capabilities and performance.
|
12:15 pm-12:35 pm
|
Ansys and Azure: Accelerating Innovation with HPC Leadership
Learn how Ansys advances engineering simulation solutions with Microsoft Azure’s HPC cloud infrastructure. In the first half of 2024, Ansys will be releasing a powerful new platform to simply the successful migration of Ansys workloads to Azure to take advantage of its industry leading HPC capabilities. This platform is called Ansys Access on Microsoft Azure and will enable customers to easily and optimally deploy Ansys simulation in their own Azure enrollments. This talk will cover the broad range of Ansys solvers that are being optimized on Azure, go through some benchmarks and performance plots, and touch on roadmap of different pathways to Azure cloud.
|
1:15 pm -1:35pm
|
Enabling Access to HPC in Academic Medical Centers
HPC is critical to research that takes place in academic medical centers. Yet many university HPC centers struggle to serve the diverse needs of medical research. Biomedical research codes change frequently and have changing hardware requirements, are bursty, and often are run on sensitive data that must be carefully protected under standards such as HIPAA. We describe how Rescale, a cloud-based HPC platform, can be used by academic researchers to conduct research with enterprise-level governance and financial controls with Microsoft Azure. We will also demonstrate Rescale Essentials, a free platform edition of Rescale that can be used through the API to submit jobs via scheduler-like interfaces or simple web portals.
|
2:15 pm – 2:35 pm
|
NVIDIA and Microsoft
|
4:15 pm – 4:35 pm
|
AMD and Microsoft: Together We Advance Cloud HPC
|
Wednesday
10:15 am -10:35 am
|
How AMD and Microsoft Built a Powerful Cloud System on Open Source Software
Learn more about the AMD ROCm software stack and how it powers some of the largest implementations of AI applications today—including workloads on the Microsoft Explorer system. We will highlight the advantages of the AMD ROCm open ecosystem and ongoing collaboration between AMD and Microsoft.
|
11:15 am – 11:35 am
|
What’s New: The latest Azure AI Infrastructure innovation with AMD
|
12:15 pm – 12:35 pm
|
Virtual Human Modeling On Azure – Case Studies about Heart, Brain, and Liver Simulations on the UberCloud Platform
In the past few years, UberCloud and Dassault supercomputers built with Azure HPC performed several challenging human modeling projects in the cloud. Projects were dealing with Drug-induced Arrhythmias of a Human Heart, Neuromodulation in Schizophrenia, Artificial Aortic Heart Valves, Personalized Left Atrial Appendage Occluder Device, Repairing Cardiac Valve Leakage Using Machine Learning, and Multiscale Multiphysics Living Liver Simulations.
|
1:15 pm – 1:35 pm
|
What’s New: The latest Azure AI Infrastructure innovation with NVIDIA
|
2:15 pm – 2:35 pm
|
Achievement Unlocked- Weather Forecasting in the Cloud
This talk tells the story of the Met Office’s world class weather and climate science and their transformational journey in partnership with Microsoft.
|
3:15 pm – 3:35 pm
|
The Future of Networking with Azure Quantum
|
4:15 pm – 4:35 pm
|
NVIDIA and Microsoft
|
Thursday
10:15 am – 10:35 am
|
Hybrid HPC Powering NOAA’s Multi-cloud and AI/ML Workloads
GDIT is a large HPC systems integrator for the Federal Government. NOAA’s vision promotes an accelerated transformation to the cloud, urging a culture that embraces agility, learning, innovation, and cloud native architecture. Parallel Works and GDIT enable NOAA researchers with an intuitive platform to run weather models like Unified Forecasting system reanalysis, and Earth Prediction Innovation models using Azure services. The increasing use of AI and ML workloads for this work will be discussed.
|

Get hands-on with HPC, AI and Quantum demos in Booth #925.
Monday
|
HPC demo | AI demo | Quantum demo
|
Tuesday
|
HPC demo | AI demo | Quantum demo | AMD partner demo
|
Wednesday
|
HPC demo | AI demo | Quantum demo | NVIDIA, Rescale, Ansys and other partner demos
|
Thursday
|
HPC demo | AI demo | Quantum demo
|

Discover the latest Azure and partner HPC and AI technology at our hardware bar in Booth #925.

Events are entertaining but also tiring! Stop by Booth #925 for a place to relax and enjoy a good cup of coffee served by Artly, the barista bot!


Here from Azure HPC and AI experts during our lightning sessions in Booth #2195.
Tuesday
12:45 pm – 1:00 pm
Wednesday
1:30 pm – 1:45 pm
Thursday
10:30 am – 10:45 am
|
Driving the AI Revolution with Azure Supercomputing
We will discuss the growth of AI, especially LLMs and generative AI, and the supercomputing making this possible. Azure HPC provides purpose-built supercomputing infrastructure to support training/tuning of foundational AI models, plus HPC infrastructure to support inferencing as consumers in all industries use AI models to assist their everyday productivity.
|

You’re invited to attend our after-hour events for networking, drinks, food, and fun! Sign up today.
Tuesday, Nov 14
7:00 pm – 9:00 pm
|
Special Networking Evening with Microsoft and AMD
Join Microsoft and AMD for an evening of connections, delicious food and cocktails. Space is limited. Contact AzureHPCEvents@microsoft.com to reserve your spot today! Location provided during registration.
|
Wednesday, Nov 15
11:30 am-1:00 pm
|
Luncheon Hosted by Microsoft and Rescale
Join Microsoft and Rescale for an informative lunch session. Discover how hybrid cloud HPC is empowering the next generation of scientists and engineers and enjoy a locally curated Southwestern lunch. Space is limited. Contact AzureHPCEvents@microsoft.com to reserve your spot today! Location provided during registration.
|
Wednesday, Nov 15
6:30 pm – 8:30 pm
|
Dinner with Microsoft and NVIDIA
Join Microsoft and NVIDIA for a European-inspired meal curated with local
ingredients and network with peers. This event is by invite-only.
|

Recent Comments