by Contributed | May 31, 2024 | Technology
This article is contributed. See the original author and article here.
Whenever you run load tests on your endpoints in Azure Load Testing, there might be a situation where your endpoints require an access token. We have seen that before load testing these endpoints, most users generate an access token and store it in the Azure Key Vault. They then pass this token as a variable in the Header of the request as a bearer token to authenticate at the endpoint. But there might be a few problems with this approach:
- Sometime has elapsed between the act of storing the token in the key vault and the start of execution of the test. There can be a case where the token might expire during the test run and the request at the endpoints start throwing errors.
- Only one static token is stored in the key vault and is used for all the requests. When we are load testing with multiple Virtual Users, we want a situation where all users have a unique access token while making the requests, as it will mimic a real-life scenario. Currently scaling is there, but the authenticity is lost.
- Most access tokens have a lifetime of around 60-75 minutes on an average. When we are running load tests for longer durations (E.g.- Soak Tests), it is almost certain that the access token will get expired during the execution of the test. We would like to have some sort of control where the service intelligently identifies when a token is going to get expired, and renews it, so that the test can carry on as usual.
This blog covers how you can create a JMeter Test plan, where you can implement a mechanism to generate and refresh access tokens which are unique for every user and run it at scale in Azure Load Testing.
PREREQUISITES
CREATING THE TEST PLAN IN THE JMETER GUI
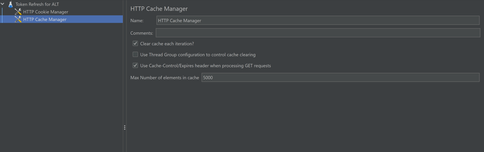
Create a Test Plan in JMeter. Add your variables in the “User defined variable section.” If you are testing an Azure endpoint, you may need to use the GetSecret function to store the client_ID, client_secret, tenant_ID etc. Proceed to the config elements and add a HTTP Cookie Manager and HTTP Cache Manager. Make sure to select the option to clear cache and cookies on each iteration.

Create a Thread Group and provide the required inputs. Enable the “Start Next Thread Loop” Option. Set the Loop Count to infinite and set the test duration.

Inside the Thread Group, create a Loop Controller and set the loop count to infinite. Further, inside the loop controller, add two more controllers: The transaction controller, which will generate the token and the runtime controller, which will refresh the token.

Inside the Transaction Controller, add an HTTP Sampler and setup a POST request to the token endpoint to fetch the access token. Set “grant type” as “client credentials” and “ignore Cache” as “true”. Add a HTTP Header Manager to the sampler and add the Content-Type as “application/x-www-form-urlencoded” and set the Authorization depending upon the configuration done at the token endpoint.

Add a JSON extractor to extract the access token and set it in a variable which will be used going forward.

Proceed to the runtime controller. In the Runtime section, specify the time after which you want the token to be refreshed. Usually token lasts for 60 minutes. Make sure to include some buffer time before token expiry. You can also extract the expiry time of the token, store it in a variable and pass it here.

Add another HTTP Sampler, this time sending a GET request to the target endpoint. In the HTTP Header Manager, set Authorization to Bearer ${token}.
Add some listeners like View Results tree, Summary Report etc to analyse the results locally. Results should look something like this.

Now the JMeter script is complete and can be used in Azure Load Testing to run it at scale.
Creating and Running the Load Test

- Upload the JMeter Script in the Test plan tab.

- Configure the Secrets section under the Parameters tab. Now, we are all set to launch the test.
CONCLUSION
Now you can run your load tests for an even longer duration without having to worry about the expiry of access tokens.
Try this this out and let us know if this works for you. Please use the comments section or use our feedback forum.
HAPPY LOAD TESTING!!
by Contributed | May 30, 2024 | Technology
This article is contributed. See the original author and article here.
Introduction
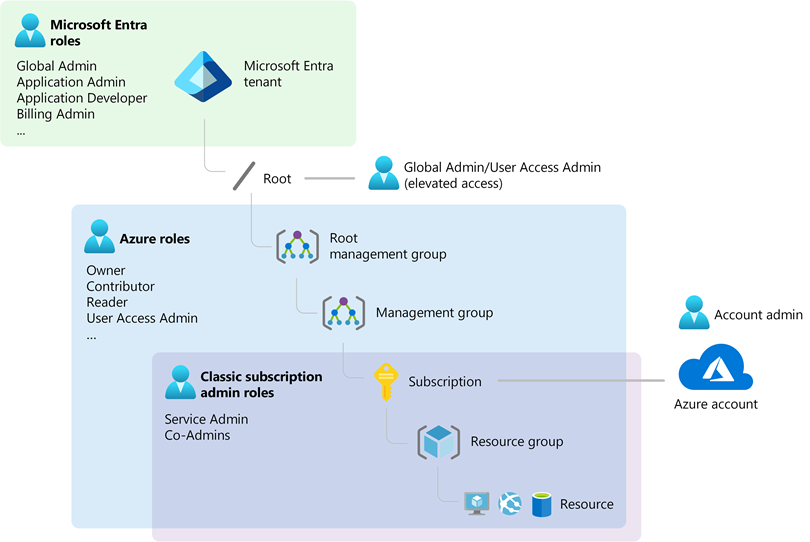
As a startup or an new customer exploring Microsoft Azure, you may find the terminology around identity and access management a bit perplexing. Terms like Tenant, Subscription, and Microsoft Entra ID, are crucial to understanding how to effectively manage and secure your Azure environment. This blog post aims to demystify these concepts and provide a clear, concise understanding of how they interrelate.
What is Microsoft Entra ID (Former Azure Active Directory)?
Microsoft Entra ID is the new name for Azure Active Directory (AAD), Microsoft’s cloud-based identity and access management service. It plays a crucial role in managing user, group, and application access to Azure services. Here’s a breakdown:
- Identity Management: Entra ID handles both authentication (verifying identity) and authorization (granting access) for Azure resources.
- Cloud-Based: Unlike traditional Active Directory, which is designed for on-premises environments, Entra ID operates entirely in the cloud, making it ideal for modern, cloud-first organizations.
Key Features:
- User and Group Management: You can create users and groups within your Entra ID tenant. These identities can be synchronized with your existing on-premises Active Directory using Entra Connect.
- Single Sign-On (SSO): Provides a seamless sign-on experience across multiple applications and services.
What is an Azure Tenant?
An Azure Tenant represents a dedicated instance of Microsoft Entra ID for your organization. It is essentially your organization’s space in the Azure cloud where you manage your identities and access.
Key Points:
- Created Automatically: When you sign up for Azure or any Microsoft cloud service, a tenant is automatically created.
- Domain Representation: By default, your tenant will have a domain like
yourcompany.onmicrosoft.com, which can be customized to use your own domain. (You can also add and replace your on.microsoft.com fallback domain)
What is an Azure Subscription?
An Azure Subscription is a logical container used to provision and manage Azure resources. It is closely tied to billing and acts as a boundary for resource management and deployment.
Key Characteristics:
- Resource Management: All Azure resources (e.g., virtual machines, databases) are associated with a subscription.
- Billing: Each subscription has its own billing cycle and payment terms, allowing you to manage costs effectively.
- Scalability: Best practice is to have separate subscriptions for production and non-production environments to manage permissions and scalability efficiently.
Relation to Tenant:
How They Work Together
Automatic Creation of Emtra ID Tenant:
- When you create an Azure subscription, an Entra ID tenant is automatically provisioned. This tenant manages identities and access within your subscription.
Authentication and Authorization:
- Azure subscriptions rely on Entra ID to authenticate and authorize users, services, and devices, ensuring that only authenticated identities can access Azure resources.
Role-Based Access Control (RBAC):
Multi-Subscription Management:
- A single Entra ID tenant can manage multiple subscriptions, enabling the same set of users and groups to access different environments. However, each subscription is associated with only one tenant.
Practical Tips for Startups
Benefit from the Azure setup Guide:
- Before you start building and deploying solutions by using Azure services, you need to prepare your environment. In this guide, we introduce features that help you organize resources, control costs, and secure and manage your organization. You can access it directly from the Azure Portal too.
Start with a Clear Structure:
- Separate Subscriptions: Use separate subscriptions for production and non-production environments to ensure better management and segregation of resources.
- Define Roles: Clearly define and assign Azure Roles and Entra ID Roles to manage permissions effectively.
Synchronize Identities:
- If you have an existing on-premises AD, use Entra Connect to synchronize identities with Entra ID, ensuring seamless access management.
Plan for Scalability:
- Design your subscription architecture to accommodate growth. Consider factors like billing, resource limits, and administrative boundaries.
Use Enterprise Scale Landing Zones:
- Implement recommended modular design to ensure your Azure environment can scale efficiently with your business needs.
Follow the links below if you are familiar with AWS and would like to understand how to map AWS concepts to Azure:
Conclusion
Understanding Microsoft Entra ID, Azure Subscriptions, and Tenants is essential for effective Azure governance. These concepts form the backbone of identity and access management in Azure, ensuring secure, scalable, and efficient management of your cloud resources. As your startup grows, mastering these basics will help you optimize your Azure environment, supporting your journey towards innovation and success.
For more detailed information, always refer to the latest Microsoft Azure documentation and best practices.
by Contributed | May 29, 2024 | Technology
This article is contributed. See the original author and article here.
Zero Trust has become the industry standard for safeguarding your entire digital estate. Central to Zero Trust is securing identity and access, which is essential for protecting resources, enforcing security policies, and ensuring compliance in today’s dynamic digital landscape.
With Microsoft Entra, we help our customers create a trust fabric that securely connects any trustworthy identity with anything, anywhere. Driven by the adoption of multicloud strategies in the era of AI, customers are encountering more challenges in securing access, not just across multiple public and private clouds, but also for business apps and on-premises resources. Unlike securing access for humans or within a single environment, where customers have established methods to address challenges, securing access anywhere is more complicated due to the dynamic nature of today’s digital estate and tools to address emerging challenges need further development. To support our customers, we unveiled our vision for securing access in any cloud at this year’s RSA conference. Today, we’re excited to dive deeper into our future investment aimed at securing access to cloud resources from any identity across diverse cloud environments.
Managing multicloud complexity in a rapidly evolving digital environment
Organizations are grappling with substantial challenges in navigating cloud access complexities, often citing issues like fragmented role-based access control (RBAC) systems, and compliance violations. These challenges are compounded by the growing use of cloud services from various cloud service providers. There have been links to several notable breaches attributed to over-permissioned identities. Our customer engagements reveal that organizations are currently using 7 to 8 products, including privileged access management (PAM) and identity governance and administration (IGA) solutions to tackle multicloud access challenges. Despite their efforts, such as toggling across multiple solutions and increasing their workforce, many organizations still struggle to achieve full visibility into their cloud access.
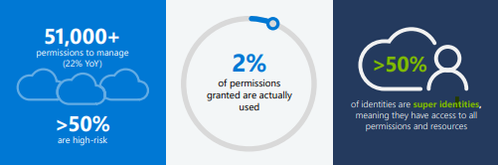
Our 2024 State of Multicloud Security Risk Report underscores these ongoing challenges arising from over-permissioned human and workload identities. Analysis of past year usage data from Microsoft Entra Permissions Management confirms that the complexities in multicloud environments primarily stem from rapid identity growth and over-provisioned permissions (learn more), including:
- Over 51,000 permissions that can be granted to identities – 50% of which are identified as high-risk permissions.
- Only 2% of those 51,000 permissions were used.
- Of the 209M identities discovered, more than 50% are identified as super identities that have all permissions to access all resources.
Figure 1: 2024 State of Multicloud Security Risk key findings
Introducing our vision for cloud access management: Building a converged platform
Today, I’m excited to expand on our vision for cloud access management.
As businesses expand, organizations inevitably face challenges of overprovisioning at various levels. Initially, this manifests as granting more access to accommodate growing teams and workloads and can lead to overlapping access privileges. To address these issues, organizations must proactively identify vulnerabilities in identities and permissions and respond swiftly and, eventually, automatically. There’s a pressing need for a new solution that empowers all identities to access resources in any cloud securely while adhering to least-privileged permissions.
To address this critical need, we’re developing a converged platform that encompasses a comprehensive set of capabilities. This upcoming platform is designed to streamline the journey from risk discovery to remediation for secure access to any cloud resource whenever deviations occur, offering:
- Visibility: Gain insights into all identities and permissions assigned and used and detect risky permissions.
- Risk remediation: Remediate risky permissions with recommendations.
- Granular controls: Grant the right privileges for role-specific durations.
- Automated governance: Implement continuous compliance through automated policies.
 Figure 2: How to secure access from any identity across multiple clouds
Our journey to secure access to resources in any cloud is advancing by building upon our industry-leading Microsoft Entra products:
- Permissions Management (CIEM) for delivering visibility into identities, permissions, and usage.
- Privileged Identity Management (PAM) for enforcing least-privileged controls for both human and workload identities.
- ID Governance (IGA) for automating identity lifecycle and access workflows regardless of origin or usage.
- Workload ID (IAM for workloads) for offering customized authorization policies for workload identities.
 Figure 3: Convergence of four critical areas
Additionally, as part of our continuous Copilot journey, we’re leveraging AI/ML to enhance all the technologies within the cloud access management platform. This enables organizations to uncover risks that are otherwise challenging to detect manually, identify the most significant risks, propose impactful remediations, and recommend usage-based custom roles and policies for any identity as the platform adoption grows. It will help simplify cloud access management and provide more effective ways to secure cloud environments for organizations.
Our commitment
At Microsoft, we’re committed to bringing this vision to life for our customers through the advancement and innovation of our newly converged platform, designed to secure access to resources in any cloud. Additionally, this vision extends to securing access to resources anywhere, including on-premises and business apps. Our goal is to help our customers enhance their security for any access to any resource in the era of AI and robust workload identities.
We look forward to collaborating with the community to realize this vision, empowering every organization to implement least-privileged access and permissions across all identities in multicloud and hybrid environments. We’ll keep you posted on our progress towards this vision. Until our next update, we invite you to explore our products that form the foundation of our cloud access management vision. Learn more about Microsoft Entra ID Governance and Permissions Management.
Thank you,
Joseph Dadzie
Partner Director of Product Management
LinkedIn
Twitter
Read more on this topic
Learn more about Microsoft Entra
Prevent identity attacks, ensure least privilege access, unify access controls, and improve the experience for users with comprehensive identity and network access solutions across on-premises and clouds.

by Contributed | May 28, 2024 | Technology
This article is contributed. See the original author and article here.
In this post, I’ll cover some exciting news on Microsoft Graph Data Connect for SharePoint as of May 2024. This feature delivers rich data assets to SharePoint and OneDrive tenants. If you’re new to MGDC for SharePoint, start by reviewing this post: https://aka.ms/SharePointData.
TL;DR
We have been busy updating our existing SharePoint datasets in MGDC and adding new ones. You can see the full list at https://aka.ms/SharePointDatasets.
We have updated our 3 publicly available datasets, just published 1 new dataset and will deliver 3 new datasets in the next few months. Here are some details…
New and Upcoming Datasets
The new SharePoint File Actions dataset was released in May 2024. This dataset delivers one object for each file accessed, deleted, downloaded, modified, moved, renamed, or uploaded. This helps you understand how documents are being used in detail. This dataset is now publicly available, billed through Azure at the regular MGDC rate.
The new OneDrive Sync Health datasets include information on devices running OneDrive for Business. This includes a dataset with one object for every Sync-enabled device in the tenant and a dataset with details on errors faced by these devices. They were announced by the Sync team at the Microsoft 365 Conference. Sync Health and Sync Errors are in private preview. They will be publicly available by the end of June. This was a joint project between SharePoint, OneDrive Sync and MGDC.
The SharePoint Files dataset includes information about files in SharePoint and OneDrive. This delivers one object for every file in the tenant stored in a SharePoint document library, including OneDrives. The Files dataset is in private preview, with Public ETA expected in a few months.
Updated datasets
Archimedes also added columns to the existing Sites, Groups and Permissions datasets.
For SharePoint Sites, our most popular dataset, we added several new properties. Here’s the list:
- ArchiveState: The archive state of the site: None, Archiving, Archived, or Reactivating
- RootWeb.Configuration: Root web template configuration id
- RecycleBinItemCount: Number of items in the recycle bin
- RecycleBinItemSize: Size of the items in the recycle bin
- SecondStageRecycleBinStorageUsage: Size of the items in the second stage recycle bin
- IsCommunicationSite: Indicates that the site is a communication site
- IsOneDrive: Indicates that the site is a OneDrive
- IsExternalSharingEnabled: Indicates if the site is configured to enable external sharing
- SiteConnectedToPrivateGroup: Indicates if a site is connected to Private Group
- Privacy: Privacy of the site: Private or Public. Applies only to team sites
- Owner.UPN: User Principal Name for the owner of the site
- SecondaryContact.UPN: User Principal Name for the secondary contact for the site
- LastUserAccessDate: Last access by a real user for the site (in UTC)
That last column is very useful to identify sites that have been inactive for a long time.
For Groups, we introduced a new TypeV2 property for owners and members, to specify the type of user. The old Type property can contain User, SecurityGroup or SharePointGroup, while the new TypeV2 can be InternalUser, ExternalUser, B2BUser, SecurityGroup and SharePointGroup.
For the SharePoint Permissions dataset, we added the following columns:
- SharedWith.TypeV2: Expands User types to InternalUser, ExternalUser and B2Buser, as described in the Groups section above
- SharedWith.UPN: User Principal Name of sharing recipient
- SharedWith.AadObjectId: AAD Object Id of sharing recipient. Blank if this is not an AAD object.
- SharedWith.UserCount: Unique user count for this sharing recipient. For groups, this is the number of users in the group, including nested groups. For users, this is always 1. It will be blank if the group is empty or if the count is unavailable
- TotalUserCount: Unique user count for this entire permission. This will be blank if the count is zero or unavailable
- ShareCreatedBy.UPN: User Principal Name of user who created the sharing link
- ShareLastModifiedBy.UPN: User Principal Name of user who modified the sharing link
The two new user count columns are a major improvement here. They do group expansion, so you can have the total number of users impacted by the permissions, including nested groups, without having to pull the SharePoint Groups and AAD Groups datasets. You can now detect oversharing using only the Permissions dataset.
General improvements
MGDC for SharePoint also improved the overall infrastructure for analytics, including:
- Filtering datasets: Downloading only rows that match specific site ids or template id. See details at How can I filter rows on a dataset?
- Dataset sampling: Get a small sample of the dataset and an full object count without pulling the entire dataset. See details at How can I sample or estimate the number objects in a dataset?
- Improved messages: Better error messages, including when dates are out of range, or when a region has no SharePoint data.
- Guidance: Improved documentation, including updated step-by-step guides and schema docs. We also have a new Official MGDC for SharePoint blog in Tech Community with information like useful links and frequently asked questions. Since you’re reading this on the blog, I imagine you already knew about that one :-).
Conclusion
These are the main improvements to Microsoft Graph Data Connect for SharePoint in the last few months. I hope these changes will improve the feature for your analytics scenarios. We are busy cooking up more improvements and will share them here in the blog as they become available.

by Contributed | May 27, 2024 | Technology
This article is contributed. See the original author and article here.
Since its launch in 2022, Outlook Lite has provided a way to enjoy the key features of Outlook in a small download size for low-resource phones. We are continuously looking for ways to meet the communication needs of our core users. Now, we are excited to bring SMS on Outlook Lite to users worldwide. With SMS on Outlook Lite, you can enjoy the convenience and security of sending and receiving SMS messages from your Outlook Lite app. SMS is integrated with your email, calendar, and contacts, so you can stay in touch with your contacts in one app.
SMS on Outlook Lite is now available in the latest version of the app, which you can download from the Google Play Store
How to get started with SMS on Outlook Lite?
Getting started with SMS on Outlook Lite is easy and fast. Just follow these steps:
1. Download Outlook Lite from the Google Play Store (here). If you already have Outlook Lite, make sure you update to the latest version.
2. Open Outlook Lite and click on the bottom tab icon named “SMS”
3. Give required permissions to activate SMS.
4. That’s it! You can now send and receive SMS messages from Outlook Lite.
What’s next for SMS on Outlook Lite?
We are working on adding more features and improvements to SMS on Outlook Lite, such as:
- Tighter integration with Email, Calendar and Contacts
- Cloud backup of messages
- Enhanced Security features.
We would love to hear your feedback and suggestions on SMS on Outlook Lite. You can contact us through the app, or by leaving a comment on this blog post.
Thank you for using Outlook Lite!

Recent Comments