Take the Guesswork Out of Project Quoting with What-if Analysis in Dynamics 365 Project Operations
This article is contributed. See the original author and article here.
Make smarter, faster, and more confident quote decisions—right where you work.
Project quoting has always required a careful balance—aligning profitability with competitiveness, staffing strategies with delivery costs, and customer expectations with business outcomes.
But evaluating these trade-offs hasn’t always been easy. It often means jumping between tools, manually recalculating numbers, and relying on assumptions to guide critical decisions.
That’s where What-if Analysis (Preview) in Dynamics 365 Project Operations comes in.
This new capability brings real-time simulation directly into your quoting workflow—so you can explore options, compare outcomes, and make decisions with clarity before finalizing a quote.
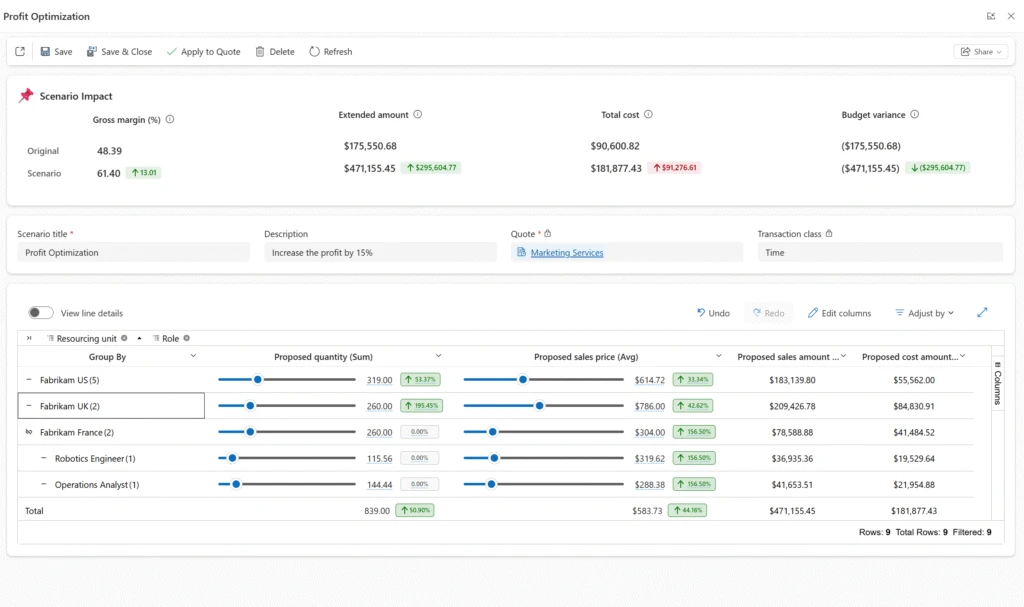
What Is What-if Analysis?
What-if Analysis introduces a dedicated simulation workspace within a project quote, allowing you to model changes to quantities and pricing and instantly see their financial impact.
Instead of working through “what if” scenarios offline, you can now:
- Explore multiple approaches within the quote
- Compare their outcomes side by side
- Apply the most effective scenario when you’re ready
All without modifying the actual quote until you choose to.
It’s a more intuitive, controlled way to move from estimation to decision-making.
Turn Everyday Questions into Clear Answers
Every project quote involves key decisions:
- Should work shift to a lower-cost delivery center?
- What happens if billing rates increase for specific roles?
- Can you stay competitive while protecting margin?
With What-if Analysis, these are no longer hypothetical questions.
As you adjust quantities and pricing, the system instantly recalculates key financial metrics—including revenue, cost, gross margin, and budget variance—so you can clearly see the impact of every change.
This real-time feedback helps you move quickly from exploration to confident, data-backed decisions.
How It Works
Getting started is simple. From the What-if Analysis tab on a Draft quote, you can create a scenario based on the quote’s existing data. Each scenario is isolated, allowing you to experiment freely without affecting the live quote.
Within the simulation workspace, you can adjust quantities and pricing across dimensions such as resourcing unit, role, or any custom pricing dimension configured in your environment. Whether you’re making high-level adjustments or refining details at the quote line level, the experience is designed to be flexible and intuitive.
You can create multiple scenarios—each representing a different approach—and compare them side by side. Built-in comparison views highlight differences in financial outcomes, making trade-offs easier to evaluate.
When you’ve identified the best approach, applying the scenario updates the Draft quote in place—so you can move forward with confidence, without creating a new revision.
What This Means for You
What-if Analysis transforms how you approach project quoting—bringing clarity, speed, and confidence into every decision.
- Make decisions with confidence: Instantly understand how pricing and staffing changes impact revenue, cost, and margin—before committing to a quote
- Optimize for both competitiveness and profitability: Evaluate trade-offs in real time and choose the approach that best aligns with your goals
- Reduce reliance on spreadsheets and manual iteration: Keep simulation and decision-making within Project Operations
- Drive faster, more aligned conversations: Use data-backed scenarios to align stakeholders and move decisions forward
Instead of relying on assumptions, your team can now explore possibilities, evaluate outcomes, and finalize quotes with confidence—knowing the numbers support the decision.
Availability and Prerequisites
What-if Analysis is currently available as a preview feature in:
- Project Operations Core (Lite deployment)
- Project Operations integrated with ERP
To get started, enable the What-if Analysis feature flag in your environment. The What-if Analysis tab will then be available on qualifying Draft quotes.
A few things to keep in mind:
- Scenarios can only be created on quotes in Draft status that contain estimates
- Activated or closed quotes are not eligible
- If the underlying quote changes, scenarios will need to be recreated
As with all preview features, we recommend evaluating this capability in a non-production environment.
The Bottom Line
Every project quote is a critical business decision. What-if Analysis gives you the tools to approach that decision with clarity—replacing guesswork with real-time insight and manual effort with seamless simulation.
The result is not just better quotes, but better decisions—ones that are competitive, financially sound, and aligned with your business goals.
Get Started
Enable What-if Analysis in your environment today and start turning “what if?” into “we know.”
Learn More
We are making constant enhancements to our features. To learn more about What-Analysis in Project Quotations, visit Quote What-if Analysis
The post Take the Guesswork Out of Project Quoting with What-if Analysis in Dynamics 365 Project Operations appeared first on Microsoft Dynamics 365 Blog.
Brought to you by Dr. Ware, Microsoft Office 365 Silver Partner, Charleston SC.


Recent Comments