by Contributed | Jul 31, 2021 | Technology
This article is contributed. See the original author and article here.
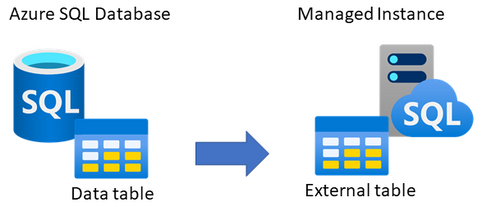
Looking for an online way to consume data from Azure SQL Database on Managed Instance?
One of the ways to consume data online from Azure SQL Database on Managed Instance is to link the two by creating an external table, using CREATE EXTERNAL DATA SOURCE (Transact-SQL). The external table is created on Managed Instance, which with appropriate credentials can be used to query data from a matching table on SQL Database.
This type of setup could be useful to applications that need to consume both Managed Instance and SQL Database data, or perhaps for an online migration of data from SQL Database to Managed Instance. This article explains how to set this up.
Networking requirements
As the first step, there has to exist connectivity between Azure SQL Database and Managed Instance. The easiest option is to configure public endpoint on SQL Database and an allow inbound traffic on port 1433 from Managed Instance. This will allow Managed Instance to log in and query data from SQL Database. Alternatively, if you would like to use the private endpoint for SQL Database, the easiest option would be to deploy its private endpoint in the same VNet as Managed Instance. In this case as well, please do not forget to allow inbound traffic to SQL Database on port 1433 from Managed Instance subnet. Please note that detailed instructions on setting up the networking is beyond the scope of this article.
You’d need to have either of these options setup as the networking requirement:
- Option 1 – public endpoint connection
- Ensure that public endpoint access is working on SQL Database using a database client (such is SSMS)
- If needed, open NSG rule on SQL Database side to allow 1433 the inbound traffic
- Option 2 – private endpoint connection
- Create an additional subnet in Managed Instance VNet
- Deploy SQL Database private endpoint to the new subnet created inside Managed Instance VNet (see this tutorial for details)
In case that you perhaps have a VM inside the same VNet as Managed Instance, you can use it to test the connectivity to SQL Database. For example, use SSMS from a VM inside the Managed Instance VNet to connect to SQL Database. If this works, then Managed Instance will be able to successfully connect to SQL Database to read data.
Prepare table to use Azure SQL Database
As the first step, decide which table on SQL Database would you like to expose to Managed Instance. This could be an existing table, or you could perhaps create a new table.
The sample code below creates a new table AzureDBtable on an existing SQL Database, and inserts the current time stamp. Hopefully, we’d be able to read off this time stamp from Managed Instance.
-- Execute on Azure SQL Database
-- Create table and insert some sample data
CREATE TABLE AzureDBtable (TimeTable datetime2)
INSERT INTO AzureDBtable values (getutcdate())
SELECT @@servername AS [Server name], * FROM AzureDBtable
Using SSMS, the below shows the table created on SQL Database.

For the purpose of this article, we have inserted the following time stamp to the table on SQL Database.

Create authentication credentials on Managed Instance
Create authentication credentials for SQL Database on Managed Instance. This will allow Managed Instance to log onto SQL Database and query data. Use an existing database on Managed Instance for which you need to create a master key first. Then, create login credentials for SQL Database in the context of this database.
Provided below is a sample script which you’ll need to modify with the name of your database, new master key password, and credentials to login to SQL Database.
-- Execute on Managed Instance
-- Create auth credentials to SQL DB for a database on Managed Instance

-- Use an existing database on Managed Instance
USE [databasename-on-mi];
-- Create master key for database on Managed Instance
CREATE MASTER KEY ENCRYPTION BY PASSWORD='password';
-- enter credetials to login to Azure SQL Database
CREATE DATABASE SCOPED CREDENTIAL AppCredential WITH IDENTITY = 'username', SECRET = 'password';
Create external data source on Managed Instance
The next step is to create an external data source on Managed Instance. This will allow Managed Instance to know to which SQL Database to connect to. Modify the sample script below to include the name of database on Managed Instance, the connection URL (FQDN) to connect to SQL Database server, and also include SQL Database name. Think of it as providing connection parameters to Managed Instance on how to connect to SQL Database. You would use similar parameters is if you were connecting to SQL Database from another client, such is for example SSMS.
-- Execute on Managed Instance, in the context of the database used
-- Create external table on Managed Instance, link it with Azure SQL Database
CREATE EXTERNAL DATA SOURCE RemoteReferenceData
WITH
(
TYPE=RDBMS,
LOCATION='tcp:server-name.database.windows.net', -- insert SQL Database server FQDN
DATABASE_NAME='sqldb-databasename', -- insert SQL Database name
CREDENTIAL= AppCredential
);
Create external table on Managed Instance
The final step is to create an external table on database on Managed Instance, which will be linked with the table on SQL Database. The below script is an example connecting to the “AzureDBtable” created as the first step of this article, as a show case. In this step, it is very important that the data type(s) you define for the external table match the same data types defined for the source table on SQL Database. If data types perhaps do not match, there will be an error in querying data. This also means that if the external table structure on SQL Database changes, you will need to re-create external table on Managed Instance matching this new structure.
-- Execute on Managed Instance, in the context of the database used
-- Connect external table on Managed Instance with Azure SQL Database
CREATE EXTERNAL TABLE AzureDBtable
(TimeTable datetime2) -- must ensure data structure matches the one on SQL Database
WITH
(
DATA_SOURCE = RemoteReferenceData
);
Screenshot below shows that through SSMS we can see that an external table, connected to SQL Database, has been successfully created on Managed Instance.

Test querying data from SQL Database on Managed Instance
As in the first step we have inserted a time stamp on Azure SQL Database, after creating an external table on Managed Instance, let’s see if we can query it. Execute this query on Managed Instance.
-- Execute on Managed Instance, in the context of the database used
-- Read data from the external table on Managed Instance. This should pull the table data from Azure SQL Database
SELECT @@servername AS [Server name], * FROM AzureDBtable
The result shows that the server where this query was executed was on Managed Instance, and that the time stamp matches the same time stamp inserted into the table on SQL Database. This shows that with external data source were were able to query data from SQL Database on Managed Instance online and in-real time.

Closing remarks
Using external table on Managed Instance will allow you to read from, but not insert data into SQL Database. It is also possible to setup the external table the other way around — an external table on SQL Database that can be used to read data from a table on Managed Instance. See this article for details.
If you find this article useful, please like it on this page and share through social media.
To share this article, you can use the Share button below, or this short link: http://aka.ms/mi-sqldb-externaltable

by Contributed | Jul 31, 2021 | Technology
This article is contributed. See the original author and article here.
Applying network security groups (NSG) to filter traffic to and from resources, improves your network security posture. However, there can still be some cases in which the actual traffic flowing through the NSG is a subset of the NSG rules defined. Adaptive network hardening provides recommendations to further harden the NSG rules. It uses a machine learning algorithm that factors in actual traffic, known trusted configuration, threat intelligence, and other indicators of compromise, and then provides recommendations to allow traffic only from specific IP/port tuples.
For example, let’s say the existing NSG rule is to allow traffic from 100.xx.xx.10/24 on port 8081. Based on traffic analysis, adaptive network hardening might recommend narrowing the range to allow traffic from 100.xx.xx.10/29 and deny all other traffic to that port.
Adaptive network hardening recommendations are only supported on the following specific ports (for both UDP and TCP): 13, 17, 19, 22, 23, 53, 69, 81, 111, 119, 123, 135, 137, 138, 139, 161, 162, 389, 445, 512, 514, 593, 636, 873, 1433, 1434, 1900, 2049, 2301, 2323, 2381, 3268, 3306, 3389, 4333, 5353, 5432, 5555, 5800, 5900, 5900, 5985, 5986, 6379, 6379, 7000, 7001, 7199, 8081, 8089, 8545, 9042, 9160, 9300, 11211, 16379, 26379, 27017, 37215
Pre-Requisite:
– Az Modules must be installed
– Service principal created as part of Step 1 must be having contributor access to all subscriptions
Steps to follow:
Step 1: Create a service principal
Post creation of service principal, please retrieve below values.
- Tenant Id
- Client Secret
- Client Id
Step 2: Create a PowerShell function which will be used in generating authorization token
function Get-apiHeader{
[CmdletBinding()]
Param
(
 [Parameter(Mandatory=$true)]
 [System.String]
 [ValidateNotNullOrEmpty()]
 $TENANTID,
 [Parameter(Mandatory=$true)]
 [System.String]
 [ValidateNotNullOrEmpty()]
 $ClientId,
 [Parameter(Mandatory=$true)]
 [System.String]
 [ValidateNotNullOrEmpty()]
 $PasswordClient,
 [Parameter(Mandatory=$true)]
 [System.String]
 [ValidateNotNullOrEmpty()]
 $resource
)
$tokenresult=Invoke-RestMethod -Uri https://login.microsoftonline.com/$TENANTID/oauth2/token?api-version=1.0 -Method Post -Body @{"grant_type" = "client_credentials"; "resource" = "https://$resource/"; "client_id" = "$ClientId"; "client_secret" = "$PasswordClient" }
$token=$tokenresult.access_token
$Header=@{
  'Authorization'="Bearer $token"
  'Host'="$resource"
  'Content-Type'='application/json'
  }
return $Header
}
Step 3: Invoke API to retrieve authorization token using function created in above step
Note: Replace $TenantId, $ClientId and $ClientSecret with value captured in step 1
$AzureApiheaders = Get-apiHeader -TENANTID $TenantId -ClientId $ClientId -PasswordClient $ClientSecret -resource "management.azure.com"
Step 4: Extracting csv file containing list of all adaptive network hardening suggestion from Azure Resource Graph
Please refer: https://github.com/MicrosoftDocs/azure-docs/blob/master/articles/governance/resource-graph/first-que…
Azure Resource graph explorer: https://docs.microsoft.com/en-us/azure/governance/resource-graph/overview
Query:
securityresources
        | where type == "microsoft.security/assessments"
        | extend source = tostring(properties.resourceDetails.Source)
        | extend resourceId =
            trim(" ", tolower(tostring(case(source =~ "azure", properties.resourceDetails.Id,
                                            source =~ "aws", properties.resourceDetails.AzureResourceId,
                                            source =~ "gcp", properties.resourceDetails.AzureResourceId,
                                            extract("^(.+)/providers/Microsoft.Security/assessments/.+$",1,id)))))
        | extend status = trim(" ", tostring(properties.status.code))
        | extend cause = trim(" ", tostring(properties.status.cause))
        | extend assessmentKey = tostring(name)
        | where assessmentKey == "f9f0eed0-f143-47bf-b856-671ea2eeed62"
Click on “Download as CSV” and store at location where adaptive network hardening script is present. Rename the file as “adaptivehardeningextract“
Set-Location $PSScriptRoot
$RootFolder = Split-Path $MyInvocation.MyCommand.Path
$ParameterCSVPath =$RootFolder + "adaptivehardeningextract.csv"
if(Test-Path -Path $ParameterCSVPath)
  {
  $TableData = Import-Csv $ParameterCSVPath
  }

foreach($Data in $TableData)
{
  $resourceid=$Data.resourceid
  $resourceURL="https://management.azure.com$resourceid/providers/Microsoft.Security/adaptiveNetworkHardenings/default?api-version=2020-01-01"
  $resourcedetails=(Invoke-RestMethod  -Uri $resourceURL -Headers $AzureApiheaders -Method GET)
  $resourceDetailjson = $resourcedetails.properties.rules | ConvertTo-Json
  $nsg = $resourcedetails.properties.effectiveNetworkSecurityGroups.networksecuritygroups | ConvertTo-Json
  if($resourceDetailjson -ne $null)
  {
    $body=@"
    {
      "rules": [$resourceDetailjson] ,
      "networkSecurityGroups": [$nsg]
    }
    "@
    $enforceresourceURL = "https://management.azure.com$resourceid/providers/Microsoft.Security/adaptiveNetworkHardenings/default/enforce?api-version=2020-01-01"
    $Enforcedetails=(Invoke-RestMethod  -Uri $enforceresourceURL -Headers $AzureApiheaders -Method POST -Body $body)
  }
}
by Contributed | Jul 30, 2021 | Technology
This article is contributed. See the original author and article here.
Version 17.8 of the Microsoft ODBC Driver 17 for SQL Server has been released. Version 17.8 brings several new features and fixes to the driver.
Features
- Ability to modify KeyStoreAuthentication and KeyStorePrincipalId settings via the DSN configuration UI (Windows)
- New replication connection option
- KeepAlive and KeepAliveInterval options added to the connection string
- Support for Ubuntu 21.04
- Support for Alpine Linux 3.13
Fixes
- Fix for restrictions on connection string regarding usage of
UID and PWD keywords
- Fix for inconsistent fonts in non-English dialogs (Windows)
- Fixed issue with having multiple connections with different AKV credentials
- Fixed accessibility issue with screen readers not reading connection test results in DSN configuration UI (Windows)
Next steps
For Windows installations, you can directly download the Microsoft ODBC Driver 17 for SQL Server.
Linux and macOS packages are also available. For installation details see the online instructions.
Roadmap
We are committed to improving quality and bringing more feature support for connecting to SQL Server Azure SQL Database Azure Synapse Analytics, and Azure SQL Managed Instance through regular driver releases. We invite you to explore the latest the Microsoft Data Platform has to offer via a trial of Microsoft Azure SQL Database or by evaluating Microsoft SQL Server.
David Engel
by Contributed | Jul 30, 2021 | Technology
This article is contributed. See the original author and article here.
Today, we are thrilled to announce the general availability of Windows Autopilot for HoloLens 2! IT administrators around the world can now use Microsoft Endpoint Manager to efficiently set up their fleet of HoloLens 2 devices and effectively deploy them to their production environments.
Traditionally, IT pros spend significant hands-on time configuring and setting up devices that will later be used by end users. With Windows Autopilot for HoloLens, we are simplifying this process. IT admins can pre-configure devices with a few simple operations, and end users can set-up the devices with little to no interaction by connecting to a network and verifying credentials.
Everything beyond that is automated.
Thanks to the valuable feedback you provide during the preview period, we have made continued improvements—to Windows Autopilot self-deploying mode in particular. With self-deploying mode, you can easily:
- Join a device to Azure Active Directory (Azure AD).
- Enroll the device in MDM using Azure AD automatic enrollment.
- Provision policies, applications, certificates, and networking profiles.
- Use the Enrollment Status Page (ESP) to prevent access to corporate resources until a device is fully provisioned.
Set up Windows Autopilot for HoloLens in 6 simple steps
Setting up your environment to support HoloLens deployment with Windows Autopilot is straightforward. Simply:
- Enable Automatic MDM Enrollment.
- Register devices in Windows Autopilot.
- Create a device group.
- Create a deployment profile.
- Verify the ESP configuration.
- Verify the profile status of the HoloLens device(s).
For more HoloLens-specific Windows Autopilot information, see our official Windows Autopilot for HoloLens 2 documentation or read our documentation about Windows Autopilot Self-Deploying mode.
Useful information
Support paths
- For support on device registration and shipments, please contact your reseller.
- For general support inquiries about Windows Autopilot or for issues like profile assignments, group creation or Microsoft Endpoint Manager admin center controls, please contact Microsoft Endpoint Manager support.
- If your device is registered in the Windows Autopilot service, and the profile is assigned on the Microsoft Endpoint Manager admin center, but you are still facing issues, please contact HoloLens support.
Continue the conversation. Find best practices. Bookmark the Windows Tech Community.
Stay informed. For the latest updates on new releases, tools, and resources, stay tuned to this blog and follow us @MSWindowsITPro on Twitter.
by Scott Muniz | Jul 30, 2021 | Security, Technology
This article is contributed. See the original author and article here.
CISA has announced the establishment of its Vulnerability Disclosure Policy (VDP) Platform for the federal civilian enterprise, which will allow the Federal Civilian Executive Branch to coordinate with the civilian security research community in a streamlined fashion. The VDP Platform provides a single, centrally managed website that agencies can leverage as the primary point of entry for intaking, triaging, and routing vulnerabilities disclosed by researchers. It enables researchers and members of the general public to find vulnerabilities in agency websites and submit reports for analysis.
This new platform allows agencies to gain greater insights into potential vulnerabilities, which will improve their cybersecurity posture. This approach also means agencies no longer need to develop separate systems to enable vulnerability reporting and triage of identified vulnerabilities, providing government-wide cost savings that CISA estimates at over $10 million.
For more details, see the blog post by CISA’s Executive Assistant Director for Cybersecurity, Eric Goldstein.

Recent Comments