by Contributed | Feb 27, 2021 | Technology
This article is contributed. See the original author and article here.
We’ve just published a new version of the CLI for Microsoft 365 with new commands for working with and managing Microsoft 365 tenants and SharePoint Framework projects on any platform.
Manage Microsoft 365 and SharePoint Framework projects on any platform
CLI for Microsoft 365 is a cross-platform CLI that allows you to manage various configuration settings of Microsoft 365 and SharePoint Framework projects no matter which operating system or shell you use.
While building solutions for Microsoft 365 expands beyond the Windows operating system, managing many of the platform settings is possible only through PowerShell on Windows. As more and more users work on non-Windows machines, it’s inconvenient for them to have to use a Windows virtual machine to configure their tenants. With the CLI for Microsoft 365, you can configure your tenant no matter which operating system you use. Additionally, using CLI for Microsoft 365, you can manage your SharePoint Framework projects.
New version of CLI for Microsoft 365 – v3.6
Following our monthly release cadence, we released this new version of CLI for Microsoft 365 with some new commands and improvements. Here are some of the most noteworthy additions. For the full list of changes, see our release notes.
Ensure SharePoint site
When building provisioning scripts, you often need to check if a particular site already exists. If it doesn’t, you need to create it. If it does, you need to check if it has the necessary settings. Depending what exactly you need to check, this logic can become pretty elaborate. If you need to create a couple of sites, you’re quickly looking at lengthy scripts that you not only need to write but also maintain.
To help you easily ensure that sites with the right configuration exists, we introduce the spo site ensure command. Using this command, you can for example easily ensure that a site exists at the specified URL and create one if it doesn’t:
m365 spo site ensure –url https://contoso.sharepoint.com/sites/team1 –alias team1 –title “Team 1”
Using the command you can also ensure that the site that exists has the right type and properties:
m365 spo site ensure –url https://contoso.sharepoint.com/sites/team1 –alias team1 –title “Team 1” –isPublic –shareByEmailEnabled
This is the first ensure command that we introduce in CLI for Microsoft 365. We’d love you to give it a try and tell us what you think. For more information about what’s possible, see the command’s documentation.
Configure SharePoint site chrome
Microsoft is continuously investing in modernizing SharePoint. With every update, we get more features to build rich portals in a robust and future-ready way. One of the recently introduced features is site chrome that allows you to control how the site’s header and footer look like.
In this version of CLI for Microsoft 365, we introduce a command that allows you to control site’s chrome.
To show site’s header in compact mode, execute:
m365 spo site chrome set –url https://contoso.sharepoint.com/sites/project-x –headerLayout Compact
To show site’s header in extended mode and align the logo to the right, execute:
m365 spo site chrome set –url https://contoso.sharepoint.com/sites/project-x –headerLayout Extended –logoAlignment Right
To disable the footer, execute:
m365 spo site chrome set –url https://contoso.sharepoint.com/sites/project-x –disableFooter true
For the full list of supported settings, see the command’s documentation.
Copy SharePoint pages and page templates
When working with pages and page templates, you might want to copy specific pages or page templates in bulk. The easiest way to automate it, is using CLI for Microsoft 365.
In this version we introduce a command that let’s you copy the specified page or page template. To copy a page template, execute:
m365 spo page copy –webUrl https://contoso.sharepoint.com/sites/team-a –sourceName “templates/PageTemplate.aspx” –targetUrl “page.aspx”
To copy a page to another site, execute:
m365 spo page copy –webUrl https://contoso.sharepoint.com/sites/team-a –sourceName “templates/PageTemplate.aspx” –targetUrl “https://contoso.sharepoint.com/sites/team-b/sitepages/page.aspx”
For the full list of supported options, see the command’s docs.
Manage Power Apps
More and more organizations use Power Apps to automate their work. With Power Apps, they can build applications for their business processes with little to no code.
To help organizations manage their Power Apps, we introduce in this version three new commands.
First, we let you get the list of your Power Apps environments, by executing:
m365 pa environment list
To get more information about a specific environment, execute:
m365 pa environment get –name Default-d87a7535-dd31-4437-bfe1-95340acd55c5
To get information about a specific app, execute:
m365 pa app get –name 3989cb59-ce1a-4a5c-bb78-257c5c39381d
These commands extend our set of Power Platform commands. For the list of all commands for Power Platform, see the documentation.
Changes
We’ve continued improving CLI, building upon the changes we’ve introduced in the previous version.
Browser-based login
Many organizations become more and more conscious about their security posture. As their awareness matures, they implement more measure to ensure that they can work securely. One of such measures is conditional access that allows organizations enforce specific checks on clients authenticating against their Microsoft 365 tenant.
To let organizations who enforce conditional policies use CLI for Microsoft 365, we introduced a browser-based way to login to Microsoft 365.
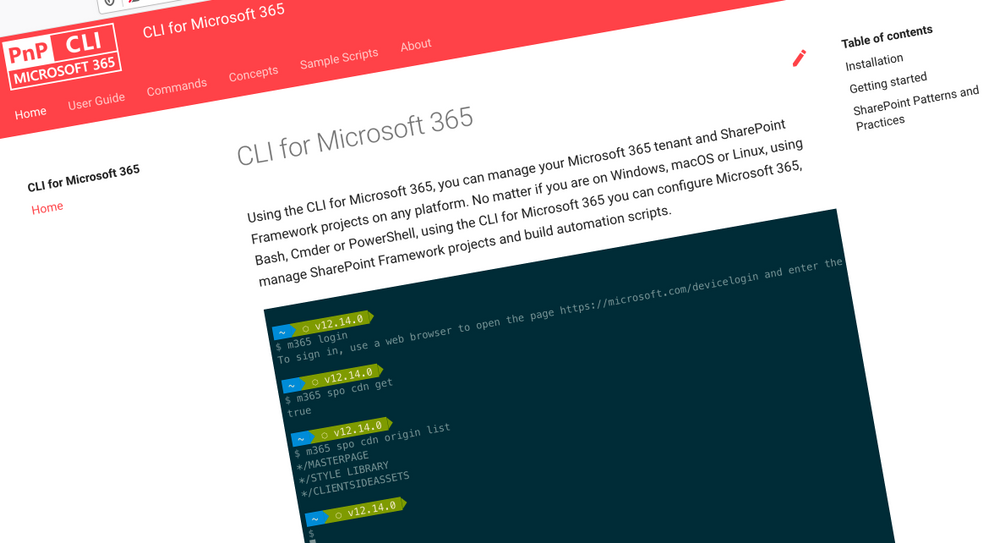
After executing: m365 login –authType browser, CLI for Microsoft 365 will launch a browser, let you sign in and obtain an access token on your behalf. If you have the browser with the right user profile active, the automatically opened login page will give you a smooth login experience without having to copy & paste device code.
From that point on, CLI for Microsoft 365 will work exactly the same way you’re used to it, allowing you to run scripts and automate managing your tenant.
Improved managing SharePoint pages and sites
CLI for Microsoft 365 is a great tool for automating managing your Microsoft 365 tenant and SharePoint Framework projects. It’s also great as an engine to build other tools on top!
Elio Struyf has build a static site generator for SharePoint named Doctor. If you want to author product documentation or a knowledgebase in Markdown but publish it to SharePoint, Doctor is the tool for the job! As Elio is extending Doctor with new capabilities, he’s contributed a number of enhancements to managing pages and sites with CLI for Microsoft 365.
Improved creating Azure AD apps
Recently we’ve introduced an easy way to create Azure AD apps with CLI for Microsoft 365. With just one line of code, you can create an app registration full configured to support your scenario.
In this version of CLI for Microsoft 365, we extended the command so that it returns the ID of your Azure AD directory, which you need to include in your code when building single-tenant apps.
We’ve also improved the mechanism to lookup service principal in cases where their names end with a / (slash).
Simplified retrieving access token for SharePoint
When building apps for Microsoft 365, you often need an access token to quickly test your code. The easiest way to get it, is using CLI for Microsoft 365.
In this version, we made it even easier by introducing an alias for the resource. If you called SharePoint previously using CLI for Microsoft 365, you can quickly get an access token for SharePoint by executing:
m365 util accesstoken get –resource sharepoint
Rather than having to specify the full URL of your SharePoint tenant, you can use sharepoint instead. It’s that easy! Are there any other aliases that we should add?
Sample scripts
CLI for Microsoft 365 is a great tool both for quick adjustments to the configuration of your Microsoft 365 tenant as well as automating more complex tasks. Because CLI for Microsoft 365 is cross-platform you can use it on any OS and in any shell. To help you get started using the CLI for Microsoft 365 for automation scenarios, we started gathering some sample scripts.
If you have any scripts that you use frequently, please share them with us so that we can learn more about the common automation scenarios.
Export conversations from Microsoft Teams Channels
We utilize Teams during incidents and create channels for each. We would like to be able to export conversation history.
To help you quickly export conversations from the teams your members of, Joseph Velliah contributed a sample script that iterates over your Teams and channels and exports conversations to a JSON file.
Contributors
This release wouldn’t be possible without the help of (in alphabetical order) Hugo Bernier, Luise Freese, Patrick Lamber, Waldek Mastykarz, Nanddeep Nachan, Smita Nachan, John Rafael, Albert-Jan Schot, Elio Struyf, Fredrik Thorild, Garry Trinder, Joseph Velliah and Rabia Williams. Thank you all for the time you chose to spend on the CLI for Microsoft 365 and your help to advance it!
Work in progress
Here are some things that we’re currently working on.
More commands, what else
Microsoft 365 is evolving and new capabilities are being released every day. With CLI for Microsoft 365, we aim to help you manage your tenant on any platform in a consistent way, no matter which part of Microsoft 365 you interact with. While we keep adding new commands to CLI for Microsoft 365 each release, we still barely scratched the surface with what’s possible in Microsoft 365. In the upcoming versions of the CLI for Microsoft, you can expect us to add more commands across the different workloads in Microsoft 365.
Improved managing SharePoint pages
Microsoft keeps investing in modern SharePoint pages continuously introducing new capabilities to let us publish rich content. We’re looking into extending our support for managing modern SharePoint pages to let you use them to their full potential.
Improved creating Azure AD apps
Recently, we’ve introduced a command to easily create Azure AD app registrations. Because they’re backbone of every app you’d build on Microsoft 365, we think you should be able to create them as easily as possible. So with CLI for Microsoft 365, you can create a fully configured Azure AD app for the most common scenarios with just one line of code.
In the future versions of CLI for Microsoft 365 you can expect us extend the capabilities with additional scenarios and features supported by Azure AD.
Script examples
In every release of the CLI for Microsoft 365, we introduce new commands for managing Microsoft 365. With over 350 commands across the different Microsoft 365 services, the CLI for Microsoft 365 has become a powerful tool, not just for managing your tenant but also for automating your daily work.
We’d love to show you how you can use the CLI for Microsoft 365 to build automation scripts in PowerShell Core and Bash. If you have any scripts using SPO or PnP PowerShell that you use frequently, please share them with us so that we can learn more about the common automation scenarios.
ensure commands
We’ve just shipped our first ensure command – an easy way to help you that a site with specific settings exists. If it doesn’t, CLI creates it for you, if it does, CLI ensures it has the right properties. All in one line of code. We’d love to hear from you how you like it and if it’s something you’d like us to implement for other commands as well.
Try it today
Get the latest release of the CLI for Microsoft 365 from npm by executing in the command line:
npm i -g @pnp/cli-microsoft365
Alternatively, you can get the latest release from Docker by executing in the command line:
docker run –rm -it m365pnp/cli-microsoft365:latest
If you need more help getting started or want more details about the commands, the architecture or the project, go to aka.ms/cli-m365.
If you see any room for improvement, please, don’t hesitate to reach out to us either on GitHub or twitter.

![[Guest Blog] Unlocking New Possibilities in the Mixed Reality Space](https://www.drware.com/wp-content/uploads/2021/02/large-1350-698x675.)
by Contributed | Feb 26, 2021 | Technology
This article is contributed. See the original author and article here.
This article was written by Amara Anigbo, Microsoft Mixed Reality Program Manager for Dynamics 365 Remote Assist and Guides as part of our Humans of Mixed Reality Guest Blogger Series. Amara shares her personal journey into the Mixed Reality space and why how she believes Mixed Reality will unlock new possibilities in the future.

My journey to Mixed Reality
Growing up, I never thought that I would work in the tech industry. I was the only Black girl in a lot of my classes and people often dissuaded me from pursuing a career in STEM.
Since I was young, I have always been interested in computers. My family got our first computer when I was in elementary school. I would rush back home after school every day to go tinker with our brand-new computer. I was drawn by the complexity of the computer and wanted to understand it at its core.
While at home, I loved to experiment with the computer, at school I really struggled with my confidence in STEM. As the only Black girl in a lot of my classes, I never saw people who looked like me excel in STEM. I didn’t have many role models to follow. Additionally, I had many teachers tell me that I wasn’t good in STEM and should “stick to what I would succeed in”. It wasn’t until I got to college and I took the leap of faith to study Computer Science. I instantly fell in love with the material and gave it my all.
Around the same time, I started studying Computer Science and applied for the Jeff Ubben Fellowship. The fellowship pairs those selected with a major industry leader for a summer internship. I thought that I had a very slim chance since I had only been studying Computer Science for two months, but I still gave the application my all. After months of interviewing for the fellowship, I was selected as one of the five scholars. My host for my summer internship was Microsoft CEO, Satya Nadella.
 Amara Anigbo interviewing Microsoft CEO Satya Nadella in her undergrad days
While interning in the Office of the CEO, I learned about Mixed Reality. My very first experience with Mixed Reality was in a boardroom with Satya as he prepared for a keynote presentation featuring Mixed Reality apps. I remember my eyes widening in amazement as I was watching the holograms dance across the screen. I knew right then and there, I wanted to contribute to this new revolution in computing.
My journey within Mixed Reality
I interned in the Mixed Reality division during both summer 2018 and 2019. I loved the experience because it always felt like I was living in the future. Interning in Mixed Reality taught me how important iteration is to innovation. More than anything, I enjoyed the collaborative space and how everyone drew from their diverse backgrounds to create groundbreaking products.
Following my internship, I joined Microsoft in August 2020 as a Program Manager on the Mixed Reality Apps Team. I work specifically on Dynamics 365 Remote Assist and Guides. It has been an eye-opening experience so far and I am learning in more depth about the potential applications of Mixed Reality.
Where do you see Mixed Reality going?
Mixed Reality has so many real-world applications! One future application that I am particularly excited about is how much it could revolutionize education. It will be interesting to see the curriculum involve Mixed Reality. It has the power to be used in the classroom environment and change the way we approach showing educational diagrams. Apart from education, mixed reality is being introduced to industries such as construction, healthcare, manufacturing, automotive and more.
During the pandemic, we have seen a great potential for Mixed Reality to truly transform the way we interact with computing, while helping ensure business continuity. I am extremely excited to how Mixed Reality capabilities evolve in real-life situations once it is widely adopted, and I hope to meet many of you who are also on this wonderful journey in Mixed Reality.
#MixedReality #CareerJourney


Recent Comments