by Scott Muniz | Aug 31, 2020 | Uncategorized
This article is contributed. See the original author and article here.
In the dazzling array of services among the Microsoft cloud offerings, the rollout of TLS 1.0/1.1 deprecations is not being done all at once. This has lead to some confusion and questions around which endpoints are dropping the older TLS support and when.
Here I want to provide some dates and times of the endpoints, along with some .NET code guidance on how to use the newer TLS protocol (1.2), with some more information on TLS across the Microsoft Cloud.
So to begin, here are some of the endpoints that we know of.
| Service |
end date |
Release |
| Office 365 (Exchange/SharePoint/etc) |
|
|
| Office 365 Dod/GCC |
1/1/2020 |
|
| Office 365 consumer |
10/15/2020 |
|
| Graph |
|
|
| Graph Government |
8/5/2020 |
|
| Graph Consumer |
10/15/2020 |
|
| Azure |
|
|
| Azure Guest OS images |
1/1/2019 |
Family 6 release |
| Azure Application Proxy |
1/31/2019 |
|
| Azure intra-service traffic |
1/1/2020 |
|
| Azure SQL DB managed instance (pre SQL 2016) |
1/1/2020 |
|
| Azure Cosmos DB |
7/29/2020 |
|
| Azure File Sync |
8/1/2020 |
|
| Azure AD registration service in all sovereign clouds (GCC High, DoD etc.) |
8/31/2020 |
|
| Azure Automation |
9/1/2020 |
|
| Azure AD registration service in all commercial clouds |
10/30/2020 |
|
| Azure App Services (Web apps/functions/etc.) no announced timeline, can be set by admin still. |
?? |
|
If you are not sure about a particular endpoint, you can use this powershell to test the endpoint to see which versions of TLS it supports-
<#
Created by: whall
Date Created: 3/25/2020

Product Area Tags: Connectivity

Technology Tags: SSL TLS

Use Case:
Shows which version(s) of TLS is supported for a URL

Description:
When you run this, it checks each TLS type connection to see if it is supported.


Parameters:
-url this is the URL of the site you are testing against

Keywords: sockets secure https

Code Example Disclaimer:
Sample Code is provided for the purpose of illustration only and is not intended to be used in a production environment. THIS SAMPLE CODE AND ANY RELATED INFORMATION ARE PROVIDED 'AS IS'
-This is intended as a sample of how code might be written for a similar purpose and you will need to make changes to fit to your requirements.
-This code has not been tested.  This code is also not to be considered best practices or prescriptive guidance.
-No debugging or error handling has been implemented.
-It is highly recommended that you FULLY understand what this code is doing  and use this code at your own risk.

#>

#TLS check
param([Parameter(Mandatory=$true)][string]$url)

function TLSAvailable([string]$url){


    Write-Host =======================
    Write-Host $url
    Write-Host =======================

    [System.Net.ServicePointManager]::SecurityProtocol = "Tls"

    try{
    $resp1 = Invoke-WebRequest -uri $url -Method GET -DisableKeepAlive
    if($resp1.StatusCode -eq 200){
        Write-Host "TLS/SSL 1.0 supported" -ForegroundColor green
    }
    }catch {
        Write-Host "TLS/SSL 1.0 not supported" -ForegroundColor Red
        #$_.Exception
    }

    [System.Net.ServicePointManager]::SecurityProtocol = "Tls11"
    try{
    $resp2 = Invoke-WebRequest -uri $url -Method GET -DisableKeepAlive
    if($resp2.StatusCode -eq 200){
        Write-Host "TLS/SSL 1.1 supported" -ForegroundColor green
    }
    }catch {
            Write-Host "TLS/SSL 1.1 not supported" -ForegroundColor Red
            #$_.Exception
    }

    [System.Net.ServicePointManager]::SecurityProtocol = "Tls12"

    try{
    $resp3 = Invoke-WebRequest -uri $url -Method GET -DisableKeepAlive
    if($resp3.StatusCode -eq 200){
        Write-Host "TLS/SSL 1.2 supported" -ForegroundColor green
    }
    }catch{
            Write-Host "TLS/SSL 1.2 not supported" -ForegroundColor Red
            #$_.Exception
    }
    Write-Host =======================

}

TLSAvailable -url $url
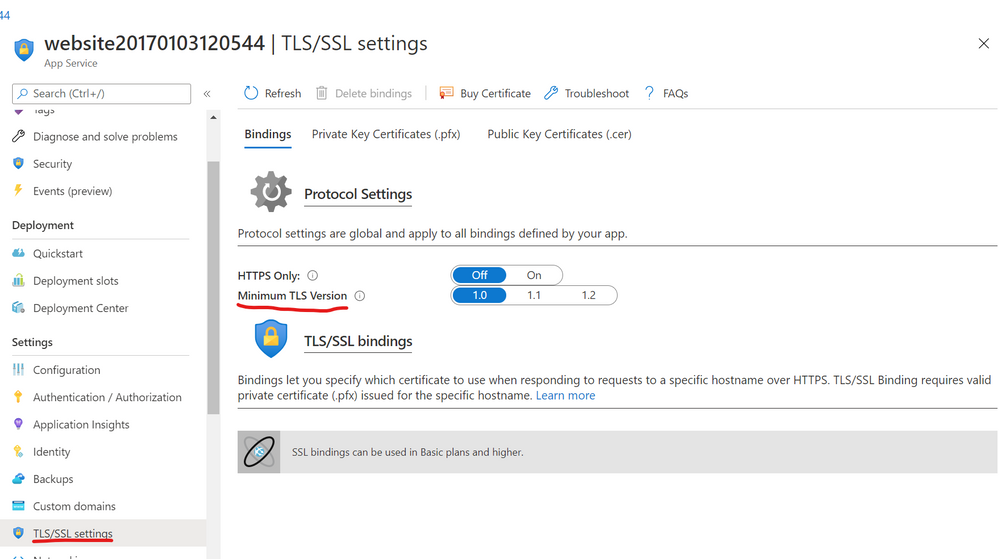
Azure Web Application Services
If you are running a .NET web application in the Azure web application services, you can set the TLS level under the application settings as below-

.NET Framework Code
If you are compiling your code for .NET framework 4.7 (4.7.1 for WCF apps) or later, it will use the default TLS version for the OS.
If you complied to a previous .NET framework version, it will use older versions of TLS unless you apply the right patch, and use one of the following methods-
- Set a registry setting to force all .NET code to use strong cryptography
- Set a config setting for the app context overrides to use the strong cryptography
- Add a line of code to change the TLS version used for HTTPS calls
Method 1 (System wide registry change)-
This enables something called strong cryptography which makes .NET use the strongest cryptography available currently. This affects all .NET applications with one registry change (per CLR version).
Enable strong cryptography for .NET CLR 4 versions (64 bit)-
Windows Registry Editor Version 5.00
[HKEY_LOCAL_MACHINESOFTWAREMicrosoft.NETFrameworkv4.0.30319]
“SchUseStrongCrypto”=dword:00000001
[HKEY_LOCAL_MACHINESOFTWAREWow6432NodeMicrosoft.NETFrameworkv4.0.30319]
“SchUseStrongCrypto”=dword:00000001
Enable strong cryptography for .NET CLR 2 versions (64 bit)-
Windows Registry Editor Version 5.00
[HKEY_LOCAL_MACHINESOFTWAREMicrosoft.NETFrameworkv2.0.50727]
“SchUseStrongCrypto”=dword:00000001
[HKEY_LOCAL_MACHINESOFTWAREWow6432NodeMicrosoft.NETFrameworkv2.0.50727]
“SchUseStrongCrypto”=dword:00000001
Method 2 (Config file change)-
Add the following to your .NET config file
<runtime>
<AppContextSwitchOverrides value=”Switch.System.Net.DontEnableSchUseStrongCrypto=false” />
</runtime>
Method 3 (Hardcoded in the application)-
Use this line of C# code in your application during the initialization so that all web calls will use the newer TLS 1.2 protocol-
System.Net.ServicePointManager.SecurityProtocol = SecurityProtocolType.Tls12;
If you are using PowerShell you can use the same object with this-
[System.Net.ServicePointManager]::SecurityProtocol = "Tls12"
More on these here-
https://docs.microsoft.com/en-us/dotnet/framework/network-programming/tls
Browser Support (Edge/Chrome/Edge legacy/IE/Firefox/Safari)
The following clients are known to be unable to use TLS 1.2. Update these clients to ensure uninterrupted access to the service.
- Android 4.3 and earlier versions
- Firefox version 5.0 and earlier versions
- Internet Explorer 8-10 on Windows 7 and earlier versions
- Internet Explorer 10 on Windows Phone 8
- Safari 6.0.4/OS X10.8.4 and earlier versions
Edge chromium disabled 1.0 and 1.1 around July 2020 (ver 84).
For all supported versions of Internet Explorer 11 and Microsoft Edge Legacy (EdgeHTML-based), TLS 1.0 and TLS 1.1 will be disabled by default as of September 8, 2020.
TLS 1.3
The next version of TLS is already implemented in some browsers, and is just around that corner, but as of yet should not be causing issues since TLS 1.2 is just getting to the lowest mandatory version.
More information
For more information on the patches for various products and more details to some of the .NET settings related to TLS please see the following articles.
Azure
https://azure.microsoft.com/en-us/updates/azuretls12/
https://azure.microsoft.com/en-us/updates/?query=TLS
Windows/.NET/SQL/SharePoint (on-Prem)
SQL-
https://support.microsoft.com/en-us/help/3135244/tls-1-2-support-for-microsoft-sql-server
SharePoint (this covers .NET/windows/SQL/browsers as well)-
https://docs.microsoft.com/en-us/sharepoint/security-for-sharepoint-server/enable-tls-1-1-and-tls-1-2-support-in-sharepoint-server-2019
.NET 4.5-
https://docs.microsoft.com/en-us/sharepoint/security-for-sharepoint-server/enable-tls-1-1-and-tls-1-2-support-in-sharepoint-server-2019#34—enable-strong-cryptography-in-net-framework-45-or-higher
.NET 3.5 update for TLS 1.1/1.2 support-
https://docs.microsoft.com/en-us/sharepoint/security-for-sharepoint-server/enable-tls-1-1-and-tls-1-2-support-in-sharepoint-server-2019#35—install-net-framework-35-update-for-tls-11-and-tls-12-support
.NET programming guidance-
https://docs.microsoft.com/en-us/dotnet/framework/network-programming/tls
![[Guest Blog] My Microsoft Ignite Experience as a Humans of IT Student Ambassador](https://www.drware.com/wp-content/uploads/2020/08/large-1304-999x675.)
by Scott Muniz | Aug 31, 2020 | Uncategorized
This article is contributed. See the original author and article here.
This article was written by Microsoft Ignite 2020 Humans of IT student advisor Kiana Alikahedemi, a Computer Science PhD candidate at the University of Florida. Kiana was previously a Humans of IT student ambassador herself at Microsoft Ignite 2019 and is returning this year as a mentor to the incoming batch of new student ambassadors from five HBCUs. Kiana shares about her experience as a student ambassador, and excitement about this year’s Microsoft Ignite Humans of IT track. This is the third article in a series featuring this year’s Humans of IT student ambassadors and advisors.
Although I have been living and studying in the US for many years now, my childhood was spent growing up in the Middle East where there is a dire lack of diversity in the engineering workforce. Many women in my community do not earn degrees, falling victim to the belief that they can’t. I vividly remember how from a young age, I decided not to let this be my story. I was always interested in problem-solving and science concepts in school. My passion led me to choose Computer Science as a major. During my undergrad days, I consciously looked for mentors who were similarly passionate about tech and had experience in helping others build their careers. It didn’t stop at my bachelor’s degree. Shortly after, I was admitted into graduate school, which brought me closer to my dream job in the tech industry and academia.
A lack of diversity continues to be a prevalent issue in most regions – I, too, experienced a lot of bias and discrimination firsthand while in graduate school. Last year, my friend heard about the Humans of IT Student Ambassador program and nominated me as she knew my passion for diversity and equity. I decided to take the challenge and join the other students to promote inclusion in tech and adopt a “human-first” approach when it comes to technology. That’s how I first got involved with the Microsoft Humans of IT Community, which turned out as a valuable experience for me to connect with diverse and wonderful people in tech from all around the world, and celebrate our common humanity.
This is the team that helped me to shape one of the best experience I’ve ever had in tech:

During Microsoft Ignite, I participated in insightful and amazing talks. I had the pleasure to meet truly amazing and inspiring people such as Haben Girma, a Disability Rights Lawyer, Author, and Speaker, who I’ve always praised for her courage and persistence. I even got to talk to her in person during the conference, and received a signed copy of her book. It was truly the highlight of my entire week!
It was incredible to meet a diverse set of people who, like me, had experienced the similar discrimination or bias in school, at work, or within their communities and simply wanted to belong in tech. Furthermore, it was also rewarding to meet people like Microsoft’s Bryce Johnson who mindfully considers diversity, accessibility and user needs in every stage of their work (If you don’t know him, just search his name you will be amazed. Hint: one of the biggest technologies he helped developed – the Xbox adaptive controller – is in the next picture!).

The Microsoft Humans of IT community has taught me to be resilient and confident. All of the conversations and encounters made me feel like I was a part of a broader community with the vision to solve diversity issues and help empower all humans out there through technology. As a community, we will pave the way for others to realize that they are incredible humans who have earned their seat at the table and have valuable skills to offer. We pledge to use our technical skills for good, and to help solve challenging world issues.
I took away all the inspirations from Microsoft Ignite 2019 with me and applied in every single decision or experience I had since. Naturally, when I heard that it was time for Microsoft Ignite 2020 (coming up in just 22 days!), I immediately put my hand up to be a student ambassador again. Not only did the Humans of IT Community welcome me back as a student ambassador, I even got the chance to become a student advisor to this year’s inspiring batch of students from Historically Black Colleges and Universities (HBCUs) to help mentor the next generation of technologists!
Amidst a global pandemic, this is an amazing opportunity to show up, be present and demonstrate how we can better understand the importance of community. I cannot wait to share lessons, challenges, and obstacles I encountered in these hard times with my Microsoft Ignite community. Together, we will overcome challenges and become #StrongerTogether.
#HumansofIT
#StudentAmbassador
#MicrosoftIgnite2020
by Scott Muniz | Aug 31, 2020 | Uncategorized
This article is contributed. See the original author and article here.
BizTalk 2020 CU1 introduced support for dynamic send ports in the Office 365 Outlook adapters. In this post, we go over this improvement into more details.
Pre-requisites
Messages sent from a dynamic send port with transport type set to one of the Office 365 Outlook adapters require the UserTokenIdentifier context property. This identifier is created when the user signs in to Office 365, which is done in the transport properties of the Office 365 Outlook adapters as documented in Office 365 Outlook adapters in BizTalk.
Once a user is signed-in, the UserTokenIdentifier is retrieved from the bindings, as shown below, in the case of an exported Mail send port (placeholder nnnnnnnn-nnnn-nnnn-nnnnnnnnnnnn):
<SendPort Name="MailSendPort2" IsStatic="true" IsTwoWay="false" BindingOption="0" AnalyticsEnabled="false">
<Description xsi:nil="true" />
<TransmitPipeline
Name="Microsoft.BizTalk.DefaultPipelines.PassThruTransmit"
FullyQualifiedName="Microsoft.BizTalk.DefaultPipelines.PassThruTransmit, Microsoft.BizTalk.DefaultPipelines, Version=3.0.1.0, Culture=neutral,
PublicKeyToken=31bf3856ad364e35" Type="2" TrackingOption="None" Description="" />
<PrimaryTransport>
<Address>O365Mail://BizTalkTestAccount1@outlook.com</Address>
<TransportType Name="Office365 Outlook Email" Capabilities="11" ConfigurationClsid="48b96e09-bd96-4f46-95ef-57accc55f23d" />
<TransportTypeData><CustomProps><DefaultCC vt="8" /><UserTokenIdentifier vt="8">nnnnnnnn-nnnn-nnnn-nnnn-nnnnnnnnnnnn</UserTokenIdentifier><FileAttachments vt="8" /><DefaultTo vt="8">BizTalkTestAccount2@outlook.com</DefaultTo><EmailAddress vt="8">BizTalkTestAccount1@outlook.com</EmailAddress><AttachBizTalkMessageParts vt="11">0</AttachBizTalkMessageParts><DefaultSubject vt="8">Hi from BizTalkTestAccount1</DefaultSubject><DefaultImportance vt="8">Normal</DefaultImportance></CustomProps></TransportTypeData>
Note that the UserTokenIdentifier is tied to a signed-in account and a transport type. A static send port needs to be created for each Office 365 transport type in order to get an identifier for each. For a given sign-in, the value of the UserTokenIdentifier may be the same for all Office 365 transport types, but static send ports need to be created for each transport type nonetheless.
Other important points to be aware of:
- Static send ports can be deleted afterwards. They are not needed once the UserTokenIdentifiers are known.
- UserTokenIdentifiers remain valid regardless of whether a dynamic or static send port exists or not, and after port deletions.
- The same UserTokenIdentifier can be used by multiple ports.
Scenario
The demo scenario is based on a simple orchestration:

Received messages follow the schema:

|
Element
|
Description
|
|
UserTokenIdentifier
|
Value of the UserTokenIdenfier acquired ahead of time by exporting the static ports.
The UserTokenIdentifier is provided by received messages. In the general case, the UserTokenIdentifier can come from any source. For instance one could keep a mapping of email addresses to UserTokenIdentifiers and make this mapping available for lookup at runtime.
|
|
PortType
|
Name of the adapter transport type:
- Office365 Outlook Email
- Office365 Outlook Calendar
- Office365 Outlook Contact
|
|
PortAddress
|
Any unique identifier for the dynamic send port. Typically it is a user-friendly string. Since we’re using an Office 365 account, we used an email address (e.g., BizTalkAccount1@outlook.com).
|
|
To
|
(only for O365 Email) Email address to send mails to, if the transport type is Office 365 Outlook Email.
|
|
Subject
|
(only for O365 Email) Email subject .
|
|
Calendar
|
(only for O365 Calendar) Calendar where the calendar items are created, when using Office 365 Outlook Calendar transport type.
|
|
Payload
|
<![CDATA[content]] where content can be either:
- Email body
- Calendar item in XML according to the Office365OutlookCalendarSend.xsd provided in the BizTalk installation folder under SDKSchemas.
- Contact item in XML following the Office365OutlookContactSend.xsd in the same location.
CDATA is used to make the XML payloads (calendar and contact) opaque to XML parsers on the receive side. The payloads are used on the send side.
|
In the case of calendar and contact items, the payloads are based on the schemas provided in the BizTalk installation folder under C:Program Files (x86)Microsoft BizTalk ServerSDKSchemas (more info in Office 365 Outlook Adapters in Action).
Examples
|
Email
|
<ns0:Root xmlns:ns0="http://DynamicO365SendPort.ReceiveSchema">
    <UserTokenIdentifier>nnnnnnnn-nnnn-nnnn-nnnn-nnnnnnnnnnnn</UserTokenIdentifier>
    <PortType>Office365 Outlook Email</PortType>
    <PortAddress>BizTalkAccount1@outlook.com</PortAddress>
    <To>BizTalkAccount2@outlook.com</To>
    <Subject>Hello</Subject>
    <Payload><![CDATA[<?xml version="1.0" encoding="utf-8"?><EmailBody>body</EmailBody>]]></Payload>
</ns0:Root>
|
|
Calendar
|
<ns0:Root xmlns:ns0="http://DynamicO365SendPort.ReceiveSchema">
    <UserTokenIdentifier>nnnnnnnn-nnnn-nnnn-nnnn-nnnnnnnnnnnn</UserTokenIdentifier>
    <PortType>Office365 Outlook Calendar</PortType>
    <PortAddress>BizTalkAccount1@outlook.com</PortAddress>
    <To>BizTalkAccount2@outlook.com</To>
    <Subject>Hello</Subject>
    <Calendar>Calendar</Calendar>
    <Payload>
        <![CDATA[
            <ns0:Event xmlns:ns0="http://schemas.microsoft.com/BizTalk/Office365OutlookCalendar/Send">
                <subject>Let's meet</subject>
                <body><content>Info for the upcoming meeting</content></body>
                <start><dateTime>2020-06-25</dateTime><timeZone>Pacific Standard Time</timeZone></start>
                <end><dateTime>2020-06-25</dateTime><timeZone>Pacific Standard Time</timeZone></end>
                <attendees>
                    <emailAddress><address>BizTalkAccount2@outlook.com</address><name>BizTalkAccount2</name></emailAddress>
                </attendees>
           </ns0:Event>
        ]]>
    </Payload>
</ns0:Root>
|
|
Contact
|
<ns0:Root xmlns:ns0="http://DynamicO365SendPort.ReceiveSchema">
    <UserTokenIdentifier>nnnnnnnn-nnnn-nnnn-nnnn-nnnnnnnnnnnn</UserTokenIdentifier>
    <PortType>Office365 Outlook Contact</PortType>
    <PortAddress>BizTalkAccount1@outlook.com</PortAddress>
    <To>BizTalkAccount2@outlook.com</To>
    <Subject>Hello</Subject>
    <Payload>
        <![CDATA[
            <ns0:Contact xmlns:ns0="http://schemas.microsoft.com/BizTalk/Office365OutlookContacts/Send">
                <displayName>displayName_3</displayName>
                more contact fields
           </ns0:Contact>
        ]]>
    </Payload>
</ns0:Root>
|
Dynamic Send Port Configuration
To keep things simple, an XML document is created on the fly and properties are added. The message creation expression is:
XMLMessage = new System.Xml.XmlDocument();

// Payload from the CDATA section of received messages
XMLMessage.LoadXml(ReceivedMessage.Payload);

// Token identifier (required)
XMLMessage(OfficeMail.UserTokenIdentifier) = ReceivedMessage.UserTokenIdentifier;
XMLMessage(OfficeCalendar.UserTokenIdentifier) = ReceivedMessage.UserTokenIdentifier;
XMLMessage(OfficeContact.UserTokenIdentifier) = ReceivedMessage.UserTokenIdentifier;

// Transport type (required)
SendPort(Microsoft.XLANGs.BaseTypes.TransportType) = ReceivedMessage.PortType;

// Port address
SendPort(Microsoft.XLANGs.BaseTypes.Address) = PortAddress; // Generated in separate expression.

// Additional fields for Mail transport type
XMLMessage(OfficeMail.To) = ReceivedMessage.To;
XMLMessage(OfficeMail.Subject) = ReceivedMessage.Subject;
Note: Additional promoted are available for Mail transport type, such as CC, importance and attached files (see Office 365 Outlook Email Adapter).
The port address is generated from received messages by using the following expression:
if (ReceivedMessage.PortType == "Office365 Outlook Email")
{
    PortAddress = "O365Mail://" + ReceivedMessage.PortAddress;
}
else if (ReceivedMessage.PortType == "Office365 Outlook Calendar")
{
    PortAddress = "O365Calendar://" + ReceivedMessage.PortAddress + "/MyCalendars/" + ReceivedMessage.Calendar;
}
else if (ReceivedMessage.PortType == "Office365 Outlook Contact")
{
    PortAddress = "O365Contact://" + ReceivedMessage.PortAddress;
}
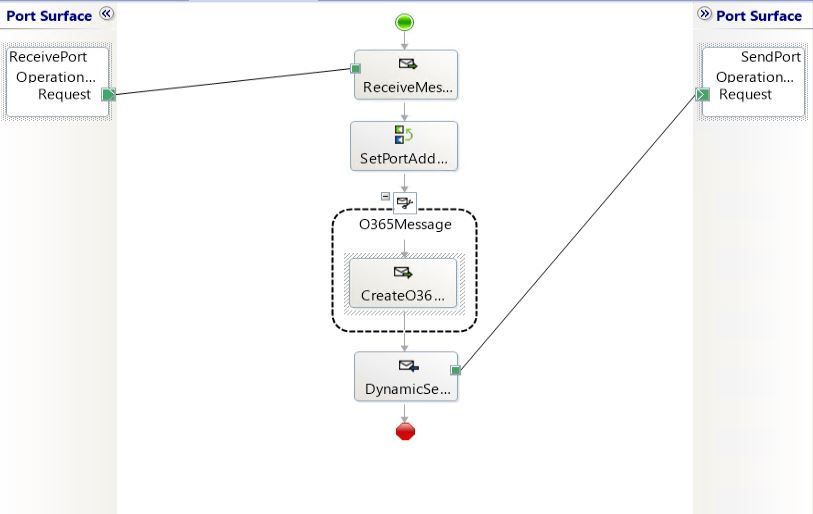
Putting it all together
The annotated view of the demo orchestration below illustrates the data flow. Received messages provide UserTokenIdentifiers and transport type to be used for the messages sent by the dynamic send port.

BizTalk code is attached to this post for reference.
by Scott Muniz | Aug 31, 2020 | Uncategorized
This article is contributed. See the original author and article here.
BizTalk 2020 CU1 introduced support for dynamic send ports in the Office 365 Outlook adapters. In this post, we go over this improvement into more details.
Pre-requisites
Messages sent from a dynamic send port with transport type set to one of the Office 365 Outlook adapters require the UserTokenIdentifier context property. This identifier is created when the user signs in to Office 365, which is done in the transport properties of the Office 365 Outlook adapters as documented in Office 365 Outlook adapters in BizTalk.
Once a user is signed-in, the UserTokenIdentifier is retrieved from the bindings, as shown below, in the case of an exported Mail send port (placeholder nnnnnnnn-nnnn-nnnn-nnnnnnnnnnnn):
<SendPort Name="MailSendPort2" IsStatic="true" IsTwoWay="false" BindingOption="0" AnalyticsEnabled="false">
<Description xsi:nil="true" />
<TransmitPipeline
Name="Microsoft.BizTalk.DefaultPipelines.PassThruTransmit"
FullyQualifiedName="Microsoft.BizTalk.DefaultPipelines.PassThruTransmit, Microsoft.BizTalk.DefaultPipelines, Version=3.0.1.0, Culture=neutral,
PublicKeyToken=31bf3856ad364e35" Type="2" TrackingOption="None" Description="" />
<PrimaryTransport>
<Address>O365Mail://BizTalkTestAccount1@outlook.com</Address>
<TransportType Name="Office365 Outlook Email" Capabilities="11" ConfigurationClsid="48b96e09-bd96-4f46-95ef-57accc55f23d" />
<TransportTypeData><CustomProps><DefaultCC vt="8" /><UserTokenIdentifier vt="8">nnnnnnnn-nnnn-nnnn-nnnn-nnnnnnnnnnnn</UserTokenIdentifier><FileAttachments vt="8" /><DefaultTo vt="8">BizTalkTestAccount2@outlook.com</DefaultTo><EmailAddress vt="8">BizTalkTestAccount1@outlook.com</EmailAddress><AttachBizTalkMessageParts vt="11">0</AttachBizTalkMessageParts><DefaultSubject vt="8">Hi from BizTalkTestAccount1</DefaultSubject><DefaultImportance vt="8">Normal</DefaultImportance></CustomProps></TransportTypeData>
Note that the UserTokenIdentifier is tied to a signed-in account and a transport type. A static send port needs to be created for each Office 365 transport type in order to get an identifier for each. For a given sign-in, the value of the UserTokenIdentifier may be the same for all Office 365 transport types, but static send ports need to be created for each transport type nonetheless.
Other important points to be aware of:
- Static send ports can be deleted afterwards. They are not needed once the UserTokenIdentifiers are known.
- UserTokenIdentifiers remain valid regardless of whether a dynamic or static send port exists or not, and after port deletions.
- The same UserTokenIdentifier can be used by multiple ports.
Scenario
The demo scenario is based on a simple orchestration:
Received messages follow the schema:
|
Element
|
Description
|
|
UserTokenIdentifier
|
Value of the UserTokenIdenfier acquired ahead of time by exporting the static ports.
The UserTokenIdentifier is provided by received messages. In the general case, the UserTokenIdentifier can come from any source. For instance one could keep a mapping of email addresses to UserTokenIdentifiers and make this mapping available for lookup at runtime.
|
|
PortType
|
Name of the adapter transport type:
- Office365 Outlook Email
- Office365 Outlook Calendar
- Office365 Outlook Contact
|
|
PortAddress
|
Any unique identifier for the dynamic send port. Typically it is a user-friendly string. Since we’re using an Office 365 account, we used an email address (e.g., BizTalkAccount1@outlook.com).
|
|
To
|
(only for O365 Email) Email address to send mails to, if the transport type is Office 365 Outlook Email.
|
|
Subject
|
(only for O365 Email) Email subject .
|
|
Calendar
|
(only for O365 Calendar) Calendar where the calendar items are created, when using Office 365 Outlook Calendar transport type.
|
|
Payload
|
<![CDATA[content]] where content can be either:
- Email body
- Calendar item in XML according to the Office365OutlookCalendarSend.xsd provided in the BizTalk installation folder under SDKSchemas.
- Contact item in XML following the Office365OutlookContactSend.xsd in the same location.
CDATA is used to make the XML payloads (calendar and contact) opaque to XML parsers on the receive side. The payloads are used on the send side.
|
In the case of calendar and contact items, the payloads are based on the schemas provided in the BizTalk installation folder under C:Program Files (x86)Microsoft BizTalk ServerSDKSchemas (more info in Office 365 Outlook Adapters in Action).
Examples
|
Email
|
<ns0:Root xmlns:ns0="http://DynamicO365SendPort.ReceiveSchema">
    <UserTokenIdentifier>nnnnnnnn-nnnn-nnnn-nnnn-nnnnnnnnnnnn</UserTokenIdentifier>
    <PortType>Office365 Outlook Email</PortType>
    <PortAddress>BizTalkAccount1@outlook.com</PortAddress>
    <To>BizTalkAccount2@outlook.com</To>
    <Subject>Hello</Subject>
    <Payload><![CDATA[<?xml version="1.0" encoding="utf-8"?><EmailBody>body</EmailBody>]]></Payload>
</ns0:Root>
|
|
Calendar
|
<ns0:Root xmlns:ns0="http://DynamicO365SendPort.ReceiveSchema">
    <UserTokenIdentifier>nnnnnnnn-nnnn-nnnn-nnnn-nnnnnnnnnnnn</UserTokenIdentifier>
    <PortType>Office365 Outlook Calendar</PortType>
    <PortAddress>BizTalkAccount1@outlook.com</PortAddress>
    <To>BizTalkAccount2@outlook.com</To>
    <Subject>Hello</Subject>
    <Calendar>Calendar</Calendar>
    <Payload>
        <![CDATA[
            <ns0:Event xmlns:ns0="http://schemas.microsoft.com/BizTalk/Office365OutlookCalendar/Send">
                <subject>Let's meet</subject>
                <body><content>Info for the upcoming meeting</content></body>
                <start><dateTime>2020-06-25</dateTime><timeZone>Pacific Standard Time</timeZone></start>
                <end><dateTime>2020-06-25</dateTime><timeZone>Pacific Standard Time</timeZone></end>
                <attendees>
                    <emailAddress><address>BizTalkAccount2@outlook.com</address><name>BizTalkAccount2</name></emailAddress>
                </attendees>
           </ns0:Event>
        ]]>
    </Payload>
</ns0:Root>
|
|
Contact
|
<ns0:Root xmlns:ns0="http://DynamicO365SendPort.ReceiveSchema">
    <UserTokenIdentifier>nnnnnnnn-nnnn-nnnn-nnnn-nnnnnnnnnnnn</UserTokenIdentifier>
    <PortType>Office365 Outlook Contact</PortType>
    <PortAddress>BizTalkAccount1@outlook.com</PortAddress>
    <To>BizTalkAccount2@outlook.com</To>
    <Subject>Hello</Subject>
    <Payload>
        <![CDATA[
            <ns0:Contact xmlns:ns0="http://schemas.microsoft.com/BizTalk/Office365OutlookContacts/Send">
                <displayName>displayName_3</displayName>
                more contact fields
           </ns0:Contact>
        ]]>
    </Payload>
</ns0:Root>
|
Dynamic Send Port Configuration
To keep things simple, an XML document is created on the fly and properties are added. The message creation expression is:
XMLMessage = new System.Xml.XmlDocument();

// Payload from the CDATA section of received messages
XMLMessage.LoadXml(ReceivedMessage.Payload);

// Token identifier (required)
XMLMessage(OfficeMail.UserTokenIdentifier) = ReceivedMessage.UserTokenIdentifier;
XMLMessage(OfficeCalendar.UserTokenIdentifier) = ReceivedMessage.UserTokenIdentifier;
XMLMessage(OfficeContact.UserTokenIdentifier) = ReceivedMessage.UserTokenIdentifier;

// Transport type (required)
SendPort(Microsoft.XLANGs.BaseTypes.TransportType) = ReceivedMessage.PortType;

// Port address
SendPort(Microsoft.XLANGs.BaseTypes.Address) = PortAddress; // Generated in separate expression.

// Additional fields for Mail transport type
XMLMessage(OfficeMail.To) = ReceivedMessage.To;
XMLMessage(OfficeMail.Subject) = ReceivedMessage.Subject;
Note: Additional promoted are available for Mail transport type, such as CC, importance and attached files (see Office 365 Outlook Email Adapter).
The port address is generated from received messages by using the following expression:
if (ReceivedMessage.PortType == "Office365 Outlook Email")
{
    PortAddress = "O365Mail://" + ReceivedMessage.PortAddress;
}
else if (ReceivedMessage.PortType == "Office365 Outlook Calendar")
{
    PortAddress = "O365Calendar://" + ReceivedMessage.PortAddress + "/MyCalendars/" + ReceivedMessage.Calendar;
}
else if (ReceivedMessage.PortType == "Office365 Outlook Contact")
{
    PortAddress = "O365Contact://" + ReceivedMessage.PortAddress;
}
Putting it all together
The annotated view of the demo orchestration below illustrates the data flow. Received messages provide UserTokenIdentifiers and transport type to be used for the messages sent by the dynamic send port.
BizTalk code is attached to this post for reference.
by Scott Muniz | Aug 31, 2020 | Uncategorized
This article is contributed. See the original author and article here.
The Project team has been focused on big features, which you can see listed here, or track in the Microsoft 365 Public Roadmap. You can let us know any new features you need on Microsoft UserVoice. Join an existing thread or create a new one to tell us how to make Project for the web better.
We love feedback! If you have feedback, submit it by using the ‘Feedback’ button in Project for the web. Make sure to include your email so we can contact you directly with any follow up questions or comments. We also monitor comments on all blog posts so let us know what you think about this or other articles!
New features:
- Group by Assigned: Starting this month, you can organize your tasks by assignee in the Board view. Get insight into what each person is working on!
Upcoming features:
- Share Projects with groups you don’t own: Starting next month, you can see all your added groups when you add a group to your project. Easily share your work with all the important people without creating new groups.
- Task Custom Fields: Use custom fields in Project for the web to ensure that all your information can live in one place.
- Project & Roadmap in Microsoft Teams: Coming soon, Project & Roadmap will have their own applications in Microsoft Teams. Chat with your teammates while viewing and updating your work. All features available in the web experience will be available in the Teams.
- Email notifications: Stay ahead of your work by creating email notifications for yourself and your teammates.
- Export to Excel: Leverage the power of Microsoft Project & Microsoft Excel together by exporting your project data into spreadsheets.
Answers to top questions:
Q: How can I share project information with non-project users?
A: Users that are assigned certain Office 365 licenses can access Project for the web and Roadmap in read-only mode. For a full list of licenses with read-only access to Project for the web, check out our documentation.
As noted above, we have an export feature planned for release in the fall.


Recent Comments