by Contributed | Dec 31, 2020 | Technology
This article is contributed. See the original author and article here.
Happy New Year everyone!
With the new year comes a new Azure Sentinel PowerShell module!
Based on the Azure SDK for .NET and part of the Azure (Az) module, we are announcing the public preview release of the SecurityInsights PowerShell module.
Because this is an official supported PowerShell module when we release it, the cmdlets are based on the Generally Available (GA) 2020-01-01 SecurityInsights API. As soon as features hit GA, we will update the SecurityInsights module to reflect that.
How to download and test
Prerequisites: the SecurityInsights module requires at a minimum PowerShell version 5.1 and relies on Az.Accounts for Azure authentication.
You can download the SecurityInsights PowerShell module from the PowerShellGallery and install it by using the PowerShell command Install-Module -Name Az
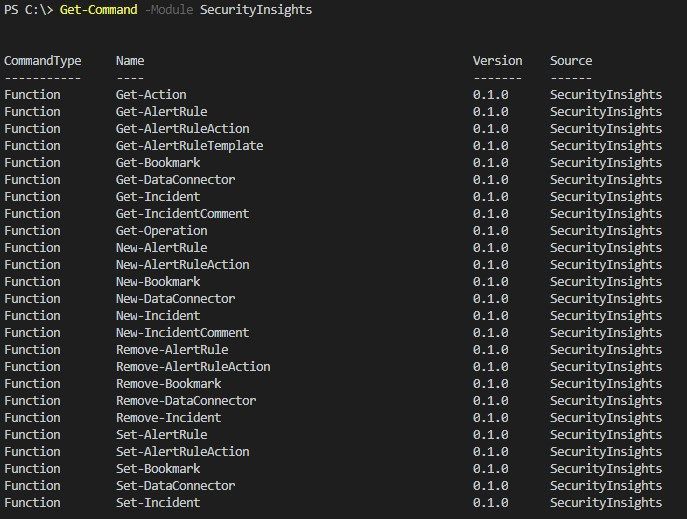
The available cmdlets can be explored by using Get-Command -Module
The SecurityInsights module supports the most common use cases, like interacting with incidents to change status, severity, owner, etc. But also, to add comments and labels to incidents and creating bookmarks.
Although using ARM templates is the preferred way for your CI/CD pipeline, the SecurityInsights module can be very useful for post deployment tasks and is specifically targeted to Security Operations Center (SOC) automation tasks. These tasks can vary from configuring data connectors, creating analytics rules, adding automation actions to analytics rules, etc.
Managing Incidents
Using the SecurityInsights module is straightforward and is parameter driven as most of the PowerShell modules. The common parameters are your Azure Sentinel workspace and resource group name. You can retrieve all your incidents using Get-AzSentinelIncident -ResourceGroupName $resourceGroupName -WorkspaceName $workspaceName or retrieve a specific incident by adding the parameter -IncidentId <yourIncidentId>
Note: the IncidentId is derived from the Name field as depicted below:

Assign an Incident Owner
Most of the cmdlets accept a string as a parameter, but some cmdlets require an input object. For example, to assign an owner to an incident you would first need to create the owner object.
The owner object requires the following mandatory object parameters:
- AssignedTo – the owner full name
- Email – the email address of the owner
- ObjectId – the Azure Active Directory objectId of the owner
- UserPrincipalName – the user principal name of the owner
There are a couple of ways to create an owner object, for example:
$ownerObject = @{"AssignedTo" = "Jeff Leatherman"; "Email" = "JeffL@contoso.com"; "ObjectId" = "f4e959b4-feda-4345-a1e7-16b4af2fc226";"UserPrincipalName" = "JeffL@contoso.com"}
After you have created the owner object, you can then pass it as a parameter to the cmdlet Update-AzSentinelIncident like this:
Update-AzSentinelIncident -ResourceGroupName <yourResourceGroupName> -WorkspaceName <yourWorkspaceName> -IncidentId a4b586c8-97d8-4cc5-9154-b723c62d26d8 -Owner $ownerObject
Closing an incident
In case you need to close an incident, you need to make sure that you are passing the valid closing classifications and classification reasons.
Valid closing incident classifications are:
- Undetermined
- TruePositive
- BenignPositive
- FalsePositive
Valid closing classification reasons are:
- SuspiciousActivity
- SuspiciousButExpected
- IncorrectAlertLogic
- InaccurateData
Example closing an incident:
Update-AzSentinelIncident -ResourceGroupName <yourResourceGroupName> -WorkspaceName <yourWorkspaceName> -IncidentID "a5977bae-2775-44d1-8381-a28f6f061954" -Classification FalsePositive -ClassificationComment "my comment" -ClassificationReason InaccurateData -Status Closed
Configuring data connectors
The cmdlet New-AzSentinelDataConnector supports configuring and enabling Azure Sentinel data connectors. The current supported GA data connectors are:
The following example configures the Office 365 data connector:
New-AzSentinelDataConnector -ResourceGroupName "yourResourceGroupName" -WorkspaceName "yourWorkspaceName" -Office365 -Exchange "Enabled" -SharePoint “Enabled"
Some data connectors require more information, like the Azure Security Center data connector:
New-AzSentinelDataConnector -ResourceGroupName "yourResourceGroupName" -WorkspaceName "yourWorkspaceName" -AzureSecurityCenter -SubscriptionId <yourSubscriptionId> -Alerts Enabled
Exporting and importing analytics rules
The most common asked question that we get is how to export analytics rules and import those in another Azure Sentinel environment. This use case is specifically valid in a Dev-Test scenario where you want to have automation support to import your created analytics rules into production. To export your analytics rules you can leverage the Get-AzSentinelAlertRule cmdlet like in the following example:
$myRules = Get-AzSentinelAlertRule -ResourceGroupName $resourceGroupName -WorkspaceName $workspaceName
$myExportPath = "C:SentinelRulesExport"
$myExtension = ".json"
foreach($rule in $myRules){
    $ruleName = $rule.DisplayName
    $rule = $rule | ConvertTo-Json
    $rule | Out-File "$($myExportPath)$($ruleName)$($myExtension)"
}
This will export your analytics rules into a folder as JSON formatted files.
You can then edit the analytics rules or just import those into another Azure Sentinel environment using the following example:
$myImportPath = "C:SentinelRulesImport"
$myNewRules = Get-ChildItem $myImportPath -Filter *.json
foreach ($myNewRule in $myNewRules) {
    $myRuleObject = Get-Content -Path $myNewRule | ConvertFrom-Json
    New-AzSentinelAlertRule -ResourceGroupName $resourceGroupName -WorkspaceName $workspaceName `
        -Scheduled -DisplayName $myRuleObject.DisplayName -Description $myRuleObject.Description -Query $myRuleObject.Query `
        -QueryFrequency $myRuleObject.QueryFrequency.Ticks -QueryPeriod $myRuleObject.QueryPeriod.Ticks -Severity $myRuleObject.Severity -TriggerThreshold $myRuleObject.TriggerThreshold
Happy automating!
by Contributed | Dec 31, 2020 | Technology
This article is contributed. See the original author and article here.
Azure Stack Hub, part of the Azure Stack portfolio, is an extension of Azure that enables you to bring the agility and fast-paced innovation of cloud computing to your on-premises environment. It extends the power of Azure so your organization can consistently build, deploy, and operate hybrid applications across cloud, datacenter, and edge locations. As an Azure Stack Hub operator, you can run your own autonomous cloud—partially or completely disconnected from the internet and public cloud—and you control access to your own data.
If this is your skill set, we have a new certification for you. The Microsoft Certified: Azure Stack Hub Operator Associate certification validates your expertise in this area and offers you the opportunity to prove your skills. To earn this certification, pass Exam AZ-600: Configuring and Operating a Hybrid Cloud with Microsoft Azure Stack Hub, currently in beta.
Is this the right certification for you?
If you’re an Azure administrator or Azure Stack Hub operator who provides cloud services to your end users or customers from within their own datacenter using Azure Stack Hub, you’re on the right path, especially if you plan, deploy, package, update, and maintain the Azure Stack Hub infrastructure. Your responsibilities also include offering hybrid cloud resources and requested services and managing infrastructure as a service (IaaS) and platform as a service (PaaS).
This certification could be a great fit if you have significant experience managing and operating Azure Stack Hub environments. You should also have a strong understanding of Azure, in addition to some knowledge of virtualization, networking, and identity management. And you need to understand how Azure Stack Hub enables DevOps processes and the hybrid development model.
Ready to prove your skills?
Take advantage of the discounted beta exam offer. The first 300 people who take Exam AZ-600 (beta) on or before February 2, 2021, can get 80% off market price!
To receive the discount, when you register for the exam and are prompted for payment, use code AZ600CASCADE. This is not a private access code. The seats are offered on a first-come, first-served basis. As noted, you must take the exam on or before February 2, 2021. Please note that this beta exam is not available in Turkey, Pakistan, India, or China.
Get ready to take Exam AZ-600 (beta):
What about Exam 70-537?
If you’re preparing for Exam 70-537: Configuring and Operating a Hybrid Cloud with Microsoft Azure Stack Hub, which is an elective for Microsoft Certified Solutions Expert (MCSE): Core Infrastructure, remember that Exam 70-537 and the associated certification will be retired on January 31, 2021, so you’ll want to pass your exam by that date.
That being said, you should consider the new Azure Stack Hub Operator Associate certification—and Exam AZ-600 (beta) instead—to help you prove that your knowledge and skills in this specific job role are up to date.
Did you know that you can take any role-based exam online? Online delivered exams—taken from your home or office—can be less hassle, less stress, and even less worry than traveling to a test center—especially if you’re adequately prepared for what to expect. To find out more, check out my blog post Online proctored exams: What to expect and how to prepare.
When do you get your score?
The rescore process starts on the day an exam goes live, and final scores for beta exams are released approximately 10 days after that. For details on the timing of beta exam rescoring and results, read my post Creating high-quality exams: The path from beta to live. For more information, follow me on Twitter (@libertymunson).
Ready to get started?
Remember, the number of spots is limited to the first 300 candidates taking Exam AZ-600 (beta) on or before February 2, 2021.
Pass Exam AZ-600 (beta), earn your certification, and apply your Azure Stack Hub operator skills to working with Azure Stack Hub. Extend the reach of Azure, balance flexibility and control, and bring the fast-paced innovation of cloud computing to your on-premises environment. Plus, earn the recognition that can come with certification, as you manage modern applications in a hybrid cloud, bringing more agility to your workplace with this powerful extension of Azure.
Related announcements
MCSA, MCSD, MCSE certifications retire; with continued investment to role-based certifications
Updating Microsoft Certifications: How we keep them relevant
Finding the right Microsoft Azure certification for you
by Contributed | Dec 31, 2020 | Technology
This article is contributed. See the original author and article here.
As we’re announcing the new Microsoft Certified: Azure Stack Hub Operator Associate certification and the Exam AZ-600: Configuring and Operating a Hybrid Cloud with Microsoft Azure Stack Hub (currently in beta – you can find more details on the announcement here, including how to access the 80% discount for the beta), we wanted to list some of the resources you can use to prepare, or refresh, you Azure Stack Hub Operator skills.
The exam page lists the skills requires and they are also outlined in the skills outline document. For the study materials, we have prepared a number of resources:
by Contributed | Dec 30, 2020 | Technology
This article is contributed. See the original author and article here.
Here’s a quick video that walks you through our scanner architecture and deployment steps!
(link to the video attached :) )
Enjoy!

by Contributed | Dec 30, 2020 | Technology
This article is contributed. See the original author and article here.
Well, I don’t think anyone was ready for what 2020 had in store for us! We are very proud of how our Health and Life Sciences community came together to help each other get through the year. Thank you to all of our authors, customers, and partners for your contributions and HAPPY NEW YEAR from the Microsoft HLS team!
Check out the top 10 HLS blog posts that were viewed the most in 2020 (in order):
- Return to work, Office Space Distancing – Vasu Sharma and Pradeep Bethi, Microsoft Customer Success Managers: As organizations limit the workforce permitted to be physically present at office locations, it has placed an additional burden on leaders, particularly facilities, office managers, and logistics teams. Learn how to use Shifts in Microsoft Teams to help create, update and manage schedules for your team here.
- Quick Start: Setting Up Your COVID-19 Health Bot – Nikita Pitliya, Microsoft Cloud Solution Architect and Sam Brown, Microsoft Teams Technical Specialist: Need a step-by-step guide on how to set up the health bot for inbound COVID-19 requests? We take you through the implementation of the Assessment, Metrics, and FAQ templates here.
- Virtual rounding using Microsoft Teams – Max Fritz, Microsoft Senior Program Manager: This is an open source solution to support virtual rounding with Microsoft Teams. Hospital and emergency room rounds will be conducted virtually, through a Microsoft Teams meeting between the provider and the patient, reducing risk of exposure to COVID-19 and helping to prevent the drain of personal protective equipment. Max demonstrates the solution and answers commonly asked questions here.
- Track the COVID-19 Growth Curve in Power BI – Greg Beaumont, Microsoft Senior Technical Specialist, Power Platform: Greg Beaumont built an interactive COVID-19 report using the data from Johns Hopkins University, The New York Times and the COVID Tracking Project. For this link, iframe snippet, and a video detailing ways that you can interact with the dashboard, check out his updated post.
- In response to COVID-19: How Microsoft can help with Situational Response and Crisis Communication – Shelly Avery, Microsoft Teams Senior Technical Specialist: As a response to the COVID-19 outbreak, Microsoft has many solutions available for customers, which Shelly summarizes here.
- Introducing the Medical Imaging Server for DICOM – Heather Cartwright, Microsoft GM, Healthcare NExT, Artificial Intelligence & Research: Microsoft recently released a new Open Source Software (OSS) that provides developers with a powerful tool to migrate medical imaging data to the cloud and integrate imaging metadata with clinical data in FHIR using DICOM Cast technology. Microsoft’s Heather Cartwright explains its impact on the next horizon of health data transformation in this article.
- Setting Up Bookings for virtual visits – Microsoft Teams Technical Specialists Shelly Avery, Max Fritz and Sam Brown: Interested in virtual visits but need to know how to set it up within Bookings and integrate it into Teams? Check out the step-by-step with screenshots and videos here.
- Deploy an End-to-End Azure Synapse Analytics and Power BI Solution using CMS Medicare Data – Greg Beaumont, Microsoft Senior Technical Specialist, Power Platform: In just 1-2 hours with no code required, you can deploy an end-to-end Azure Synapse and Power BI solution using 120+ million rows of real CMS Medicare Part D Data with the Azure ARM template. Check out the paint-by-numbers video tutorial and instructions here.
- Return to Workplace – Space management with Shifts (Part 2) – Vasu Sharma and Pradeep Bethi, Microsoft Customer Success Managers: As a follow up to the office space distancing article above, this details how administrators can use Shifts for space management, send daily guidance, provide topical Q&A, and use incident reporting capabilities. Details here.
- Situational Response Management, Communications, and Virtual Patient Outreach – Webcast Recording: Several Microsoft Technical Specialists review tools and solutions applicable not only for business continuity and crisis management in general, but also for the immediate needs of organizations dealing with the impact of COVID-19 today. Check out the recording.
Authors of these popular 2020 HLS blog posts:

Nikita Pitliya, Microsoft Data & AI Solution Architect

Vasu Sharma, Microsoft Customer Success Manager

Pradeep Bethi, Microsoft Director, Customer Success

Greg Beaumount, Senior Technical Specialist, Microsoft Power Platform

Michael Gannotti, Principal Technical Specialist, Microsoft Teams

Shelly Avery, Senior Technical Specialist, Microsoft Teams

Max Fritz, Microsoft Senior Program Manager

Heather Cartwright, GM, Microsoft Health Cloud and Data
Let us know how the Microsoft HLS team can help you in the upcoming year!
.jpg")
Sam Brown, Technical Specialist, Microsoft Teams

Recent Comments