This article is contributed. See the original author and article here.
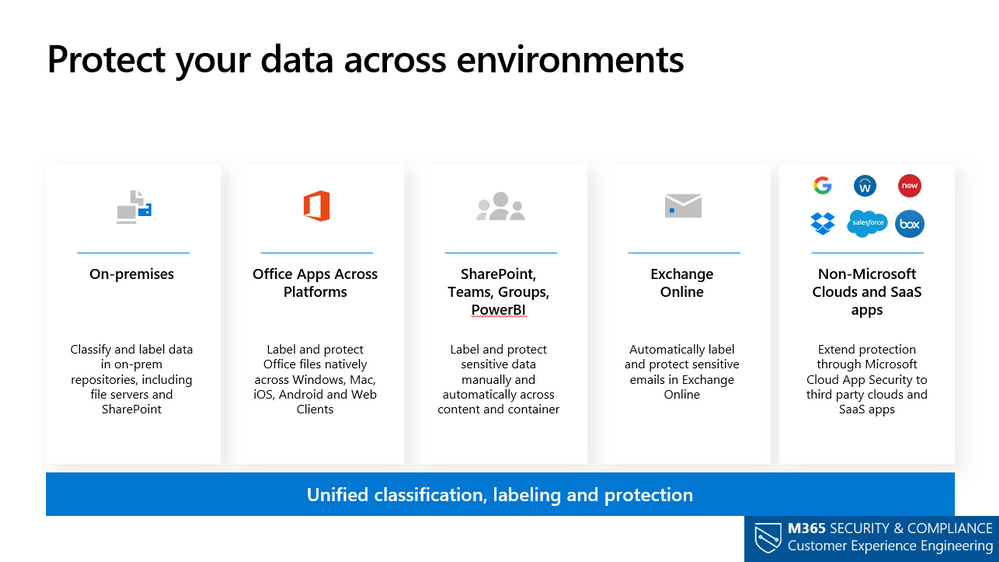
Use Microsoft Information Protection (MIP) to help you discover, classify, and protect sensitive information wherever it lives or travels. MIP capabilities are included with Microsoft 365 Compliance and give you the tools toknow your data,protect your data, andprevent data loss.
This webinar was presented on October 13th, 2020, and the recording can be found here.
Attached to this post are:
The FAQ document that summarizes the questions and answers that came up over the course of both Webinars.
A PDF copy of the presentation.
Thanks to those of you who participated during the two sessions and if you haven’t already, don’t forget to check out our resources available on theTech Community.
Thanks!
@LaurenVaughn on behalf of the MIP and Compliance CXE team
This article is contributed. See the original author and article here.
Better productivity requires a better search. The modern workplace looks quite different than it did ten years ago. More people are working outside of the office and using a myriad of devices and tools to get their work done. No matter where people work or what kind of device they use, they need the ability to quickly and easily find the information that will help them be more productive. When you need to find something to get work done, what do you do? If you’re like many people, you look through your personal files or company intranet to find what you need. If you don’t know or remember enough about the document you need, your search experience can be difficult and time consuming. The time you put into searching could instead be used to complete your current task. Making sure you can find what you need is a team effort – and now we’ll be bringing additional tools to Microsoft Search to help search administrators make sure search is performing at its best.
Last month at Microsoft Ignite we shared our vision and roadmap across Microsoft Search, among that, improvements to search usage reporting with new capabilities coming to Microsoft Search analytics. Tenant analytics in Microsoft Search give you the tools and insights to make search great for your company, delivering a new Microsoft Search Insights dashboard will help you keep employees productive with insights into what they’re searching for.
As we rollout the new insights experience to Microsoft Search, we’ll be retiring classic tenant-wide usage reports available in SharePoint Online beginning December 9, 2020.
After this change, you will be able to discover site collection usage data through the ClassicSite Collection Usage reports available through Site Settings | Site collection administration | search reports where you can access and download usage data for the last 31 days and past 12 months.
For administrators of Microsoft Search you can access the tenant usage analytics reports through the Microsoft Admin center under Settings | Search and intelligence | Insights. The tenant- level usage analytics reports (top queries, abandoned queries, no result queries, and query volume are aggregated over Bing, SharePoint home, and Office.com Microsoft Search entry points. To access the tenant level reports you will need to be assigned to one of the following roles- search admin, search editor, global admin, or global reader in Microsoft admin center.
What will happen to existing search usage data?
Data from the classic tenant-wide search usage reports will not be available beginning December 9, 2020. If required, you can download and save historical data from these reports before December 9, 2020. To learn more about downloading the tenant- wide usage reports in Excel, please refer to the following support article.
Where can I find my data in the future?
Tenant-wide usage reports for SharePoint Online will no longer be available in the SharePoint Online admin center starting on December 9, 2020. You can view classic site- collection usage data from the classic Site Settings page under Site Settings | search reports is where you can download past 31 days and past 12 months of data in Excel for a specific site collection. Learn more about the
For tenant level usage analytics, navigate to the Microsoft 365 admin center, and the select Settings | Search and Intelligence | Insights. You will be able to download the past 31 days and the past 12 months of data from across both SharePoint home and Office.com search entry points. Learn more about Search and Intelligence insights.
For more information see roadmap ID 68781.
Subscribe to this article to keep up to date on future improvements to Microsoft Search in Microsoft 365.
This article is contributed. See the original author and article here.
This post was co-authored with Jinzhu Li and Sheng Zhao
Neural Text to Speech (Neural TTS), a powerful speech synthesis capability of Cognitive Services on Azure, enables you to convert text to lifelike speech which is close to human-parity. Since its launch, we have seen it widely adopted in a variety of scenarios by many Azure customers, from voice assistants like the customer service bot like BBC and Poste Italiane, to audio content creation scenarios like Duolingo.
Voice quality, which includes the accuracy of pronunciation, the naturalness of prosody such as intonation and stress patterns, and the fidelity of audio, is the key reason that customers are migrating from the traditional TTS voices to neural voices. Today we are glad to share that we have upgraded our Neural TTS voices with a new-generation vocoder, called HiFiNet, which results much higher audio fidelity while significantly improving the synthesis speed. This is particularly beneficial to customers whose scenario relies on hi-fi audios or long interactions, including video dubbing, audio books, or online education materials.
What’s new?
Our recent updates on Azure Neural TTS voices include a major upgrading of the vocoder. The voice fidelity has been improved significantly and audio quality defects such as glitches and small noises are largely reduced. Our tests show that this new vocoder generates audios without hearable quality loss from the recordings of training data (more details are introduced later). In addition, it can synthesize speech much faster than our previous version of product. All these benefits are achieved through a new-generation neural vocoder, called HiFiNet.
What is a vocoder and why does it matter?
Vocoder is a major component in speech synthesis, or text-to-speech. It turns an intermediate form of the audio, which is called acoustic feature, into audible waveform. Neural vocoder is a specific vocoder design which uses deep learning networks and is a critical module of Neural TTS.
Microsoft Azure Neural TTS consists of three major components in the engine: Text Analyzer, Neural Acoustic Model, and Neural Vocoder. To generate natural synthetic speech from text, first, text is input into Text Analyzer, which provides output in the form of phoneme sequence. A phoneme is a basic unit of sound that distinguishes one word from another in a particular language. Sequence of phonemes defines the pronunciations of the words provided in the text. Then the phoneme sequence goes into the Neural Acoustic Model to predict acoustic features, which defines speech signals, such as speaking style, speed, intonations, and stress patterns, etc. Finally, the Neural Vocoder converts the acoustic features into audible waves so the synthetic speech is generated.
The vocoder is critical to the final audio quality. In specific, it directly impacts the fidelity of a wave, including clearness, timbre, etc. Let’s hear the difference of the audio quality with samples generated using different neural vocoders based on the same acoustic features (recommended to listen with a high-quality headset).
Vocoder versions
2018 vocoder for real-time synthesis
2019 vocoder for real-time synthesis
2020 for real-time synthesis (HiFiNet)
“Top cinematographers weigh in on filmmaking in the age of streaming.”
With each vocoder update, the speech generated sounds clearer, voice less muffled and noises reduced. In the next section, we introduce how a HiFiNet vocoder is trained during the creation of a neural voice model.
How does HiFiNet work?
In Azure TTS system, neural voice models are trained using human voice recordings as training data with deep learning networks. As part of the training, a vocoder is built with the goal to generate high quality audio output close to the original recordings from the training data. In the meantime, it needs to run fast enough to produce at least 24,000 samples per seconds, i.e. with a sampling rate of 24khz, which is the default sampling rate of Azure Neural TTS voice models.
Leveraging the state-of-art research on vocoders, we designed the training pipeline for HiFiNet, the new-generation Neural TTS vocoder, and applied it to create neural voice models in Azure Neural TTS. This pipeline is built with one simple goal: produce machine-generated audio waves (synthetic speech) that is indistinguishable from its original waves (human recordings) in a high speed.
Below chart describes how the HiFiNet training pipeline works. With this pipeline, two key networks are trained: A Generator which is used to create audio (‘Generated Wave’), and a Discriminator which is used to identify the gap of the created audio from its training data (‘Real Wave’). The goal of the training is to make the Generator generate waves that the Discriminator can’t distinguish from the original real recordings.
Training pipeline of the HiFiNet Vocoder
First, the training pipeline uses the original human recording as input and extract the acoustic features. Then, the acoustic features are fed into the Generator module which generates waves, so we get two sets of waves: the original recordings as real waves, and the generated waves as fake waves. Next, the two sets of waves are fed into the Discriminator network to distinguish which are the real waves and which are the generated fake waves. This output from the Discriminator is used as feedback to help the Generator and Discriminator to learn better. As this training loop continues, the Generator becomes smarter to create indistinguishable fake waves, while the Discriminator gets smarter in making the right judgements. Finally, when the training reaches a point where Discriminator can’t distinguish the waves generated by the Generator from real waves, the vocoder is successfully trained. This vocoder is capable of producing audio outputs without noticeable quality loss compared to the original human recordings.
In the next section we describe the performance of HiFiNet vocoder.
What are the benefits?
HiFiNet significantly improves audio quality.
To understand the benefit of HiFiNet, we conducted a number of tests in many aspects which yelled positive results. Our tests show that the HiFiNet vocoder significantly improves the audio quality of the Neural TTS voice output, compared to our previous version of product.
CMOS (Comparative Mean Opinion Score) is a well accepted method in the speech industry for comparing the voice quality of two TTS systems. A CMOS test is similar to an A/B testing, where participants listen to different pairs of audio samples generated by two systems and provide their subjective opinions on how A compares to B. Normally in one test, we recruit 30-60 anonymous testers with qualified language expertise to evaluate around 50 pairs of audio samples side by side. The result is reported as CMOS gap, which measures the average of the difference in the opinion score between the two systems. In the cases where the absolute value of a CMOS gap is <0.1, we claim system A and B are on par. When the absolute value of a CMOS gap is >=0.1, then one system is reported better than the other. If the absolute value of a CMOS gap is >=0.2, we say one system is significantly better than the other.
We have done hundreds of CMOS tests of HiFiNet compared to our last version vocoder, on 68 neural voices across 49 languages/locales. Our results show that HiFiNet is notably better than the previous production vocoder in Azure Neural TTS.
In general, the audio quality, especially the fidelity is obviously improved. On average, across all languages, the HiFiNet vocoder achieves a CMOS gain higher than 0.2 compared to the previous vocoder, which means the improvement is hearable for users.
In particular, HiFiNet also has better robustness than the previous version of vocoder. Audio defects are largely reduced in the generated waves with HiFiNet. Our tests show that with the previous production vocoder, in 100 test samples, our testers can hear about 10 defects like beep, click sound, fidelity loss. Although most of them are not obvious, it can still be annoying if it keeps happening in a long audio or multi-round voice interactions. Now, these defects are no longer reported with the HiFiNet audios, under the same test procedure with the same test sets.
With these advantages, we have updated the Neural TTS voices on Azure Cognitive Services with the new vocoder. Listen to the samples below to hear the difference. Or test the new voices using your own text with our online demo.
Language
Previous vocoder
HiFiNet
HiFiNet CMOS gain
English (US)
+0.122 (Better)
German
+0.193 (Better)
Chinese (Mandarin, Simplified)
+0.348 (Obviously Better)
Japanese
+0.465 (Obviously Better)
HiFiNet reaches human-parity audio fidelity.
In addition, we have conducted tests to compare the human recording audio quality and the computer-generated audio quality with HiFiNet. To make the comparison more accurate and more focused on the vocoder itself, we use the acoustic features extracted directly from human recordings instead of the TTS-predicted acoustic features so the acoustic differences are controlled and only the vocoder is evaluated in CMOS tests. Participants are asked to give their scores for different pairs of the generated waves and human recordings. Our result shows the CMOS gap of the audios produced by HiFiNet compared to human recordings is -0.05, which mean the difference is hardly hearable and the audio quality is on par.
Hear how close the HiFiNet audio fidelity is to the human recordings with the samples below.
Language
Human recording
HiFiNet
HiFiNet CMOS gap
English (US)
+0.045 (on par)
Chinese (Mandarin, Simplified)
-0.054 (on par)
HiFiNet generates audios faster.
Real Time Factor (RTF) is used to measure the performance of vocoder. It is calculated as the time duration needed to generate the audio divided by the audio duration.
HiFiNet is a parallel vocoder so it can generate multiple samples at the same time. Here are some measurements of HiFiNet performance on both GPU and CPU devices.
With the output of 24khz sampling rate, on M60 GPU, through carefully optimized CUDA implementation, the vocoder RTF is around 0.01, which means the HiFiNet system can generate an audio 10 second-long in 0.1 second. This speed is almost 3x of our previous production vocoder.
On CPU machines, thanks to the highly-optimized ONNX runtime, the vocoder RTF is around 0.02 for 24khz sampling rate output.
With the performance improvement of HiFiNet, the end-to-end synthesis speed is about 50% faster than our previous Neural TTS engine, which the audio quality is significantly improved at the same time.
What to expect next
Currently we support up to 24khz sampling rate on Azure Neural TTS service with 68 neural voice models available. In some highly sophisticated scenarios like audio dubbing, higher fidelity output like 48khz sampling rate makes a world of difference.
Below snippet from an audio spectrum shows the difference between 48hz sampling rate and 24khz. Audios with 48khz sampling rate get a higher frequency responding range which keeps more sophisticated details and nuances of the sound. Such high sampling rate creates challenges on both voice quality and inference speed.
24khz vs. 48khz: different frequency range
In our exploration, HiFiNet can handle both challenges well. According to our experiments, HiFiNet vocoder on 48khz sampling rate can be trained to achieve even higher quality with reasonable inference speed.
Hear the difference of the audio fidelity between the TTS output in 24khz and 48khs sampling rate, with a hi-fi speaker or headset.
Language
24khz HiFiNet
48khz HiFiNet
English (US)
English (UK)
The 48khz vocoder is now in private preview and can be applied to custom voices. Contact mstts [at] microsoft.com for details.
Create a custom voice with HiFiNet
The HiFiNet vocoder is also available in the Custom Neural Voice capability, enabling organizations to create a unique brand voice in multiple languages for their unique scenarios.
With these updates, we’re excited to be powering more natural and intuitive voice experiences for global customers. Text to Speech has more than 70 standard voices in over 40 languages and locales in addition to our growing list of Neural TTS voices.
This article is contributed. See the original author and article here.
Original release date: November 3, 2020
Google has released Chrome version 86.0.4240.183 for Windows, Mac, and Linux addressing multiple vulnerabilities, including vulnerability CVE-2020-16009. Exploit code for this vulnerability exists in the wild.
The Cybersecurity and Infrastructure Security Agency (CISA) encourages users and administrators to review the Chrome Release Note and apply the necessary updates immediately.
This article is contributed. See the original author and article here.
A quick post about the error and fix. The customer tried to create a trigger activation and it fails.
Error:
Trigger activation failed for Trigger 1. Failed to subscribe to storage events for event trigger: Trigger 1
The customer had the correct permissions he was the owner of the workspace as the matter of fact he was admin.
He also had a storage blob data contributor. So it seems everything was in place. Even though I checked the logs regards this failure and I saw there was a permission error.
“The integration described in this article depends on Azure Event Grid. Make sure that your subscription is registered with the Event Grid resource provider. For more info, see Resource providers and types. You must be able to do the Microsoft.EventGrid/eventSubscriptions/* action. This action is part of the EventGrid EventSubscription Contributor built-in role.”
Options are:
Owner permission on the storage
Eventgrid RBAC subscription contributor and reader on the Subscription
This article is contributed. See the original author and article here.
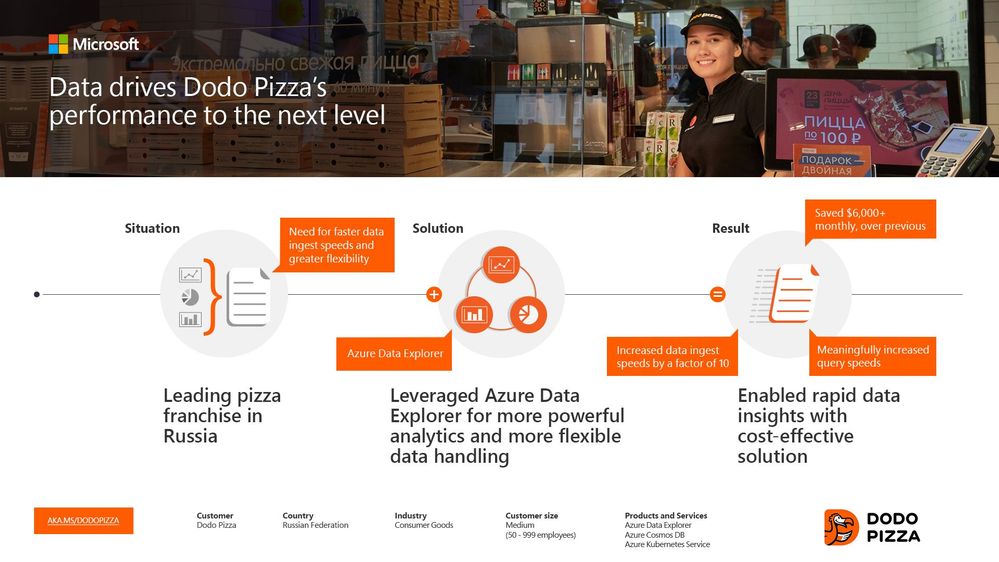
Founded in 2011, Russian pizza franchise Dodo Pizza is one of Europe’s fastest-growing restaurant chains. “We are digitally transforming global pizza delivery,” tells GlebLesnikov, Cloud Architect at Dodo Pizza. “From our 600-plus locations, we generate a lot of data every single day. And we need to be able to interactively query that data, to explore it and gather insights. That’s what Azure Data Explorer has allowed us to do—for any kind of data, unstructured or structured. We’re ingesting 1TB per day now. We also spend less time operating the cluster because it’s automatic. It’s a night and day difference.”
If one of the above scenarios applies to you, we recommend that youopen aSupport ticketto pre-request capacity. By pre-requesting capacity, you can:
Ensure that your Azure subscription’s capacity limit for Azure Lab Servicesallowsfor the number of VMs and the VM size that you plan to use in your labs. All Azure subscriptions have an initial capacity limit that restricts how many VMs you can create inside your labs before you need to request for a limit increase. Read the following article to learn more: Capacity limits in Azure Lab Services.
Create your lab account within a region that has sufficient VM capacity based on the number of VMs and the VM size you plan to use in your labs.This is especially important if you need to peer yourlab account to a VNet because both your lab account and VNet must be located in the same region. It’s important to pick a region that has sufficient capacity before you set this up.
In this post, we’ll look closerat the process for ensuring thatthere is sufficientregional capacity for your labs.
Problem
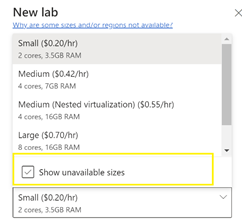
When your lab account is peeredtoa VNet, thelocationof your lab accountandVNetdeterminesthe regionwhere your labsarecreated. In the lab creation wizard,only VM sizes that have capacityinthisregionareshown in the list ofavailablesizes. Youmay notice that you havethe option toshow unavailable sizes, but youare prevented fromchoosingthese.
You have more flexibility to find available capacity when your lab account is notpeered to aVNet. In this case,Azure Lab Services automatically looks for available VM capacity across allregions in the same geography as the lab account.However, you still may not be able to choose a VM size if none of the regions have available capacity.For example, currently in Canada, GPU sizes (e.g. NV series) are notoffered inany regions. As a result, you must create your lab account in a geography that does have GPUs available.
You alsocan configure a setting calledenable location selection(this setting is only available when your lab account is not peered to a VNet).This setting allowslab creators tochoose a different geographyfrom the lab account when they create a lab.Enabling this option gives lab creators the greatest flexibility to find a region that has available capacity for a VM size.
Regardless if you are using VNet peering or not, you can still run into unexpected capacity issues later. For example, when creating additional labs or increasing your lab’s VM pool size.
Solution
We recommend the following process to ensure that you pick a location that has sufficient capacitybefore you create your lab account and peer to aVNet:
Refer to the below link which shows VM sizes that are supported by each region.
This article is contributed. See the original author and article here.
In this installment of the weekly discussion revolving around the latest news and topics onMicrosoft 365, hosts –Vesa Juvonen(Microsoft) | @vesajuvonen,Waldek Mastykarz(Microsoft) | @waldekm, are joined byDarrel Miller(Microsoft) | @darrel_miller, Developer, Evangelist, and API Architect on the Microsoft Graph (Developer Experience) team. The team that creates developer tooling –Graph Explorer, Graph SDK, Documentation, and the API Review Board that helps otherMicrosoft 365teams (approx. 50) expose (with consistency) their APIs in Microsoft Graph.
Discussion on challenges getting developers to use the APIs, the _v2 property, evolution of the SDK, Microsoft Identity Web.MicrosoftGraph, auto-generated code, API surface quality control, and the Graph “no breaking change policy.” Microsoft Graph’s fundamental mission is making life easier for developers by rigorously coordinating consistency, non-duplication, and usage of the API surface by both Microsoft and partner developers. Coverage on 17 recently released articles and videos from Microsoft and the PnP Community are highlighted as well.
This episode was recorded on Monday, November 2, 2020.
Did we miss your article? Please use #PnPWeekly hashtag in the Twitter for letting us know the content which you have created.
As always, if you need help on an issue, want to share a discovery, or just want to say: “Job well done”, please reach out to Vesa, to Waldek or to your PnP Community.
This article is contributed. See the original author and article here.
You might have an idea for an application using AI and not have anyone to build it. You might be a programmer and want to try out your ideas and Azure Custom Vision before you start writing code. No matter what your coding skills are, if you want to prototype an application with AI, Power Platform and it’s AI Builder feature is a fast and easy option.
This article explains what is Power Platform, as well as go through a step by step process to create an application that detects objects from photos using Power Apps and AI Builder. Check out the video below to see the app we will build to detect different Mixed Reality Headsets such as HoloLens version 1 and 2 Augmented Reality and Virtual Reality headsets and their hand controllers.
What is Power Platform?
Power Platform is a set of tools,API‘s and SDK‘s that helps you analyze your data and build automations,applications and virtual agents with or without having to write any code.
What are Power Apps?
Power Apps is a set of tools that allows you to create applications with a drag and drop UI and easy integration of your data and 3rd party APIs through connectors.
A connector is a proxy or a wrapper around an API that allows the underlying service to talk to Microsoft Power Automate, Microsoft Power Apps, and Azure Logic Apps. It provides a way for users to connect their accounts and leverage a set of pre-built actions and triggers to build their apps and workflows. For example, you can use Twitter connector to get tweet data and visualize it in a dashboard or use Twilio connector to send your users text messages without having to be an expert in Twitter or Twilio APIs or having to write a line of code.
AI Builder is one of the additional features of Power Apps. With AI Builder, you can add intelligence to your apps even if you have no coding or data science skills.
What are some of the use cases for AI Builder?
You can use pre-trained models to:
Detectobjects from images
Analyze your customers sentiment from feedback
Detect keywords from text
Extractspecificinformation about your business from text
Is AI Builder the right choice?
Great question! There are so many tools out there and many ways to do the same thing. How do you know which one is the right solution before investing time and effort?
I have a rule of thumb when I want to build something, use whatever is available and easy to use first. When your needs exceed what the tool you are using covers, look into another solution or building it yourself.
Use the tool easiest to get started when you are building your idea. When your needs exceed the capabilities of the tool you are using, find a solution that enables you. Don’t invest in building things from scratch before you know it is worth it to do so.
For example, if you have an app idea, it is better to have a prototype running as easily as possible. You can test your ideas before investing your time into building custom designed UI or features. In our specific case, you can first prototype your app with the drag and drop UI of Power Apps and using prebuilt AI models. When your specific needs surface, such as recognizing a particular object or keyword, you can invest your time into creating your custom models to train for the object or keyword detection.
Can I use Power Apps and AI Builder for production?
Yes you can. As any tool that does things magically, AI Builder in Power Apps comes with a cost. That does not mean you can’t try your ideas out for free.
What will my production app cost?
If you want to go to production with Power Apps, it is a good idea to consider the costs. Thankfully there is an app for that. AI Builder Calculator let’s you input what AI tools you will need and how many users will be accessing your app’s AI features and gives you the price it will cost you.
What are preview features?
AI Builder was released for public preview on June 10, 2019 in Europe and the United States. Preview release features are subject to change and may have restricted functionality before the official release for general availability. Preview releases are not meant for production use. You can try them out and influence the final product by giving feedback.
The General Availability (GA) release will occur in a phased manner, with some features remaining in preview status while others are released for GA. You can check out the release status on the AI Builder documentation.
What is Object Detection?
AI Builder Object detection is an AI model that you can train to detect objects in pictures. AI models usually require that you provide samples of data to train before you are able to perform predictions. Prebuilt models are pre-trained by using a set of samples that are provided by Microsoft, so they are instantly ready to be used in predictions.
Object detection can detect up to 500 different objects in a single model and support JPG, PNG, BMP image format or photos through the Power Apps control.
How to try out Object Detection capabilities?
You can try out and see how object detection works before having to create and accounts or apps yourself on the Azure Computer Vision page.
What can you do with Object Detection?
Object counting and inventory management
Brand logo recognition
Wildlife animal recognition
How to detect objects from images?
To start creating your AI model for your app, sign in to Power Apps and click on AI Builder on the left hand menu. Select Object Detection from the “Refine Model for your business needs” option.
Name your new AI model with a unique name. Select Common Objects and proceed to next section.
Name the objects that you are going to detect.
Upload images that contain the object you will detect. To start with you can upload 15 images for each object.
Make sure each object has approximately the same amount of images tagged. If you have more examples of one object, the training data will be likely to detect that object when it is not.
Tag your objects by selecting a square that your object is in and choosing the name of the object.
Once you are done choose Done Tagging and Train. Training process will take some time.
If you choose to not use an image or clear any tags, you can do that at any time by going back to your model under the AI Builder on the left hand side menu and choose your model and choose edit.
AI Builder will give you a Performance score over 100 and a way to quickly test your model before publishing. You can edit your models and retrain to improve your performance. Next section will give you some best practices to improve your performance.
How to improve Model performance?
Getting the best model performance for your business can be a rather iterative process. Results can vary depending on the customizations you make to the model, and the training data you provide.
To help facilitate this process, AI Builder allows you to have multiple versions of your model so you can use your model and continue to improve it at the same time.
What are some best practices for training for object detection?
Use diverse images to train with all possible use cases. For example if you are training your data to detect a VR headset, use images of the headset used in different environments as well as the out of the box images. If you only train with images with people wearing the headset, your model would not recognize images of the same device when it is in its box.
Use images with variety of backgrounds. Photos in context are better than photos in front of the neutral backgrounds.
Use training images that have different lighting. For example, include images images taken with flash, high exposure, and so on.
Use images of objects in varied sizes. Different sizing helps the model generalize better.
Use images taken from different angles. If all your photos are from a set of fixed cameras such as surveillance cameras, assign a different label to each camera. This can help avoid modeling unrelated objects such as lampposts as the key feature. Assign camera labels even if the cameras capture the same objects.
How to share your models?
By default, only you can see the models you create and publish. This feature allows you to test them and use them within apps and flows without exposing them.
If you want others to use your model, you can share it with specific users, groups, or your whole organization.
How to use your Custom Vision model in a Power App?
Once you are happy with you model’s performance, you can add it to a new app by choosing Use model and New app.
You will be redirected to Power App editor and an Object Detection component that uses your model will be added automatically. In the editor, you can add new pages to navigate, design and customize your pages.
What’s next?
Now you have your app’s prototype, you can add more features, get feedback and test your app.
Should I keep using my power app or rebuild it?
When your needs change, you can consider refactoring your application to a serverless backend and a custom built UI. If the app is working fine for you and your users, you can continue using and improving overtime using Power Apps.
What would be the changes that requires the upgrade? There are two possibilities for the changed requirements for your app:
Feature
Budget
How to create a custom feature for Power Apps?
Ready made tools are always limited to the features the product team decides to include. If you are writing custom code, you can add any feature that you need. Thankfully, for the features that are not implemented yet, it is always possible to author a custom connector that you can use with or without Power Apps.
A connector is a proxy or a wrapper around an API that allows the underlying service to talk to Microsoft Power Automate, Microsoft Power Apps, and Azure Logic Apps. It provides a way for users to connect their accounts and leverage a set of pre-built actions and triggers to build their apps and workflows.
How to compare costs for Power Apps and Logic Apps?
Once you start using your app, you will have a better idea about the number of users accessing AI capabilities and the number of images that you need to train. You can use AI Builder Cost Calculator and Logic App Cost Calculator to compare options. You can check any other service price through Azure Product Cost Calculator.
This article is contributed. See the original author and article here.
Hey Bing Insiders,
We’ll be starting a new weekly blog post to recap what’s happen over the last 7 days with Bing. Since this is the first of many, I thought we’d go for the whole month of October!
Big things are happening with Give with Bing. Expanding to 7 new markets, including over 1.4 million organizations, and teaming up with celebs Janelle Monae and Jamal Adams to get the word out about this awesome way to raise money for charities you care about most.
Still, deciding on the upcoming vote? Bing’s here for you. We’ve created a dynamic space for you to dig into each candidate and issue on your upcoming ballot.
Powered by Bing Data, the MSN Esports Hub has everything you’re looking for about your favorite games. Keep up to date with Tournaments, emerging streamers, and Esports news. If you really want to be in the know you can even connect with our Esports Hub Developers on Discord.
More awesome news for the avid gamer! We released the Microsoft Bing app on Xbox this month. This means even more ways to earn Microsoft Rewards! Now you can search for hints right from your console when you’re stuck in your game. Pretty neat, huh?
From our Microsoft Bing Webmaster Tools team, we bring you the new and improved SEO Explorer! Here you can easily check out the SEO status and health of your URLs. This tool will be pivotal for webmasters to be able to debug sites and cater to their viewers.
Curious to know which parts of your website is most used? Microsoft Clarity can help you understand several key aspects of your website and user experience using Heat Maps, Session Playbacks, and the Insight Dashboard.
Inclusivity and accessibility is the name of our game! We’ve taken an exciting step to successfully scale the Bing intelligent question-answering feature to over 100 languages and 200 regions in the world. This is just the first step of many. Check out the article to see how we did it.


 •
• 


You might have an idea for an application using AI and not have anyone to build it. You might be a programmer and want to try out your ideas and Azure Custom Vision before you start writing code. No matter what your coding skills are, if you want to prototype an application with AI, Power Platform and it’s AI Builder feature is a fast and easy option.