by Contributed | Jan 13, 2021 | Technology
This article is contributed. See the original author and article here.
We are happy to announce the availability of the Microsoft Defender for Identity sensor for Active Directory Federation Server (AD FS) after successfully piloting the feature with customers in Private Preview over the last few months.
Advanced identity protection can help prevent lateral movement by attackers
Microsoft Defender for Identity is a cloud-based security solution that leverages your on-premises Active Directory signals to identify, detect, and investigate advanced threats, compromised identities, and malicious insider actions directed at your organization.
Until now, Microsoft Defender for Identity has protected domain controllers in either on-premises or hybrid environments. By installing the sensor on the domain controller, you are gaining access to the core value from our product:
- Attack surface reduction – Increases on-premises identity resiliency against malicious intent – both internal and external.
- Detect malicious attempts to compromise on-premises identities, move laterally within your organizations and gain persistency in your Active Directory environment.
- Investigate the activities of identities and gain further insights into their behaviors to respond to compromised identities in order to stop further expansion across domains (when you use Microsoft Defender for Identity through the Microsoft Cloud App Security or Microsoft 365 Security Center console experiences)
While Active Directory continues to play a major role in most organizations, we must always look to how we can enhance our identity protection capabilities through the power of the cloud. Our products have constantly evolving roadmaps that are built from the fantastic work our security research teams carry out. Continuous improvement based on customer feedback and the evolving threat landscape are a key part of helping to keep our customers secure and protected.
AD FS enables federated Identity and access management by securely sharing digital identity and access rights across security and enterprise boundaries. While we recommend customers upgrade their existing on-premises AD FS systems to Azure AD to gain the protections that a cloud identity solution can provide, we understand that some customers are on different journeys – which is why we are introducing today new capabilities from Microsoft Defender for Identity to protect your AD FS environment.
Best practices to reduce your attack surface from Solorigate with AD FS
As we have seen in recent events related to Solorigate, on-premises compromise can propagate to the cloud. We plan our security with an “assume breach” philosophy and layer in defense-in-depth protections and controls to stop attackers sooner when they do gain access. To protect privileged accounts, we recommend best practices such as those outlined here, and implementing Privileged Access Workstations (PAW).
With credential compromise still being one of the most common entry methods for a potential attacker, services like AD FS are often a target for bad actors given that it’s a critical element of identity and access management infrastructure. We encourage customers to adopt best practices like enabling MFA and general credential hygiene because credential theft is a common entry point.
Additional information on Solorigate and guidance for security admins, operations and hunters can be found at our Solorigate resource center.
Given what we know about the importance of AD FS, let’s explore the impact of introducing an AD FS sensor as part of Microsoft Defender for Identity’s capabilities:
Protect AD FS from on-premises attacks
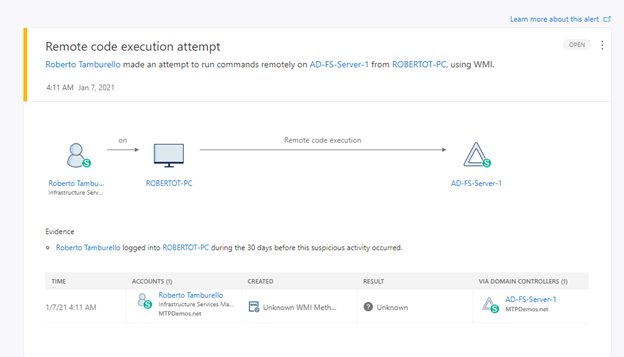
Much like the existing domain controller sensor, Microsoft Defender for Identity’s new capability for AD FS provides visibility into advanced persistent threats, detecting attempts to compromise the AD FS server through techniques such as remote code execution or attempts to install malicious services.
(figure 1. Remote code execution attempt against AD FS server)
Microsoft Defender for Identity detections are better with AD FS
With the new sensor, there are two detections that immediately take advantage of the information and signals being captured from AD FS. These are:
- Suspected Brute Force attack (LDAP) and
- Account enumeration reconnaissance

(figure 2. Brute force attack with failed logons from DC and AD FS)
Microsoft Defender for Identity activities are better with AD FS
Correlating login data from both AD FS sensor and Active Directory sensors enables Microsoft Defender for Identity to analyze further user behavior. For example, some authentication activities, such as failed logins, are visible only to the AD FS server. On other successful logins, Microsoft Defender for Identity can now correlate login information from Active Directory with data from the AD FS server, including whether multi factor authentication occurred when the request was made, the user context, and more.
Here is an example of the enrichment mentioned above in user activity log in Microsoft Defender for Identity before and after the AD FS sensor is installed:

(figure 3. User activity log before and after AD FS sensor has been installed)
The new benefit we are adding enhances Microsoft Defender for Identity by introducing the ability to see the actual device the account was logged into with additional context. This will provide further enrichment in a similar way that RADIUS information provides to Microsoft Defender for Identity when contributing VPN login activities. More information from identity sources makes for more context and as a result, better detections.
Tag the AD FS as a sensitive entity further enhances protection
After installing an AD FS sensor, the AD FS servers in the Microsoft Defender for Identity portal will be automatically tagged as sensitive. This extends functionality that already marks other high value asset servers as sensitive, such as DHCP servers, DNS servers, Microsoft Exchange servers and Certificate Authority servers.

(figure 4. AD FS asset tagged as sensitive)
What’s next?
The requirements for installing the AD FS sensor are:
- Windows Server 2016 or later (required for the appropriate audit logs)
- Domain controller is not installed on the same server as AD FS
- Audit logs enabled on the AD FS server
If you meet these requirements, download the latest deployment package from the sensor configuration page.
To learn more about the requirements and how to enable audit logs, click here.
Get started today
Are you just starting your Microsoft Defender for Identity journey? Begin a trial of Microsoft 365 Defender to experience the benefits of the most comprehensive, integrated, and secure threat protection solution for your organization.
Join the Microsoft Defender for Identity community for the latest updates and news about Identity Security Posture Management assessments, detections and other updates.
Once again, further information and information for security admins, operations and hunters on Solorigate can be found at our Solorigate resource center
by Contributed | Jan 13, 2021 | Technology
This article is contributed. See the original author and article here.
Howdy folks –
(Cross-posting just to make sure you don’t miss the big news.)
Today we turned on the GA release of our new features for Frontline workers and Frontline managers. You can learn all about it over on the Microsoft Security blog: Azure Active Directory empowers frontline workers with simplified and secure access – Microsoft Security

Best regards,
Alex Simons
Corporate Vice President
Microsoft Identity Division
by Scott Muniz | Jan 13, 2021 | Security, Technology
This article is contributed. See the original author and article here.
This Analysis Report uses the MITRE Adversarial Tactics, Techniques, and Common Knowledge (ATT&CK®) framework. See the ATT&CK for Enterprise framework for all referenced threat actor tactics and techniques.
The Cybersecurity and Infrastructure Security Agency (CISA) is aware of several recent successful cyberattacks against various organizations’ cloud services. Threat actors are using phishing and other vectors to exploit poor cyber hygiene practices within a victims’ cloud services configuration. The information in this report is derived exclusively from several CISA incident response engagements and provides the tactics, techniques, and procedures; indicators of compromise (IOCs) that CISA observed as part of these engagements; and recommended mitigations for organization to strengthen their cloud environment configuration to protect against, detect, and respond to potential attacks.
For a downloadable copy of IOCs, see AR21-013A.stix.
Note: the activity and information in this Analysis Report is not explicitly tied to any one threat actor or known to be specifically associated with the advanced persistent threat actor attributed with the compromise of SolarWinds Orion Platform software and other recent activity.
Background
These types of attacks frequently occurred when victim organizations’ employees worked remotely and used a mixture of corporate laptops and personal devices to access their respective cloud services. Despite the use of security tools, affected organizations typically had weak cyber hygiene practices that allowed threat actors to conduct successful attacks.
Technical Details
The cyber threat actors involved in these attacks used a variety of tactics and techniques—including phishing, brute force login attempts, and possibly a “pass-the-cookie” attack—to attempt to exploit weaknesses in the victim organizations’ cloud security practices.
Phishing
CISA observed cyber threat actors using phishing emails with malicious links to harvest credentials for users’ cloud service accounts (Phishing: Spearphishing Link [T1566.002]). The cyber actors designed emails that included a link to what appeared to be a secure message and also emails that looked like a legitimate file hosting service account login. After a targeted recipient provided their credentials, the threat actors then used the stolen credentials to gain Initial Access [TA0001] to the user’s cloud service account (Valid Accounts [T1078]). CISA observed the actors’ logins originating from foreign locations (although the actors could have been using a proxy or The Onion Router (Tor) to obfuscate their location). The actors then sent emails from the user’s account to phish other accounts within the organization. In some cases, these emails included links to documents within what appeared to be the organization’s file hosting service.
In one case, an organization did not require a virtual private network (VPN) for accessing the corporate network. Although their terminal server was located within their firewall, due to remote work posture, the terminal server was configured with port 80 open to allow remote employees to access it—leaving the organization’s network vulnerable. The threat actor attempted to exploit this by launching brute force login attempts (Brute Force [T1110]).
Forwarding Rules
In several engagements, CISA observed threat actors collecting sensitive information by taking advantage of email forwarding rules, which users had set up to forward work emails to their personal email accounts (Email Collection: Email Forwarding Rule [T1114.003]).
Modified Forwarding
In one case, CISA determined that the threat actors modified an existing email rule on a user’s account—originally set by the user to forward emails sent from a certain sender to a personal account—to redirect the emails to an account controlled by the actors. The threat actors updated the rule to forward all email to the threat actors’ accounts.
Keyword Search Rule
Threat actors also modified existing rules to search users’ email messages (subject and body) for several finance-related keywords (which contained spelling mistakes) and forward the emails to the threat actors’ account.
New Rule Creation and Forwarding
In addition to modifying existing user email rules, the threat actors created new mailbox rules that forwarded certain messages received by the users (specifically, messages with certain phishing-related keywords) to the legitimate users’ Really Simple Syndication (RSS) Feeds or RSS Subscriptions folder in an effort to prevent warnings from being seen by the legitimate users.
Authentication
CISA verified that the threat actors successfully signed into one user’s account with proper multi-factor authentication (MFA). In this case, CISA believes the threat actors may have used browser cookies to defeat MFA with a “pass-the-cookie” attack (Use Alternate Authentication Material: Web Session Cookie [T1550.004]).
The threat actors attempted brute force logins (Brute Force [T1110]) on some accounts. However, this activity was not successful. This thwarted attempt was due, in part, to the threat actors not guessing a correct username/password combination, as well as the organization’s use of MFA to access their cloud environment.
CISA recommends the following steps for organizations to strengthen their cloud security practices.
- Implement conditional access (CA) policies based upon your organization’s needs.
- Establish a baseline for normal network activity within your environment.
- Routinely review both Active Directory sign-in logs and unified audit logs for anomalous activity.
- Enforce MFA.
- Routinely review user-created email forwarding rules and alerts, or restrict forwarding.
- Have a mitigation plan or procedures in place; understand when, how, and why to reset passwords and to revoke session tokens.
- Follow recommend guidance on securing privileged access.
- Consider a policy that does not allow employees to use personal devices for work. At a minimum, use a trusted mobile device management solution.
- Resolve client site requests internal to your network.
- Consider restricting users from forwarding emails to accounts outside of your domain.
- Allow users to consent only to app integrations that have been pre-approved by an administrator.
- Audit email rules with enforceable alerts via the Security and Compliance Center or other tools that use the Graph API to warn administrators to abnormal activity.
- Implement MFA for all users, without exception.
- Conditional access should be understood and implemented with a zero-trust mindset.
- Ensure user access logging is enabled. Forward logs to a security information and event management appliance for aggregation and monitoring so as to not lose visibility on logs outside of logging periods.
- Use a CA policy to block legacy authentication protocols.
- Verify that all cloud-based virtual machine instances with a public IP do not have open Remote Desktop Protocol (RDP) ports. Place any system with an open RDP port behind a firewall and require users to use a VPN to access it through the firewall.
- Focus on awareness and training. Make employees aware of the threats—such as phishing scams—and how they are delivered. Additionally, provide users training on information security principles and techniques as well as overall emerging cybersecurity risks and vulnerabilities.
- Establish blame-free employee reporting and ensure that employees know who to contact when they see suspicious activity or when they believe they have been a victim of a cyberattack. This will ensure that the proper established mitigation strategy can be employed quickly and efficiently.
- Ensure existing built-in filtering and detection products (e.g., those for spam, phishing, malware, and safe attachments and links are enabled.
- Organizations using M365 should also consider the following steps.
- Assign a few (one to three) trusted users as electronic discovery (or eDiscovery) managers to conduct forensic content searches across the entire M365 environment (Mailboxes, Teams, SharePoint, and OneDrive) for evidence of malicious activity.
- Disable PowerShell remoting to Exchange Online for regular M365 users. Disabling for non-administrative users will lower the likelihood of a compromised user account being used to programmatically access tenant configurations for reconnaissance.
- Do not allow an unlimited amount of unsuccessful login attempts. To configure these settings, see password smart lockout configuration and sign-in activity reports.
- Consider using a tool such as Sparrow or Hawk—open-source PowerShell-based tools used to gather information related to M365—to investigate and audit intrusions and potential breaches.[1][2]
Resources
January 13, 2021: Initial Version
by Contributed | Jan 13, 2021 | Technology
This article is contributed. See the original author and article here.
We are looking for people who have an inspiring story to share about why they got certified and how it impacted their life, career, or personal development. We’ll be featuring select stories starting at the next Microsoft Ignite March 2-4, 2021.
We know that Microsoft Certification can help you build confidence, get recognized as a leader, and unlock new opportunities. But we want to hear it from you. If you achieved a Microsoft Certification (fundamentals, role-based, or specialty), tell us your experience and how it’s helped you. What did you do to prepare? How has being certified changed your career? What new insights did you gain after becoming certified? Your video should be under 3 minutes.
Is English not your native language? No problem! We would love for you to submit your video in your native language.
Things to consider
- Make sure to start by introducing yourself – include your name and the fact that you’re “proud to be certified.”
- When you record your video, make sure you have good, even lighting in front of you so we can clearly see your face, keep your camera at eye level (you don’t want to be looking up or down), use an external microphone if you have one, and turn off anything wherever you’re recording that could be creating additional noise like your cell phone, radios, fans, etc.
- Keep your background clutter free.
- Keep videos to a maximum of 3 minutes in length. We know you’re excited about your certifications, but give us the highlights and we can always follow up with you for more information.
- And maybe most importantly, be yourself. Tell us what excites you in your own words or even your native language – and have some fun with it!
We are excited to hear your stories and highlight some of you at the next Microsoft Ignite on March 2-4, 2021. Make sure to submit your video prior to January 31, 2021 at 11:59pm Pacific Time.
Share your story today!
by Scott Muniz | Jan 13, 2021 | Security, Technology
This article is contributed. See the original author and article here.
CISA is aware of several recent successful cyberattacks against various organizations’ cloud services. Threat actors used a variety of tactics and techniques, including phishing and brute force logins, to attempt to exploit weaknesses in cloud security practices.
In response, CISA has released Analysis Report AR21-013A: Strengthening Security Configurations to Defend Against Attackers Targeting Cloud Services which provides technical details and indicators of compromise to help detect and respond to potential attacks.
CISA encourages users and administrators to review AR21-013A and apply the recommendations to strengthen cloud environment configurations.

by Scott Muniz | Jan 13, 2021 | Security
This article was originally posted by the FTC. See the original article here.
There’s a new coronavirus-related scam making the rounds, but this time the crooks are targeting small businesses. It starts with an email that claims to come from the “Small Business Administration Office of Disaster Assistance.” It says you’re eligible for a loan of up to $250,000 and asks for personal information like birth date and Social Security number. Let’s do a CSI-style investigation to spot clues that the email is a fake.
Clue #1. You got an email or phone call out of the blue that claims to be from the IRS, the Social Security Administration, or – in this case – the Small Business Administration. The FTC has warned about
government imposter scams like this.
Clue #2. You were told that you’re automatically eligible for a big loan. Real lenders never do this.
Clue #3. You’re asked to hand over your date of birth and Social Security number. This is a tip-off that the sender is trying to steal your personal information.
Phishing attempts aren’t the only scam that business owners are reporting. We’ve heard from people who have applied for loans through websites pretending to be part of the SBA’s Economic Injury Disaster Loan program, which has been extended to December 31, 2021. And other people report they’ve been contacted to repay loans they never took out. The likely culprits? Criminals who illegally applied for loans in their name.
Here are steps you can take to help protect yourself.
Check your credit report. The worst time to learn that someone has taken out a loan in your name is when you’re applying for a loan yourself. So check your credit report first at
www.annualcreditreport.com, the authorized source for the free reports consumers are guaranteed by law. In addition, the three major credit bureaus are offering free weekly online reports to consumers through April 2021. If you’re not in the market for credit or a loan,
freezing your credit offers an extra – and free – measure of protection.
Look for reliable sources of information. Looking for a loan? Don’t click on a link in an unsolicited email and be careful with online search engine results. Scammers often bait their online traps with sound-alike names and URLs, phony endorsements, and professional-looking websites. For small business owners looking for COVID-relief programs, always start at
www.sba.gov, the official site of the Small Business Administration. Or reach out to a trusted financial institution in your community.
Check out lenders before sharing personal information. Scammers who impersonate lenders have the perfect excuse to ask you for lots of personal information that can be used to steal your identity. Don’t leave a trail of personal information exposed by filling out lots of applications online with lenders you don’t know. Investigate lenders first and if you spot something amiss, stop. And then file a report at
ReportFraud.ftc.gov.
Brought to you by Dr. Ware, Microsoft Office 365 Silver Partner, Charleston SC.
by Contributed | Jan 13, 2021 | Technology
This article is contributed. See the original author and article here.
If you’re in retail, healthcare, manufacturing—any industry with a large, disperse frontline workforce—you know how challenging it is to connect people from the top floor to the shop floor. That coordination is now more critical than ever, too, as leadership navigates unprecedented changes to frontline locations.
Microsoft Teams helps bridge this gap, especially with the recent release of the Tasks app in Teams and, as of today, task publishing. Task publishing is now generally available to coincide with our announcement of the release at NRF, one of the largest retail conferences in the world.
With task publishing in Teams, leadership can create tasks centrally at the corporate level and publish those tasks to targeted frontline locations like stores, clinics, or factories. Tasks can be assigned to all frontline teams or specific locations based on customizable characteristics like size or layout. After tasks are assigned, frontline workers see a simple list of their task assignments through Teams, while corporate has full visibility into task progress across all locations.
2020 is now behind us, but companies would be remiss to ignore its lessons in 2021 and beyond. Of everything we learned, the most important was the essential role of frontline workers. Microsoft is taking this lesson to heart, too. You can read about our frontline worker strategy and enabling features like task publishing in a pair of new blogs from Emma Williams, CVP of Microsoft Office Modern Workplace Transformations, and our friends on the Microsoft Teams Tech Community. The first blog is here and the second here. We’ve also put together a short video that highlights our strategy in the context of a potential real-world scenario.
Companies around the world are already seeing the benefits of managing their frontline worker tasks in Teams. This includes Chedraui, a publicly traded, Mexico-based grocery store and department store chain. “We chose Microsoft Teams because it brought all the communication and productivity tools we needed together in a single platform, combined with robust security,” says Pilar Rojas Suárez, CEO and Director of Systems at Chedraui. “With Tasks in Teams and the mobile app, area managers have considerably reduced the time it takes to carry out, monitor, and supervise tasks.” You can read the full Chedraui case study here.
For more details on task publishing and how to get started, check out our dedicated support page—but first you’ll need to set up your team targeting hierarchy. If you need more help with this, contact your sales representative. We’ve also developed a “Tasks in Teams and Task Publishing” look book that goes into even more detail about the feature. Select the download icon at the bottom of this blog to grab it.
Microsoft has several virtual sessions at NRF this week. We hope you tune in! We also hope you’ll continue visiting our Tech Community and submitting your ideas to improve Planner on UserVoice.
by Contributed | Jan 13, 2021 | Technology
This article is contributed. See the original author and article here.
Nowadays there are tons of customers who have successful stories using our fully-managed PostgreSQL database due to its various advantages such as pay-as-you-go, high availability, security, and manageability features. However, because a cloud database service like Azure Database for PostgreSQL uses a different connectivity architecture (it’s running on cloud, after all), you may run into connectivity issues if you don’t follow the best practices.
Working in Azure Database Support, we often deal with connectivity issues. Many of these Postgres connection issues fit into some common patterns and here I am listing those patterns and all possible causes below—to give you a checklist you can use to investigate connection issues with the Single Server deployment option for Azure Database for PostgreSQL.
1. Scenario: You have just provisioned a server in Azure Database for PostgreSQL – Single Server, but the connection fails
There can be multiple reasons for this as follows:
Invalid connection String or password
- Make sure the user you are connecting with an account has the appropriate permission.
- If you are using the single server deployment mode, confirm that the username you are passing ends with the correct server name/hostname field (usernames need to be passed as
username@servername)
- Make sure the password is correct in all connections. If you have enabled connection throttling server parameter in the portal, the database service will temporarily throttle connections per IP if there are too many invalid password login failures.
Security
- Check the firewall rules in the portal. The error pg_hba.conf entry for host ‘xxxx‘, user ‘xxxx‘, database ‘pxxxx‘, SSL… indicates that a firewall rule is needed. Set up firewall rules to allow your client’s IP address.
- Make sure you are using the correct SSL configuration and choose the right certificate.
- As a part of our maintenance activity, we are working on changing out gateway certificate used to connect to the server using SSL. Refer to the steps to mitigate the issue in this article.
- Make sure you are using the correct TLS configuration. This is the link for single server TLS configuration. If you use flexible deployment mode, TLS/SSL is enabled by default and cannot be disabled. Minimum TLS version supported on the server is TLS1.2.
Is it a client Issue?
- You can simply test the connection from Azure CLI in the portal and see if you can connect. This test can help narrow down if the database is having availability issue or your client network issue.
- Ping the FQDN and see if it resolves to our Gateway IP correctly when using PostgreSQL single server deployment mode. If you are using the private endpoint, it should resolve to your private IP for the private endpoint.
- Confirm that your network allows outbound connections on port 5432. You can try to telnet to your server. When using single server deployment mode, confirm your network/firewall does not block connection to the regional Azure Database for PostgreSQL Gateway IP.
- If you are connecting within Azure VM (virtual machines), check NSG (network security groups) rules to see if it blocks the connection. Also check the route table and see if there is any VPN device which may need to be configured.
- If you are using VNET rules, ensure that the service endpoints are correctly configured.
- If you are using basic tier and see the error ‘Server is not configured to allow IPv6 connections‘, note that the Basic tier does not support VNet service endpoints. You must remove the endpoint Microsoft.Sql from the subnet attempting to connect to the Basic tier server.
- When you see ‘An existing connection was forcibly closed by the remote host,’ that indicates your client closed the connection to the Postgres server. Check your client timeout and idle connection settings. Learn more about this error.
Are you using the right connection drivers?
- Check out this supported client library list.
- If you see an error related to GSS, you are likely using a newer client/driver version which Azure Postgres Single Server does not yet fully support. This error is known to affect JDBC driver versions 42.2.15 and 42.2.16. Consider using a later driver version. Or, consider disabling the request of GSSAPI. Use a connection parameter like gssEncMode=disable.
2. Scenario: Is your connection taking longer time?
The Single Server architecture leads to high connection time. This can impact your workload performance if there are large short duration connections. For example, user creates a connection, runs a simple query, and closes the connection. We highly recommend connection pooling if you have not done it yet and exam your pool configuration. Learn more about this.
If you notice the connection latency suddenly increases, you can start checking if you have increased workload.
3. Scenario: Are you experiencing any connection failures/timeout during peak hours?
This means your connection string is correct and you can connect successfully in regular hours. However, during peak hours you may experience either connection failures or time outs.
- Please check your active connections as well as CPU/memory/IO usage percentage in the portal metrics tab. High utilization may lead to unavailable resources for a new connection. Please consider upgrading your server if the resource is hitting 100%.
4. Scenario: All connections are failing?
This could be because of issue in Azure infra or maintenance activities.
Hopefully, you have found the cause of the connectivity issue if you have checked all items in the checklist above. If you have any questions, please feel free to let me know.
Enjoy!
by Contributed | Jan 13, 2021 | Technology
This article is contributed. See the original author and article here.
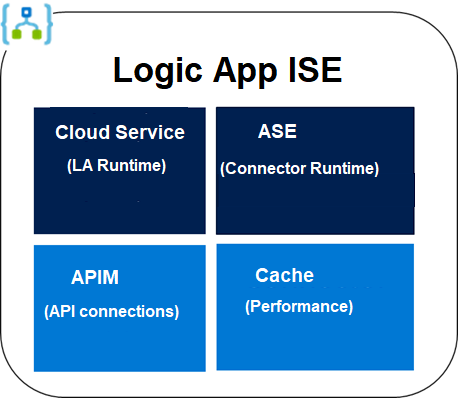
Each ISE has its own dedicated storage and other resources that are kept separate from the “global” multi-tenant Logic Apps service. Internally It consists of four services: a Cloud Service, an App Service Environment (ASE), an API Management Service (APIM), and a Cache Service (note: The Dev Sku ISE does not have a Cache service and now you know why Dev Sku is not for production.). When we deploy an ISE, we are actually deploying these four services in the background. Any one of the four service fails to deploy, the ISE deployment deems a failure.
Most of the deployment failure was due to network configuration issues.
- Please understand and follow the main ISE deployment guide: https://docs.microsoft.com/en-us/azure/logic-apps/connect-virtual-network-vnet-isolated-environment. It has the list of required inbound and outbound ports.
- If you are using forced tunneling, please be aware of its strict and long list of requirements: https://docs.microsoft.com/en-us/azure/logic-apps/connect-virtual-network-vnet-isolated-environment#forced-tunneling-requirements.
- Forced tunneling lets you redirect or force all traffic back to a firewall for inspection and auditing. It can be configured through UDR or ExpressRoute BGP. Basically the default route 0.0.0.0/0 is set with your firewall (instead of Internet) as the next hop.
- You must take care of the UDR requirement to avoid asymmetric routing.
- You shall enable the required service endpoints (Azure SQL, Storage, Service Bus, KeyVault, and Event Hubs) on all four subnets. Otherwise you will need to whitelist wildcard URIs such as *.vault.azure.net on your firewall.
- please pay attention to the ‘Other inbound and outbound dependencies’ requirement under https://docs.microsoft.com/en-us/azure/logic-apps/connect-virtual-network-vnet-isolated-environment#forced-tunneling-requirements. For example, if a firewall blocks some seemingly unrelated URIs such as prod3.metrics.nsatc.net or www.thawte.com etc, it may cause the deployment to fail or render the deployed ISE unhealthy.
- Some may ask why there are so many requirements for using forced tunneling. Again, it is the combined requirements of the four internal components. Forced tunneling is where we have seen most deployment failures.
- If your virtual network uses custom DNS servers, you will need to add a DNS forwarder to Azure DNS server (168.63.129.16) or add Azure DNS server (168.63.129.16) directly to the list of the DNS servers for the virtual network.
- ISE requires four subnets. For testing purpose, you may want to create a test subnet on the same virtual network and apply the same NSG and UDE of the four ISE subnets. Then you can deploy a virtual machine (VM) to this subnet. You can log into the virtual machine to perform some tests. For example:
- ISE deployment can take up to 5 hours. There is no charge for failed deployment. There is no charge until an ISE is successfully deployed.
- When a deployment fails, you may want to delete the failed ISE. Deleting the ISE does not delete the four subnets. You will need to delete the subnets separately. But it may take up to nine hours before these subnets can be deleted. So if you want to retry the ISE deployment right away, you may want to create and use four new subnets.

by Contributed | Jan 13, 2021 | Technology
This article is contributed. See the original author and article here.
TLDR; this article tells you why you should use Azure KeyVault to store and manage your secrets. Furthermore, it takes you all the way from local development to deployed on Azure (there are some differences in how to authenticate).
Azure Key Vault service is a service on Azure. It’s a vault for your secrets that is encrypted. It solves the following problems:
- Secrets Management – Azure Key Vault can be used to Securely store and tightly control access to tokens, passwords, certificates, API keys, and other secrets.
- Key Management – Azure Key Vault can also be used as a Key Management solution. Azure Key Vault makes it easy to create and control the encryption keys used to encrypt your data.
- Certificate Management – Azure Key Vault is also a service that lets you easily provision, manage, and deploy public and private Transport Layer Security/Secure Sockets Layer (TLS/SSL) certificates for use with Azure and your internal connected resources.
Why use it
Key Vault greatly reduces the chances that secrets may be accidentally leaked. There are also some additional benefits such as:
Secrets are separate from code Application developers no longer need to store security information in their application.
Access via URIs. Your applications can securely access the information they need by using URIs. These URIs allow the applications to retrieve specific versions of a secret.
No need for custom code. There is no need to write custom code to protect any of the secret information stored in Key Vault.
Monitoring, you can enable logging for your Vaults. You can configure the monitoring to:
- Archive to a storage account.
- Stream to an event hub.
- Send the logs to Azure Monitor logs
Authentication via AAD, Azure active directory. Access to a Key Vault requires proper authentication and authorization. Authentication is done via Azure Active Directory.
Two ways to authorize. Authorization may be done via Azure role-based access control (Azure RBAC) or Key Vault access policy
References
Learn module Azure Key Vault. If you are completely new to Key Vault this is the best place to start. It takes you through explaining what Key Vault is, what to use it for. How to run something locally and how to deploy it to the cloud.
More on auth
Quickstart Node.js This is a quickstartt that tells you how to work with secrets locally using Node.js. Great no-nonsense guide if you want to get started quickly.
Quickstart .NET A good quick start article showing how to create a Key Vault, use the .NET SDK and a service principal to authenticate.
KeyVault secrets. Good page that gives more ooof an understanding of how secrets are stored and what different permission levels exist among other things.
Authenticating to Key Vault
An important thing to realize when you want to read from the Key Vault within an app is that you need two different approaches depending on whether you are developing locally, or you have deployed the app to Azure. Why is that?
Let’s explain the two different situations:
In development locally, you can be authenticated by using either Azure CLI and the az login command. You can also use the Azure extension for VS Code and log in to Azure that way. What happens when you use either of those methods a credential is created on your machine. If you then use the official SDKs for your chosen platform, it will be able to authenticate using said credential.
When deployed on Azure. To reiterate, your code will most likely use an SDK for a supported language platform like .NET, Node.js, Python etc. Now, the SDK works for you in both when developing locally and deployed to Azure. It looks for credentials in many places like Az CLI and Visual Studio Code as we’ve already mentioned. However, once deployed, your app has access to neither of those two, so what does it do? It uses either environment variables (in App Settings for example) or it uses a so called managed identity to authenticate.
A managed identity is an impersonated identity you can create, either based on your service (a web app for example) or based on your user. What you do is to run a command, with either your user or your app as an argument, and back comes an identity and a secret. Here’s an example of how you can create such an identity:
   az webapp identity assign

    –resource-group “<resource group name>”

    –name “<your-unique-app-name>”
The above command returns a principal id that you will use as an argument in the next command. Once you have that identity created you need to assign it to the Key Vault using az keyvault set policy:
   az keyvault set-policy

    –secret-permissions get list

    –name “<your-unique-vault-name>”

    –object-id “<your-managed-identity-principalid>”
After that, you are ready to deploy your app to Azure and Azure Active Directory will authenticate your app and let you read from the Key Vault. This will all be shown in detail further down in the article, but now you know roughly what goes on.
Permissions
The set-policy command above not only associates your identity to the KeyVault, it also sets permissions. The argument –secret-permissions contains a list of permissions that determines if you are able to read, write and manage secrets. Be as restrictive as you can who can do what with your Key Vault. In general, I reason like this when it comes to permissions:
- Read, for most apps. Most apps only needs to read a secret.
- Write, only when absolutely needed. Apps or users that needs this access is some kind of admin. Either the app manages secrets via a web API for example or there’s an admin user that some other way needs to do something advanced to the secrets.
Have a safe behavior
Even though Key Vault helps you keep your secrets secure, it can still leak if you’re not careful. You don’t want to ever show the value of a secret on a web page or as part of an error. What you can do, is to have a safe behavior and ensure you do things such as:
- Be restrictive with permissions, if your app only needs to read a secret, don’t give it permission to SET, DELETE or do something else.
- Rotate keys, you can change the values of the keys/secrets. The apps using those keys won’t be affected as they only operate on they keys name, not its value.
DEMO, create a Key Vault store and read a secret
Next, you will be taken through a series of steps where you will get to do the following:
- Create a KeyVault, you will create a Key Vault from the command line using Azure CLI
- You will add secrets, to the Key Vault and ensure you can read back the value using Node.js and some SDK libraries.
- Create an assign identity, you will then create a managed identity, using your web app as an argument and assign to the Key Vault
- Deploy app, once you have all these parts in place, you will deploy the app and see that it can still read secrets from the Key Vault.
To create a Key Vault, follow these steps:
- Login to Azure. In a terminal type
az login:
Select the user you want to login with.
- Create a resource group. You may use an existing resource group at this point, but if you want to create a new one, type the following:
az group create –name “<a name for resource group>” -l “EastUS”
- Create the Key Vault. Run the
az keyvault command below:
az keyvault create –name “<unique vault name>” –resource-group “keyvaultrg” –location “EastUS”
- Create a secret, using the following command
az keyvault secret set:
az keyvault secret set –vault-name “<unique vault name>” –name “mySecret” –value “abc123”
- Read the secret, from the vault by running this command
az keyvault secret show:
az keyvault secret show –vault-name=“<unique vault name>” –name=“mySecret”
DEMO, reading a secret from your code, when developing
There’s SDKs for most major platforms. I’ll be selecting the Node.js one for this demo. If you want the C# one you can select this language pivot:
C# KeyVault SDK
- Run the command
az login to ensure you are logged into Azure before proceeding. This will place a credential on your machine that the SDK will be able to pick up.
Select the Azure user that you want and then close the browser windows when asked.
- Create a file app.js
- Instantiate a Node.js project by running the
npm init command like so:
- Download the needed SDK libraries from npm using the
npm install command like so:
npm install @azure/identity @azure/keyvault–secrets dotenv
dotenv is not part of the SDK, it just let’s us define some environment variables in a .env file and they get read to the env variables at initialization.
- Add imports. Open app.js and add the following two lines at the top:
   require(‘dotenv‘).config()
   const { DefaultAzureCredential } = require(“@azure/identity“);

   const { SecretClient } = require(“@azure/keyvault-secrets“);
The first line ensures values from the .env file is read in. Given the upcoming code the content of .env file should look something like this:
VAULT_NAME=<key vault value, change me>
- Instantiate a client. We do that with the following lines of code:
   const secretName = “mySecret“;

   const keyVaultName = process.env[“VAULT_NAME“];

   const KVUri = “https://“ + keyVaultName + “.vault.azure.net“;
   const credential = new DefaultAzureCredential();

   const client = new SecretClient(KVUri, credential);
Note how the first two lines help construct the URL to the Key Vault given it’s name, that it reads from VAULT_NAME variable from our .env file. Next an instantiation of DefaultAzureCredential is done. This instance will find the credential produced by az login.
NOTE, we will need to change how this authentication happens once we deploy the app, but this works for now.
- Retrieve secrets value. Lastly, we add code retrieve the value of the secret:
   async function main() {

    const retrievedSecret = await

    client.getSecret(secretName);

    console.log(retrievedSecret);

   }
   main();
- Add npm “start” command. Add an entry to package.json and the script section:
- Run the app, by typing the following in the console:
This should give you a response looking something like this:
   {

     value: ‘abc123‘,

     name: ‘mySecret‘,

     properties: {

       expiresOn: undefined,

       createdOn: 2021–01–11T18:06:19.000Z,

       updatedOn: 2021–01–11T18:06:19.000Z,

       value: ‘abc123‘,

       id: ‘https://<key vault name>.vault.azure.net/secrets/mySecret/<the secret>‘,

      tags: { ‘file-encoding‘: ‘utf-8‘ },

      vaultUrl: ‘https://<key vault name>.vault.azure.net‘,

      name: ‘mySecret‘,

      version: ‘<version>‘,

      enabled: true,

      recoverableDays: 90,

      recoveryLevel: ‘Recoverable+Purgeable‘

   }
You can see that you are able to successfully retrieve the value of your secret from the Key Vault and via code. Great, congrats.
DEMO, reading a secret from code, when deployed
As we are looking to deploy our app next, there are two things we need to do:
- Rebuild to an API. Ensure we rebuild the app to a web API, we will use Express framework for this
- Authenticate via a principal. We will need to perform the following steps for that:
- Create a webapp on Azure.
- Create a principal, using the name of the app as an arg.
- Associate the principal to the Key Vault.
- Deploy the app. That’s something we can do via the command line.
Rebuild to an API
First, we will need to rebuild the app to Express. We do this just so we can interact with the app once deployed. We will display the value of the secret.
Don’t do this in a real scenario, this is just to show that we have the proper access to the Key Vault.
- Install web framework. Install express using
npm install
- Add route. Ensure you have app.js open and change the code to the following:
   // this is not needed when deployed

   // require(‘dotenv’).config()
   const { DefaultAzureCredential } = require(“@azure/identity“);

   const { SecretClient } = require(“@azure/keyvault-secrets“);
   const app = require(‘express‘)();

   const port = process.env.PORT || 3000;
   const keyVaultName = process.env[“VAULT_NAME“];

   const KVUri = “https://“ + keyVaultName + “.vault.azure.net“;
   const credential = new DefaultAzureCredential();

   const client = new SecretClient(KVUri, credential);
   const secretName = “mySecret“;
   app.get(‘/api/test‘, async(req, res) => {

      const secret = await getSecret();
      res.type(‘text‘);

      res.send(secret);

   });
   async function getSecret() {

      const retrievedSecret = await client.getSecret(secretName);

      return retrievedSecret;

   }
   app.listen(port, () => {

      console.log(‘server running‘);

   })
What we have now is an express app with a route to /api/test.
- Test your program, by running
npm start in the console. In the browser, navigate to http://localhost:3000/api/test. It should show your secret as a JSON response.
Create the web app
Because we plan to deploy this on Azure we need to make sure our app properly authenticates to Azure AD and that the Key Vault is ok with us reading from it. There’s just a few steps to make that happen:
- Create a service plan, first need a service plan. Run the command
az appservice plan create, like so:
   az appservice plan create

    –name “<unique service plan name for your subscription>”

    –sku FREE

    –location centralus

    –resource-group “<existing resource group>”
- Create a web app, we need to create web app first as we will use it’s name as an argument when we create a so-called principal. Run
az webapp create:
   az webapp create

    –plan “<unique service plan name for your subscription>”

    –runtime “node|10.6”

    –resource-group “<existing resource group>”

    –name “<unique app name>”
- Create the app settings, next configure the app setting on the web app by calling
az webapp config appsettings set:
   az webapp config appsettings set

    –resource-group “<existing resource group>”

    –name “<unique app name>”

    –settings ‘VAULT_NAME=<your-unique-vault-name>’ ‘SCM_DO_BUILD_DURING_DEPLOYMENT=true’
The command above will ensure that process.env[‘VAULT_NAME’] will get populated once deployed. Also we no longer need the dotenv lib to read from the .env file.
Authenticate via a principal
There are two things that needs doing. Creating the impersonated identity and assigning the identity to the Key Vault, and in doing so give the needed permissions to be able to read the secrets values.
- Create a service principal, run the command
az webapp identity assign:
   az webapp identity assign

    –resource-group “<existing resource group>”

    –name “<unique app name>”
This will produce a JSON response that contains a field principalId. You will use that in the next command to associate an identity with a Key Vault, while adding a set of permissions.
- Grant permission to the Key Vault, run the command
az keyvault set-policy:
   az keyvault set-policy

    –secret-permissions get list

    –name “<your-unique-vault-name>”

    –object-id “<principalId>”
Here we can see how we assign get and list as permissions for our identity, when it gets associated to the Key Vault. That’s what’s needed for the app to be able to read from the Key Vault.
We would have needed another set of permissions if we wanted to create or delete a secret for example.
Deploy the app
To deploy the app, there’s only one command we need to run. All that’s needed is to compress the application and deploy it.
- Deploy the app. As a final step, deploy the app using the command:
   zip site.zip * -x node_modules/
   az webapp deployment source config-zip

    –src site.zip

    –resource-group “<existing resource group>”

    –name “<unique app name>”
The above command will pack up all your files, node_modules excluded, into a file site.zip. Then the files are deployed. A few minutes later you will app your app up and running and your Key Vault showing the value of your secret mySecret if you navigate to deployedUrl/api/test
Summary
This article was somewhat long, but it did tell you why you should use the Azure Key Vault service. It also told you how to work with the Key Vault in local development and finally how you needed to change your source code and thereby prepare it for deployment. I hope it was helpful.


Recent Comments