
by Contributed | Jan 15, 2021 | Technology
This article is contributed. See the original author and article here.
Surface tools that assist IT admins with core security, management, and diagnostic tasks have been updated with support the latest enterprise devices. Updated tools include:
- Surface Diagnostic Tool for Business. Eases support experience through Surface Diagnostics. This tool provides a full suite of diagnostic tests and software repairs to quickly investigate, troubleshoot, and resolve hardware, software, and firmware issues with Surface devices. Note that Surface Hub Hardware Diagnostics is already built into the Teams OS device for easier troubleshooting and is available in Microsoft Stores for download.
Built in support
In addition, the latest versions of Surface Data Eraser, Surface Brightness Control , Surface Asset Tag already have built in support for Surface Pro 7+.
Download
You can download these and other tools from Surface Tools for IT, available on the Microsoft Download Center. Surface Pro 7+ and Surface Hub 2S 85” are available for purchase now.


by Contributed | Jan 15, 2021 | Technology
This article is contributed. See the original author and article here.
Overview
In the world of Artificial Intelligence and Machine Learning, data quality is paramount in ensuring our models and algorithms perform correctly. By leveraging the power of Spark on Azure Synapse, we can perform detailed data validation at a tremendous scale for your data science workloads.
What is Azure Synapse?
Azure Synapse is a Data Analytics Service that provides tools for end-to-end processing of data within Azure. The Azure Synapse Studio provides an interface for developing and deploying data extraction, transformation, and loading workflows within your environment. All of these workflows are built on scalable cloud infrastructure and can handle tremendous amounts of data if needed. For data validation within Azure Synapse, we will be using Apache Spark as the processing engine. Apache Spark is an industry-standard tool that has been integrated into Azure Synapse in the form of a SparkPool, this is an on-demand Spark engine that can be used to perform complex processes of your data.
Pre-requisites
Without getting into too much detail, the main requirements you will need for running this code is an Azure Synapse Workspace and a data set on which you would like to perform some validations loaded to Azure Storage. The technique shown here provides a starting point for performing these types of data validations within your own use case.
For demonstration purposes, I have loaded a data set of hard drive sensor data (link below) to an Azure Storage account and linked the storage account in Synapse (https://docs.microsoft.com/en-us/azure/synapse-analytics/get-started)

I have also set up a SparkPool (link) for developing in PySpark Notebooks within Azure Synapse, I can read the data by connecting to the data source and using some simple PySpark commands:
from  pyspark.sql.functions import input_file_name
import os

df = spark.read.load('abfss://[container]@[storage_account].dfs.core.windows.net/[path]/*.csv', format='csv', header=True).withColumn('file', input_file_name())

display(df)

One key part to take note of is the command .withColumn(‘file’, input_file_name()), this adds a column to your dataset named file with the name of the source data file. Very helpful when trying to find malformed rows.
Let’s start validating
After loading the data you can begin by calculating some high-level statistics for simple validations.
df_desc = df.describe()
display(df_desc)

the describe() function calculates simple statistics (mean, standard deviation, min, max) that can be compared across data sets to make sure values are in the expected range. This is a built-in data function that can be used on any data. You can save these data sets back to your data lake for downstream processes using:
df_desc.write.parquet("[path][file].parquet")
But we can get much more complex by using spark queries to further validate the data.
We can count how many rows were contained in each file using this code:
validation_count_by_date = df.groupBy('file','date').count()

This count can be useful in ensuring each file contains a complete dataset. If file sizes are outside of the expected range, it may mean that the file is either incomplete or contains excess data.
Furthermore, we can even look at the specific values within the data at a row-level granularity. The code below uses the named columns “file” and “date” to the group missing values across all files in your data set. Missing values are defined as Null or NaN values in the dataset.
from pyspark.sql.functions import isnull, isnan, when, count, col

cols = [count(when(isnan(c) | col(c).isNull(), c)).alias(c) if c not in ['file', 'date'] else count(col(c)).alias('count_{}'.format(c)) for c in df.columns]
missing_by_file = df.groupBy('file', 'date').agg(*cols)

display(missing_by_file)

Don’t be intimidated by the above code. I am essentially using some python loops to generate a list of columns cols, and then using the * (star) operator to pass those columns to the select function. I encourage you to try running these commands on your data to become familiar with the power of python.
We can go a step further in calculating the ratio of missing values for each column within a file:
missing_by_file_pct = missing_by_file.select(['date', 'file', *[(col(c)/col('count_file')).alias('{}_pct'.format(c)) for c in df.columns]])
display(missing_by_file_pct)

Now instead of looking at total values, we can identify incomplete data by looking at the percentage of filled-in values in a file. Again, this technique accompanied by business rules can be very powerful in validating raw data sources and ensuring data quality in a scalable method.
Up until this point, I have only defined the column names of “file” and “date”, all other columns have been derived from the source file header/schema so there is no need to maintain column lists as part of the validation rules. If you do require checking for specific values within a file, you can easily extend these examples such as this:
from pyspark.sql.functions import countDistinct
validation_modelcount_by_date = df.groupBy('file','date').agg(countDistinct('model'))
display(validation_modelcount_by_date)

The query above identifies all the distinct values for the column “model” which are present in each file. As you can see the count of distinct models varies slightly from file to file, we can establish an acceptable range fairly easily by looking at this data.
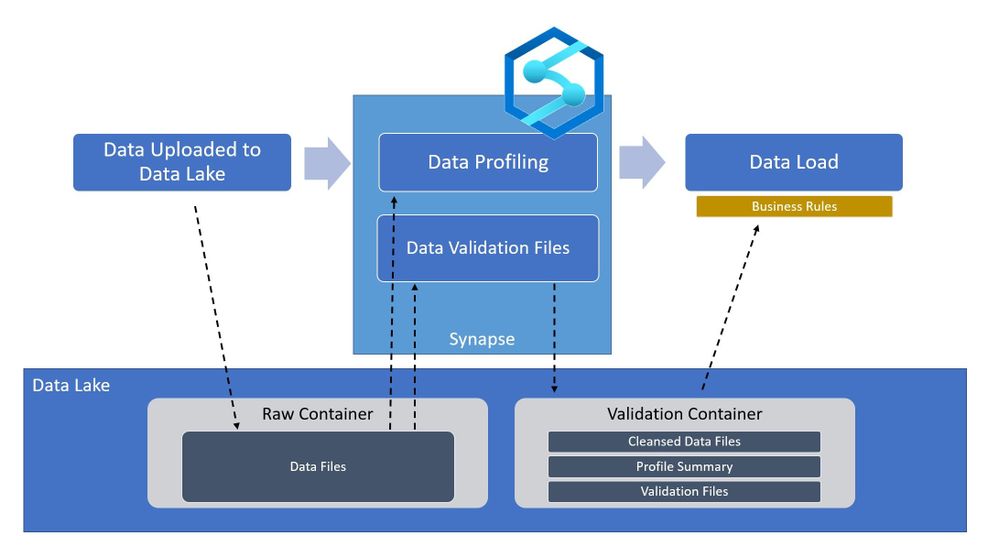
How can I use this in my processes?
Going back to the high-level architecture diagram shown at the beginning of the blog. This technique can be applied during the ingestion of your data to certify whether the raw files are qualified to be in the data lake. By using Synapse Spark we can perform the row-level checks fast and efficiently, and output the results back into the data lake. Downstream processes such as Machine Learning Models and/or Business Applications can then read the validation data to determine whether or not to use the raw data without having to re-validate it. With Azure Synapse and Spark, you can perform powerful validations on very large data sources with minimal coding effort.
Data reference: Backblaze Hard Drive Stats
Github Link: AzureSynapseDataValidation/Validation-Sample.ipynb
by Contributed | Jan 15, 2021 | Technology
This article is contributed. See the original author and article here.
Surface Pro 7+ brings next level performance and versatility to the enterprise
It’s now easier for you to store, sync, and share large files in Microsoft 365. This latest improvement will help increase the upload file size limit for Microsoft 365 from 100 GB to 250 GB—which includes uploads of files into SharePoint, Teams, and OneDrive.
News for Frontline workers
Push tasks from corporate to frontline workers with task publishing in Teams
Empower your frontline workers with these Azure AD capabilities that just went GA
Approvals in Microsoft Teams, Now Generally Available
Riny van Eekelen is the Member of the Week. Riny is very active in the Excel discussion space, starting topics and replying to members with help.
View the Weekly Roundup for Jan 11-15th in Sway and attached PDF document.
https://sway.office.com/s/E2obAPPpUN0nAblc/embed
by Scott Muniz | Jan 15, 2021 | Security, Technology
This article is contributed. See the original author and article here.
The National Security Agency (NSA) has released an information sheet with guidance on adopting encrypted Domain Name System (DNS) over Hypertext Transfer Protocol over Transport Layer Security (HTTPS), referred to as DNS over HTTPS (DoH). When configured appropriately, strong enterprise DNS controls can help prevent many initial access, command and control, and exfiltration techniques used by threat actors.
CISA encourages enterprise owners and administrators to review the NSA Info Sheet: Adopting Encrypted DNS in Enterprise Environments and consider implementing the recommendations to enhance DNS security.
by Contributed | Jan 15, 2021 | Technology
This article is contributed. See the original author and article here.
permalink: https://aka.ms/FTAISVGovernance
Microsoft Azure includes many governance features that can help an independent software vendor (ISV) with resource and subscription management. In this set of three video presentations, I present your options and features.
Although these are not talking about any ISV-only features, they are ISV-focused – so while this content would certainly be helpful for you if you’re not an ISV, you should be aware that is the lens through which I am presenting the content.
These videos include a English closed-caption-file reference, and are best viewed full-screen.
Please let us know in the comments what you think, and if you have questions! Also, this is the first of a set of ISV-oriented Azure videos. If you have an ISV-specific topic that you feel would be good for a 15-20 minute video or a small set of them, let us know… we already have videos on logging and monitoring and on multi-tenant databases under development…
Session 01: Organizing Resources
Sorry, your browser doesn’t appear to support embedded videos.
Session 02: Policies, Initiatives, and Blueprints
Sorry, your browser doesn’t appear to support embedded videos.
Session 03: ISV Summary
Sorry, your browser doesn’t appear to support embedded videos.
by Contributed | Jan 15, 2021 | Technology
This article is contributed. See the original author and article here.
Hi Folks! I am Naveen kanneganti and welcome to my blog post.
You can now send client notification action from the Configuration Manager to trigger a client device to upload its client logs to the site server. In order access collected log files you have several options available. the following are some of the options in resource explorer to access collected log files
- Open Support Center: Launches Support Center. from support centre you can open the logs in the viewer.
- View file: Opens the folder where the zip file is located with File Explorer.
- Save: Opens a Save File popup box.
Prerequisites
Administrative user needs Notify resource permission on the Collection
- The following built-in roles have this permission by default:
- Full Administrator
- Infrastructure Administrator
Collect client logs
- Launch ConfigMgr Console, In the Assets and Compliance workspace, go to either the Devices or Device Collections node.
- Right-click on a device, or a device collection.

- Choose Client Diagnostics and then Click Collect Client Logs.


- On the client computer, you can check Diagnostics.log under C:WindowsCCMlogs .

- On the Management point, you can monitor from MP_SinvCollFile.log

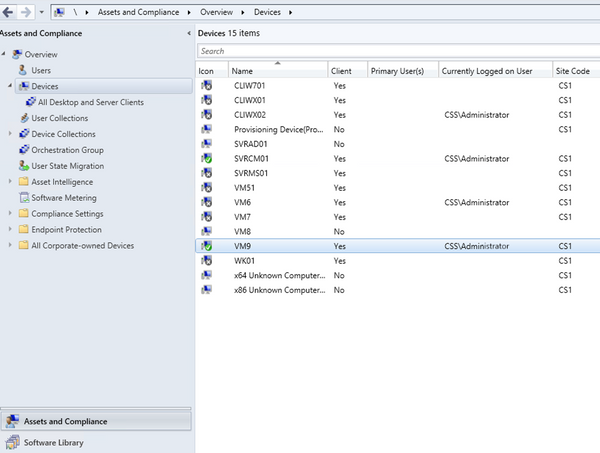
- On the site server you can monitor Sinvproc.log for the SIC file, processed Successfully as shown below

- Capture Resid and time stamp from Sinvproc.log. You can check whether Zip file is collected to the location:[site server]SMS_CS1inboxessinv.boxFileCol[Resid]
(ex: svrcm01.css.intSMS_CS1inboxessinv.boxFileCol16777228 )

View collected Client Logs
- Open Support Center
Follow the below steps to view collected logs, using this option
- Launch ConfigMgr Console, In the Assets and Compliance workspace go to devices and right click on the Device

- Choose Start and then click on Resource explorer

- In the resource explorer, choose Diagnostic files and then right click on latest files. Click on open Support Center

- Support Center open logs automatically as shown below

- Click on any log you interested and click Open from top ribbon

- Log viewer automatically open and display the log information

2. View Files
Follow the below steps to view collected logs, using this option
- In the resource explorer, choose Diagnostic files and then right click on latest files. Click on View File

- The zip file will be open with File explorer

- You can browse to ccmLogDataCollectorlogs folder and view the Collected Logs

3. Save
Follow the below steps to view collected logs using this option
- In the resource explorer, choose Diagnostic files and then right click on latest files. Click on Save

- It automatically opens Save popup Box to Save the files to your desired location

- After logs are saved to your desired destination folder, you can browse to .CcmLogDataCollectorlogs and view collected log files.

Hope this step-by-step process helps to start using Collect Client logs!
If you are looking to collect extensive list of logs, registry settings, and diagnostic data from a device or collection of devices please check URL:https://github.com/russrimm/CollectAllLogs
Best Regards
Naveen Kanneganti
Customer Engineer
Microsoft Services

by Contributed | Jan 15, 2021 | Technology
This article is contributed. See the original author and article here.
Read on to see what’s next in our Office Hours series, learn how we’re leading and growing, meet our preferred partners, and more.
Learn more about search at our Jan 20 Office Hours
Hear more about Microsoft Search and Azure Cognitive Search on our next Knowledge & Content Services Office Hours webinar – January 20 at 9am Pacific. Bill Baer, Senior Product Manager, Microsoft Search, Assistant, and Intelligence, and Liam Cavanagh, Principal Program Manager, Azure Search, will join us to tell you more about each solution and how you can use and combine their capabilities to deliver better search solutions for your organization. Register today for this webinar.
Visit the Knowledge & Content Services Office Hours page to learn more about this webinar series (formerly known as the Project Cortex Office Hours series). You can get the latest on upcoming meetings and view the recaps and recordings for past meetings.
See how we’re leading and growing
Thank you to our customers for inspiring our ongoing innovations! Over the past year, as our planet has pivoted to the “new normal” of remote work, we’re honored that many customers have turned to Microsoft 365 as their content and productivity cloud.
In December, we announced that for the fourth year running, Microsoft has been recognized as a Leader in the Gartner Content Services Platforms Magic Quadrant for 2020. Once again, Microsoft placed highest in Ability to Execute, and is placed higher on both Completeness of Vision and Ability to Execute than any other company in the Leaders’ quadrant. Download a copy of the Gartner Content Services Platform Magic Quadrant Report to learn more.

We were also humbled to announce SharePoint usage doubled in the last year and passed a new milestone of 200 million monthly active users in the cloud. Every day, our users create petabytes of data as they collaborate, communicate, and drive engagement. Demand has skyrocketed. And SharePoint has scaled to become the content engine that powers all of it – including Office, Microsoft Teams, OneDrive, Stream, and more.
See what’s new – Microsoft Content Services whitepaper
Read our Growing organizational intelligence with knowledge and content in Microsoft 365 whitepaper to learn more about the broad range of knowledge and content capabilities available in Microsoft 365.
Meet Microsoft 365 Content Services preferred partners
We’re excited to tell you more about the Microsoft 365 Content Services preferred partners, who are equipped to help you plan for and implement knowledge and content services solutions, including SharePoint Syntex. Below are the advisory and implementation launch partners based in the UK:
And around the world:
Upcoming events
Hear more from Microsoft at an upcoming virtual event.
AIIM virtual event – Mastering Your Microsoft 365 and SharePoint Investment: Moving from Rapid Adoption to Sensible Maturity
Jan 27
Catch up on recent events
Virtual Hub for Knowledge
Visit the Knowledge & Content Services resource center to learn more.
by Contributed | Jan 15, 2021 | Technology
This article is contributed. See the original author and article here.
The Azure Sphere OS version 21.01 is now available for evaluation in the Retail Eval feed. The retail evaluation period provides 14 days for backwards compatibility testing. During this time, please verify that your applications and devices operate properly with this release before it is deployed broadly via the Retail feed. The Retail feed will continue to deliver OS version 20.12 until we publish 21.01 in two weeks. For more information on retail evaluation see our blog post, The most important testing you’ll do: Azure Sphere Retail Evaluation.
The evaluation release includes an OS update only; it does not include an updated SDK.
Areas of special focus for compatibility testing with the 21.01 release should include:
- Apps and functionality utilizing GPIO.
- Apps and functionality utilizing Real Time Clocks (RTC).
- Apps and functionality utilizing wolfSSL, curl, or the Azure IoT C SDK.
For more information on Azure Sphere OS feeds and setting up an evaluation device group, see Azure Sphere OS feeds and Set up devices for OS evaluation.
For self-help technical inquiries, please visit Microsoft Q&A or Stack Overflow. If you require technical support and have a support plan, please submit a support ticket in Microsoft Azure Support or work with your Microsoft Technical Account Manager. If you would like to purchase a support plan, please explore the Azure support plans.
by Contributed | Jan 15, 2021 | Technology
This article is contributed. See the original author and article here.
Blog Note – this only impacts the iOS/iPadOS device enrollment using Apple Configurator – Setup Assistant – as documented here: iOS/iPadOS device enrollment – Apple Configurator-Setup Assistant – Microsoft Intune | Microsoft Docs. Only setup assistant workflow is impacted – all other iOS/iPad enrollment workflows are not affected.
We recently posted IT234239 on the Service Health Dashboard. Unfortunately, as part of this incident, we have confirmed that there is a certificate mismatch between Apple Configurator profiles and the Intune certificate issuing service for iOS/iPadOS enrollment through this setup experience. Existing devices remain enrolled as they have already established trust through the Apple configurator setup assistant workflow. However, if you plan to enroll new devices in the next few weeks there’s one set of steps post incident to enroll new devices, and then when the certificate update is completed, a quick profile update to ensure new enrollments are successful.
How will you know you are affected?
- You use Apple configurator – setup assistant – for enrollment.
- You have an enrollment profile that has worked historically to enroll new devices, but now those new devices (userless or user-based) fail enrollment. The error in device logs either indicates there’s no service response or enrollment can’t succeed so no errors are logged.
Steps for new enrollments between January 14, 2021- February 10, 2021:
For enrollment in the next few weeks until the new certificates described in MC225591 and also described in this blog post are fully deployed across the entire service, you’ll want to add the Baltimore CyberTrust Root Certificate back to the list of certificates in your profile to ensure that enrollment can complete through setup assistant.
Here are the steps you’ll take on a macOS device per the instructions here: iOS/iPadOS device enrollment – Apple Configurator-Setup Assistant – Microsoft Intune | Microsoft Docs:
- Navigate to https://enrollment.manage.microsoft.com/EnrollmentServer/Discovery.svc/iOS/ESProxy. This will load an empty page.
- Download the Baltimore CyberTrust Root certificate. You can read more about getting the Baltimore Cybertrust root certificate here: Configure Trusted Roots and Disallowed Certificates | Microsoft Docs. NOTE: In Microsoft Edge or Chrome, this can be done by clicking the padlock next to the URL, clicking “Certificate”, selecting Baltimore CyberTrust Root certificate and then dragging the large icon to the Desktop. In Safari, this can be done by clicking the padlock next to the URL, clicking “Show Certificate”, selecting Baltimore CyberTrust Root certificate and then dragging the large icon to the Desktop.
- In the Microsoft Endpoint Manager admin center, under Home > Devices > iOS/iPadOS > Apple Configurator, select the profile, and then “Export Profile”
- Copy the Profile URL from the blade.
- In Apple Configurator 2, right click the device and select “Prepare”.
- Choose “Manual Configuration” in the “Prepare with:” drop down.
- Select “New Server” and paste the URL from step 4 into the “Host name or URL” text box.
- On the “Define an MDM Server” click the + icon and select the Baltimore CyberTrust Root from where you downloaded it.
- Click “Next” and proceed as usual.
This will ensure for a short period of time enrollment proceeds as necessary.
Steps for new enrollments after February 10, 2021:
If you’re looking to enroll a device through Apple Configurator after the certificates update is completed, the Apple Configurator profile will need to be updated to point to the new certificate. We expect the new certificate rollout to be completed after February 10, but again check this blog post for additional information on the certificate rotation. For this step, you’ll just need to “touch” (which will get the profile to resync) your profile. Creating a new Apple Configurator profile will have the same effect, so we recommend going with what’s easiest for you.
In Apple Configurator 2, right click the devices and select Re-export the URL and repaste that into your server list in Apple Configurator 2. When you go through the resolution, it will ensure all components involved in your enrollment profile work as expected.
- Navigate to https://enrollment.manage.microsoft.com/EnrollmentServer/Discovery.svc/iOS/ESProxy. This will load an empty page.
- In the Microsoft Endpoint Manager admin center, under Home > Devices > iOS/iPadOS > Apple Configurator, select the profile, and then “Export Profile”
- Copy the Profile URL from the blade.
- In Apple Configurator 2, right click the device and select “Prepare.”
- Choose “Manual Configuration” in the “Prepare with:” drop down.
- Select “New Server” and paste the URL from step 3 into the “Host name or URL” text box.
- Click “Next” and proceed as usual.
Let us know as if you have any questions on the steps in this post. Tag @Intunesuppteam in Twitter for any questions too!

by Contributed | Jan 15, 2021 | Technology
This article is contributed. See the original author and article here.
I am super thrilled to roll out a new (and detailed) migration guide for those of you who are migrating your Oracle workloads to our Azure Database for PostgreSQL managed database service.
Heterogenous database migrations such as moving from Oracle to PostgreSQL are hard, multi-step projects—especially for complex applications. Now, why are so many teams migrating their Oracle workloads to Postgres these days? This article from Stratoscale explains why there is an increasing demand for these migrations and is one of my favorite posts. I highly recommend a thorough read to get a feel of our industry’s current stand on this topic. To summarize, some of the top reasons that teams are migrating from Oracle to Postgres include: cost savings, decisions to transition to an open source culture, and desire to improve efficiency by modernizing workloads and moving to the public cloud.
If you’re modernizing your entire workload (as opposed to just your database tier) then you’re probably looking to migrate all your dependencies—front-end apps, middleware components, etc.—so you can garner the advantages of moving to the cloud. From our experience, these tough migration challenges can only be solved by a combination of people—specifically, in-house migration experts—and processes such as pre-migration, migration, and post-migration to-dos/checklists—and technology, including tools to automate the migration.
With the new Oracle to Azure Database for PostgreSQL migration guide, we dive deep into this problem space to give you the best practices you will need to manage your database migration. You will also get a 360° view—across the people, process, and tools aspects—into what you can expect from an Oracle to Postgres migration journey.
In this four-part blog series, we’ll dive into the following aspects of Oracle to PostgreSQL migrations:
- Process – The journey map of an Oracle to PostgreSQL migration, and how it ties into this new migration guide
- Storage objects – Migrating database objects such as tables, constraints, indexes, etc.
- Code objects – Migrating database code objects (stored procedures, functions, triggers, etc.) and
- Feature Emulations – Emulating various Oracle features in PostgreSQL
Before we dive into the contents of the migration guide and see how it can help you, let’s take a look at what happens in a typical Oracle to PostgreSQL migration. Also, note that the journey map by itself applies for migrations to all deployment options offered by Azure Database for PostgreSQL (Single Server, Flexible Server, and Hyperscale (Citus)). While this migration guide is focused on moving from Oracle to our managed Postgres service on Azure—aka Azure Database for PostgreSQL—you will probably find this migration guide useful, even if you are migrating from Oracle to self-managed Postgres deployments. (We want to live and breathe open source  ).
).
 Figure 1: Depiction of the 8 steps in the end-to-end journey of an Oracle to PostgreSQL migration.
The first 2 steps in the Oracle to Postgres migration journey: Evaluate & Discover
An important first step in approaching these migrations is to know what existing workloads you have and evaluate whether you need to do the migration at all. From our experience, those of you who choose to migrate from Oracle to Postgres do so for a bunch of different reasons as mentioned above.
Once you have evaluated why you want to migrate, discovering which workloads to migrate is the next step. You can discover workloads with a combination of tools and people who understand the full stack—both your application and your database. Given migrations are done for the full stack, it is also important for you to understand the dependencies between applications and databases in the portfolio. Discovering all possible workloads will help you to:
- Understand scope of the migration
- Evaluate migration strategies
- Assess engagement strategies
- Recognize opportunities to improve
This exercise will also clearly help you understand if certain workloads will need to remain in Oracle for various reasons. If that is the case, the good news is that you can still move your Oracle workloads to Azure and run Oracle applications on Azure.
Step 3 is all about assessing the workload & planning your migration
Once you have pinpointed which workloads are candidates for migration to PostgreSQL, and have a good idea of the dependencies—the next logical step is to assess the overall cost/effort of your Oracle to Postgres migration.
A fleet-wide analysis of your workloads with a cost model for the database migration will show how easy or difficult each migration will be. You might be wondering where this cost model is going to come from? It’s not easy to generate in some instances, I admit, but the good news is that there is a dedicated chapter on “Migration Effort Estimation” in the guide.
The cost model you create will help you to decide on which workloads to start migrating—or at least, which workloads to migrate first. At that point, all the details you collected in the earlier Evaluation step will help you to assess:
- Fit – If your workload can really run in Postgres
- Automation – Tools to use for the end-to-end database migration
- Execute – Choose whether you want to do the migration yourself or engage with some of our awesome partners who do these Oracle to Postgres migrations day-in and day-out
Overall, this planning process puts you on the path to move successfully to PostgreSQL in the cloud. It enables your team to be productive throughout the migration and operate with ease once complete.
Step 4 starts the conversion process & creates a target environment in Postgres
While your developers, database administrators, and PMs may be involved in the initial assessment and planning stages, the conversion process is where technical teamwork is in full swing. In the case of heterogeneous database migrations from Oracle to Azure Database for PostgreSQL, you will need to:
- Convert schema & objects: Convert your source database schema and database code objects such as views, stored procedures, functions, indexes, etc. to a format compatible with Postgres.
- Convert SQL: If an ORM library (such as Hibernate, Doctrine, etc.) is not being used, you will need to scan application source code for embedded SQL statements and convert them to a format compatible with Postgres.
- Understand exceptions: Understand which objects from the database source and application code could not be parsed and converted.
- Track all the changes: Centrally track all conversions, emulations, or substitutions so they can be reused across all the workloads you migrate from Oracle to PostgreSQL, both currently and in the future.
Once the conversion process is complete, step 5 kicks in: validate & test. You will need to ensure that the converted objects in your app or your database undergo thorough testing to ensure functional correctness in the new Postgres environment. You also need to make sure the new Postgres environment meets the performance and SLA requirements of your workload, end-to-end.
Step 6 is when you Migrate data and in Step 7 you validate the full workload stack
When you reach this stage in the Oracle to Postgres migration, you will have a converted and tested Postgres environment you can migrate into. Your technical teams, who understand different aspects of the databases currently being used, prepare for data migration. Your teams will work to understand other requirements such as downtime—and will plan for special considerations such as the need for bi-directional replication—as well as identify tools/services to migrate data.
Typically, to migrate data, you will use logical replication capabilities in Oracle to move initial data and ongoing changes to Postgres. Logical replication is one of the only ways to perform heterogeneous migrations. You can also validate data and test the full stack by taking an instance of your new Postgres database at a given point in time, restored from an Azure Database for PostgreSQL point in time snapshot. Once you have taken this point in time snapshot of your Postgres target database, you can run an instance of the application on the restored snapshot, to check for performance issues and data validity. This testing process ensures everything from functionality correctness to performance requirement baselines is ready, and a cutover can be scheduled.
Step 8 is when you Cutover your workload to use Postgres
On cutover day, for unidirectional replication scenarios, writes from the application are stopped. Writes are stopped in order to let the Postgres database fully catch up, until the overall logical replication latency from Oracle to Postgres is zero. All your migration jobs are stopped once the target is fully caught up and validated.
For applications interfacing with an ORM layer, the Oracle database connection string is changed to point to the new Postgres database, and writes are resumed to complete cutover. For applications that were rearchitected, the new instance of the application now takes up production traffic pointing to the new Postgres database. All code deployment best practices in the cloud need to be followed in this step. The rollback infrastructure should also be in place with clear instructions on steps to rollback along with criteria. Your team should be well trained and ready to operate on the new infrastructure before cutover is complete.
As you can see, the process is pretty involved and requires proper planning to utilize a combination of people + process + tools to be successful.
Despite the effort taken to do these tough migrations, I want to re-emphasize that there are so very many benefits to moving your Oracle workloads to Postgres in the cloud. Given the importance of these database migrations and our experience helping many of you to navigate this landscape, we wanted to give back to the community and thus the idea behind the Oracle to Azure Database for PostgreSQL migration guide was born.
Welcome to the new Oracle to Azure Database for PostgreSQL Migration Guide
From our experience working with those of you who have already done an Oracle to Postgres migration—specifically migrations to our Azure Database for PostgreSQL managed service—people spend more than 60% of the entire migration project in the conversion (step 4) and migration (step 6) phases described in the journey map above.
And as you probably already know, there are already some outstanding open source tools such as Ora2Pg available in the Postgres community. These tools help plan, convert, and perform these migrations at scale. However, some Oracle features will still need manual intervention to ensure the conversion was done as expected. To help you with this challenge, we created this Oracle to Postgres guide—based on our Azure team’s experience helping teams navigate this landscape of migrating their Oracle workloads into Azure Database for PostgreSQL.
The details given in our new migration guide apply fully for migrations to self-managed Postgres as well as our Single Server/Flexible Server deployment options for Azure Database for PostgreSQL. A subset of the best practices discussed in this guide apply to Oracle migrations into our Hyperscale (Citus) deployment option as well. If you’d like to dive deeper into the specifics of Hyperscale (Citus) as a potential target platform for your Oracle workloads, feel free to reach out to us to discuss specifics.
Our goals in creating this Oracle to Postgres migration guide were to give you:
- Go-to, definitive resource: Record all ideas, gotchas, and best practices in one place.
- Best practices: Walk through the best practices of setting up the infrastructure to pull off migrations at scale.
- Feature-by-feature guidance: For each feature in Oracle, provide best practice examples (with code snippets) for their use in Oracle and guidance on how that feature will work in PostgreSQL.
- Postgres version comparisons: Show how PostgreSQL is evolving and show a comparison between PostgreSQL 11 vs. 12 vs. 13 to help you make good decisions from a migration standpoint.
- What to expect from Ora2pg: Dive deep into the general migration complexity of each Oracle feature with the Ora2pg automation capability, so you know what to expect when you use Ora2pg to plan your migration.
Fair warning, folks  : All this work resulted in a 300+ page guide that walks you through multiple facets of an Oracle to PostgreSQL conversion and migration.
I know, that sounds looooong. However, the good news is that we put a lot of thought into the structure of our Oracle to Postgres migration guide to make it easy to look things up and easy to navigate. You don’t need to read through all pages to get value out of the guide. Based on where you are in your migration journey, you can easily navigate to specific chapters within the guide, get the info you need, and move on to next steps.
Here are a few screenshots of different parts of the Oracle to Postgres migration guide to give you a visual on the content –
 Figure 2: Migration Guide Summary Table
 Figure 3: Consume content and go back to summary table for the next lookup.
Are you ready to migrate from Oracle to Postgres?
Now that you have a good overview of the journey, go ahead, and check out our Oracle to Postgres migration guide. If you would like to chat with us about migrations to PostgreSQL in general, or have questions on our PostgreSQL managed service, you can always reach out to our product team via email at Ask AzureDB for PostgreSQL. I also love all the updates on our Twitter handle (@AzureDBPostgres) and would recommend following us for more Postgres news and updates. We would love to hear from you. Happy learning.

Recent Comments