by Contributed | Mar 4, 2021 | Technology
This article is contributed. See the original author and article here.
Authors: Sumit Sarabhai and Ravinder Singh
Reviewers: Arvind Shyamsundar, Denzil Ribeiro, Davide Mauri, Mohammad Kabiruddin, Mukesh Kumar, and Narendra Angane
INTRODUCTION
Bulk load methods on SQL Server are by default serial, for example, one BULK INSERT statement would spawn only one thread to insert the data into a table. However, for concurrent loads you may insert into the same table using multiple BULK INSERT statements, provided there are multiple files to be read.
Consider a scenario where the requirements are:
- Load data from a single file of a large size (say, more than 20 GB)
- Splitting a file isn’t an option as it will be an extra step in the overall bulk load operation.
- Every incoming data file is of different size, which makes it difficult to identify the number of chunks (to split the file into) and dynamically define BULK INSERT statements to execute for each chunk.
- The size of file(s) to be loaded spans through several GBs (say more than 20 GB and above), each containing millions of records.
In such scenarios utilizing Apache Spark engine is one of the popular methods of loading bulk data to SQL tables concurrently.
In this article, we have used Azure Databricks spark engine to insert data into SQL Server in parallel stream (multiple threads loading data into a table) using a single input file. The destination could be a Heap, Clustered Index* or Clustered Columnstore Index. This article is to showcase how to take advantage of a highly distributed framework provided by spark engine by carefully partitioning the data before loading into a Clustered Columnstore Index of a relational database like SQL Server or Azure SQL Database.
The most interesting observation shared in this article is to exhibit how the Clustered Columnstore Index row group quality is degraded when default spark configurations are used, and how the quality can be improved by efficient use of spark partitioning. Essentially, improving row group quality is an important factor for determining query performance.
*Note: There could be some serious implications of parallel inserting data into Clustered Index as mentioned in Guidelines for Optimizing Bulk Import and The Data Loading Performance Guide These guidelines and explanations are still valid for the latest versions of SQL Server.
Environment Setup
Data Set:
- Custom curated data set – for one table only. One CSV file of 27 GB, 110 M records with 36 columns. The input data set have one file with columns of type int, nvarchar, datetime etc.
Database:
- Azure SQL Database – Business Critical, Gen5 80vCores
ELT Platform:
- Azure Databricks – 6.6 (includes Apache Spark 2.4.5, Scala 2.11)
- Standard_DS3_v2 14.0 GB Memory, 4 Cores, 0.75 DBU (8 Worker Nodes Max)
Storage:
- Azure Data Lake Storage Gen2
Pre-requisite: Before going further through this article spend some time to understand Overview of Loading Data into Columnstore Indexes here: Data Loading performance considerations with Clustered Columnstore indexes
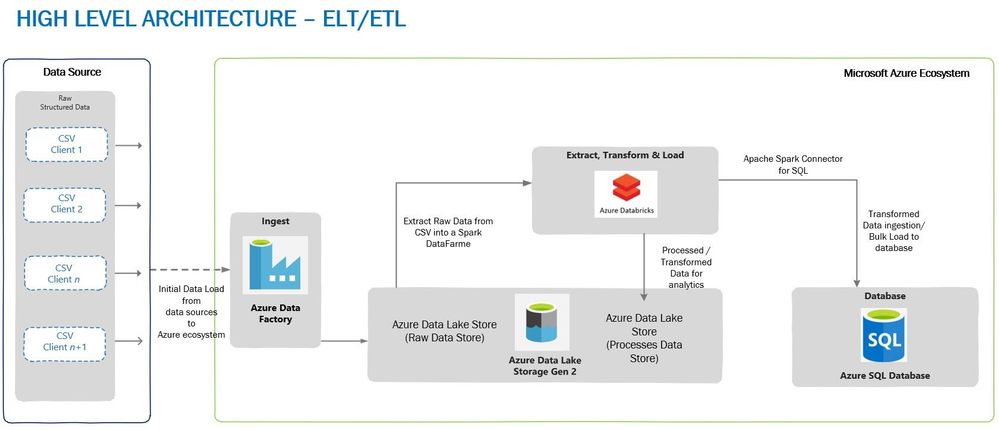
In this test, the data was loaded from a CSV file located on Azure Data Lake Storage Gen 2. The CSV file size is 27 GB having 110 M records with 36 columns. This is a custom data set with random data.
A typical high-level architecture of Bulk ingestion or ingestion post-transformation (ELTETL) would look similar to the one given below:
Loading Through BULK INSERTS
In the first test, a single BULK INSERT was used to load data into Azure SQL Database table with Clustered Columnstore Index and no surprises here, it took more than 30 minutes to complete, depending on the BATCHSIZE used. Remember, BULK INSERT is a single threaded operation and hence one single stream would read and write it to the table, thus reducing load throughput.


Loading Through Azure Databricks
To achieve maximum concurrency and high throughput for writing to SQL table and reading a file from ADLS (Azure Data Lake Storage) Gen 2, Azure Databricks was chosen as a choice of platform, although we have other options to choose from, viz. Azure Data Factory or another spark engine-based platform.
The advantage of using Azure Databricks for data loading is that Spark engine reads the input file in parallel through dedicated Spark APIs. These APIs would use a definite number of partitions which are mapped to one of more input data files, and the mapping is done either on a part of the file or entire file. The data is read into a Spark DataFrame or, DataSet or RDD (Resilient Distributed Dataset). In this case data was loaded into a DataFrame which was followed by a transformation (setting the schema of a DataFrame to match the destination table) and then the data is ready to be written to SQL table.
To write data from DataFrame into a SQL table, Microsoft’s Apache Spark SQL Connector must be used. This is a high-performance connector that enables you to use transactional data in big data analytics and persists results for ad-hoc queries or reporting. The connector allows you to use any SQL database, on-premises or in the cloud, as an input data source or output data sink for Spark jobs.
Bonus: A ready to use Git Hub repo can be directly referred for fast data loading with some great samples: Fast Data Loading in Azure SQL DB using Azure Databricks
Note that the destination table has a Clustered Columnstore index to achieve high load throughput, however, you can also load data into a Heap which will also give good load performance. For the relevance of this article, we’ll talk only about loading into a Clustered Columnstore Index. We used different BATCHSIZE values for loading data into a Clustered Columnstore Index – please refer this document to know the impact of BATCHSIZE during bulk loading into Clustered Columnstore Index.
Below are the test runs of data loading on Clustered Columnstore Index with BATCHSIZE 102,400 and 1,048,576:

Please note that we are using default parallelism and partitions used by Azure Databricks and directly pushing the data to SQL Clustered Columnstore Indexed table. We have not manipulated any default configuration used by Azure Databricks. Irrespective of the BatchSize defined, all our tests were completed at approximately the same time.
The 32 concurrent threads loading the data into SQL DB is due to the size of provisioned Databricks cluster mentioned above. The cluster has maximum of 8 worker nodes with 4 cores each i.e., 8*4 = 32 cores capable of running a maximum of 32 concurrent threads at max.
A Look at Row Groups
For table in which we inserted the data with BATCHSIZE 1,048,576, here are the number of row groups created in SQL:
Total number of row groups:
SELECT COUNT(1)

FROM sys.dm_db_column_store_row_group_physical_stats

WHERE object_id = OBJECT_ID(‘largetable110M_1048576’)

216
Quality of row groups:
SELECT *  FROM sys.dm_db_column_store_row_group_physical_stats

WHERE object_id = OBJECT_ID(‘largetable110M_1048576’)

In this case, we have only one delta store with OPEN state (total_rows = 3810) and 215 row groups which were in COMPRESSED state, and this make sense because if the batch size for the insert is > 102,400 rows, the data no longer ends up in the delta store, rather is inserted directly into a compressed rowgroup in columnar format. In this case, all the row groups in the COMPRESSED state have >102,400 records. Now, the questions regarding row groups are:
- Why do we have 216 row groups?
- Why do each row group have a different number of rows in them when our BatchSize was set at 1,048,576?
Please note that each row group has data which is approximately equal to 500,000 records in the above result set.
The answer to both these questions is the way Azure Databricks spark engine partitions the data and controls the number of records getting inserted into row groups of Clustered Columnstore Index. Let’s have a look at the number of partitions created by Azure Databricks for the data set in question:
from pyspark.sql.functions
import spark_partition_id
df_gl.withColumn(“partitionId”, spark_partition_id()).groupBy(“partitionId”).count().show(10000)

Comparing the number of records in spark partitions with the number of records in the row groups, you’ll see that they are equal. Even the number of partitions is equal to the number of row groups. So, in a sense, the BATCHSIZE of 1,048,576 is being overdriven by the number of rows in each partition.
sqldbconnection = dbutils.secrets.get(scope = “sqldb-secrets”, key = “sqldbconn”)
sqldbuser = dbutils.secrets.get(scope = “sqldb-secrets”, key = “sqldbuser”)
sqldbpwd = dbutils.secrets.get(scope = “sqldb-secrets”, key = “sqldbpwd”)
servername = “jdbc:sqlserver://” + sqldbconnection url = servername + “;” + “database_name=” + <Your Database Name> + “;”
table_name = “<Your Table Name>”
df_gl.write
.format(“com.microsoft.sqlserver.jdbc.spark”)
.mode(“overwrite”)
.option(“url”, url)
.option(“dbtable”, table_name)
.option(“user”, sqldbuser)
.option(“password”, sqldbpwd)
.option(“schemaCheckEnabled”, False)
.option(“BatchSize”, 1048576)
.option(“truncate”, True)
.save()
Row Group Quality
A row group quality is determined by the number of row groups and records per row group. Since a Columnstore index scans a table by scanning column segments of individual row group, maximizing the number of rows in each rowgroup enhances query performance. When row groups have a high number of rows, data compression improves which means there is less data to read from the disk. For the best query performance, the goal is to maximize the number of rows per rowgroup in a Columnstore index. A rowgroup can have a maximum of 1,048,576 rows. However, it is important to note that row groups must have at least 102,400 rows to achieve performance gains due to the Clustered Columnstore index. Also, remember that the maximum size of the row groups (1 million) may not be reached in every case, courtesy this document the rowgroup size is not just a factor of the max limit but is affected by the following factors.
- The dictionary size limit, which is 16 MB
- Insert batch size specified.
- The Partition scheme of the table since a rowgroup doesn’t span partitions.
- Memory Grants or memory pressure causing row groups to be trimmed.
- Index REORG being forced or Index Rebuild being run.
Having said that, it is now an important consideration to have row group size as close to 1 million records as possible. In this testing since the size of each row group is close to 500,000 records, we have two options to reach to the size of ~1 million records:
- In spark engine (Databricks), change the number of partitions in such a way that each partition is as close to 1,048,576 records as possible,
- Keep spark partitioning as is (to default) and once the data is loaded in a table run ALTER INDEX REORG to combine multiple compressed row groups into one.
Option#1 is quite easy to implement in the Python or Scala code which would run on Azure Databricks. The overhead is quite low on the Spark side.
Option#2 is an extra step which is needed to be taken post data loading and ofcourse, this is going to consume extra CPU cycles on SQL and add to the time taken for the overall loading process.
To keep the relevance of this article, let’s stick to Spark partitioning. Let’s now discuss more about spark partitioning and how it can be changed from its default values and its impact in the next section.
Spark Partitioning
The most typical source of input for a Spark engine is a set of files which are read using one or more Spark APIs by dividing into an appropriate number of partitions sitting on each worker node. This is the power of Spark partitioning where the user is abstracted from the worry of deciding number of partitions and the configurations controlling the partitions if they don’t desire. The default number of partitions which are calculated based on environment and environment settings typically work well for most of the cases. However, in certain cases a better understanding of how the partitions are automatically calculated and a user can alter the partition count if desired can make a stark difference in performance.
Note: Large Spark clusters can spawn a lot of parallel threads which may lead to memory grants contention on Azure SQL DB. You must watch out for this possibility to avoid early trim due to memory timeouts. Please refer this article for more details to understand how schema of the table and number of rows etc. also may have an impact on memory grants.
spark.sql.files.maxPartitionBytes is an important parameter to govern the partition size and is by default set at 128 MB. It can be tweaked to control the partition size and hence will alter the number of resulting partitions as well.
spark.default.parallelism which is equal to the total number of cores combined for the worker nodes.
Finally, we have coalesce() and repartition() which can be used to increase/decrease partition count of even the partition strategy after the data has been read into the Spark engine from the source.
coalesce() can be used only when you want to reduce the number of partitions because it does not involve shuffle of the data. Consider that this data frame has a partition count of 16 and you would want to increase it to 32, so you decide to run the following command.
df = df.coalesce(32)

print(df.rdd.getNumPartitions())
However, the number of partitions will not increase to 32 and it will remain at 16 because coalesce() does not involve shuffling. This is a performance-optimized implementation because you can get reduced partition without expensive data shuffle.
In case you want to reduce the partition count to 8 for the above example then you would get the desired result.
df = df.coalesce(8)

print(df.rdd.getNumPartitions())
This will combine the data and result in 8 partitions.
repartition() on the other hand would be the function to help you. For the same example, you can get the data into 32 partitions using the following command.
df = df.repartition(32)

print(df.rdd.getNumPartitions())
Finally, there are additional functions which can alter the partition count and few of those are groupBy(), groupByKey(), reduceByKey() and join(). These functions when called on DataFrame results in shuffling of data across machines or commonly across executors which result in finally repartitioning of data into 200 partitions by default. This default 200 number can be controlled using spark.sql.shuffle.partitions configuration.
Back to Data Loading
Now, knowing about how partition works in Spark and how it can be changed, it’s time to implement those learnings. In the above experiment, the number of partitions was 216 (by default) and it was because the size of the file was ~27 GB, so dividing 27 GB by 128 MB (which is maxPartitionBytes defined by Spark by default) gives 216 partitions.
Impact of Spark Re-partitioning
The change to be done to the PySpark code would be to re-partition the data and make sure each partition now has 1,048,576 rows or close to it. For this, first get the number of records in a DataFrame and then divide it by 1,048,576. The result of this division will be the number of partitions to use to load the data, let’s say the number of partitions is n. However, there could be a possibility that some of the partitions now have >=1,048,576 rows, hence, to make sure in each partition have rows <= 1,048,576 we take number of partitions as n+1. Using n+1 is also important in cases when the result of th division is 0. In such cases, you’ll have one partition.
Since the data is already loaded in a DataFrame and Spark by default has created the partitions, we now have to re-partition the data again with the number of partitions equal to n+1.
At this point, let’s write the data into SQL table again and verify the row group quality. This time the number of rows per row group will be close to the rows in each partition (a bit smaller than 1,048,576). Let’s see below:
Row Groups After Re-partitioning
SELECT COUNT(1)

FROM sys.dm_db_column_store_row_group_physical_stats

WHERE object_id = OBJECT_ID(‘largetable110M_1048576’)

105
Quality of Row Groups After Re-partitioning

Essentially, this time the overall data loading was 2 seconds slower than earlier, but the quality of the row group was much better. The number of row groups was reduced to half, and the row groups are almost filled to their maximum capacity. Please note that there will an additional time consumed due to repartitioning of the data frame and it depends on the size of the data frame and number of partitions.
Disclaimer: Please note that you won’t always get 1 million records per row_group. It will depend on the data type, number of columns etc. along with factors discussed earlier – See trim_reason in sys.dm_db_column_store_row_group_physical_stats (Transact-SQL) – SQL Server | Microsoft Docs
Key Take Away
- It is always recommended to use BatchSize while bulk loading data into SQL Server (be it CCI or Heap). However, in case Azure Databricks or any other Spark engine is used to load the data, the data partitioning plays a significant role to ascertain the quality of row groups in Clustered Columnstore index.
- Data loading using BULK INSERT SQL command will honor the BATCHSIZE mentioned in the command, unless other factors affect the number of rows inserted into a rowgroup.
- Partitioning the data in Spark shouldn’t be based on some random number, it’s good to dynamically identify the number of partitions and use n+1 as number of partitions.
- Since a Columnstore index scans a table by scanning column segments of individual row groups, maximizing the number of records in each rowgroup enhances query performance. For the best query performance, the goal is to maximize the number of rows per rowgroup in a Columnstore index.
- The speed of data loading from Azure Databricks largely depends on the cluster type chosen and its configuration. Also, note that as of now the Azure SQL Spark connector is only supported on Apache Spark 2.4.5. Microsoft has released support for Spark 3.0 which is currently in Preview, we recommend you to test this connector thoroughly in your devtest environments.
- Depending on the size of the data frame, number of columns, the data type etc. the time to do repartitioning will vary, so you must consider this time to the overall data loading from end-end perspective.
by Contributed | Mar 4, 2021 | Technology
This article is contributed. See the original author and article here.
Windows Admin Center is a tool I wish I had had when I was managing servers. When the tool was first announced in 2017 under the name Project “Honolulu”, I was intrigued. I was working for a managed service provider at the time and was mostly focusing on Microsoft 365 migrations and adoptions, so it wasn’t a tool I really got to use much, but I did have it installed and used it to manage the test server we had in the office!
What is Windows Admin Center?
Windows Admin Center is a remote management tool for Windows Server. It can manage your server wherever it resides, either in your on-premises datacentre, in Microsoft Azure or another cloud.
The tools you expect to need to do management tasks on your server are there, you don’t have to go opening the Microsoft Terminal Services Client (MSTSC) to remote into the server, you don’t have to open a separate Microsoft Management Console (MMC) windows to carry out that task you’ve been asked to. You can use Windows Admin Center! It’s a single management plane for your server management tasks.
When I was managing servers, I remember the days of having multiple MSTSC sessions open, or MMC windows open or even some browser-based session open to carry out tasks. It would get confusing having so many windows open, and there was all the chance of accidently doing something on the wrong server.
Windows Admin Center is a browser-based management tool that can help you manage those single server instances or cluster instances in troubleshooting, configuration, or management scenarios. One of the greatest benefits of Windows Admin Center is that there are no additional costs, it’s included with Windows Server license.
Built for the future
Windows Admin Center can also help you extend on-premises deployments of Windows Server to the cloud using the Azure Hybrid services. Windows Admin Center can help you implement technologies such as Azure Backup, Azure File Sync, Azure Monitor, Azure Arc, Azure Update Management and Azure Security Centre into your on-premises servers.
From within Windows Admin Center you can start to interact with your Azure subscription, setting up resources groups and installing the necessary agents for Azure Arc to help manage and monitor your on-premises servers.
From within Windows Admin Center you can configure it so that your server is protected by Azure Backup. Windows Admin Center walks you through the process needed without leaving your Windows Admin Center session.
What I love about this is Windows Admin Center is something you can start using within your organization today, even if you aren’t using any cloud services, even if using the cloud isn’t on your trajectory just yet. But when you are ready to use the cloud the features and functionality to help you manage your on-premises servers is there built in ready for you to use. So, it’s ready for the future.
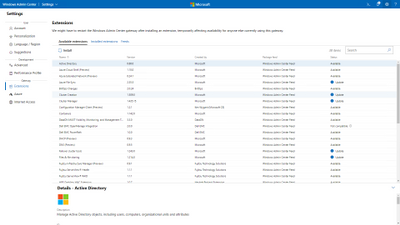
Extensibility
The other great thing about Windows Admin Center it has great extensibility. Which really means that it gives Microsoft and 3rd party developers the ability to build out additional capabilities to complement the existing offerings. Microsoft offers an SDK that enables developers to build their own tools for Windows Admin Center. Several partners have developed some extensions, such as DataON, Fujitsu and Lenovo. So again, Windows Admin Center is helping to give you a unified experience, with your Windows Server management tasks, your Azure management tasks as well as managing your hardware.
The option is there for anyone to have a go at creating a tool extension, solution extension or gateway plugin. The SDK contains content and examples to help guide you through the process.
Windows Admin Center in the Azure Portal
In September 2020, the team announced a new way to utilize Windows Admin Center. From within the Azure Portal! This new capability allows you to manage tasks you need to carry out within your Windows Server Azure IaaS VMs seamlessly and at a more granular level. The feature has went public preview so is now available for you to try!
Get started today
If you have to manage Windows Servers and haven’t tried Windows Admin Center, then go download a copy today and give it a whirl and understand how it can help your environment!
by Contributed | Mar 4, 2021 | Technology
This article is contributed. See the original author and article here.
Initial Update: Thursday, 04 March 2021 07:16 UTC
We are aware of issues within Application Insights and are actively investigating. Some customers may experience intermittent data gaps and incorrect alert activation in US Gov Virginia region.
- Work Around: None
- Next Update: Before 03/04 09:30 UTC
We are working hard to resolve this issue and apologize for any inconvenience.
-Vyom
by Contributed | Mar 4, 2021 | Technology
This article is contributed. See the original author and article here.
Many applications have regulatory, compliance, or other business purposes that require you to retain database backups beyond the 7-35 days provided by Azure SQL Managed Instance automated backups. By using the long-term retention (LTR) feature, you can store the specified full backup of a SQL Managed Instance database in Azure Blob storage with configured redundancy for up to 10 years. You can then restore any backup as a new database. Long-term retention is available in Public Preview for Azure SQL Managed Instance.
How long-term retention works?
Long-term backup retention (LTR) leverages the full database backups that are automatically created to enable point-time restore (PITR). If an LTR policy is configured, these backups are to different for long-term storage. The LTR policy for each database can also specify how frequently the LTR backups are created. To enable LTR, you can define a policy using a combination of four parameters: weekly backup retention (W), monthly backup retention (M), yearly backup retention (Y), and week of year (WeekOfYear). To learn more about how to configure long-term retention policy, see here.
Configuring backup storage redundancy
By default, SQL Managed Instance stores data in geo-redundant storage blobs that are replicated to a paired region. When an Azure region is unavailable, geo-restore can be used to recover the database in a different Azure region. Geo-restore is only available if backups are geo-redundant.
However, to meet data residency requirements, managed instance backups can now be configured as local or zone redundant. This ensures that the database backups stay within the same region. The configured backup storage redundancy for a given managed instance applies to both PITR backups and long-term retention backups (LTR).
For SQL Managed Instance, the backup storage redundancy must be selected at the time of creation of the managed instance. Updating backup storage redundancy for an existing managed instance is not supported yet.
Long-term retention using Azure Portal
In this section we will describe how you can configure long-term retention for your SQL Managed Instance database using Azure Portal. Here are the RBAC roles that you will need while operating with the long-term retention backups.
When you setup long-term retention for a database, you may perform the following operations on your backups:
- Set the long-term retention policy for your database.
- Update the long-term retention policy.
- View or get a list of available long-term retention backups.
- Restore from an available long-term retention backup.
- Delete a long-term retention backup.
- Restore from a long-term retention backup of a deleted database.
- Monitor the long-term retention backup costs.
We will look into each of these and understand how this can be done.
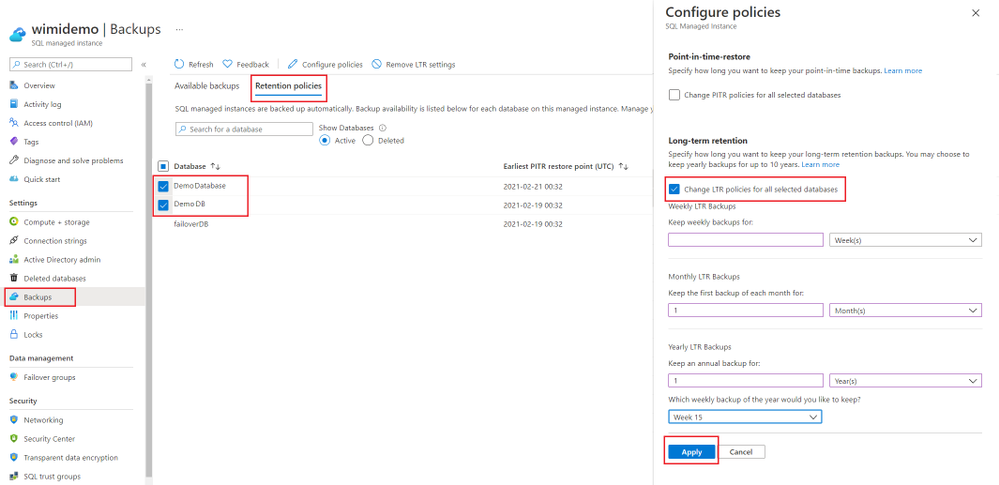
Create or Update long-term retention policy for a managed instance database.
To setup a new LTR policy for a database:
- Navigate to the managed instance on Azure Portal.
- Open the Backups tab
- Next, click on the Retention Policies tab and select the database(s) for which you want to set the LTR policy.
- Click on Configure policies.
- Click on ‘Change LTR policies for all selected databases.
- Apply the Weekly/Monthly/Yearly setting that you would like to keep.
- Click Apply to apply the new policy.
List available long-term backups for a database.
To list all the available LTR backups for a given database:
- Navigate to the managed instance.
- Click on Backups -> Available backups
- The databases which have accumulated LTR backups, will show Manage under the ‘Available LTR backups’ column.
- Click Manage, this will open up a list of available LTR backups for the given database. This list shows the time when backup was taken and the expiration time for the backup as per the retention policy.

Restore or Delete a long-term retention backup.
There are 2 different methods that you can use on Azure Portal to restore using a long-term retention backup.
- Go to Available backups blade and for the database where you see Manage under the ‘Available LTR backups’ column, click on the Restore icon. This will open the Create Database/Restore Database experience on a new page.

- OR, you can click on Manage, this will open up a list of available LTR backups in a new blade. Select the LTR backup, which you would like to use for restore. Then click the Restore button. This will also open the Create Database/Restore Database experience on a new page.

3. Clicking on Restore will open the full-screen database restore experience on Azure Portal. Here, you will see the long-term retention source backup. A name for the new database will be pre-selected based on the timestamp, you can change the database name here and set it to desired value.

4. To delete a backup, which is no longer required, instead of clicking Restore, click the Delete button. This will delete the selected long-term retention backup(s). Note that, deleting a long-term retention backup is an irreversible operation. Once deleted, these backups cannot be recovered.
Restore from a long-term retention backup of a deleted database.
To restore LTR backup of a deleted database:
- Navigate to your managed instance on Azure Portal.
- Click on Backups -> Available backups.
- Select the Deleted radio button under Show Databases. This will bring up a list of deleted databases, which have backups available for restore.
- Click Manage under the ‘Available LTR backups’ column. This will open a blade, which will show you a list of available LTR backups for that database.
- Select the backup that you want to restore from the list. Then click Restore. This will open the full-screen restore experience.

Analyze LTR backup costs
To analyze backup costs, you can use the Cost Analysis tool available at the subscription level on Azure Portal. Details of how to look up different backup costs are described here. In this section, we will look at how you can look up your LTR backup costs.
- Navigate to your Subscription on Azure Portal.
- Click on Cost Analysis.
- Click on Add filter.
- Add a ‘Service name‘ filter, with value ‘sql database’.
- Add another filter for ‘Meter subcategory‘, with value ‘ltr backup storage’.
- In the charts displayed, if you slice by Resource, you will see the longtermretetnion backups listed from your resource.
- In the next chart, if you filter by Meter, it will show you the storage type used by backups and the applicable cost for backups.

Conclusion
To meet your organizations compliance or regulatory needs, you can now easily configure long-term retention backups for up to 10 years for Azure SQL managed instance database(s). This can be easily done using Azure Portal or Azure PowerShell. You can also pick the desired backup storage redundancy for backups, to meet your data residency requirements.
If you find this article useful, please like it on this page and share through social media. To share this article, you can use the Share button below, or this short link: https://aka.ms/LTRonMI.
Disclaimer
Please note that products and options presented in this article are subject to change. This article reflects the long-term retention backup options available for Azure SQL Managed Instance in March, 2021.

by Contributed | Mar 3, 2021 | Technology
This article is contributed. See the original author and article here.
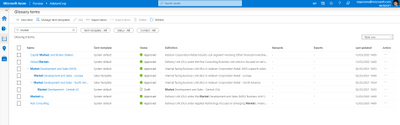
Update 2103 for the Technical Preview Branch of Microsoft Endpoint Configuration Manager has been released. Community hub now supports contributing and downloading configuration baselines including the child configuration items. This integration allows administrators to easily share and reuse configuration baselines and configuration items. Contributing and downloading configuration baselines is also available for current branch versions of Configuration Manager.
baselines in community hub
Note: Baselines with software updates or version-specific references aren’t supported.
For more information, see What’s new in Community hub and Contribute to the community hub.
This preview release also includes:
Tenant attach: Antivirus policy supports exclusions merge – When a tenant attached device is targeted with two or more antivirus policies, the settings for antivirus exclusions will merge before being applied to the client. This change results in the client receiving the exclusions defined in each policy, allowing for more granular control of antivirus exclusions.
Cloud attach during site upgrade – Microsoft Endpoint Manager is an integrated solution for managing all of your devices. Cloud attach brings together Configuration Manager and Intune into a single console called Microsoft Endpoint Manager admin center. If you haven’t already enabled the following cloud attach features, now the site upgrade process lets you cloud attach the site:
New CMG deployments use TLS 1.2 – Starting in this release, new deployments of the cloud management gateway (CMG) by default enable the option to Enforce TLS 1.2. This change doesn’t affect existing deployments. While not recommended, if you need to use the less secure TLS protocol versions, you can still disable this option.
PowerShell release notes preview – These release notes summarize changes to the Configuration Manager PowerShell cmdlets in technical preview version 2103.
Update 2103 for Technical Preview Branch is available in the Microsoft Endpoint Configuration Manager Technical Preview console. For new installations, the 2103 baseline version of Microsoft Endpoint Configuration Manager Technical Preview Branch is available on the Microsoft Evaluation Center. Technical Preview Branch releases give you an opportunity to try out new Configuration Manager features in a test environment before they are made generally available.
We would love to hear your thoughts about the latest Technical Preview! Send us Feedback about product issues directly from the console and use our UserVoice page for ideas about new features.
Thanks,
The Configuration Manager team
Configuration Manager Resources:
Documentation for Configuration Manager Technical Previews
Try the Configuration Manager Technical Preview Branch
Documentation for Configuration Manager
Microsoft Endpoint Manager announcement
Microsoft Endpoint Manager vision statement
Configuration Manager Forums
Configuration Manager Support
by Contributed | Mar 3, 2021 | Technology
This article is contributed. See the original author and article here.

by Contributed | Mar 3, 2021 | Technology
This article is contributed. See the original author and article here.
Following the announcement of Microsoft Mesh, our Cloud Advocacy team received an abundance of requests for more information on how to get started with Mixed Reality. Fortunately, this is an area our Cloud Advocacy team specializes in helping the community! But for starters, what is Mixed Reality?
Mixed Reality is a blend of physical and digital worlds, unlocking the links between human, computer, and environment interaction. We think of Mixed Reality as a spectrum — with the physical world on one end and the digital world on the other.

Image: Mixed Reality is the result of blending the physical world with the digital world.
You may often associate Mixed Reality with HoloLens. Although yes, you could use a HoloLens for Mixed Reality development, Microsoft Mesh is a device agnostic solution. This means that you have far more options as it relates to which device can be used to create your own Mixed Reality experiences. And as it relates to getting started with Mixed Reality, there’s no device requirement beyond your computer! You can complete most simulations within the Unity editor.
So, where should you get started? Follow the concepts in the order presented for a major impact in how you learn. The concepts are presented in a manner which builds upon prior learned concepts. Already familiar with a concept listed below? Feel free to skip ahead!
Mixed Reality
For the true beginner, I’d first suggest getting started with our Introduction to Mixed Reality Learn module. This module provides you with a foundation in the core concepts, terminology, and design processes that are unique to mixed reality development.
Mixed Reality Design Principles
There’s a wealth of design principles which you should become familiar with prior to creating any experience. Understanding how to design for Mixed Reality is a concept that shouldn’t be taken for granted. You’ll want to ensure that you’re creating a comfortable, accessible, and inclusive experience. To get started with design principles, check out our Design documentation.
Language
Are you already familiar with C#? If not, then no worry! We have a Take Your First Steps with C# Learn module designed to help you establish a foundation of the C# programming language. Learning C# comes in handy when it’s time to start Unity scripting. What’s Unity? Don’t worry, I’ll cover that next.
Development Platform
What’s this Unity thing I spoke of? Unity is a real-time development platform that’s great for creating 2D, 3D, AR & VR experiences. Like learning any new technology platform, the learning curve can be relatively steep if you’ve never used the platform for development. Fortunately, Unity provides a Learn platform that’s pretty helpful for getting familiar with the interface as well as Unity Scripting. You can also choose to focus on specific areas of Unity development if you’re already familiar with the platform. My advice would be to start with learning how to create for 2D first and then transition to 3D. C# knowledge comes in handy here given that you’ll use C# for Unity scripting.
P.S. I cover additional platforms in a post I wrote on Dev.to for Development Platforms for XR. Check it out to learn more about other platform options.
Windows Mixed Reality Development with Unity
At this stage, you’re ready to dive into Windows Mixed Reality Development! However, there’s a bit of set-up involved before you can start doing cool things with 3D models. Fortunately, we break down the steps for you in our Set up a Mixed Reality Project in Unity with the Mixed Reality Toolkit Learn module. This is a crucial step to getting started given that you must have your environment properly configured prior to working with our tools.
Mixed Reality Toolkit
The aforementioned Learn module leaves off with a brief introduction to the Mixed Reality Toolkit (MRTK). MRTK is an open-source, cross-platform development kit that provides a set of components and features used to accelerate mixed reality app development. You can sort of think of MRTK as a low code/no code tool for adding UX features to your experiences. Check out the MRTK documentation to learn more about its UX building blocks and most important, Spatial Awareness. Spatial Awareness is how you can make your holograms aware of what’s in your real-world environment.
Another P.S.: I created a YouTube video series on getting started with Spatial Awareness. Check out the GitHub repository for more information about getting started.
From here, the journey is wherever you’d like for your experience to go! We have two dedicated Azure mixed reality cloud services available if you’d like to try your hand at integrating these services into your apps:
In addition, you could integrate many other Azure cloud services into your Unity project. For example, if you’re interested in Azure Speech, we created a Learn module to help you get started with integrating speech translation into your app. I also created a video series that guides you through the steps of integrating a Bot created with the QnA Maker into your mixed reality app. To learn more about services support, check out our Azure mixed reality Cloud Services Overview.
And if you’re ahead of the curve and want to get started with Microsoft Mesh, check out our Microsoft Mesh documentation — and check back often for more updates!
As you continue your learning journey, you’ll likely come across many more resources to help you get started with mixed reality. The best advice I could give you is to take your time and enjoy the journey.
Have any questions about getting started? Feel free to leave a comment below or come find me on Twitter @VogueandCode.
Happy Learning!
by Contributed | Mar 3, 2021 | Technology
This article is contributed. See the original author and article here.
We have released an update to Microsoft.Data.SqlClient, version 2.1.2. The update addresses several issues that are important to our customers.
Updates in Microsoft.Data.SqlClient 2.1.2 include:
Fixed
- Fixed issue connecting with instance name from a Linux/macOS environment #874
- Fixed wrong results issues by changing the timeout timer to ensure a correct execution state #929
- Fixed a vulnerability by prohibiting DtdProcessing on XmlTextReader instances in .NET Core #885
- Fixed Kerberos authentication when an SPN does not contain the port #935
- Fixed missing error messages in Managed SNI #883
- Fixed missing System.Runtime.Caching dependency for .NET Standard assemblies #878
- Fixed event source tracing issues #941
- Fixed MARS header contains errors issue against .NET Framework 4.8.1 #928
To get the new package, add a NuGet reference to Microsoft.Data.SqlClient in your application.
For the list of changes in Microsoft.Data.SqlClient 2.1.2, you can also see the Release Notes.
If you encounter any issues or have any feedback, head over to the SqlClient GitHub repository and submit an issue.
David Engel

by Contributed | Mar 3, 2021 | Technology
This article is contributed. See the original author and article here.
Check it out at http://aka.ms/mcasninja!
Feedback
Let us know if you have any feedback or relevant use cases/requirements for this portion of Cloud App Security by emailing CASFeedback@microsoft.com and mention the core area of concern.
Learn more
For further information on how your organization can benefit from Microsoft Cloud App Security, connect with us at the links below:
To experience the benefits of full-featured CASB, sign up for a free trial—Microsoft Cloud App Security.
Follow us on LinkedIn as #CloudAppSecurity. To learn more about Microsoft Security solutions, visit our website. Bookmark the Security blog to keep up with our expert coverage on security matters. Also, follow us at @MSFTSecurity on Twitter, and Microsoft Security on LinkedIn for the latest news and updates on cybersecurity.
by Contributed | Mar 3, 2021 | Technology
This article is contributed. See the original author and article here.
MCAS DLP Walk-Through
March 2021
Hi everyone! Welcome to the fourth blog of my MCAS Data Protection Blog Series! If this is your first time seeing this blog, check out my landing page for some more information about me and links to previous blogs!
This month, I’ll be focusing on the new capability of extending Microsoft data loss prevention to MCAS (announced in September here) in the Compliance Center.
As my colleague Mas Libman mentioned, since MCAS provides compliance visibility and control over both native and third-party apps, this new extension of capability pushes the integration for Microsoft DLP policy-based content inspection across connected applications such as Dropbox, Box, Google Drive, WebEx, One Drive, SharePoint, and others. This goal is to help users remain continuously compliant when using both native and third-party cloud apps. It also helps prevent sensitive content from accidentally or inappropriately being shared. DLP in MCAS now uses the same DLP policy framework common across all Microsoft DLP offerings, to provide a familiar, consistent, and seamless compliance experience.
After this announcement and the rollout of the capability, my team and I have received several questions regarding deployment. For this blog, I’ll be walking through how this looks for MCAS users.
Before we begin, please refer to the table below with some high-level details regarding the portals necessary for the following customer scenario. Disclaimer: the following scenario is based on a use case submitted by a commercial customer.
Name
|
Portal
|
Colloquial Names
|
What can you access? (Non-Exhaustive List)
|
Microsoft 365 Compliance Center
|
Compliance.microsoft.com
GCC-High: compliance.microsoft.us
DOD: compliance.apps.mil
|
Compliance Center, Compliance Portal
|
- Sensitivity Labels
- Custom and Built-in Information Types
- Test Custom Information Types
- Trainable Classifiers
- Content Explorer
- Activity Explorer
- Endpoint DLP
|
Microsoft Cloud App Security
|
Portal.cloudappsecurity.com
GCC-High: portal.cloudappsecurity.us
|
MCAS, Microsoft CAS, Microsoft CASB
|
- File Policies
- Threat Detection Policies
- Information Protection Policies
- Cloud Discovery Policies
|
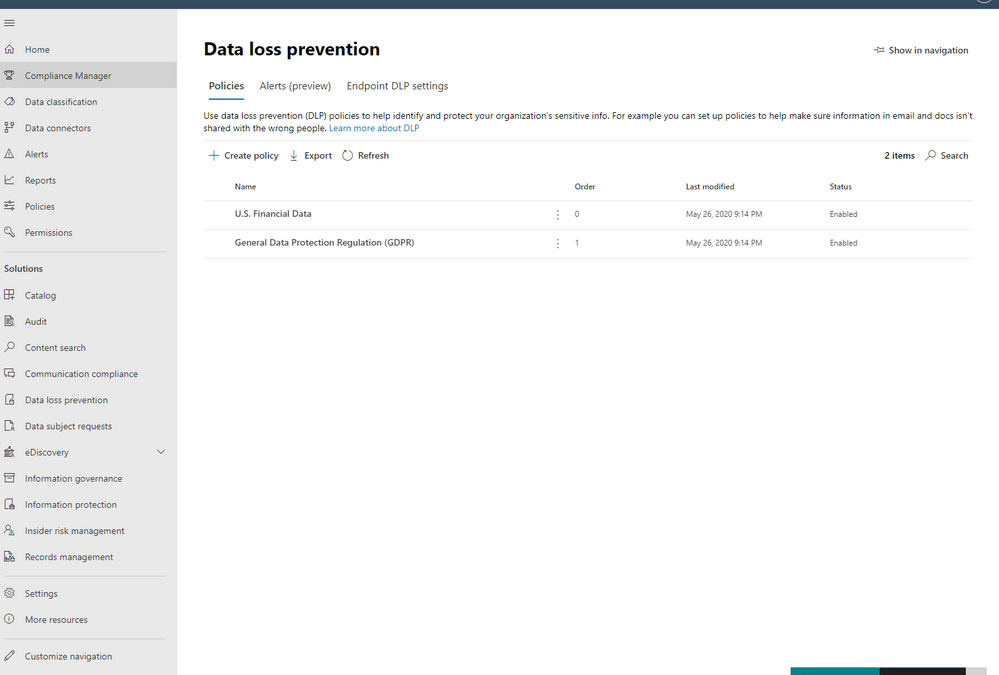
Alright, so for our first step, we are going to jump over to the Compliance Portal. Let’s scroll down to Solution and select Data Loss Prevention. From there, please select Policies and click Create Policy.

For the purposes of this effort, we’re going to focus on PCI DSS and select this under Templates from the Financial Category.

Now, enter a name that’ll help you differentiate this policy from others, I’m naming it “Sarahzin: MCAS Credit Card DLP” to make it easier to identify.

Next, let’s choose the location of Microsoft Cloud App Security (only) and click Choose whichever Instances you’d like to use. For my scenario, I selected Box, Salesforce, Dropbox, and ServiceNow.


NOTE: To have your instances pop up here, it is required that your apps already be connected in MCAS. Visit our documentation here to get more guidance on connected apps in MCAS.
Afterwards, move on to the next step and click Create or customize advanced DLP rules.

Next, you can either create a rule or use the prepopulated Low volume of content detected PCI Data Security Standard or High volume of content detected PCI Data Security Standard rule sets. We’re going to create a custom rule and delete the prefilled rule sets (not a requirement).
Please add a condition with the sensitive information type of Credit Card Number. Then, click on Add an action and select Restrict Third Party Apps.

Please select Restrict Third Party Apps at the top, and choose “Send policy-match digest to file owner” for the apps that have this option available. You can choose any of these actions and these are from the list of governance provided by MCAS.

After saving your configurations, your page should look like the image below.

Next, you have the option to turn this on, run in simulation mode, or keep turned off but saved. We’re turning it on.

So once the policy is set through the Compliance center, after some time, it’ll populate in MCAS as a policy. The naming convention will say “MIP – ” with your name from the Compliance Center. In MCAS, go to policies and filter on File Policies. You’ll see your new policy here.

Note: Policies from the Compliance Center pop up in MCAS but policies from MCAS do not pop up in the Compliance Center (only alerts under the Alerts section on the Compliance Center home page).

When you click into the policy in MCAS, you wont be able to change any of the configurations. It gives you a warning that “This policy is an imported subset rule of Microsoft Information Protection policy. Read-only fields can be edited in the original policy. Go to Microsoft Information Protection policies.”

The filters are pre-filled and your governance actions are selected as well.


You’ll notice that the policy has a couple matches. When you click into the matches, you’ll find the files that triggered the policy.

There you have it! Your policies are working now and triggering any time you have matches.
Please let us know if you have any additional questions or if you’d like to see something else.
——-
Feedback
Let us know if you have any feedback or relevant use cases/requirements for this portion of Cloud App Security by emailing CASFeedback@microsoft.com and mention the core area of concern.
Learn more
For further information on how your organization can benefit from Microsoft Cloud App Security, connect with us at the links below:
To experience the benefits of full-featured CASB, sign up for a free trial—Microsoft Cloud App Security.
Follow us on LinkedIn as #CloudAppSecurity. To learn more about Microsoft Security solutions, visit our website. Bookmark the Security blog to keep up with our expert coverage on security matters. Also, follow us at @MSFTSecurity on Twitter, and Microsoft Security on LinkedIn for the latest news and updates on cybersecurity.


