The OneDrive team is always focusing on inclusive design principles to provide millions of our users more choice and greater flexibility. In this effort , we are rolling out Dark Mode for OneDrive web, for both commercial and personal accounts. In addition to its aesthetic appeal, Dark Mode also reduces eye strain and improves the battery life of your devices.
When users share Word files, the sharing e-mail will now include new information like estimated time to read as well as key points in the document. This will help recipients decide how to engage with the shared document. Note that files that have been marked as sensitive by DLP will not include this information.
Quick summary of the shared document in the sharing email.
Admins who do not want this new functionality can disable it using the SharePoint Online Management Shell by running “Set-SPOTenant – IncludeAtAGlanceInShareEmails $false”
Getting back to your important PDFs in your mobile devices just got easier. Use the new bookmark option in OneDrive for iOS to add bookmarks to your important content so you can pick up where you left off.
Now when you open a PDF on your iOS device you would be able to add or remove bookmarks by tapping the bookmark icon(on the top-right corner) of the page or by long-pressing anywhere on the page you want to tag.
Tap the new bookmark icon to bookmark any page in a PDF.Add bookmark to a PDF page by long-pressing anywhere on the selected page.
You also have the option to access all your bookmarked pages in the single view.
View all the pages bookmarked in a single view.
This feature will soon roll out to Android as well – Roadmap ID 70547
We’re updating OneDrive Sync client to support Version History for DWG files. This change fixes a known issue where Version History is missing for DWG files backed by Sync client.
Learn more and stay engaged
Hear from Omar Shahine, VP of Product OneDrive and SharePoint (Microsoft 365), as he shares all of the new innovations and capabilities in OneDrive, SharePoint and Lists.
As you can see, we continue to evolve OneDrive as a place to access, share, and collaborate on all your files in Microsoft 365, keeping them protected and readily accessible on all your devices, anywhere.
Thank you again for your support of OneDrive. We look forward to your continued feedback on UserVoiceand hope to connect with you at Ignite or another upcoming Microsoft or community-led event.
Thanks for your time reading all about OneDrive,
Ankita Kirti – Product Manager – OneDrive | Microsoft
This article is contributed. See the original author and article here.
Protect your Power BI instance using Microsoft Cloud App Security
In the last couple of years, Microsoft has demonstrated its extraordinary ability to turn vision into reality, as witnessed by Microsoft’s repeatedly being named as a Leader in Gartner’s Magic Quadrant, in both the security and business intelligence landscapes.
In the Microsoft Cloud App Security and Power BI teams (two of the named leaders in the Cloud Access Security Broker (CASB), and Analytics and BI markets, respectively), we have identified an opportunity to provide an even more comprehensive solution. By bringing these two technologies together, we provide security administrators the tools they need to safely onboard business users to a large cloud workload such as Power BI (which has become an even greater key service for businesses in “work-from-home” mode during the COVID-19 crisis), while enjoying peace of mind with respect to the threats and risks inherent in using cloud services.
Using Cloud App Security, it is possible to detect and control risky Power BI sessions as they occur, thus reducing the threat that arises when malicious actors try to access content and data.
This partnership, first publicly announced at the end of 2019, has continued to evolve and deepen. We’d like to take the opportunity here to recap the capabilities that currently exist and are available to organizations that (or might be do so in the future). Some of these capabilities you may have already tried; others have been launched just recently.
With Cloud App Security, organizations can monitor and control, in real time, risky Power BI sessions such as user access from unmanaged devices or infrequent locations. Security administrators can define policies to control user actions, such as downloading reports with sensitive information.
For example, if a user connects to Power BI from outside of their country, the session can be monitored by Cloud App Security’s real-time controls, and risky actions, such as downloading data tagged with a “Highly Confidential” sensitivity label, can be blocked immediately.
Figure 1: Cloud App Security real-time controls in Power BI service
Investigate Power BI user activity with the Cloud App Security activity log
The Cloud App Security activity log includes a large portion of the Power BI activity as captured in the Office 365 audit log, which contains information about all user and admin activities, as well as sensitivity label information for relevant activities such as apply, change, and remove label.
Cloud App Security brings you the following added value:
Advanced filters for improved search and exploration of activities. For example, activity log filters can be used to look for all user “remove” activities where the sensitivity label Confidential is removed from Power BI reports and/or datasets.
Quick actions that can be carried out as part of the activity investigation process.
Figure 2.1: Power BI audit events in Cloud App Security activity log
Create custom policies to alert on suspicious user activity in Power BI
After you’ve investigated user activity, be it in the Office 365 audit log or in the Cloud App Security activity log, you probably have a good understanding of which, how, and by whom content is being accessed and modified.
The next step is to leverage Cloud App Security’s activity policy feature to define your own custom rules, to help you detect user behavior that deviates from the norm, and even possibly act upon it automatically, if it seems too dangerous.
Some examples of scenarios that can be detected using activity policies:
Massive sensitivity label removal. For example: alert me when sensitivity labels are removed by a single user from 20 different reports in a time window shorter than 5 minutes.
Encrypting sensitivity label downgrade. For example: alert me when a report that was with the ‘Highly confidential’ sensitivity label is now classified as ‘Public’.
Sensitivity label change by an unauthorized user. For example: alert me when a user who is not a dataset owner applies, changes, or removes a sensitivity label.
Massive download of content. For example: alert me when a single user performs more than 20 export operations in a time window shorter than 5 minutes.
Unauthorized users are accessing confidential datasets. For example: alert me when someone outside a predefined security group is viewing an executive report.
Notes:
The unique identifiers of sensitivity labels can be found using the informationProtectionLabel endpoint provided by Microsoft Information Protection REST APIs.
Cloud App Security’s anomaly detection policies provide out-of-the-box user behavioral analytics and machine learning so that you are ready from the outset to run advanced threat detection across your cloud environment. When an anomaly detection policy identifies a suspicious behavior, it triggers a security alert. For example:
Multiple Power BI report sharing: Alerts you when a user performs an unusual number of Power BI report sharing activities, compared to the learned baseline.
Suspicious Power BI sharing: Alerts you when a potentially sensitive Power BI report is suspiciously shared outside of your organization.
Impossible travel: This detection identifies by the same user (in a single or multiple sessions) originating from geographically distant locations within a time window shorter than the time it takes to travel from the first location to the second. This indicates that a different user is using the same credentials.
Cloud App Security provides an app-specific admin role that can be used to grant Power BI admins only the permissions they need to access Power BI-relevant data in the portal, such as alerts, users at risk, activity logs, and other Power BI-related information.
However, it doesn’t stop there; this role not only provides access to the information listed above – it can also be used to create custom policies and detections such as those presented earlier in this article.
Cloud App Security admins, you are encouraged to let Power BI admins in your organization into the Cloud App Security portal, to start and help securing the next cloud workload on your list.
Additional resources
Learn how to create the Power BI admin role in the Cloud App Security portal – Manage admin roles
Let us know if you have any feedback or relevant use cases and requirements for this portion of Cloud App Security by emailing CASFeedback@microsoft.com and mention the Power BI integration.
Follow us on LinkedIn as #CloudAppSecurity. To learn more about Microsoft Security solutions visit our website. Bookmark the Security blog to keep up with our expert coverage on security matters. Also, follow us at @MSFTSecurity on Twitter, and Microsoft Security on LinkedIn for the latest news and updates on cybersecurity.
This article is contributed. See the original author and article here.
Official websites use .gov A .gov website belongs to an official government organization in the United States.
Secure .gov websites use HTTPS A lock () or https:// means you’ve safely connected to the .gov website. Share sensitive information only on official, secure websites.
This article is contributed. See the original author and article here.
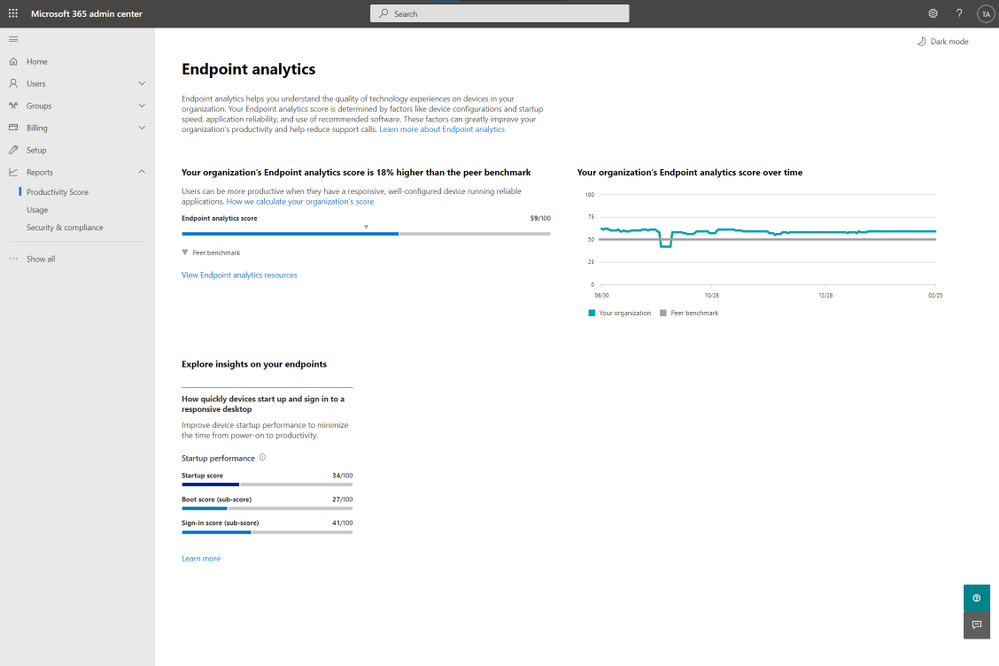
Critical to any digital transformation effort is understanding how your devices contribute to your end-user’s experience and enable them to reach their goals. This is why Endpoint analytics is a critical category to Microsoft Productivity Score. The visibility and insights it provides in areas like device boot times and application reliability can help your users quickly capture an idea or join that first meeting on Monday morning on time and not suffer through an endless login process or lose the work they just did as an application unexpectedly shuts down.
The problem was that some of you could not see all these great insights. Some of this detailed information was in the Endpoint analytics section of the Microsoft Endpoint Manager console. If you were an Intune Admin or a Global Admin, you could see this, but the rest of you who were using Productivity Score to drive your transformation efforts were in the dark. Well, not anymore. Based on your feedback, we have created a new Endpoint analytics page that shares these organizational insights with the other roles that already have access to Productivity Score.
New Endpoint analytics page
This new page looks very similar to the other pages you see in the people experiences, making it easy to dive right in. You can see your Endpoint analytics score and your score over the at the top of the page. Below that, you can see the startup insight showing your boot and sign-in scores. If you click the link under the startup insight you will get additional details about the startup performance. In the future, we will add the other insights you see in the Endpoint analytics console.
Details panel for the startup performance insight
To check out the new page which is rolling out over the next few days, head over to https://aka.ms/productivityscore. If you want to learn more about the new page, you can read the documentation at https://aka.ms/ea-ps. As always, feel free to leave any questions or thoughts you have below!
This article is contributed. See the original author and article here.
The pandemic has fundamentally changed how we all live, learn, and work. As we begin to recover from the pandemic and plan our return to the office, many organizations are rethinking the future of work:
Over 80% of managers surveyed expect to have more flexible work from home policies post-pandemic.
More than 70% of the employees and managers reported a desire to continue working from home at least part-time.
Source: Harris Poll survey commissioned by Microsoft, May 2020
At Microsoft, we believe the future of work is hybrid. The essence of hybrid work is extreme flexibility, in terms of where and when people work. Organizations are creating new policies that empower employees to spend some portions of their week working from home, as well as flexible working hours. While certain measures may need to be put in place to optimize hybrid workplace functions, there is no turning back when it comes to the future of work. A large majority of people prefer a mix of remote-work and office-work instead of a return to the traditional work model, or permanent all-remote work.
As we return to the workplace, moving to a hybrid work model will not just be about continuing the great work-from-home experiment many of us have been participating in for almost 12 months now. We will need to change our behavior by developing new skills and habits to help us stay healthy, finding new ways to engage and stay connected as we adopt this new way of working. It is going to take a collective effort for organizations to make a successful transition to a hybrid workplace.
There are big changes ahead for those of us moving to a hybrid work model. Like any organizational change initiative, we must be thoughtful about how we guide people through the journey. If not, organizations face risks such as decreased productivity, increased turnover, or employees that are just not engaged.
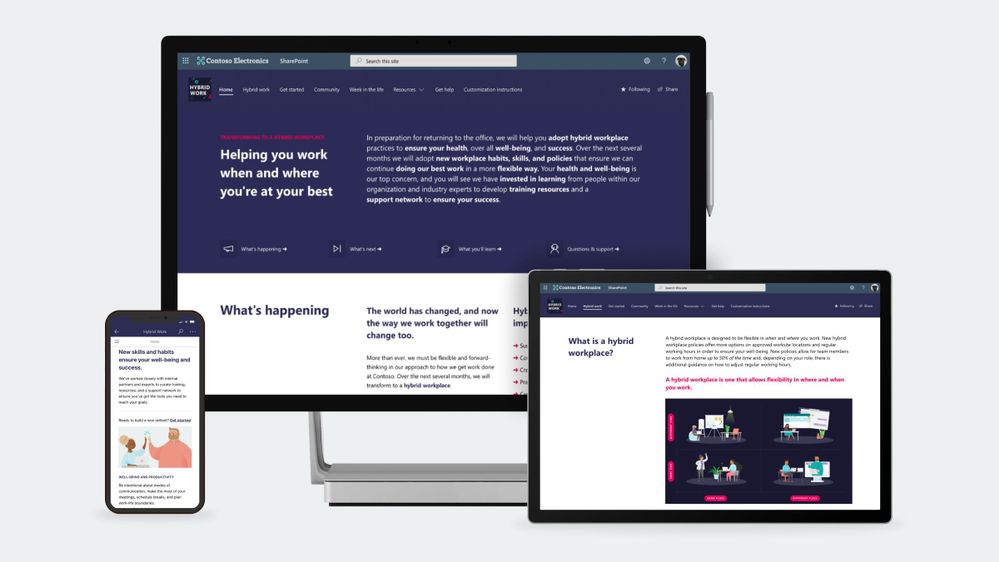
To help our customers lead their organization’s transition to a hybrid workplace we have launched a SharePoint site template on the SharePoint look book called the Workplace transformation site as well as new end-user training to help employees learn new habits and skills that support hybrid work.
Workplace transformation site
The Workplace transformation site template helps organizations:
Inspire employees on the new possibilities the hybrid workplace offers.
Provide employees with the information, resources, and support they will need to buy-in and adopt the new way of working.
Prepare employees for a successful transition to a hybrid workplace with a change journey checklist and quick tips.
The Workplace transformation site features:
A fully configured and customizable hybrid work transformation site built on SharePoint communication sites: The Workplace transformation site brings together information architecture, pre-populated content, site design and webparts to help inform and support employees through the transition to a new way of working. The site can be customized to add your organization’s content and to align with its look and feel.
Hybrid work checklist: Any organizational change initiative can be stressful for employees. Help your employees through the change process by providing them a curated change journey checklist. Guide employees through organizational changes with a customizable activity list of tasks such as required training courses and learning events.
Inspirational help content: Understanding how the day-to-day workplace will change in the new hybrid model is key to helping onboard employees. The Workplace transformation site includes “quick tip” guides for employees and managers, and a week in the hybrid workplace content.
Support resources: As employees’ transition to a hybrid work model, they will need multiple levels of support from self-service support like FAQs to one-on-one help from champions. The hybrid work transformation site includes a champions program overview page, a Yammer community web part, and pre-populated FAQs to help support employees.
Mobile-ready: The Workplace transformation site can be easily accessed on mobile devices so employees can continue their hybrid work transition journey from wherever they may be working.
Hybrid work end user training
To help employees develop new hybrid workplace habits and discover new tools that set them up for success, we have developed new end-user training content based on Microsoft research insights. The training content is focused on collaboration and meetings in a hybrid world, using asynchronous collaboration methods, well-being, productivity, security, and data protection. Embed hybrid workplace training content into your Workplace transformation site using Microsoft 365 learning pathways – a free, on-demand training solution. Microsoft 365 learning pathways can be easily deployed in your Microsoft 365 tenant environment and can be used to customize new hybrid work training playlists to suit your organization, along with other Microsoft-maintained product training playlists.
Question: What are the requirements for installing the Workplace transformation site into my tenant environment?
Answer:
Ensure SharePoint Online is enabled in your environment.
The individual that will provision the hybrid work transformation site must be the tenant admin.
Question: How long will it take to install the site in our tenant environment?
Answer: Based on our testing of the installation, it should take 10 minutes or less. Individual tenant configurations could cause differences in installation duration. This does not include time to customize the site to your organizations’ requirements.
Question: What customization options are available for the Workplace transformation site?
Answer: The site can be fully customized to fit the needs of your change management project, users, and organization. Review the Workplace transformation site template provisioning and customization guidance before getting started.
This article is contributed. See the original author and article here.
The auto-failover groups feature allows you to manage the replication and failover of a group of databases on a server or all databases in a managed instance to another region. It is a declarative abstraction on top of the existing active geo-replication feature, designed to simplify deployment and management of geo-replicated databases at scale.
To monitor the replication lag between primary and secondary instances, and last replication time of the secondary databases, we can use the DMV sys.dm_geo_replication_link_status.
Run the below query on your primary instance:
SELECT
link_guid
, partner_server
, partner_database
, last_replication
, replication_lag_sec
FROM sys.dm_geo_replication_link_status;
Each row represents an information for each database under the SQL instance.
replication_lag_sec : Shows the time difference in seconds between the last_replication value and the timestamp of that transaction’s commit on the primary based on the primary database clock. This value is available on the primary database only.
last_replication : Shows the timestamp of the last transaction’s acknowledgement by the secondary based on the primary database clock. This value is available on the primary database only.
Moreover, both primary and secondary instances are required to have the same service tier. If the primary database is experiencing a heavy write workload, a secondary with lower compute size may not be able to keep up with it. That will cause redo lag on the secondary, and potential unavailability of the secondary. To mitigate these risks, active geo-replication will throttle the primary’s transaction log rate if necessary, to allow its secondaries to catch up.
We can monitor the replication lag over time in SQL Managed Instance by creating a scheduled agent job to run and capture the lag into a table every ex: 5 min for a day or two, to check how the lag time can be different along with the workload.
Short steps can be:
1) Create a table for example named monitor_lag
2) Create a job with the below step and set it to be run every 5 minutes.
This article is contributed. See the original author and article here.
Blogger: Ragnar Heil, MVP Office Apps and Services, Channel Account Manager at Quest.
Wednesday, March 3 Session code:FS189 2:00 AM – 2:30 AM CET Speakers: Bob Bejan | Microsoft, Lars Johnson | Microsoft, Christina Torok | Microsoft
Microsoft starts this Ignite Session about easy, intuitive webinars with Microsoft Teams in a different and refreshing way – not looking like a typical webinar, rather than a TV News Shows. Lars Johnson, Sr Director of Microsoft Teams Marketing, is our Anchor Man for next 30 minutes and leads us to new ways of virtual engagement in the age of remote work. First funny ice breaker: “It’s been a long time since we have been able to tell the difference between weekdays and weekends.“
Joining Webinars as an attendee in many different ways with more reactions I assume we all have faced Webinar fatigue especially since global Covid 19 pandemic started. Too many webinars were offered with too less interactions. Now you can share your reactions, it can be loving hearts, applause or constructive criticism. You can attend the event on demand or real time. You can think about joining the event from your home bike and increase your fitness.
Creating Events and Webinars as organizer Setting up and running webinars will be just as easy as meetings in Microsoft Teams. Just add a custom attendee registration page to your meeting or webinar to manage attendance before and after any engagement. Following registration, attendees automatically receive an email confirmation for a simple join experience. In case you are using different providers for webinars and team meetings / conference calls: This is now a good time to consolidate and save money.
Christina Torok (Sr Product Marketing Manager at Microsoft) explains how to setup a registration page including:
Event details like title, date, time, abstract and Microsoft Teams Link
Teams Channel
Location
Repeating event?
Collaborative meeting note taking: yes/no
Speaker information with Name and short CV
Registration fields like First Name, Last Name and Email
Custom questions
Requires registration: None/people in your organization and guests/everyone
With Teams you can organize and conduct interactive webinars for people inside and outside of your organization with up to 1,000 attendees. You are afraid that too many attendees could disturb your webinar based on Teams Meetings? Host controls such as the ability to disable attendee chat and video. If your webinar grows to over 1,000 attendees, Teams will seamlessly scale to accommodate a 10,000-person view-only broadcast experience. Due to the pandemic Microsoft has increased this number up to 20,000 attendees for a limited time.
Now PowerPoint also wants to transform your webinars with rich presentation options: Simply launch a Teams meeting and instead of opening a PowerPoint deck and sharing your screen, just pick a file under the PowerPoint Live section of the new and improved Share content in Teams. Get full control over your content, the view you see as the presenter is yours only – review notes, engage in chats, and see your audience – all in one panel view.
PowerPoint Live in Microsoft Teams allows attendees to access the shared content through screen readers and increases inclusion significantly. Whether you are joining via a mobile phone or 8k monitor, using low bandwidth or fiber connection, each attendee experiences is optimized for their screen type.
Analyzing Webinars as Marketing expert After the event Marketing can see on a dashboard how many people went to the registration page, have registered and attended. Total event time and average attendee time is shown as well as list of all attendees with status, duration, join-and leave time.
Looks good so far? Maybe you are looking for deeper ways of integration into your CRM. Microsoft is offering an integration with Dynamics365.
In this session I have learned more how Bob Bejan (Corp VP, Microsoft) is looking at the future of Hybrid Events. He is responsible for the development, production and execution of global events and experiential marketing for Microsoft. Ignite 2021 is produced completely different than all previous Ignites which happened onsite. Perspectives are so much different and ways of interactions and gathering feedback changes completely. Don’t just send a feedback poll at the end of your webinar, create a story or interesting video around it.
We are going to see more much more immersive webinar experience types soon, so I highly recommend to also watch Microsoft Mesh Ignite Session – powered by VR and Augmented Reality devices like Hololens or Oculus.
This article is contributed. See the original author and article here.
Typically, every Wednesday Data Exposed goes live at 9AM PT on LearnTV. Every 4 weeks (mostly the first week of each month), we’ll do a News Update. We’ll include product updates, videos, blogs, etc. as well as upcoming events and things to look out for. We’ve included an iCal file, so you can add a reminder to tune in live to your calendar. If you missed the episode, you can find it at https://aks.ms/AzureSQLYT along with other videos.
This month is an exception, with Ignite going on. We’ve shifted the live episode to TOMORROW MARCH 4th, but it’ll still be on Learn TV, and we hope to see you there. We’ll be diving into the latest announcements related to migrating to Azure SQL (really cool new stuff, you do not want to miss!)
In lieu of the Data Exposed Live News Update for March, you can read this blog to get all the updates. We’ll be back with a Data Exposed Live News Update in April. Here’s the March 2021 update:
Product updates
Ignite
There are four major areas for Azure SQL updates announced at Ignite this year: migration, security, HADR, and maintenance.
On the migration front, the team announced a new end to end SQL Server migration experience for migrations at scale with Azure Migrate. We also announced a limited preview that will simplify migrations from SQL Server to Azure SQL using Azure Data Studio (ADS).
With High Availability and Disaster Recovery (HADR), Long Term Retention (LTR) went Public Preview for Azure SQL Managed Instance backups. This is already available in Azure SQL Database so is a great step towards bringing parity between the two services’ capabilities. Additionally, Geo-replication for Azure SQL Database Hyperscale also went Public Preview. Similarly, this is something already available for other service tiers in Azure SQL Database, so many customers are excited to see this land in Hyperscale.
Not necessarily a product update, but Davide Mauri and I did a really fun session about catching the bus (literally) with Azure SQL. It was fun and produced at high quality, so you should definitely check it out. You can access it on-demand here.
Pre-ignite
The Log Replay Service (LRS) went public preview for Azure SQL Managed Instance. Azure SQL Managed Instance utilizes log shipping technology to enable custom migrations of databases from SQL Servers 2008 through 2019 to Azure SQL Managed Instance. The LRS feature enables building fully customizable data migration solutions in cases when more control is needed, when there exists little tolerance for downtime, or when Azure Data Migration Service cannot be used. Learn more here.
Machine Learning for Azure SQL Managed Instance became generally available in December, however, this recent update expands and allows for using R and Python in Azure SQL Managed Instance. Learn more about the capabilities and newer capabilities here.
Videos
We continued to release new and exciting Azure SQL episodes this month. Here is the list, or you can just see the playlist we created with all the episodes!
How Azure SQL Enables Real-time Operational Analytics (HTAP) – Part 1, Silvano Coriani
How to Create Operational Analytics with Window Functions in Azure SQL – Part 2, Silvano Coriani
[MVP Edition]: How to deploy Azure SQL anywhere using Azure Arc for data services, Ben Weissman
Protect your SQL Anywhere using Azure Defender for SQL, David Trigano
Testing App Cloud Readiness for Failover Resiliency with SQL Managed Instance, Dani Ljepava
We’ve also had some great Data Exposed Live sessions. Subscribe to our YouTube channel to see them all. Here are some of the recent live streams.
Azure SQL Security: The What, Why and How of Securing your Data with Azure SQL
Best Practices Assessment for Azure SQL VMs, Managed Instances, and SQL Servers
By the way, tomorrow we will be doing a special Data Exposed Live episode (outside our normal Wednesday slot due to Ignite)! Raj Pochiraju and Ajay Jagannathan will join us to talk about the latest technologies that we just announced related to migrating to Azure SQL. You don’t want to miss it. Just tune in to https://aka.ms/LearnTV at 9AM PT on Thursday, March 4th!
Blogs
As always, our team is busy writing blogs to share with you all. Blogs contain announcements, tips and tricks, deep dives, and more. Here’s the list I have of SQL-related topics you might want to check out.
As always, there are lots of events coming up this month. Here are a few to put on your calendar and register for:
3/2: Microsoft Ignite Secure your data with Azure SQL; Anna Hoffman and Bob Ward Recipe for Modern Applications: .NET, Azure SQL, Functions, Geospatial, JSON; Anna Hoffman and Davide Mauri Ask the Experts: What’s new in Azure Data; Uri Barasah, Luis Cabrera, Nellie Gustafsson, Anna Hoffman, Ajay Jagannathan, Matt Usher, Pratik Verma, and Bob Ward
3/5: WIT Tech Day Notebooks 101 for SQL People; Julie Koesmarno
3/17:RunAs Radio Migrating to Azure SQL; Anna Hoffman
3/24-3/25:Codecamp_The One with .NET Recipe for Modern Applications: .NET, Azure SQL, Functions, Geospatial, JSON; Anna Hoffman
In addition to these upcoming events, here’s the schedule for Data Exposed Live: 3/4: Deep Dive: Discover & Assess SQL Server Data Estate Migrating to Azure SQL Using Azure Migrate 3/10: Deep Dive: Azure SQL Virtual Machine Sizing 3/17: Deep Dive: The Architecture of Azure SQL 3/24: Something Old, Something New with Buck Woody 3/31: Ask the Experts: SQL Edge to Cloud with Bob Ward and Buck Woody
Plus find new, on-demand Data Exposed episodes released every Thursday, 9AM PT at aka.ms/DataExposedyt
Featured Microsoft Learn Module
Learn with us! This month I highlighted the Secure your data with Azure SQL module. Check it out! Bob Ward and I also delivered this as part of Learn Live at Ignite. You can access the recording here.
Plus, starting March 15th, Bob Ward and I will start delivering one module per week on https://aka.ms/LearnTV at 2PM. More details to come.
Anna’s pick of the month: New Azure SQL Security Series on Data Exposed Live
In February, we kicked off a new mini-series on Data Exposed Live called Azure SQL Security. Over the course of this six-episode series, we will dive into various security topics and how they relate to Azure SQL and data professionals. In the kickoff episode, the Principal Group Program Manager of the Azure SQL Security team, Joachim Hammer, came on the show to give us an overview of all security pillars related to Azure SQL. In subsequent episodes, we’ll dive into each pillar with various members of the security team. Subscribe to the Azure SQL YouTube channel to watch the first episode and get notified about future episodes (next one coming in April).
Until next time…
That’s it for now! Be sure to check back next month for the latest updates, and tune into Data Exposed Live every Wednesday at 9AM PST on LearnTV. We also release new episodes on Thursdays at 9AM PST and new #MVPTuesday episodes on the last Tuesday of every month at 9AM PST at aka.ms/DataExposedyt.
Having trouble keeping up? Be sure to follow us on twitter to get the latest updates on everything, @AzureSQL. You can also download the iCal link with a recurring invite!
We hope to see you next time, on Data Exposed :smiling_face_with_smiling_eyes:
This article is contributed. See the original author and article here.
Microsoft has released out-of-band security updates to address four vulnerabilities in Exchange Server:
It is possible for an attacker, once authenticated to the Exchange server, to gain access to the Active Directory environment and download the Active Directory Database.
Tactics, Techniques and Procedures
The majority of the TTPs in this section are sourced from a blog post from Volexity, a third party cybersecurity firm. Note: the United States Government does not endorse any commercial product or service, including any subjects of analysis. Any reference to specific commercial products, processes, or services by service mark, trademark, manufacturer, or otherwise, does not constitute or imply their endorsement, recommendation, or favoring by the United States Government.
Volexity has observed the following files as targets of HTTP POST requests:
<exchange install path>FrontEndHttpProxyowaauth (any file or modified file that is not part of a standard install)
<exchange install path>FrontEndHttpProxyowaauthCurrent (any aspx file in this folder or subfolders)
<exchange install path>FrontEndHttpProxyowaauth<folder with version number> (any aspx file in this folder or subfolders)
Administrators should search in the /owa/auth/Current directory for the following non-standard web log user-agents. These agents may be useful for incident responders to look at to determine if further investigation is necessary.
As with the non-standard user-agents, responders can examine internet information services (IIS) logs from Exchange Servers to identify possible historical activity. Also, as with the non-standard user agents, these should not be taken as definitive IOCs:
POST /owa/auth/Current/
POST /ecp/default.flt
POST /ecp/main.css
POST /ecp/<single char>.js
Volexity has seen attackers leverage the following IP addresses. Although these are tied to virtual private servers (VPSs) servers and virtual private networks (VPNs), responders should investigate these IP addresses on their networks and act accordingly:
103.77.192.219
104.140.114.110
104.250.191.110
108.61.246.56
149.28.14.163
157.230.221.198
167.99.168.251
185.250.151.72
192.81.208.169
203.160.69.66
211.56.98.146
5.254.43.18
5.2.69.14
80.92.205.81
91.192.103.43
Volexity has also provided the following YARA signatures that can be run within your network to assist in finding signs of a compromise.
rule webshell_aspx_simpleseesharp : Webshell Unclassified { meta: author = “threatintel@volexity.com” date = “2021-03-01” description = “A simple ASPX Webshell that allows an attacker to write further files to disk.” hash = “893cd3583b49cb706b3e55ecb2ed0757b977a21f5c72e041392d1256f31166e2”
Note: this is not an all-inclusive list of indicators of compromise and threat actors have been known to use short-term leased IP addresses that change very frequently. Organizations that do not locate any of the IOCs in this Alert within your network traffic, may nevertheless have been compromised. CISA recommendations following the guidance located in the Microsoft Advisory to check your servers for any signs of a compromise.
Conduct Forensic Analysis
Should your organization see evidence of compromise, your incident response should begin with conducting forensic analysis to collect artifacts and perform triage. Please see the following list of recommendations on how to conduct forensic analysis using various tools.
Although the following free tools are not endorsed by the Federal Government, incident responders commonly use them to perform forensics.
While collecting artifacts to perform triage, use processes and tools that minimize the alteration of the data being collected and that minimize impact to the operating system itself.
Ideally, during data collection, store the data on removable/external media and, when possible, run the artifact collection tools from the same media.
Key artifacts for triage that should be collected:
Memory
All registry hives
All windows event logs
All web logs
Memory can be collected with a variety of open source tools (e.g., FTK Imager by AccessData, Ram Capture by Belkasoft).
Registry and Windows Event logs can be collected with a variety of open source tools as well (e.g., FTK_Imager, Kroll Artifact Parser And Extractor [KAPE]).
Web logs can also be collected with a variety of open source tools (e.g. FTK Imager).
Note: Ensure your review of and compliance with the applicable license associated with the product referenced, which can be found in the product’s User Guide. The United States Government does not endorse any commercial product or service, including any subjects of analysis. Any reference to specific commercial products, processes, or services by service mark, trademark, manufacturer, or otherwise, does not constitute or imply their endorsement, recommendation, or favoring by the United States Government.
2) Collect memory from live system using FTK Imager. See Memory Capture with FTK Imager.pdf for instructions. Note: Download and copy “FTK Imager” folder to an external drive. Run FTK Imager.exe from the FTK Imager folder from external drive. Wait until memory collect is complete before proceeding to step 2.
3) Collect important system artifacts using KAPE. See KAPE Collection Procedure. Note: Download KAPE from a separate system; do not download KAPE to the target system. Run KAPE from external drive.
4) Collect disk image using FTK Imager. See Live Image with FTK Imager.pdf for instructions. Note: Run FTK Imager.exe from the “FTK Imager” folder from external drive.
Memory Capture with FTK Imager
1) Open FTK Imager. Log into the system with Administrator privileges and launch “FTK Imager.”
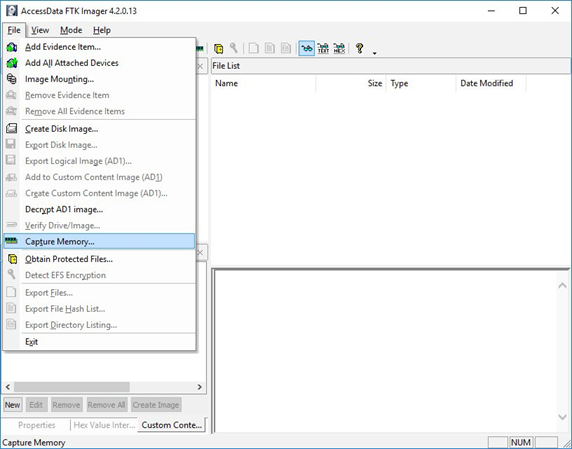
2) Open “Capture Memory.” Select “Capture Memory…” from the File menu.
Figure 1: FTK Imager – Capture Memory Command
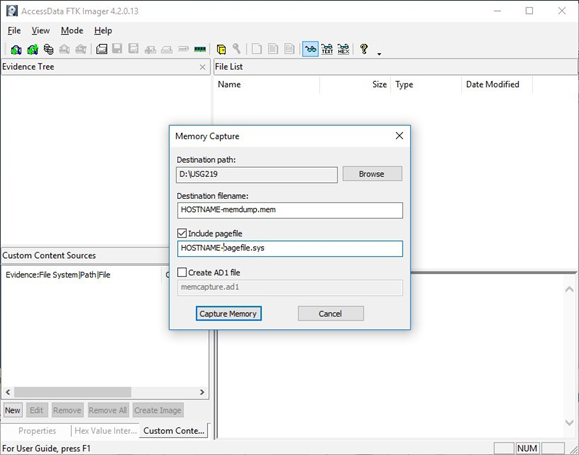
3) Select Path and Filenames. On the window that appears, use the “Browse” button to identify the destination of the memory capture. Save the memory capture to an external device and not the main hard drive of the system. Doing so will prevent the saved file from overwriting any dataspace on the system.
Name the destination file with a descriptive name (i.e., hostname of the system).
Select the box “Include pagefile” and provide a name of the pagefile that is descriptive of the system.
Do not select “Create AD1 file.”
Figure 2: FTK Imager – Memory Capture
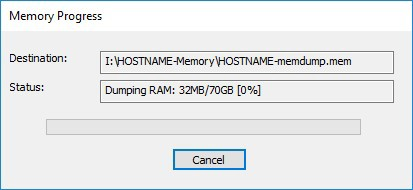
4) Capture Memory. Click on “Capture Memory” to begin the capture process. The process will take several minutes depending on the size of the pagefile and the amount of memory on the system.
1) Download KAPE from https://www.kroll.com/en/services/cyber-risk/investigate-and-respond/kroll-artifact-parser-extractor-kape.
2) Disable any antivirus or host protection mechanisms that prevent execution from removable media, or data loss prevention (DLP) mechanisms that restrict utilization of removable media.
Enable antivirus and host protection once this process is completed.
3) Unzip Kape.zip and run gkape.exe as admin from your removable media
4) Target source should be the drive on which the OS resides, typically C:.
5) Target destination should be an external drive folder, not the same drive as the Target source. If available, use an external hard drive or flash drive.
A KAPE execution with these parameters will typically produce output artifacts with a total size of 1-25 GB.
If you are going to be running KAPE on different machines and want to save to the same drive, ensure the Target destination folder is unique for each execution of KAPE.
6) Uncheck Flush checkbox (it is checked natively).
7) Check Add %d and Add %m checkboxes.
8) Select ALL checkboxes to ensure KAPE will target all available data that it is capable of targeting. This takes some time; use the down arrow and space bar to move through the list quickly.
9) Check Process VSCs checkbox.
10) Select Zip radio button and add Base name TargetOutput.
11) Ensure Deduplicate checkbox is checked (it is checked natively).
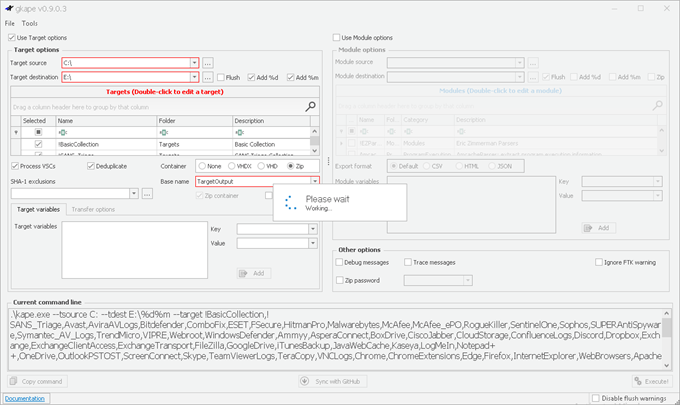
At the bottom you should now see a large Current command line, similar to:
In the bottom right corner hit the Execute! Button.
Screenshot below shows gkape.exe during execution, you will also see a command window execute. Note: KAPE usually takes less than 20 minutes to complete on a workstation; if it is taking significantly longer there may be an issue.
This article is contributed. See the original author and article here.
When working with Microsoft 365, we see many overlapping tools and features, and we will need (to provide) much guidance around ‘when to use what’ for users. While most comparisons address users, I want to cover some more IT-related scenarios in this blog post. Specifically, I want to compare two different RESTful APIs, which we can use in Power Automate and Azure Logic Apps to send HTTP requests. If you are not familiar with that, don’t fret; continue to read my blog post abouthow to get started with http requests in Power Automate, I will grab a coffee:hot_beverage:in the meanwhile.
Back again? Cool. Let me introduce you to our
use case
We want to create a new SharePoint list and add some columns based on the user’s input using Power Automate or Azure Logic Apps. When we look at the different available SharePoint actions in Power Automate, we will see that there is no ‘create a list’ and no ‘add column to SharePoint list’ action, but that we could try out something with‘send an HTTP request to SharePoint’
Option No. 1: SharePoint REST
The ‘send an HTTP request to SharePoint’ action uses SharePoint REST API. To create a list, we can look upworking with lists and lists itemsand see that we need to send a POST request to thehttps://{site_url}/_api/web/listsendpoint and specify in the body of our list how it should look like. We can define the title and description of the list and alsoset the Basetemplate(in case you want to do the same with a library etc.):
POST https://{site_url}/_api/web/lists
Authorization: “Bearer ” + accessToken
Accept: “application/json;odata=verbose”
Content-Type: “application/json”
Content-Length: {length of request body as integer}
X-RequestDigest: “{form_digest_value}”
as body- make sure you replace the placeholder with Dynamic Content:
Parse JSON
Now we want to add a column. Let’s have a lookinto the documentation, how we can do this.
POST https://{site_url}/_api/web/lists(guid'{list_guid}’)/Fields
Authorization: “Bearer ” + accessToken
Accept: “application/json;odata=verbose”
Content-Type: “application/json”
Content-Length: {length of request body as integer}
X-RequestDigest: “{form_digest_value}”
We need another ‘send an HTTP request to SharePoint’ action, and we need thelist Guid. To get the list Guid, we need to add aParse JSONaction. If you are not familiar with that – I blogged about it:How to use Parse JSON action in Power Automate
Parse JSON
Let your flow run – just the mobile trigger and the ‘send an HTTP request to SharePoint’ action
Go to your flow run history
Copy the outputs from the ‘send an HTTP request to SharePoint’ action
add a ‘Parse JSON’ action to your flow
selectbodyfrom the ‘send an HTTP request to SharePoint’ action asContent
clickGenerate from sample
paste the copied JSON code in here
clickDone
When we now have a look into our Dynamic Content, we will see many more options, also the list Guid, which is namedIdhere.
Send an HTTP request to SharePoint 2 – add a column
Now we add another ‘send an HTTP request to SharePoint’ action, which will create us a column:
Select the site of your choice from the dropdown menu
Select methodPost
enter_api/web/lists(guid’@{body(‘Parse_JSON’)?[‘d’]?[‘Id’]}’)/Fieldsas URI (replace the placeholder with Dynamic content)
enter Headers as follows:
Content-type:application/json;odata=verbose
accept:application/json;odata=verboseenter in the Body:
Please replace again all placeholder by Dynamic content
Should you stumble upon the FieldTypeKind, please find referencehere– 2 means ‘single line of text’.
If you want to run your flow, please think about changing the list name because you already created a list!
If we now control our newly created SharePoint list, we will see that our new column doesn’t show up in the default view but that we need to enable the column- bummer!
Send an HTTP request to SharePoint 3 – add column to view
To have the column in the default view (or another view), we need to add another ‘send an HTTP request to SharePoint’ action:
Select the site of your choice from the dropdown menu
Select methodPost
enter_api/web/Lists/getByTitle(‘@{triggerBody()[‘text’]}’)/views/getByTitle(‘All Items’)/ViewFields/addViewField(‘@{triggerBody()[‘text_2′]}’)as URI
(replace the placeholder with Dynamic content)
enter Headers as follows:
Content-type:application/json;odata=verbose
accept:application/json;odata=verbose
Body is empty
Advantages of this solution
no need to register an application in Azure AD
send an HTTP request to SharePoint is not a premium connector, which means that you won’t need a Power Automate Standalone license
Disadvantages of this solution:
with an ‘http request to SharePoint’ action you have – compared to the power of Microsoft Graph API – limited options, as you can only send requests to SharePoint, but not to other services in Microsoft 365-
to add the new column to our default view, we need 3 HTTP requests – which makes the flow unnecessarily more complex
Option No. 2: Microsoft Graph API
Let’s see how we can create a SharePoint list or library and columns in it using Microsoft Graph. Microsoft Graph is a super powerful set of APIs that gives you a consistent experience for authentication, documentation, and samples. You can try it out onMicrosoft Graph Explorer. For full documentation please continuehere. If you are not familiar with using Microsoft Graph in Power Automate,please continue to read here… time for another coffee for me then :)
mobile flow trigger
Again, to make things easy, we will use the same trigger as in Option No. 1.:
HTTP action
Now that we registered our app in Azure AD, we can continue with the HTTP action in Power Automate.
To create a list, we will look updocumentation hereand see that we will need to send a POST request to
And that we will need to add permissions to be able to call this API. Our HTTP request requires authentication, which can be done via Azure Active Directory OAuth, but we will first need to represent our app (yes, this flow that calls Microsoft Graph is an application) in Azure AD.
We will follow these steps to register an app in Azure AD:
Go to portal.azure.com and log in
Click app registrations
Click New App registration
Give your app a nice name
Save tenant ID and Client(app) ID somewhere (notepad or similar)
ClickAPI PERMISSIONSand select Microsoft Graph
Now look up the permissions needed for this action:Create a new list:
Permission type
Permissions (from least to most privileged)
Application
Sites.ReadWrite.All
Select all these permissions
Grant Admin consent
ClickCertificates & secrets
ClickNew client secret
Type in a description
ClickAdd
Copy the value and save it in your notepad (you will need that later)
Initialize variables for Tenant ID, App ID and App Secret
Create three different string variables with the copied values of Tenant ID, App ID, and App Secret
HTTP action to create a list
Add an HTTP (not ‘send an HTTP request to SharePoint action) action to your flow and fill it out as follows:
When we now run our flow, we will see that the columns that we created are already visible in the default view.
Advantages of this solution:
We only need one HTTP request to Create a list, columns and have the columns in the default view
If our flow gets more complex over time and we provision more things in not only SharePoint, we can do this with Microsoft Graph as well and extend our permission scope in Azure AD app registration
Disadvantages of this solution:
Because HTTP is a premium connector, we will need a Power Apps Standalone license
We also need to register an app in Azure AD
Bonus Chapter: What about CLI Microsoft 365?
If you read one of my previous blog posts aboutHow to get started with CLI Microsoft 365 and Adaptive Cards, you could read between the lines that I found CLI Microsoft 365 pretty cool. Although I wanted to compare SharePoint REST and Microsoft Graph API using Power Automate in this Post, I felt it could be a cool idea to check how things would go in CLI Microsoft 365.
If you are not familiar with it, please read my blog post first or head over to thefull documentation. After you installed CLI Microsoft 365, open a shell that makes you happy (I use PowerShell inside Visual Studio Code Terminal).
Login
Runm365 login
Copy the Login Code, click on the link
Paste the Login Code
Select the user you want to log in with from the list
Return to your shell window
Create a list
Runm365 spo list add –title Awesome%20List –baseTemplate DocumentLibrary –webUrl https://xxx.sharepoint.com/sites/yyyby replacingxxxby your tenantname andyyyby your sitename
Add fields and more
You can now run even more commands to add fields, make them required, add them to default view, and so on,feel free to try it out!
Conclusion
As always, the answer to the question “When shall I use what” will be a typical consultant ‘It Depends.’ Depending on your experience and skillset, the scope of your app, and how you approach it, you will prefer one tool over another – the purpose of this blog was to share some options to achieve the same thing – with creating a SharePoint list as an example. Please tell me – which solution would you prefer? Which are your use cases? Please reply below; I am curious!


Recent Comments