by Contributed | Apr 12, 2021 | Technology
This article is contributed. See the original author and article here.
When I first started in IT, my large organization had an entirely separate “Data Security” team who were responsible for user management – adds/moves/deletes and password resets. They were a small but busy team, handling both calls from users via the helpdesk and requests generated by HR. Apart from using some Active Directory automation scripting with VBScript instead of the GUI, each request was handled individually.
Fast forward to 2021 and as well as replacing those scripts with PowerShell, we can use dynamic groups to maintain the group members based on the attributes of those members.
Why would you use Dynamic Groups?
Using a query-based membership, when you update the attributes of a user or device they will be added to or removed from the dynamic groups that are now relevant to them, without you having to do any other steps. You might have a dynamic group for people who have the same department name or location specified in their user account. You can combine more than one attribute so, for example, the group members have to both be in the Finance department and be located in Brisbane, Australia. You can even create a “direct reports” dynamic group for people who report to the same manager.
Devices can also be group members but you can’t mix both users and devices in the same group. You could create dynamic groups of devices with the same operating system version, Intune device property label or enrolment profile name, for example.
For a full list of supported attribute queries and syntax, visit Dynamic membership rules for groups in Azure Active Directory.
Licensing
Dynamic membership is supported in security groups and Microsoft 365 groups. It requires an Azure AD P1 license for each unique user who is a member of one of or more dynamic groups. This is an overall count though – the P1 license doesn’t have to be assigned to the people you want to be included in dynamic groups, but the total member count of people in dynamic groups must match or be exceeded by the total number of P1 licenses owned by your organization. Some Microsoft 365 license plans include this Azure AD premium functionality – E3, E5, MF1 and MF3. No licenses are required for devices that are members of dynamic groups.
Dynamic Groups in Azure Active Directory
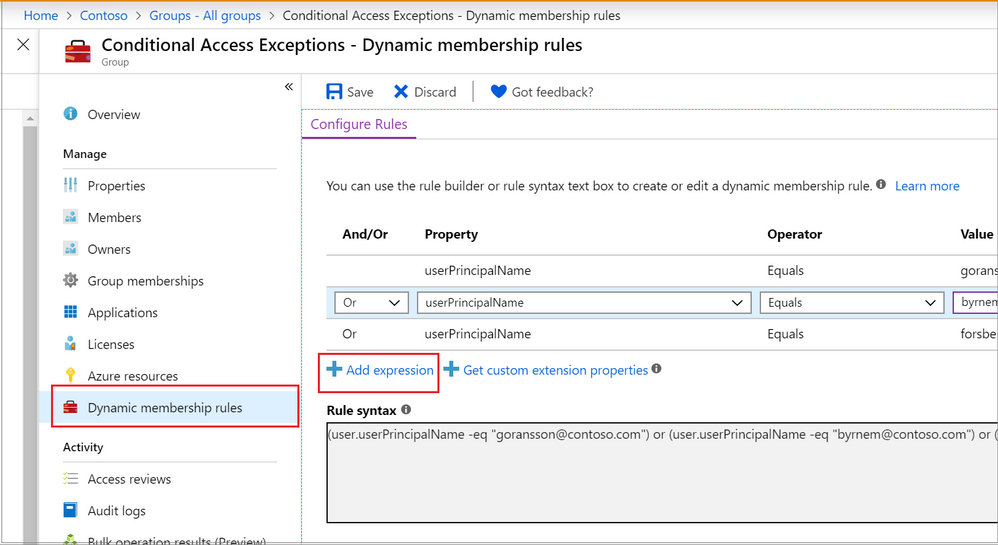
The Azure portal provides a graphical-based rule builder for dynamic membership, which supports adding up to five expressions, and the ability to enter your query string directly into the text editor. You also need to use the text editor for the “direct reports” scenario I mentioned above, setting operator precedence, and for writing more complex rules.
Adding a dynamic membership rule to a group in the Azure Portal
Operator precedence is where we want a part of the query to be evaluated before another part. For example, we can use parenthesis to build a list of matching department names (finance or HR) and add that to the Brisbane location:
user.city -eq "Brisbane"-and (user.department -eq "Finance" -or user.department -eq "HR")
To build more complex queries, you can use the following operators:
-eq -ne -startsWith -notStartsWith -contains -notContains -match –notMatch -in -notIn
-not
-and
-or
-any -all
Example: Direct Reports
This rule maintains members who have their Manager property set to the same Manager ID. The Manager ID is the unique object identifier found in the manager’s profile. It does not support subgroups and can’t be combined with any other membership rules.
Direct Reports for "{objectID_of_manager}" for example Direct Reports for "62e19b97-8b3d-4d4a-a106-4ce66896a863"
Example: On-premises domain membership
If you’re synchronizing identities from Active Directory to Azure Active Directory, you can build dynamic groups based on which Active Directory Domain the user belongs to. This is based on the user’s Security Identifier (SID). You can use PowerShell to query the users with a domain filter to get the start of the SID that you need:
Get-ADUser -Filter * -SearchBase "dc=domain,dc=local" | select Name,SID
Then use the rule syntax that queries Azure AD for the user.onPremisesSecurityIdentifier attribute:
(user.onPremisesSecurityIdentifier -startsWith "S-1-5-21-12345678-1234567891-123456789")
Verifying members of your dynamic group
When an identity attribute of a user or a device changes, Azure AD evaluates all dynamic membership rules that exist in that directory, triggering any relevant membership additions or removals. You can also see the list of current group members via the Azure portal, or use the following PowerShell command for a simple list:
(Get-AzADGroup -DisplayName "<DisplayNameofGroup>" | Get-AzADGroupMember).DisplayName
Note: This requires the Azure Active Directory PowerShell module that you can download here.
In preview, is the ability to validate your rules against up to 20 users or devices. The Validate Rules tab will run your query against your selected target users or devices and confirm if they would meet the requirements to be a group member or not. For more information, visit Validate a dynamic group membership rule (preview) in Azure Active Directory.
Microsoft 365 groups and Microsoft Teams dynamic membership
Microsoft 365 groups (as a group type) provision access across a selection of Microsoft 365 services for a group of people who will be working together. They are designed to prove quick and easy access, removing the administration overhead of an IT Pro needing to set permission on several different Microsoft 365 services, including Teams, a SharePoint Online site, a Planner Plan, a Power BI workspace and a shared mailbox. This group type also supports dynamic membership, created via the Azure Portal the same as you would an Azure AD security group.
By using this group type and dynamic membership, you can add and remove members to a Microsoft Team automatically, without the team owner needing to do any administration tasks.
To achieve this, you can either:
Create your Microsoft 365 group in Azure Active Directory, adding your dynamic membership rule.
Then either create a new team from this group (after giving Azure AD time to update).
Or apply dynamic membership to an existing team by changing its group membership from static to dynamic.
For more details, visit Overview of dynamic membership for Teams.
What about dynamic distribution groups?
Yes, Exchange Online supports dynamic membership for email distribution groups! Unlike security groups, the group membership is calculated each time a message is sent to the group. To set up and manage dynamic distribution groups, you need to use the Exchange Admin Center or Exchange Online PowerShell.
This example creates a dynamic group of Full Time Employees by querying a custom attribute:
New-DynamicDistributionGroup -Name "Full Time Employees" -RecipientFilter "(RecipientTypeDetails -eq 'UserMailbox') -and (CustomAttribute10 -eq 'FullTimeEmployee')"
For details, visit Manage dynamic distribution groups.
You also need to use Exchange Online PowerShell to query the list of group members at this point in time, as they can’t be viewed in the Exchange Admin Center or the Azure Portal:
$FTE = Get-DynamicDistributionGroup "Full Time Employees"
Get-Recipient -ResultSize Unlimited -RecipientPreviewFilter $FTE.RecipientFilter -OrganizationalUnit $FTE.RecipientContainer | Format-Table Name,Primary*
Check out View members of a dynamic distribution group for more details.
Conclusion
Dynamic group membership is a powerful feature, but like any technology capability it requires planning and alignment with your organization’s needs and its business processes. What scenarios do you have where dynamic groups would be useful? Need help writing more complex queries? Let us know in the comments!
by Contributed | Apr 12, 2021 | Technology
This article is contributed. See the original author and article here.
About a year ago, we conducted a survey and requested feedback on UserVoice about management pack for SCOM. Based on all the feedback that we received and constant input from Microsoft support, SCOM PG prioritized those requests, valued its outcomes, and planned few activities.
- One activity was reviving old but important old MPs which are extensively used by customers, but they lacked updates. Example: Windows Cluster, Exchange, HyperV.
- Another activity was to prevent customers using multiple MPs for different versions of a single workload by transitioning to Version agnostic MP. Example: Windows OS, DPM, ADCS.
- Most importantly, develop MPs for newer 1P Microsoft. Example: M365, AzStackHCI
Looking at the above plan, we updated and released below Management Packs over the past few months. Additionally, work is in progress for Management Pack on monitoring Microsoft 365, Azure Stack HCI and many more. If you are want to be part of the early testers of these MPs, please write to us at systemcenterfeedback@microsoft.com.
MP Name
|
Link
|
Version
|
MP Name in Catalog
|
Change details
|
|---|
S2D
|
100782
|
1.0.47.1
|
Storage Spaces Direct 2016+
|
Fixed multiple cookdown and performance issues.
|
DPM
|
56560
|
5.0.1401.2
|
Data Protection Manager 2016 and above
|
Added DPM Deduplication Management pack and fixed DPM executive summary issue.
|
ADCS
|
56671
|
10.0.0.1
|
Active Directory Certification Services 2016 and above
|
Fixed TLS 1.0 issue with Topology discovery and published the MP as version agnostic for Windows Server 2016 and above.
|
MP Recommendation
|
NA
|
10.19.10304.1
|
Management Pack Recommendations
|
Added Dell EMC Server lightweight discovery to MP recommendations.
|
Cluster 2012 MP
|
2268
|
10.0.6.6
|
Windows Server Cluster
|
Removed v. 10.0.6.0, added language support for v. 10.0.6.6.
|
Win OS (2012 R2 and Earlier)
|
9296
|
6.0.7326.0
|
Core OS
|
“Volume Name” property discovery issue has fixed for Logical Disks.
|
Win OS (2016 and above)
|
54303
|
10.1.0.5
|
Core OS 2016 and above
|
· Non-physical NIC’s discovery issue has fixed in Windows Server 2016 and above Network Adaptor discovery.
· Display strings are updated from “2016 and 1709+” to “2016 and above”
|
ADRMS (2016 and above)
|
55655
|
10.0.0.1
|
Active Directory Rights Management Services 2016 and above
|
The MP has been verified against ADRMS for Windows Server 2016 and above operating systems and branded as version agnostics.
|
Azure
|
50013
|
1.8.0.5
|
Microsoft Azure
|
Multiple issues fixed.
|
We also recognize the need to service Management Pack on a regular basis and, given the plethora of monitoring workloads SCOM caters to, we plan to build a robust and agile way of improving MPs. Getting constant inputs from customers, community and MVPs have immensely given us the energy to push our efforts in the right direction and we greatly appreciate that. We look forward to suggestions in delivering, developing, and improving MPs on a faster basis. After all, change should always be constant.
Feel free to share your comments in the below section and you can write to us at systemcenterfeedback@microsoft.com too.
by Contributed | Apr 12, 2021 | Technology
This article is contributed. See the original author and article here.
Introduction
Sometimes we have a requirement to get reports of users and their roles on the SharePoint site and we have to export to CSV/Excel format. To achieve this solution we will use PnP Powershell.
Let’s see step-by-step implementation:
Implementation
- Open Windows Powershell ISE
- Create a new file and write a script
Now we will see all the steps which we required to achieve the solution:
1. We will read the site URL from the user
2. Then we will connect to the O365 admin site and then we will connect to the site which the user has entered
3. Create a function to get user and their roles and store it in an array
4. And we will export the array to CSV format
So in the end, our script will be like this,
$basePath = "E:ChandaniBlogsUserRolesPS"
$dateTime = "{0:MM_dd_yy}_{0:HH_mm_ss}" -f (Get-Date)
$csvPath = $basePath + "userdetails" + $dateTime + ".csv"
$adminSiteURL = "https://*****-admin.sharepoint.com/" #O365 admin site URL
$username = #Email ID
$password = "********"
$secureStringPwd = $password | ConvertTo-SecureString -AsPlainText -Force
$Creds = New-Object System.Management.Automation.PSCredential -ArgumentList $username, $secureStringPwd
$global:userRoles = @()


Function Login() {
    [cmdletbinding()]
    param([parameter(Mandatory = $true, ValueFromPipeline = $true)] $Creds)

    #connect to the O365 admin site
    Write-Host "Connecting to Tenant Admin Site '$($adminSiteURL)'" -f Yellow

    Connect-PnPOnline -Url $adminSiteURL -Credentials $Creds
    Write-Host "Connection Successfull" -f Yellow

}
Function StartProcessing {
    Login($Creds);
    GetUserRoles
}

Function GetUserRoles {
    try {
        $siteURL = Read-Host "Please enter site collcetion URL"
        Write-Host "Connecting to Site '$($siteURL)'" -f Yellow

        Connect-PnPOnline -Url $siteURL -Credentials $Creds

        $web = Get-PnPWeb -Includes RoleAssignments

        foreach ($roles in $web.RoleAssignments) {
            $member = $roles.Member
            $loginName = get-pnpproperty -ClientObject $member -Property LoginName
            $title = get-pnpproperty -ClientObject $member -Property Title
            $rolebindings = get-pnpproperty -ClientObject $roles -Property RoleDefinitionBindings
            $roleName = $($rolebindings.Name)

            $global:userRoles += New-Object PSObject -Property ([ordered]@{
                    UserName  = $title
                    LoginName = $loginName
                    Roles     = $roleName
                })
        }
    }
    catch {
        Write-Host -f Red "Error in connecting to Site '$($TenantSite)'"
    }
    Write-Host "Exporting to CSV" -ForegroundColor Yellow
    $global:userRoles | Export-CSV $csvPath -NoTypeInformation
    Write-Host "Export to CSV successfully!" -ForegroundColor Yellow
}

StartProcessing
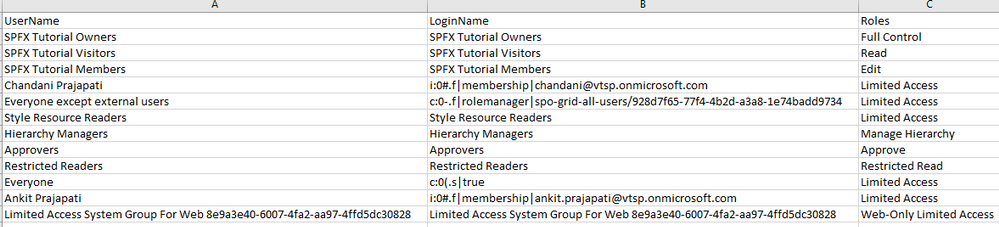
Output
Summary
So in this article, we have seen how to get users and their roles from any SharePoint site collection and convert it in CSV format.
Hope this helps! If it is helpful to you then share it with others.
Sharing is caring!
by Contributed | Apr 12, 2021 | Technology
This article is contributed. See the original author and article here.
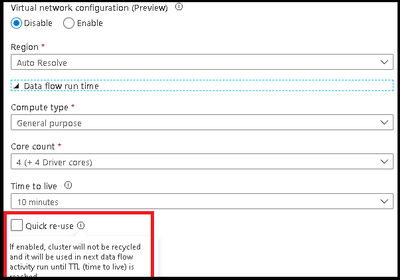
ADF has added a new option in the Azure Integration Runtime for data flow TTL: Quick re-use. This feature is currently available as a public preview. By selecting the re-use option with a TTL setting, you can direct ADF to maintain the Spark cluster for that period of time after your last data flow executes in a pipeline. This will provide much faster sequential executions using that same Azure IR in your data flow activities. You may find that parallel data flow executions or data flows that take have long execution times, will be better served as single job clusters without a TTL.
In the video below, I will walk you through how to use your TTL settings in the Azure IR so you can take your data flow sequential pipelines and move from 1-2 min warm pool startup times to activities that start in seconds:
by Contributed | Apr 11, 2021 | Technology
This article is contributed. See the original author and article here.
Suppose you are a community leader or an instructor who will run a hands-on lab session for Power Platform. You got content for it. Now it’s time for setting up the lab environment. There are roughly three approaches for the preparation.
- Ask the participants to bring their existing Power Platform environment,
- Ask the participants to set up their environment by themselves, or
- The session leader is preparing the environment for the participants to use.
Each effort has its pros and cons like:
- The first approach would be the easiest and the most convenient for the instructor because it’s based on the assumption that everyone is ready for the exercise. However, you never know if every participant has the same configurations as you expect. It really depends on their organisation’s policy. After all, you, as the session leader, will probably suffer from a lot of unexpected circumstances.
- The second one can be convenient for you as the session leader. It might be as tricky as the first approach. Delegating the environment set-up efforts to the participants may make you free, but at the same time, you should provide an instructional document very thoroughly and carefully. Even if you do so, it entirely depends on the participants’ capability. After all, you should start the lab session by confirming the environment set-up anyway.
- The last option goes to you as the session leader. You prepare everything for the participants. They just come, sit and practice. If you do this set-up by hand, it would be awful. You will not want to do that.
Therefore, as a hands-on lab session leader, I’m going to discuss how to automate all the provisioning process and minimise human intervention by running one PowerShell script.
The PowerShell script used in this post is downloadable from this GitHub repository.
One-Liner Script
Let’s say you use the following information for the admin account.
- Tenant Name:
powerplatformhandsonlab
- Tenant URL:
powerplatformhandsonlab.onmicrosoft.com
- Admin E-mail:
admin@powerplatformhandsonlab.onmicrosoft.com
- Admin Password:
Pa$$W0rd!@#$
With this information, how can you set up the lab environment in just one go? Here’s the entire script and you just run the command below.
    ./Set-Environment.ps1 `

        -AdminUsername “admin” `

        -AdminPassword “Pa`$`$W0rd!@#`$” `

        -TenantName “powerplatformhandsonlab”
Wait, what? What’s going on? Here’s the magic. Let’s find them together.
Create Microsoft 365 Tenant
The first step to do as the session leader is to create a Microsoft 365 tenant. Microsoft 365 offers a free trial for 30 days. It includes 25 seats, including the admin account, which is suitable for the lab. Click this link, http://aka.ms/Office365E5Trial, and create the Microsoft 365 E5 plan’s trial tenant.
After filling out the form below, you get the trial tenant!
As you’ve got a new tenant, let’s configure the lab environment in PowerShell. Please note that you HAVE TO use the PowerShell console with the admin privilege.
Provisioning Order
There is no particular order for the environment provisioning. However, I would recommend following this order because there’s incompatibility found between PowerShell modules especially between Power Apps and AzureAD:
- Activate Microsoft Dataverse for Power Platform Default Environment
- Add User Accounts
- Assign Microsoft 365 Roles to Accounts
- Assign Microsoft 365 Licenses to Accounts
- Assign Azure Roles to Accounts
If you do the Microsoft Dataverse initialisation later than Azure AD, you will get an error. I’ll discuss it later how to avoid it.
NOTE: To use any of the PowerShell module mentioned in this post, you need PowerShell v5.1 running on Windows. PowerShell Core (v6 and later) doesn’t support this scenario. For more details about this, refer to this page, Connect to Microsoft 365 with PowerShell.
Install AzureAD Module
You can add a new user account to a Microsoft 365 tenant through the AzureAD module. As of this writing, the latest version of the module is 2.0.2.130. Use the Install-Module cmdlet to install the module. If you append these two parameters, -Force -AllowClobber (line #3), it always installs the newest version regardless it’s already installed or not.
    Install-Module -Name AzureAD `

        -Scope AllUsers -Repository PSGallery `

        -Force -AllowClobber
Log-in to AzureAD as Admin
After installing the module, log into the Azure AD as the tenant admin. For automation, you should stay within the console. Therefore, the following command is more efficient for sign-in.
    $tenantName = “powerplatformhandsonlab”

    $adminUpn = “admin@$tenantName.onmicrosoft.com”

    $adminPW = ConvertTo-SecureString “Pa`$`$W0rd!@#`$” -AsPlainText -Force

    $adminCredential = New-Object `

        -TypeName System.Management.Automation.PSCredential `

        -ArgumentList ($adminUpn, $adminPW)
    $connected = Connect-AzureAD -Credential $adminCredential
Add User Accounts
It’s time to add user accounts. As the trial tenant includes 25 licenses, you can add up to 24 accounts. For more details to add a new user account, refer to this document, Create Microsoft 365 User Accounts with PowerShell. But you just run the following commands. Here are some assumptions:
- Each user has the same password of
UserPa$$W0rd!@#$ for convenience, and it’s not allowed change (line #2-4).
- Each user has the same location where the tenant resides. For now, it’s
KR (line #6).
- You need to create up to 24 accounts, so
ForEach-Object is the go (line #9).
- All user accounts created are added to the
$users array object (line #18).
    $userPWProfile = New-Object -TypeName Microsoft.Open.AzureAD.Model.PasswordProfile

    $userPWProfile.Password = “UserPa`$`$W0rd!@#`$”

    $userPWProfile.EnforceChangePasswordPolicy = $false

    $userPWProfile.ForceChangePasswordNextLogin = $false
    $usageLocation = “KR”
    $users = @()

    (1..24) | ForEach-Object {

        $user = New-AzureADUser `

            -DisplayName $(“PPUser” + $_.ToString(“00”)) -GivenName $(“User” + $_.ToString(“00”)) -SurName “PP” `

            -UserPrincipalName $(“ppuser” + $_.ToString(“00”) + “@$tenantName.onmicrosoft.com”) `

            -UsageLocation $usageLocation `

            -MailNickName $(“ppuser” + $_.ToString(“00”)) `

            -PasswordProfile $userPWProfile `

            -AccountEnabled $true
        $users += $user

    }
Assign Microsoft 365 Roles to User Accounts
The user accounts need to have appropriate Microsoft 365 roles. As it’s the hands-on lab configuration, you can assign the Power Platform admin role to each user account. For more details of the Microsoft roles assignment, refer to this Assign Admin Roles to Microsoft 365 User Accounts with PowerShell page. Run the following command to activate the Power Platform admin role.
    $roleName=”Power Platform Administrator”
    $role = Get-AzureADDirectoryRole | Where-Object { $_.DisplayName -eq $roleName }

    if ($role -eq $null) {

        $roleTemplate = Get-AzureADDirectoryRoleTemplate | Where-Object { $_.DisplayName -eq $roleName }

        $enabled = Enable-AzureADDirectoryRole -RoleTemplateId $roleTemplate.ObjectId
        $role = Get-AzureADDirectoryRole | Where-Object { $_.DisplayName -eq $roleName }

    }
The admin role has now been stored in the $role object. Now, iterate the $users array to assign the role.
    $users | ForEach-Object {

        $assigned = Add-AzureADDirectoryRoleMember `

            -ObjectId $role.ObjectId `

            -RefObjectId $_.ObjectId

    }
Assign License to User Accounts
To use Power Platform within the tenant, each user MUST have a license for it. You can assign the license through the PowerShell command. For more details, visit this Assign Microsoft 365 licenses to user accounts with PowerShell page.
First of all, let’s find out the licenses. As soon as you create the trial tenant, there SHOULD be only one license, whose name is ENTERPRISEPREMIUM.
Get-AzureADSubscribedSku
Then, run the following command to assign the license to all users by iterating the $users array.
    $sku = Get-AzureADSubscribedSku
    $license = New-Object -TypeName Microsoft.Open.AzureAD.Model.AssignedLicense

    $license.SkuId = $sku.SkuId
    $licensesToAssign = New-Object -TypeName Microsoft.Open.AzureAD.Model.AssignedLicenses

    $licensesToAssign.AddLicenses = $license
    $users | ForEach-Object {

        $assigned = Set-AzureADUserLicense -ObjectId $_.ObjectId -AssignedLicenses $licensesToAssign

    }
So far, you’ve completed automating processes to create a trial tenant, create user accounts, and assign roles and licenses.
Activate Microsoft Dataverse for Power Platform Default Environment
Power Platform internally uses Microsoft Dataverse as its database. Microsoft Dataverse is fundamentally essential for other Microsoft 365 services to use. You can also initialise it through PowerShell commands. For more details, visit the Power Apps Cmdlets for Administrators page.
First, you need to install both PowerShell modules, Microsoft.PowerApps.Administration.PowerShell and Microsoft.PowerApps.PowerShell. Like the previous installation process, use the -Force -AllowClobber option to install the modules or reinstall both if they already exist (line #3, 7).
    Install-Module -Name Microsoft.PowerApps.Administration.PowerShell `

        -Scope AllUsers -Repository PSGallery `

        -Force -AllowClobber
    Install-Module -Name Microsoft.PowerApps.PowerShell `

        -Scope AllUsers -Repository PSGallery `

        -Force -AllowClobber
Log into the Power Apps admin environment, using $adminUpn and $adminPW values.
$connected = Add-PowerAppsAccount -Username $adminUpn -Password $adminPW
NOTE: You might not be able to log into the Power Apps admin environment with the following error.

It’s because the internal log-in process for both Microsoft 365 tenant and Power Apps environment are different from each other. If it happens to you, don’t panic. Just open a new PowerShell console with an admin privilege and attempt to log in.
Here are some assumptions for the Microsoft Dataverse initialisation:
- Initialise Microsoft Dataverse on the default environment (line #1),
- Follow the currency settings of the default environment (line #5), and
- Follow the language settings of the default environment (line #10).
    $paenv = Get-AdminPowerAppEnvironment -Default

    if ($paenv.CommonDataServiceDatabaseProvisioningState -ne “Succeeded”) {

        $currency = Get-AdminPowerAppCdsDatabaseCurrencies `

            -LocationName $paenv.Location | Where-Object {

                $_.IsTenantDefaultCurrency -eq $true

            }
        $language = Get-AdminPowerAppCdsDatabaseLanguages `

            -LocationName $paenv.Location | Where-Object {

                $_.IsTenantDefaultLanguage -eq $true

            }
        $activated = New-AdminPowerAppCdsDatabase `

            -EnvironmentName $paenv.EnvironmentName `

            -CurrencyName $currency.CurrencyName `

            -LanguageName $language.LanguageName

    }
Assign Azure Subscription
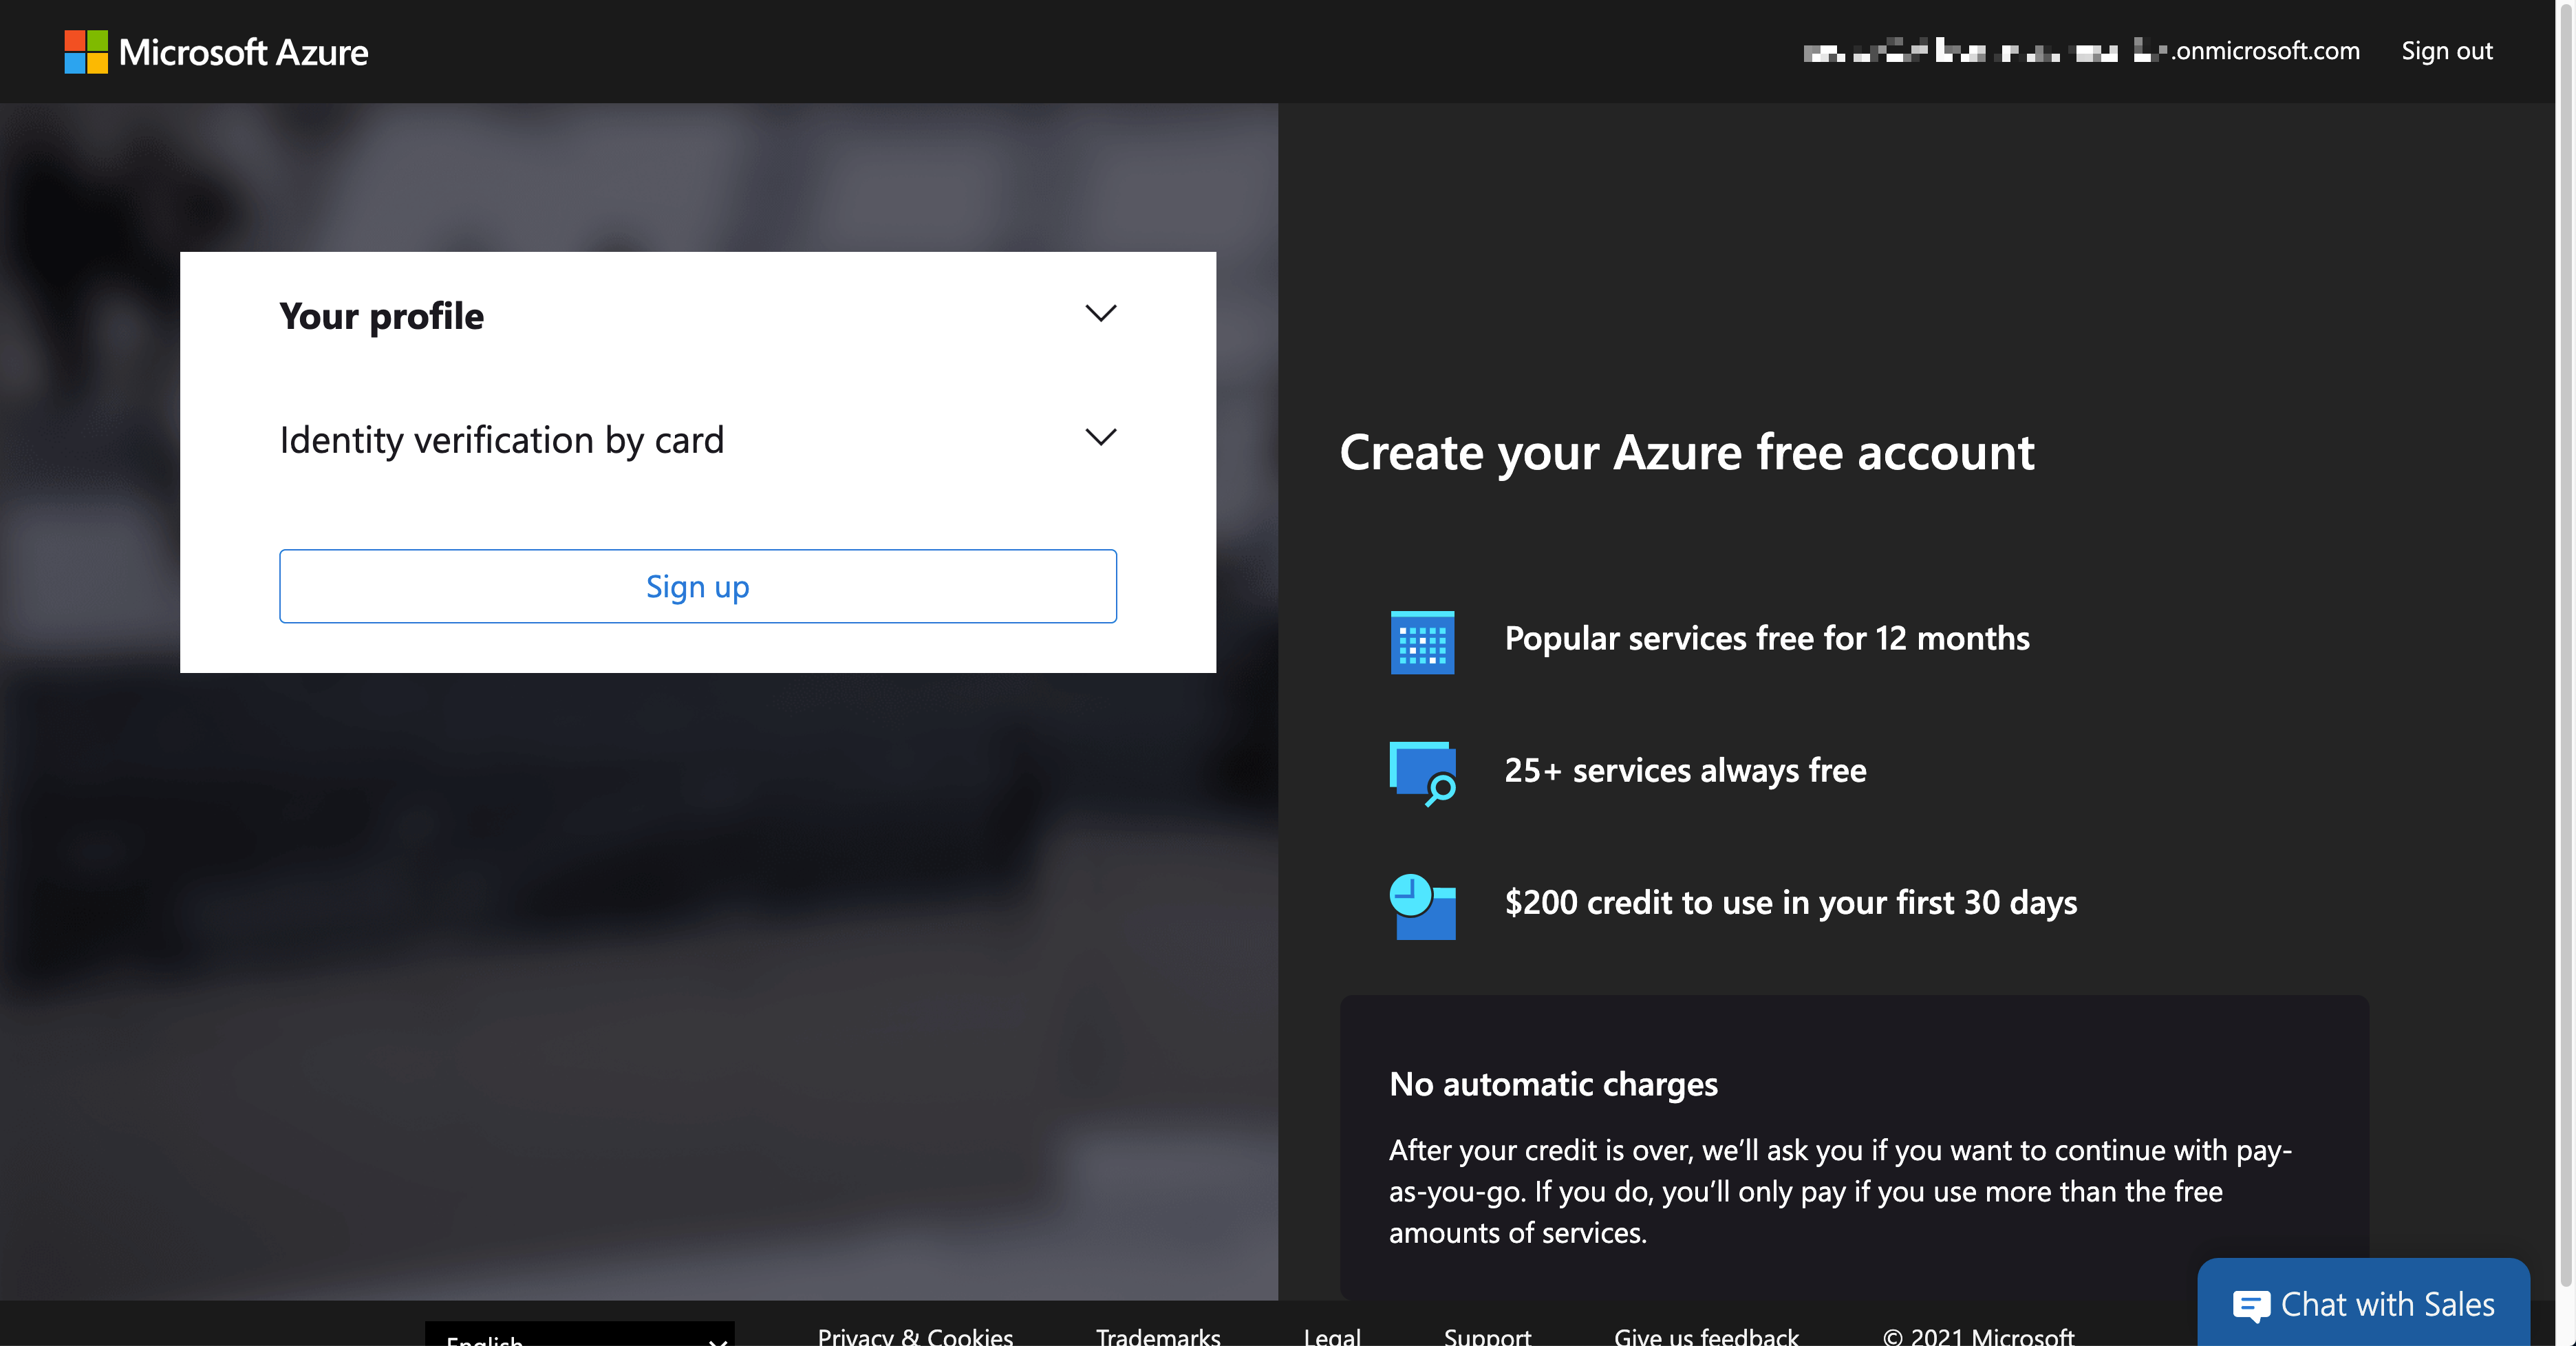
Building custom connectors is inevitable while using Power Platform. In this case, you might need to handle resources on Azure, which requires an Azure subscription. If you create the trial tenant for Microsoft 365, you can also activate the trial Azure subscription. As it requires credit card verification, it MUST be done within Azure Portal. If you log into Azure Portal with your admin account, you can see the following screen.
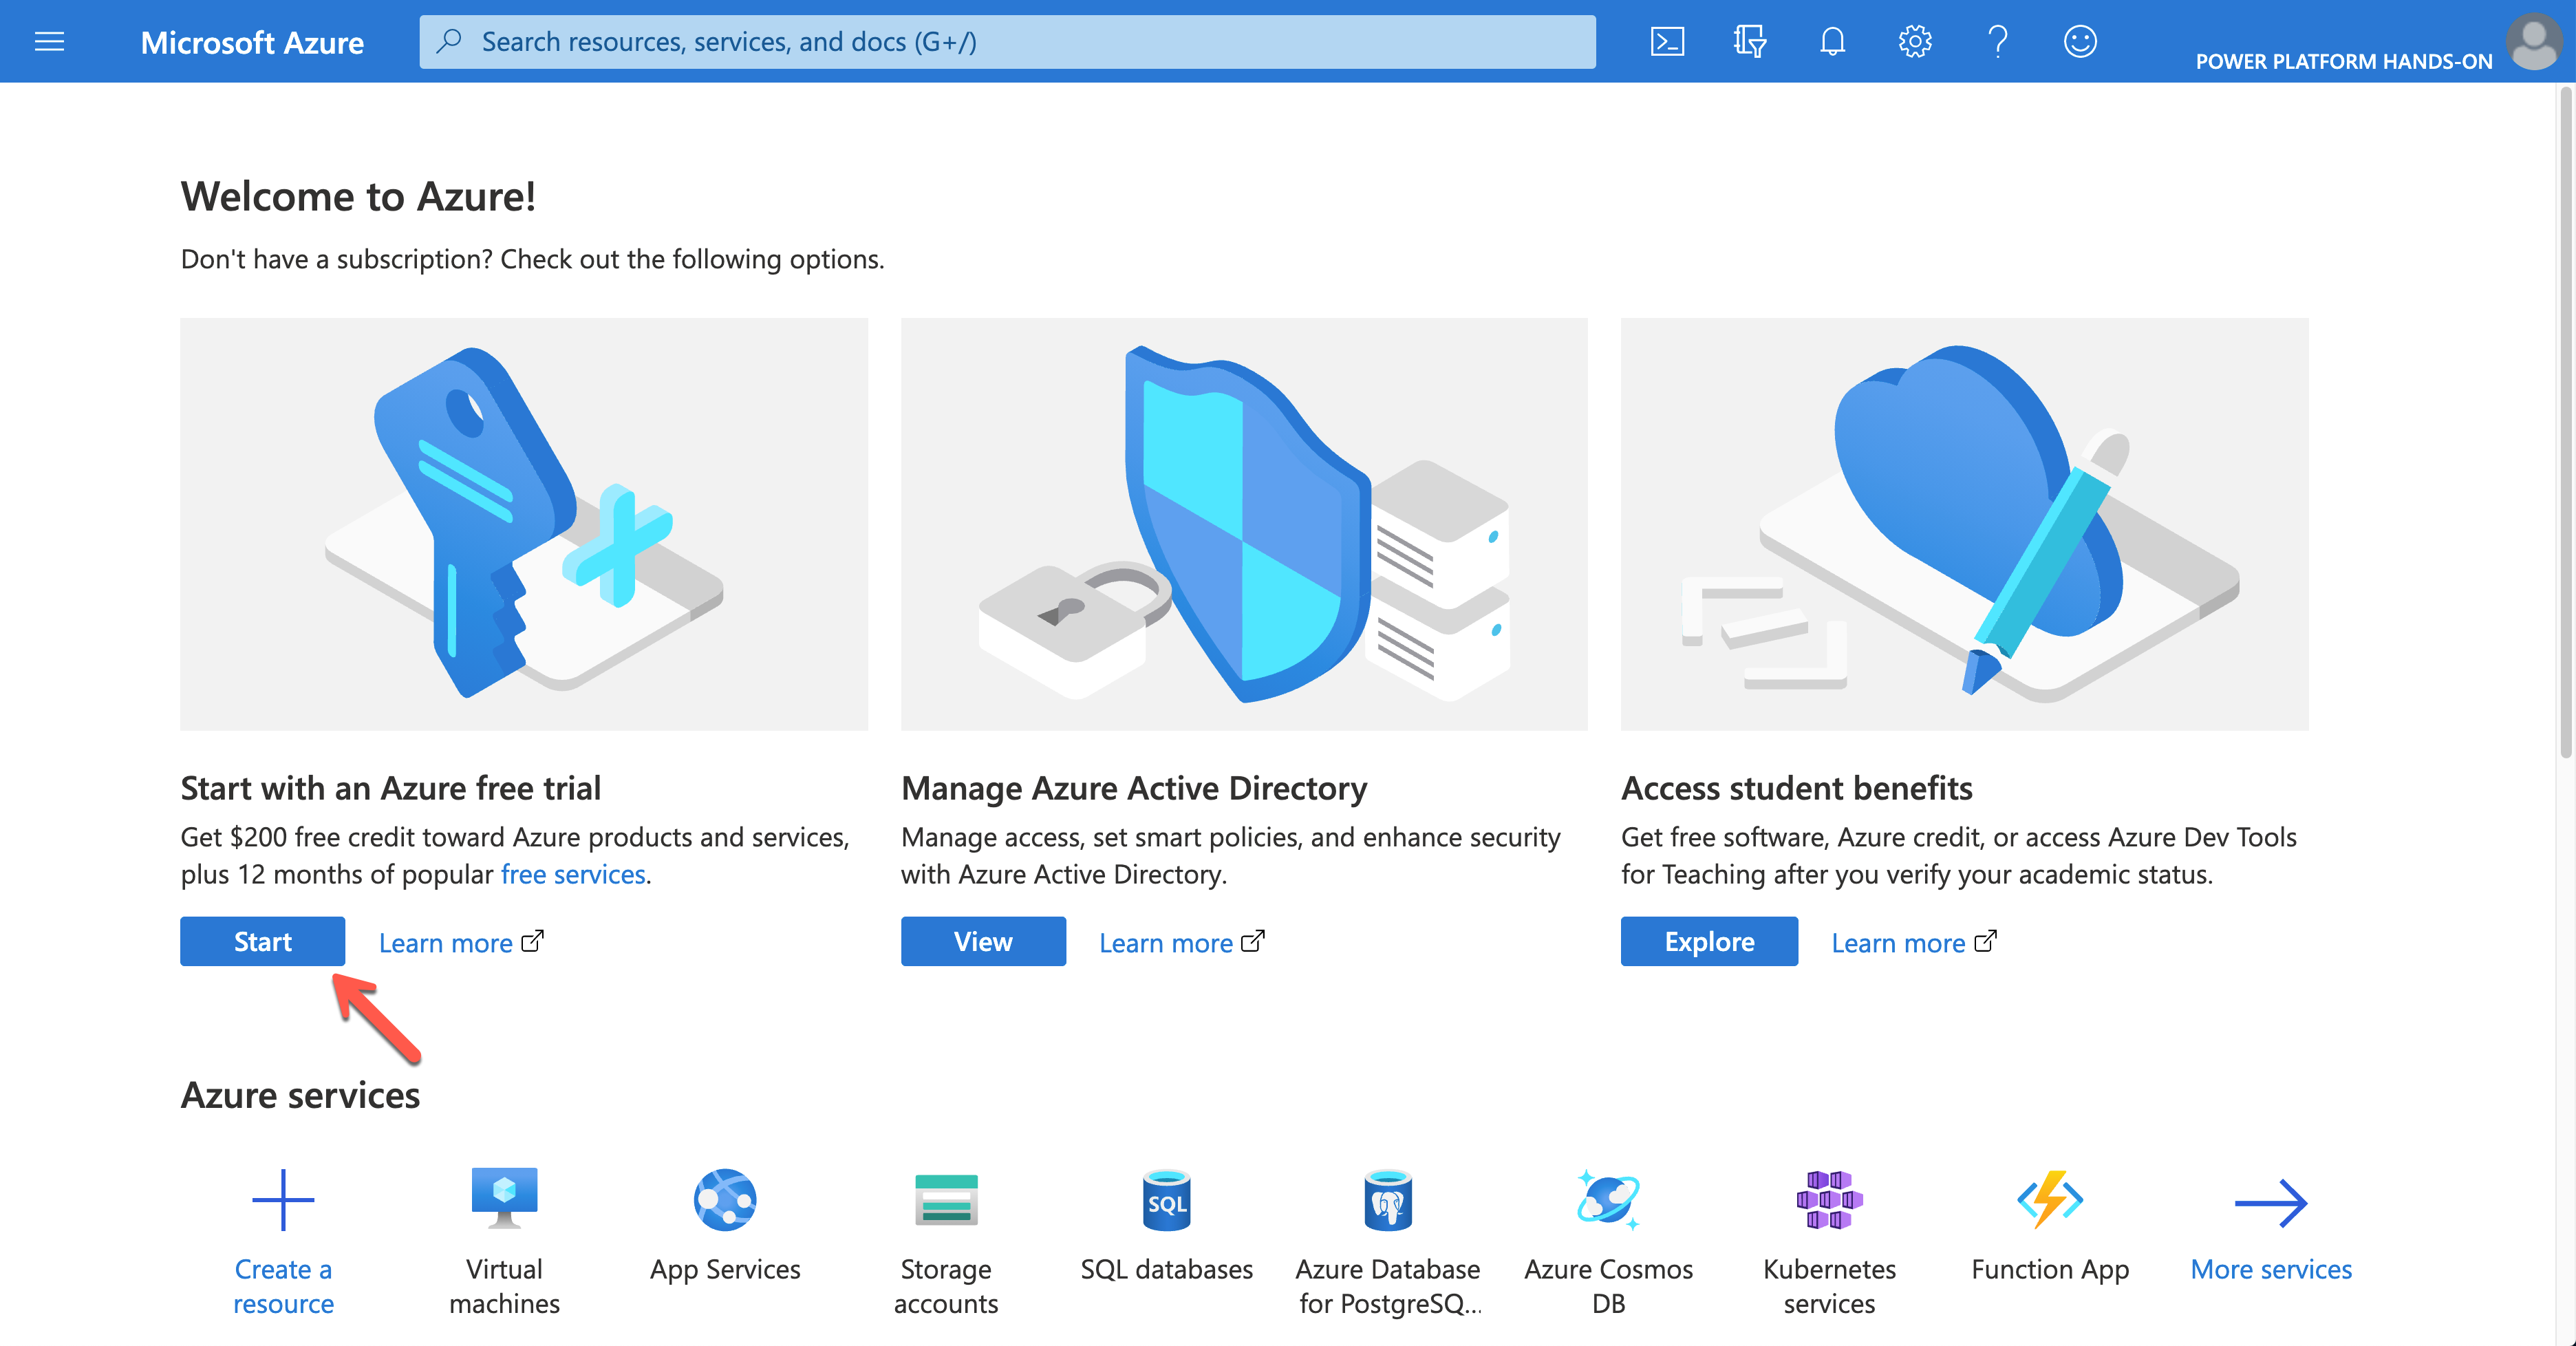
Click the Start button to sign-up for the trial subscription.
Once completing the trial subscription, log in to Azure using the PowerShell command below. The $adminCredential object is the same one used for Azure AD log-in.
$connected = Connect-AzAccount -Credential $adminCredential
NOTE: You SHOULD install the Az module beforehand.
Install-Module -Name Az -Scope AllUsers -Repository PSGallery -Force -AllowClobber
Only a limited number of resources are available in the trial subscription. For custom connectors, mainly Azure Logic Apps, Asture Storage Account, Azure Virtual Network, Azure API Management and Azure Cosmos DB are supposed to use. Therefore, to use those resources, run the following command to register those resource providers.
    $namespaces = @(

        “Microsoft.Logic”,

        “Microsoft.Storage”,

        “Microsoft.Network”,

        “Microsoft.ApiManagement”,

        “Microsoft.DocumentDB”

    )
    $namespaces | ForEach-Object {

        $provider = Get-AzResourceProvider `

            -ProviderNamespace $_ | Where-Object { $_.RegistrationState -eq “Registered” }

        if (($provider -eq $null) -or ($provider.Count -eq 0)) {

            $registered = Register-AzResourceProvider -ProviderNamespace $_

        }

    }
Then, assign the subscription to each user account. For Azure Roles, visit this Assign Azure Roles Using Azure PowerShell page for more details.
NOTE: Instead of scoping the entire subscription to each user account, it’s better to create a resource group for each user, scope to the resource group and assign it to each account. For the resource group, you need a location. In this example, koreacentral is used.
    $role = Get-AzRoleDefinition | Where-Object { $_.Name -eq “Contributor” }

    $location = “koreacentral”
    $users | ForEach-Object {

        $rg = Get-AzResourceGroup | Where-Object {

            $_.ResourceGroupName -eq $(“rg-” + $_.MailNickName)

        }

        if ($rg -eq $null) {

            $rg = New-AzResourceGroup `

                -Name $(“rg-” + $_.MailNickName) `

                -Location $location

        }
        $assigned = New-AzRoleAssignment `

            -ObjectId $_.ObjectId `

            -RoleDefinitionId $role.Id `

            -Scope $rg.ResourceId

    }
All users are now able to access to Azure resources for the exercise.
So far, we’ve walked through how to automatically provision a Power Platform environment for hands-on labs, using PowerShell. Now, if you are going to run a hands-on lab session and need a new environment, simply run the code above. Then, it’s all good to go!
This article was originally published on Dev Kimchi.
by Contributed | Apr 11, 2021 | Technology
This article is contributed. See the original author and article here.
Introduction
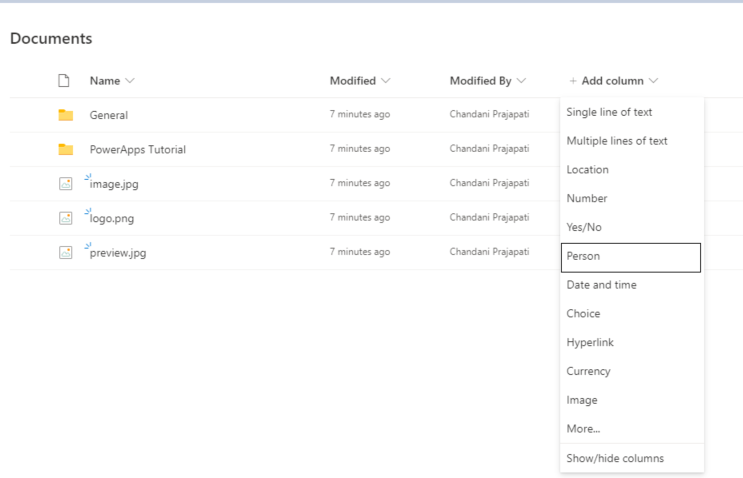
Currently, Microsoft released a new update to the show profile picture of the user column in the SharePoint list/library. So in this article, we will see how to use this feature in our list or library. for more details refer to this.
How to use it?
1. Log in to any SharePoint Modern Site.
2. Move to the modern list/library
3. Create a Person column in List/Library as below,
4. Turn on to show profile photo to see profile URL.

4. Then create a list item and check it in the list/library view.

Summary
In this article, we have seen how to show the profile picture in the person column.
Hope this helps!
Sharing is caring!
by Contributed | Apr 10, 2021 | Technology
This article is contributed. See the original author and article here.
We recently announced the addition of integration of unified data loss prevention with Microsoft Cloud App Security (MCAS), allowing you to extend data protection to non-Microsoft cloud apps. For example, say a user is trying to share a document in a third-party app on his or her mobile device. Because Microsoft Cloud App Security helps protect cloud apps, the same DLP policy will be triggered, both the end-user and the admin will receive a notification, and in this case, the link will be automatically disabled.
Watch our short video to understand how this works and don’t forget to vote for more videos!
https://8gportalvhdsf9v440s15hrt.blob.core.windows.net/videos/Security%20Privacy%20Compliance/EndpointDLPUsecasesUnallowedApps.mp4
aka.ms/mipc/vblogsvote
Thank you!
by Contributed | Apr 9, 2021 | Technology
This article is contributed. See the original author and article here.
Spring is the #1 framework for Java and millions of developers love using it. Spring Boot and Spring Cloud provide a robust platform for developing and operating microservice applications. The challenge many developers face is having to create, configure, and maintain Spring Cloud infrastructure. Setting up scaling, installing and managing multiple components, and wiring up the application to your logging can be complex and take time away from working on your apps.
That is why VMware and Microsoft teamed up to create Azure Spring Cloud – a fully managed service for Spring Boot and .NET Core apps operated by Microsoft. Azure Spring Cloud makes it easy to get your apps to production. Azure Spring Cloud abstracts away the complexity of infrastructure and Spring Cloud middleware management, so you can focus on building your business logic and let Azure take care of dynamic scaling, security patches, compliance standards, and high availability.
With a few clicks, you can provision an Azure Spring Cloud instance. After configuring a couple dependencies in your POM file, your Spring Cloud app is automatically wired up with Spring Cloud Config Server and Service Registry. Furthermore, you can deploy and scale Spring Boot applications in seconds.
Sounds great right? I bet you’re wondering how you can learn more. Microsoft and VMware have you covered with a webinar and workshop series where you can see how easy it is to get up and running with Azure Spring Cloud. It’s free and open to all – just register for using the links below. We’ll see you there!
Rapid Development with Azure Spring Cloud Webinar and Workshop
Webinar date/time: April 15 – 11:00 AM PDT and then available on-demand
Register: Sign-up now
Join Josh Long (Developer Advocate at VMware) and Julien Dubois (Cloud Developer Advocate at Microsoft) as they provide an overview of Azure Spring Cloud and demo some of the topics that will be covered in the hands-on workshop. You’ll see how to:
- Deploy an application using a JAR file or code.
- Scale up and down based on load or schedule using Autoscale.
- Monitor your apps with logs, metrics, and tracing using Application Insights.
- And more! And it can all be done in just a few minutes.
Workshop date and time options:
- April 21 – 11:00 AM PDT | 2:00 PM EDT
- April 28 – 12:00 AM PDT | 8:00 AM BST
- May 5 – 6:00 PM PDT | 9:00 AM SGT
Register: Sign-up today
Join the experts from VMware and Microsoft at this virtual event will give you an introduction to Java and Spring microservice architecture and application development You will:
- Create an Azure Spring Cloud cluster and build Spring Cloud microservices that use Azure Cosmos DB and Azure Database for MySQL.
- Configure a Spring Cloud Config server that is managed by Azure Spring Cloud and set up application logs to easily troubleshoot common issues.
- Put it all together to create a complete microservice stack and learn how to make microservices talk to each other for efficient communication.
- And more!

by Scott Muniz | Apr 9, 2021 | Security
This article was originally posted by the FTC. See the original article here.
 After more than a year of pandemic-related devastating losses — including job losses – you may be one of millions looking to get back on your feet with a new job. This Financial Literacy Month, as always, the FTC wants to help keep you on track with ways to avoid job scams.
Scammers post ads online or in print for a variety of jobs, including work-at-home jobs. They sometimes even pretend to represent well-known companies or the government. But these ads are really just tricks to get your money or personal information. Here’s how to protect yourself:
- Never respond to ads guaranteeing you’ll get a job. Even if your qualifications are ideal, it’s never a sure thing that you’ll get the job.
- Avoid work-at-home ads guaranteeing you’ll make big money. No one can predict how much money you’ll actually make working for yourself.
- Never pay to get a job. Scammers may say they have a job waiting if you just pay a fee for certification, training, equipment, or supplies. But, after you pay, you find out the job is fake — and you won’t get your money back.
- Don’t bank on a “cleared” check. No legitimate company will ever send you a check and then tell you to send on part of that money, or gift cards. It’s a scam: that check is a fake and you’ll lose your money.
- Don’t believe ads for “previously undisclosed” federal government jobs. Information about federal jobs is publicly available at usajobs.gov.
- Research potential employers. Search online for a company’s name, email address, and phone number. If you’ve heard of the company, look on its website, call, or email to find out if the job is real.
- Find legitimate job listings. Try visiting sites like your state’s Career OneStop.
Learn more about spotting and avoiding job scams. And if you experience this or other scams, tell the FTC at ReportFraud.ftc.gov.
Brought to you by Dr. Ware, Microsoft Office 365 Silver Partner, Charleston SC.

by Contributed | Apr 9, 2021 | Dynamics 365, Microsoft 365, Technology
This article is contributed. See the original author and article here.
Dynamics 365 Customer Service 2021 release wave 1 includes enhancements that give admins greater control over knowledge management configuration and help agents access the information they need to resolve customer queries more quickly. This release makes it easier for agents to filter and find the most relevant knowledge articles. Admins can set the knowledge article authoring language at the organizational level, while agents have the flexibility to set their preferred language. Filter knowledge articles and set filter preferences Administrators can configure standard or custom fields for agents to use as filters, allowing agents to narrow down search results to view only the articles they need to resolve a customer issue. Key capabilities of filter configuration allow admins to: Add or delete custom filters for their organization. Set the visibility of the filter values by choosing which values are shown to agents at runtime. Set multiple preselected filter values by defining multiple default values based on which search results are filtered. Activate or deactivate filters to support business scenarios. Configure whether personalization of filter values is enabled or disabled for agents. Agents can set their own preferred search filters. Key capabilities of filter personalization allow agents to: Change the preselected default filter values their administrators set for them. Activate or deactivate filters to support business scenarios. Multiselect filter values to increase their productivity. Configure and personalize language settings for authoring With the April release, admins can set the organization’s default language for authoring new knowledge articles. In addition, authors can override the organization’s authoring language and set their own preferred language for writing new articles if desired. Key capabilities of language configuration for authoring knowledge articles are: Ability for admins to set the default language for authoring knowledge articles to match the language used for the organization’s user interface. Ability for agents to set a language of their choice as their preferred authoring language. Example screenshot for filters Enable the knowledge management feature Enable this feature on the Customer Service Hub > Service Management > Knowledge Base Management > Settings screen. Next steps Read more about knowledge management and other capabilities included in Dynamics 365 Customer Service 2021 release wave 1 or check out the documentation for Dynamics 365 Customer Service
The post Knowledge management enhancements increase agent efficiency appeared first on Microsoft Dynamics 365 Blog.
Brought to you by Dr. Ware, Microsoft Office 365 Silver Partner, Charleston SC.

Recent Comments