by Contributed | Aug 4, 2021 | Technology
This article is contributed. See the original author and article here.
Since we first announced users could save Teams meetings recordings in Microsoft 365, we’ve clocked immense progress – with most users now saving their Teams meetings recordings by default on OneDrive and SharePoint than on Classic Stream. With this switch, users are enjoying many new benefits from meeting recordings being better integrated with Microsoft 365, including: easy share controls and external sharing capabilities, improved video management, advanced compliance and governance, and much more.
In line with the vision for Stream (built on SharePoint), and to bring these increased benefits to all our users, all new Teams meeting recordings will soon be saved to OneDrive and SharePoint – with rollout beginning incrementally from August 16, 2021.
Major updates to transcript coverage and controlling downloads.
Central to the changes we’re making are our users’ needs. Thus, alongside our efforts to transition meeting recordings to Microsoft 365, we’ve been gathering your feedback – resulting in the following product updates and feature accelerations to ensure a more accessible and secure product:
Generating Teams live transcription for all meetings to ensure closed captions are available during playback in Microsoft 365:
- Available today: Teams Live Transcription with speaker attribution has been expanded to all Office and Microsoft 365 license types.
- Rolling out by August: Live transcription will always be generated when a user clicks ‘Start recording’ on desktop client.
- Rolling out by August: Live transcription will be available across all meeting types, including channel meetings and ad-hoc meetings.
- Rolling out by August: Live transcription and live captions will be available for 15 additional spoken languages.
Downloading and editing a transcript file:
- Available today: Users can download the transcript file from the Teams meeting ‘Transcripts’ tab, where users can edit and share the file manually with others.
- Under development: Improvements to the above flow by allowing users to download the transcript file from the video player itself, make changes locally, and upload the file to the player so that the changes are reflected in the closed captions.
- Other immediate options to edit transcripts within the video player: users can download recordings from ODSP and upload to Classic Stream, where a transcript will be generated on-demand and users can edit the transcript within the video itself.
- If you have questions about this or other features, please contact support through your M365 Admin Center or your account manager.
Blocking the downloads of meeting recordings is now available for all users in ODSP:
- Available today: Block downloads for non-channel meeting recordings has been rolled out and turned on by default for all recordings.
- Available today: Block downloads for channel meeting recordings has been rolled out and admins may enable this feature through a new Teams policy setting.
To learn more about these updates, admins can see Message Center post 222640. Microsoft is excited about these updates that will bring higher quality and more accurate transcription to more people and languages than ever before.
What else is happening with Teams meeting recordings stored in Microsoft 365?
The changes above fall within the broader context of the work we’re doing with Stream (on SharePoint). Several other features have begun lighting up for Teams meeting recordings stored in Microsoft 365 including:
- Now available: Auto-recording – Meeting owners can set meetings to automatically start recording.
- Now available: Stream start page – Search and manage meeting recordings from the new Stream start page (stream.office.com)
- Rolling out: Stream video player – Watch recordings from the new Stream web player.
- Under development: Auto-expiration of meeting recordings – learn more about this feature.
To learn more about these, and other upcoming features for Stream (on SharePoint), click here.
In a nutshell, be ready for new experiences with Teams meeting recordings in Microsoft 365.

by Contributed | Aug 3, 2021 | Technology
This article is contributed. See the original author and article here.
Many smart cities are thinking about generating traffic insights using edge AI and video as a sensor. These traffic insights can range from simpler insights such as vehicle counting and traffic pattern distribution over time to more advanced insights such as detecting stalled vehicles and alerting the authorities.
In this blog, I show how I am using an Azure Percept dev kit to build a sample traffic monitoring application using the reference sources and samples in GitHub provided by Microsoft along with the Azure IoT and Percept ecosystem.
I wanted to build a traffic monitoring application that would classify vehicles into cars, trucks, bicycles etc. and count each vehicle category to generate insights such as traffic density and vehicle type distribution over time. I wanted the traffic monitoring AI application to show me the traffic pattern distribution in a dashboard updated in real-time. I also wanted to generate alerts and visualize a short video clip whenever an interesting event occurs (for example number of trucks exceed a threshold value). In addition, a smart city manager would be able to pull up a live video stream when heavy traffic congestion is detected.
Here’s what I needed to get started

Azure Percept ($349 in the Microsoft store): https://www.microsoft.com/store/build/azure-percept/8v2qxmzbz9vc
HOST: NXP iMX8m processor
Vision AI: Intel Movidius Myriad X (MA2085) vision processing unit (VPU)
- Inseego 5G MiFi ® M2000 mobile hotspot (reliable cloud connection for uploading events and videos)

Radio: Qualcomm ® snapdragon ™ x55 modem
Carrier/plan: T-Mobile 5g Magenta plan
https://www.t-mobile.com/tablet/inseego-5g-mifi-m2000
Key Azure Services/Technologies used
Overall setup and description
Step 1: Unbox and setup the Azure Percept
This step takes about 5-10 minutes when all goes well. You can find the setup instructions here https://docs.microsoft.com/azure/azure-percept/quickstart-percept-dk-set-up.
Here are some screenshots that I captured as I went through my Azure Percept device setup process.

Key points to remember during the device setup are to make sure you note down the IP address of the Azure Percept and setup your ssh username and password so you can ssh into the Azure Percept from your host machine.
During the setup, you can create a new Azure IoT Hub instance in the Cloud or you can use an existing Azure IoT hub that you may already have in your Azure subscription.
Step 2: Ensure good cloud connectivity (uplink/downlink speed for events, videos and live streaming)
The traffic monitoring AI application I am building is intended for outdoor environments where wired connections are not always feasible or available. Video connectivity is necessary for live streaming or uploading video clips when network connectivity is available. For this demo, the Azure Percept device will be connecting to the cloud using a 5G device to upload events and video clips. Make sure that the video uplink speeds over 5G are good enough for video clip uploads as well as live streaming. Here is a screenshot of the speed test for the Inseego 5G MiFi ® M2000 mobile hotspot from T-Mobile that I am using for my setup.

Step 3: Reference architecture
Here is a high-level architecture diagram of a traffic monitoring application built with Azure Percept and Azure services. For this project, I used the Azure Percept dev kit with the single USB-connected camera (as opposed to external IP cameras) and Azure Video Analyzer.

Step 4: Build Azure eye module docker container for ARM 64
You will want to make a few customizations to the Azure Eye Module C++ source code tailored to your traffic monitoring application (for example, you can make customizations to only send vehicle detection events to IoT hub or you can build your own custom parser class for custom vehicle detection models). For this project, I am using the SSD parser class with the default SSD object detection model in the Azure Eye Module.
To build a customized Azure Eye Module, first download the Azure Eye Module reference source code from GitHub. On your host machine, clone the following repo:
git clone https://github.com/microsoft/azure-percept-advanced-development.git
On your host machine, open a command shell and use the following command to build the Azure Eye Module docker container. Note that you will need docker desktop running prior to running this command (I am using a Windows host):
docker buildx build --platform linux/arm64 --tag azureeyemodule-xc -f Dockerfile.arm64v8 --load
Once docker image is built, tag it and push it to your ACR.
Step 5: Build Objectcounter docker container for arm64
Download the Object Counter reference source code from github. On your host machine, clone the following repo:
git clone https://github.com/Azure-Samples/live-video-analytics-iot-edge-python
Navigate to the folder live-video-analytics-iot-edge-pythonsrcedgemodulesobjectCounter
Build the docker container and push it to your ACR:
docker build  -f docker/Dockerfile.arm64 –no-cache .  -t objectcounter:0.0.1-arm64v8
docker login  -u <your_acr_name>  -p <your_acr_password>  <your_acr_name>.azurecr.io
docker push <your_acr_name>.azurecr.io/objectcounter:0.0.1-arm64v8
I made several source code changes to main.py in the objectCounter module to customize my own objectCounter docker container. For example, I only send a video event trigger to the signal gate processor (to capture video recording of a few seconds around an event) when a certain vehicle category exceeds a threshold count. I also made customizations so that object counter can understand inference events from SSD (in-built detection engine that comes with AzureEye Module) or a custom YOLOv3 model that is external to the AzureEye module (You can read about how to run an external YOLOv3 model in my previous blog post here
https://techcommunity.microsoft.com/t5/internet-of-things/set-up-your-own-end-to-end-package-delivery-monitoring-ai/ba-p/2323165)
Step 6: Azure Video Analyzer For Edge Devices
To be able to save video recordings around interesting event detections, you will need the Azure Video Analyzer module.
You may choose to build your own custom AVA docker container from here:
https://github.com/Azure/video-analyzer.git
You can read more about the AVA and how to deploy it to an edge device here
https://docs.microsoft.com/en-us/azure/azure-video-analyzer/video-analyzer-docs/deploy-iot-edge-device
Step 7: Configure message routes between the Azure IoT edge modules
The different modules (Azure Percept Module, ObjectCounter Module and AVA Module) interact with each other through MQTT messages.
Summary of the routes:
- Azure Percept module sends the inference detection events to IoT hub which is configured to further route the messages either to blob storage or a database (for dashboards and analytics in the cloud).
- Azure Percept module sends the detection events to objectCounter module that implements business logic (such as object counts and aggregations which are used to trigger video recordings via the AVA module)
- ObjectCounter module sends the aggregations and triggers to IoT hub which is configured to further route the messages either to blob storage or a database (for dashboards and analytics in the cloud).
- ObjectCounter module sends the event triggers to AVA so that AVA can start recording event clips
Here are a couple of screenshots to show how to route messages from IoT Hub to an endpoint:


Here is a sample inference detection event that IoT hub receives from the Azure Percept Module
Body":{
  "timestamp": 145831293577504,
  "inferences": [
    {
      "type": "entity",
      "entity": {
        "tag": {
          "value": "person",
          "confidence": 0.62337005
        },
        "box": {
          "l": 0.38108632,
          "t": 0.4768717,
          "w": 0.19651619,
          "h": 0.30027097
        }
      }
    }
  ]
Step 8: Set up the graph topology for AVA
There are multiple ways to build your own custom graph topology based on the use cases and application requirements. Here is how I configured the graph topology for my sample traffic monitoring AI application.
 "sources": [
        {
          "@type": "#Microsoft.Media.MediaGraphRtspSource",
          "name": "rtspSource",
          "endpoint": {
            "@type": "#Microsoft.Media.MediaGraphUnsecuredEndpoint",
            "url": "${rtspUrl}",
            "credentials": {
              "@type": "#Microsoft.Media.MediaGraphUsernamePasswordCredentials",
              "username": "${rtspUserName}",
              "password": "${rtspPassword}"
            }
          }
        },
        {
          "@type": "#Microsoft.Media.MediaGraphIoTHubMessageSource",
          "name": "iotMessageSource",
          "hubInputName": "${hubSourceInput}"
        }
      ],
      "processors": [
        {
          "@type": "#Microsoft.Media.MediaGraphSignalGateProcessor",
          "name": "signalGateProcessor",
          "inputs": [
            {
              "nodeName": "iotMessageSource"
            },
            {
              "nodeName": "rtspSource"
            }
          ],
          "activationEvaluationWindow": "PT3S",
          "activationSignalOffset": "-PT1S",
          "minimumActivationTime": "PT3S",
          "maximumActivationTime": "PT4S"
        }
      ],
      "sinks": [
        {
          "@type": "#Microsoft.Media.MediaGraphFileSink",
          "name": "fileSink",
          "inputs": [
            {
              "nodeName": "signalGateProcessor",
              "outputSelectors": [
                {
                  "property": "mediaType",
                  "operator": "is",
                  "value": "video"
                }
              ]
            }
          ],
          "fileNamePattern": "MP4-StreetViewAssetFromEVR-AVAEdge-${System.DateTime}",
          "maximumSizeMiB":"512",
          "baseDirectoryPath":"/var/media"
        }
      ]
    }
  }
If you are using a pre-recorded input video file (.mkv or .mp4) instead of live frames from the USB-connected camera module, then update the rtspUrl to grab frames via the RTSPsim module:
"name": "rtspUrl",
"value": "rtsp://rtspsim:554/media/inv.mkv"
I use the following RTSPSim container module provided by Microsoft to stream a pre-recorded video file:
mcr.microsoft.com/lva-utilities/rtspsim-live555:1.2
If you are using live frames from the USB-connected camera, then grab the live rtsp stream from Azure Percept Module:
"name": "rtspUrl",
"value": "rtsp://AzurePerceptModule:8554/h264"
Here is a brief explanation of the media graph topology that I use:
- There are two source nodes in the graph.
- First source node is the RTSP source (the RTSP source can either serve live video frames from the Percept camera module or pre-recorded video frames served via the RTSPsim)
- Second source node is the IoT message source (this is the output of the Object Counter Trigger)
- There is one Processor node which is the signal gate processor. This node takes the IoT message source and RTSP source as inputs and based on the object counter trigger, the signal gate requests the AVA module to create a 5 second video recording of the detected event (-PT1S to +PT4S)
- There is one Sink node, which is the fileSink. This could also be an AMS asset sink. However, currently, AMS asset sink has a limitation of minimum 30 seconds video clip duration. Hence, I used a fileSink to save a 5 second clip and then used an external thread to upload the locally saved .mp4 files to Azure blob storage. Note that for on-demand live streaming, I use Azure AMS.
You can learn more about Azure Media Graphs here:
https://docs.microsoft.com/azure/media-services/live-video-analytics-edge/media-graph-concept
You can learn more about how to configure signal gates for event based video recording here:
https://docs.microsoft.com/azure/media-services/live-video-analytics-edge/configure-signal-gate-how-to
Step 9: Dashboard to view events, videos and insights
You can use any web app (e.g. react.js based) and create APIs to build a traffic monitoring dashboard that shows real-time detections and video recordings from Azure IoT hub and Azure blob storage. Here is an example of a dashboard:

Here are some examples of what the Azure Percept detected for a few live and pre-recorded videos:


In conclusion, in just a few days, I was able to set up a quick Proof of Concept of a sample traffic monitoring AI application using Azure Percept, Azure services and Inseego 5G MiFi ® M2000 mobile hotspot!
Learn more about the Azure Percept at https://azure.microsoft.com/services/azure-percept/
Note: The views and opinions expressed in this article are those of the author and do not necessarily reflect an official position of Inseego Corp.

by Contributed | Aug 2, 2021 | Technology
This article is contributed. See the original author and article here.
Healthcare organizations need to provide more avenues of care for patients but scheduling and managing virtual visit appointments can be a time-consuming and tedious task for frontline healthcare workers.
The good news: It just got easier. Microsoft Bookings is now part of our Microsoft 365 for frontline workers offer. Bookings is available as an app in Microsoft Teams so frontline healthcare workers can schedule, manage, and conduct virtual appointments right from Teams—where they’re already working.
That means your frontline teams can save time with a simple, yet powerful tool that eases the hassle of scheduling and is integrated into their workflows. They can have a single hub with the tools they need for streamlining both care team collaboration and virtual health.
That can help your healthcare organization:
- Quickly and efficiently increase patient access to care with virtual visits.
- Improve patient outcomes by simplifying collaboration across care teams.
- Reduce costs and optimize resources by simplifying fragmented workflows.
See how frontline healthcare workers can streamline care team collaboration and virtual visits with Microsoft Teams in this video.
Seamless virtual health experiences for your frontline and your patients
With Bookings available as an app in Teams, your frontline can create calendars, assign staff, schedule new appointments, and conduct virtual visits and provider consults without ever leaving Teams.

Bookings can help reduce and automate repetitive scheduling tasks for frontline care teams. They can view multiple clinicians’ Outlook calendars to find an open slot to schedule a virtual visit. Customized confirmation and reminder emails and texts with a link to join can be automatically sent to patients. And when it’s time for their virtual visit, patients can easily join from a mobile device without needing to install an app.
In other words, you can enable seamless virtual health experiences for both your frontline and your patients.
Plus, you can earn and keep your patients’ trust with a virtual health platform that can help support your protection of patient data and compliance with healthcare regulations. For example, with Microsoft Teams, a Business Associate Agreement is put in place by default for customer organizations that are considered covered entities or business associates under HIPAA. Learn more about that in our recent whitepaper.
Virtual visits made easy and cost-effective
Our healthcare customers such as St. Luke’s Hospital and Lakeridge Health have enhanced patient care with virtual visits using the Bookings app in Teams and Microsoft 365. Now with Bookings included in Microsoft 365 for frontline workers, we’ve made it even easier and more cost-effective for healthcare organizations of all sizes to enable seamless virtual health.
Get started with Microsoft 365 for frontline workers.
A virtual health platform with many options to meet your needs
In addition to our Microsoft 365 for frontline workers offering, Teams and Microsoft 365 provide many options to help you meet your healthcare organization’s specific virtual health needs. You can expand virtual visit capabilities by connecting Teams to your electronic health record system, customizing experiences in your own apps, integrating into the Microsoft Cloud for Healthcare, and more. Learn more on our Microsoft Teams and healthcare page and Microsoft 365 and healthcare page. You can also get help finding the right fit for your healthcare organization with our virtual visit selection tool.
by Contributed | Jul 31, 2021 | Technology
This article is contributed. See the original author and article here.
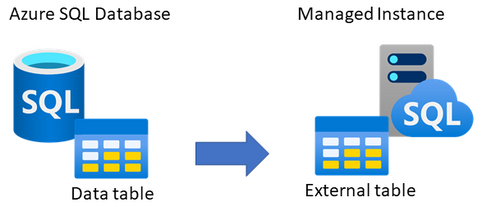
Looking for an online way to consume data from Azure SQL Database on Managed Instance?
One of the ways to consume data online from Azure SQL Database on Managed Instance is to link the two by creating an external table, using CREATE EXTERNAL DATA SOURCE (Transact-SQL). The external table is created on Managed Instance, which with appropriate credentials can be used to query data from a matching table on SQL Database.
This type of setup could be useful to applications that need to consume both Managed Instance and SQL Database data, or perhaps for an online migration of data from SQL Database to Managed Instance. This article explains how to set this up.
Networking requirements
As the first step, there has to exist connectivity between Azure SQL Database and Managed Instance. The easiest option is to configure public endpoint on SQL Database and an allow inbound traffic on port 1433 from Managed Instance. This will allow Managed Instance to log in and query data from SQL Database. Alternatively, if you would like to use the private endpoint for SQL Database, the easiest option would be to deploy its private endpoint in the same VNet as Managed Instance. In this case as well, please do not forget to allow inbound traffic to SQL Database on port 1433 from Managed Instance subnet. Please note that detailed instructions on setting up the networking is beyond the scope of this article.
You’d need to have either of these options setup as the networking requirement:
- Option 1 – public endpoint connection
- Ensure that public endpoint access is working on SQL Database using a database client (such is SSMS)
- If needed, open NSG rule on SQL Database side to allow 1433 the inbound traffic
- Option 2 – private endpoint connection
- Create an additional subnet in Managed Instance VNet
- Deploy SQL Database private endpoint to the new subnet created inside Managed Instance VNet (see this tutorial for details)
In case that you perhaps have a VM inside the same VNet as Managed Instance, you can use it to test the connectivity to SQL Database. For example, use SSMS from a VM inside the Managed Instance VNet to connect to SQL Database. If this works, then Managed Instance will be able to successfully connect to SQL Database to read data.
Prepare table to use Azure SQL Database
As the first step, decide which table on SQL Database would you like to expose to Managed Instance. This could be an existing table, or you could perhaps create a new table.
The sample code below creates a new table AzureDBtable on an existing SQL Database, and inserts the current time stamp. Hopefully, we’d be able to read off this time stamp from Managed Instance.
-- Execute on Azure SQL Database
-- Create table and insert some sample data
CREATE TABLE AzureDBtable (TimeTable datetime2)
INSERT INTO AzureDBtable values (getutcdate())
SELECT @@servername AS [Server name], * FROM AzureDBtable
Using SSMS, the below shows the table created on SQL Database.

For the purpose of this article, we have inserted the following time stamp to the table on SQL Database.

Create authentication credentials on Managed Instance
Create authentication credentials for SQL Database on Managed Instance. This will allow Managed Instance to log onto SQL Database and query data. Use an existing database on Managed Instance for which you need to create a master key first. Then, create login credentials for SQL Database in the context of this database.
Provided below is a sample script which you’ll need to modify with the name of your database, new master key password, and credentials to login to SQL Database.
-- Execute on Managed Instance
-- Create auth credentials to SQL DB for a database on Managed Instance

-- Use an existing database on Managed Instance
USE [databasename-on-mi];
-- Create master key for database on Managed Instance
CREATE MASTER KEY ENCRYPTION BY PASSWORD='password';
-- enter credetials to login to Azure SQL Database
CREATE DATABASE SCOPED CREDENTIAL AppCredential WITH IDENTITY = 'username', SECRET = 'password';
Create external data source on Managed Instance
The next step is to create an external data source on Managed Instance. This will allow Managed Instance to know to which SQL Database to connect to. Modify the sample script below to include the name of database on Managed Instance, the connection URL (FQDN) to connect to SQL Database server, and also include SQL Database name. Think of it as providing connection parameters to Managed Instance on how to connect to SQL Database. You would use similar parameters is if you were connecting to SQL Database from another client, such is for example SSMS.
-- Execute on Managed Instance, in the context of the database used
-- Create external table on Managed Instance, link it with Azure SQL Database
CREATE EXTERNAL DATA SOURCE RemoteReferenceData
WITH
(
TYPE=RDBMS,
LOCATION='tcp:server-name.database.windows.net', -- insert SQL Database server FQDN
DATABASE_NAME='sqldb-databasename', -- insert SQL Database name
CREDENTIAL= AppCredential
);
Create external table on Managed Instance
The final step is to create an external table on database on Managed Instance, which will be linked with the table on SQL Database. The below script is an example connecting to the “AzureDBtable” created as the first step of this article, as a show case. In this step, it is very important that the data type(s) you define for the external table match the same data types defined for the source table on SQL Database. If data types perhaps do not match, there will be an error in querying data. This also means that if the external table structure on SQL Database changes, you will need to re-create external table on Managed Instance matching this new structure.
-- Execute on Managed Instance, in the context of the database used
-- Connect external table on Managed Instance with Azure SQL Database
CREATE EXTERNAL TABLE AzureDBtable
(TimeTable datetime2) -- must ensure data structure matches the one on SQL Database
WITH
(
DATA_SOURCE = RemoteReferenceData
);
Screenshot below shows that through SSMS we can see that an external table, connected to SQL Database, has been successfully created on Managed Instance.

Test querying data from SQL Database on Managed Instance
As in the first step we have inserted a time stamp on Azure SQL Database, after creating an external table on Managed Instance, let’s see if we can query it. Execute this query on Managed Instance.
-- Execute on Managed Instance, in the context of the database used
-- Read data from the external table on Managed Instance. This should pull the table data from Azure SQL Database
SELECT @@servername AS [Server name], * FROM AzureDBtable
The result shows that the server where this query was executed was on Managed Instance, and that the time stamp matches the same time stamp inserted into the table on SQL Database. This shows that with external data source were were able to query data from SQL Database on Managed Instance online and in-real time.

Closing remarks
Using external table on Managed Instance will allow you to read from, but not insert data into SQL Database. It is also possible to setup the external table the other way around — an external table on SQL Database that can be used to read data from a table on Managed Instance. See this article for details.
If you find this article useful, please like it on this page and share through social media.
To share this article, you can use the Share button below, or this short link: http://aka.ms/mi-sqldb-externaltable

by Contributed | Jul 31, 2021 | Technology
This article is contributed. See the original author and article here.
Applying network security groups (NSG) to filter traffic to and from resources, improves your network security posture. However, there can still be some cases in which the actual traffic flowing through the NSG is a subset of the NSG rules defined. Adaptive network hardening provides recommendations to further harden the NSG rules. It uses a machine learning algorithm that factors in actual traffic, known trusted configuration, threat intelligence, and other indicators of compromise, and then provides recommendations to allow traffic only from specific IP/port tuples.
For example, let’s say the existing NSG rule is to allow traffic from 100.xx.xx.10/24 on port 8081. Based on traffic analysis, adaptive network hardening might recommend narrowing the range to allow traffic from 100.xx.xx.10/29 and deny all other traffic to that port.
Adaptive network hardening recommendations are only supported on the following specific ports (for both UDP and TCP): 13, 17, 19, 22, 23, 53, 69, 81, 111, 119, 123, 135, 137, 138, 139, 161, 162, 389, 445, 512, 514, 593, 636, 873, 1433, 1434, 1900, 2049, 2301, 2323, 2381, 3268, 3306, 3389, 4333, 5353, 5432, 5555, 5800, 5900, 5900, 5985, 5986, 6379, 6379, 7000, 7001, 7199, 8081, 8089, 8545, 9042, 9160, 9300, 11211, 16379, 26379, 27017, 37215
Pre-Requisite:
– Az Modules must be installed
– Service principal created as part of Step 1 must be having contributor access to all subscriptions
Steps to follow:
Step 1: Create a service principal
Post creation of service principal, please retrieve below values.
- Tenant Id
- Client Secret
- Client Id
Step 2: Create a PowerShell function which will be used in generating authorization token
function Get-apiHeader{
[CmdletBinding()]
Param
(
 [Parameter(Mandatory=$true)]
 [System.String]
 [ValidateNotNullOrEmpty()]
 $TENANTID,
 [Parameter(Mandatory=$true)]
 [System.String]
 [ValidateNotNullOrEmpty()]
 $ClientId,
 [Parameter(Mandatory=$true)]
 [System.String]
 [ValidateNotNullOrEmpty()]
 $PasswordClient,
 [Parameter(Mandatory=$true)]
 [System.String]
 [ValidateNotNullOrEmpty()]
 $resource
)
$tokenresult=Invoke-RestMethod -Uri https://login.microsoftonline.com/$TENANTID/oauth2/token?api-version=1.0 -Method Post -Body @{"grant_type" = "client_credentials"; "resource" = "https://$resource/"; "client_id" = "$ClientId"; "client_secret" = "$PasswordClient" }
$token=$tokenresult.access_token
$Header=@{
  'Authorization'="Bearer $token"
  'Host'="$resource"
  'Content-Type'='application/json'
  }
return $Header
}
Step 3: Invoke API to retrieve authorization token using function created in above step
Note: Replace $TenantId, $ClientId and $ClientSecret with value captured in step 1
$AzureApiheaders = Get-apiHeader -TENANTID $TenantId -ClientId $ClientId -PasswordClient $ClientSecret -resource "management.azure.com"
Step 4: Extracting csv file containing list of all adaptive network hardening suggestion from Azure Resource Graph
Please refer: https://github.com/MicrosoftDocs/azure-docs/blob/master/articles/governance/resource-graph/first-que…
Azure Resource graph explorer: https://docs.microsoft.com/en-us/azure/governance/resource-graph/overview
Query:
securityresources
        | where type == "microsoft.security/assessments"
        | extend source = tostring(properties.resourceDetails.Source)
        | extend resourceId =
            trim(" ", tolower(tostring(case(source =~ "azure", properties.resourceDetails.Id,
                                            source =~ "aws", properties.resourceDetails.AzureResourceId,
                                            source =~ "gcp", properties.resourceDetails.AzureResourceId,
                                            extract("^(.+)/providers/Microsoft.Security/assessments/.+$",1,id)))))
        | extend status = trim(" ", tostring(properties.status.code))
        | extend cause = trim(" ", tostring(properties.status.cause))
        | extend assessmentKey = tostring(name)
        | where assessmentKey == "f9f0eed0-f143-47bf-b856-671ea2eeed62"
Click on “Download as CSV” and store at location where adaptive network hardening script is present. Rename the file as “adaptivehardeningextract“
Set-Location $PSScriptRoot
$RootFolder = Split-Path $MyInvocation.MyCommand.Path
$ParameterCSVPath =$RootFolder + "adaptivehardeningextract.csv"
if(Test-Path -Path $ParameterCSVPath)
  {
  $TableData = Import-Csv $ParameterCSVPath
  }

foreach($Data in $TableData)
{
  $resourceid=$Data.resourceid
  $resourceURL="https://management.azure.com$resourceid/providers/Microsoft.Security/adaptiveNetworkHardenings/default?api-version=2020-01-01"
  $resourcedetails=(Invoke-RestMethod  -Uri $resourceURL -Headers $AzureApiheaders -Method GET)
  $resourceDetailjson = $resourcedetails.properties.rules | ConvertTo-Json
  $nsg = $resourcedetails.properties.effectiveNetworkSecurityGroups.networksecuritygroups | ConvertTo-Json
  if($resourceDetailjson -ne $null)
  {
    $body=@"
    {
      "rules": [$resourceDetailjson] ,
      "networkSecurityGroups": [$nsg]
    }
    "@
    $enforceresourceURL = "https://management.azure.com$resourceid/providers/Microsoft.Security/adaptiveNetworkHardenings/default/enforce?api-version=2020-01-01"
    $Enforcedetails=(Invoke-RestMethod  -Uri $enforceresourceURL -Headers $AzureApiheaders -Method POST -Body $body)
  }
}

Recent Comments