by Scott Muniz | Jul 22, 2020 | Alerts, Microsoft, Technology, Uncategorized
This article is contributed. See the original author and article here.
This month we released a bi-weekly YouTube show dedicated to Azure Security Center. The guest for the first episode was Tal Rosler, from our Azure Security Center Engineering Team. Check it out the first episode where Tal talks about Threat Protection in Azure Security Center, including the new Alert Suppression feature:
The second episode, released today was about Secure Score and our guest was Miri Peer Landau. Make sure to watch this episode and see some updates in the Secure Score, including the new Secure Score PowerBI dashboard:
Make sure to subscribe to the new Microsoft Security Channel, and follow the show at https://aka.ms/ascinthefield
by Scott Muniz | Jul 22, 2020 | Alerts, Microsoft, Technology, Uncategorized
This article is contributed. See the original author and article here.
INTRODUCTION
While using Azure DevOps Continuous Integration and Continuous Delivery (CICD) pipelines, most of the documentation and articles show how to use Office 365 Command Line Interface (CLI) to upload, add and deploy the SPFx packages. It’s because Office 365 CLI is a cross-platform command line tool and thus you get the benefit of using either a Windows or a Linux machine as your build agent. To login with Office 365 CLI using username and password:
login --authType password --userName user@contoso.com --password pass@word1
There are ways to secure the password in Azure DevOps using variables or Azure Key Vault. However, enterprise organizations who are still not comfortable to use passwords and looking for other like certificates.
With this blog post I highlight two aspects:
- How to setup Office 365 CLI with Azure AD App and Certificate based authentication and
- How to login using O365 CLI and certificates in Azure DevOps YAML pipelines
You can find the documentation on how to use certificate to login using Office 365 CLI. This article goes into detailed steps complementing the documentation. I will also touch upon some issues that I faced while setting this up.
Note: Another advantage that you get from following these steps will be the ability to define fine grained permissions limited for the required for use case (Example: deploy to SPO app catalog).
CERTIFICATE GENERATION
- Create self-signed certificate of type Personal Information Exchange (PFX) or Privacy Enhanced Mail (PEM)
- For windows, install openssl client. I used: http://slproweb.com/products/Win32OpenSSL.html
Instructions are assuming openssl client is extracted to c:OpenSSL folder.
NOTE: After trying couple of openssl clients, I had success with this ssl client. I hope that saves some time for you in researching which client works. If you WSL enabled/configured, then this is a non-issue.
- Navigate to the OpenSSL bin directory.
- c:OpenSSLbin in our example.
- Right-click the openssl.exe file and select Run as administrator.
- Enter the following command to begin generating a certificate and private key
openssl req -x509 -sha256 -nodes -days 365 -newkey rsa:2048 -keyout privateKey.key -out certificate.cer
- You will then be prompted to enter applicable Distinguished Name (DN) information, totaling seven fields:
- Once completed, you will find the certificate.crt and privateKey.key files created under the OpenSSLbin directory.
- Create a new Personal Information Exchange (.PFX) file using the certificate and private key as inputs from above step.
openssl pkcs12 -export -out protected.pfx -inkey privateKey.key -in certificate.cer -password pass:pass@word1
NOTE: I’d would like to highlight and note that I spent many hours troubleshooting an issue related to this command. If you use double quotes for the password string as documented (Example: openssl pkcs12 -export -out protected.pfx -inkey privateKey.key -in certificate.cer -password pass:”pass@word1″ ), the quotes are also considered to be part of the password.
- At this point the protected.pfx file can be used to log in the Office 365 CLI. We will come back to this step later.
Artifacts from this section:
- Certificate.cer
- privateKey.key
- protected.pfx
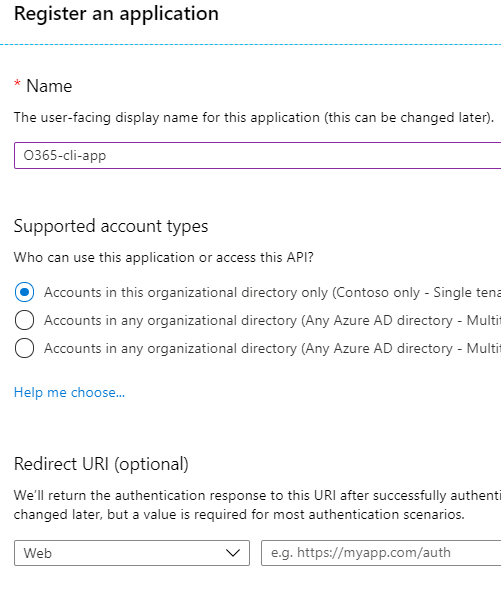
AZURE AD APPLICATION REGISTRATION
- Creating AAD app is well documented in many articles, so I sparsely documented it here. Also, please check out Garry Tinder’s post which goes into details on how to create AAD app to log in using Office 365 CLI.
- Create new Azure AD App with a valid name. Leave all other fields/options as-is.

- Save the app id and tenant id.

- Give below “application” permissions to the app

NOTE: Microsoft Graph permission is not a prerequisite. Ignore it.
- Make sure the Admin Consent is provided for all the permissions.
- Go to “Certificates & Secrets” and choose “Upload certificate” to upload the certificate.cer file created in step 7 in first section.

NOTE: Instead of upload certificate, it’s also possible to manually update the manifest file.
- Save the thumbprint to use later.
Artifacts from this section:
- App Id
- Tenant ID
- Thumbprint
TEST LOCALLY
- Before we can use these artifacts in Azure DevOps pipeline, lets test locally to ensure the certificate is usable with Office 365 CLI login. We need to make the AAD App ID and the Tenant ID available to Office 365 CLI using environment variables. If you are looking to script this or looking for steps to do in other operating systems, I’d refer to Garry Tinder’s blog post.
- Add below environment variables on your PC.
- OFFICE365CLI_AADAPPID = App Id
- OFFICE365CLI_TENANT = Tenant ID

- Test your certificate by trying to login using O365 CLI in terminal window (PS or Command Win)
login --authType certificate --certificateFile C:OpenSSL-Win64binprotected.pfx --thumbprint 5D500FE3BTRUNCATED563173009BC --password pass@word1
Note: Change the certificateFile, thumbprint, password as per your environment
- Run some sample commands. Example:
- Status
- Spo app list

USE CERTIFICATE IN AZURE DEVOPS PIPELINE
- In this section, we will configure Azure DevOps repository so that the pipelines can use the certificate when logging with Office 365 CLI. Here is a demo repository on GitHub that contains two files:
- SPFX Package file (sppkg file)
- This is a sample SPFx application customizer extension that adds Azure Application Insights to SPO sites. Note: It can be any other SPFx package file.
- Azure-pipelines.yml
- YAML pipeline that uses the certificate to login using Office 365 CLI. This pipeline takes the SPFx package, uploads, deploys to SharePoint Online App Catalog site.
- First, we need to upload the certificate to the repository. Open your Azure DevOps (ADO) project. Go to Pipelines > Library page.
- Select “Secure files” tab. Use the + Secure file button to upload the pfx file.

- Below you can see the sample entries (script tasks) that you can use in your YAML pipelines to access the certificate from the secure files store.
- script: echo Building!

    - task: DownloadSecureFile@1

      name: caCertificate

      displayName: 'Download CA certificate'

      inputs:

        secureFile: 'protected.pfx'

    - script: |

        echo Found cert at $(caCertificate.secureFilePath)

 ##

    ## login to Office 365 CLI

 ##

    - script: o365 login $(o365_app_catalog_site_url) --authType certificate --certificateFile $(caCertificate.secureFilePath) --thumbprint $(cert_thumbprint) --password pass@word1

      displayName: Login to Office365
- When the pipeline executes the first time, you will see a prompt to approve the usage of the certificate. See below screenshot:


SAMPLE PIPELINE
Below you can see the Azure pipeline in full. You can access this pipeline on GitHub here.
trigger:
  branches:
    include:
      - '*'

variables:
  OFFICE365CLI_AADAPPID: '80fdc955-8677-4251-8d49-050d02071c15'
  OFFICE365CLI_TENANT: '216e190d-67e4-4a6e-98bd-15b8468e5928'
  o365_app_catalog_site_url: 'https://YOURTENANT.sharepoint.com/sites/APPCATALOGSITENAME'
  o365cli_app_catalog_scope: 'tenant'
  node_version: '10.x'
  cert_thumbprint: '5D500FE3B7543FCC61D4DCFD0C164563173009BC'
  spfx-pkg: 'azure-app-insights.sppkg'

pool:
  vmImage: ubuntu-latest

stages:
- stage: Build
  jobs:
  - job: BuildJob
    steps:
    - script: echo Building!
    - task: DownloadSecureFile@1
      name: caCertificate
      displayName: 'Download CA certificate'
      inputs:
        secureFile: 'protected.pfx'
    - script: |
        echo Found cert at $(caCertificate.secureFilePath)
    ##
    ## specify which node version to use
    ##
    - task: UseNode@1
      displayName: Set to Node.js $(node_version)
      inputs:
        version: $(node_version)
      condition: ne('$(node_version)', '')

    ##
    ## install Office 365 CLI
    ##
    - script: sudo npm install --global @pnp/office365-cli
      displayName: Install Office365 CLI

    ##
    ## login to Office 365 CLI
    ##
    - script: o365 login $(o365_app_catalog_site_url) --authType certificate --certificateFile $(caCertificate.secureFilePath) --thumbprint $(cert_thumbprint) --password pass@word1
      displayName: Login to Office365

    ##
    ## upload *.sppkg to the target app catalog
    ##
    - script: o365 spo app add --filePath $(spfx_pkg) --appCatalogUrl $(o365_app_catalog_site_url) --scope tenant --overwrite
      displayName: Upload SharePoint package to Site Collection App Catalog

    ##
    ##deploy the package
    ##
    - script: o365 spo app deploy --name $(spfx_pkg) --appCatalogUrl $(o365_app_catalog_site_url) --scope tenant
      displayName: Deploy SharePoint package
Thanks for reading. I hope this helps you out.
Disclaimer
The sample scripts are not supported under any Microsoft standard support program or service. The sample scripts are provided AS IS without warranty of any kind. Microsoft further disclaims all implied warranties including, without limitation, any implied warranties of merchantability or of fitness for a particular purpose. The entire risk arising out of the use or performance of the sample scripts and documentation remains with you. In no event shall Microsoft, its authors, or anyone else involved in the creation, production, or delivery of the scripts be liable for any damages whatsoever (including, without limitation, damages for loss of business profits, business interruption, loss of business information, or other pecuniary loss) arising out of the use of or inability to use the sample scripts or documentation, even if Microsoft has been advised of the possibility of such damages.
by Scott Muniz | Jul 22, 2020 | Uncategorized
This article is contributed. See the original author and article here.
A single compromised user or malicious insider can compromise an entire organization – which is why we’re always looking for the best way to protect identity environments.
Since its release in 2015, Microsoft Advanced Threat Analytics (ATA) has protected organizations from identity-based attacks in on-premises environments, receiving multiple updates that introduced new functionality and improvements to existing features.
As the nature and requirements of security changed, so did the frequency and severity of cyber-attacks. We saw a dramatic increase in the sophistication and velocity of attacks and realized that the current IT security tools provided were limited in the protection they could offer to on-premises environments.
To help customers combat these attacks, in March 2018 we introduced Azure Advanced Threat Protection (Azure ATP), which shifted to a lightweight sensor connected to cloud service model. This allows us to rapidly update detections and provide customers with an easier deployment path.
We are now reaching the end of mainstream support for ATA and are guiding our customers to shift to Azure ATP as their on-premises identity threat protection solution.
Our commitment to security means we will continue to provide critical security updates affecting ATA, with Extended Support continuing until January 2026. Mainstream support ends on January 12, 2021. The final update in mainstream support will be ATA v1.9.3. We will communicate further details about this release in the coming weeks.
To help you get started, we have compiled some information and resources:
• Preventing threats – Assess your security posture through full visibility into on-premises Active Directory configuration, users, and service accounts that could become compromised due to security misconfigurations or failure to follow best practices. Identity Security Posture assessments powered by Azure ATP alert you to known bad practices within your environment, like dormant accounts within sensitive groups or risky lateral movement paths. This proactivity ensures you are remediating potentially harmful configurations before they become an additional attack vector.
• Detecting threats – Detect on-premises, advanced attacks in real time, leveraging unique approaches to Network Traffic Analytics & User and Entity Behavior Analytics, as well as entity enrichments such as device name resolution, event log inspection, and Event Tracing for Windows events. Azure ATP detections can identify attackers’ activities through the kill chain — starting with network and user mapping (reconnaissance) and continuing with attempts to compromise identities and move laterally inside the organization to gain domain dominance. Potential threats are grouped together using cloud-powered analytics.
• Investigating threats – Review alerts and user activities to understand the attack methods and potential damage. Additionally, you can hunt through user activities and define custom alerts based on user events. And, with Azure ATP’s Investigation Priority Score, you can pinpoint the riskiest users to investigate, based on their alerts and suspicious activities.
• Remediating threats – Azure ATP’s integration with other products in Microsoft’s security portfolio helps you mitigate the impact of compromised users by raising a user’s AAD User Risk level and enforcing organizational risk policies such as blocking access—or allowing access, but requiring a password change using Azure AD self-service password reset.
We also know that the real test of any security solution is real-world results. Recently we submitted Azure ATP for MITRE ATT&CK APT 29 evaluation. MITRE evaluates cybersecurity products using an open methodology based on the ATT&CK knowledge base. The latest evaluation centered around a nation-state threat actor Advanced Persistent Threat (APT) 29. Azure ATP detected account compromise at the domain level, lateral movement, and the more sophisticated pass-the-ticket (Golden Ticket) attack. Check out this blog for more details on how Azure ATP performed in the evaluation.
Acknowledgement from independent experts like MITRE is a great milestone for Azure ATP, but we also have large customers who rely on it to help protect their environments. Ansell, a global personal protective equipment leader, made the move from ATA to Azure ATP and is pleased with their new, enhanced capabilities:
George Michalitsianos, Senior Director of IT Security and Infrastructure at Ansell, states “We valued Advanced Threat Analytics for the ability to recognize and even help proactively stop an attack, and now that we have the same capability in Azure ATP, we’re in an even better position. We can use new features and capabilities as soon as they’re delivered.”
Find out more about Ansell’s cloud security journey here.
So what do we recommend you do right now? The best way to experience all that Azure ATP has to offer is to try it for yourself. Resources to assist in migrating can be found here. And, for personalized help with the transition, contact us at atahelp@microsoft.com.
by Scott Muniz | Jul 22, 2020 | Uncategorized
This article is contributed. See the original author and article here.
Planning, implementing, and managing an onboarding experience for new employees is time consuming and challenging. For organizations, its difficult to efficiently onboard new employees into the complexity of an organization’s structure, people, processes, and culture. Only 12% of employees strongly agree their organization does a great job of onboarding new employees.[1] For new employees, the onboarding experience is often exciting, but can also be stressful, overwhelming, and inconsistent. Based on research, new employees who have a negative onboarding experience are twice as likely to look for new opportunities within the first six months of starting their new job. [2]
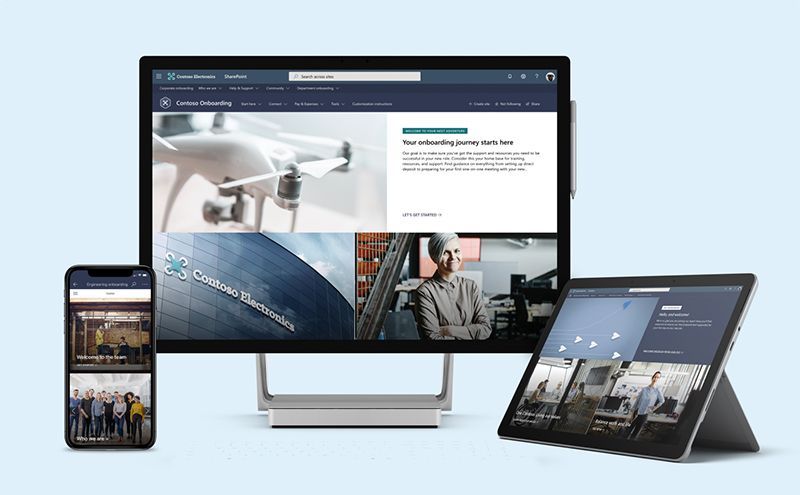
To help our customers improve their new hire onboarding experience, we have launched a new set of SharePoint site templates on the SharePoint look book called the New Employee Onboarding (NEO) hub.

The NEO hub helps organizations:
- Provide new employees resources, support, and general information
- Connect new employees to people, community, and culture
- Help stakeholders easily contribute to new employee onboarding

An engaging and well-organized NEO process can make all the difference in helping a new hire navigate through an exciting – but stressful – career journey, and it can have major organizational benefits:
- Improve new hire performance and time to productivity – Organizations with a standard onboarding process report 50% greater new-hire productivity.[3]
- Improve new employee retention – 69% of employees are more likely to stay with a company for three years if they had a great onboarding experience.[4]
[1] Gallup, State of the American Workplace, 2017
[2] Gallup, State of the American Workplace, 2017
[3] SHRM, Don’t Underestimate the Importance of Good Onboarding, 2017
[4] SHRM, Don’t Underestimate the Importance of Good Onboarding, 2017
NEO hub
New employee onboarding involves creating an end-to-end experience for new employees that begins before their first day on the job. Research has shown pre-onboarding new hires (after they sign their acceptance letter but before they officially join the company) can lead to higher performance and better retention rates. New employee onboarding also involves providing support on multiple levels within an organization, like corporate and departmental onboarding. Each onboarding level provides its own unique value, contributing to a comprehensive onboarding experience that each new employee will benefit from. To deliver a consistent and integrated new hire onboarding experience the NEO hub consists of three types of SharePoint site templates, designed to work as one cohesive and familiar experience for new hires:

What’s included
To help accelerate your implementation of a new employee onboarding hub in your tenant the following highlights just some of the features included:
- A fully configured and customizable set of new hire sites built on SharePoint communication sites: The NEO hub brings together the sites, information architecture, design, user interface and webparts to help provide new hires with a great onboarding experience. The NEO hub can be customized to add your organization’s new hire content and to align with its look and feel.
- Onboarding checklist: Onboarding can be an overwhelming experience for new hires with everything the new hire is typically expected to do and learn. Avoid overwhelming your new employees by providing them a curated onboarding journey that paces the new hire through a configurable activity list of onboarding to-do’s.
- Sample new hire site pages: To inspire and provide design templates for arranging your content, the NEO hub includes sample inner site pages. Use these site pages as templates for your content.
- Mobile ready: The NEO hub can be easily accessed on mobile devices so your new hires can continue their onboarding from wherever they may be working.
Learn more about the NEO hub. Provision the NEO hub to your tenant today and customize it to help your new hires onboard successfully.
FAQ:
Question: What are the requirements for installing the New Employee Onboarding (NEO) Hub into my tenant environment?
Answer:
- SharePoint Online and Communication Sites enabled.
- The individual that will be provisioning CLO365 must be the admin of the target tenant for install.
Question: How long will it take to install the site in our tenant environment?
Answer: Based on our testing of the installation, it should take less than 20 minutes. This does not include time required to customize the site to your requirements.
by Scott Muniz | Jul 22, 2020 | Uncategorized
This article is contributed. See the original author and article here.
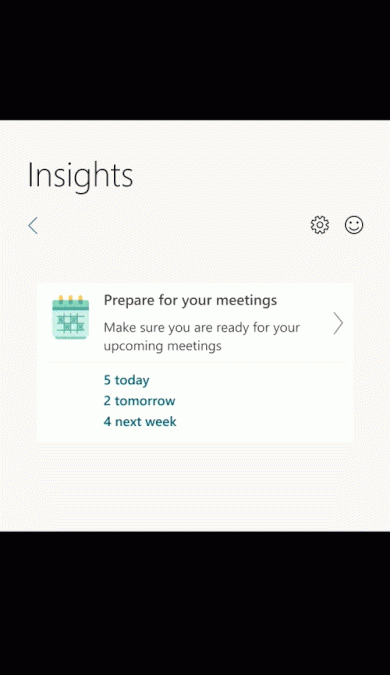
Last year, we launched a meeting preparation insight in the Insights Outlook Add-in to help organizers prepare for meetings they have set up. Based on customer feedback, we have added insights for meetings you are invited to as well as added additional features for you as a meeting organizer.
Here is a list of new experiences you can now use
- Prepare for invited meetings: In addition to meetings you organize, you will also see insights for meetings you’ve been invited to.
- Assist in establishing quorum: Review conflicts for your upcoming meetings and respond to a meeting request inline, helping the organizer get an accurate count for the meeting.
- essential information before the meeting: Get pre-read recommendations for upcoming meetings as well as suggested tasks related to the meeting and review all explicitly attached documents.

As always, you can use this insight to book preparation time before the meeting, review attendees, and check for the presence of an online meeting link. For more information, read Prepare for your meetings
by Scott Muniz | Jul 22, 2020 | Alerts, Microsoft, Technology, Uncategorized
This article is contributed. See the original author and article here.
Final Update: Wednesday, 22 July 2020 18:22 UTC
We’ve confirmed that all systems are back to normal with no customer impact as of M/D, HH:MM UTC. Our logs show the incident started on M/D, HH:MM UTC and that during the <duration of incident> hours that it took to resolve the issue X% of customers experienced <impact statement & metrics>.
- Root Cause: The failure was due to <provide a transparent failure statement but don’t mention specific technologies>.
- Lessons Learned: <if there is chance of re-occurrence talk to the specifics on how we’ll resolve and plan to monitor & respond while risk is active><Talk to the learning that we pulled out of this incident and will apply to avoid these failure types in the future>
- Incident Timeline: X Hours & X minutes – M/D, HH:MM UTC through M/D, HH:MM UTC
We understand that customers rely on Application Insights as a critical service and apologize for any impact this incident caused.
-Sindhu
Initial Update: Wednesday, 22 July 2020 18:21 UTC
We are aware of issues within Application Insights and are actively investigating. Some customers may experience Data Gaps.
- Work Around: <none or details>
- Next Update: Before 07/22 21:30 UTC
We are working hard to resolve this issue and apologize for any inconvenience.
-Sindhu
Update: Wednesday, 22 July 2020 18:21 UTC
We continue to investigate issues within Application Insights. Root cause is not fully understood at this time. Some customers continue to experience <impact statement from a user perspective>. We are working to establish the start time for the issue, initial findings indicate that the problem began at <MM/DD ~HH:MM UTC>. We currently have no estimate for resolution.
- Work Around: <none or details>
- Next Update: Before 07/22 21:30 UTC
-Sindhu

by Scott Muniz | Jul 22, 2020 | Uncategorized
This article is contributed. See the original author and article here.
As more people start using Apple’s iPad as one of their go-to computing devices, the Excel team is working to deliver a great experience on the Excel iPad app. One of the first steps towards this goal is to introduce new keyboard shortcuts to provide users a great authoring experience while using hardware keyboards.
These new keyboard shortcuts will bring the authoring experience on iPad closer to macOS, across different areas such as navigation, editing formulas, and format and edit data.
We will be introducing new shortcuts across multiple iterations over the next few months, starting with 13 new shortcuts in the July release . Here is a list of the new shortcuts – for the complete list please check Keyboard Shortcuts in Excel.
|
Action
|
Shortcut
|
|
Move to the next sheet in the workbook
|
Option + Right Arrow
|
|
Move to the previous sheet in the workbook
|
Option + Left Arrow
|
|
Apply outline border
|
+ Option + 0 |
|
Remove outline borders
|
 + Option + Hyphen + Option + Hyphen |
|
Hide Column(s)
|
 + 0 + 0 |
|
Unhide Column(s)
|
Shift + Control+ Left parenthesis ())
Or
Shift +  + Left parenthesis ()) + Left parenthesis ())
|
|
Hide Row(s)
|
Control + 9
|
|
Unhide Row(s)
|
Shift + Control+ Right parenthesis ())
|
|
Toggle the formula reference style between absolute, relative, and mixed
|
 + T + T
Or
 + 4 + 4
|
|
Insert the AutoSum formula
|
Shift + + T + T
|
|
Calculate open workbook
|
 + = + = |
We will add more shortcuts in the coming months as we continue to focus on providing users a great experience while using Excel on the iPad. To start using these shortcuts, from the App Store.
by Scott Muniz | Jul 22, 2020 | Uncategorized
This article is contributed. See the original author and article here.
Microsoft Surface Hub is an all-in-one digital whiteboard, meetings platform, and collaborative computing device powered by Windows 10. We are excited to share that the latest version of the Surface Hub operating system, Windows 10 Team 2020 Update, is now available for preview through the Windows Insider Program.
This Windows Insider Preview release delivers the latest Windows 10 features, including major improvements to device deployment and manageability, and will be available for First-generation Surface Hub 55″ and for Surface Hub 2S 50″. The First-generation Surface Hub 84″ will be supported in the final release of Windows 10 Team 2020 Update.
What’s new in Windows 10 Team 2020 Update
Improvements for Azure Active Directory Joined devices
This update addresses top customer requests, starting with full support for organizations using Azure Active Directory (Azure AD) to manage their Surface Hub devices:
- Single Sign-On (SSO) for Azure AD joined devices:
When users sign in with their Microsoft 365 credentials to “My meetings and files”, their user credentials flow seamlessly from app to app – including Microsoft 365 experiences in the browser.
- Conditional Access (CA) for Azure AD joined devices:
IT admins can deploy device-level security policies to their Azure AD joined Surface Hub to control access to organizational resources in accordance with corporate security and compliance requirements.
- Support for non-global-admins for Azure AD joined devices:
Customers can choose a more granular set of admins within their admin hierarchy to manage Surface Hub. For more information, see Admin group management.
Improvements for device deployment and manageability
We also added features to help customers configure and manage their Surface Hub devices:
- Modern authentication for cloud device accounts: Surface Hub supports Exchange Web Services (EWS) and Active Directory Authentication Library (ADAL) based authentication to connect to Exchange, allowing customers to deprecate the use of Basic authentication. For details, see Modern authentication on Surface Hub.
- Over 20 new and updated mobile device management (MDM) policies: These policies give IT admins improved control over app updates from the Microsoft Store, wireless projection settings such as Miracast over infrastructure, network settings such as Quality-Of-Service and 802.1x wired authentication, and new privacy/GDPR related settings. For more information, see Manage Surface Hub 2S with Intune.
Improvements for meeting and collaborating on Surface Hub
Finally, this update introduces significant improvements to help end-users meet and collaborate on a Surface Hub device:
Support for the new Microsoft Edge:
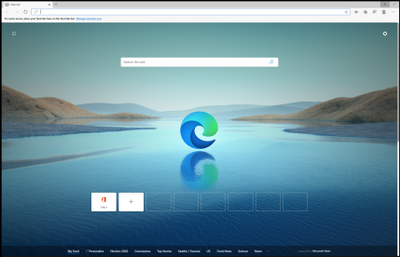
Customers can install the new Microsoft Edge, which has been rebuilt from the ground up to bring you world-class compatibility and performance, the security and privacy you deserve, and new features designed to bring you the best of the web. For details on installing the new Microsoft Edge, see Install and configure the new Microsoft Edge on Surface Hub.
 New Microsoft Edge Browser on Surface Hub
- Deploy Microsoft Teams faster: Microsoft Teams is included as the default Meetings, calling and collaboration app on new Surface Hub devices which can be changed or configured via MDM or directly on Surface Hub using the Settings app. For more information, see Deploy Microsoft Teams.
- Support for Proximity Join with Microsoft Teams:
Proximity Join enables users to take scheduled Microsoft Teams calls on a nearby Surface Hub using their laptop/phone, or seamlessly transition an in-progress meeting to a nearby Surface Hub. Windows 10 Team 2020 Update adds Mobile Device Management (MDM) support to configure Proximity Join, and the feature will be subsequently released as a Microsoft Teams update through Microsoft Store.
- Support for Coordinated Meetings with Microsoft Teams:
In meeting rooms that feature a Surface Hub and a Microsoft Teams Room device, or spaces with two Surface Hub devices, Coordinated Meetings enable users to easily leverage both devices during a Microsoft Teams meeting. With a single tap, users can join a meeting from either device and maximize screen real estate by showing video feeds on one device, and a digital whiteboard or content on the other. Windows 10 Team 2020 Update adds Mobile Device Management (MDM) support to configure Coordinated Meetings, and the feature will be subsequently released as a Microsoft Teams update through Microsoft Store.
- Passwordless sign-in using FIDO2 security keys: Using FIDO2 security keys, customers can quickly and easily sign into Surface Hub without having to type in usernames and passwords. Combined with Single Sign-On (SSO), this feature provides fast and seamless authentication to files, apps, and websites during a meeting. For more information, see Configure passwordless sign-in on Surface Hub.
- Improvements to passwordless sign-in using Microsoft Authenticator: For organizations that use Azure AD, users can use the Microsoft Authenticator app to sign in without having to type in usernames and passwords. Additionally, users can sign-in using their preferred email aliases in Azure AD in addition to their User Principal Name (UPN). For more information, see Sign in to Surface Hub with Microsoft Authenticator.
- Dual-pen inking on Surface Hub 2S: Users can whiteboard and collaborate side-by-side on Surface Hub 2S using two Surface Hub 2 Pens. The firmware updates required to enable dual-pen inking will be released with a subsequent update.
Preview the Windows 10 Team 2020 Update today
To download the update, simply enroll your Surface Hub device to the Windows Insider Program. For additional information, see Install Windows 10 Team 2020 Update Preview Build.
We invite you to send us your insights and suggestions through Microsoft Service & Support (CSS) or Microsoft Premier. For known issues, see Known issues: Windows 10 Team 2020 Update Preview Build.
by Scott Muniz | Jul 22, 2020 | Uncategorized
This article is contributed. See the original author and article here.
Hi there, Gonzalo again here. We have many customers that contact us with the same request: When Teams it is installed, profile disk rapidly grows around 4 to 5 GB in size, but the data contained there is just about a few MBs. This issue it is only observed when you are using the default disk type (Dynamic).
I would like to clarify something before moving forward: This is not bug in Teams nor FSLogix. As any software, during setup, Teams will write temporary data that will be deleted when setup completes, and the good news is that there is a way to avoid this. After some research conducted by our product group, they shared with us a way to avoid this situation by adding an exclusion to the redirections.xml file. You will need to add the following exclusion:
<Exclude Copy=”0″>AppDataRoamingMicrosoftTeamsService Worker</Exclude>
Please note that this will be beneficial to you if you add this line before installing Teams. If you already installed Teams and you want to remove all those empty blocks from the profile disk, please review the options described in this other blog.
You can get more information about the use of redirections by looking at our official documentation and more in depth in the following technical article.
by Scott Muniz | Jul 22, 2020 | Alerts, Microsoft, Technology, Uncategorized
This article is contributed. See the original author and article here.
Here are the updates to the Azure portal this month:
Compute>Linux
Storage>Storage Account
All categories
Intune
Let’s look at each of these updates in greater detail.
Compute>Linux
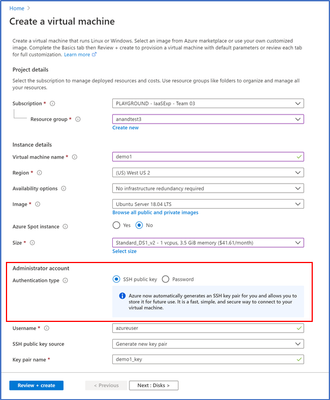
Simplification of the Linux + SSH Experience
In the VM create experience, SSH key is now the default authentication method instead of passwords for Linux images. Azure will now automatically generate a new SSH key pair for you instead of you having to use a third-party tool to create a key pair.

- Enter information to create your virtual machine, and after you click “create”, you will be prompted to download the private key pair, which you will need to connect to their VM via SSH

2. Go to the VM you created and select “SSH”, then open the SSH (terminal, PuTTy, etc.) client of your choice, making sure that you have read-only access to your private key.

3. Copy the file path where your private key is stored 4. Paste the command in your SSH client

When creating additional Linux VMs, you can reuse SSH key pairs as well instead of creating a new key each time.

Storage>Storage Account
Network Routing Preferences for Storage Accounts now in Public Preview
You can now configure a routing preference to direct network traffic for the default public endpoint of your Storage account using either the Microsoft global network or using the public internet.
- Optimize for premium network performance by using the Microsoft global network, which delivers low-latency path selection with high reliability and routes traffic through the point-of-presence closest to the client.
- Alternatively, route traffic through the point-of-presence closest to your storage account to lower network costs and minimize traversal over the Microsoft global network.
Routing configuration options for your Storage account also enable you to publish additional route-specific endpoints. Use these new public endpoints to override the routing preference specified for the default public endpoint by explicitly directing traffic over a desired path.
Routing preferences for Azure Storage is now available for preview in France South, North Central US, and the West Central US regions.
You can specify your routing preference for a storage account at Create time in the Networking tab.

You can also specify a routing preference for your storage account after creation in the Firewalls and Virtual Networks tab in Storage Account Manage.

Should you elect to public the individual route-specific endpoints, you can generate an SAS token that directs traffic along the network route you specify.

All Categories
New Dashboard Pinning Experience
Previously, users did not have the option to select a dashboard when pinning content. With the new pinning experience, users can now choose an existing dashboard or even create a new dashboard to pin their content to. This pinning experience can be invoked from any service that offers the pinning feature, as indicated by a pin icon.
- Go to any service that enables pinning. Take “All resources” for example.
- Click on the “pin” icon which opens the new pinning experience

3. From here you can pin to an existing dashboard (default) or create a new dashboard.
If you pin to an existing dashboard:
a. Select whether you want to pin to an existing private or shared dashboard in the “Type” section
b. Find the dashboard in dashboard dropdown – the default selection in the dropdown is your most recently accessed dashboard
c. Once you select the dashboard from the dropdown, click “Pin”

d, You will get a notification once the pinning has been completed. You can access the dashboard by clicking on the notification.
If you pin to a new dashboard:
a. Select “Create new”
b. Select whether you want to create a new private or shared dashboard
c. Fill in the required information

d. Once you’re done, click “Create and pin”. You will get a notification when the dashboard is successfully created and pinned to. You can access the dashboard by clicking on the notification. You can also access the pinned content by going to Dashboard in the left nav and finding the dashboard you’ve pinned the content to.
INTUNE
Updates to Microsoft Intune
The Microsoft Intune team has been hard at work on updates as well. You can find the full list of updates to Intune on the What’s new in Microsoft Intune page, including changes that affect your experience using Intune.
Azure portal “how to” video series
Have you checked out our Azure portal “how to” video series yet? The videos highlight specific aspects of the portal so you can be more efficient and productive while deploying your cloud workloads from the portal. Check out our most recently published video:
Next steps
The Azure portal has a large team of engineers that wants to hear from you, so please keep providing us your feedback in the comments section below or on Twitter @AzurePortal.
Sign in to the Azure portal now and see for yourself everything that’s new. Download the Azure mobile app to stay connected to your Azure resources anytime, anywhere.
See you next month!

Recent Comments