by Scott Muniz | Jul 22, 2020 | Uncategorized
This article is contributed. See the original author and article here.
Synapse Workspaces provide a rich interface which allows users to make use of an array of features and services. However this does come with a few requirements from an access perspective.
To ensure that you are able to navigate the workspace without limitations and that functionality is not limited ensure that the following URLs are accessible on port 80 and 443 respectively.
In addition SQL Specific ports are required for SQL Pools and SQL On Demand which is discussed in the following article Synapse SQL Pool and On Demand Inaccessible
by Scott Muniz | Jul 22, 2020 | Uncategorized
This article is contributed. See the original author and article here.
We are happy to announce that the July 2020 release (1.2020.709.0) of the MSIX Packaging Tool is now available!
We have release the MSIX Packaging Tool through the Microsoft Store, and are offering the offline download of the tool and license here as well.
Our July 2020 release features new abilities such as the ability to edit multiple items at a time in Package Editor, and the improved support for installer types. To learn more about other great features and fixes we’ve made, you can check out our release notes. If you have any questions, feature ideas, or just want to connect with the Product Team, join our Tech Community. We love connecting and hearing from you, so don’t hesitate to file any feedback with us via the Feedback Hub as well!
Don’t forget about our Insider Program, which gets you early access to releases as they are in development!
Sharla Akers (@shakers_msft)
Program Manager, MSIX

by Scott Muniz | Jul 22, 2020 | Uncategorized
This article is contributed. See the original author and article here.
Defining FTI and Consequences of Non-Compliance
Originally Authored by: Miknon Go |Senior Director, Strategic Advisors, AvePoint
It’s not just the Internal Revenue Service (IRS) or federal agencies, every state government has a department responsible for taxation or revenue.
By their very nature, these agencies handle both personally identifiable information (PII) as well as federal tax information (FTI).
PII is any sensitive information that can be used to identify an individual, such as social security numbers, whereas FTI is defined very broadly in Internal Revenue Code 6103 as return information received from the IRS or a secondary source. This includes information on a person’s tax affairs even if it is anonymized and identifiers are stripped out.
Information provided by the IRS must be classified as FTI, but the exact same information obtained in a different manner, may need to be classified as PII.
The sensitivity levels of PII and FTI require that agencies are extremely diligent in the protection of the confidentiality of this information.

Note: there are other types of regulated PII and the strategies provided can be easily modified to address regulations such as the Healthcare Insurance Portability and Protection Act (HIPAA) and others as well.
In fact, Internal Revenue Code 7213 makes it a felony offense for federal and state employees and others who illegally disclose federal tax returns and return information. It is “punishable upon conviction by a fine in any amount not exceeding $5,000, or imprisonment of not more than 5 years.”
Challenges to Compliant Collaboration
Many state agencies are challenged in their handling of FTI by a few key factors. Some are common communication challenges and risks for sensitive data types that aren’t specific to the nature of FTI such as:
- Multiple siloed divisions and agencies;
- Dispersed office locations across the state; and
- The need to work with a diverse range of external collaborators including taxpayers, vendors and contractors.
But perhaps the largest challenge to modernizing collaboration surrounding FTI data is that the unique restrictions and requirements placed on this data preclude the use of powerful collaboration platforms, such as Microsoft 365 (formerly Office 365), unless configured appropriately.
The obstacle to proper configuration often rests with how Microsoft 365 is deployed across the state government. In virtually every case, the entirety of the state’s government leverages a single Microsoft 365 tenant for all their agencies.
This is advantageous as it allows state governments to purchase at scale and enables faster, easier collaboration while removing data silos. It becomes a challenge, however, when agencies with specific data restrictions, like FTI data, require a different set of configuration settings than other agencies.

While Microsoft 365 is incredibly extensible and flexible, there are still certain settings, such as how you provision Groups, that follow a “one tenant, one rule,” architecture. As a result, the central state IT provider is often reluctant to put tighter restrictions on other agencies to support one agency’s use case and the agency handling the sensitive data must find alternative means for collaboration.
But Microsoft 365’s incredibly robust security and compliance features make it the ideal environment to host and protect these sensitive data types.
FTI Rules and Regulations
As previously mentioned, FTI data is governed by unique rules and regulations that are enforced by strong punitive measures for non-compliance.
The rules and regulations for managing both physical as well as digital FTI data can be accessed in Publication 1075, “Tax Information Security Guidelines For Federal, State and Local Agencies.”
It’s important to note that it’s a detailed document that provides guidelines for a wide range of modern digital systems—in no part of the document does it limit the use of FTI data to older legacy systems such as secure email.

If combing through the 163 pages sounds a bit daunting, we have summarized what we see as the most relevant requirements for any system managing and storing FTI content. The system must be able to:
- Generate a report of all FTI content in the collaboration environment for audits
- Determine everyone in a department or agency who has had access to FTI content
- Leverage encryption that is FIPS 140-2 compliant for data at rest and in motion
- Manage, monitor and control who has access to FTI content, this frequently includes internal employees, contractors cleared by the IRS, and external taxpayers accessing their own FTI content
- Retain all FTI content and associated activity logs for 7 years
LEGAL DISCLAIMER: The information contained in this publication is provided for informational purposes only, and should not be construed as professional advice on any subject matter. We expressly disclaim all liability for actions taken or not taken based on any content herein. All information is provided “as is”, with no guarantee of completeness, accuracy, timeliness or of the results obtained from the use of the information.
Current Common Collaboration Scenarios
So if these restrictions are preventing state agencies from leveraging Microsoft 365 to handle FTI what are they using? The typical workflow we have seen is:
- States access FTI data through a proprietary application, specific to the IRS
- Any new content developed with information derived from this application becomes classified as FTI content
- FTI content is often stored in network drives (or even personal hard drives!) and shared through secure email . While this is a compliant system, the collaboration with internal and external users is inefficient. Much of this is a result of the limitations of email attachments: co-authoring is prohibited, large files are difficult to send, versioning creates confusion over a single truth and there is no granular permission access.
- Alternative common collaboration methods include cumbersome secure FTP, costly to maintain proprietary systems, and verbal communications.
Future State
New Possible Collaboration Scenarios
Now let’s take a second to imagine additional, modern collaboration scenarios that can be enabled by Microsoft 365 and Microsoft Teams such as persistent chat in channels, ad-hoc chat, and an underlying enterprise collaboration management system to store and access files.
What would FTI compliant versions of these scenarios look like?
Ongoing Group FTI Discussion
Use Case: Collaboration and real-time chat for a regular series of collaborators around ongoing initiatives and reoccurring tasks.
Tool: A “Confidential” Team in Microsoft Teams
Advantages: Chat, voice and collaboration can be in context with the relevant documents and specific information stored within the Team. Membership is restricted to those who need access.
Process:
- A monthly “Confidential” Team is requested and provisioned for the working group.
- The group uses this “Confidential” Team to discuss and share FTI content
- Any documents uploaded to the Team is tagged and classified as FTI
- Any conversation in the Team with FTI will be tagged with “#FTI”
- At the end of the month, the Team will be archived and a new one provisioned
Non-Sensitive Communication
Use Case: An agency employee that also handles FTI information (agency FTI user) needs to communicate and collaborate regarding non-sensitive information.
Tool: “Non-Sensitive” Team in Microsoft Teams
Advantages: The agency FTI user is now able to communicate with other state employees using the tool they are using, which removes information silos. Any sensitive information is caught and contained.
Process:
- Agency FTI user requests a new Non-Sensitive Team
- If a Team member uploads a document or shares something in a Team conversation with PII or FTI the system scans the content and creates a security incident.
Use Case: The agency responsible for handling FTI data needs to communicate with an external taxpayer regarding their FTI data.
Tool: “Confidential” Internal Audit Team and “Confidential” External Audit Team in Microsoft Teams
Advantages: Chat, voice and collaboration can be in context with the relevant documents and specific information stored within the Team. Membership is restricted to those who need access, including specific external users.
Process:
- Audit working group requests a new “Confidential” Internal and External Audit Teams be provisioned
- FTI information is captured from the tax system of records and copied into a document
- Document is uploaded into the Internal Team and tagged/classified as FTI
- Audit team discusses the audit in the Internal Audit Team conversation using “#FTI”
- The taxpayer is added to the External Audit Team
- Audit Team copies appropriate FTI documents from the external team and tags as FTI
- Document is then uploaded to the External Team and tagged as External Confidential
- Any conversation with the taxpayer has the “#FTI” tag
- Once the audit complete, both Teams are archived
Enabling Technologies
The core technologies enabling these modern collaboration scenarios are of course Microsoft 365 and Microsoft Teams. Microsoft 365 has the most robust security and compliance features available of any collaboration platform today.
The Security and Compliance Center allows organizations to confidently identify, classify, manage and protect all types of sensitive content leveraging sensitivity labels.
These features can be extended and configured uniquely for a specific agency using third-party solutions, which you can see in this table mapping FTI requirements to technical solutions.

by Scott Muniz | Jul 22, 2020 | Uncategorized
This article is contributed. See the original author and article here.
Hi everyone – I’m excited to have Daniel Buchner discuss an initiative we’ve been working on (in partnership with Microsoft Research) to develop a new Zero-Knowledge Proof scheme that enhances user privacy and security for digital credential systems.
Cheers,
Pamela
——
While decentralized identity standards and technologies can be used in a wide array of use cases, ranging from authentication with Decentralized Identifiers (DIDs) to decentralized apps via DID-encrypted personal datastores, one of the initial use cases many of the decentralized identity ecosystem are focused on is the use of DIDs for Verifiable Credentials (VCs). Credentials are signed assertions from a DID owner (known as ‘Issuers’) to another entity they’re attesting some fact or proof about (known as ‘Subjects’). At the Subject’s election, they can choose to prove the facts contained in a credential by submitting credential proofs to other parties who can independently validate them (known as ‘Verifiers’). These credentials can stand for just about anything, from airplane tickets to diplomas, but the core concept is the same:

- The Issuer signs a credential for the Subject using the cryptographic keys associated with the Issuer’s DID.
- The Subject takes possession of Issuer-signed credential and stores it in their DID Wallet for use with Verifiers who may need proof of the facts the Issuer is attesting to.
- The Subject provides the signed credential, or some derived proof thereof, to a Verifier who validates the credential and uses the data it presents in its evaluation.
Credential use cases pose privacy and personal safety challenges
To understand the issues that arise in common credential use cases, let’s examine a real-life set of scenarios related to work history and job skills:
Publishing a resume on a career networking app is something hundreds of millions of people do every year. This represents an open disclosure of work history the user wants others in the wider business community to be aware of. The expectation of privacy for this information is inherently low, as the user intends for this information to be widely known and verified by all who see it. For this use case, we need a credential mechanism that can verify signed statements by an issuer that are verifiable by observers.
Once a user has shared their career-related credentials, verifiers may need to periodically check the current status of work history credentials (e.g. an employee leaves one job for another). These sorts of status checks on credentials are often programmatically run at intervals, which may occur when the user is not actively engaged in an app, outside of normal waking hours, or when the user is not connected to the internet. This use case underscores the need for a feature that allows verifying parties to check the status of a credential without requiring the user to connect to the site and perform an interactive task.
Similarly, interviewing for a new job can be stressful, and in many cases individuals do so while currently employed. While a user may not care if observers are able to validate the past work history they list on career networking sites, prospective employers often want to validate current employment, which likely includes checking the active status of the current employment credential an applicant presents. If the prospective employer is a competitor of the user’s current employer, any check for active status that alerted the company to their employee’s intentions could cause problems for the applicant. As such, we need a credential scheme that allows parties to verify active status of a credential without disclosing any information about the credential or its holder to the issuer.
Some credential schemes can expose users to privacy and personal safety risks
Equipped with a general awareness of how DID-based credentials are issued and used, and an understanding of the privacy concerns that arise in real-life credential use cases, it’s important to understand that credentials can come in different forms. Basic credentials are plaintext data objects that include one or more ‘claims’ an Issuer signs using the cryptographic keys linked to their DID. The same credential object is then presented to external parties who can see all the properties and values it contains. Basic credential schemes often incorporate revocation mechanisms where Verifiers ‘phone home’ to Issuers to check the status of a specific Subject’s credential (e.g. is a driver’s license active), providing Subject-identifying data in the process. Other credential schemes utilizing zero-knowledge features avoid some of these issues, but often introduce other tradeoffs, like requiring users to be involved in interactive flows to prove credential status.
The following privacy and tracking issues often arise from these types of credential schemes:
- Presenting the same credential bytes to multiple verifiers enables them to track its trail of usage. Schemes that try to remedy the presentation of the same credential bytes to multiple Verifiers by fetching unique copies of credentials just-in-time still disclose time of use and other trackable metadata to Issuers.
- Exposing raw credential values to Verifiers can needlessly expose sensitive information. For example: disclosing a Subject’s specific date of birth can have negative effects, especially when proving their age is greater than a certain threshold would suffice.
- Status check mechanisms that disclose Subject-identifying information enable Issuers to track how a Subject is using a credential. This is often the case in credential schemes that ‘phone home’ to check on credentials using a credential ID or other specifically identifying data.
There is also a set of desirable features existing credential schemes often lack:
- Generate uncorrelatable versions of a credential for each Verifier, without contacting the Issuer – a credential scheme should enable a Subject to generate uncorrelatable versions of a credential that doesn’t expose them to tracking by Issuers or Verifiers.
- Empower Subjects to only disclose the minimum necessary facts – instead of disclosing all the data a credential contains, or precise data values, a scheme should allow Subjects to prove any subset of facts a credential contains, at varying levels of granularity. For example: if a Subject has a credential that contains their exact age, among other things, the Subject should be able to generate a proof that only includes the fact that they over a certain age, without disclosing their date of birth.
- Enable credential status checks that don’t divulge Subject-identifying information to Issuers – Verifiers should be able to derive the status of a credential without divulging to the Issuer any information about the Subject or specific credential they’re checking.
- Enable Verifiers to check the status of a credential offline – Verifiers should be able to check the status of credentials based on proofs that can be cached for use when disconnected from the internet.
- Credential status checks shouldn’t require manual user participation – Subjects should not have to be actively connected to verification systems for Verifiers to check the status of a credential. For example: if a bank needs to run a monthly automated check for the status of a homeowner’s fire insurance policy, and that check runs at odd hours, the homeowner should not have to be involved in any way. (Some schemes require a user to engage software on their device to facilitate status checks for Verifiers, which makes many valid business scenarios infeasible.)
To summarize, existing credential schemes generally exhibit the following profile of issues, which we would like to solve:

Zero-Knowledge Proofs can enhance privacy and personal safety
The privacy and personal safety issues surrounding credential schemes have been known to members of the identity community for decades. Many past initiatives and groups have worked on solutions for these issues (including Microsoft’s U-Prove developments in the late aughts), but until the advent of cryptocurrencies and decentralized identity systems, there was not a pressing business need that required wide-scale deployment of solutions to these problems. In the years since, countless developers, academics, and organizations have been working on new schemes that incorporate a number of advanced cryptographic techniques to overcome the challenges outlined in the sections above. The most promising of these techniques are recent innovations in Zero-Knowledge Proofs cryptographic schemes, or ZKPs for short. ZKP schemes come in many flavors, each with unique trade-offs, features, and performance profiles, which can be tailored to particular use cases and requirements.
As we considered the wide range of scenarios we wanted to tackle, we felt we could make contributions in the area of privacy preserving credentials that could help advance the ecosystem. To that end, we began a joint initiative with our colleagues in Microsoft Research to develop a ZKP credential scheme that accounts for the range of features and use cases we seek to enable (as enumerated in the sections above). The following are notable technical details about the scheme we’ve been working on:
- The scheme is based on a transparent SNARK construction, Spartan (to be presented at the 40th Annual International Cryptology Conference), that does not require a trusted setup and offers faster prover and verification times than most equivalent schemes, with proof sizes that are smaller (when utilized for this purpose) than all schemes in this family, with the exception of Bulletproofs.
- The scheme supports a range of statement types, including predicate proofs, range checks, set membership, etc.
- For the encoding of zero-knowledge claims, the scheme employs Rank-1 Constraint Satisfiability (R1CS).
- Proving cost scales linearly with the number of R1CS-encoded constraints included in a program.
- Status checks can be proven with the user out-of-band, without requiring Subject interactivity.
From how credentials are issued, all the way through their revocation, we believe this scheme can fulfill the requirements we have laid out and address the issues we’ve identified. In the end, we believe we should be able to overcome the negatives we listed earlier and produce an implementation that exhibits the following profile:

We have contributed the whitepaper detailing our ZKP credential construction to the DIF ZKP credentials initiative, and will begin development of an open source reference implementation in DIF later this summer. We’d like to thank DIF, the wider community, and all those who have been working to advance privacy preserving credential technologies. Please join us in DIF and contribute to this initiative – it’s important that the identity community gets this right, and we need your help to do it.
Daniel Buchner
Decentralized Identity / Microsoft Identity
Image/Icon Credits:
prettycons from www.flaticon.com
Freepik from www.flaticon.com
Becris from www.flaticon.com
Smashicons from www.flaticon.com
Geotatah from www.flaticon.com
Monkik from www.flaticon.com
Darius Dan from www.flaticon.com
by Scott Muniz | Jul 22, 2020 | Alerts, Microsoft, Technology, Uncategorized
This article is contributed. See the original author and article here.
The Azure Sphere Security Service is an integral part of Azure Sphere and brokers trust for device-to-cloud communication. When a customer creates a new tenant, the Azure Sphere Security Service issues a tenant certificate authority (CA) certificate to the customer. The tenant CA certificate, in turn, issues device certificates that the device uses to get OS updates and to upload telemetry. Tenant CA certificates have a lifetime of two years, which starts from tenant creation. The Azure Sphere Security Service will automatically renew tenant CAs approximately 60 days prior to expiry. If you use Azure Sphere tenant CA certificates to register in Azure IoT hub, Azure IoT Central, and any other relying party, you must register the new certificate so they recognize and authenticate your devices.
Renewal process
Tenant CA certificates will be automatically renewed. Automated renewal process begins approximately 60 days before the current certificate expires.
- A new tenant CA certificate is generated within 60 days prior to the expiration of the current active certificate.
- Approximately 30 days after the creation date of the newly generated CA certificate, it becomes the new active CA certificate and the current active CA certificate becomes inactive and retired. Once a tenant CA certificate has been retired, Azure Sphere device certificates will be issued from the new active CA certificate.
- Once the new tenant CA certificate is issued, it is ready for download. Using new commands available in the Azure Sphere Developer Command prompt, you can:
- Download certificates and certificate chains for the current and new certificates
- Download proof of possession certificates to verify the tenant CA certificate in Azure IoT Central and/or IoT Hub
- Get a list of available certificates and their details for an Azure Sphere tenant.
- A tenant CA certificate status will be one of three possible values, listed below along with a brief explanation of what each status means for you:
| Certificate status |
Description |
What does this mean for you? |
| Revoked |
An untrusted certificate |
This will not be used by the Azure Sphere Security Service |
| Active |
Current active certificate for the tenant |
This tenant CA certificate will issue device certificates |
| Inactive |
This state could mean one of the following. The certificate could be:
- Newly created certificate if “End Date” displayed by the command or “notAfter” in the certificate is approximately two years in the future
- Retired certificate if “End Date” displayed by the command or “notAfter” in the certificate is one to 60 days in the future
- Expired certificate if the “End Date” displayed by the command or “notAfter” in the certificate is in the past
|
The newly created certificate will become active approximately 30 days after it is created. Register this tenant CA certificate in Azure IoT Hub or IoT Central or any other third-party resources |
What do you need to do?
The newly generated certificate is not automatically re-registered in IoT Hub, IoT Central, or any other third-party resource. First, this new certificate must be downloaded. When downloading the certificate, ensure that the newly generated certificate is downloaded and not the currently active certificate. You can use the thumbprint to verify if you are using the correct certificate.
In Azure IoT hub and Azure IoT Central, registering the certificate involves a few simple steps:
- Tenant CA certificate must be first uploaded in the certificates section of IoT Hub or IoT Central.
- In the enrollments section of IoT Hub or IoT Central, the uploaded certificate can be configured as either the primary or secondary certificate. Do not remove any certificates that have not expired.
- The proof of possession certificate can be downloaded using the verification code generated by IoT Hub or IoT Central. Proof of possession certificate must then be uploaded in IoT Hub or IoT Central to complete the certificate registration process.
To avoid any interruption in service, you will have 30 days to register the new certificate in Azure IoT Hub, IoT Central, or any other third-party resource before the newly generated certificate becomes the active certificate.
NOTE: These steps require the 20.07 SDK, which is currently scheduled for release on the afternoon of July 29, 2020 (PST). We will update this post with links to documentation once the 20.07 SDK has been released.
Questions:
Q: Will my devices be updated even after the certificate auto renewal?
A: Your tenant CA certificates are auto renewed to ensure that your devices will continue to receive updates and uploading telemetry.
Q: Help! Rollover has happened to new cert, and my devices are now failing to connect to my services, how do I resolve?
A: You can still register the new certificate. The Azure Sphere Security Services may already be using the new certificate. Relying partners such as IoT central or IoT hub will fail to authenticate your device till the new tenant CA certificate is registered with them.
Q: Oh no! My tenant CA certificate has expired, and I didn’t realize I had to register the new certificate? What do I do?
A: Register your new certificate ASAP. The Azure Sphere Security Service will already be using the new certificate. Relying partners such as IoT central or IoT hub will fail to authenticate your device till the new tenant CA certificate is registered with them.
Documentation Resources:
by Scott Muniz | Jul 22, 2020 | Alerts, Microsoft, Technology, Uncategorized
This article is contributed. See the original author and article here.
This tutorial walks you through the process on how to load data from Always Encrypted enabled Azure SQL database using SQL Server Integration Services (SSIS) in Azure Data Factory.
Azure-SSIS integration runtime has built-in Microsoft ODBC Driver 13 for SQL Server. In this tutorial, we use SSIS ODBC source with Microsoft ODBC Driver 13 to load data from Azure SQL database. Details about ODBC driver setup, refer to using Always Encrypted with the ODBC Driver for SQL Server via Azure Key Vault built-in keystore provider.
- Follow the steps to configure Always Encrypted by using Azure Key Vault , Column Master Key (CMK) is now stored in Azure Key Vault.
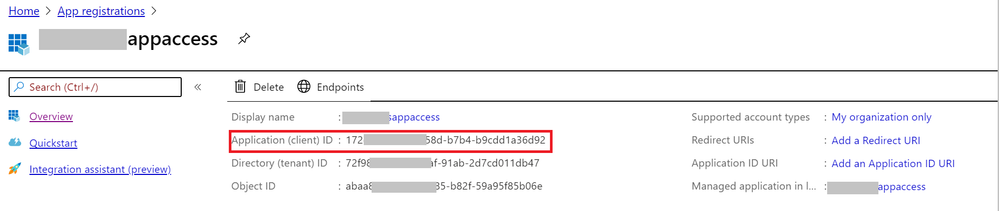
- Enable client application access to get the Application (client) ID and client secrete.


3. Grant the client application proper permissions (get, unwrapKey, and verify) in the Azure Key Vault.

- Create simple SSIS package in Visual Studio 2017 that uses an ODBC source and a flexible file destination. Configure connection string like below:
DRIVER={ODBC Driver 13 for SQL Server};SERVER= <EnterYourServer.database.windows.net>;uid=<myuser>; DATABASE=<mydatabase>;ColumnEncryption=Enabled;KeyStoreAuthentication=KeyVaultClientSecret; KeyStorePrincipalId=<Application (client) ID>;KeyStoreSecret=<client secrete>
Note:
Surround the value with { } when there are [ ] { ( ) , ; ? * = ! @ characters in the client secrete, and manually escape the interior } with a second }.
Example:
keystoresecret={)#|;_=&*{+>*-.&)$8?%}}|S|_^?|*=?.;o==_#-QA=&%};

- Execute package successfully in Visual Studio.
- Deploy project to SSIS in Azure Data Factory.

7. Author data factory pipeline with execute SSIS package activity, input password in connection manager parameter.

8. Execute data factory pipeline.
by Scott Muniz | Jul 22, 2020 | Uncategorized
This article is contributed. See the original author and article here.
Ahora que Teams está siendo fuertemente utilizado en el sector de educación, Microsoft ha estado invirtiendo más esfuerzos en agregar características a la plataforma que agreguen valor a las clases en línea que se dictan.
Uno de los principales problemas reportados durante las clases, es que los estudiantes tienen predeterminadamente el privilegio de silenciar, expulsar o compartir contenido, así que se vuelve muy fácil sabotear o interrumpir. Esto es porque al unirse a una reunión recién programada, de forma predeterminada todos los asistentes tienen el rol de presentador.
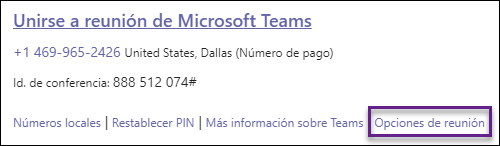
Para poder cambiar esto, es necesario programar la reunión y luego ir a las Opciones de reunión, ubicadas debajo del enlace de acceso:

También es posible acceder a estas opciones desde la parte superior derecha de la lista de asistentes de una llamada en curso:

En la página de opciones de reunión, en la lista desplegable de ¿Quién puede presentar?, escoger Solo yo:

Al realizar este cambio, solo el organizador de la reunión tendrá el rol de presentador, y las demás personas, el rol de asistente. Para entender más sobre los roles en Microsoft Teams, pueden leer Roles en una reunión de Teams.
Aunque la configuración es bastante sencilla de realizar, es un trabajo que tendría que realizar el profesor manualmente para cada nueva reunión, por lo que se vuelve bastante propenso a errores, sea por mala configuración, porque se le olvidó o porque simplemente no se hizo. Para mitigar esto, el equipo de Microsoft Teams liberó una directiva para designar el rol de presentador de forma predeterminada, de esta forma la configuración se establecerá para toda la organización y los organizadores no tendrán que hacer el cambio manual, pero seguirá habilitado.
En este artículo, explicaré cómo realizar esta configuración a través de PowerShell para toda la organización.
Instalación de los módulos necesarios
Para gestionar completamente Teams, es necesario instalar dos módulos:
Módulo de PowerShell para Microsoft Teams
Para instalar el módulo correspondiente a Microsoft Teams:
1. Ejecutar PowerShell ISE como administrador:

2. Presionar CTRL + N o ir al menú Archivo > Nuevo para crear un nuevo script
3. En el script, digitar:
Install-Module MicrosoftTeams
4. Para ejecutarlo, seleccionar todo el texto del comando y presionar el botón de Ejecutar selección (o presionar F8):

5. En la ventana de instalación del NuGet, clic en el botón Sí para continuar:

6. En la ventana del repositorio que no es de confianza, clic en Sí a todo para continuar:

7. Guardar el script y cerrar la ventana de PowerShell
Módulo de PowerShell para Skyper for Business
Para instalar el módulo correspondiente a Skype for Business:
1. Descargar e instalar el módulo:

2. Ejecutar PowerShell ISE siguiendo el primer paso de la instalación del módulo anterior y abrir el script que se guardó
3. Digitar en el script:
Import-Module SkypeOnlineConnector
$credential = Get-Credential
$session = New-CsOnlineSession -Credential $credential
Import-PSSession $session
4. Seleccionar todo y presionar el botón superior de Ejecutar selección (o presionar F8):

5. En la ventana de credenciales, digitar las que corresponden al administrador global en la organización y clic en Aceptar:

6. Dejar la ventana de PowerShell ISE abierta
Conectarse a Microsoft Teams
Para conectarse a Microsoft Teams:
1. Desde la ventana de PowerShell ISE que se dejó abierta, digitar en el script:
Connect-MicrosoftTeams -Credential $credential
2. Seleccionar toda la línea y presionar el botón superior de Ejecutar selección:

Nota: en caso de que se haya cerrado el script, es necesario abrirlo de nuevo y ejecutar desde el paso 3 anterior para que se pueda conectar, puesto que el paso 1 de conexión a Teams da por hecho de que aún se mantiene la sesión anterior conectada y la variable de $credential.
3. Dejar abierta la consola de PowerShell para los siguientes pasos
Creación de la directiva de rol asignado
Para crear la directiva que aplique el rol predeterminado:
1. Desde el script de PowerShell, digitar:
New-CsTeamsMeetingPolicy -Identity DesignatedRolePolicy -DesignatedPresenterRoleMode OrganizerOnlyUserOverride
Nota: el valor de -Identity corresponde al nombre que se le desea asignar a la directiva, así que puede ser diferente.
2. Seleccionar todo y presionar el botón de Ejecutar selección en la parte superior:

3. Si la directiva ejecuta bien, debe de aparecer en la consola inferior el resumen de todas las configuraciones predeterminadas para la directiva recién creada, incluyendo la del rol:

4. Dejar la ventana de PowerShell abierta para los próximos pasos
Asignación de la directiva manualmente
Para asignar la directiva a un usuario:
1. Desde la sesión de PowerShell, escribir en el script:
Grant-CsTeamsMeetingPolicy -Identity <userID> -PolicyName DesignatedRolePolicy
Donde <userID> hace referencia al nombre de usuario completo al que se le va asignar la política. Por ejemplo, para el caso mío que es Cara Coleman, quedaría así:
Grant-CsTeamsMeetingPolicy -Identity carac@nalacorp.info -PolicyName DesignatedRolePolicy
2. Seleccionar todo el script y presionar el botón de Ejecutar selección en la parte superior:

3. Cerrar la ventana de PowerShell
Después de unas horas (generalmente 2 o 4), cada sesión que se agende por parte del usuario tendrá la opción de Solo yo de forma predeterminada:

Configuración de la directiva global
En caso de que más del 50 % de usuarios requieran tener esta configuración, es conveniente aplicar el cambio en la política global, de esta forma todos los usuarios podrán ver reflejado el cambio en cuestión de horas.
Para modificar la política global:
1. Abrir el script de PowerShell que se generó anteriormente
2. Ejecutar solamente esta parte:
$credential = Get-Credential
$session = New-CsOnlineSession -Credential $credential
Import-PSSession $session
Connect-MicrosoftTeams -Credential $credential
3. Una vez conectados a Teams, ejecutar:
Set-CsTeamsMeetingPolicy -Identity global -DesignatedPresenterRoleMode OrganizerOnlyUserOverride

4. Para verificar que el cambio haya quedado aplicado, ejecutar:
Get-CsTeamsMeetingPolicy -Identity global
5. Buscar que el valor de DesignatedPresenterRoleMode sea el de OrganizerOnlyUserOverride:

6. Cerrar la ventana de PowerShell
Después de aproximadamente 4 horas, cada reunión que se cree en Teams tendrá como valor predeterminado el Solo yo para el presentador:

Para tener en cuenta
Basado en mi experiencia en Colombia, quiero compartir algunos detalles:
1. Aunque la configuración cambia el tipo de rol predeterminado, el profesor u organizador puede ir en cualquier momento y hacer el cambio a todos o a personas específicas. No hay forma todavía de bloquear el cambio
2. Técnicamente, solo se necesita el módulo de Skype for Business para este cambio, puesto que se trata de configuración de llamadas
3. Generalmente la configuración se ve primero en la versión web que en la de escritorio. Es muy importante cerrar sesión del todo en escritorio y volver a iniciar con la cuenta
4. La única forma de verificar y hacer los cambios es a través de PowerShell; desde la consola no se pueden ver estos
by Scott Muniz | Jul 22, 2020 | Uncategorized
This article is contributed. See the original author and article here.
You may have seen the recent announcement of new meeting features in Teams in Reimagining virtual collaboration for the future of work and learning (if not, check it out!). Today, we’re pleased to share that we’re making several of these features available to most users of Teams over the next few days.
We’re gradually rolling the features out. Once you’ve got the build that has the new experience (Teams desktop app only), you’ll have the option to turn it on. Read on to learn how to turn it on, what comes with it, how to use it, and answers to some common questions. Let’s get right to it!
Turn on the new experience
You do this via a checkbox in Teams Settings. Here’s how:
- Select your profile pic at the top of the Teams app, then Settings > General. (General should be what’s showing when you open Settings, so you probably won’t have to select it.)
- Select Turn on new meeting experience.
- Restart Teams by doing the following:
a. Right-click or Cmd-click the Teams icon in the Windows task bar or Mac System Tray.
b. Select Quit.
c. Start Teams again like you normally would.
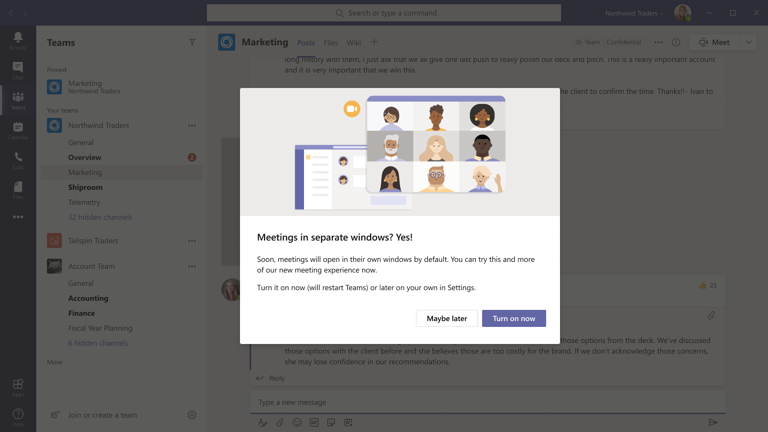
You might also see a notification that announces the new experience or reminds you to turn it on. Then it’s even easier—in that notification, choose Turn it on now if you’re ready at that point, or Maybe later if you’re in the middle of something.

What happens after you’ve turned it on
After turning on the new experience and restarting Teams, the biggest thing you’ll probably notice is that any calls and meetings will pop out into their own window, separate from the main Teams window. Like this:

If you’re still seeing calls and meetings in the main Teams window after turning the setting on and restarting, go to your profile pic again and select Check for updates. Once that is done, do the same quit and restart procedure per above. That should do the trick.
But wait, there’s more
Here are the other new things you’ll see and can try out:
- Meeting controls are moved to the top of the meeting screen. They’re docked there so you always have access to them (without jiggling your mouse) and they’re out of the way of the content and video that’s being shared.

- Large gallery view lets you see up to 49 video streams at once. This view is available when there are 10 or more attendees who are sharing video. To switch to large gallery, go to More options (…) in the meeting controls > Large gallery.

Here’s what it looks like—pretty cool to see all those faces!

- Together mode lets you feel like you’re in the same shared space with everyone in the meeting. (It might be even more fun than Large gallery.) It’s in the same menu as Large gallery, just below it. Here’s Together mode:

Together mode is available when 5 or more participants are sharing video.
Both Large gallery and Together mode are being rolled out gradually over the next few weeks. If you don’t see them right away, check again later.
- Meeting notes are now taken directly on the meeting’s Meeting notes tab in the main Teams window. (This is one of the benefits of having the meeting in a separate window.) To access or take notes from within the meeting window, select More options (…) > Show meeting notes and you’ll see the usual side pane come up. In the pane, there is a Take notes button that brings you to the Meeting notes tab.

- Focus mode is available when content is being shared. If you’d like to pay close attention to content, without the distraction of seeing video feeds, Focus mode is for you. It’s available in the meeting controls under More options (…) > Focus mode. Give it a whirl!
Common questions
- Has screen sharing changed? How do I share my screen?
No big changes here. In the meeting controls at the top, select Share screen. The screen choices you have will come up from the bottom of the meeting window just like they did before.

To stop sharing your screen, select Close screen share in the meeting controls. It’s the icon next to the Leave button.
- Why are message extensions grayed out? I like to send polls in meeting chat.
We’re working on it! For now, if you want to send a poll or use other message extensions in the meeting chat, go back to the main Teams window, select the meeting chat (either via the Calendar or the list in Chat), and do it there.
- What about InVision Freehand whiteboard?
Yup, we’re working on that, too.
- Will live events also open in their own window?
No, not yet—that functionality is coming soon.
- Focus mode is nice, but what about Full screen view?
We like Full screen view, too! (It’s available currently in meetings that happen in the main Teams window.) We’re working on bringing that to the new experience as well. When we do, you’ll have both Focus mode and Full screen view to choose from.
- Is this available for any license type?
The new experience isn’t available for Teams for Government or Teams free just yet. But soon.
The new meeting and calling experience is available for the Teams desktop client on both Windows and Mac. It’s not available for Teams on the web. (If you need to download the desktop client, go here.)
- What if I don’t turn the new experience on?
We’d love for you to try it out. We’re making it available in this way partly because in the near future, we’ll turn the experience on by default. Eventually, the setting to turn it on and off will go away. At that time, the experience of meetings in separate windows, with the meeting controls at the top, will become the norm. So we want you to have ample time to get familiar with it.
That’s our overview and how-to for this new meeting and calling experience. We hope you’ll try it. Remember to check for updates and restart the Teams client after you turn it on. Enjoy!
by Scott Muniz | Jul 22, 2020 | Uncategorized
This article is contributed. See the original author and article here.
Microsoft Threat Protection simplifies security operations center (SOC) work by consolidating powerful security solutions protecting your devices, email and docs, identities, and cloud apps. With advanced hunting, you get an extremely flexible query-based tool designed for proactive exploration, investigation, and hunting across a comprehensive set of data, covering system information, regular event logs, and security alerts.
To make advanced hunting even more accessible and easy to use, we’ve built some enhancements that many SOC analysts, whether hunting enthusiasts or budding defenders, will find useful:
- Pivot and query from multiple contexts
- Inspect records quickly
- Get reference info while hunting
Pivot and query from multiple contexts
When investigating an incident, we always look to learn more about affected assets and other entities, hoping to enrich the investigation with more data and insight. The new Go hunt action in Microsoft Threat Protection lets us quickly pivot from an ongoing incident investigation to inspecting a specific event, user, device, or other entity type on advanced hunting with an exhaustive, predefined query.
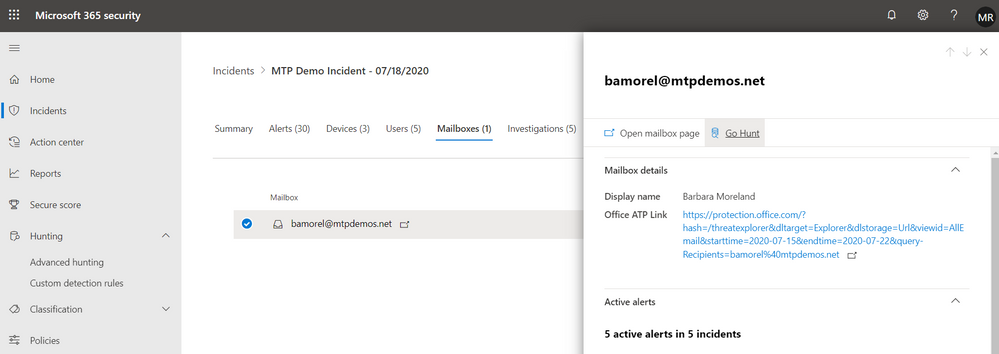
Let’s take a look at this incident involving a particular mailbox:

For most intrusions, a mailbox is typically the initial entry point of an attack. Therefore, we should start by investigating the mailbox to look for suspicious emails that were identified by Office 365 ATP as phishing or malware. By selecting Go hunt from the mailbox details pane, we are immediately taken to advanced hunting with a prepopulated query for email events related to the mailbox.

From this starting point, we can make small tweaks to the query to go deeper into the pivot. We add a new line to narrow down to only emails found to be phishing or malware.
let selectedTimestamp = datetime(2020-07-18T08:02:04.0000000Z);
let emailAddress = "bamorel@mtpdemos.net";
EmailEvents
| where Timestamp between ((selectedTimestamp - 24h) .. (selectedTimestamp + 24h))
and RecipientEmailAddress == emailAddress
//malicious emails
and (MalwareFilterVerdict == "Malware" or PhishFilterVerdict == "Phish")
Seasoned hunters will find many other ways to tweak these queries and surface even more insights about the mailbox in question and ultimately the investigation. As you work with other investigations on Microsoft Threat Protection, you will find many other go hunt entry points for digging deeper while utilizing the power of flexible queries.
Read more about go hunt
Inspect records thoroughly and quickly
Let’s say our modified go hunt query for malicious emails returned two emails, both of which had links and were detected as phishing. Of course, we’ll want to inspect each of those emails.
In the past, the best we could do was scroll slowly to the right while reading the values under each column. To speed things up and give defenders back a little bit more leisure time, we’ve added the Inspect record pane, which slides out to display all the columns as well as other relevant details about a selected record. You also get related assets, such as users and mailboxes that received or sent the email. If the record has process-related information, you also get a process tree.

You’ll be scrolling down for more info, which is much faster than scrolling to the right.

Get reference info while hunting
As we inspect one of the phishing emails, we‘d want to inspect the phishing link or URL embedded in the email. Our original go hunt query traversed the EmailEvents table, which broadly contains email processing events, but what we need is email content information.
To locate the right schema table, most of us will likely look at the schema tree and find EmailUrlInfo. We can quickly confirm that this is the right table by selecting View reference.

This opens the in-portal reference, which can also be accessed by selecting Schema reference in the upper right of the page.

The in-portal reference includes detailed information about each table and its columns. For those who want to explore schema items further, it also comes with sample queries as well as detailed ActionType (event type) information for tables that hold event information.

Now that we’ve found the EmailUrlInfo table and have verified that it holds information about URLs in email messages, we can try a little bit of Kusto Query Language (KQL) magic. In the example below, we use the join operator to get the embedded URLs in each of the phishing emails:
let selectedTimestamp = datetime(2020-07-18T08:02:04.0000000Z);
let emailAddress = "bamorel@mtpdemos.net";
EmailEvents
| where Timestamp between ((selectedTimestamp - 24h) .. (selectedTimestamp + 24h))
and RecipientEmailAddress == emailAddress
//malicious emails
and (MalwareFilterVerdict == "Malware" or PhishFilterVerdict == "Phish")
| join EmailUrlInfo on NetworkMessageId
| project EmailTime = Timestamp, Subject, Url

The hunt continues
Want to see how the rest of this investigation unfolds? Stay tuned for the next chapter where we continue the hunt using other fresh enhancements to advanced hunting.
For more information about advanced hunting and the features discussed in this article, read:
by Scott Muniz | Jul 22, 2020 | Uncategorized
This article is contributed. See the original author and article here.
We keep hearing many of you are eager to host gRPC-enabled services on IIS in Azure, such as here on GitHub. However, the lack of support for several HTTP features in the platform components is blocking you. We listened, and we have good news: we built HTTP support for gRPC into Http.sys! We are targeting the feature for Windows Server vNext. You can try it out today if you have access to Windows Server Insider builds.
Let us back up a bit. gRPC is a “modern open-source high-performance RPC framework”. You can read more about it here on the gRPC website. It allows clients and backends to communicate with one another with relative ease while using different frameworks and languages. In theory, such communication is achievable with JSON serialization. However, gRPC significantly outperforms it in terms of message sizes and speed of serialization. For its full functionality, it has more requirements from the implementation of the HTTP/2 protocol, which is the transport for gRPC. Unlike the browser scenarios, it requires support for bidirectional streaming and response trailers. Http.sys has always supported bidirectional streaming, but the response trailers were a feature gap up to this point. You can read more about the use of gRPC here in the context of .NET and usage patterns.
If you want to try out native gRPC support in Http.sys, you will need to start by getting an Insider build of Windows Server. You can do that by following the instructions on the Windows Server Insider Preview page.
Once you have your Windows Server vNext installed, you can test out the new HTTP features, whether you are building on top of Http.sys or simply want to see it working under the hood. The following code sample will show you how to verify the necessary HTTP features are working properly.
HTTP_DATA_CHUNK Chunks[2];
HTTP_UNKNOWN_HEADER Trailers[2];
PSTR ResponseBody = "Response Body";
HTTP_RESPONSE Response;
HTTP_CACHE_POLICY CachePolicy = {0};

Trailers[0].pName = "Trailer1";
Trailers[0].NameLength = (USHORT)strlen(Trailer[0].pName);
Trailers[0].pRawValue = "Value1";
Trailers[0].RawValueLength = (USHORT)strlen(Trailer[0].pRawValue);

Trailers[1].pName = "Trailer2";
Trailers[1].NameLength = (USHORT)strlen(Trailer[0].pName);
Trailers[1].pRawValue = "Value2";
Trailers[1].RawValueLength = (USHORT)strlen(Trailer[0].pRawValue);

Chunks[0].DataChunkType = HttpDataChunkFromMemory;
Chunks[0].FromMemory.pBuffer = (PVOID)ResponseBody;
Chunks[0].FromMemory.BufferLength = (USHORT)strlen(ResponseBody);

Chunks[1].DataChunkType = HttpDataChunkTrailers;
Chunks[1].Trailers.TrailerCount = RTL_NUMBER_OF(Trailers);
Chunks[1].Trailers.pTrailers = Trailers;

RtlZeroMemory(&Response, sizeof(Response));

Response.StatusCode = 200;
Response.pReason = "OK";
Response.ReasonLength = (USHORT) strlen(Response.pReason);

Response.pEntityChunks = Chunks;
Response.EntityChunkCount = RTL_NUMBER_OF(Chunks);

Error = HttpSendHttpResponse(RequestQueue,
                             Request->RequestId,
                             0,
                             &Response,
                             &CachePolicy,
                             &BytesSent,
                             NULL,
                             NULL,
                             NULL,
                             NULL);
We are excited about this feature and eager to hear you feedback!

Recent Comments