by Contributed | Nov 9, 2020 | Technology
This article is contributed. See the original author and article here.
We recently received a customer support case where the App Protection Policy (APP also known as MAM) was not being delivered to the device due to a missing IP address exemption. If your organization uses a firewall or network protection system which targets or restricts reachable IP addresses, we recommend that you update your network configuration to allow network traffic to and from all MAM IP ranges as outlined in Network endpoints for Microsoft Intune, in case you run into the same issue.
For Windows devices, if you use a Defender Firewall profile to configure your IP address settings, below are the steps you can use to update these:
- Log in to Microsoft Endpoint Manager
- Go to Devices > Configuration profiles
- Select the Windows 10 and later with a Profile Type listed as Endpoint protection
- Select Properties and click edit next to Configuration settings
- Click Microsoft Defender Firewall
- Scroll down to Firewall rules and edit the rule to update the IP address settings
For more information about firewall settings, see the following documents:
Let us know if you have any additional questions on this by replying to this post or by tagging @IntuneSuppTeam out on Twitter.

by Contributed | Nov 9, 2020 | Technology
This article is contributed. See the original author and article here.
Having the right tools can help improve your productivity as you build applications and try to get day-to-day tasks done efficiently. The CLI is the predominantly preferred by developers as a tool for performing everything from one-time tasks to creating automated scripts. To help developers work more efficiently and maximize their productivity, we’ve made many improvements to the Azure Database for MySQL Flexible Servers (Preview) CLI experience.
For example, the new experience includes:
- Refined output to ensure that you’re informed about what’s going on behind the scenes.
- A single command for creating a secure server inside a virtual network.
- The ability to use contextual information between CLI commands to help reduce the number of keystrokes for each command.
See all Azure Database for MySQL Flexible Server CLI commands to get started.
Local context support
Flexible Server CLI commands support local context with the az config param-persist command, which locally stores information such as region, resource group, subscription ID, resource name, etc., for every sequential CLI command you run. You can easily turn on local context to store information by using the az config param-persist on command. If local context is turned on, you can see the contextual information by using the az config param-persist show command. You can always turn off local context by using the az config param-persist off command.

Figure 1: Run az config param-persist show to view what information is stored.
Ease of provisioning and deprovisioning
When creating a MySQL server using our managed database service on Azure, you’ll probably want to get started quickly, especially if you’re just trying things out. With the new and improved Azure CLI for Flexible Server on Azure Database for MySQL, you can quickly create a MySQL server inside a virtual network. If you prefer, you can also easily provision a server with firewall rules in a single step. You can also view the progress visually as CLI commands to keep informed about what’s going on behind the scenes.
Create a MySQL Flexible Server inside a new virtual network
Rather than using separate commands to create a resource group, a virtual network, and a subnet, you can use the az mysql flexible-server create command as shown below to create a secure MySQL Flexible Server inside a new virtual network and have a new subnet delegated to the server.

Figure 2: Run az mysql flexible-server create to provision a secure server in a virtual network
Create a MySQL Flexible Server with public access to all IPs
Use the az postgres flexible-server create –public-access all command to create a publicly accessible MySQL server. A publicly accessible server can be accessed from any client computer using the correct username and password.
To restrict access only to your IP set, use the –public -access argument to scope it either your <IP – address> or a range of IP addresses, <Start IP address – End IP address>.

Figure 3: Run az postgres flexible-server create –public-access all to provision a publicly accessible server.
Delete the server when using local context
Use the az mysql flexible-server delete command to delete any MySQL Flexible Server identified in the local context. In the example below, the command identifies server210976926 in the local context and then tries to delete that server.

Figure 4: Run az mysql flexible-server delete to delete a publicly accessible server.
Boost your productivity
Tuning MySQL database parameters is important when configuring your server to meet your application’s needs, or even to optimize performance. You can use the parameter set command to easily update server parameters with ease . You can view all the server parameter with parameter list and parameter show commands to view the values of a specific server parameter.

Figure 5: Run az mysql flexible-server parameter set to configure audit logs.
Do more with flexible servers with Azure CLI utilities
Here are few more powerful things that you can do when using the Azure CLI with MySQL Flexible Server:
- Use the az find command to find a specific command.
- Use the –help argument to get a complete list of commands and subgroups of a group.
- Change the output formatting to table or tsv or yaml formats.
- Use az interactive mode, which provides an interactive shell with auto-completion, command descriptions, and examples.
- Use the az upgrade command to update your CLI and extensions.
- Use the az rest command to call your service endpoints to run GET , PUT , PATCH methods in a secure way
These changes have been designed to support the best possible experience for developers when creating and managing their MySQL servers. We’d love for you to try out Azure Database for MySQL Flexible Server CLI commands and share any feedback you might have on the new or existing CLI commands.

by Contributed | Nov 9, 2020 | Technology
This article is contributed. See the original author and article here.
 On Monday 11/09 Microsoft’s Scott Murray and Paul Jones spoke about Azure Active Directory Conditional Access. Check out the recording below as well as resources and find out how Conditional Access can be of benefit for your organization.
Resources:
Thanks for visiting – Michael Gannotti LinkedIn | Twitter
 Michael Gannotti
by Contributed | Nov 9, 2020 | Technology
This article is contributed. See the original author and article here.
Final Update: Monday, 09 November 2020 20:24 UTC
We’ve confirmed that all systems are back to normal with no customer impact as of 11/9, 18:40 UTC. Our logs show the incident started on 11/9, 13:50 UTC and that during the 4 hours and 50 minute that it took to resolve the issue customers would have experienced data access issues while trying to query their workbooks whose data access calls were routed through the West US or West Europe endpoints.
- Root Cause: The failure was due to a backend dependency.
- Incident Timeline: 4 Hours & 5 minutes – 11/9, 13:50 UTC through 11/9, 18:40 UTC
We understand that customers rely on Application Insights as a critical service and apologize for any impact this incident caused.-Eric Singleton
by Contributed | Nov 9, 2020 | Technology
This article is contributed. See the original author and article here.
I am starting a conversation here for us to stay engaged around SWIFT Message Pack for BizTalk Server.
Firstly, the updates for 2020 are available to download at:
https://www.microsoft.com/en-us/download/details.aspx?id=102265
In view of the Pandemic, SWIFT reduced the scope of changes applicable this year (from what was initially proposed).
https://www.swift.com/standards/standards-releases/release-highlights#:~:text=In%20recognition%20of%20the%20operational%20stresses%20that%20the,Regulation%20%28CSDR%29%20and%20Shareholder%20Rights%20Directive%20%28SRD%29%20II.
Accordingly, we have released a patch that can be installed on top of SWIFT Message Pack 2019 for BizTalk Server. This is a change from previous years, where the message pack has been a full installation (and not an update/patch).
We have also made the code for message pack publicly available on GitHub.
https://github.com/microsoft/Integration/tree/master/BizTalk%20Server/Swift
With respect to the annual updates to SWIFT Message Pack, we believe there are 3 categories of the effort:
1) Understanding the changes proposed by SWIFT and incorporating that into schemas and rules
2) Testing the changes
3) Building and distribution of the message pack
With all the application knowledge and financial expertise concentrated outside of Microsoft, we request BizTalk community to own and drive the changes to schemas and rules going forward and help each other by reviewing and testing the changes. We will closely work with
all of you throughout and help in driving the builds and distribution of the message pack.
We fully understand that this is a CHANGE. Our intension here is to create and help drive a process in the community that can be eternal and is sustained as long as there is a need.
Let us embrace this change and we assure you that we will work together to iron out any wrinkles that we encounter. I am starting this discussion so we have ample time to understand each other and converge on something that works and is seamless and without disruption to the updates in 2021 by the time they are due.

by Contributed | Nov 9, 2020 | Technology
This article is contributed. See the original author and article here.
You can perform logical backups of your database from Azure Database for PostgreSQL to azure storage accounts for long term retention. These backups can be restored to your on-prem environment or to another PostgreSQL instance on a Virtual Machine.
Follow the steps below to extract a backup from Azure Database for PostgreSQL to a Storage Account.

In an nutshell, what we will need to do is the following:
- Use an existing VM or spin a Linux VM in the same region as the database (we use Ubuntu Server for this example).
- Mount your storage account as file share in the VM.
- Create a bash script that uses pg_dump to create a backup from your database.
- Schedule a task to run this script using crontab and to deallocate the VM when completed.
- Schedule the VM to start before the selected backup time using Logic Apps.
Prerequisites:
- Blob storage account with a File Share
- A Virtual Machine
- A Logic Apps instance.
Let’s break down each step.
- Spin up or use an existing Virtual Machine and configure it:
- Create a VM from the Azure portal. Refer to this QuickStart guide if needed.
- Start a remote session to your VM and install the following required packages:
sudo apt install postgresql-client-10 # installs PostgreSQL client utilities
sudo apt install cifs-utils # installs the Common Internet File System utilities
curl -sL https://aka.ms/InstallAzureCLIDeb | sudo bash # installs Azure CLI
- If your PostgreSQL server is version 11 or above, please install the client tools with the following commands:
sudo apt install wget ca-certificates
wget --quiet -O - https://www.postgresql.org/media/keys/ACCC4CF8.asc | sudo apt-key add -
sudo sh -c 'echo "deb http://apt.postgresql.org/pub/repos/apt/ `lsb_release -cs`-pgdg main" >> /etc/apt/sources.list.d/pgdg.list'
sudo  apt update
sudo apt-get install postgresql-client-11 #Or the required version above 10
-
- Mount your storage account as a File Share.
- Create a File Share in your storage account
-


If needed you can refer to this document on how to create an Azure File Share.
- Collect the following details from the Azure Portal: Resource Group, Storage Account Name and File Share Name.
- Log into your VM and declare the following variables:
resourceGroupName="myResourceGroup"
storageAccountName="myStorageAccount"
fileShareName="myFileShare"
mntPath="/home/azureuser/myfolder/"#File share needs to be mounted in the home directory rather than the mnt directory. Otherwise, folder will be deleted after VM deallocation.
- Create a folder where the storage account will be mounted:
mkdir /home/azureuser/myfolder
- Login to your Azure subscription from the VM:
az login
- Check that connection to the storage account through port 445 is possible:
httpEndpoint=$(az storage account show
--resource-group $resourceGroupName
--name $storageAccountName
--query "primaryEndpoints.file" | tr -d '"')
smbPath=$(echo $httpEndpoint | cut -c7-$(expr length $httpEndpoint))
fileHost=$(echo $smbPath | tr -d "/")
nc -zvw3 $fileHost 445
- Storage account credentials are stored in the VM:
sudo mkdir /etc/smbcredentials
storageAccountKey=$(az storage account keys list
--resource-group $resourceGroupName
--account-name $storageAccountName
--query "[0].value" | tr -d '"')
smbCredentialFile="/etc/smbcredentials/$storageAccountName.cred"
if [ ! -f $smbCredentialFile ]; then
echo "username=$storageAccountName" | sudo tee $smbCredentialFile > /dev/null
echo "password=$storageAccountKey" | sudo tee -a $smbCredentialFile > /dev/null
else
echo "The credential file $smbCredentialFile already exists, and was not modified."
fi
- Change permissions so only root can read and modify the password file:
sudo chmod 600 $smbCredentialFile
- Append mount point to /etc/fstab:
httpEndpoint=$(az storage account show
--resource-group $resourceGroupName
--name $storageAccountName
--query "primaryEndpoints.file" | tr -d '"')
smbPath=$(echo $httpEndpoint | cut -c7-$(expr length $httpEndpoint))$fileShareName
if [ -z "$(grep $smbPath $mntPath /etc/fstab)" ]; then
echo "$smbPath $mntPath cifs $nofail,vers=3.0,credentials=$smbCredentialFile,serverino,dir_mode=0777,file_mode=0$777" | sudo tee -a /etc/fstab > /dev/null
else
echo "/etc/fstab was not modified to avoid conflicting entries as this Azure file share was already present. You may want to double check /etc/fstab to ensure the configuration is as desired."
fi
- Mount the storage account:
sudo mount -a
3. Create a bash script that uses pg_dump to create a backup from your database. You can write something like this:
#!bin/bash
cd /home/azureuser/<folder to mount storage account>/
export PGPASSWORD="password"
date=$(date +%s)
echo $date
pg_dump -Fc -v --host=dbservername.postgres.database.azure.com --dbname=dbname --username=user@dbservername -f dbtest$date.dump
az vm deallocate -g MyResourceGroup -n MyVm #This deallocates the VM after the backup has been saved to the storage account
4. Schedule a task to run this script using crontab and to deallocate the VM when completed.
crontab -e

For example, use the following line if you would like to have the backup run every Friday at midnight (VM time zone is UTC):
0 0 * * 5 /home/azureuser/backup_script.sh
5. Schedule the VM to start before the selected backup time using Logic Apps.

by Contributed | Nov 9, 2020 | Technology
This article is contributed. See the original author and article here.
Intro
Yammer powers communities, knowledge, and employee engagement in Microsoft 365. At Microsoft Ignite, we shared how Yammer is investing in three areas for knowledge: capturing knowledge with questions and answers, organizing it using topics, and spreading it across the organization with Project Cortex.
Today, we are sharing the first updates to our new topics experience—which lays the foundation for future improvements and the greater distinction between topics and hashtags.
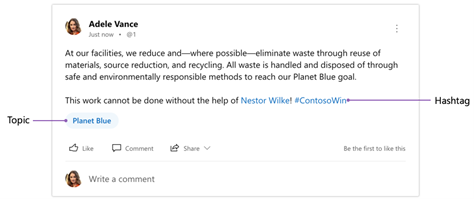
Topics and Hashtags today
Currently, Yammer has two related features available for categorizing knowledge: topics and hashtags.
Topics are a useful tool to organize, curate, and reference knowledge within and across communities. Anyone can affix a topic to a conversation by using the “Add Topics” option during or after posting. If a topic exists already, it is presented as a suggestion. Topics are metadata that apply to the thread, not individual messages, whereas hashtags are part of the message itself. Clicking a topic takes you to that specific topic’s page.
Hashtags are a great way to encourage and promote participation in campaigns and conversations across communities. They also provide a creative way to express yourself. You can include a hashtag in a message by simply adding the ‘#’ symbol before the text. Posting a message with a hashtag automatically adds a topic of the same name to the thread. Clicking a hashtag takes you to the topic page of the same name.
What’s changing
While topics and hashtags each have many uses, organizations have been eager for a clearer distinction between the two. The current behavior of automatically adding a topic when posting a hashtag can lead to confusion.
Moving forward, we are drawing a sharper distinction between these features so that topics power knowledge curation, management, and referencing while hashtags continue to be used to support campaigns and user expression.
This means the following changes in the coming weeks:
- Topics will no longer include the ‘#’ symbol before the topic making them visually distinct from hashtags. This should make topics in Yammer easier to scan for in a feed, and match how topics look across Microsoft 365. Hashtags will continue to look the same.
- Posting a hashtag will no longer automatically add a topic to the thread. One can continue to manually add a topic to a thread.
- Clicking a topic will open the topic page. Clicking a hashtag will initiate a search for all messages that include that hashtag.
But don’t worry — all threads that have been marked with topics will continue to be marked with topics. And all messages that include a hashtag will continue to have that hashtag.

Future of topics
We intend for topics to be an excellent tool for organizing, curating, and connecting knowledge across communities in Yammer, and even beyond in Microsoft 365. In the future, you will see these updates to topics in Yammer:
- Create descriptions for topics that show on the topic page and topic picker
- Add a filter to topic pages to see all questions marked with the topic
- See the most used topics within a community
- Ability to delete topics
To make the community knowledge from Yammer broadly accessible and support a cohesive experience across Microsoft 365, Yammer and Project Cortex will be tightly integrated. This means:
- Topics will mean and refer to the same thing whether in Yammer, Project Cortex and elsewhere across Microsoft 365
- Project Cortex topic cards will surface when hovering over topics within Yammer
- Project Cortex topic cards will include content from Yammer such as question and answers, and conversations
- Project Cortex topic pages will gather content from across Microsoft 365 including Yammer questions and answers, and conversations marked with that topic
Future of hashtags
We will continue to evolve hashtags to support organic expression and internal campaigns as part of larger conversations at the organization.
For more details on topics and hashtags, please see this support article.
by Contributed | Nov 9, 2020 | Technology
This article is contributed. See the original author and article here.
Now that Microsoft Surface Duo has been released you can experience it with its ideal companion, OneNote. The dual screens help make your note-taking experience even better. OneNote helps make working on Surface Duo easy and productive, giving you the power to create notes more effectively than ever before. Read on for an in-depth look at how OneNote on Surface Duo is crafted to optimize your efficiency.
App groups
You are likely used to juggling between apps – like OneNote and Teams to take meeting notes or OneNote and Edge to capture something interesting while surfing the internet. OneNote on Surface Duo is here to the rescue! It gives you the power to optimize taking notes using app groups. Check out this article on how to add OneNote to an app group.
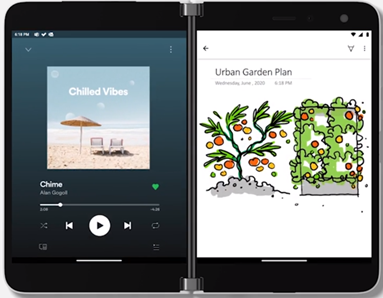
 OneNote as part of App Groups on Surface Duo
The power of the dual screen
With Surface Duo you can expand your creativity across two screens, giving OneNote a more flexible experience. You can do things like view your navigation pane on one screen and open a notebook page on the other screen. This enables you to organize your notes or easily reference a note which is on one screen, while you keep working on the other screen. You can also expand your notebook across the dual-screen for easier viewing.
 Utilize Surface Duo’s dual screens for working in OneNote
Drag and Drop
With OneNote on Surface Duo, say goodbye to copy and paste! Now you can simply drag and drop content. So when you are browsing your favorite blog on Edge, just drag and drop interesting content on a OneNote page. This helps save you time while you create content rich notes!
 Drag and drop content right onto a OneNote page
Inking with Microsoft Surface Pen
If you have a Microsoft Surface Pen, you can draw on the OneNote canvas like never before. It brings all the power and goodness of OneNote for Android to your Surface Duo. With an improved selection of colors and sizes of pens and highlighters, inking is better than ever! The lasso tool enables you to move and resize objects easily. Other tools, like eraser and undo/redo, make editing notes simple.
 Ink tools in OneNote on Surface Duo
Landscape Mode
You can change the orientation of your screen to optimize your OneNote experience on Surface Duo. Rotate your device for landscape mode to expand OneNote across the two screens. When you are editing in landscape mode, the keyboard occupies one screen, giving you space on the other screen.
This was just a glimpse of how we have optimized your OneNote experience on Surface Duo. Surface Duo’s two screens provide an opportunity to organize your notes on the go with the Navigation Pane on the left screen for both Sections and Pages and the Page view on the right screen. Also, it comes with Dark Mode to enable users to use OneNote in any mode they like.
We would love to hear from you. Please keep providing your feedback right from the OneNote app or Playstore. We are working hard to keep improving OneNote and make it the place for all your notes. Be sure to join our Tech Community to stay up to date with the latest!
by Contributed | Nov 9, 2020 | Technology
This article is contributed. See the original author and article here.
This installment is part of a broader series to keep you up to date with the latest features in Azure Sentinel. The installments will be bite-sized to enable you to easily digest the new content.
NOTE: Microsoft 365 Defender was formerly known as Microsoft Threat Protection or MTP. Microsoft Defender for Endpoint was formerly known as Microsoft Defender Advanced Threat Protection or MDATP.
We’re very pleased to announce that the public preview of the new Microsoft 365 Defender connector is now available, alongside a new Azure Sentinel benefit for Microsoft 365 E5 customers! The M365 Defender connector lets you stream advanced hunting logs – a type of raw event data – from Microsoft 365 Defender into Azure Sentinel. Click here to look at Microsoft documentation page on this connector.
With the integration of Microsoft Defender for Endpoint (MDATP) into the Microsoft 365 Defender security umbrella, you can now collect your Microsoft Defender for Endpoint advanced hunting events using the Microsoft 365 Defender connector, and stream them straight into new purpose-built tables in your Azure Sentinel workspace. These tables are built on the same schema that is used in the Microsoft 365 Defender portal, giving you complete access to the full set of advanced hunting logs, and allowing you to do the following:
- Easily copy your existing Microsoft Defender ATP advanced hunting queries into Azure Sentinel.
- Use the raw event logs to provide additional insights for your alerts, hunting, and investigation, and correlate events with data from additional data sources in Azure Sentinel.
- Store the logs with increased retention, beyond Microsoft Defender for Endpoint or Microsoft 365 Defender’s default retention of 30 days. You can do so by configuring the retention of your workspace or by configuring per-table retention in Log Analytics.

How to enable the Microsoft 365 Defender connector in Azure Sentinel
Prerequisites
- You must have a valid license for Microsoft Defender for Endpoint, as described in Set up Microsoft Defender for Endpoint deployment.
- Your user must be assigned the Global Administrator role on the tenant (in Azure Active Directory).
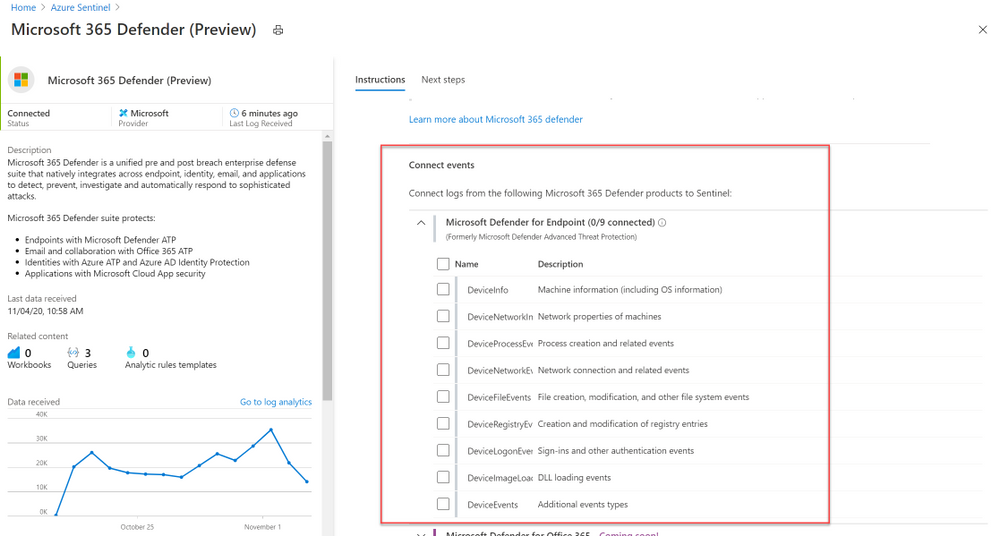
- From the Azure Sentinel navigation menu, select Data connectors.

- Select Microsoft 365 Defender from the data connectors gallery, and then select Open Connector Page on the preview pane.

- On the Microsoft 365 Defender connector page, under Connect events and Microsoft Defender for Endpoint tick the boxes for the types of logs you would like to be sent to Azure Sentinel and select Apply Changes.

And that’s it! You will now have Microsoft Defender for Endpoint logs connected to your Sentinel workspace.
A new Azure Sentinel benefit for Microsoft 365 E5 customers
With this new offer, you can take advantage of end-to-end integrated security and save significant costs when ingesting Microsoft 365 data into Azure Sentinel. From November 1, 2020 through May 1, 2021, Microsoft 365 E5 and Microsoft 365 E5 Security customers can receive a data grant of up to 100 MB per user/month to ingest Microsoft 365 data, including Microsoft 365 advanced hunting data (including Microsoft Defender for Endpoint logs) described in this blog. For more details, please visit the M365 E5 Sentinel benefit website.
Get started today!
Try out the new connector and let us know your feedback using any of the channels listed in the Resources.
You can also contribute new connectors, workbooks, analytics and more in Azure Sentinel. Get started now by joining the Azure Sentinel Threat Hunters GitHub community!
by Contributed | Nov 9, 2020 | Technology
This article is contributed. See the original author and article here.
The ability to select multiple playbooks to be triggered for each Analytics Rule will change the way you use playbooks in Azure Sentinel. It will save you time, add stability, reduce risks, and increase the automation scenarios you can put in place for each security alert.
Azure Sentinel playbooks help the SOC automate tasks, improve investigations, and allow quick responses to threats. Azure Sentinel workspaces are meant to be constantly fine-tuned to be used effectively: each analytics rule is created to generate alerts on a single unique security risk; each playbook to handle a specific automation purpose. But many automation purposes can be achieved over any analytics rule. Now this can be done effectively, as this new feature enables selection of up to 10 playbooks to run when a new alert is created.
Why should I connect multiple playbooks to one analytics rule?
Move to “one goal” playbooks: Simple to develop, easy to maintain
Multiple playbooks can influence the way you plan and develop playbooks. Before this feature, if a SOC wanted to automate many scenarios to the same analytics rule, it had to create nested playbooks, or a single large playbook with complex logic blocks. Or it might create similar versions of the same playbook to be applied to different analytics rules, reusing the same functionalities.
Now, you can create as many single-process playbooks as needed. They include fewer steps and require less advanced manipulations and conditions. Debugging and testing are easier as there are fewer scenarios to test. If an update is necessary, it can be done in just the one relevant playbook. Rather than repeating the same content in different playbooks, you can create focused ones and call as many as required.
One analytics rule, multiple automation scenarios
For example, an analytics rule that indicates high-risk users assigned to suspicious IPs might trigger:
- An Enrichment playbook will query Virus Total about the IP entities, and add the information as a comment on the incident.
- A Response playbook will consult Azure AD Identity Protection and confirm the risky users (received as Account entities) as compromised.
- An Orchestration playbook will send an email to the SOC to inform that a new alert was generated together with its details.
- A Sync playbook will create a new ticket in Jira for the new incident created.
Increase your capabilities and flexibility as a MSSP
Multiple playbooks allow Managed Security Service Providers (MSSP) to add their provided playbooks to analytics rules that already have playbooks assigned, whether their own rules or their customers’. Similarly, customers of MSSPs can “mix and match,” adding both MSSP-provided playbooks and their own playbooks, to either their own rules or to MSSP-provided rules.
Get started
- Navigate to Azure Sentinel -> Analytics
- Create or Edit an existing schedule query rule
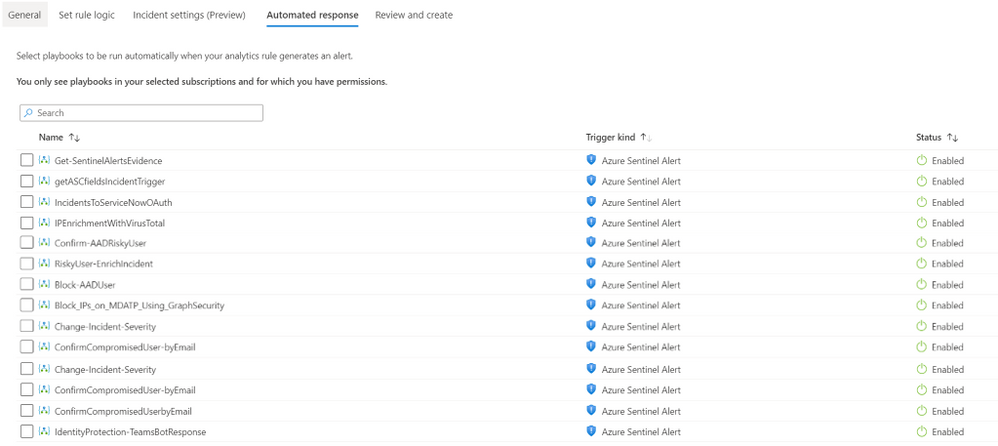
- Go to Automated response tab
- Select the multiple playbooks you would like to trigger.

It’s as simple as that!
At this point, the selected rules will run in no particular order. We are working on a new automation experience which will allow defining the order of execution as well – stay tuned.

Recent Comments