by Contributed | Dec 18, 2020 | Technology
This article is contributed. See the original author and article here.
Many customers connect their private corporate networks to Microsoft 365 to benefit their users, devices, and applications. However, there are many well-documented ways these private networks can be compromised. As we have seen in recent events related to the SolarWinds compromise, on-premises compromise can propagate to the cloud. Because Microsoft 365 acts as the “nervous system” for many organizations, it is critical to protect it from compromised on-premises infrastructure.
This document will show you how to configure your systems to protect your Microsoft 365 cloud environment from on-premises compromise. We primarily focus on Azure AD tenant configuration settings, the ways Azure AD tenants can be safely connected to on-premises systems, and the tradeoffs required to operate your systems in ways that protect your cloud systems from on-premises compromise.
We strongly recommend you implement this guidance to secure your Microsoft 365 cloud environment.
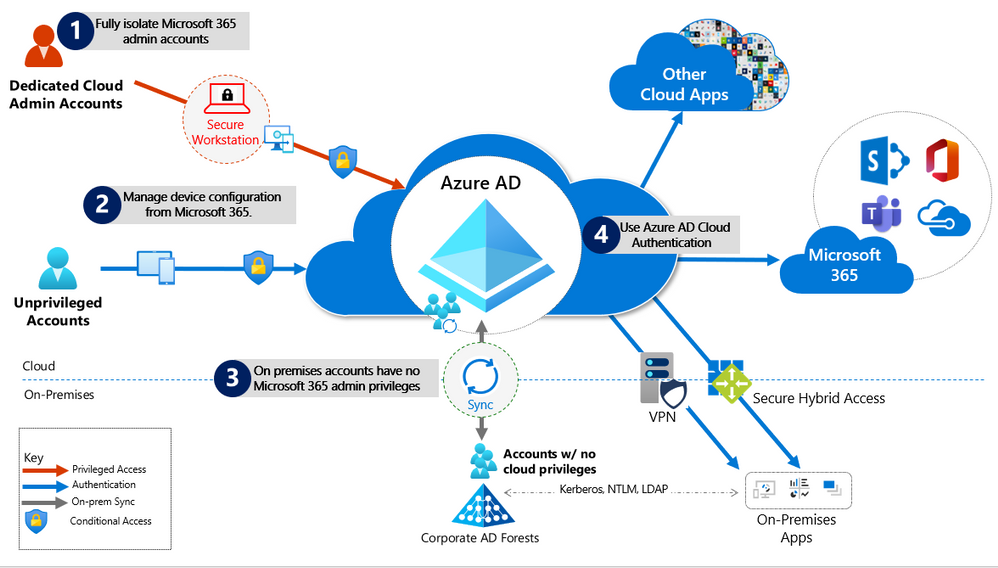
Understanding primary threat vectors from compromised on-premises environments
Your Microsoft 365 cloud environment benefits from an extensive monitoring and security infrastructure. Using machine learning and human intelligence that looks across worldwide traffic can rapidly detect attacks and allow you to reconfigure in near-real-time. In hybrid deployments that connect on-premises infrastructure to Microsoft 365, many organizations delegate trust to on-premises components for critical authentication and directory object state management decisions. Unfortunately, if the on-premises environment is compromised, these trust relationships result in attackers’ opportunities to compromise your Microsoft 365 environment.
The two primary threat vectors are federation trust relationships and account synchronization. Both vectors can grant an attacker administrative access to your cloud.
- Federated trust relationships, such as SAML authentication, are used to authenticate to Microsoft 365 via your on-premises Identity Infrastructure. If a SAML token signing certificate is compromised, federation would allow anyone with that certificate to impersonate any user in your cloud. We recommend you disable federation trust relationships for authentication to Microsoft 365 when possible.
- Account synchronization can be used to modify privileged users (including their credentials) or groups granted administrative privileges in Microsoft 365. We recommend you ensure that synchronized objects hold no privileges beyond a user in Microsoft 365, either directly or via inclusion in trusted roles or groups. Ensure these objects have no direct or nested assignment in trusted cloud roles or groups.
Principles for Protecting Microsoft 365 from on-premises compromise
To address the threat vectors outlined above, we recommend you adhere to the principles illustrated below:
- Fully Isolate your Microsoft 365 administrator accounts. They should be
- Mastered in Azure AD.
- Authenticated with Multi-factor authentication (MFA).
- Secured by Azure AD conditional access.
- Accessed only by using Azure Managed Workstations.
These are restricted use accounts. There should be no on-premises accounts with administrative privileges in Microsoft 365. For more information see this overview of Microsoft 365 administrator roles. Also see Roles for Microsoft 365 in Azure Active Directory.
- Manage devices from Microsoft 365. Use Azure AD Join and cloud-based mobile device management (MDM) to eliminate dependencies on your on-premises device management infrastructure, which can compromise device and security controls.
- No on-premises account has elevated privileges to Microsoft 365. Accounts accessing on-premises applications that require NTLM, LDAP, or Kerberos authentication need an account in the organization’s on-premises identity infrastructure. Ensure that these accounts, including service accounts, are not included in privileged cloud roles or groups and that changes to these accounts cannot impact the integrity of your cloud environment. Privileged on-premises software must not be capable of impacting Microsoft 365 privileged accounts or roles.
- Use Azure AD cloud authentication to eliminate dependencies on your on-premises credentials. Always use strong authentication, such as Windows Hello, FIDO, the Microsoft Authenticator, or Azure AD MFA.
Specific Recommendations
The following sections provide specific guidance on how to implement the principles described above.
Isolate privileged identities
In Azure AD, users with privileged roles such as administrators are the root of trust to build and manage the rest of the environment. Implement the following practices to minimize the impact of a compromise.
For more information, see Securing privileged access, which has detailed guidance on this topic. Also, see Secure access practices for administrators in Azure AD.
Use cloud authentication
Credentials are a primary attack vector. Implement the following practices to make credentials more secure.
Limitations and tradeoffs
- Hybrid account password management requires hybrid components such as password protection agents and password writeback agents. If your on-premises infrastructure is compromised, attackers can control the machines on which these agents reside. While this will not compromise your cloud infrastructure, your cloud accounts will not protect these components from on-premises compromise.
- On-premises accounts synced from Active Directory are marked to never expire in Azure AD, based on the assumption that on-premises AD password policies will mitigate this. If your on-premises AD is compromised and synchronization from AD connect needs to be disabled, you must set the option EnforceCloudPasswordPolicyForPasswordSyncedUsers.
Provision User Access from the Cloud
Provisioning refers to the creation of user accounts and groups in applications or identity providers.

- Provision from cloud HR apps to Azure AD: This enables an on-premises compromise to be isolated without disrupting your Joiner-Mover-Leaver cycle from your cloud HR apps to Azure AD.
- Cloud Applications: Where possible, deploy Azure AD App Provisioning as opposed to on-premises provisioning solutions. This will protect some of your SaaS apps from being poisoned with malicious user profiles due to on-premises breaches.
- External Identities: Use Azure AD B2B collaboration. This will reduce the dependency on on-premises accounts for external collaboration with partners, customers, and suppliers. Carefully evaluate any direct federation with other identity providers. We recommend limiting B2B guest accounts in the following ways.
- Limit guest access to browsing groups and other properties in the directory.
- Use the external collaboration settings to restrict guest ability to read groups they are not members of.
- Block access to the Azure portal. You can make rare necessary exceptions.
- Disconnected Forests: Use Azure AD Cloud Provisioning. This enables you to connect to disconnected forests, eliminating the need to establish cross-forest connectivity or trusts, which can broaden the impact of an on-premises breach.
Limitations and Tradeoffs:
- When used to provision hybrid accounts, the Azure AD from cloud HR systems relies on on-premises synchronization to complete the data flow from AD to Azure AD. If synchronization is interrupted, new employee records will not be available in Azure AD.
Use cloud groups for collaboration and access
Cloud groups allow you to decouple your collaboration and access from your on-premises infrastructure.
- Collaboration: Use Microsoft 365 Groups and Microsoft Teams for modern collaboration. Decommission on-premises distribution lists, and Upgrade distribution lists to Microsoft 365 Groups in Outlook.
- Access: Use Azure AD security groups or Microsoft 365 Groups to authorize access to applications in Azure AD.
- Office 365 licensing: Use group-based licensing to provision to Office 365 using cloud-only groups. This decouples control of group membership from on-premises infrastructure.
Owners of groups used for access should be considered privileged identities to avoid membership takeover from on-premises compromise. Take over includes direct manipulation of group membership on-premises or manipulation of on-premises attributes that can affect dynamic group membership in Microsoft 365.
Manage devices from the cloud
Use Azure AD capabilities to securely manage devices.
Workloads, applications, and resources
- On-premises SSO systems: Deprecate any on-premises federation and Web Access Management infrastructure and configure applications to use Azure AD.
- SaaS and LOB applications that support modern authentication protocols: Use Azure AD for single sign-on. The more apps you configure to use Azure AD for authentication, the less risk in the case of an on-premises compromise.
- Legacy Applications
- Authentication, authorization, and remote access to legacy applications that do not support modern authentication can be enabled via Azure AD Application Proxy. They can also be enabled through a network or application delivery controller solution using secure hybrid access partner integrations.
- Choose a VPN vendor that supports modern authentication and integrate its authentication with Azure AD. In the case of an on-premises compromise, you can use Azure AD to disable or block access by disabling the VPN.
- Application and workload servers
- Applications or resources that required servers can be migrated to Azure IaaS and use Azure AD Domain Services (Azure AD DS) to decouple trust and dependency on AD on-premises. To achieve this decoupling, virtual networks used for Azure AD DS should not have connection to corporate networks.
- Follow the guidance of the credential tiering. Application Servers are typically considered Tier 1 assets.
Conditional Access Policies
Use Azure AD Conditional Access to interpret signals and make authentication decisions based on them. For more information, see the Conditional Access deployment plan.
Monitoring
Once you have configured your environment to protect your Microsoft 365 from an on-premises compromise, proactively monitor the environment.
Scenarios to Monitor
Monitor the following key scenarios, in addition to any scenarios specific to your organization. For example, you should proactively monitor access to your business-critical applications and resources.
- User Entity Behavioral Analytics (UEBA) alerts: Use UEBA to get insights on anomaly detection.
- Microsoft Cloud App Discovery (MCAS) provides UEBA in the cloud.
- You can integrate on-prem UEBA from Azure ATP. MCAS reads signals from Azure AD Identity Protection.
- Emergency access accounts activity: Any access using emergency access accounts should be monitored and alerts created for investigations. This monitoring must include:
- Sign-ins.
- Credential management.
- Any updates on group memberships.
- Application Assignments.
- Privileged role activity: Configure and review security alerts generated by Azure AD PIM. Monitor direct assignment of privileged roles outside PIM by generating alerts whenever a user is assigned directly.
- Azure AD tenant-wide configurations: Any change to tenant-wide configurations should generate alerts in the system. These include but are not limited to
- Updating custom domains
- Azure AD B2B allow/block list changes
- Azure AD B2B allowed identity providers (SAML IDPs through direct federation or social logins)
- Conditional Access or Risk policy changes
- Application and service principal objects:
- New applications or service principals that might require Conditional Access policies
- Additional credentials added to service principals
- Application consent activity
- Custom roles:
- Updates of the custom role definitions
- New custom roles created
Log Management
Define a log storage and retention strategy, design, and implementation to facilitate a consistent toolset such as SIEM systems like Azure Sentinel, common queries, and investigation and forensics playbooks.
- Azure AD Logs Ingest logs and signal produced following consistent best practices (e.g., diagnostics settings, log retention, SIEM ingestion, etc.). The log strategy must include the following Azure AD logs:
- Sign-in activity
- Audit logs
- Risk events
Azure AD provides Azure Monitor integration for the sign-in activity log and audit logs. Risk events can be ingested through Microsoft Graph API. You can stream Azure AD logs to Azure monitor logs.
- Hybrid Infrastructure OS Security Logs. All hybrid identity infrastructure OS logs should be archived and carefully monitored as a Tier 0 system, given the surface area implications. This includes:
- Azure AD Connect. Azure AD Connect Health must be deployed to monitor identity synchronization.
- Application Proxy Agents
- Password write-back agents
- Password Protection Gateway machines
- NPS that have the Azure MFA RADIUS extension
Stay up to date
The Solarwinds attack is an ongoing investigation, and our teams continue to act as first responders to these attacks. As new information becomes available, we will make updates through our Microsoft Security Response Center (MSRC) blog at https://aka.ms/solorigate.
by Contributed | Dec 18, 2020 | Technology
This article is contributed. See the original author and article here.
By Lothar Zeitler – Senior Program Manager | Microsoft Endpoint Manager – Intune
The E-FOTA service is provided by Samsung as part of Samsung Knox and can be connected to Microsoft Endpoint Manager. In this blog article, we look at the possibilities of E-FOTA in combination with Enterprise Mobility Management (EMM) and how to connect E-FOTA with Microsoft Endpoint Manager.
With the Knox service, Samsung offers E-FOTA (Enterprise Firmware-Over-The-Air) updates for Samsung Android devices. With E-FOTA, for example, device groups can be created for individual update settings, such as which updates are to be installed on the devices and at what times. In addition, admins can set whether the user is still allowed to change the device configuration or not. E-FOTA offers granular update management for corporate devices.
Devices managed in Microsoft Intune can be integrated into E-FOTA update management. Devices do not have to be adopted specifically into E-FOTA (e.g. CSV import), but can be added and managed immediately with group membership. As a further advantage, it can be ensured that only devices managed by Intune are managed with E-FOTA.
Device groups in Azure Active Directory (Azure AD) can be used to classify devices which will be assigned to the corresponding E-FOTA configuration groups (campaigns) in E-FOTA. Examples can be pilot groups to test firmware updates, or groups for corporate divisions which will receive different versions of updates or kiosk devices which will execute update installation in a certain time window.
These E-FOTA groups (campaigns) can each have different update settings and the corresponding Azure AD device groups can be assigned to them individually. Thus, if an Azure AD group is assigned to a campaign, all the Azure AD group devices receive the settings from the campaign to which the Azure AD groups are assigned.
This article requires Azure AD and that the device management is in Microsoft Intune. Besides Intune and Azure AD, we also need access to Samsung Knox.
The following demonstrates how to use E-FOTA within an existing Intune environment where Samsung devices are already managed.
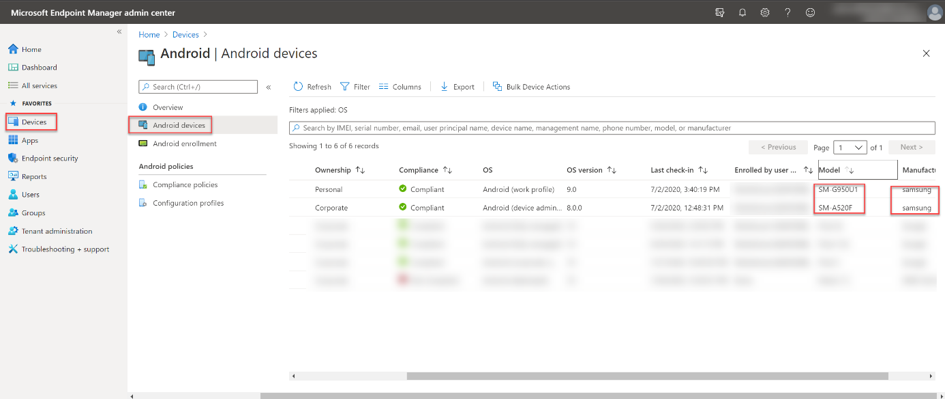
In the Intune console, we see two Samsung devices:
(Devices – Android Devices)
Intune admin console – All Android devices blade
To get started, an Azure AD group needs to be created that contains these two Samsung models, this will bring them into the update management in E-FOTA later. The group is dynamically created to automatically add new registered Samsung devices. If new devices come into the group, they are also automatically assigned to the setting assigned to the appropriate campaign in E-FOTA.
To create a dynamic group, we go to Groups > New Group in the Intune console. In this example, we use “Samsung EFOTA G950U1 A520F” as the name. Because devices are to be added to the respective devices’ group, we use the Dynamic Device group type.
 Dynamic Device group configuration
For the group criteria, we use Samsung as the manufacturer, as well as specific models for a granular control of the group membership.
The criteria in our example is:
(device.deviceManufacturer -eq "samsung") and ((device.deviceModel -contains "SM-G950U1") or (device.deviceModel -contains "SM-A520F")).
Note that more complex logical groupings can no longer be displayed in the UI/Querybuilder and therefore it must be entered in the Rule Syntax field. After entering the rule, Save and Create to confirm your rule. The devices will be added automatically to the group. Keep in mind, the process of adding devices can take a few minutes.
 Dynamic membership rule configuration
After the first Azure AD group for E-FOTA has been created, E-FOTA and Intune must be connected. The communication between E-FOTA and Azure AD takes place via the Graph API. Access to Azure AD resources, such as groups, requires identification in Azure AD. An application must be registered in Azure AD for this purpose. An application can be a web or mobile app as well as a web-API.
Note: This Samsung Knox site offers great guidance on E-FOTA.This blog essentially follows this guide.
First, the app must be registered in Azure AD. The best way to do this is to use the Azure Portal (portal.azure.com). A new app can then be registered under Azure AD > App registrations > New registration.
On the registration page, the name of the app needs to be specified. The app should only be made known for the organization by selecting Accounts in this organizational directory only. The Register action finishes the registration in Azure AD.
 Knox E-FOTA One app registration
After successful registration, a summary of the registration appears. For further configurations, it is important to remember the Application (client) ID and the Directory (tenant) ID.
 Knox E-FOTA One app registration summary
The next step is to create a client secret. This ensures that it is only possible to communicate with the app if the client secret is known. To create a client secret in Azure AD for the Knox E-FOTA One app, go to Certificates & secrets via the app properties and then select the New client secret option in the Client secrets section. Add a Description, we suggest including the name, e.g. “Client secret for Knox E-FOTA One” and select when the secret should expire. In this example, we set the value to “never.” Add generates the Secret.
 Knox E-FOTA One – Clients & secrets configuration
The generated client secret is required on a later step.
 Client secret for Knox E-FOTA One
As a last step, API entitlements need to be set. Access to Intune Groups is performed by Microsoft Graph, which ensures that the devices administrated in Intune are established in E-FOTA. The following requirements are needed:
The entitlements can be added through API-Permissions and Add a permission. Microsoft Graph is selected on the page Request API permissions.
 API permissions request for Microsoft Graph
Select API Permission in the following dialog box and search for the permissions Device.Read.All, Group.Read.All and DeviceManagementManagedDevices.Read.All. Add them by clicking Add permission. If this process is completed, the relating permissions will have to be acknowledged with the command Grant admin consent for <org>.
 API Permission request – Granting admin consent for your organization
At this point, the configuration in Azure AD is complete. The following steps must be set out in the Samsung Knox E-FOTA console:
Here it is important to establish the connection from E-FOTA to the corresponding Azure AD. This is done via the app that was previously created in Azure AD. After logging into the Samsung Knox setting, Microsoft Intune can be added by selecting EMM Groups and Connect EMM in the E-FOTA section.
After clicking Microsoft Intune, the following dialogue will appear: «Connect with your EMM Dialog». The values for Client ID, Client Secret and Tenant ID are learned from the Azure AD app’s properties Knox E-FOTA One.
 Connect with your EMM dialog box
After registering successfully, device groups from Azure AD will be displayed.
Here, we select the dynamic group which was set up at the beginning. Later, further groups can be added as well.
 Add dynamic device groups to E-FOTA
All the devices which are members of the group will be added in E-FOTA. An explicit registration of the devices in Samsung Knox is not necessary.
Note: EMM groups with E-FOTA:
- Groups are synchronized every six hours.
- Devices deleted in EMM are deleted from E-FOTA as well.
- Devices added to an EMM group are added to E-FOTA automatically.
- If devices are transferred to another EMM group, the assignment will reflect in E-FOTA accordingly.
Learn more about Managing EMM groups (samsungknox.com).
If the devices are in the E-FOTA system, these can become part of a campaign. Each campaign, in turn, can contain an individual setting profile. In the E-FOTA console you’ll find a menu entry to configure a campaign.
 Screenshot of the Knox E-FOTA Campaigns console
With the function Create Campaign, a new update configuration can be created in E-FOTA.
In this example, the campaign is named, ”EFOTA for Intune Devices”. Various settings can be configured after the campaign is created.
 Knox E-FOTA portal – New campaign information
As the final step, the devices must be assigned to the campaign. Under Assign devices and firmware you will find the corresponding option, Assign Devices.
 Knox E-FOTA portal – Assigning devices
Note: In the case of devices that have been recently added, it can take several hours until the list showing the available firmware options is generated.
 Knox E-FOTA portal – Selecting the target firmware to push to devices
Learn more on how to Create a campaign (samsungknox.com).
After Azure AD and E-FOTA have been configurated, the devices still need to be set up in Microsoft Intune so that the device can establish a connection with the E-FOTA service.
Regarding this step, there are two possibilities in Microsoft Intune:
The E-FOTA app can be downloaded/pushed to the Samsung devices with the Intune app installation. After the app is installed, the device is ready to be included in a campaign but the user has to activate the device by starting E-FOTA.
The second option is to automate the process. With Microsoft Intune, OEMConfig profiles can be created and configured to help set up the E-FOTA client on Samsung devices. The installation/configuration of the required software happens fully automated. Only the E-FOTA disclaimer must be confirmed once.
Note: Additional Information on OEMConfig can be found on: Use OEMConfig on Android Enterprise devices in Microsoft Intune – Azure | Microsoft Docs.
Automating the process is more complex, we will walk you through the steps.
First you must create an Android Enterprise Configuration Profile with the type OEMConfig.
 Android Enterprise Configuration Profile with the OEMConfig profile
After choosing a profile name, the Knox Service Plugin (KSP) is selected. The KSP processes the OEMConfig profile’s settings.
 Selecting the Knox Service Plugin as the OEMConfig app
Under Configuration Settings, the E-FOTA special settings can then be searched and configured. It is also possible to make further, non-E-FOTA settings here. To find the E-FOTA options, you can search via the locate link with the search term E-FOTA.
 Enabling the E-FOTA settings
After adding the E-FOTA options to the configuration, the settings can be configured.
 Configuring the E-FOTA options
The last step is to automatically assign the device group to be configured using OEMConfig. This is done under assignments.
Once the assignment has been made, the registration with the E-FOTA service and the setting of the parameters from the OEMConfig proceeds largely automatically. Not much can be seen on the respective device itself during execution. In the system notifications of the device, the actions (e.g. installation of E-FOTA) or the sequence can be tracked.
The only necessary interaction is to confirm the E-FOTA disclaimer. Below, screenshots show a few notifications during the installation/configuration processes as well as the disclaimer.
 User experience to confirm the E-FOTA disclaimer
If a device is successfully assigned to a campaign, it receives the update management settings from E-FOTA. The E-FOTA console can be used to check the devices’ status and their allocation to campaigns. If the status is “Campaign active“, the device updates are successfully managed through E-FOTA.
 Knox E-FOTA portal – Device overview
Samsung Knox offers granular update management by E-FOTA services for Samsung devices. These settings are in addition to the standard EMM settings. With the integration of Azure AD, Microsoft Intune and Samsung E-FOTA, the strengths of the respective platforms can be easily combined.
For further information on E-FOTA, see: Knox E-FOTA (samsungknox.com) to learn more.
If you have any questions on this post, just let us know by commenting back on this post. You can also ask quick questions at @IntuneSuppTeam out on Twitter.
by Contributed | Dec 18, 2020 | Technology
This article is contributed. See the original author and article here.
We have released an update to Microsoft.Data.SqlClient, version 2.1.1. The update addresses a few issues that are important to our customers.
Updates in Microsoft.Data.SqlClient 2.1.1 include:
Fixed
- Fixed issue with System-Assigned Managed Identity in Azure Functions #841
- Fixed issue with Kerberos Authentication for .NET Core in Unix environments #848
- Fixed issue with TCP Keep Alive for .NET Core in Unix environments #855
To get the new package, add a NuGet reference to Microsoft.Data.SqlClient in your application.
For the list of changes in Microsoft.Data.SqlClient 2.1.1, you can also see the Release Notes.
If you encounter any issues or have any feedback, head over to the SqlClient GitHub repository and submit an issue.
David Engel
by Contributed | Dec 18, 2020 | Technology
This article is contributed. See the original author and article here.
News this week includes:
Live Photos come to OneDrive
Reduce background noise in Microsoft Teams meetings with AI-based noise suppression
Guest Access in Yammer using Azure AD is now in preview!
Pontus Själander is our member of the week and a fantastic contributor in the M365 community.
View the Weekly Roundup for Dec 14-18th in Sway and attached PDF document.
https://sway.office.com/s/oUJHJbmjiTFWsm5m/embed

by Contributed | Dec 18, 2020 | Technology
This article is contributed. See the original author and article here.
Originaly posted on Olivier’s blog: How I built my first Azure RTOS GUIX display driver (olivierbloch.com)
Developing display drivers for IoT devices (not powered by a big OS like Linux or Windows) can be tricky. You don’t get to use default PC drivers which have a dependency on Linux or Windows, displays themselves can come in some esoteric forms and resolutions considering they are adapted for embedded applications (super small, not rectangular) and the protocols used for communicating with the display controllers are often proprietary and different from one another.
Azure RTOS GUIX to the rescue!
It has been some time I wanted to try Azure RTOS GUIX out as it seemed to be making developing Graphical User Interfaces (aka GUI) for embedded devices so much simpler than what I remembered from my experience as an embedded and real-time developer. I happened to have an Azure Sphere MT3620 devkit and a 28×14 Flip-Dot panel from Alfa-Zeta from a demo I inherited from my friend Mike Hall from the Azure Sphere team a couple years ago. These panels are the same as the ones you certainly have seen in airports, flipping pixels with a very satisfying click sound. It would be a shame letting this panel taking dust on a shelf or even worst in a box!
I decided to give GUIX a try to control this Flip-Dot panel doing more than just displaying some hard coded images or text. The promise of GUIX is to make the development simple while offering advanced features and functionalities AND keeping things real-time and low footprint on the embedded device. And it delivers! Here is the tale of my first-time experience with Azure RTOS GUIX.

An introduction to Azure RTOS GUIX
Azure RTOS GUIX is a high-performance, feature rich, and very small memory Graphical User Interface (GUI) middleware designed for embedded and real-time systems. It exposes APIs for anything from drawing pixels and lines to anti-aliasing, texture fills, creating and modifying screens and widgets. It also offers an event-driven programming model.
The GUIX APIs use an abstract drawing canvas in memory, which is totally independent from the hardware itself. To transfer the canvas memory to the physical display frame buffer or whatever structure is used on the hardware side, you need to write a GUIX display driver. This driver is defined by a structure containing the physical display parameters and a set of function pointers to the low-level driver functions. GUIX provides a complete, fully functional, default set of drawing functions for each supported color depth and color format. This means that in your display driver, you only have to write the code needed for hardware acceleration or other hardware specific consideration.
This means that for the simplest of drivers you only need to implement the function that initializes the hardware and eventually provide a function for toggling the canvas buffer to the physical frame one. As you’ll see below the display driver for the monochrome 28×14 Flip-Dot panel is pretty straightforward!
 With the level of abstraction offered by the GUIX APIs, widgets and the display driver, it becomes really simple to develop advanced user interfaces, and if that were not enough, Azure RTOS GUIX comes with a WYSIWYG tool called GUIX Studio which is a desktop application used to create user interfaces and generate code to be added in your app.
I invite you to learn more about the benefits of using GUIX for your real-time and embedded user interfaces by reading the docs.
In a nutshell, GUIX takes care of pretty much everything for you. To build a rich GUI for your embedded device, you only have to take care of a couple things:
- Put together a driver that will allow GUIX to control your display hardware.
- Creating a UI using concepts like windows, widgets, fonts, colors, gradients, events and more, leveraging the GUIX APIs and the desktop tool GUIX Studio
Do I need Azure RTOS ThreadX to use GUIX?
GUIX relies on a threading and tasking engine and while it is fully integrated with ThreadX, you can easily port it to other real-time OS implementing a set of elementary functions described in this documentation. Licensing is still necessary if you want to use GUIX in production even without ThreadX.
Coding my first GUIX display driver (and simple GUI to test it) for my Flip-Dot panel
Getting setup
Before I could get to the development of the display driver itself and the graphical interface using GUIX, I had to get my tools and device ready as well as create the scaffolding for the app. You can find all the detailed steps in the GitHub repo. In a nutshell, here are the things I did prior to coding the driver and the UI:
After I had setup the CMake config files I could test it all compiled (pretty much an empty ThreadX application starting a GUIX thread with nothing in it) I was ready for the display driver.
Writing the GUIX display driver
As described above, for a display as simple as the Flip-Dot, I didn’t have much to implement in my driver as I could rely on almost all default implementations in GUIX. I only needed to write the setup function as well as the buffer toggle one used to map and send the canvas data to the display.
The Flip-Dot panel is controlled over a serial connection using a simple protocol that Alfa -Zeta shares when you purchase one of their panels. In the case of the 28×14 panel, which is composed of 2 trays of 28×7 pixels, it consists in sending 2 frames: one for the top tray with 7 lines, and a second one for the lower tray with 7 lines. Each frame should contain the following data structure:
# bytes |
Value |
Description |
|---|
1 |
0x80 |
Frame start byte |
1 |
0x83 |
Command byte (0x83=send to display) |
1 |
0x00 or 0x01 |
Address (indicating which tray to send data to) |
28 |
[Pixels data] |
Data to be sent to display |
1 |
0x8F |
Frame end byte |
For the way the pixels data is formatted, I invite you to check out the code below in the display driver used to map from the GUIX canvas to the physical one.
I created the 2 following files in my project for the driver: flipdot_graphics_driver_setup.h and flipdot_graphics_driver_setup.c
In the header file I only needed to include the GUIX api and default display driver headers, and declare the setup function:
#include "gx_api.h"
#include "gx_display.h"

UINT flipdot_graphics_driver_setup(GX_DISPLAY *display);
In the flipdot_graphics_driver_setup.c file, which is shown below, you can see the main driver setup function flipdot_graphics_driver_setup that initializes the serial port (leveraging the mt3620 library from Thinkcode Labs), sets up some local resources for managing the frame buffer mapping and then invokes the default GUIX monochrome display setup function pointing to a flipdot_buffer_toggle function meant to be invoked by GUIX when refresh of the display is needed.
The flipdot_buffer_toggle function is pretty straight forward as well, mapping the GUIX abstract canvas into the physical display buffer using map_logical_display_to_physical_display and then sending data to the Flip-Dot panel over the serial port.
The map_logical_display_to_physical_display function is not shown below as it is not really relevant for this article. In a nutshell, this function maps the content of bFlipDisp into bOutBuffer converting from the logical display format to the one expected by the Flip-Dot display controller.
#include "flipdot_graphics_driver.h"
#include "UART.h"

// Serial port stuff
#define FLIPDOT_UART MT3620_UNIT_ISU0
UART *driver = NULL;

// Flipdot hardware stuff
typedef struct {
unsigned char frameStart;
unsigned char command;
unsigned char address;
unsigned char data[28];
unsigned char frameEnd;
} flipFrame;

flipFrame frame;

const static unsigned char cmd_sendToDisplay = 0x83;

unsigned char bFlipDisp[56]; // the logical display buffer.
unsigned char bOutBuffer[56]; // the vertical stripe reverse horizontal flip-dot display buffer (aka format expected by FlipDot controller).

// Main buffer toggle function for the driver
static void flipdot_buffer_toggle(GX_CANVAS *canvas, GX_RECTANGLE *dirty)
{
// Copy canvas to logical diplay buffer
memcpy(bFlipDisp, canvas->gx_canvas_memory, 56);

// Map to physical display
map_logical_display_to_physical_display();

// Send to flipdot
// top display
frame.address = 0x00;
// copy the top display data.
memcpy(frame.data, bOutBuffer, 28);
// write the data
UART_Write(driver, (unsigned char*)&frame, sizeof(frame) );
tx_thread_sleep(3);

// bottom display
frame.address = 0x01;
// copy the top display data.
memcpy(frame.data, (bOutBuffer)+28, 28);
// write the data
UART_Write(driver, (unsigned char*)&frame, sizeof(frame) );
tx_thread_sleep(3);

}

// Driver setup
UINT flipdot_graphics_driver_setup(GX_DISPLAY *display)
{
// Init serial port
driver = UART_Open(FLIPDOT_UART, 57600, UART_PARITY_NONE, 1, NULL);

// Init frame buffer
memset(bFlipDisp, 0x00, 56);

// setup the basic display frame
frame.frameStart = 0x80;
frame.command = cmd_sendToDisplay;
frame.frameEnd = 0x8f;
frame.address = 0x00; // top display

// perform standard function pointer setup
_gx_display_driver_monochrome_setup(display, GX_NULL, flipdot_buffer_toggle);

return GX_SUCCESS;
}
The full display driver is 69 lines of actual code (after trimming out comments and blank lines)! And I am sure this could be even less with proper C coding skills ;).
Create the UI for my application with GUIX Studio
I could have written the rest from scratch, leveraging the GUIX APIs, creating windows, widgets and more by hand. At the end of the day, for a UI as simple as the one I wanted to build initially for the panel (2 lines of text) that wouldn’t have been too much of a hassle.
But why bother when you can use a WYSIWYG tool that generates the code for you, right?
So here I am installing the GUIX Studio tool and opening it up.
In GUIX Studio, I created a new project, configured the resolution of the GUI to 28×14 and 1bpp.
By default, I got a window widget which is the main window of the GUI. With so little real estate and with the ambition of only displaying some text for now, I decided to add a multiline text view filling the whole window. After some fine tuning, removal of borders, I entered “…” as default content for the text view widget.
But here I could see the issue with such a low resolution: the font! The default TEXT_INPUT font is 18 pixels high… which definitively wouldn’t work for me. I first thought that I would have to create my own font, but after looking around in the docs, I figured that the tool allowed to import True Type fonts.
 Easy enough: off to the web to find a nice 3×5 font. I picked one on fontstruct.com that works great. I copied the ttf file in the project folder. In GUIX Studio I went to the Fonts menu, clicked Add New Font, selected the ttf file, named it flipdotfont3by5, set a Font Height of 5 pixels, then hit save.
 Now I could set the font for my text view widget as well as set a line space of 2 pixels in order to get 2 lines of text on the display (1 blank pixel on top, 5 pixels characters, 2 blank spaces between text lines, 5 pixels characters, 1 blank pixel at the bottom = 14 total pixels).
Before leaving GUIX Studio I went back to my main window properties to set an Event Function called main_event_process which would be used for some event management on the window:

Last thing left to do was to export all the resource and specification files using the menu Project | Generate All Output Files:

That was it, my graphical user interface resources had been generated by the tool:
- flipdot_guix_resources.c and flipdot_guix_resources.h: containing the GUIX resources (font, display theme, color map,…)
- flipdot_guix_specifications.c and flipdot_guix_specifications.h: containing the specifications and functions for the GUI Widget (in my case, the main window and the text view)
For these files to be compiled with the project I just needed to add them to the CMakeLists.txt file.
Back to the threadx_app.c file to add my window and its widgets: in order to have something happening on the display besides just displaying text, I wanted to have a simple timer that would change the text every second, alternating between “Hello World” and “Hello World.” resulting in a blinking dot.
Here is what I needed to add to the file:
#include <stdbool.h>
#include "tx_api.h"
#include "gx_api.h"
#include "flipdot_guix_resources.h"
#include "flipdot_guix_specifications.h"
#include "flipdot_graphics_driver.h"

// GUIX Windows
GX_WINDOW_ROOT *root;

// Timer for ticker refresh
#define CLOCK_TIMER 20
static bool ticker_on = false;
I then edited the main GUIX thread to setup the driver and create the main window:
// GUIX main thread
VOID guix_thread_entry(ULONG thread_input)
{
GX_WINDOW_ROOT *root;

/* Initialize GUIX. */
gx_system_initialize();

/* Setup graphics-related hardware and create the display. */
gx_studio_display_configure(DISPLAY, flipdot_graphics_driver_setup, LANGUAGE_ENGLISH, DISPLAY_THEME_1, &root);

/* create the main screen */
gx_studio_named_widget_create("window", (GX_WIDGET *) root, GX_NULL);

/* Show the root window to make it visible. */
gx_widget_show(root);

/* start GUIX thread */
gx_system_start();
}
And I finally added the main_event_process function to create the timer when the main window gets created and then change the text in the text view widget each time the timer ticked:
// Main window event processing
UINT main_event_process(GX_WINDOW *wnd, GX_EVENT *event_ptr) {
switch (event_ptr->gx_event_type)
{
case GX_EVENT_SHOW:
// Start a timer to update text at regular intervals
gx_system_timer_start((GX_WIDGET *)wnd, CLOCK_TIMER, TX_TIMER_TICKS_PER_SECOND/2,TX_TIMER_TICKS_PER_SECOND/2);
// Call default event process
return gx_window_event_process(wnd, event_ptr);

case GX_EVENT_TIMER:
// If the timer id is our clock timer, change what's on the display
if (event_ptr->gx_event_payload.gx_event_timer_id == CLOCK_TIMER)
{
gx_multi_line_text_view_text_set(&window.window_text_view, ticker_on?"Hello World .":"Hello World");
ticker_on = !ticker_on;
}
break;

default:
return gx_window_event_process(wnd, event_ptr);
}
return GX_SUCCESS;
}
Now the moment of truth: hit F5 to compile, link, deploy and start the debug…

And that was it!
To create an Azure RTOS GUIX display driver and a graphical user interface for a real time embedded application, I only needed to go through a short series of pretty simple and well documented tasks. Doing this for embedded systems has never been easy. Azure RTOS GUIX does make it simple, totally abstracting the hardware and taking care of all the underlying layers. You can now focus on developing rich, responsive, intuitive, productive graphical user interfaces for your embedded and real-time systems!
I am sure you’ll see this panel again soon in some other projects/demos on this very blog! Stay tuned on Twitter @obloch.
The video version
I put together a little video that walks through all the steps from scratch
Try it out for yourselves (even if you don’t have a Flip-Dot panel)
Azure RTOS GUIX really makes things easy, but don’t just take my word for it and check it out for yourselves: I put the detailed steps on GitHub.
 And don’t worry if you only have the Azure Sphere MT3620 devkit and no physical Flip-Dot panel , my friend Mike Hall put together a Flip-Dot emulator for Windows which paired with a serial-USB adapter will allow you to run the exact same code that controls the real hardware to drive the emulator! Who doesn’t have a serial-USB adapter lying around?
by Contributed | Dec 18, 2020 | Technology
This article is contributed. See the original author and article here.
Hi Teams Community,
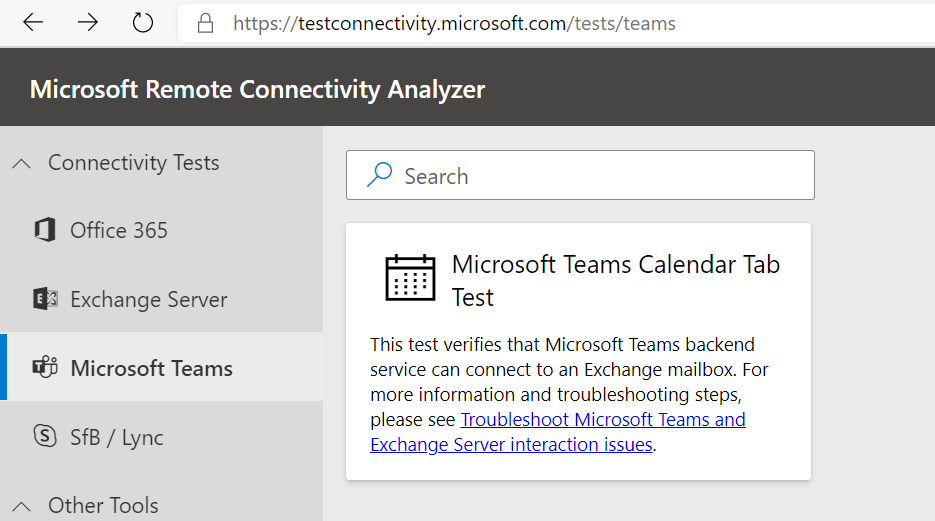
We’re back with another great addition to Support Diagnostics for Microsoft Teams. @João Loureiro has written our first offering in the Microsoft Remote Connectivity Analyzer, the Teams Calendar App test.
As you know, Teams and Exchange integration needs to be properly configured for users to get the full feature experience in Teams with Calendar functionality. This new test will help you troubleshoot and test your Exchange On-Premises Hybrid configuration to ensure it’s properly setup for Teams users.
If you’re experiencing issues with the Calendar App missing in Teams, or getting odd error messages in the Teams Meeting Add-in for Outlook like “We couldn’t schedule the meeting. Please try again later.” AND you have On-Premises Exchange server, you should use this diagnostic to help you troubleshoot.
To access the new diagnostic, navigate to Microsoft Remote Connectivity Analyzer, select Microsoft Teams, then click on the Microsoft Teams Calendar Tab test.
You’ll need to enter valid credentials of an account with an On-Premises Exchange Server mailbox. Keep in mind your end users can also perform these tests, you do not need to be an Administrator of your tenant. In some scenarios you’ll want to work with your impacted end user to run the tests and collect additional data for Microsoft Support.
At a high level the test checks a couple things:
- The user is licensed and fully provisioned for Teams
- The user’s mailbox is accessible via Exchange Web Services (EWS)
- We can get items from the user’s Calendar
You’ll also want to go over the following documents carefully when configuring your environment or troubleshooting these issues:
How Exchange and Microsoft Teams interact
Configuring Teams calendar access for Exchange on-premises mailboxes
Troubleshoot Microsoft Teams and Exchange Server interaction issues
Please give the new diagnostic a try if you’re using Exchange Server On-Premises and having trouble with Teams users’ Calendar apps or Outlook add-ins for Teams Meetings and let us know if it helped?
Thanks!
Microsoft Teams Support
by Contributed | Dec 18, 2020 | Technology
This article is contributed. See the original author and article here.
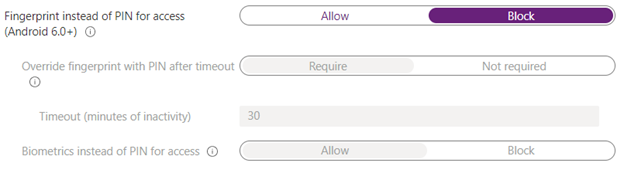
We wanted to inform you of a known issue with the Android 10 Samsung A10 biometric authorization in case you run into it. Launching any apps with App Protection Policies (APP, also known as MAM) on an Android 10 Samsung A10 with biometric authorization enabled (face recognition/thumbprint) will cause the device to crash. This issue has already been filed with Google and Samsung but we have not seen resolution. Due to this, in January’s Company Portal release, we will be disabling biometric authentication on impacted devices and these devices will use a PIN instead.
To work around this issue, you can create/edit your Android APP policies to Block for device biometrics settings and set this policy for an assigned group for Android 10 Samsung A10 users.
Screenshot displaying blocking biometric authentication
Note: Biometric authentication will work to unlock the device.
We’ll keep this post updated as we receive additional information.
If you have any questions, just let us know though comments on this post, or tagging @IntuneSuppTeam on Twitter.
by Contributed | Dec 18, 2020 | Dynamics 365, Microsoft 365, Technology
This article is contributed. See the original author and article here.
This year, I’ve shared inspiring stories of organizations responding to adversity by building digital resilience into the fabric of their operations and cultures. A common thread between these organizations is the agility to be better prepared for change, as well as the ability to stay focused on putting customers first.
That’s why it’s apropos to close the year by spotlighting Grant Thornton, a public accounting and advisory firm that, at the start of the pandemic, rapidly adjusted operating and client engagement modelsfrom selling and engaging clients remotely, to focusing services on those that will have the most immediate and beneficial impact in a time of crisis.
Grant Thornton’s journey to transform sales and customer service delivery is a testament to just how far digital sales tools have evolved in recent yearsand how the right platform can help client engagement teams to guide customers at the most crucial times of need.
A shift to digital selling pays off in deeper customer engagements
Organizations in 135 countries depend on Grant Thornton’s expertise and insights to prepare for the future, whether applying new technologies or digital transformation, understanding shifting regulatory landscapes, and tax and advisory services.
In 2018, Grant Thornton had the foresight to reimagine how to engage customers and build deeper relationships. Microsoft Relationship Sales, which brings together Microsoft Dynamics 365 Sales and LinkedIn Sales Navigator, helped them to build customer relationships at scale.
Nichole Jordan, Grant Thornton’s Central Region Managing Partner, shared how the solution had transformed the business at the 2019 Microsoft Business Applications Summit. “We believe it’s critical to monitor the health of the relationship with our clients at all times and using technology is the best way to be able to do that,” explain Jordan, citing the relationship sales solution enables teams to understand the sentiment of the relationships at all times.
Jordon shared that LinkedIn Sales Navigator was making a big impact on the depth and breadth of relationships. “Those teams that have more LinkedIn connections with their particular customer base have a higher win rate and an increased amount of sales versus those who don’t. We can see that the technology is helping us to better understand these companies, build deeper relationships and wider across the entire organization.”
Dynamics 365 Sales introduced a constant stream of intelligence to Grant Thornton teams around the globe, tracking changes at client organizations, from personnel to mergers and acquisitions, to customer and competitive trends, “providing automated insights and research to Grant Thornton partners twenty-four hours a day, seven days a week,” said Jordan. “These alerts go to our partners on their phones so they are constantly getting the latest about our client base so that they can provide more relevant information for them.”
Responding to a global crisisone customer at a time
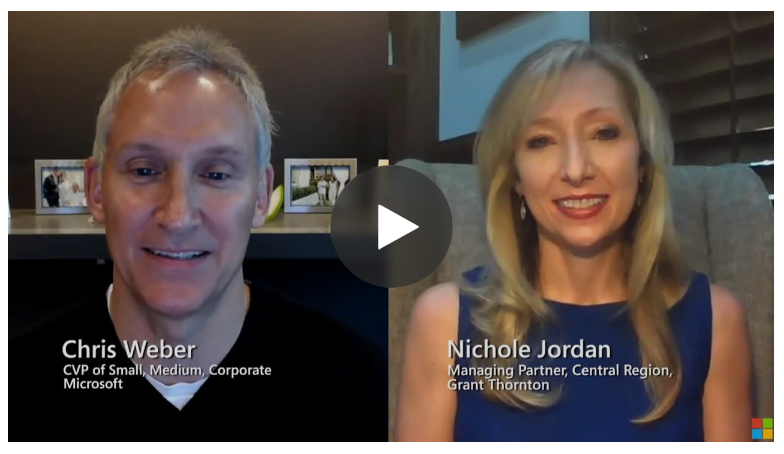
When the pandemic struck, Grant Thornton had to rapidly pivot priorities. “It was critical that we could reach out to our clients,” explained Jordan, in a recent conversation with Chris Weber, Microsoft Corporate Vice President, “to be there for them, to listen, to learn, and to offer help.”
Jordan shared with Weber how Grant Thornton leveraged its digital sales tools to help its team keep customer relations personal and impactful in the face of emerging challenges.
The first step was to reach out to its extensive customer base. “In our business we don’t regularly send messages to all of our customers so this was a first and we really relied very heavily on our Microsoft relationship and our customer relationship management (CRM) system with Dynamics 365, just our central repository for all of our customer contact information, so we started there.”
Sales staff offered clients a complimentary pandemic resiliency tool, a risk assessment dashboard that helps quantify risk through data-driven analysis across multiple impact zones and risk factors, plus tailored benchmarking by competitor or industry. “In order to leverage the toolwe had to dig in deep to the relationships that we had. And to do that we leveraged our CRM, so we were fully engaged in Dynamics 365,” explained Jordan.
The sales team is also continuing to leverage LinkedIn Sales Navigator, as well as Microsoft Power Platform. “All of our teams have access to our sales pipeline management through Microsoft Power BI,” said Jordan, “that gets updated every night and our teams have access to it every morning. So it’s built into their routineto be able to access the pipeline and the wins and the losses, and helps them understand the winning areas so that we can double down on that and bring that value across other clients.”
The sales team is also exploring Microsoft Power Apps to help target sales opportunities. For example, enabling teams to quickly pull up previous engagements that helped banks solve regulatory challenges, which could then be replicated at a different client or industry sector.
Real results
This combination of digital selling tools, from Dynamics 365 to Power Platform and LinkedIn Sales Navigator, has resulted in markedly improved business outcomes, according to Jordan.
The teams are able to connect with a broader number of clients and deepen relationships widely across an organization. They can prioritize opportunities that have a higher likelihood of winning. And they can do it all with speed and accuracy, enabling teams to respond to opportunities faster, including delivering proposals in days, rather than weeks.
“The technology improves our speed, it improves our accuracy with all that we’re doing, it’s helping us connect more broadly with clients, and it’s helping us focus our time, our money and our resources on areas where we can really bring the greatest value to clients and where we can win as a firm.”
Get the full story
Watch ademoor take aguided tourto see howDynamics 365 Salescanempower your sellers with actionable insights.To learn more about how Grant Thornton has deepened engagements with customers,read the full story and watch the full conversation between Nichole Jordan and Chris Weber.
The post Digital selling helps Grant Thornton engage clients at scale appeared first on Microsoft Dynamics 365 Blog.
Brought to you by Dr. Ware, Microsoft Office 365 Silver Partner, Charleston SC.
by Contributed | Dec 18, 2020 | Technology
This article is contributed. See the original author and article here.
Microsoft Stream (Classic) now includes new features that deliver better video experiences across all of Microsoft 365.
Fast Embed
The Microsoft Stream team has replaced our old embed player with an improved version called Fast Embed. This means users will experience faster-loading times for all Stream videos embedded across Microsoft 365 applications.
Wondering how fast it is? Check out the table below:
Host App
|
Before:
P75 TTI
|
After:
P75 TTI
|
% Change P75 TTI
|
Before:
P75 TTP
|
After:
P75 TTP
|
% Change P75 TTP
|
Teams
|
15.24s
|
11.6s
|
23.9% faster
|
4.03s
|
0.167s
|
95.9% faster
|
SharePoint (embedded before Nov*)
|
14.7s
|
8.86s
|
39.7% faster
|
0.395s
|
0.06s
|
84.8% faster
|
SharePoint (embedded after Nov*)
|
10.9s
|
1.0s
|
90.8% faster
|
5.0s
|
4.9s
|
2% faster
|
OneNote
|
18.9s
|
9.9s
|
47.6% faster
|
3.8s
|
0.103s
|
97.3% faster
|
Forms
|
11.2s
|
10.68s
|
4.6% faster
|
7.5s
|
0.157s
|
97.9% faster
|
Yammer
|
11.41
|
7.8s
|
31.6% faster
|
4.4s
|
0.179s
|
95.9% faster
|
PowerPoint Online
|
6.43s
|
4.14s
|
35.6% faster
|
5.85s
|
0.01s
|
99.8% faster
|
PowerPoint Win32
|
6.34s
|
5.2s
|
18.0% faster
|
6.03s
|
0.4s
|
93.4% faster
|
Webcam-only Recording
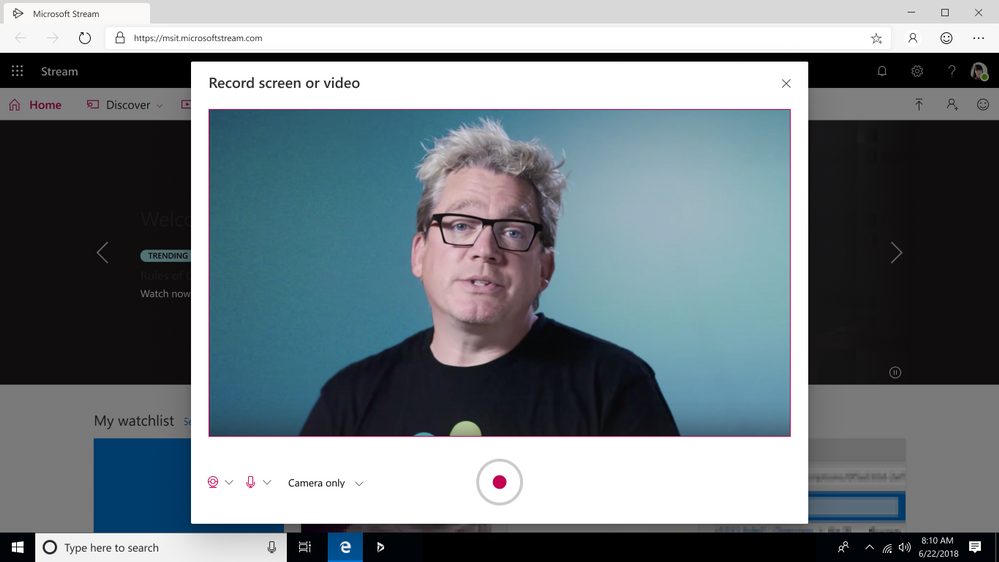
We’ve rolled out webcam-only recording to Stream (Classic) customers. This update gives everyone an additional way to create videos for training, knowledge sharing and communications across the organization without downloading additional tools or software.
.png")
by Contributed | Dec 18, 2020 | Technology
This article is contributed. See the original author and article here.
Following our blog post from December 6th , today we are providing further information on the Windows 10 Team 2020 Update.
Starting today, the updated Surface Hub Recovery Tool (SHRT) with the Windows 10 Team 2020 update is available here for first-generation Surface Hubs.
This is the first step in our continued commitment to service our 55” and 84” first-generation Surface Hubs as we prepare to deliver the update via Windows Update and Windows Update for Business in the new year, as we do for Surface Hub 2S.
We encourage our customers and partners to review the list of known issues for this build prior to installing the update.
Happy Holidays from the Surface Hub team!

Recent Comments