
by Contributed | Jan 7, 2021 | Technology
This article is contributed. See the original author and article here.
Join us January 21st at 11am eastern to learn about the Nursing Hackathon Delivered Innovative Solutions Designed to Reimagine Care Delivery.
The Reimagine Care Delivery Developer Challenge (virtual hackathon), presented by: Allscripts, MATTER, Microsoft and ARC (Sheba Medical Center) was held in December 2020 and the competition was stellar! The “entry solutions” were all designed to create the EHR of the future, to reduce the burden on nurses. Join 2 of the judges, Kathleen McGrow, RN, CNIO, Microsoft and Paul Minton, RN, VP Solutions Management, Allscripts, to hear about competition and the finalists. Also, joining the winner – DeepScribe (Matthew Ko, Co-founder and COO), to highlight how their innovative solution will be bringing the joy back to medicine!
To attend the webcast download the .ics calendar file below or click on the direct link on the date/time of the webcast.
Thanks for visiting – Michael Gannotti LinkedIn | Twitter
 Michael Gannotti
![[Call for Content] Become a Mixed Reality BizApps Guest Blogger!](https://www.drware.com/wp-content/uploads/2021/01/large-344)
by Contributed | Jan 7, 2021 | Technology
This article is contributed. See the original author and article here.
Call for Content: Mixed Reality BizApps Guest Bloggers
Happy new year, Mixed Reality Community!
If your 2021 new year resolution is to become a published guest blogger, here’s your chance! We’re looking for community guest bloggers to contribute exciting and inspiring stories about how you use Mixed Reality Business Applications like Dynamics 365 Remote Assist and/or Guides on HoloLens in your organization (or even personal life!).
Here are some starter questions that you can incorporate into your story:
- How did you get into the mixed reality space? (i.e did you have role models, did the community help you fit in etc)
- What is it about mixed reality that excites you?
- What do you think is the biggest misconception people have about mixed reality?
- How do you think mixed reality business apps can help positively impact the world and/or help solve key world issues?
- What advice would you give to someone aspiring to join this space? Any resources you can share?
Benefits of becoming a Mixed Reality Community guest blogger:
- Have your blog posts/stories count as community contribution towards MVP status
- Raise your profile within the Mixed Reality industry (and meet awesome peers in the process!)
- The best stories might even net you a speaking gig at our flagship/community events
- Watch this space for upcoming special raffles for you to have a chance at scoring some goodies!
Ready to dig in? Submit your story pitch at https://aka.ms/MRGuestBloggers today!
#MixedReality #GuestBloggers
by Contributed | Jan 7, 2021 | Technology
This article is contributed. See the original author and article here.
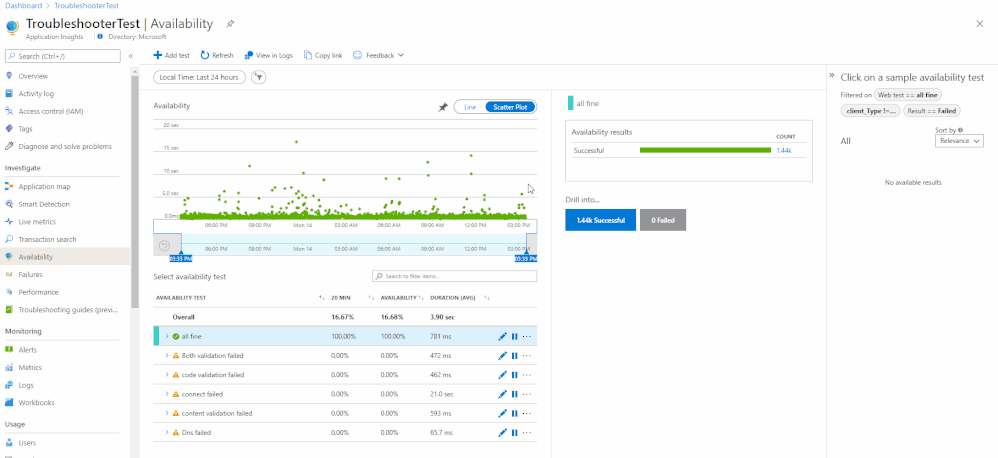
A common challenge for app developers, site reliability engineers (SREs), and DevOps engineers is that a synthetic availability test could fail while the application is still functioning perfectly. It can be extremely frustrating to identify if the root cause of the failure was due to your application or network issues.
Introducing the new Availability Troubleshooting Report
NOTE: The troubleshooting report is only available for URL ping tests.
The Troubleshooting Report is intended to help you understand why your customers may have problems accessing your application or alert you to potential issues while all metrics indicate it is healthy.
It can be accessed through the portal by selecting a test result from the scatter plot or Drill Into section. Each dependency will have an individual troubleshooting report attached.

If a step fails, then it will appear at the top of the availability result to give you instant insight into where the problem might be. If no step fails, then the troubleshooting report will be closed by default.
Common Test Failures & Potential Root Causes:

DNS lookup could fail because your record needs to be publicly available for the ping test to work.
If you need to test against a private DNS record, then use the TrackAvailability SDK. This enables you to run availability tests behind a firewall or in an isolated environment, expand your test region selection, and author more complex tests than are available in the portal UI.

Connection Failed indicates that there might be a firewall blocking our service from accessing your endpoints.
You can add the Application Insights Availability service tag to your Network Security Group (NSG) or Azure Firewall to allow only inbound traffic from our testing engine. Service tags will automatically update the list of allowed IP addresses for specific services, minimizing the complexity and need for updating network security rules. You can also whitelist by individual IP addresses.
If you need to run tests without allowing any traffic into your virtual network, then we recommend using the TrackAvailability SDK.

Status Code & Content Validation ensures your webpage has specific content available and that it sends the correct response code.
The application owners should be contacted to investigate why their page returns an incorrect code or is missing content.
See more:
Troubleshoot your Azure Application Insights availability tests – Azure Monitor | Microsoft Docs
by Contributed | Jan 7, 2021 | Technology
This article is contributed. See the original author and article here.
It’s been a few years since we blogged about this topic, so we thought we’d share a few updates with you. Below we’ve provided options and tips for you to consume new feature, service change, and service health notices for Microsoft Intune. Let us know what questions you have by replying on this post or asking us out on Twitter @IntuneSuppTeam.
Message center posts
Intune aligns to the Modern Lifecycle Policy and we communicate planned service changes through the Message center, such as:
New major features (communicated at release)
Changes to existing service behavior (typically communicated 30 days in advance)
Planned maintenance (at a minimum 5 days prior)
End of Support statements (if an entire service, typically a year; if an OS or large feature typically 90 day in advance)
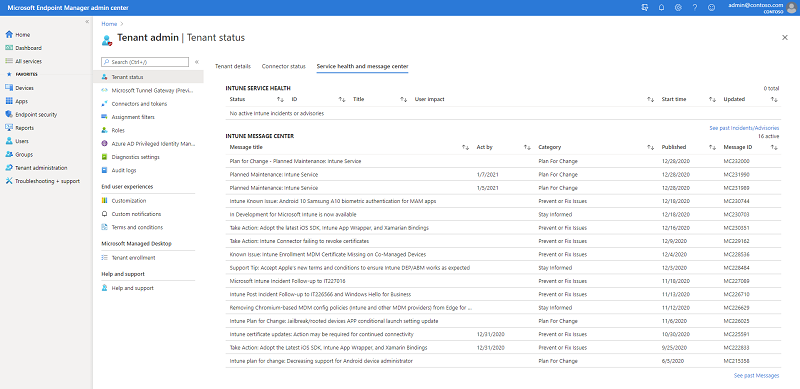
You can see all of your Intune Message center Posts in the Microsoft Endpoint Manager admin center on the tenant status blade. Here’s a screen shot from my Message center:
Screenshot of the MEM admin center – Service health and message center blade
We do our best to make sure that you only see Message center posts that affect your organization, particularly when there are changes that will affect a specific scenario. For example, the top message shown in the screen shot above – about Apple updating their T&C’s – went to customers with managed Apple devices. If the scope is broader or indeterminate, we’ll post to all customers and explain how you could be impacted in the “How does this affect my organization” section of the post.
If you are interested in other M365 service messages outside of Intune, then head to the M365 admin portal. It’s the same Intune messages posted there – we use the M365 service API’s to pull Intune messages from the M365 admin center to Endpoint Manager. Within the M365 admin portal, you can then set preferences for the messages you see – for example if you administer Exchange and Intune you can select both and view them in the M365 admin portal. We’ve linked from the Microsoft Endpoint Manager admin center on the tenant status blade to the M365 admin center to make it easy for you to go from one to the other without having to reauthenticate.
 Screenshot of the M365 admin center – Message center preferences pane
Message center FAQ:
Intune In development/What’s new
Intune also publishes a list of UI updates and features In development (expect to ship in the next monthly release) and in What’s new (what ships in the monthly service release). Items move from In Development to What’s New as we ship each release. There are times a feature gets pulled back into development after it ships or a feature misses our readiness documentation process. We work back with our PM and engineering teams to ensure the documentation and communication process is followed.
In Development/What’s New FAQ:
Does every What’s New item get it’s own Message center post? No, we do a single message center post to inform customers of the latest What’s New release where you can then go and read about each new feature. A good way to think about the distinction between the Message center and What’s New is that we prefer to use the Message center more for targeted service changes, especially where action may be required in a specific time period. New features are updated on What’s New.
I saw something on In Development but now it’s gone. What happened? Rarely items are pulled out of our pre-production, but it does happen from time-to-time. Or the item released and moved to What’s New.
How do I know when In Development/What’s New updates? Three options – follow @IntuneSuppTeam out on Twitter, check your Message center for a notice that they’ve been updated, or follow the docs RSS feed on those pages.
Service Health Dashboard
You can see service incidents for Intune over in Microsoft Endpoint Manager admin center. They are in the same spot as the Message center on the Tenant Administration > Tenant Status > Service health and Message center.
 Screenshot of the MEM admin center – Service health and message center blade
Service health notices will stay active on the Microsoft Endpoint Manager admin center for 5-7 days after the incident closed. Over in the M365 admin center, you can see archived notices for up to 30 days.
How to check Microsoft 365 service health – Microsoft 365 Enterprise | Microsoft Docs
Email notifications for Message Center and Service Health Dashboard posts
If you prefer to receive notifications via email, you can opt in through the M365 admin center. Navigate to the Service Health blade and click Preferences > Email and check the box to receive email notifications. Enter 1-2 email addresses that you’d like notifications to be sent to and select your preferences. You’ll likely want to pick advisories and incidents. You can read more on the distinction here: How to check Microsoft 365 service health – Microsoft 365 Enterprise | Microsoft Docs.
 Screenshot of the M365 admin center – Message center email preferences pane
For Message center posts, repeat these steps on the Message center blade. If you select the Send me a Weekly Digest > Microsoft Intune you’ll get a once-a-week summary of everything posted for Intune into your Message Center.
Note that email is a onetime setup and the only sign-up for Intune service change emails today is from the M365 admin center.
Using the M365 Admin app on your phone
You can see notices from the M365 Admin app. When you open the app, the Home page will automatically show the Health dashboard where you can tap into the Message center or Service Health notices. You can also access both Message center and Service health from the hamburger menu.
 M365 Admin app – Home screen
  M365 Admin app – Message center option
Turn on push notifications for both Service Health and Message center by going to Settings > Notifications and tapping the toggles to green for all notifications or tap the arrows next to each and turn on notifications for specific services or notices.
 M365 Admin app – Notifications screen
  M365 Admin app – Notifications screen
Office 365 Communications API
You can use Office 365 Communications API to access incident and message center posts from Microsoft Intune. The API relies on Azure Active Directory (Azure AD) and OAuth2 so you will need to register and configure your application within Azure AD before being able to access the API. The following steps will walk you through the process of registering your application and running the PowerShell script to call the API.
Navigate to the Azure Active Directory admin center.
Click Azure Active Directory > App registrations > New registration.
Fill out the fields and click Create. Copy the Application ID for later.
Note: Make sure Web is selected for URI, the domain will be used later.
 Azure Active Directory – Registering a new application
- Click on the newly created App > API Permissions > Add > Office 365 Management APIs.
 Adding the O365 Management API to the newly created app registration
- Click Delegated permissions and select “ServiceHealth.Read”, repeat with Application permissions and click “Add permissions”.
 Adding the ServiceHealth.Read permission to the newly created app registration
Next, click Certificates & secrets > New client secret > Enter name and select expiration > Add.
Copy the “Client secrets” Value for later.
 Certificates & Secrets – Highlighted Value
- Download and save this PowerShell script. Update with your tenant ID (How to find your Azure Active Directory tenant ID, application ID (step 3), and the Client secret value (step 6).
 Editing the PowerShell script to include tenant ID, app ID, and client secret
- Run the PowerShell script to receive all Intune related messages from the O365 admin center.
There are multiple ways to receive message center notices, whether it’s in the admin center, email, M365 app, or using the service API’s — choose the one that works best for you.
As always, we want to hear from you! If you have any suggestions, questions, or comments, just let us know through comments on this post or tagging @IntuneSuppTeam on Twitter.
by Contributed | Jan 7, 2021 | Technology
This article is contributed. See the original author and article here.
Overview
When deploying the SAP application layer of NetWeaver or S/4HANA, one of the requirements is to have directories like /sapmnt/SID, saptrans shared in the environment. Additionally, when deploying highly-available SAP system, file systems like /sapmnt/SID, usr/sap/SID/ASCS, also need to be protected and highly available.
On Azure, you have several different options for deploying “sap shared directories”. You may be asking yourself, what are the differences and when should I use which option? In this blog we explore the options and describe how to deploy highly available SAP system, using Azure Files NFS v4.1 shares, which recently entered public preview.
What are the options for SAP shared directories?
So far, when deploying highly available SAP ASCS/ERS instance on Linux VMs in Azure, you could deploy the sap shared directories on:
- NFS volumes on ANF
- Highly available NFS cluster: either Pacemaker cluster with DRBD replication on SLES, or GlusterFS cluster on RHEL
When using highly-available NFS cluster, you are responsible for deploying and configuring these NFS clusters, including the HA configuration. Once built, you are also responsible of all aspects of maintaining and operating the NFS cluster. That means that the TCO goes well beyond the cost of the Azure infrastructure components for such an NFS cluster. On the other hand, because no specialized Azure components are required, such a solution can be deployed in any Azure region. If the SAP system is in a zonal deployment, the NFS cluster itself can also be deployed across Availability zones. Cross-region replication for Disaster Recovery(DR) across availability zones is also to be configured and operated by you as a customer.
When using NFS volumes on ANF, there is no need to deploy, configure and maintain NFS clusters. ANF clusters have built in redundancy (within a single zone), and ANF comes with 99.99% availability SLA. Cross-region replication (in public preview) is a new ANF feature, based on SnapMirror, which allows cross-region replication of ANF volumes for DR purposes. ANF can deliver sub-milliseconds latency, and while this is not the topic of the blog, it is worth mentioning, that ANF is an excellent choice for deploying HANA DB as its latency and throughput characteristics meet SAP’s requirements for HANA deployments. If you are considering zonal deployment, keep in mind that ANF is not zone-aware, and data is not automatically replicated across Availability zones. The minimum capacity pool size for ANF is 4 TiB, and such entry point is relatively high for customers with smaller requirements: for instance customers with smaller SAP Landscapes, only interested in using ANF for the SAP shared directories of the SAP application layer.
What about the new option Azure Files NFS v4.1 shares? This is a new Azure offering that is in a public preview stage. As the name implies, it is based on Azure Files – Premium. Like ANF, Azure Files NFS eliminates the need to deploy, configure and maintain NFS clusters. The minimum size for a single NFS share on Azure Files is 100GB. You only pay for the capacity of the deployed shares. Expectation on delivered storage latency is that it does not meet the level necessary for SAP databases. But that the storage latencies are sufficient for hosting SAP application layer shares in a very cost-effective manner.
Two choices for data redundancy are offered: LRS (local, in zone synchronous data replication) and ZRS (synchronous replication of your data across all 3 availability zones). If using ZRS, in the case of a zonal failure, the NFS sessions are automatically redirected to a healthy zone, if using Private Endpoint to access the shares in the storage account. It is not necessary to re-mount the NFS shares to your Azure VMs after a zonal failure. While the storage layer fails over, the SAP application may experience “disturbance”, depending on how long it takes for the NFS sessions to be redirected to a healthy zone. For instance, the SAP workload may experience higher than usual latency. Or SAP work processes may restart. As usual, single point of failure components, like SAP ASCS/ERS, should be protected with clustering technology (Pacemaker cluster), so that the cluster can automatically restart or fail-over the instances. In the case of a VM failure – the Pacemaker cluster will failover to the healthy cluster node, as usual.
Automatic cross-region replication for DR scenarios is currently not offered with NFS on Azure Files. Cross-region replication can be achieved, using tools like rsync.
If you are considering a zonal deployment for your SAP Application workload, and looking for a simplified, cost effective option for the SAP shared directories, that also offers cross-zone resilient, read on – NFS on Azure Files could be a good fit and you can try it now. Azure Files NFS v4.1 shares is not suitable for production workloads at this point in time, as it is in a public preview stage.
To summarize the features of the different options:
|
NFS – Azure Files |
NFS – ANF |
NFS Cluster |
SAP use case |
(SAP shared directories) |
(SAP shared directories)
|
(SAP shared directories) |
High Availability/
Redundancy
|
Built-in (LRS or ZRS) |
Built-in (within a single zone) |
Custom |
Cross-Zonal replication |
Yes (with ZRS) |
No |
Yes, if the cluster is deployed across zones |
Cross-Region Replication |
Custom (rsync) |
Yes (SnapMirror) |
Custom (rsync) |
Minimum requirements |
100 GB / individual share |
4TiB / capacity pool |
N/A |
TOC considerations |
Cost of the NFS shares |
Cost of the ANF capacity pool |
Cost of the VMs and disks for the NFS cluster, plus effort/cost to configure and maintain the cluster |
Now, let’s go back and take a look at the example in this blog:
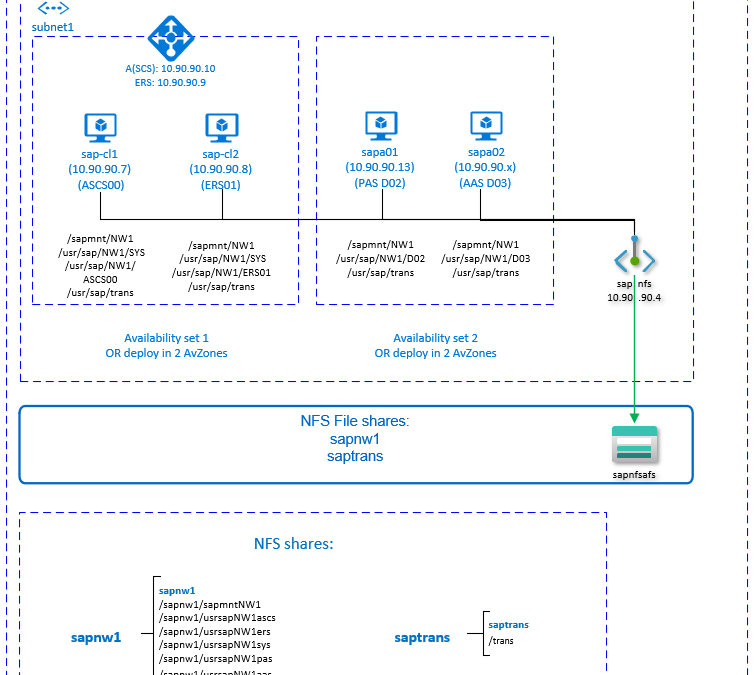
- We will be deploying SAP system NW1, HANA S/4 1809, with instance numbers: ASCS(00), ERS(01), PAS(02), AAS(03).
- All SAP file systems are placed on NFS shares on Azure Files in a single storage account, accessed via private endpoint. The storage account has two NFS shares: sapnw1 and saptrans. NFS share sapnw1 contains all directories for SAP system NW1.
- SAP ASCS/ERS are in a Pacemaker cluster and STONITH is based on Azure Fence agent (SBD works as well)
- All VMs are deployed with SLES 12 SP5

Prepare Infrastructure
We are assuming that the Virtual networks, subnets, resource groups are already deployed.
- Deploy your VMs. You can deploy them in Availability sets, or in Availability zones, if the Azure region supports it. If you need additional IPs to your VMs, deploy and attach second NIC. Don’t add secondary IP to the primary NIC, as this scenario is not supported with floating IP in the Azure LB.
- Deploy and configure an Azure load balancer – it is best to deploy standard SKU Azure LB.
- You will need two front IPs: one for ASCS (10.90.90.10) and one for ERS (10.90.90.9).
- Create a backend pool and add both VMs, which will be clustered.
- Create the health probes for ASCS (probe port: 62000) and ERS (probe port 62101). The probe ports must match the ports that you will use later in the Pacemaker resource configuration.
- Configure the load balancing rules for ASCS and ERS, being careful to select the corresponding front IPs, health probes and the backend pool. Select HA ports, make sure to increase the idle timeout to 30 minutes and enable floating IP.
For more detailed instructions, reference Deploy Azure Load Balancer via Azure portal.
The Azure Fence agent requires outbound connectivity to the Azure ARM public end point and that is not the case by default for VMs in the backend pool of Standard Azure LB. Several scenarios how to achieve outbound connectivity for these VMs are covered here.
Deploy Azure Files Storage Account and NFS shares
Now, let’s look at the steps to deploy Azure Files NFS shares (we will use ZRS replication). If you are curious to learn more about Azure Files NFS shares, the documentation can be found here.
First, you will need to deploy Premium Storage Account of type file. You will be accessing the Storage account via Private end point, deployed in the same VNET as the VMs for your SAP application layer. That means that the traffic from your SAP system never leaves the virtual network security boundaries. SAP systems often contain sensitive and business critical data and staying within the boundaries of the VNET is important security consideration for many customers.
If you need to access the storage account from a different VNET (Network topology often varies across customers), then you can use Azure VNET peering.
- First, Deploy the FileStorage storage account sapafsnfs . In Azure portal select Create a resource –> Storage –> Storage Account.
- Basics: Select Subscription, Resource Group, Region
- Basics: Enter the storage account name, i.e. sapafsnfs
- Basics: Make sure to select Premium as performance tier.
- Basics: select FileStorage as account kind.
- Basics: select replication Zone-redundant storage (ZRS)
- Click Next
- Networking: select Private endpoint as connectivity method. The private end point will be used to access the storage form within the configured VNETs.
- Create PrivateEndpoint, while creating the Storage Account
- While still in Networking, Click on Add in the Private endpoint section.
- Select/verify the Subscription, Resource Group and Region.
- Enter Name of the Private endpoint: sapafsnfs_pe
- Storage sub-resource: file
- Virtual Network/subnet: select the virtual network/subnet, where the SAP VMs are deployed.
- Accept the default (Yes) for Integrate with private DNS zone
- Make sure to select your Private DNS Zone from the drop down.
- Click OK, to go back to the Network tab in Create storage Account.
- Continue with the creation of storage account
- Click Next
- Data protection: accept the defaults
- Click Next
- Advanced: Set Secure transfer required to Disabled
- Proceed and create the storage account
For details on how to create storage account see Create FileStorage Storage Account.
- Next, you will need to deploy your NFS shares in the storage account you just created. In this example we will need two NFS shares:
- sapnw1 (128GB). All NW1 file systems, except saptrans are nested mount points
- saptrans (128GB)
The only supported protocol is NFSv4.1. Navigate to the storage account (sapafsnfs) and click on File shares
- Enter the name of the share, i.e. sapnw1, saptrans
- Size: 128GB
- Select NFS (preview) as protocol
- Make sure to select “No root Squash”. Otherwise, when you mount the shares on your VMs you will not see the file owner/group.
For details on how to deploy NFS shares, see Create NFS share.
Create Pacemaker cluster
Now that you have deployed the Azure infrastructure components for your SAP system, you can proceed with the configuration of the system.
The SAP ASCS instance is a single point of failure in an SAP system. To achieve highly available deployment, configure a Pacemaker cluster for the ASCS/ERS VMs.
Follow the instructions here to build the Pacemaker cluster. You can choose to use either Azure Fence Agent or SBD for fencing.
SAP ASCS/ERS installation
The following items are prefixed with either [A] – applicable to all nodes, [1] – only applicable to node 1 or [2] – only applicable to node 2.
- [A] Install the latest version of the SAP SUSE cluster connector
sudo zypper in sap-suse-cluster-connector
- [A] Set up host name resolution. Insert in /etc/hosts:
10.90.90.7   sap-cl1
10.90.90.8   sap-cl2
10.90.90.10  sapascs
10.90.90.9   sapers
- [1] Create the SAP directories on the NFS share: temporarily mount NFS share sapnw1, and create the directories that will be used as nested mount points:
sudo mkdir -p /saptmp
sudo mount -t nfs sapnfs.file.core.windows.net:/sapnfsafs/sapnw1 /saptmp -o vers=4,minorversion=1,sec=sys
sudo mkdir -p /saptmp/sapmntNW1
sudo mkdir -p /saptmp/usrsapNW1ascs
sudo mkdir -p /saptmp/usrsapNW1ers
sudo mkdir -p /saptmp/usrsapNW1sys
sudo mkdir -p /saptmp/usrsapNW1pas
sudo mkdir -p /saptmp/usrsapNW1aas
sudo umount /saptmp
- [A] Create the SAP shared directories
sudo mkdir -p /sapmnt/NW1
sudo mkdir -p /usr/sap/trans
sudo mkdir -p /usr/sap/NW1/SYS
sudo mkdir -p /usr/sap/NW1/ASCS00
sudo mkdir -p /usr/sap/NW1/ERS01
sudo chattr +i /sapmnt/NW1
sudo chattr +i /usr/sap/trans
sudo chattr +i /usr/sap/NW1/SYS
sudo chattr +i /usr/sap/NW1/ASCS00
sudo chattr +i /usr/sap/NW1/ERS01
- [A] Mount the file systems, that will not be controlled by the Pacemaker cluster. In this example we use /etc/fstab.
sapnfs.file.core.windows.net:/sapnfsafs/saptrans /usr/sap/trans nfs vers=4,minorversion=1,sec=sys 0 0
sapnfs.file.core.windows.net:/sapnfsafs/sapnw1/sapmntNW1 /sapmnt/NW1 nfs vers=4,minorversion=1,sec=sys 0 0
sapnfs.file.core.windows.net: /sapnfsafs/sapnw1/usrsapNW1sys/ /usr/sap/NW1/SYS nfs vers=4,minorversion=1,sec=sys 0 0
# Mount the file systems
mount -a
- [A] Configure the SWAP file and restart the agent to activate the changes
sudo vi /etc/waagent.conf
# Set the property ResourceDisk.EnableSwap to y
# Create and use swapfile on resource disk.
ResourceDisk.EnableSwap=y
# Set the size of the SWAP file with property ResourceDisk.SwapSizeMB
# The free space of resource disk varies by virtual machine size. Make sure that you do not set a value that is too big. You can check the SWAP space with command swapon
# Size of the swapfile.
ResourceDisk.SwapSizeMB=2000
#restart the agent to activate the changes
sudo service waagent restart
- [1] Create the VIP and the health probe resource for ASCS
sudo crm node standby afs-cl2
sudo crm configure primitive fs_NW1_ASCS Filesystem device=' sapnfs.file.core.windows.net:/sapnfsafs/sapnw1/usrsapNW1ascs' directory='/usr/sap/NW1/ASCS00' fstype='nfs' options='sec=sys,vers=4.1'
op start timeout=60s interval=0
op stop timeout=60s interval=0
op monitor interval=20s timeout=40s
sudo crm configure primitive vip_NW1_ASCS IPaddr2
params ip=10.90.90.10 cidr_netmask=24
op monitor interval=10 timeout=20
sudo crm configure primitive nc_NW1_ASCS azure-lb port=62000
sudo crm configure group g-NW1_ASCS fs_NW1_ASCS nc_NW1_ASCS vip_NW1_ASCS
meta resource-stickiness=3000
Before proceeding with the SAP ASCS installation, make sure all cluster resources are started:
Full list of resources:
 rsc_st_azure   (stonith:fence_azure_arm):      Started afs-cl1
 Resource Group: g-NW1_ASCS
     fs_NW1_ASCS        (ocf::heartbeat:Filesystem):    Started afs-cl1
     nc_NW1_ASCS        (ocf::heartbeat:azure-lb):      Started afs-cl1
     vip_NW1_ASCS       (ocf::heartbeat:IPaddr2):       Started afs-cl1
- [1] Install the SAP ASCS instance – use the virtual hostname, associated with the IP address of the load balancer frontend configuration for ASCS. In this case, sapascs.
sudo <swpm>/sapinst SAPINST_REMOTE_ACCESS_USER=sapadmin SAPINST_USE_HOSTNAME=ASCS_virtual_hostname
If the installation fails to create a subfolder in /usr/sap/NW1/ASCS00, try setting the owner and group of the ASCS00 folder to sidadm and retry.
- [1] Create the VIP and the health-probe for the ERS instance.
sudo crm node online afs-cl2
sudo crm node standby afs-cl1
sudo crm configure primitive fs_NW1_ERS Filesystem device=' sapnfs.file.core.windows.net:/sapnfsafs/sapnw1/usrsapNW1ers' directory='/usr/sap/NW1/ERS01' fstype='nfs' options='sec=sys,vers=4.1'
op start timeout=60s interval=0
op stop timeout=60s interval=0
op monitor interval=20s timeout=40s
sudo crm configure primitive vip_NW1_ERS IPaddr2
params ip=10.90.90.9 cidr_netmask=24
op monitor interval=10 timeout=20
sudo crm configure primitive nc_NW1_ERS azure-lb port=62101
sudo crm configure group g-NW1_ERS fs_NW1_ERS nc_NW1_ERS vip_NW1_ERS
Verify that the cluster resources have started, before proceeding with the SAP ERS installation:
Full list of resources:

 rsc_st_azure   (stonith:fence_azure_arm):      Started afs-cl2
 Resource Group: g-NW1_ASCS
     fs_NW1_ASCS        (ocf::heartbeat:Filesystem):    Started afs-cl2
     nc_NW1_ASCS        (ocf::heartbeat:azure-lb):      Started afs-cl2
     vip_NW1_ASCS       (ocf::heartbeat:IPaddr2):       Started afs-cl2
Resource Group: g-NW1_ERS
     fs_NW1_ERS (ocf::heartbeat:Filesystem):    Started afs-cl2
     nc_NW1_ERS (ocf::heartbeat:azure-lb):      Started afs-cl2
     vip_NW1_ERS        (ocf::heartbeat:IPaddr2):       Started afs-cl2
- [2] Install SAP ERS on the second cluster node, using the virtual name associated with the IP address of the load balancer frontend configuration for ERS. In this case, sapers.
sudo <swpm>/sapinst SAPINST_REMOTE_ACCESS_USER=sapadmin SAPINST_USE_HOSTNAME=ERS_virtual_hostname
If the installation fails to create a subfolder in /usr/sap/NW1/ERS01, try setting the owner and group of the ERS01 folder to sidadm and retry.
- [1] Adapt the ASCS and ERS SAP profiles
- ASCS profile
# Add the following lines
service/halib = $(DIR_CT_RUN)/saphascriptco.so
service/halib_cluster_connector = /usr/bin/sap_suse_cluster_connector
- ERS profile
# Add the following lines
service/halib = $(DIR_CT_RUN)/saphascriptco.so
service/halib_cluster_connector = /usr/bin/sap_suse_cluster_connector
#Make sure Autostart is not activated in the profile
# Autostart = 1
- [A] Configure Keep Alive: make sure that the keepalive OS parameters are set as described in SAP note #1410736 on all VMs, running SAP instances (including the VMs running SAP PAS and AAS).
- [A] Add sidadm to the Pacemaker cluster group
# Add sidadm to the haclient group
sudo usermod -aG haclient nw1adm
- [1] Add the ASCS and ERS SAP services to the sapservices file
cat /usr/sap/sapservices | grep ASCS00 | sudo ssh afs-cl2 "cat >>/usr/sap/sapservices"
sudo ssh afs-cl2 "cat /usr/sap/sapservices" | grep ERS01 | sudo tee -a /usr/sap/sapservices
- [1] Create the SAP cluster resources. This example is based on ENSA2:
sudo crm configure property maintenance-mode="true"
sudo crm configure primitive rsc_sap_NW1_ASCS00 SAPInstance
operations $id=rsc_sap_NW1_ASCS00-operations
op monitor interval=11 timeout=60 on-fail=restart
params InstanceName=NW1_ASCS00_nw1ascs START_PROFILE="/sapmnt/NW1/profile/NW1_ASCS00_nw1ascs"
AUTOMATIC_RECOVER=false
meta resource-stickiness=5000
sudo crm configure primitive rsc_sap_NW1_ERS01 SAPInstance
operations $id=rsc_sap_NW1_ERS01-operations
op monitor interval=11 timeout=60 on-fail=restart
params InstanceName=NW1_ERS01_nw1ers START_PROFILE="/sapmnt/NW1/profile/NW1_ERS01_nw1ers" AUTOMATIC_RECOVER=false IS_ERS=true
sudo crm configure modgroup g-NW1_ASCS add rsc_sap_NW1_ASCS00
sudo crm configure modgroup g-NW1_ERS add rsc_sap_NW1_ERS01
sudo crm configure colocation col_sap_NW1_no_both -5000: g-NW1_ERS g-NW1_ASCS
sudo crm configure order ord_sap_NW1_first_start_ascs Optional: rsc_sap_NW1_ASCS00:start rsc_sap_NW1_ERS01:stop symmetrical=false
sudo crm node online afs-cl1
sudo crm configure property maintenance-mode="false"
Once you have configured the SAP resources in the cluster, make sure all resources have started and that the cluster status is OK:
Online: [ afs-cl1 afs-cl2 ]
Full list of resources:
 rsc_st_azure   (stonith:fence_azure_arm):      Started afs-cl1
 Resource Group: g-NW1_ASCS
     fs_NW1_ASCS        (ocf::heartbeat:Filesystem):    Started afs-cl1
     nc_NW1_ASCS        (ocf::heartbeat:azure-lb):      Started afs-cl1
     vip_NW1_ASCS       (ocf::heartbeat:IPaddr2):       Started afs-cl1
     rsc_sap_NW1_ASCS00 (ocf::heartbeat:SAPInstance):   Started afs-cl1
 Resource Group: g-NW1_ERS
     fs_NW1_ERS (ocf::heartbeat:Filesystem):    Started afs-cl2
     nc_NW1_ERS (ocf::heartbeat:azure-lb):      Started afs-cl2
     vip_NW1_ERS        (ocf::heartbeat:IPaddr2):       Started afs-cl2
     rsc_sap_NW1_ERS01  (ocf::heartbeat:SAPInstance):   Started afs-cl2
Complete the SAP system installation
The following items are prefixed with either [A] – applicable to both PAS and AAS, [P] – only applicable to PAS or [S] – only applicable to AAS.
- [A] Set up host name resolution
10.90.90.7 sap-cl1
10.90.90.8 sap-cl2
10.90.90.10 sapascs
10.90.90.9 sapers
10.90.90.12 sapa01
10.90.90.13 sapa02
- [A] Create the SAP directories
sudo mkdir -p /sapmnt/NW1
sudo mkdir -p /usr/sap/trans
sudo chattr +i /sapmnt/NW1
sudo chattr +i /usr/sap/trans
- [P] Create the PAS directories and mount the NFS shares
sudo mkdir -p /usr/sap/NW1/D02
sudo chattr +i /usr/sap/NW1/D02
sapnfs.file.core.windows.net:/sapnfsafs/saptrans /usr/sap/trans nfs vers=4,minorversion=1,sec=sys 0 0
sapnfs.file.core.windows.net:/sapnfsafs/sapnw1/sapmntNW1 /sapmnt/NW1 nfs vers=4,minorversion=1,sec=sys 0 0
sapnfs.file.core.windows.net: /sapnfsafs/sapnw1/usrsapNW1pas/ /usr/sap/NW1/D02 nfs vers=4,minorversion=1,sec=sys 0 0
# Mount the file systems
mount -a
- [S] Create the AAS directories and mount the NFS shares
sudo mkdir -p /usr/sap/NW1/D03
sudo chattr +i /usr/sap/NW1/D03
sapnfs.file.core.windows.net:/sapnfsafs/saptrans /usr/sap/trans nfs vers=4,minorversion=1,sec=sys 0 0
sapnfs.file.core.windows.net:/sapnfsafs/sapnw1/sapmntNW1 /sapmnt/NW1 nfs vers=4,minorversion=1,sec=sys 0 0
sapnfs.file.core.windows.net: /sapnfsafs/sapnw1/usrsapNW1aas/ /usr/sap/NW1/D03 nfs vers=4,minorversion=1,sec=sys 0 0
# Mount the file systems
mount -a
- [A] Configure SWAP file
sudo vi /etc/waagent.conf
# Set the property ResourceDisk.EnableSwap to y
# Create and use swapfile on resource disk.
ResourceDisk.EnableSwap=y
# Set the size of the SWAP file with property ResourceDisk.SwapSizeMB
# The free space of resource disk varies by virtual machine size. Make sure that you do not set a value that is too big. You can check the SWAP space with command swapon
# Size of the swapfile.
ResourceDisk.SwapSizeMB=2000
#restart the agent to activate the changes
sudo service waagent restart
- [P] Run the SAP database installation as root, using the virtual name for your database scenario (we are assuming the database layer is in HA configuration as well).
sudo <swpm>/sapinst SAPINST_REMOTE_ACCESS_USER=sapadmin
- [P] Install the SAP primary application server as root
sudo <swpm>/sapinst SAPINST_REMOTE_ACCESS_USER=sapadmin
- [S] Install one or more additional application server(s) as root. In this example we installed one PAS and one AAS SAP instance.
Next, make sure that you thoroughly test your Pacemaker cluster. You want to make sure that when you need it, your HA solution will deliver. You can find the typical set of failover tests to execute here .
by Scott Muniz | Jan 7, 2021 | Security, Technology
This article is contributed. See the original author and article here.
Original release date: January 7, 2021
Mozilla has released security updates to address a vulnerability in Firefox, Firefox for Android, and Firefox ESR. An attacker could exploit this vulnerability to take control of an affected system.
CISA encourages users and administrators to review the Mozilla Security Advisory and apply the necessary updates.
This product is provided subject to this Notification and this Privacy & Use policy.
by Scott Muniz | Jan 7, 2021 | Security, Technology
This article is contributed. See the original author and article here.
Original release date: January 7, 2021
Google has released Chrome version 87.0.4280.141 for Windows, Mac, and Linux. This version addresses vulnerabilities that an attacker could exploit to take control of an affected system.
CISA encourages users and administrators to review the Chrome Release and apply the necessary updates.
This product is provided subject to this Notification and this Privacy & Use policy.
by Contributed | Jan 7, 2021 | Technology
This article is contributed. See the original author and article here.
We’re excited to introduce the Microsoft Teams for Education policy wizard, now available in the Microsoft Teams Admin Center. IT admins can now easily apply education tailored policies for a safe learning environment for students, educators and staff. The policy wizard enables you to quickly and easily apply the most relevant set of policies for students at a global (Org-wide default) level and apply a custom policy set to a group of educators and staff tailored to their needs.
To control how Teams behaves in your environment and meet your educational requirements, it is necessary to apply policies in Teams, such as calling policies, meeting policies, and messaging policies. Each policy area can be customized to reflect your special needs. Previously IT Admins needed to gain familiarity with the relevant policies and granularity of applying these policies.
Now the policy wizard identifies the most relevant set of education tailored policies to help reduce your operation time to apply these policies and ensure a safe and focused learning environment.
There are two sets of policies. One is for students, who will have more restrictive policies, reducing their risks of receiving inappropriate levels of access. And second is for educators and staff, who will have more permissive policies to enable them to be successful in the class. For example, allow educators to schedule meetings and restrict students from doing so.
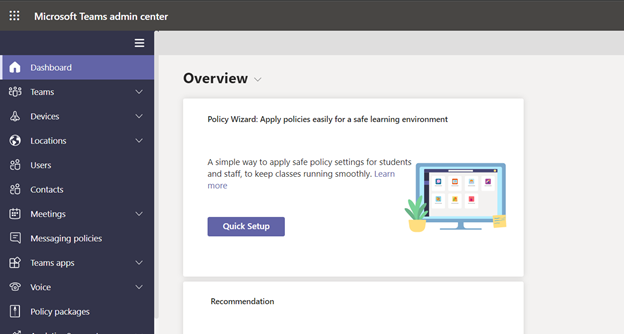
If your school or university is new to Teams, the wizard automatically starts. Otherwise, you can start the wizard any time from the Teams admin center dashboard by clicking on Quick Setup:
Getting into the policy wizard, you can choose between set of policies based on educational institution type (Primary or Secondary or Higher education).

Search for and select a group that contains your educators and staff, and then click Next. If you don’t have any groups set up yet for your educators and staff, create a group and then re-run the wizard.

Currently, you can only select one group. Educators and staff in the group you selected will be assigned a set of custom policies tailored to their needs. This set of policies is separate from the policies applied to students.
Review your selections and click “Apply” – simple as that.

A few other key pieces of information to know and consider:
- If you need to make changes after you run the wizard, you can re-run it and change your selections.
- Please be sure to follow Message Center posts for new policy updates, as new policy or policy attributes aren’t automatically added by the wizard with student safe setting. This capability will be available in a future release.
- If you are an existing tenant with policies already assigned to students, educators and staff, you might need to remove these policies after running the wizard for policies applied by wizard to take effect.
- You can also check these additional safety recommendations depending on your requirements.
For detailed instructions on how policy wizard works click here to learn more.
by Contributed | Jan 7, 2021 | Technology
This article is contributed. See the original author and article here.
We’re excited to introduce the Microsoft Teams for Education policy wizard, now available in the Microsoft Teams Admin Center. IT admins can now easily apply education tailored policies for a safe learning environment for students, educators and staff. The policy wizard enables you to quickly and easily apply the most relevant set of policies for students at a global (Org-wide default) level and apply a custom policy set to a group of educators and staff tailored to their needs.
To control how Teams behaves in your environment and meet your educational requirements, it is necessary to apply policies in Teams, such as calling policies, meeting policies, and messaging policies. Each policy area can be customized to reflect your special needs. Previously IT Admins needed to gain familiarity with the relevant policies and granularity of applying these policies.
Now the policy wizard identifies the most relevant set of education tailored policies to help reduce your operation time to apply these policies and ensure a safe and focused learning environment.
There are two sets of policies. One is for students, who will have more restrictive policies, reducing their risks of receiving inappropriate levels of access. And second is for educators and staff, who will have more permissive policies to enable them to be successful in the class. For example, allow educators to schedule meetings and restrict students from doing so.
If your school or university is new to Teams, the wizard automatically starts. Otherwise, you can start the wizard any time from the Teams admin center dashboard by clicking on Quick Setup:
Getting into the policy wizard, you can choose between set of policies based on educational institution type (Primary or Secondary or Higher education).
Search for and select a group that contains your educators and staff, and then click Next. If you don’t have any groups set up yet for your educators and staff, create a group and then re-run the wizard.
Currently, you can only select one group. Educators and staff in the group you selected will be assigned a set of custom policies tailored to their needs. This set of policies is separate from the policies applied to students.
Review your selections and click “Apply” – simple as that.
A few other key pieces of information to know and consider:
- If you need to make changes after you run the wizard, you can re-run it and change your selections.
- Please be sure to follow Message Center posts for new policy updates, as new policy or policy attributes aren’t automatically added by the wizard with student safe setting. This capability will be available in a future release.
- If you are an existing tenant with policies already assigned to students, educators and staff, you might need to remove these policies after running the wizard for policies applied by wizard to take effect.
- You can also check these additional safety recommendations depending on your requirements.
For detailed instructions on how policy wizard works click here to learn more.
by Contributed | Jan 7, 2021 | Technology
This article is contributed. See the original author and article here.
In 2020, remote work became the norm for most organizations around the world – a trend that is likely to continue in 2021. In fact, the percentage of workers permanently working from home is expected to double this year. With more than 115 million daily active users on Microsoft Teams, we’ve seen how organizations have truly empowered their employees with remote collaboration tools such as online meetings, chat and calls, and real-time document coauthoring. As remote collaboration continues to be business critical, how can IT and security operations teams enable productivity while safeguarding enterprise assets?
The Importance of end user training
In many ways, end users hold the key to protecting corporate assets because their actions or inactions can create inroads for cyber threats. Certainly, a data governance strategy and security tools like device management or automated information protection capabilities can help, but realistically, security operations can’t be involved in every action an end user makes. This makes end user training a vital element in any cyber security strategy.
For example, training end users to use sensitivity labels to classify content appropriately can significantly improve security and compliance. Many of our customers have rolled out sensitivity labels for email and trained their users to flag emails that contain sensitive business information so that they can be appropriately restricted to specific audiences.
In Teams, IT can enable easy-to-use security controls such as data encryption, data loss prevention, and secure guest access. But for these controls to work effectively, end users must be educated on when and how to appropriately use these security tools.
Providing accessible and consumable end user training
To promote a security-conscious work environment, many organizations provide end user training through a dedicated internal site, such as a Wiki or Frequently Asked Questions (FAQ) page, and then amplify this training through communication channels or organizational initiatives to reiterate and reinforce a security mindset. Creating an effective end user security training program can be difficult especially for IT teams that don’t have the capacity or capabilities to do so. Microsoft Teams video training is a helpful place to start.
Microsoft Teams training focused on safe online meetings and collaboration
With the influx in online collaboration, these new Microsoft Teams training assets are designed to help any user to take advantage of Teams security features and become Teams power users. Across the security-focused training, you’ll find three asset types:
|
End user guides tailored to specific functions, such as how to mute attendees or create a new team |
 |
Infographics that contain a collection of relevant actions or functions, like safe online meetings and collaboration controls |
 |
Bite-sized videos demonstrating how to use Teams features |
Here are some of the practical topics covered in these training assets:
- Meeting options available to every meeting creator to control who can join the meeting directly or who can present their screen (note that some meeting option defaults are set by IT)
- How to mute individual attendees or mute all attendees
- Understanding presenter vs. attendee meeting role and how to promote/demote attendees
- Creating a new Team using an IT-created sensitivity label to help regulate sensitive information contained in the team
- How to end a Teams meeting for all attendees
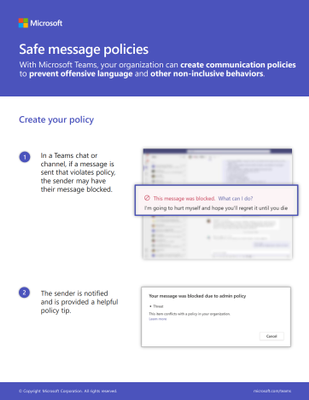
- Understanding Teams chat policy violations, such as a message being blocked due to sharing sensitive business information or violating internal organization policies
You can download and access the end user guides and infographics at the end of the post, while the bite-sized videos will be posted to the Microsoft Teams video training site.
Tips on using the Microsoft Teams training assets
The individual end user guides and bite-size training videos are ideal to host on a central training site for educating end users on how to use Teams features and functionality. The collective infographic helps group related security-focused functions together to help promote a security-conscious workforce.
In addition to hosting the assets on a centralized site, end user training is often more impactful when the resources available or specific training is communicated through regular intervals. This continues to help promote any centralized training site and assets while also directly sharing a useful tip, trick, or useful feature.
If you’ve recently rolled out Teams or are starting to scale adoption, more frequent communications such as a “Feature Friday” mail can help achieve a targeted training plan. This can be especially useful during an initial Teams rollout where general awareness of how to use Teams may be limited. Helping end users understand how to use Teams not only drives business productivity, but creates a frontline security defense of Teams power users!
For more depth learning and interactive training make sure to check out the latest Teams training on Microsoft Learn including a specific learning path on enforcing security, privacy, and compliance in Microsoft Teams!
End User Guides and Infographics

Recent Comments