by Contributed | Feb 23, 2021 | Technology
This article is contributed. See the original author and article here.
Thank you for being a part of our Azure Arc community! Welcome to your single resource for ways to learn, events to attend and communities to join to always stay up to date on the full Hybrid portfolio. Here are the top things to do:
- Visit the Cloud Adoption Framework for guidance on using Azure Arc enabled servers today
- Try Azure Arc quickly with the Azure Arc jumpstart
- Try out Azure Stack HCI for free today
Now, here’s a complete list of more resources to explore…
Azure Arc
Read:
Watch:
Do:
Azure Stack
Read:
Watch:
Do:
by Contributed | Feb 23, 2021 | Technology
This article is contributed. See the original author and article here.
Welcome to the Azure infrastructure community! Your source to technical training and resources that can help accelerate your cloud journey.
Learn more about Azure infrastructure products and solutions and simplify cloud migration with the Azure Migration Program.
Microsoft Learn
Explore the fundamentals of Azure infrastructure through guided paths and learn how to accomplish specific tasks with individual learning modules.
Training Videos
Learn tips and tricks for deploying and managing your Azure infrastructure on the Microsoft Azure YouTube Channel.

Azure Blogs
Stay up to date on the latest news, product updates, and announcements on the Microsoft Azure blog channel.

Azure Tech Community
Share best practices and learn from experts about Microsoft Azure here.

Azure Documentation
Learn how to build and manage powerful applications on your terms with Azure documentation. Get started with Azure infrastructure:

Start your journey
Start your cloud journey with implementation guidance, best practices, and tools that are proven guidance from Microsoft and designed to accelerate your cloud adoption journey. Explore the Microsoft Cloud Adoption Framework for Azure.

by Contributed | Feb 23, 2021 | Technology
This article is contributed. See the original author and article here.
We are delighted to announce today that the popular Nextflow workflow manager now supports running data pipelines seamlessly on Microsoft Azure via the Azure Batch service. This is a significant step forward for our customers, particularly those in Life Sciences, who are migrating genomics, machine learning, and other data pipeline or workflow oriented applications on to Azure.
Workflow managers such as Nextflow provide engineers and scientists an easy way of constructing multi-stage workloads with complex task relationships and data dependencies. Importantly, they also help abstract away the underlying task scheduler and execution platform, making users’ workloads easily portable.
The Azure-Nextflow integration was jointly developed by Microsoft and Seqera Labs and is released today in beta. Seqera Labs are the creators of the Nextflow open source project and the Nextflow Tower application stack for pipelines management. The Azure Batch integration is made available in both the Nextflow open-source project as well as the Nextflow Tower product for seamless cloud execution and hybrid cloud bursting.
With this integration, Nextflow users can now select Azure Batch as an executor and utilize Azure Blob Storage for storing data for their pipelines. Batch in turn autoscales the pools of compute nodes and schedules tasks to run on the nodes. Users only need to specify a base configuration such as the number of CPUs, the region, and the Storage Account that they wish to use in order to seamlessly execute their containerized pipelines on Azure.
“We are incredibly excited by this OSS contribution made by Microsoft to implement support for Azure Batch in Nextflow. This represents a major milestone for the project and provides the entire Nextflow community with a powerful and established cloud platform to deploy their pipelines.” Paolo Di Tommaso – CTO and co-founder, Seqera Labs
Find out more about running Nextflow pipelines on Azure on the Nextflow blog. For more information or to apply to participate in the beta program, reach out to Seqera Labs at info@seqera.io
—-
About Azure Batch
Azure Batch provides cloud-scale job scheduling and compute management and is used to run large-scale parallel and high-performance computing (HPC) batch jobs efficiently in Azure. Azure Batch creates and manages a pool of compute nodes (virtual machines), installs the applications you want to run, and schedules jobs to run on the nodes. There’s no cluster or job scheduler software to install, manage, or scale. Instead, you use Batch APIs and tools, command-line scripts, or the Azure portal to configure, manage, and monitor your jobs.
About Seqera Labs
Seqera Labs develops solutions to simplify complex data analysis pipelines. Our software enables developers and data scientists to create and securely deploy data applications in the cloud or on traditional on-premise infrastructure. The core open-source technology Nextflow transforms the building of massively scalable and distributed computing solutions. Seqera is now delivering results for customers across pharma, genomics and biotech, breaking with the status quo of closed-platforms and custom scripts and enabling them to embrace the future of distributed data analysis in the cloud.
by Scott Muniz | Feb 23, 2021 | Security
This article was originally posted by the FTC. See the original article here.
Winter this year is turning out to have its own set of weather-related emergencies — and right now, all in the midst of a pandemic. Lots of us are really ready for the winter of 2021 to be over. But while we’re waiting, why not prepare (or see if you might already be prepared) for a weather-related emergency?
The FTC’s site, Dealing with Weather Emergencies, has free practical tips to help you prepare for, deal with, and recover from a weather emergency like our friends across the South are seeing. It’s mobile-friendly, so you’ll have ready access to information when and where you need it.
The page has four sections:
Active in your community? There’s a customizable one-page handout, Picking Up the Pieces after a Disaster, with key tips drawn from the FTC’s site. You can add local consumer protection and emergency service contacts and post downloadable copies for public access throughout your community.
Brought to you by Dr. Ware, Microsoft Office 365 Silver Partner, Charleston SC.
by Contributed | Feb 23, 2021 | Technology
This article is contributed. See the original author and article here.
Initial Update: Tuesday, 23 February 2021 12:01 UTC
We are aware of issues within Log Analytics and are actively investigating. Some customers may experience intermittent data latency, data gaps and incorrect alert activation in East US region.
- Work Around: None
- Next Update: Before 02/23 15:30 UTC
We are working hard to resolve this issue and apologize for any inconvenience.
-Harshita
by Contributed | Feb 23, 2021 | Technology
This article is contributed. See the original author and article here.
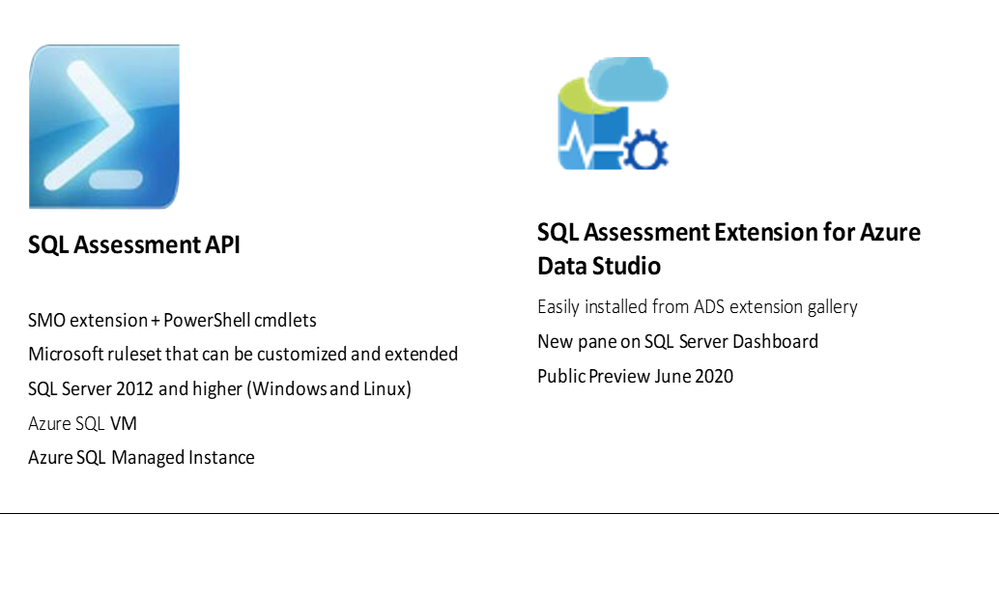
If you are curious about how to easily determine if your SQL is following best practices guidelines, you can watch the Data Exposed Live episode we did recently. We demo’ed SQL Assessment API and SQL Assessment Extension for Azure Data Studio (ADS).
Best Practices Assessment for Azure SQL VMs, Managed Instances, and SQL Servers | Data Exposed Live – YouTube
If you prefer scripting, SQL Assessment API PowerShell cmdlets give you an easy and flexible way to do an assessment. If you prefer a GUI solution, you can use SQL Assessment Extension.
SQL Assessment API provides a mechanism to evaluate the configuration of your SQL Server, Azure SQL VMs, and Managed Instances for best practices. The API is delivered with a ruleset containing best practice rules suggested by SQL Server Team. The API is built with the intent to give a highly customizable and extensible solution. Users can tune the default rules and create their own. SQL Assessment extension for Azure Data Studio provides an interface for the API.
0:00 Show begins
1:16 Introductions
3:05 SQL Assessment API Overview
6:30 Results of an assessment
11:38 Demo: SQL Assessment API
20:35 Try for yourself in Github
23:00 Demo: SQL Assessment Extension for ADS (for those who prefer a GUI solution rather than scripting with Powershell)
31:48 Demo: How to customize existing ruleset to fits your needs (Powershell and JSON)
50:00 Getting started
53:40 Q&A
Some resources :
Docs online page
Rules and samples on GitHub – You can see all the rules in Defaultruleset csv file
Notebooks on GitHub – these have lots of examples on how to use the cmdlets
SQL Assessment Extension public preview blog post
Please watch the video, look at the resources listed above, and try it out. You can use github issues on our repo (http://aka.ms/sql-assessment-api) to reach out to us with any feedback.
by Contributed | Feb 23, 2021 | Technology
This article is contributed. See the original author and article here.
Hi,
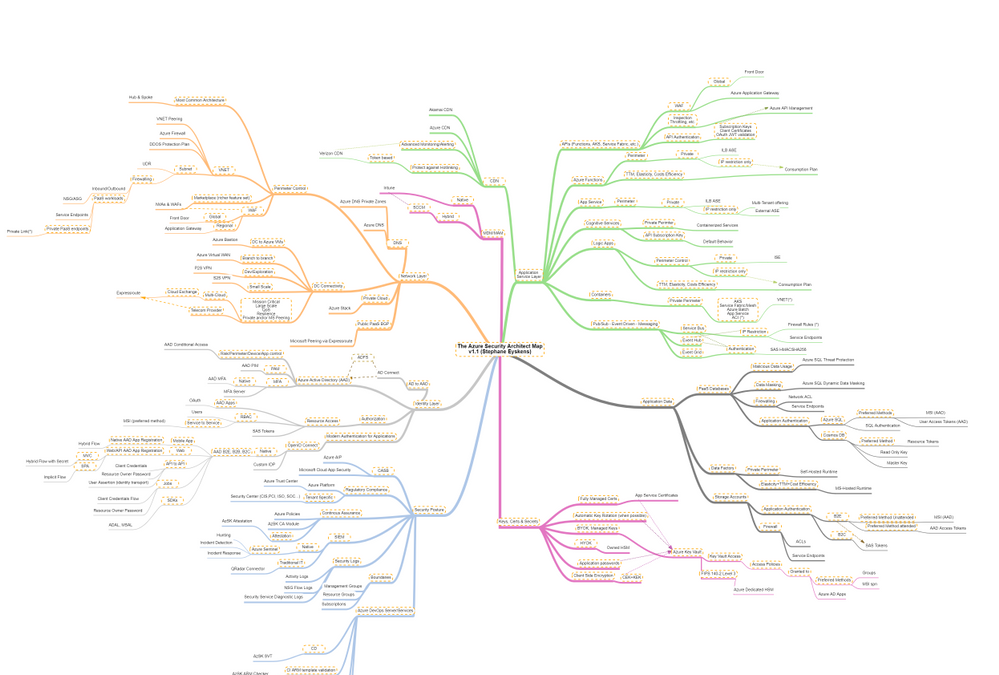
Recently, I built the Azure Solution Architect Map aimed at helping Architects finding their way in Azure. Given the unexpected success and the very positive feedback I received, I decided to come up with other maps, namely the Azure Security Architect Map, the Azure Infrastructure Architect Map and the Azure Application Architect Map.
Here are all the maps in my series of Architecture Maps:
The purpose of the Solution Architect map is to give a high-level view and quick insights about what is available and how to choose between the different services according to some functional needs.
It covers a few key areas, mostly about putting in place the foundations of an Azure Platform, and cannot go into the details because this would make the map very indigestible.
Today I come with the Azure Security Architect Map:

which focuses on security only and goes much deeper into that key area. It is by no means the holy grail but it should help you take informed decisions on how you plan to use and deploy services and how you will govern your Azure workloads. I bring business drivers such as TTM, cost optimization and true elasticity into the equation to highlight the consequences of choosing an option over another.
The map focuses on the following areas:
- Network Layer
- Identity Layer
- Application Service Layer
- Application Data
- Security Posture
- Keys, Certificates and Secrets Management as well as Encryption capabilities
- MDM & MAM
How to read this map?
Whenever you see the attachment icon  , it means that I have attached an explanation on a given rationale or service. If you see a (*) next to a node, it is kind of a must read information. So for instance, in the following screenshot:

I want to catch your attention on the following:

The rationales behind certain routes are based on my own experience and do not represent the only option, but they should be considered as advisory only. So the idea is to review these maps frequently since the above information is likely to change over the coming months and I’ll simply keep adding notes or remove them when it does not make sense anymore.
The link icon  is a pointer to the corresponding Microsoft documentation.
With this tool, any Security Architect (Cloud or not) will quickly grasp the security landscape of Azure.
Here is the pointer to the map:
Update (02/2021): the online MindMapMaker tool deletes maps that are older than 1 year….A pointer to the last version is available in the below table.
Here are all the maps in my series of Architecture Maps:
by Contributed | Feb 23, 2021 | Technology
This article is contributed. See the original author and article here.
When using Azure Sentinel, you are bound to get some false positives. No detection rule is perfect. In this blog post, we will learn how to handle false positives in scheduled analytics rules.
Understanding false positives
In most cases, false positives stem from specific entities such as users or IP addresses which should be excluded. Common scenarios are:
- During his normal activity, a user may often exhibit a pattern that can be viewed as suspected. This would often be a service principal.
- An intentional security scanning activity coming from known IP addresses is often detected as malicious.
- A rule excludes private IP addresses. However, some internal IP addresses are not private and should also be excluded.
Implementing false positive handling
The solution is to modify the rule queries, either by including the exceptions directly in the rule, or preferably, when possible, including a reference to a watchlist and managing the exception list in the watchlist.
Taking the typical rule preamble, you can add the blue line at the beginning of the query:
let timeFrame = 1d;
let logonDiff = 10m;
SigninLogs
| where TimeGenerated >= ago(timeFrame)
| where IPAddress in (‘10.0.0.8’, ‘192.168.12.1’)
…
The relevant exception is not limited to IP addresses and might be for specific users (using the UserPrincipalName field) or Apps (using the AppDisplayName).
You can also exclude multiple attributes:
| where IPAddress in (‘10.0.0.8’, ‘192.168.12.1’)
| where UserPrincipalName == ‘user@microsoft.com’
Or, to implement a more fine-grained exception when applicable, to reduce the chance for false negatives, by combining attributes:
| where IPAddress == ‘10.0.0.8’ and UserPrincipalName == ‘user@microsoft.com’
Excluding subnets
The third use case described above, excluding IP ranges used by the organization, requires subnet exclusion. The following examples show how to exclude subnets. Note that since the ipv_lookup operator is an enrichment operator and not a filtering operator, the filtering is actually done in the following line by inspecting those events for which a match was not made.
let subnets = datatable(network:string) [ “111.68.128.0/17”, “5.8.0.0/19”, …];
let timeFrame = 1d;
let logonDiff = 10m;
SigninLogs
| where TimeGenerated >= ago(timeFrame)
| evaluate ipv4_lookup(subnets, IPAddress, network, return_unmatched = true)
| where not(isempty(network))
| where ResultType == “0”
…
Using Watchlists to handle false positives outside of the rule itself
You can use a Watchlist to manage the list of IP addresses outside of the rule itself. When applicable, this is the preferred solutions and has several advantages:
- This enables an analyst to add exceptions without editing the rule, which better follows SOC best practices.
- The same watchlist can apply to multiple rules, enabling central exception management.
Using a watchlist is rather similar to using a direct exception:
let timeFrame = 1d;
let logonDiff = 10m;
let allowlist = (_GetWatchlist(‘ipallowlist’) | project IPAddress);
SigninLogs
| where TimeGenerated >= ago(timeFrame)
| where IPAddress in (allowlist)
…
Subnets filtering can also be done using a watchlist by replacing in the subnets example above, the subnets table definition with a watchlist:
let subnets = _GetWatchlist(‘subnetallowlist’);
I hope you found this useful!
by Contributed | Feb 23, 2021 | Technology
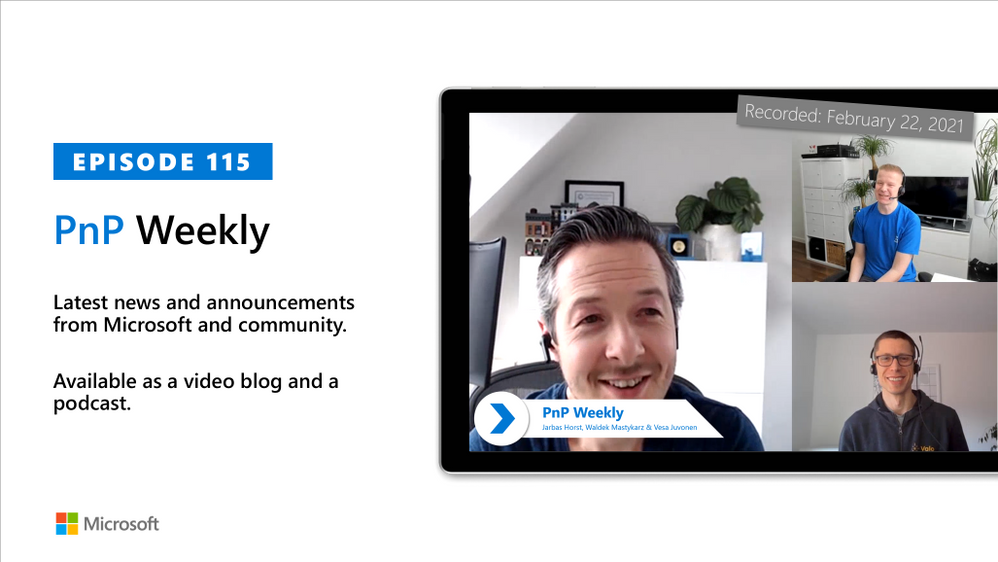
This article is contributed. See the original author and article here.
In this installment of the weekly discussion revolving around the latest news and topics on Microsoft 365, hosts – Vesa Juvonen (Microsoft) | @vesajuvonen, Waldek Mastykarz (Microsoft) | @waldekm, are joined by Germany-based MVP, Product owner for the Valo Teamwork tool, and community contributor – Jarbas Horst – working for Finland-based Valo Intranet | @devjhorst.
The discussion touches on role transition from developer to big picture manager, what suggests a successful day, evaluating feedback, the value of being an empathetic leader, proper onboarding, and the challenge of bringing people together in remote work times.
The session was recorded on Monday, February 22, 2021.
Did we miss your article? Please use #PnPWeekly hashtag in the Twitter for letting us know the content which you have created.
As always, if you need help on an issue, want to share a discovery, or just want to say: “Job well done”, please reach out to Vesa, to Waldek or to your Microsoft 365 PnP Community.
Sharing is caring!

by Contributed | Feb 23, 2021 | Technology
This article is contributed. See the original author and article here.
The Microsoft 365 Developer tenant is an amazing feature to learn and experiment in the Microsoft 365 universe (actually I’m talking about your personal development “sandbox” of the Microsoft 365 developer program. If you have no idea, what a “dev tenant” is, read the article “What is a “Dev tenant” and why would you want one” from Julie Turner). But there are limitations if it comes to experience the full potential of the Power Platform. Power Platform licensing is a bit complex, but to simplify things: You may use standard connectors within most Microsoft 365 licenses (like E3 or E5), but you can’t you can’t use premium connectors, or on prem data gateways, or add Microsoft Dataverse to your environments. Since the dev tenant gives only you a Microsoft 365 E5 license, you would need to purchase a standalone license., Which is not ideal if you just want to learn and decide later on if you want to dig deeper into the Power Platform.
Luckily there is the Power Apps Community Plan and you can add this plan to your developer tenant.
What are the advantages of the Power App Community Plan?
With the Community plan, you get a developer environment for free which gives you the possibility to learn and develop your skills (check out the Power Platform Apps plan docs article for more information). Developer environments are exclusively for the Community Plan , you can learn more here in the environments overview documentation. In this environment you get a lot of possibilities which are not included in the Power Apps license seeded in the Microsoft 365 E5 license:
- You can use premium connectors (only for datasources within Power Apps)
- You can build unlimited custom connectors
- You can use Dataverse
- You’re able to export your apps and flows to AppSource for others to test
You see, if you want to learn more about the Power Platform and develop your skills, this is a huge benefit for you. And it comes for free.
 What is included in the Power Apps Community Plan
How to join the Community Plan?
Let me walk you through the process. You need your log in data for the developer tenant: Mail address and password.
Go to the Power Apps Community Plan website and click on Get started free.
 The overview page of the Power Apps Community Plan
In the next step you need to insert the mail address of your dev tenant. That is very important, do not use a different mail address, since you want the Community Plan to be linked to your dev tenant. After that click on Sign Up.
 The sign in page of the Power Apps Community Plan
You will get a notification that says, that you’re using this address with another Microsoft Service already. Of course, you do, you use it for your developer tenant, right? So click on Sign In.
 a pop up mentioning, that you already use the address for a Microsoft Service
The next window is a confirmation that you’re signed in and you can (important, you don’t have to) decide to get promotion and offers send to your address.
You can also decide to share your information with partners in order to get more relevant information.
You don’t have to, so choose wisely.
And naturally by clicking on Start you confirm that you’ve read the terms and conditions and the Microsoft Privacy Policy. So maybe it’s a good point to read them ;)
 A pop up asking you to agree to the terms and conditions and decide if you want to share your information and get email offers from Microsoft
Don’t you worry, you’re almost done. In order to start with the Power Apps Community Plan you need to choose the country you’re using the Power Platform in. There are various legal conditions, which differ depending on the country. Once again you can choose the get the latest Power Apps tips and information, yet this is no mandatory field.
If you hit that Accept button you’re done.
 A pop up asking you to choose your country to begin.
If you check the Power Platform Admin Center you will recognize, that there is another environment, next to the default one.
Congratulations, you’ve just joined the Power Apps Community Plan and can now see your new Developer environment.
 A picture of two different environments in the Power Platform Admin Center
Now you can start developing apps and flows in this specific environment.
But there is one more thing you need to pay attention to: If you open Power Automate or Power Apps, make sure that you’re in the correct environment. In the upper right corner of your browser you can see, what environment you’re currently in. Click on the button Environments to see a list of all your available environments. Now select you newly created Developer environment (in my case it’s Michael Roth’s Environment). Now you’re using the newly created Developer environment with all the benefits from the Power Apps Community Plan.
 A picture showing the button the select the right environment in the Power Tools


Recent Comments