by Contributed | Feb 22, 2021 | Technology
This article is contributed. See the original author and article here.
Initial Update: Tuesday, 23 February 2021 00:21 UTC
We are aware of issues within Log Analytics and are actively investigating. Some customers in East US2 may experience delayed or missed alerts.
- Work Around: None
- Next Update: Before 02/23 02:30 UTC
We are working hard to resolve this issue and apologize for any inconvenience.
-Anupama
![You Own M365, Now What? [M365 Meetup for Government]](https://www.drware.com/wp-content/uploads/2021/02/large-1021)
by Contributed | Feb 22, 2021 | Technology
This article is contributed. See the original author and article here.
Microsoft 365 takes a “best-of-suite” approach to allow for organizations to securely enable collaboration, communication, and productivity without compromises. This session features a series of presenters who will help you understand the scope of the Microsoft 365 offerings and features, and how organizations can rapidly and effectively utilize and consolidate their investment in Microsoft 365.
WHEN: Tuesday, March 23rd, 2021 @ 5:00PM ET
REGISTER NOW: You Own M365, Now What? | Meetup
Speakers:
Presentation 1 – Understanding Office 365
Bob Ballard – Planet Technologies Principal Cloud Strategist
https://www.linkedin.com/in/bobballard/
Presentation 2 – M365 Security & Compliance Planning Considerations
Jay Bhalodia – Microsoft Specialist
https://www.linkedin.com/in/jbhalodia/
Marialino Bello – Managing Architect
https://www.linkedin.com/in/marialina/

by Contributed | Feb 22, 2021 | Technology
This article is contributed. See the original author and article here.
In this series, Microsoft identity team members share their reasons for loving passwordless authentication (and why you should too!). In this post, Sue Bohn continues the series by sharing another benefit of passwordless.
I love passwordless because of how much customers benefit from the increased security and convenience that one passwordless option offers in particular—security keys. At Microsoft Ignite 2019, we showcased Azure Active Directory support for FIDO2 security keys. During an Ignite side chat with Joey Snow, I showed the audience my personalized security key with a bling decal, conveniently attached to my bracelet. It makes it so easy to quickly access it to sign into my personal or work accounts.
My security key provides not only strong authentication but also works with multiple online services in addition to Azure AD. With security keys, you simply insert the key into your Windows 10 machine (via USB, NFC, or Bluetooth), the key authenticates your identity, and you can start working right away. And it doesn’t require typing upper and lowercase letters, numbers, a special character, and your favorite emoji!! A security key is especially handy when devices are shared or when you cannot bring you phone into your place of work, such as a factory floor or retail store. Security keys are so portable you can even wear it!
In the past 18 months, thousands of organizations are trying the experience. Enterprise customers have been piloting passwordless authentication with their security departments and their executive teams to increase identity protection. For example, Keepmoat Homes wanted to modernize the authentication experience for their employees and make it portable, so they chose Windows Hello for Business and Yubikeys which they say provided “the most secure form of single sign on and multifactor authentication with a frictionless end user experience.” During the US election last year, we saw security key adoption by campaigns, thinktanks, and other government entities as part of Microsoft’s Account Guard program. Because security key uses FIDO2 standards, it mitigates phishing attacks and offers more security to use with digital services.
Top security keys
With a growing number of people interested in using security keys for authentication, our team recognizes the need to create a robust partner ecosystem. This gives our customers more choices in form factors including biometrics. You can check out the Microsoft Compatible Security Key partner list, a list of several devices from security key providers that have been tested with Azure Active Directory and Windows 10.
A broad ecosystem gives our customers choice in keys that deliver a higher fit to our customers’ needs. Today our customers tell us the key form factors they most often use are USB-based factor, NFC, and smartcards. Nearly 40% of the universally used security key models have a fingerprint reader. If you’re not sure which one to select, consider these top 7 security keys vendors, based on usage with Azure AD*:
- Yubico
Yubico’s Yubikey 5 NFC (Near Field Communication) (link)
|
Yubico’s Security Key (link)
|

|

|
If you are a Systems Integrator (SI) interested in building your passwordless practice, register for Yubico’s System Integrator Pilot Program.
- Feitian
Feitian BioPass K27 (link)
|
Feitian ePass FIDO2 NFC Authenticator (link)
|

|

|
Enterprise customers interested in piloting FIDO2 keys can register for Feitian’s Pilot Program.
- Ensurity
Ensurity ThincC (link)
|

|
- Thales
Thales IDCore FIDO2 Authenticator (link)
|

|
- TrustKey (Formerly eWBM)
TrustKey G310 (link)
|

|
- AuthenTrend
AuthenTrend ATKey.Pro FIDO2 (link)
|
AuthenTrend ATKey.Card (link)
|

|

|
Small business customers interested in piloting AuthenTrend’s FIDO2 key and card can register here.
- HID Global
HID Cresendo C2300 (link)
|

|
Get in touch!
I hope you find this blog useful, and perhaps I inspired you to glam up your own security key! Please get in touch with me (@Sue_Bohn) and our Security Key partners if would like more information about the ease of use and portability of FIDO2 security keys and how they might work in your own organization.
Cheers,
Sue
*Based on Security Key usage with Azure Active Directory is as of Feb 2021. We highlight up to two keys per brand. Microsoft takes privacy seriously. We remove all personal data and organization-identifying data, such as company name, from the data before using it to produce reports. We never use customer content such as the content of an email, chat, document, or meeting to produce reports.
Check out the other posts in this series:
Learn more about Microsoft identity:
by Contributed | Feb 22, 2021 | Technology
This article is contributed. See the original author and article here.
This blog post grew out of a conversation with one of my Microsoft colleagues about how one would push a Planner task to Azure DevOps – and the scenario was that they are very happy with the Message Center to Planner integration as a means to triage changes as they come through – but to actually execute on the changes they would normally use Azure DevOps. So I got my thinking cap on and took a look at what was available in Power Automate.
Planner is somewhat limited in direct actions and triggers, but of course you can use the Graph API too once you get a Flow started – but the trigger is what you need here and I wanted to avoid a timer job just looking in Planner. The “On completed” trigger seemed like the best approach, as if you were carrying out the work in Azure DevOps (or Project) then the plan task could be closed. Then with the number of supported labels increasing in the very near future I thought that, combined with a complete task, would get me started.
Power Automate then has an action to read the Planner labels, so I could check if the task needed to go to Azure DevOps – and if so use the “Create a work item” action.

In this example I decided to create as a Feature – and in the description I crafted a link that would navigate back to the Planner task to get the full information. A proper job here would probably involve a few more steps to read the information and populate it into Azure DevOps, but as a quick proof of concept it worked for what I needed.

And here is my newly created Azure DevOps feature.
My next thought was – that nice – but what if I want to use Project Online or the new Project to manage a Microsoft 365 change? (The eagle eyed may have already seen the :Send to Project Online and Send to PfW in my labels list) so I extended my Flow to also look at those labels and react accordingly.

It is important to mention here that I am creating these as projects in Project Online and Project for the web – and not as tasks – as the assumption is that you would use this when you needed more than just a task (otherwise why not leave in Planner?). Likewise for Azure DevOps – I created a feature but there may well be other entities added to deliver the change.
For the examples I’ve used I’ll admit that these could probably just have been handled in Planner – as I can’t imagine our adding of text predictions justifies a complete project plan to ready users…

And in the new Project we see the other task turned to a plan – in this case in a different environment than the default using the new flexible deployments option.

The Flow was pretty basic adding these two too – just a condition driven by the label that was applied, then the Create a new Project for Project Online (as the description doesn’t support HTML I didn’t create the href):

and for the new Project in the Dataverse environment I used the following:

The tricky piece here was working out what the GUIDs needed to be, and I used the option to open the datasets in Excel to get a good look at the GUIDs so I could test out and confirm what these needed to be. You can do this (permissions allowing) by going to make.powerapps.com, selecting the environment, then under Data, Tables select the table of interest (set filter to “All”) then use the “Edit data in Excel option (don’t get too excited – you can’t really edit the data for this Project stuff in Excel).
Calendar Id can be found from the Calendar column of the Work template table – in my case I only had one work template, the default – so not problem using just this one – you might need to have some way to choose if your config is more complex.
Contracting Unit can be found as the Contracting Unit column in the Project table – and again I just had one so ok to hard code – your mileage may vary (Don’t confuse it with the Contracting Unit (Lookup) field…).
Project Manager comes from the Project Manager column in the Project table, and has its origins in the User table and the User column. It is NOT the same as the AAD GUID.
Like the Azure DevOps example you’d probably want to add a few more steps to pull more information in – and I did skip a big “gotcha” on the Project Online side – as Project Online does not allow certain characters in a Project name I chose my example carefully. You’d need to swap out any occurenace of the following characters – : .(period) ” / : ; | ? ‘ < > * # ~ % { } +.
Finally – a screenshot of the whole Flow:

Let me know what you think – and what would make managing Microsoft 365 changes easier?

by Contributed | Feb 22, 2021 | Technology
This article is contributed. See the original author and article here.
Microsoft Access application development has been a favorite of mine for many years, because it lends itself to a rapid application development cycle and can provide a cost-effective custom solution for small businesses. I want to illustrate this with two examples of recent projects I have completed.
Client 1 – 2nd generation retail business taking over from 1st generation businesses
Problem – Payroll commission computation was time consuming and error prone. Inputs came from 2 different enterprise sources and were not in a clean format.
Solution – Access is terrific for merging Excel based exports from enterprise databases like point of sale and employee timecard systems.
- Prior to importing, the Excel workbooks were massaged with VBA code to cleanse and reformat.
- Saved Access imports were then used to import the data from Excel.
- Data was then merged via Access queries.
- A simple form was developed to step the payroll officer through the commission calculation process. This included 2 imports and 3 reports.
- The first report was designed to allow the payroll officer to review the computed commissions for accuracy.
- The second report split the first report up by sales rep and emailed the reports to the individual reps.
- The final report was an Excel based export in the format the accountant needed to complete the payroll.
Impact and Learnings – The payroll officer absolutely loved the end product! The steps of the solution follow the same process she was familiar with, but saved her hours of tedious work and provided greater accuracy in the resulting reports.
A strength of Access is its ability to easily integrate with other products in the Office platform and make use of the strengths of products like Excel and Outlook, and this project shows that the combination of Access queries and VBA code can be used to apply even complicated business rules.
Client 2 – Professional business needing to generate lots of client based letters
Problem – Letters have lots of data fields in them. Word mail merge was routinely failing and often error prone to set up. It also resulted in one document that included all clients’ letters. Documentation of what was sent to whom was problematic.
Solution – Word mail merge can be difficult to work with. This was further complicated in this instance since the data resided in an encrypted Access database due to the sensitive nature of the client data. The simpler solution was to push the data TO Word instead of pull it FROM Access.
- Since the business used a wide variety of letters, the solution allows them to add Word Templates (built in Word) to a table in Access
- They then map named Content Controls from the template to fields in an Access client query.
- A form was developed to allow the professional to run a premade Access Query, or filter on predefined fields in the client query, to find the clients whom they wished to create a letter for.
- Then they select the letter they want and the directory they want the resulting letters to be placed in.
- With VBA code behind the Form, the Word template is opened, and for each client selected, a Word document is produced with merged data from that client record using the previously setup mapping.
- Each letter is saved to the chosen directory with a standard naming convention.
Impact and Learnings – The business users of this solution love the ease at which they can now generate and archive client letters. Gone are crashing, error prone, or time consuming Word mail merges. The super user who sets up the templates and mappings finds the solution easy to use and right on target with their goals.
Again, this project shows the strength of Access’ easy integration with other products across the Office platform; this time with Word. Although Word mail merge allows you to select and filter data, Access is much stronger at organizing and querying data. Understanding and using the best tool for a project is key. This project also enables the user to self-serve by creating additional Word templates on their own, and then easily set those up to be used from the Access application.
Maria Barnes is the President of Barnes Business Solutions, Inc. She has 35 years of Software Design and Programming Expertise and specializes in Access and SQL Server databases. She has been named an Access MVP by Microsoft since 2018. Maria publishes a monthly newsletter and is the chapter president of AccessUserGroups.org Lunchtime chapter. You can reach Maria at mbarnes@BarnesBusinessSolutions.com
by Contributed | Feb 22, 2021 | Technology
This article is contributed. See the original author and article here.
In this video, we look at how to use Microsoft Partner Center Ingestion API for managing “Azure Application” offers in Azure Marketplace.
Document called “Partner Center submission API to onboard Azure apps in Partner Center” provides some high-level information on how to create a Service Principal, add it to the Partner Center account, and use it to obtain access_token from Azure Active Directory. The document also points to the Swagger defining the API methods, but it does not provide specific examples for the sequences for the API calls required to manage Azure Application offers.
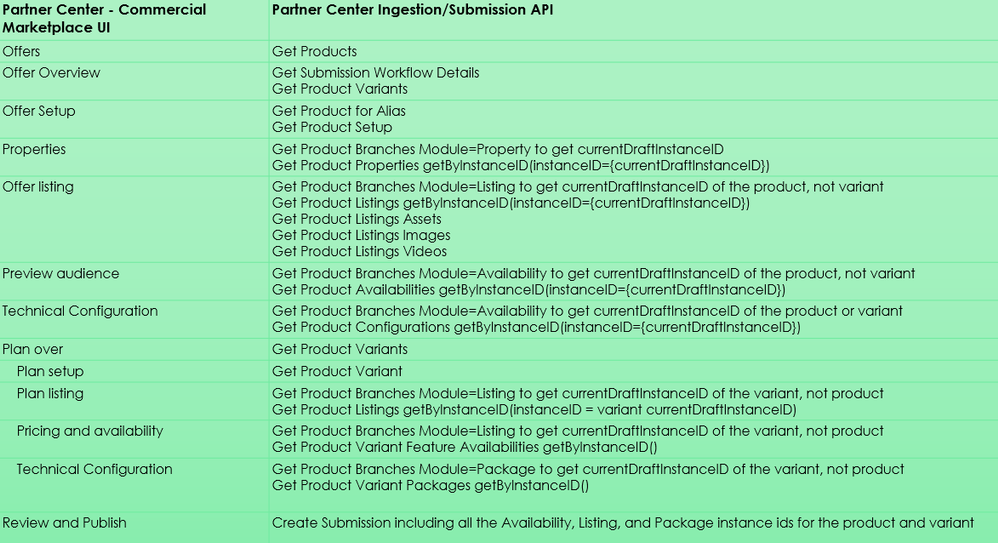
In this video walkthrough, we go a bit deeper and look at how to use Postman to invoke the multiple REST methods of the Partner Center Ingestion REST API and how these calls “map” to the Partner Center Commercial Marketplace UI experience.
You can download my Postman collection here.
Note: This video is specifically about the “Azure Application” offer type. If you are looking at how to manage “Virtual Machine” offers, please see “Using CPP API for managing Virtual Machine offers in Azure Marketplace”.
Video Walkthrough
Tip: Play the video full screen to see all of the details.
Approximate Mapping of Partner Center UI to the Ingestion APIs
So, should we use Partner Center API or Cloud Partner Portal CPP API?
Answer: It depends on the “offer type”
- Azure Application Offers: api.partner.microsoft.com/ingestion/v1 (described in this article)
- VM Offers (and a few other types): cloudpartner.azure.com (described in the related article)
Originally published at https://arsenvlad.medium.com/using-partner-center-ingestion-api-for-managing-azure-application-offers-in-azure-marketplace-b47b290dd947 on September 10, 2020.
by Contributed | Feb 22, 2021 | Technology
This article is contributed. See the original author and article here.
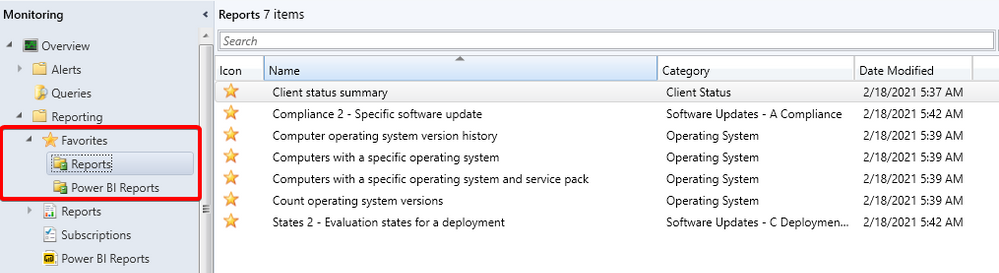
Update 2102 for the Technical Preview Branch of Microsoft Endpoint Configuration Manager has been released. Configuration Manager ships with several hundred reports by default, and you may have added more to that list. Instead of continually searching for reports you commonly use, based on your UserVoice feedback, you can now make a report a favorite. This action allows you to quickly access it from the new Favorites node.
Favorite reports node
This preview release also includes:
Improvements to the collection relationships viewer – Starting in current branch version 2010, you can view dependency relationships between collections in a graphical format. The relationships for a collection were presented as two hierarchical trees, one for dependents and the other for dependencies. In this release, you can view both dependency and dependent relationships together in a single graph. This change allows you to quickly see an overview of all the relationships of a collection at once and then drill down into specific related collections. It also includes other filtering and navigation improvements.
Download Power BI report templates from Community hub – Community hub now supports contributing and downloading Power BI report template files. This integration allows administrators to easily share and reuse Power BI reports. Contributing and downloading Power BI report template is also available for current branch versions of Configuration Manager.
Improvements to BitLocker support via cloud management gateway – In current branch version 2010, you can manage BitLocker policies and escrow recovery keys over a cloud management gateway (CMG). This support included a couple of limitations. Starting in this technical preview release, BitLocker management policies over a CMG support the following capabilities:
- Recovery keys for removable drives
- TPM password hash, otherwise known as TPM owner authorization
Improvements to query preview – You now have more options when using the collection query preview. The following improvements have been made to previewing collection queries:
- Limit the number of rows returned.
- Omit duplicate rows from the result set.
- Review statistics for the query preview such as number of rows returned and elapsed time.
Improvements to collection evaluation view – The following improvements were made to the collection evaluation view:
- The central administration site (CAS) now displays a summary of collection evaluation status for all the primary sites in the hierarchy
- Drill through from collection evaluation status queue to a collection
- Copy text to the clipboard from the collection evaluation page
- Configure the refresh interval for the collection evaluation statistics page
TLS certificate pinning for devices scanning HTTPS-configured WSUS servers – Further increase the security of HTTPS scans against WSUS by enforcing certificate pinning. To enable this behavior, add certificates for your WSUS servers to the new WindowsServerUpdateServices certificate store on your clients and enable certificate pinning through Client Settings. This setting ensures that your clients will only be able to communicate with WSUS when certificate pinning is successful.
Change foreground color for Software Center branding – Software Center already provides various controls for you to customize the branding to support your organization’s brand. For some customers, their brand color doesn’t work well with the default white font color for a selected item. To better support these customers and improve accessibility, you can now configure a custom color for the foreground font.
Changes for CMPivot – We’ve temporarily disabled the Simplified CMPivot permissions requirements that were introduced in technical preview version 2101. If you removed the Read permission on SMS Scripts and the default scope permission, re-add the permissions.
Improvements to client setting for Software Center custom tabs – Technical preview version 2101 included a new client setting for displaying Software Center custom tabs. There are general improvements to this feature in this technical preview release.
Change default maximum run time for software updates – Configuration Manager sets the following maximum run time for these categories of software updates:
- Feature updates for Windows: 120 minutes
- Non-feature updates for Windows: 60 minutes
- Updates for Microsoft 365 Apps (Office 365 updates): 60 minutes
All other software updates outside these categories, such as third-party updates, were given a maximum run time of 10 minutes. Starting in this technical preview, the default maximum run time for these updates is 60 minutes rather than 10 minutes.
Update 2102 for Technical Preview Branch is available in the Microsoft Endpoint Configuration Manager Technical Preview console. For new installations, the 2010 baseline version of Microsoft Endpoint Configuration Manager Technical Preview Branch is available on the Microsoft Evaluation Center. Technical Preview Branch releases give you an opportunity to try out new Configuration Manager features in a test environment before they are made generally available.
We would love to hear your thoughts about the latest Technical Preview! Send us Feedback about product issues directly from the console and use our UserVoice page for ideas about new features.
Thanks,
The Configuration Manager team
Configuration Manager Resources:
Documentation for Configuration Manager Technical Previews
Try the Configuration Manager Technical Preview Branch
Documentation for Configuration Manager
Microsoft Endpoint Manager announcement
Microsoft Endpoint Manager vision statement
Configuration Manager Forums
Configuration Manager Support

by Contributed | Feb 22, 2021 | Technology
This article is contributed. See the original author and article here.
At Microsoft, we pride ourselves in providing our customers with the confidence to upgrade and update to the latest Microsoft products. Keeping up to date is crucial to minimize the risk for your customers, employees, and your business. That means helping you discover what’s possible, create a plan for success, and onboard new users and capabilities at a flexible pace.
The FastTrack App Assure service was launched in 2018 to fulfill Microsoft’s promise on application compatibility. While most apps will continue to work on Windows 10, Microsoft 365 Apps, Windows Virtual Desktop (WVD), Microsoft Edge, and Windows 10 on ARM64 PCs following deployment, App Assure engineers are available to help resolve any issues you might experience. This is part of the FastTrack benefit, which comes at no additional cost with eligible Microsoft 365 and Windows 10 plans of 150+ licenses.
Since launching, App Assure has received and evaluated nearly 750,000 applications, allowing our engineers to study and learn from customer experiences. Only a small group (approximately 0.31%) reported having any compatibility issues at all after upgrading to the latest Microsoft products, and certain questions and concerns appeared frequently. We’d like to walk through three of these commonly expressed concerns, hopefully clear up any confusion you might have, and offer some guidance based on real-world experiences over the past two years as we helped our customers resolve their application compatibility questions.
Concern one: Staying current with Microsoft 365 will cause too many application compatibility issues
As our engineers have confirmed, staying current is important for avoiding application compatibility issues, while also ensuring devices remain protected with the latest in security updates. Planning ahead is a key to successful application compatibility, and we recommend that you define a readiness process to stay current with your Microsoft products and help identify potential issues—before you start your deployment. The tools outlined below will help you create your process.
Get started by checking out our Windows 10 deployment documentation on Docs to align to a prescriptive, process-based model for both deployment and update management that takes place across three phases: plan, prepare, and deploy. To complement this three-phase approach, there is also a step-by-step learning path to help you plan for, prepare for, and deploy updates across your organization.
Once you’ve completed the learning path and have begun your planning, follow these steps to help ensure application compatibility:
- Create an inventory of apps your company uses to make an informed decision about what to:
- Retire
- Keep and remediate (if necessary)
- Keep and modernize
- Microsoft 365 and Windows 10 E3 customers can use the Desktop Analytics tool to make an informed decision about the feature update readiness of your Windows clients
- Validate your enterprise apps to identify potential compatibility issues by utilizing these resources:
Readiness Toolkit for Office – Assesses application compatibility for Microsoft 365 applications.
Enterprise Site Discovery – Collects data and compatibility insights on devices running Internet Explorer to guide your Microsoft Edge deployment
Ready for Edge – A list of applications that your organization may be using that are supported on the newest version of Microsoft Edge
Concern two: Application code changes will always be required
Some customers described feeling reluctant to update Windows, Microsoft 365 Apps, or Microsoft Edge, as they assumed extensive discovery, triage, and mitigation efforts would be required to ensure compatibility. Specifically, changes to code were noted as a scenario our customers wished to avoid. Here, our planning comes in handy again.
By having a process to review the updates for Windows and Microsoft 365 Apps, potential problems (however unlikely) can be identified early—often before the update is applied in production—helping you minimize the risk of impact on your business.
In the rare case where code change is required to ensure that an application remains compatible, App Assure will help you resolve the issue. In most cases, there is a solution available that does not involve updating code. And if a code change is required, we will guide your team through the process. Dedicated App Assure engineers are ready to work with your developers to determine the root cause, identify any potential bugs, and make the necessary adjustments.
Concern three: My app won’t run on the latest Microsoft Edge browser
Most legacy and modern apps will work on Microsoft Edge, backed by Microsoft security and innovation and built on Chromium. Additionally, Microsoft Edge is included by default with the latest Windows 10 20H2 feature update. If your web apps or sites work in Internet Explorer 11, on supported versions of Google Chrome, or in any version of Microsoft Edge, those web apps and sites should work with Microsoft Edge. If it’s a legacy app and has ActiveX or Doc Mode dependencies, it will most likely work in the current version of Microsoft Edge by utilizing the IE mode feature along with the Enterprise Mode site list.
App Assure has helped remediate legacy apps for customers who experienced:
- A white browser window instead of app or site content
- Buttons missing or malfunctioning
- Blank or inactive input fields
- “Unsupported browser” or similar message
- Visually misaligned content
LEARN MORE: For more Microsoft Edge deployment documentation visit here.
Still need help with your apps?
If you need help with application compatibility, please don’t hesitate to contact App Assure, which is available at no additional cost for eligible Microsoft 365 and Windows 10 plans of 150+ licenses. App Assure is part of the FastTrack for Microsoft 365 benefit, which includes remote guidance to help customers deploy Microsoft 365 products and capabilities. Visit aka.ms/AppAssureRequest to submit your request for assistance which will be assigned to your dedicated App Assure Manager. Learn more about App Assure compatibility assistance here. You can also watch this introductory video on App Assure.
by Contributed | Feb 22, 2021 | Technology
This article is contributed. See the original author and article here.
Changes scheduled to be deployed starting from March 1, 2021, 7 AM PST for Azure Monitor for Virtual Machines (VM Insights) will impact the Map experience for a short duration (~ two hours). VM Insights will migrate to SHA256, and this deployment might cause the same process and connection to display twice in the Map UI during the rollout window. Performance and Health experiences under VM Insights will work as expected. There will be no impact on the billing as the number of records ingested does not change.
The changes will be deployed from March 1, 2021, to March 8, 2021, depending upon the region of the virtual machine and the Map UI might be impacted during that window.
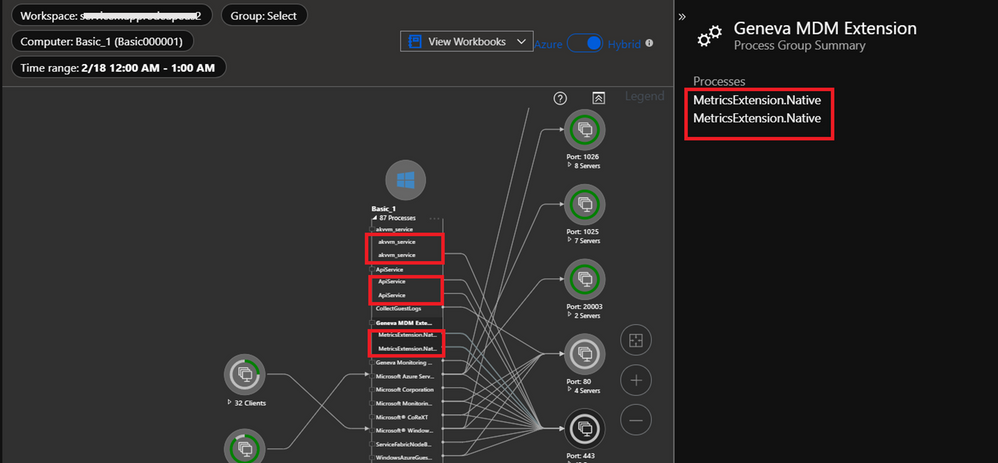
Root-cause: The Map UI is aggregated on Process id (in VMProcess table) and Connection id (in VMConnection table) over a period of time (up to 1 hour). During the transition phase, Map UI might aggregate records based on both old and new ids and treat them as different processes or connections respectively. Here’s a snippet of the impacted Map UI:
We understand that customers rely on Azure Monitor VM Insights as a critical service and apologize for any impact this incident caused.

by Contributed | Feb 22, 2021 | Technology
This article is contributed. See the original author and article here.
Azure Functions recently released support for .NET 5. Let’s take a look at how to upgrade our existing Azure Functions to use it!
Note: This is a preview experience for .NET 5 support in Azure Functions. The Azure Functions teams notes that the “.NET 5 experience will improve in the coming weeks”.
Why is it more complicated than last time?
You might be wondering “Why can’t I just change `netcoreapp3.1` to `net5.0`?”
Historically, Azure Functions has always been tightly coupled with .NET, specifically Long Term Support (LTS) .NET releases. This meant that we couldn’t use a newer version of .NET until the Azure Functions team also updated their Azure Functions .NET Runtime.
This is the first release that moves .NET to an “out-of-process model“, allowing us to run our Azure Functions using any version of .NET!
Walkthrough
In this walkthrough, I’ll be providing snippets from the Azure Functions I use for my app GitTrends. GitTrends is an open-source app available in the iOS and Android App Stores, built in C# using Xamarin, that uses Azure Functions for its backend.
You can find the completed solution in the `Move-Azure-Functions-to-net5.0` branch on the GitTrends repository, here: https://github.com/brminnick/GitTrends/tree/Move-Azure-Functions-to-net5.0/GitTrends.Functions
1. Update .NET
Let’s update to .NET 5!
First, download the .NET 5 SDK and install it on your development machine.
Then, in your Functions’ CSPROJ, set the following values for `TargetFramework`, `LangVersion`, `AzureFunctionsVersion`,` OutputType` and `_FunctionsSkipCleanOutput`:
(Here is a completed working example)
<PropertyGroup>
	<TargetFramework>net5.0</TargetFramework>
	<LangVersion>preview</LangVersion>
	<AzureFunctionsVersion>v3</AzureFunctionsVersion>
	<OutputType>Exe</OutputType>
	<_FunctionsSkipCleanOutput>true</_FunctionsSkipCleanOutput>
</PropertyGroup>
2. Update NuGet Packages
Now let’s add the necessary NuGet Packages.
In your Functions’ CSPROJ, ensure the following `PackageReference`s have been added:
(Here is a completed example)
Note: For `Microsoft.Azure.Functions.Worker.Sdk`, add `OutputItemType=”Analyzer”`
<ItemGroup>
    <PackageReference Include="Microsoft.Azure.Functions.Worker" Version="1.0.0-preview3" />
    <PackageReference Include="Microsoft.Azure.Functions.Worker.Sdk" Version="1.0.0-preview3" OutputItemType="Analyzer" />
    <PackageReference Include="Microsoft.Azure.WebJobs.Extensions" Version="4.0.1" />
    <PackageReference Include="Microsoft.Azure.WebJobs.Extensions.Http" Version="3.0.12" />
    <PackageReference Include="Microsoft.Azure.WebJobs.Extensions.Storage" Version="4.0.3" />
    <PackageReference Include="Microsoft.Azure.WebJobs.Script.ExtensionsMetadataGenerator" Version="1.2.1" />
    <PackageReference Include="System.Net.NameResolution" Version="4.3.0" />
</ItemGroup>
3. Add Non-Windows Workaround
We need to include a workaround to ensure this new out-of-process worker works properly on non-Windows machines.
In your Functions CSPROJ, add the following `Target`:
(Here is a completed working example)
<Target Name="CopyRuntimes" AfterTargets="AfterBuild" Condition=" '$(OS)' == 'UNIX' ">
<!-- To workaround a bug where the files aren't copied correctly for non-Windows platforms -->
<Exec Command="rm -rf $(OutDir)bin/runtimes/* && mkdir -p $(OutDir)bin/runtimes && cp -R $(OutDir)runtimes/* $(OutDir)bin/runtimes/" />
</Target>
4. Update local.settings.json
To run our Functions locally, we’ll need to tell the Azure Functions Host to use the isolated dotnet runtime in `local.settings.json` by by setting `FUNCTIONS_WORKER_RUNTIME` to `dotnet-isolated`, like so:
(Here is a working completed example)
{
  "IsEncrypted": false,
  "Values": {
    "FUNCTIONS_WORKER_RUNTIME": "dotnet-isolated",
    "AzureWebJobsStorage": "UseDevelopmentStorage=true",
    "AzureWebJobsDashboard": "UseDevelopmentStorage=true"
  }
}
Then, in the Functions’ CSPROJ, ensure it is being copied to the output directory using `CopyToOutputDirectory` like so:
(Here is a working completed example)
<ItemGroup>
	<None Update="local.settings.json">
		<CopyToOutputDirectory>PreserveNewest</CopyToOutputDirectory>
	</None>
</ItemGroup>
5. Update Initialization & Dependency Injection
The way we initialize Azure Functions, including Dependency Injection, for .NET 5 has improved.
Old Initialization & Dependency Injection (pre .NET 5.0)
The old way to use Dependency Injection with Azure Functions was to add the `[assembly: FunctionsStartup]` attribute and inherit from `FunctionsStartup`.
Here is an example of how we used to initialize Dependency Injection in Azure Functions:
(Here is a completed working example)
//Note: This is the old (pre-.NET 5) way of using Dependency Injection with Azure Functions

[assembly: FunctionsStartup(typeof(Startup))]
namespace GitTrends.Functions
{
    public class Startup : FunctionsStartup
    {
        readonly static string _storageConnectionString = Environment.GetEnvironmentVariable("AzureWebJobsStorage") ?? string.Empty;

        public override void Configure(IFunctionsHostBuilder builder)
        {
            builder.Services.AddHttpClient();();
            builder.Services.AddSingleton<BlobStorageService>();
            builder.Services.AddSingleton<CloudBlobClient>(CloudStorageAccount.Parse(_storageConnectionString).CreateCloudBlobClient());
        }
    }
}

//Note: This is the old (pre-.NET 5) way of using Dependency Injection with Azure Functions
New Initialization & Dependency Injection
The new way is to initialize Azure Functions in .NET 5 is more similar to ASP.NET. It uses to `Microsoft.Extensions.Hosting.HostBuilder`, like so:
(Here is a competed working example)
namespace GitTrends.Functions
{
    class Program
    {
        readonly static string _storageConnectionString = Environment.GetEnvironmentVariable("AzureWebJobsStorage") ?? string.Empty;

        static Task Main(string[] args)
        {
            var host = new HostBuilder()
                .ConfigureAppConfiguration(configurationBuilder =>
                {
                    configurationBuilder.AddCommandLine(args);
                })
                .ConfigureFunctionsWorker((hostBuilderContext, workerApplicationBuilder) =>
                {
                    workerApplicationBuilder.UseFunctionExecutionMiddleware();
                })
                .ConfigureServices(services =>
                {
                    services.AddHttpClient();
                    services.AddSingleton<BlobStorageService>();
                    services.AddSingleton<CloudBlobClient>(CloudStorageAccount.Parse(_storageConnectionString).CreateCloudBlobClient());
                })
                .Build();

            return host.RunAsync();
        }
    }
6. Update HttpTrigger Functions
To update an existing HttpTrigger Function, we replace the following method parameters:
- `HttpRequest` -> `HttpRequestData`
- `ILogger` -> `FunctionExecutionContext`
Note: `ILogger` can now be found in `FunctionExecutionContext.Logger`
Old HttpTrigger (pre .NET 5.0)
Here is an example of the old (pre .NET 5) way of creating an `HttpTrigger`:
(Here is a completed working example)
//Note: This is the old (pre-.NET 5) way of creating an HttpTrigger with Azure Functions

public static class GetGitHubClientId
{
	readonly static string _clientId = Environment.GetEnvironmentVariable("GitTrendsClientId") ?? string.Empty;

	[FunctionName(nameof(GetGitHubClientId))]
	public static IActionResult Run([HttpTrigger(AuthorizationLevel.Anonymous, "get")] HttpRequest request, ILogger log)
	{
		log.LogInformation("Retrieving Client Id");

		if (string.IsNullOrWhiteSpace(_clientId))
			return new NotFoundObjectResult("Client ID Not Found");

		return new OkObjectResult(new GetGitHubClientIdDTO(_clientId));
	}
}
//Note: This is the old (pre-.NET 5) way of creating an HttpTrigger with Azure Functions
New HttpTrigger
The new `HttpTrigger` syntax is nearly identical; only `HttpRequestData` and `FunctionExecutionContext` are now being used as its method parameters:
(Here is a completed working example)
public static class GetGitHubClientId
{
	readonly static string _clientId = Environment.GetEnvironmentVariable("GitTrendsClientId") ?? string.Empty;

	[FunctionName(nameof(GetGitHubClientId))]
	public static IActionResult Run([HttpTrigger(AuthorizationLevel.Anonymous, "get")] HttpRequestData req, FunctionExecutionContext executionContext)
	{
		var logger = executionContext.Logger;
		logger.LogInformation("Retrieving Client Id");

		if (string.IsNullOrWhiteSpace(_clientId))
			return new NotFoundObjectResult("Client ID Not Found");

		return new OkObjectResult(new GetGitHubClientIdDTO(_clientId));
	}
}
7. Update TimerTrigger Functions
To update an existing TimerTrigger Function, we must do the following:
- Create `TimerInfo.cs`
- `ILogger` -> `FunctionExecutionContext`
Create TimerInfo.cs
The out-of-process worker doesn’t yet include the `TimerInfo` class, but we can create it ourselves with the same properties and its values will injected at runtime:
(Here is a completed working example)
using System;
namespace GitTrends.Functions
{
    public class TimerInfo
    {
        public ScheduleStatus? ScheduleStatus { get; set; }

        /// <summary>
        /// Gets a value indicating whether this timer invocation
        /// is due to a missed schedule occurrence.
        /// </summary>
        public bool IsPastDue { get; set; }
    }

    public class ScheduleStatus
    {
        /// <summary>
        /// Gets or sets the last recorded schedule occurrence.
        /// </summary>
        public DateTime Last { get; set; }

        /// <summary>
        /// Gets or sets the expected next schedule occurrence.
        /// </summary>
        public DateTime Next { get; set; }

        /// <summary>
        /// Gets or sets the last time this record was updated. This is used to re-calculate Next
        /// with the current Schedule after a host restart.
        /// </summary>
        public DateTime LastUpdated { get; set; }
    }
}
Old TimerTrigger (pre .NET 5.0)
Here is an example of a TimerTrigger Function before updating it to .NET 5.0:
(Here is a working completed example)
//Note: This is the old (pre-.NET 5) way of creating an TimerTrigger with Azure Functions

public class SendSilentPushNotification
{
	const string _runEveryHourCron = "0 0 * * * *";

	readonly static string _notificationHubFullConnectionString = Environment.GetEnvironmentVariable("NotificationHubFullConnectionString") ?? string.Empty;

	readonly static Lazy<NotificationHubClient> _clientHolder = new(NotificationHubClient.CreateClientFromConnectionString(_notificationHubFullConnectionString, GetNotificationHubInformation.NotificationHubName));

	static NotificationHubClient Client => _clientHolder.Value;

	[FunctionName(nameof(SendSilentPushNotification))]
	public static Task Run([TimerTrigger(_runEveryHourCron)] TimerInfo myTimer, ILogger log) => Task.WhenAll(TrySendAppleSilentNotification(Client, log), TrySendFcmSilentNotification(Client, log));
}

//Note: This is the old (pre-.NET 5) way of creating an TimerTrigger with Azure Functions
New TimerTrigger
In the new TimerTrigger, in the its method parameters, we remove `ILogger`, replacing it with `FunctionExecutionContext`:
(Here is a working completed example)
public class SendSilentPushNotification
{
	const string _runEveryHourCron = "0 0 * * * *";

	readonly static string _notificationHubFullConnectionString = Environment.GetEnvironmentVariable("NotificationHubFullConnectionString") ?? string.Empty;

	readonly static Lazy<NotificationHubClient> _clientHolder = new(NotificationHubClient.CreateClientFromConnectionString(_notificationHubFullConnectionString, GetNotificationHubInformation.NotificationHubName));

	static NotificationHubClient Client => _clientHolder.Value;

	[FunctionName(nameof(SendSilentPushNotification))]
	public static Task Run([TimerTrigger(_runEveryHourCron)] TimerInfo myTimer, FunctionExecutionContext executionContext)
	{
		var logger = executionContext.Logger;

		return Task.WhenAll(TrySendAppleSilentNotification(Client, logger), TrySendFcmSilentNotification(Client, logger));
	}
}
8. Run .NET 5 Azure Functions Locally
Currently, the only way to run our .NET 5 Azure Functions locally is to use the command line.
Note: Visual Studio and Visual Studio for Mac have not yet been updated to run .NET 5 Azure Functions. If you try to run this code using Visual Studio, it will throw a `System.UriFormatException`: “Invalid URI: The hostname could not be parsed.”
1. Install Azure Functions Core Tools v3.0.3160
- On macOS: Open the Terminal and run the following command:
- `brew tap azure/functions; brew install azure-functions-core-tools@3`
- On Windows: Open the Command Prompt and run the following command:
- `npm i -g azure-functions-core-tools@3 –unsafe-perm true`
2. On the command line, navigate to the folder containing your Azure Functions CSPROJ
3. On the command line, enter the following command:
- `func host start –verbose`
Note: This command is slightly different from the command you may already be familiar with, `func start`
9. Publish .NET 5 Azure Functions to Azure
Currently, the only way to publish our .NET 5 Azure Functions to Azure is to use the command line.
Note: Deployment to Azure is currently limited to Windows plans. Note that some optimizations are not in place in the consumption plan and you may experience longer cold starts
1. Install Azure Functions Core Tools v3.0.3160
- On macOS: Open the Terminal and run the following command:
- `brew tap azure/functions; brew install azure-functions-core-tools@3`
- On Windows: Open the Command Prompt and run the following command:
- `npm i -g azure-functions-core-tools@3 –unsafe-perm true`
2. On the command line, navigate to the folder containing your Azure Functions CSPROJ
3. On the command line, enter the following command:
- `dotnet publish -c Release`
4. On the command line, navigate to the publish artifacts by entering the following command:
- `cd ./bin/Release/net5.0/publish`
5. On the command line, publish the Function App to Azure using the following command:
- `func azure functionapp publish <APP_NAME>`
Conclusion
The Azure Functions team is doing a ton of work to create out-of-process workers that allow us to use .NET 5.0 in Azure Functions.
Their work is still on going, and I highly recommend Watching & Staring the azure-functions-core-tools GitHub Repo: https://github.com/Azure/azure-functions-core-tools

Recent Comments