by Scott Muniz | Jul 28, 2020 | Uncategorized
This article is contributed. See the original author and article here.
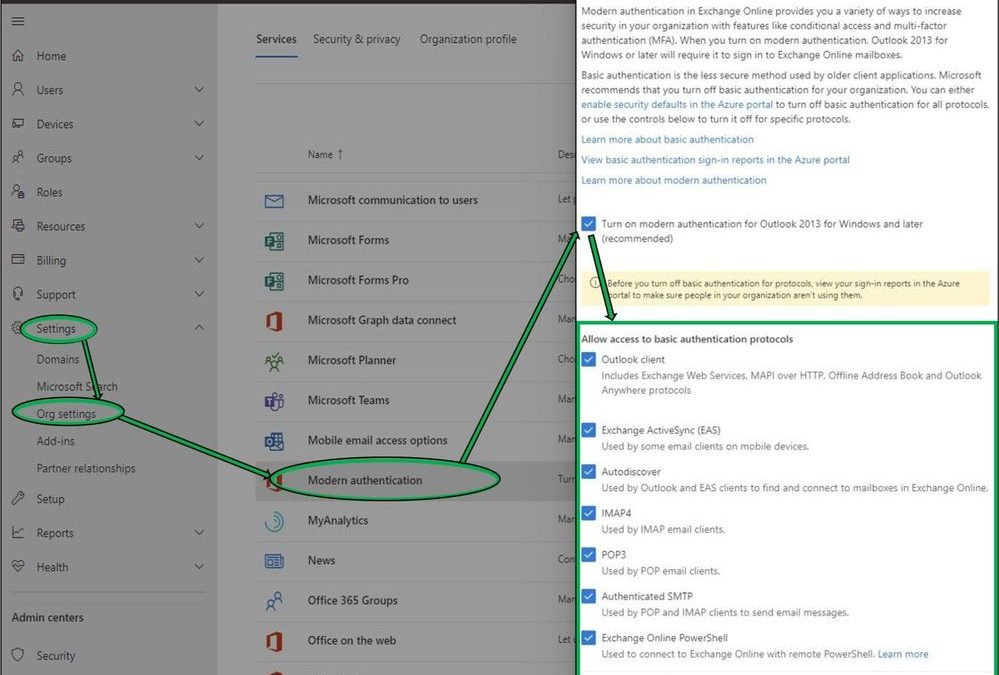
Today we are pleased to announce some new changes to Modern Authentication controls in the Microsoft 365 Admin Center, exposing simpler options for customers to manage both Modern and Basic Authentication requirements within their organizations. Available from within the Admin Center under Settings > Org Settings > Modern Authentication (alternatively, search for “Modern Authentication” in portal Home page Search field), customers may now quickly designate the protocols in their tenant that no longer require Basic Authentication to be enabled.
While additional granularity is available through PowerShell, once Modern Authentication is enabled these new UI options will provide Administrators simpler controls to manage Basic Authentication access to common protocol combinations. These new changes, rolling out to all tenants, align with our entry from the M365 Roadmap.

Behind the scenes, these new Modern Auth UI options utilize Authentication Policies. For customers that have not created their own Authentication Policies in the past, modifying any of these selections in the new UI (POP3 in the example below) will automatically create the first new Authentication Policy. This policy is visible only through PowerShell. For advanced customers that may already be utilizing Authentication Policies, changes within the UI will modify their existing default policy. You’ll want to look through your Azure AD Sign-in logs to get a good idea of which protocols clients are using before making any changes.

Additional Information
We realize there may be some confusion around different efforts Microsoft is making to provide more secure environments for our customers. The easiest answer for customers who aren’t using Basic Authentication, and don’t have a complicated auth story, is to enable Security Defaults. Otherwise, while the below isn’t an exhaustive list, we thought it would be a good idea to try to cover a few additional details here.
Modern vs. Basic Authentication: Hopefully by now we don’t need to expand upon the virtues of Modern Authentication. Enabled by default for all new tenants since August 1, 2017, Modern Auth is the superior alternative for all users and applications connecting to Office 365. If you haven’t turned Modern Authentication on yet we certainly recommend it. Just be aware this switch affects all the Outlook for Windows clients in your entire tenant, so make sure you are clear on how it may affect your users.
Security Defaults: If your tenant was created on or after October 22, 2019, it is possible that Security Defaults are already enabled in your tenant. In an effort to provide basic level of security, Security Defaults are being rolled out to all newly created tenants. Security Defaults block all Legacy/Basic Authentication and enable Modern/Multi-Factor Authentication for all users. We should clarify that Security Defaults are typically tailored for new customers or those who are new to managing their own security story. While the end results are similar, Security Defaults do not utilize Exchange Authentication Policies under the hood. Thus, to prevent overlap and confusion, we restrict the combination of these controls in the new Modern Auth UI. If Security Defaults are enabled in the organization, administrators attempting to use new Modern Auth UI will be presented with the following text. (You should disable Security Defaults only if you understand the risks of using Basic Authentication.)

Authentication Policies: As announced last year, the Exchange Team is planning to disable Basic Authentication for the EAS, EWS, POP, IMAP, and RPS protocols in the second half of 2021. As a point of clarity, Security Defaults and Authentication Policies are separate, but provide complementary features. We recommend that customers use Authentication Policies to turn off Basic Authentication for a subset of Exchange Online protocols or to gradually turn off Basic Authentication across a large organization. While more details will come in future announcements, as mentioned in April, we plan to begin disabling Basic Authentication in existing tenants with no recorded usage as early as October 2020. We will provide notifications via Message Center posts before we disable Basic Authentication for any tenant.
Client SMTP Submission (SMTP AUTH): While SMTP AUTH Basic Authentication will not be deprecated, the use of Basic Authentication within SMTP AUTH is still considered insecure. There are multiple initiatives for SMTP AUTH that are worth calling out, and administrators should have familiarity with each of these:
- As announced in April, we have additionally disabled SMTP AUTH for all new Office 365 tenants by utilizing the SmtpClientAuthenticationDisabled parameter, and we’ll be expanding this effort over the next several months. If your tenant doesn’t need to use SMTP AUTH at all, this option allows the granularity to disable SMTP Auth for individual users via Set-CASMailbox or Set-TranportConfig for tenants. Read more here.
- For customers that still require SMTP AUTH, we’ve got you covered, with new options for implementing OAuth 2.0 for client applications. After updating your SMTP AUTH clients, please make sure you block legacy authentication methods via one of the following:
- Security Defaults (which as mentioned covers all protocols including SMTP AUTH) if enabled will block Basic Authentication access to SMTP AUTH for all end users within a tenant. Security Defaults is being rolled out as default for all new tenants and is the recommended action if it works for your organization.
- Authentication Policies, either via PowerShell or the new UI announced here today, can also block Basic Authentication access to SMTP AUTH for all or groups of users.
Exchange Online PowerShell: As we announced recently, Exchange Online PowerShell V2 module is now fully released and this is what you should use to connect using Modern Authentication. We have also recently announced the preview program which will allow you to run PowerShell scripts with Modern Authentication (using certificates).
If you have any feedback, please let us know in the comments below.
The Exchange Team
by Scott Muniz | Jul 28, 2020 | Uncategorized
This article is contributed. See the original author and article here.
Announcing the release of BizTalk Server 2020 CU1. The download went live just moments ago.
Here are the details
https://support.microsoft.com/help/4538666 (master)
https://support.microsoft.com/help/2555976 (index)
As you may recall from 2020 setup experience, for BizTalk Developer Tools, in addition to installing CU package, also update/install new version of BizTalk Server Visual Studio extension (3.13.2.0). The extension can be installed from https://marketplace.visualstudio.com/items?itemName=ms-biztalk.BizTalk or within Visual Studio – Manage Extensions.
As a standard practice, EN download is made available by default. All other language packages will be made available on need basis. If a download is not available for the supported BizTalk language that you need, please contact me for the same.
by Scott Muniz | Jul 28, 2020 | Alerts, Microsoft, Technology, Uncategorized
This article is contributed. See the original author and article here.
This article is the 5th part of the Zero to Hero with App Service series. This article assumes you have completed the first article.
If you would like to customize your web app and have a domain name other than “azurewebsites.net”, you can add a custom domain to your web app. Moreover, you can secure your custom domain with a free certificate with App Service Managed Certificates, which will give your customers peace of mind when browsing your website.
Prerequisite
Before you can add a custom domain to your web app, you need to have purchased a custom domain already. If you don’t have a custom domain, you can buy one through App Service Domains, which you can get started with the App Service Domains section of the article . If you already have your own custom domain, proceed to the adding a custom domain to your web app section of the article.
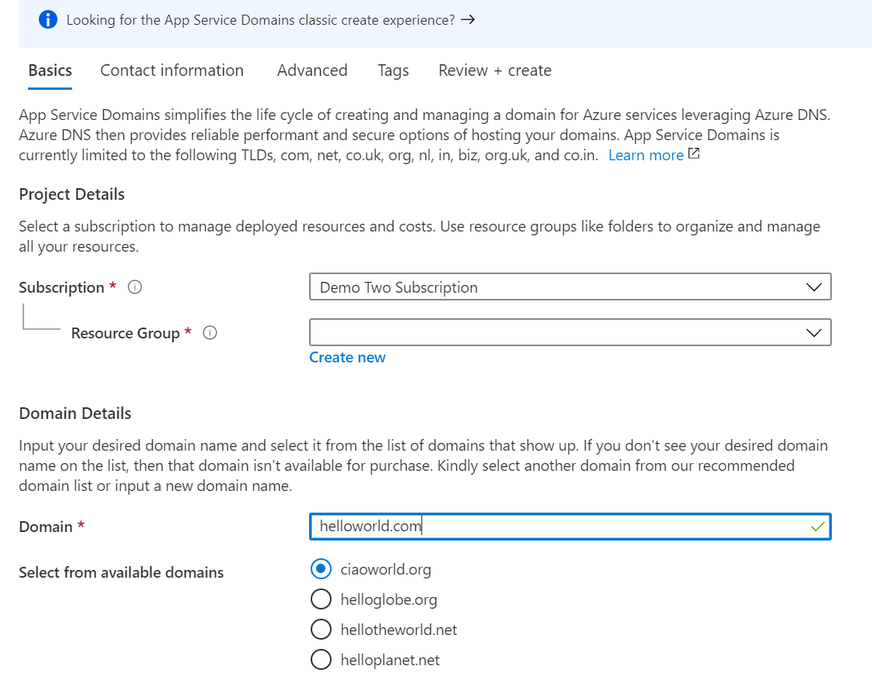
App Service Domains
App Service Domains lets you create and manage domains hosted on Azure DNS through the Azure portal. The domain can be used for services such as Web Apps, Traffic Manager, and etc.. Purchasing an App Service Domain also provides the added benefit of privacy protection: your personal data will be protected from the WHOIS public database for free. This is often costs extra with other domain registrars. This product can auto-renew your domains and it integrates easily with your web apps.
To create your App Service Domain, you can click on this link here or you can head to the Azure portal and search for “App Service Domain”.

In the domain search bar, type the domain name you would like to purchase. If you don’t see the name in the list of available domains, then the domain isn’t available for purchase. However, you can choose from the suggested list of available domains or enter a new domain you would like to purchase. In the “Contact information” tab, enter your personal information. Then in the “Advanced” tab, choose whether you want to set up auto-renew for the domain. Domain auto-renew prevents accidental loss of domain ownership after expiration. Lastly, decide whether you would like to add privacy protection at no extra charge. Go to “Review + create” to review the legal terms, verify the domain information, and click “Create”. Once your domain has successfully been created, proceed to the adding a custom domain to your web app section of the article.
Adding a custom domain to your web app
To add a custom domain to your web app, you will need to update your domain’s DNS records. If you purchased an App Service Domain, the DNS records will be updated for you automatically and you can proceed to verifying and adding a custom domain section. Otherwise, you will need to work on updating DNS records .
Updating DNS records
You will need to get the custom domain verification ID of your web app. This token will be used to verify the domain ownership. You can get this value in the “Custom domains” tab of your web app.

Once you have the ID, go to the domain provider of your domain. In the DNS records, create a CNAME and a TXT Record. As an example, if you want to map your ‘www’ subdomain, refer to the chart below:
| Record Type |
Host |
Value |
| CNAME |
www |
.azurewebsites.net |
| TXT |
asuid.www |
Custom Domain Verification ID |
Your DNS records page should look something like the following example:

Verifying and adding custom domain
After updating your DNS records (if not using App Service Domain):
- Go to your App Service and navigate to the “Custom domain” section under “Settings”.
- Click on the “Add custom domain” button
- Enter the domain that you would like to use
- Click “Validate”
- If you correctly updated your DNS records and the DNS changes have propagated, you will see the option to “add custom domain”. Otherwise, return to the previous updating DNS records section to make sure you have correctly updated your DNS records. Click “add custom domain”.

Once the custom domain has successfully been added to your web app, you will see it under the list of “Assigned Custom Domains”. You can navigate to your web app using these domain names.
If you are interested in securing your custom domain, proceed to the following section on Creating an App Service Managed Certificate .
Creating an App Service Managed Certificate
If you would like to secure your custom domain at no cost, you can create an App Service Managed Certificate and bind it to your domain. With Managed Certificates, you don’t have to worry about renewals, as the certificate is automatically renewed for you!
Go to your web app resource and navigate to the “TLS/SSL settings” section under “Settings”. Click on the “Private Key Certificates” blade and look for the “Create App Service Managed Certificate” button.

Select the domain from the dropdown menu that you would like to create a certificate for and click “Create”.

Once the certificate has been created, you will see that it in the list of your private certificates on the “TLS/SSL Settings” blade. In order to use this certificate to secure your domain, you will need to bind this certificate to your domain, which will be explained in the next section of binding your certificate to your web app .

Binding Your Certificate to Your Web App
The final step to securing your domain is to bind your certificate to the domain. In the Portal, go to your web app and navigate to the “Custom domain” section under “Settings”. Look for the domain you want to secure from the list of “Assigned Custom Domains” and click “Add binding”.

In the following blade…
- Select the correct custom domain
- Select the App Service Managed Certificate you’ve just created from the dropdown menu
- Select “SNI SLL” for the TLS/SSL Type
- Click “Add Binding”

Once the binding has successfully been created, you will see a green checkmark and the word “Secure” beside your custom domain under the “Assigned Custom Domains” list.
Summary
Congratulations! In this article, you have successfully added and secured a custom domain for your App Service! Your users can now reach your web site at the new domain, and their browser will let them know that the site is secured.
Helpful Resources
by Scott Muniz | Jul 28, 2020 | Alerts, Microsoft, Technology, Uncategorized
This article is contributed. See the original author and article here.
We are excited to share several new Azure Migration-related assets to help you navigate cloud migration, learn about best practices, and understand tooling options available from Microsoft.
- Cloud Migration Simplified E-Book Learn about the cloud migration journey, with our tried and true framework for a successful migration and migration best practices, along with guidance on how to navigate all of the tools and resources provided by Microsoft and partners.
- Azure Migrate E-Book Learn how to discover, assess, and migrate infrastructure, applications, and data to the cloud with Microsoft’s first-party migration service, Azure Migrate.
- Virtual Machine Migration Learning Path Get step-by-step instructions along with video demos on how to migrate virtual machines and apps to Azure using Azure Migrate, including guided set up, assessment, and migration.
by Scott Muniz | Jul 28, 2020 | Uncategorized
This article is contributed. See the original author and article here.
Several federal initiatives such as CDM (Continuous Diagnostic and Mitigation) TIC (Trusted Internet Connection) are increasingly becoming similar, in that identical tools and approaches such as Zero Trust can be used to meet multiple federal mandates. This convergence provides an opportunity to reduce complexity while helping agencies improve their security posture and increase IT efficiency.
This blog is the fourth of a four-part series on meeting federal mandates with SaaS services, provides a deep dive on auditing and logging.
Previous blogs in the series have addressed various ways to manage and secure mobile devices, endpoints, and the Office 365 platform. In Part 4, we will focus on the various methods to audit and log activity. The cloud is ever changing, and Microsoft has published numerous announcements since the blog series started. One of which was the release of Microsoft Threat Protection (MTP), which helps unify auditing and querying of Microsoft’s security solutions.
There are several locations that activity logs can be found however for this post we will focus on three primary solutions.
- Unified Access Logs (UAL)
- Microsoft Threat Protection
- Azure Sentinel
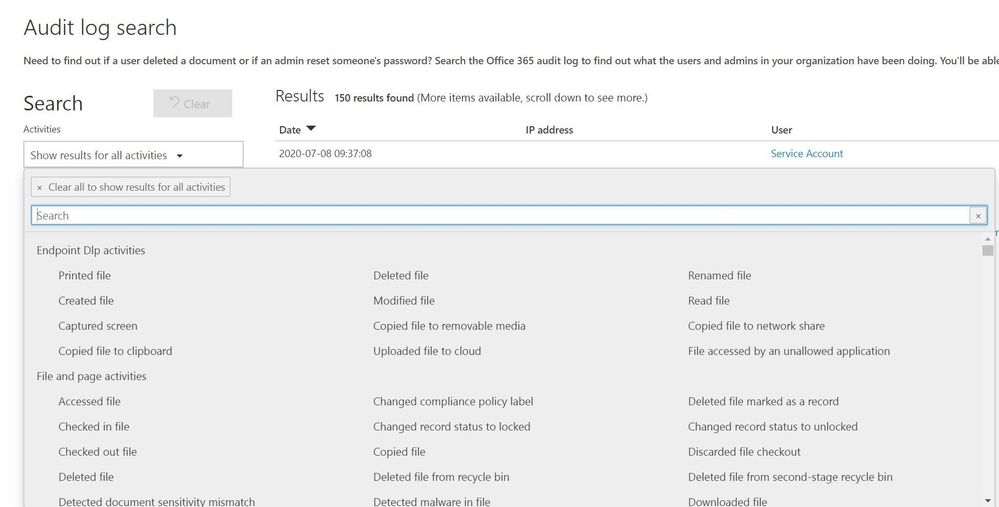
Unified Audit Logs (UAL)
When an organization wants to gain insights into Office 365 activity the first location to be familiar with is the UAL located at https://protection.office.com/unifiedauditlog . The UAL provides organizations with a rich set of filters to search 100’s of Office 365 activities.

Figure 1: Unified Audit Log search interface
The UAL provides multiple ways to search the data using a graphical interface like the portal or a command line via Powershell, which allows organization to choose the right method for their needs. The UAL can assist organizations in understanding what data is accessed and by whom however, the UAL can only see activity that is hosted in Office 365 services such as: OneDrive, SharePoint Online, and Exchange Online. The UAL has no visibility into data once it leaves the platform, this is where other Microsoft security tools extend the organizations’ ability to continue to track data that has moved outside of Office 365.
Microsoft Threat Protection
Microsoft announced the release of Microsoft Threat Protection (MTP) at RSA this year. MTP is a unified pre- and post-breach enterprise defense suite that natively coordinates detection, prevention, investigation, and response across endpoints, identities, email, and applications to provide integrated protection against sophisticated attacks.
Security teams understand modern attacks traverse many parts of infrastructure and the Microsoft Threat Protection suite protects:
- Endpoints with Microsoft Defender ATP - Microsoft Defender ATP is a unified endpoint platform for preventative protection, post-breach detection, automated investigation, and response.
- Email and collaboration with Office 365 ATP - Office 365 ATP safeguards your organization against malicious threats posed by email messages, links (URLs), and collaboration tools.
- Identities with Azure ATP and Azure AD Identity Protection - Azure ATP uses Active Directory signals to identify, detect, and investigate advanced threats, compromised identities, and malicious insider actions directed at your organization.
- Applications with Microsoft Cloud App security - Microsoft Cloud App security is a comprehensive cross-SaaS solution bringing deep visibility, strong data controls, and enhanced threat protection to your cloud apps.

Figure 2: Modern Threat Kill Chain
MTP will reduce the number of portals IT staff must utilize when securing their infrastructure, Microsoft’s goal is to move security related information to https://security.microsoft.com and provide a common method to search/query data. The first change in the initial release is the ability to utilize the advanced hunting language, Kusto Query Language (KQL). KQL has become the new query language for Microsoft security solutions and provides a rich set of capabilities, scalability, and speed.
The advanced hunting capabilities of MTP allows organizations to search across several data sets in a single interface and join queries together to gain rich insight. MTP should not be confused with a traditional SIEM. The focus of MTP is to unify Microsoft security solutions into a single location, not to aggregate 3rd party data. We will address the “3rd party data” scenario shortly.
Figure 3: MTP Advanced Hunting interface
MTP aggregates several Microsoft security solutions together helping organizations identity attacks that span an entire kill chain. When creating custom detection rules MTP maps the detections to the MITRE ATT&CK framework. This helps security teams identify the type of techniques being used and can assist in breaking the attack chain.

Figure 4: MTP custom detection rule wizard
One of the challenges security teams often face is alert fatigue. This happens when security teams receive hundreds of individual alerts and may also be known as an alert storm. MTP automatically correlates alerts into incidents reducing the “noise” for security teams. In the incident below MTP has correlated 165 alerts, 15 devices, and 603 pieces of evidence into a single incident. This allows staff a single location to pivot across several entities and investigate an entire kill chain vs. “hunting down” individual alerts. MTP does an excellent job of aggregating the signal from the MTP stack but it is not a SIEM, this is where Azure Sentinel comes into the picture.

Figure 5: MTP Incident view zoomed in
Azure Sentinel
Microsoft released Azure Sentinel, a born in the cloud SIEM/SOAR which provides scalability and deep integration with a variety of vendors. Over time Azure Sentinel will be able to aggregate the data from MTP into a single location. Since Azure Sentinel was created as a cloud-first solution, the pace of new features evolves quickly and allows for massive scale and high performance.

Figure 6: Azure Sentinel capabilities overview
Azure Sentinel is built on top of the Log Analytics platform which means you use the same KQL language to query the data as with MTP. Since these tools share a common query language, this helps security teams easily move between tools and use a familiar experience.

Figure 7: Azure Sentinel advanced hunting
Hunting through raw data is valuable but, at times organizations need an easy way to visualize data. Azure Sentinel allows you to create workbooks from the data feeds you are receiving. Each connector has a default workbook that provides a data visualization. Organizations can edit or create custom views that meet their requirements.
Figure 8: Azure Sentinel workbook views
The biggest difference between MTP and Azure Sentinel is the ability to pull in 3rd party data and custom data sources. Azure Sentinel was designed to provide a single click experience when connecting Microsoft data sources like Office 365. This simplifies a task that often challenges security teams when attempting to connect various data sources. The list of first party and 3rd party connectors is always expanding at a cloud pace.
Azure Sentinel includes numerous Microsoft log sources at no additional cost to your organization for 90 days.
Figure 8: Azure Sentinel data connectors
Like MTP, Azure Sentinel maps threats to the MITRE ATT&CK framework and helps organizations hunt through data with many predefined queries written by Microsoft’s internal threat team Microsoft threat intelligence center (MSTIC). A challenge with data queries is once a data set is parsed and new data is added, its missed in a query. Azure Sentinel has a feature called live streaming that will parse any new data while the query is running so that security teams can identify possible indicators.
Figure 9: Azure Sentinel hunting
Azure Sentinel has integrated Juniper notebooks into the platform to allow analyst to store and share hunting repos. Juniper notebooks help security teams that use other scripting languages, and run queries to data sources, that maybe outside of Azure Sentinel. Microsoft also publishes a set of notebooks on GitHub located here that anyone can download and incorporate into their environment even if you do not use Azure Sentinel.
Figure 10: Azure Sentinel Juniper notebooks
At the heart of most SIEMs is incident management. Azure Sentinel provides a rich set of Playbooks and the ability to assign incidents to analysts and keep a history of comments with the incident. The incident view quickly allows security teams to view any entities involved with an alert and provide a graphical investigation view of the incident.
Figure 10: Azure Sentinel Incident view
Playbooks are considered a Security Orchestration And Response (SOAR) tool that can help organizations create, processes, and automate tasks. Playbooks have native connections into hundreds of applications and services allowing staff to connect alerts into Microsoft teams, Slack, or create tickets in ITSM solutions like ServiceNow. Playbooks are the corner stone for your SOC to automate processes to provide a consistent set of actions and remove many manual tasks.
Figure 11: Azure Sentinel Playbooks
Microsoft provides organizations several methods to audit and log data from various sources to include Office 365. In this post we focused on three main locations.
- Unified Access Log (UAL)
- Microsoft Threat Protection (MTP)
- Azure Sentinel
Each location provides a rich set of data that can be reviewed by security teams to help audit and secure an organization.
Blog Series links:
Part 1: Securing mobile: Designing SaaS service implementations to meet federal policy
Part 2: Securing the endpoint: designing SaaS service implementations to meet federal policy
Part 3: Securing the Platform: Designing SaaS service implementations to meet federal policy

Recent Comments