This article is contributed. See the original author and article here.
This article is the 5th part of the Zero to Hero with App Service series. This article assumes you have completed the first article.
If you would like to customize your web app and have a domain name other than “azurewebsites.net”, you can add a custom domain to your web app. Moreover, you can secure your custom domain with a free certificate with App Service Managed Certificates, which will give your customers peace of mind when browsing your website.
Prerequisite
Before you can add a custom domain to your web app, you need to have purchased a custom domain already. If you don’t have a custom domain, you can buy one through App Service Domains, which you can get started with the App Service Domains section of the article . If you already have your own custom domain, proceed to the adding a custom domain to your web app section of the article.
App Service Domains
App Service Domains lets you create and manage domains hosted on Azure DNS through the Azure portal. The domain can be used for services such as Web Apps, Traffic Manager, and etc.. Purchasing an App Service Domain also provides the added benefit of privacy protection: your personal data will be protected from the WHOIS public database for free. This is often costs extra with other domain registrars. This product can auto-renew your domains and it integrates easily with your web apps.
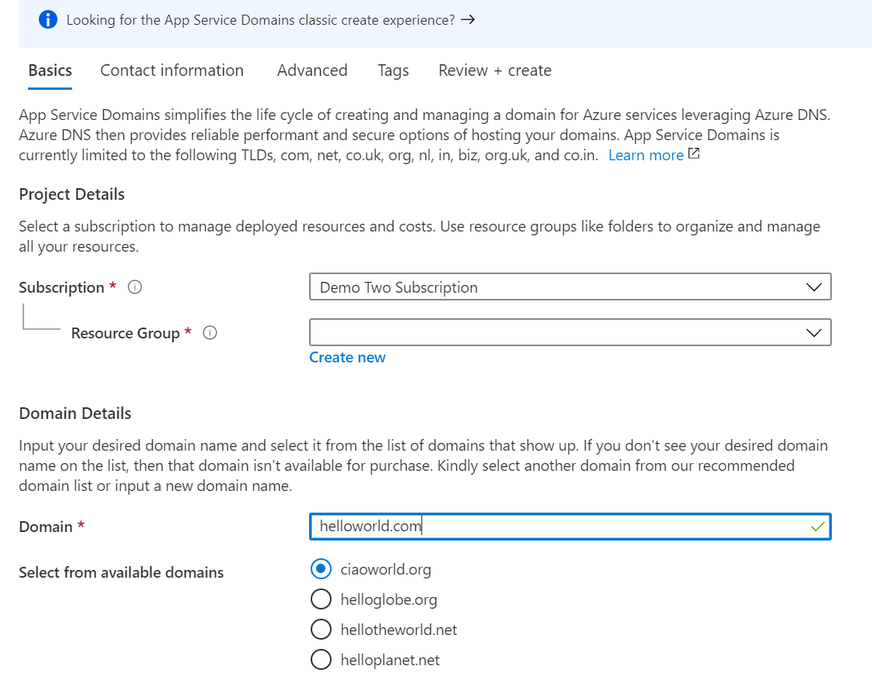
To create your App Service Domain, you can click on this link here or you can head to the Azure portal and search for “App Service Domain”.

In the domain search bar, type the domain name you would like to purchase. If you don’t see the name in the list of available domains, then the domain isn’t available for purchase. However, you can choose from the suggested list of available domains or enter a new domain you would like to purchase. In the “Contact information” tab, enter your personal information. Then in the “Advanced” tab, choose whether you want to set up auto-renew for the domain. Domain auto-renew prevents accidental loss of domain ownership after expiration. Lastly, decide whether you would like to add privacy protection at no extra charge. Go to “Review + create” to review the legal terms, verify the domain information, and click “Create”. Once your domain has successfully been created, proceed to the adding a custom domain to your web app section of the article.
Adding a custom domain to your web app
To add a custom domain to your web app, you will need to update your domain’s DNS records. If you purchased an App Service Domain, the DNS records will be updated for you automatically and you can proceed to verifying and adding a custom domain section. Otherwise, you will need to work on updating DNS records .
Updating DNS records
You will need to get the custom domain verification ID of your web app. This token will be used to verify the domain ownership. You can get this value in the “Custom domains” tab of your web app.

Once you have the ID, go to the domain provider of your domain. In the DNS records, create a CNAME and a TXT Record. As an example, if you want to map your ‘www’ subdomain, refer to the chart below:
| Record Type | Host | Value |
|---|---|---|
| CNAME | www | .azurewebsites.net |
| TXT | asuid.www | Custom Domain Verification ID |
Your DNS records page should look something like the following example:

Verifying and adding custom domain
After updating your DNS records (if not using App Service Domain):
- Go to your App Service and navigate to the “Custom domain” section under “Settings”.
- Click on the “Add custom domain” button
- Enter the domain that you would like to use
- Click “Validate”
- If you correctly updated your DNS records and the DNS changes have propagated, you will see the option to “add custom domain”. Otherwise, return to the previous updating DNS records section to make sure you have correctly updated your DNS records. Click “add custom domain”.

Once the custom domain has successfully been added to your web app, you will see it under the list of “Assigned Custom Domains”. You can navigate to your web app using these domain names.
If you are interested in securing your custom domain, proceed to the following section on Creating an App Service Managed Certificate .
Creating an App Service Managed Certificate
If you would like to secure your custom domain at no cost, you can create an App Service Managed Certificate and bind it to your domain. With Managed Certificates, you don’t have to worry about renewals, as the certificate is automatically renewed for you!
Go to your web app resource and navigate to the “TLS/SSL settings” section under “Settings”. Click on the “Private Key Certificates” blade and look for the “Create App Service Managed Certificate” button.

Select the domain from the dropdown menu that you would like to create a certificate for and click “Create”.

Once the certificate has been created, you will see that it in the list of your private certificates on the “TLS/SSL Settings” blade. In order to use this certificate to secure your domain, you will need to bind this certificate to your domain, which will be explained in the next section of binding your certificate to your web app .

Binding Your Certificate to Your Web App
The final step to securing your domain is to bind your certificate to the domain. In the Portal, go to your web app and navigate to the “Custom domain” section under “Settings”. Look for the domain you want to secure from the list of “Assigned Custom Domains” and click “Add binding”.

In the following blade…
- Select the correct custom domain
- Select the App Service Managed Certificate you’ve just created from the dropdown menu
- Select “SNI SLL” for the TLS/SSL Type
- Click “Add Binding”

Once the binding has successfully been created, you will see a green checkmark and the word “Secure” beside your custom domain under the “Assigned Custom Domains” list.
Summary
Congratulations! In this article, you have successfully added and secured a custom domain for your App Service! Your users can now reach your web site at the new domain, and their browser will let them know that the site is secured.
Helpful Resources
- Tutorial: Map an existing custom DNS name to Azure App Service
- Add a TLS/SSL certificate in Azure App Service
Brought to you by Dr. Ware, Microsoft Office 365 Silver Partner, Charleston SC.

Recent Comments