by Contributed | Mar 3, 2021 | Technology
This article is contributed. See the original author and article here.
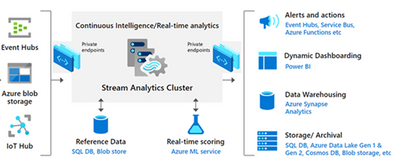
General Availability of Stream Analytics Clusters
Today we announced GA of Stream Analytics clusters!:party_popper: This Dedicated SKU is for customers with medium to large streaming workloads along with strong enterprise security requirements such as network isolation and predictable price and performance. VNET support has been one of the top asks from the community and we’re very excited to take the first step in offering this capability. You can now start using ASA clusters in production right away!
Gated preview of T-SQL streaming in Synapse
We also announced a gated preview of T-SQL streaming in Synapse. With this new capability, customers can now create and monitor their streaming jobs using their T-SQL knowledge directly in Synapse Studio. You can connect to real time streaming sources such as Azure Event Hubs and Azure IoT Hubs to do complex analytics and write directly to Synapse SQL Database with egress throughput up to 200 Mbps. If you are interested in onboarding to this gated preview, please sign up and our team will be in touch with you very soon.

Public preview of CPU% utilization metric
Our customers have always pushed us to provide more visibility into the health of their running jobs. Until today, you could only identify bottlenecks caused due to excessive memory consumption. Meaning, if the job was bottlenecked on CPU usage, you would never be able to identify this as the root cause. We are taking the first step to expose a job level CPU % Utilization metric out of the box. And going forward, we will also allow customers to drilldown to understand which part of their streaming query is causing the bottlenecks so that you can make targeted optimizations. You can start using this metric right away to troubleshoot performance issues with your job!

The Azure Stream Analytics team is highly committed to listening to your feedback. We welcome you to join the conversation and make your voice heard via our UserVoice. You can stay up-to-date on the latest announcements by following us on Twitter @AzureStreaming. If you have any questions or run into any issues accessing the public preview, you can also reach out to us at askasa [at] microsoft [dot] com .
by Contributed | Mar 3, 2021 | Technology
This article is contributed. See the original author and article here.
AksHci PowerShell February Release
If you were one of many people who gave us feedback on our December release, we have exciting news for you! In our February release, we’ve delivered one of the most requested features, additional networking options! While you can use PowerShell or Windows Admin Center to provision and manage your Azure Kubernetes Service clusters on Azure Stack HCI (AKS-HCI), this post will focus on the AksHci PowerShell module and how it is moving closer to being aligned with the AKS PowerShell module.
What’s new?
In this version of the AksHci PowerShell, new capabilities are now available such as creating a private virtual network, static IP deployment, and Active Directory integration.
Now, with the new command `New-AksHciNetworkSetting`, users are given the option to deploy with DHCP or static IP. We recommend deploying with Static IP because the IP addresses remain the same over time unless it is changed manually. This command will create a configuration object for a virtual network for the control plane, load balancer, agent endpoints, and a static IP range for nodes in all clusters. To deploy a cluster with a virtual network based on the configuration object created, you will pass the assigned name of the object to the new parameter `-vnet` in the command `Set-AksHciConfig`.
New-AksHciNetworkSetting example for static IP deployment
$vnet = New-AksHciNetworkSetting -vnetName “External” -k8sNodeIpPoolStart “172.16.10.0”
-k8sNodeIpPoolEnd “172.16.10.255” -vipPoolStart “172.16.255.0” -vipPoolEnd “172.16.255.254”
-ipAddressPrefix “172.16.0.0/16” -gateway “172.16.0.1” -dnsServers “172.16.0.1”
|
Set-AksHciConfig -imageDir c:clusterstoragevolume1Images
-cloudConfigLocation c:clusterstoragevolume1Config -vnet $vnet -enableDiagnosticData
-cloudservicecidr “172.16.10.10/16”
|
Install-AksHci
|
*Note: The values for the parameters need to be configured to your environment.
New-AksHciNetworkSetting example for a DHCP deployment
$vnet = New-AksHciNetworkSetting -vnetName “External” -vipPoolStart “172.16.255.0”
-vipPoolEnd “172.16.255.254”
|
Set-AksHciConfig -imageDir c:clusterstoragevolume1Images
-cloudConfigLocation c:clusterstoragevolume1Config -vnet $vnet -enableDiagnosticData”
|
Install-AksHci
|
*Note: The values for the parameters need to be configured to your environment.
For more information about the `New-AksHciNetworkSetting` command and its parameters, go here.
For more information on virtual network, Static IP, and DHCP, go here.
In addition to the new virtual network and Static IP features, you can now integrate Active Directory (AD) with Azure Kubernetes Service on Azure Stack HCI. Without Active Directory, connection to the API server relied on a certificate-based kubeconfig file. Having secrets such as these certs in the kubeconfig file creates a greater opportunity for those secrets to be leaked. Now, users can enable AD authentication to use AD single sign-on (SSO) to securely connect to the API server. This new feature introduces a new parameter, -enableAdAuth`, to the command `New-AksHciCluster` and a new command, `Install-AksHciAdAuth`
Install-AksHciAdAuth example
New-AksHciCluster -name mynewcluster1 –enableADAuth
|
Install-AksHciAdAuth -name mynewcluster1 -keytab <.current.keytab>
-previousKeytab <.previous.keytab> -SPN <service/principal@CONTOSO.COM>
-adminUser CONTOSOBob
|
*Note: The values for the parameters need to be configured to your environment.
For more information on the `Install-AksHciAdAuth` command and its parameters, go here.
For a tutorial on Active Directory integration with AKS-HCI, go here.
Parity with Azure Kubernetes Service (AKS) PowerShell
Not only do these new features provide a wider range of capabilities and configuration for our customers, but they also bring the AKS-HCI platform to be more closely aligned with AKS capabilities. The AKS-HCI team is working on bringing parity between the two platforms. One of the goals for this is to make sure that the user experience for AKS and AKS-HCI is as closely aligned as possible. There are two ways to provision and manage your AKS-HCI clusters: Windows Admin Center and the AKS-HCI PowerShell module, which are designed to have the same user experience as the Azure Portal and AKS PowerShell respectively.
Below, these are some examples of AKS-HCI and AKS commands.
Provision a Kubernetes cluster
AKS-HCI
|
AKS
|
New-AksHciCluster -name mycluster
|
New-AzAksCluster -name mycluster
-resourceGroupName myresourcegroup
|
*Note: The parameter ‘-resourceGroupName’ is different because AKS-HCI is run on-premises and its resource are not grouped.
List deployed Kubernetes clusters
AKS-HCI
|
AKS
|
Get-AksHciCluster
|
Get-AzAksCluster
|
Delete a Kubernetes cluster
AKS-HCI
|
AKS
|
Remove-AksHciCluster -name mycluster
|
Remove-AzAksCluster -name mycluster
-resourceGroupName myresourcegroup
|
*Note: The parameter ‘-resourceGroupName’ is different because AKS-HCI is run on-premises and its resource are not grouped.
There are still some disparities between the two modules, but we are working on closing these gaps in future releases to provide customers with a seamless experience for a hybrid environment in AKS and AKS-HCI.
We would love feedback on AKS consistency in PowerShell, hearing about any other AKS features you would like to see in AKS-HCI, or if you are interested in an on-premises Kubernetes solution! Please fill out this quick survey here.
Learn how to set up your Azure Kubernetes Service host on Azure Stack HCI here.
by Contributed | Mar 3, 2021 | Technology
This article is contributed. See the original author and article here.
Last year, Microsoft collaborated with Tigera and released Project Calico to the Windows platform. This contribution to the open-source community was very well received by the community and we got many requests from customers to also support Calico for Windows server on Azure Kubernetes Service (AKS). I’m pleased to announce that Calico for Windows is now available in public preview on AKS.
We have started seeing customers with Linux and Windows operating system (OS) node pools on a single cluster. With more customers adopting containers and microservices, customers are developing applications that runs across Linux and Windows containers. With our support for Calico on Windows in AKS, customer can now have a single network policy experience on node pool cluster running both Linux and Windows containers to secure their network traffic.
In this blog post, I’ll walk you through the steps to install AKS with Calico and setup network policy.
Prerequisites:
- Kubernetes version 1.20.2 or above.
- Bash environment in Azure Cloud Shell (bash)
- Ability to create AKS clusters
- Knowledge on Kubernetes and kubectl
Overview:
- Create AKS cluster with Calico enabled with Direct Server Return (DSR)
- Setup polices for Windows and Linux
- Test the network policy
Step 1: Set up cluster with Calico enabled
We have simplified the process of enabling Calico on a cluster by including it as part of an addon to AKS cluster creation.
Step 1.1: Set the preview feature flag for Calico feature on windows
To use Calico with Windows node pools, you also need to register the “Microsoft.ContainerService/EnableAKSWindowsCalico” flag since it is a public preview feature.
Register the EnableAKSWindowsCalico feature flag by following the command as shown in the following example:
$ az feature register --namespace "Microsoft.ContainerService" --name "EnableAKSWindowsCalico"
You can check on the registration status using running this command below:
$ az feature list -o table --query "[?contains(name, 'Microsoft.ContainerService/EnableAKSWindowsCalico')].{Name:name,State:properties.state}"
When ready, refresh the registration of the Microsoft.ContainerService resource provider using the following command:
$ az provider register --namespace Microsoft.ContainerService
Step 1.2: Create AKS cluster with Calico Addons
Here, we will create an AKS cluster with Calico enabled. To enable Calico network policy on Windows, the network plugin must be “azure” since Windows on AKS supports Azure CNI network plug-in only.
Note: When setting up your Windows node pools to your cluster, it is required to add the windows-admin-username and windows-admin-password parameters as you see in the example below.
$ rg=MyResourceGroup
$ location=MyRegion
$ PASSWORD_WIN="MyPassword"

$ az group create -n $rg -l $location

$ az aks create
    --resource-group $rg
    --name k8s
    --node-count 1
    --enable-addons monitoring
    --windows-admin-username azureuser
    --windows-admin-password $PASSWORD_WIN
    --kubernetes-version 1.20.2
    --vm-set-type VirtualMachineScaleSets
    --load-balancer-sku standard
    --network-plugin azure
    --node-vm-size Standard_D2s_v3
    --network-policy calico

$ az aks nodepool add
    --resource-group $rg
    --cluster-name k8s
    --os-type Windows
    --name npwin
    --node-count 1
    --kubernetes-version 1.20.2
    --node-vm-size Standard_D2s_v3
When Calico is enabled, you should be able to see the calico system pods running inside the calico-system namespace. To connect to AKS, please refer to connect to cluster doc and run the following command.
$ kubectl get pods -n calico-system
NAME                                   		READY   STATUS    RESTARTS   AGE
calico-kube-controllers-6b4fc665cc-6pmgq   	1/1     Running   0          6d
calico-node-474qb                         	1/1     Running   0          6d
calico-typha-5889b7f49d-9bblq              	1/1     Running   0          6d
Step 2: Setup policies on Windows and Linux
Once the cluster is created, we will create client and server pods on Linux and Windows nodes and verify connectivity between the pods.
Step 2.1: Create Linux Pod
Run the following command which includes the yaml file.
$ kubectl apply -f - <<EOF
apiVersion: v1
kind: Namespace
metadata:
  name: calico-demo
---
apiVersion: v1
kind: Pod
metadata:
  labels:
    app: busybox
  name: busybox
  namespace: calico-demo
spec:
  containers:
  - args:
    - /bin/sh
    - -c
    - sleep 360000
    image: busybox:1.28
    imagePullPolicy: Always
    name: busybox
  nodeSelector:
    beta.kubernetes.io/os: linux
---
apiVersion: v1
kind: Pod
metadata:
  labels:
    app: nginx
  name: nginx
  namespace: calico-demo
spec:
  containers:
  - name: nginx
    image: nginx:1.8
    ports:
    - containerPort: 80
  nodeSelector:
    beta.kubernetes.io/os: linux
EOF
Step 2.2: Create Windows Pod
We’ll create a client (powershell) and server (porter) pod on the Windows nodes.
Note: AKS uses Windows Server 2019 as the host OS version only. Container images build using other Windows Server versions are not support. (mcr.microsoft.com/windows/servercore:1809)
Run the following command which includes the yaml file.
$ kubectl apply -f - <<EOF
apiVersion: v1
kind: Pod
metadata:
  name: pwsh
  namespace: calico-demo
  labels:
    app: pwsh
spec:
  containers:
  - name: pwsh
    image: mcr.microsoft.com/windows/servercore:1809
    args:
    - powershell.exe
    - -Command
    - "Start-Sleep 360000"
    imagePullPolicy: IfNotPresent
  nodeSelector:
    kubernetes.io/os: windows
EOF
- Create the porter server pod
Run the following command which includes the yaml file.
$ kubectl apply -f - <<EOF
apiVersion: v1
kind: Pod
metadata:
  name: porter
  namespace: calico-demo
  labels:
    app: porter
spec:
  containers:
  - name: porter
    image: calico/porter:1809
    ports:
    - containerPort: 80
    env:
    - name: SERVE_PORT_80
      value: This is a Calico for Windows on AKS.
    imagePullPolicy: IfNotPresent
  nodeSelector:
    kubernetes.io/os: windows
EOF
You should be able to see all the pods running in calico-demo namespace. Make sure pods are all up and running.
$ kubectl get pod -n calico-demo --watch
NAME      	READY   STATUS    RESTARTS   AGE
busybox   	1/1     Running   1          5d19h
nginx     	1/1     Running   0          5d19h
porter    	1/1     Running   0          5d19h
pwsh      	1/1     Running   1          5d19h
Step 2.3: Verify the connectivity between pods
- Verify that the busybox pod can reach the porter pod on port 80.
$ kubectl exec -n calico-demo busybox -- nc -vz $(kubectl get po porter -n calico-demo -o 'jsonpath={.status.podIP}') 80
- If the connection from the busybox pod to the porter pod succeeds, we will get output like the following:
192.168.40.166 (192.168.40.166:80) open
- Verify that the powershell pod can reach the nginx pod.
$ kubectl exec -n calico-demo pwsh -- powershell Invoke-WebRequest -Uri http://$(kubectl get po nginx -n calico-demo -o 'jsonpath={.status.podIP}') -UseBasicParsing -TimeoutSec 5
- If the connection succeeds, we will get output like:
RawContent        : HTTP/1.1 200 OK
                    Connection: keep-alive
                    Accept-Ranges: bytes
                    Content-Length: 612
                    Content-Type: text/html
                    Date: Mon, 01 Mar 2021 19:00:39 GMT
                    ETag: "56a78fbf-264"
                    Last-Modified: Tue, 26 Jan 2016 ...
Forms             :
Headers           : {[Connection, keep-alive], [Accept-Ranges, bytes],
                    [Content-Length, 612], [Content-Type, text/html]...}
Images            : {}
InputFields     : {}
Links             : {@{outerHTML=<a href="http://nginx.org/">nginx.org</a>;
                    tagName=A; href=http://nginx.org/}, @{outerHTML=<a
                    href="http://nginx.com/">nginx.com</a>; tagName=A;
                    href=http://nginx.com/}}
ParsedHtml        :
RawContentLength  : 612
Step 3: Test the Network Policy
Now, we’ll apply a basic network policy to isolate pod traffic.
Step 3.1: Run the Network Policy
In this example, we will only allow busybox to communicate.
$ kubectl apply -f  - <<EOF
apiVersion: networking.k8s.io/v1
kind: NetworkPolicy
metadata:
  name: allow-busybox
  namespace: calico-demo
spec:
  podSelector:
    matchLabels:
      app: 'porter'
  policyTypes:
  - Ingress
  ingress:
  - from:
    - podSelector:
        matchLabels:
          app: busybox
EOF
Note: If you want to use calico api, calicoctl is required. It is not available in Azure Cloud Shell by default. You would need to download calicoctl on Azure Cloud Shell. For more information on using calicoctl, please refer to calico docs.
Step 3.2: Validate whether the policy works
- Verify that the busybox pod is still able to reach the porter pod
$ kubectl exec -n calico-demo busybox -- nc -vz $(kubectl get po porter -n calico-demo -o 'jsonpath={.status.podIP}') 80
- Verify that the powershell pod is not able to reach the porter pod
$ kubectl exec -n calico-demo pwsh -- powershell Invoke-WebRequest -Uri http://$(kubectl get po porter -n calico-demo -o 'jsonpath={.status.podIP}') -UseBasicParsing -TimeoutSec 5
The request times out with a message like:
Invoke-WebRequest : The operation has timed out.
At line:1 char:1
+ Invoke-WebRequest -Uri http://10.240.0.122 -UseBasicParsing -TimeoutS ...
+ ~~~~~~~~~~~~~~~~~~~~~~~~~~~~~~~~~~~~~~~~~~~~~~~~~~~~~~~~~~~~~~~~~~~~~
    + CategoryInfo          : InvalidOperation: (System.Net.HttpWebRequest:Htt
   pWebRequest) [Invoke-WebRequest], WebException
    + FullyQualifiedErrorId : WebCmdletWebResponseException,Microsoft.PowerShe
   ll.Commands.InvokeWebRequestCommand

command terminated with exit code 1
Conclusion:
Hope you found the following steps helpful in getting started with Calico for Windows on AKS. Give this feature a try and let us know what you think and how we can improve it.
For more details, please see below:
by Contributed | Mar 3, 2021 | Technology
This article is contributed. See the original author and article here.
We announced the public preview of Logic Apps’ new runtime, performance and developer improvements in September 2020, and first public preview refresh in December 2020. Today, we are happy to announce another major update that continue to extend the capability of Logic Apps. You can find the highlights about this release below.
Quality focused
We have received tremendous amount of interests from customers in healthcare, insurance, retail and other industries on the new runtime. As the team gears up towards general availability of the new runtime, the top focus of this public preview refresh is quality. The team spent significant amount of time on bug fix, reliability, and supportability improvements, so that you can feel confident using the new runtime for production workload at general availability.
Cross-platform compatibility
Inline Code action allows customers to write simple JavaScript code from right within the workflow designer with the ability to reference outputs from previous actions. In this release, Inline Code action is now supported not only on Windows, but also on macOS and Linux.
Developer productivity
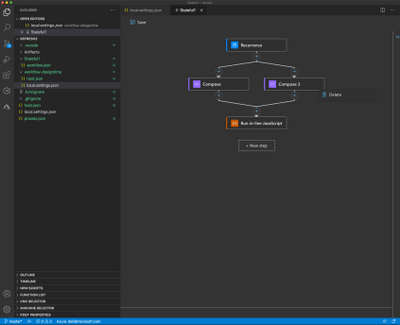
With the new runtime, customers can author workflows using the visual designer locally from VS Code. In this release, we’ve made it even more streamlined by removing designer’s storage dependency. This means you are no longer required to have storage emulator or connection to storage account in Azure to use the visual designer in VS Code.
Other improvements to VS Code extension includes the ability to configure webhook hostname so that the callback request can be routed to localhost during testing, and the ability to switch from extension bundle to NuGet-based local project.
Designer and portal improvements
New designer features in this release allow you to create parallel branches, drag-and-drop to rearrange actions, and easily delete unwanted actions via right-click menu.
In Azure portal, the resource browse experience is combined to show both the multi-tenant/consumption Logic Apps, as well as the single-tenant Logic Apps on Functions runtime. Trigger history page is added to allow easy debugging when the workflow isn’t being triggered as expected.

Accessibility
Microsoft is committed to revolutionizing access to technology for people living with disabilities, and us from the Logic Apps team believe in developing technologies that enable everyone to easily build workflows and integration solutions. In this release, we added keyboard navigation shortcuts to allow intuitive navigation of the graph between actions.
Learn more
Please check out documentations on the new runtime, and tune in to the upcoming Logic Apps Live, scheduled to premiere on March 4th, 2021 at 9AM pacific time, during which the team will cover the release in more details.

To get started, download the VS Code extension and create a local project, or create a new resource from the Azure Portal. You can submit your feedback here.
Derek, on behalf of the Logic Apps team

Recent Comments