
by Contributed | Mar 3, 2021 | Technology
This article is contributed. See the original author and article here.
Blogger: Ragnar Heil, MVP Office Apps and Services, Channel Account Manager at Quest.
Wednesday, March 3
Session code: FS189
2:00 AM – 2:30 AM CET
Speakers: Bob Bejan | Microsoft, Lars Johnson | Microsoft, Christina Torok | Microsoft
Microsoft starts this Ignite Session about easy, intuitive webinars with Microsoft Teams in a different and refreshing way – not looking like a typical webinar, rather than a TV News Shows. Lars Johnson, Sr Director of Microsoft Teams Marketing, is our Anchor Man for next 30 minutes and leads us to new ways of virtual engagement in the age of remote work. First funny ice breaker: “It’s been a long time since we have been able to tell the difference between weekdays and weekends.“
Joining Webinars as an attendee in many different ways with more reactions
I assume we all have faced Webinar fatigue especially since global Covid 19 pandemic started. Too many webinars were offered with too less interactions. Now you can share your reactions, it can be loving hearts, applause or constructive criticism. You can attend the event on demand or real time. You can think about joining the event from your home bike and increase your fitness.
Creating Events and Webinars as organizer
Setting up and running webinars will be just as easy as meetings in Microsoft Teams. Just add a custom attendee registration page to your meeting or webinar to manage attendance before and after any engagement. Following registration, attendees automatically receive an email confirmation for a simple join experience. In case you are using different providers for webinars and team meetings / conference calls: This is now a good time to consolidate and save money.
Christina Torok (Sr Product Marketing Manager at Microsoft) explains how to setup a registration page including:
- Event details like title, date, time, abstract and Microsoft Teams Link
- Teams Channel
- Location
- Repeating event?
- Collaborative meeting note taking: yes/no
- Speaker information with Name and short CV
- Registration fields like First Name, Last Name and Email
- Custom questions
- Requires registration: None/people in your organization and guests/everyone

With Teams you can organize and conduct interactive webinars for people inside and outside of your organization with up to 1,000 attendees. You are afraid that too many attendees could disturb your webinar based on Teams Meetings? Host controls such as the ability to disable attendee chat and video. If your webinar grows to over 1,000 attendees, Teams will seamlessly scale to accommodate a 10,000-person view-only broadcast experience. Due to the pandemic Microsoft has increased this number up to 20,000 attendees for a limited time.
Now PowerPoint also wants to transform your webinars with rich presentation options: Simply launch a Teams meeting and instead of opening a PowerPoint deck and sharing your screen, just pick a file under the PowerPoint Live section of the new and improved Share content in Teams. Get full control over your content, the view you see as the presenter is yours only – review notes, engage in chats, and see your audience – all in one panel view.

PowerPoint Live in Microsoft Teams allows attendees to access the shared content through screen readers and increases inclusion significantly. Whether you are joining via a mobile phone or 8k monitor, using low bandwidth or fiber connection, each attendee experiences is optimized for their screen type.
Analyzing Webinars as Marketing expert
After the event Marketing can see on a dashboard how many people went to the registration page, have registered and attended. Total event time and average attendee time is shown as well as list of all attendees with status, duration, join-and leave time.

Looks good so far? Maybe you are looking for deeper ways of integration into your CRM. Microsoft is offering an integration with Dynamics365.
In this session I have learned more how Bob Bejan (Corp VP, Microsoft) is looking at the future of Hybrid Events. He is responsible for the development, production and execution of global events and experiential marketing for Microsoft. Ignite 2021 is produced completely different than all previous Ignites which happened onsite. Perspectives are so much different and ways of interactions and gathering feedback changes completely. Don’t just send a feedback poll at the end of your webinar, create a story or interesting video around it.
We are going to see more much more immersive webinar experience types soon, so I highly recommend to also watch Microsoft Mesh Ignite Session – powered by VR and Augmented Reality devices like Hololens or Oculus.
Read more here:
Microsoft Tech Community: Ignite Highlights for Microsoft Teams
Introducing PowerPoint Live in Microsoft Teams
My Microsoft 365 Modern Work Blog, Podcast and weekly Teams News Show
by Contributed | Mar 3, 2021 | Technology
This article is contributed. See the original author and article here.
Typically, every Wednesday Data Exposed goes live at 9AM PT on LearnTV. Every 4 weeks (mostly the first week of each month), we’ll do a News Update. We’ll include product updates, videos, blogs, etc. as well as upcoming events and things to look out for. We’ve included an iCal file, so you can add a reminder to tune in live to your calendar. If you missed the episode, you can find it at https://aks.ms/AzureSQLYT along with other videos.
This month is an exception, with Ignite going on. We’ve shifted the live episode to TOMORROW MARCH 4th, but it’ll still be on Learn TV, and we hope to see you there. We’ll be diving into the latest announcements related to migrating to Azure SQL (really cool new stuff, you do not want to miss!)
In lieu of the Data Exposed Live News Update for March, you can read this blog to get all the updates. We’ll be back with a Data Exposed Live News Update in April. Here’s the March 2021 update:
Product updates
Ignite
There are four major areas for Azure SQL updates announced at Ignite this year: migration, security, HADR, and maintenance.
On the migration front, the team announced a new end to end SQL Server migration experience for migrations at scale with Azure Migrate. We also announced a limited preview that will simplify migrations from SQL Server to Azure SQL using Azure Data Studio (ADS).
For security, Always Encrypted with Secure Enclaves for Azure SQL Database has gone Public Preview, and Azure SQL Auditing for Log Analytics, Event Hub, and Microsoft Operations has reached General Availability. Both capabilities have been highly requested, so it’s great to announce them!
With High Availability and Disaster Recovery (HADR), Long Term Retention (LTR) went Public Preview for Azure SQL Managed Instance backups. This is already available in Azure SQL Database so is a great step towards bringing parity between the two services’ capabilities. Additionally, Geo-replication for Azure SQL Database Hyperscale also went Public Preview. Similarly, this is something already available for other service tiers in Azure SQL Database, so many customers are excited to see this land in Hyperscale.
Finally, maintenance windows for Azure SQL Database and Azure SQL Managed Instance were announced. For many data professionals, getting insight into the maintenance windows is a great comfort when moving from SQL Server to Azure SQL Database and/or Azure SQL Managed Instance.
Not necessarily a product update, but Davide Mauri and I did a really fun session about catching the bus (literally) with Azure SQL. It was fun and produced at high quality, so you should definitely check it out. You can access it on-demand here.
Pre-ignite
The Log Replay Service (LRS) went public preview for Azure SQL Managed Instance. Azure SQL Managed Instance utilizes log shipping technology to enable custom migrations of databases from SQL Servers 2008 through 2019 to Azure SQL Managed Instance. The LRS feature enables building fully customizable data migration solutions in cases when more control is needed, when there exists little tolerance for downtime, or when Azure Data Migration Service cannot be used. Learn more here.
Machine Learning for Azure SQL Managed Instance became generally available in December, however, this recent update expands and allows for using R and Python in Azure SQL Managed Instance. Learn more about the capabilities and newer capabilities here.
Videos
We continued to release new and exciting Azure SQL episodes this month. Here is the list, or you can just see the playlist we created with all the episodes!
- How Azure SQL Enables Real-time Operational Analytics (HTAP) – Part 1, Silvano Coriani
- How to Create Operational Analytics with Window Functions in Azure SQL – Part 2, Silvano Coriani
- [MVP Edition]: How to deploy Azure SQL anywhere using Azure Arc for data services, Ben Weissman
- Protect your SQL Anywhere using Azure Defender for SQL, David Trigano
- Testing App Cloud Readiness for Failover Resiliency with SQL Managed Instance, Dani Ljepava
We’ve also had some great Data Exposed Live sessions. Subscribe to our YouTube channel to see them all. Here are some of the recent live streams.
- Something Old, Something New: Reduce, Reuse, Recycle
- Azure SQL Security: The What, Why and How of Securing your Data with Azure SQL
- Best Practices Assessment for Azure SQL VMs, Managed Instances, and SQL Servers
By the way, tomorrow we will be doing a special Data Exposed Live episode (outside our normal Wednesday slot due to Ignite)! Raj Pochiraju and Ajay Jagannathan will join us to talk about the latest technologies that we just announced related to migrating to Azure SQL. You don’t want to miss it. Just tune in to https://aka.ms/LearnTV at 9AM PT on Thursday, March 4th!
Blogs
As always, our team is busy writing blogs to share with you all. Blogs contain announcements, tips and tricks, deep dives, and more. Here’s the list I have of SQL-related topics you might want to check out.
- Azure Blog, Ignite specific
- Azure Blog
- SQL Server Tech Community
- Azure SQL Tech Community
- Azure SQL Devs’ Corner
- Azure Database Support (SQL-related posts)
Upcoming events
As always, there are lots of events coming up this month. Here are a few to put on your calendar and register for:
3/2: Microsoft Ignite
Secure your data with Azure SQL; Anna Hoffman and Bob Ward
Recipe for Modern Applications: .NET, Azure SQL, Functions, Geospatial, JSON; Anna Hoffman and Davide Mauri
Ask the Experts: What’s new in Azure Data; Uri Barasah, Luis Cabrera, Nellie Gustafsson, Anna Hoffman, Ajay Jagannathan, Matt Usher, Pratik Verma, and Bob Ward
3/5: WIT Tech Day
Notebooks 101 for SQL People; Julie Koesmarno
3/17: RunAs Radio
Migrating to Azure SQL; Anna Hoffman
3/24-3/25: Codecamp_The One with .NET
Recipe for Modern Applications: .NET, Azure SQL, Functions, Geospatial, JSON; Anna Hoffman
3/27: Haitian SQL One Day Event
In addition to these upcoming events, here’s the schedule for Data Exposed Live:
3/4: Deep Dive: Discover & Assess SQL Server Data Estate Migrating to Azure SQL Using Azure Migrate
3/10: Deep Dive: Azure SQL Virtual Machine Sizing
3/17: Deep Dive: The Architecture of Azure SQL
3/24: Something Old, Something New with Buck Woody
3/31: Ask the Experts: SQL Edge to Cloud with Bob Ward and Buck Woody
Plus find new, on-demand Data Exposed episodes released every Thursday, 9AM PT at aka.ms/DataExposedyt
Featured Microsoft Learn Module
Learn with us! This month I highlighted the Secure your data with Azure SQL module. Check it out! Bob Ward and I also delivered this as part of Learn Live at Ignite. You can access the recording here.
Plus, starting March 15th, Bob Ward and I will start delivering one module per week on https://aka.ms/LearnTV at 2PM. More details to come.
Anna’s pick of the month: New Azure SQL Security Series on Data Exposed Live
In February, we kicked off a new mini-series on Data Exposed Live called Azure SQL Security. Over the course of this six-episode series, we will dive into various security topics and how they relate to Azure SQL and data professionals. In the kickoff episode, the Principal Group Program Manager of the Azure SQL Security team, Joachim Hammer, came on the show to give us an overview of all security pillars related to Azure SQL. In subsequent episodes, we’ll dive into each pillar with various members of the security team. Subscribe to the Azure SQL YouTube channel to watch the first episode and get notified about future episodes (next one coming in April).
Until next time…
That’s it for now! Be sure to check back next month for the latest updates, and tune into Data Exposed Live every Wednesday at 9AM PST on LearnTV. We also release new episodes on Thursdays at 9AM PST and new #MVPTuesday episodes on the last Tuesday of every month at 9AM PST at aka.ms/DataExposedyt.
Having trouble keeping up? Be sure to follow us on twitter to get the latest updates on everything, @AzureSQL. You can also download the iCal link with a recurring invite!
We hope to see you next time, on Data Exposed :smiling_face_with_smiling_eyes:
–Anna and Marisa
by Scott Muniz | Mar 3, 2021 | Security, Technology
This article is contributed. See the original author and article here.
Microsoft has released out-of-band security updates to address four vulnerabilities in Exchange Server:
It is possible for an attacker, once authenticated to the Exchange server, to gain access to the Active Directory environment and download the Active Directory Database.
Tactics, Techniques and Procedures
The majority of the TTPs in this section are sourced from a blog post from Volexity, a third party cybersecurity firm. Note: the United States Government does not endorse any commercial product or service, including any subjects of analysis. Any reference to specific commercial products, processes, or services by service mark, trademark, manufacturer, or otherwise, does not constitute or imply their endorsement, recommendation, or favoring by the United States Government.
Volexity has observed the following files as targets of HTTP POST requests:
/owa/auth/Current/themes/resources/logon.css/owa/auth/Current/themes/resources/owafont_ja.css/owa/auth/Current/themes/resources/lgnbotl.gif/owa/auth/Current/themes/resources/owafont_ko.css/owa/auth/Current/themes/resources/SegoeUI-SemiBold.eot/owa/auth/Current/themes/resources/SegoeUI-SemiLight.ttf/owa/auth/Current/themes/resources/lgnbotl.gif
Administrators should search the ECP server logs for the following string (or something similar):
S:CMD=Set-OabVirtualDirectory.ExternalUrl='
The logs can be found at <exchange install path>LoggingECPServer.
To determine possible webshell activity, administrators should search for aspx files in the following paths:
inetpubwwwrootaspnet_client (any .aspx file under this folder or sub folders)<exchange install path>FrontEndHttpProxyecpauth (any file besides TimeoutLogoff.aspx)<exchange install path>FrontEndHttpProxyowaauth (any file or modified file that is not part of a standard install)<exchange install path>FrontEndHttpProxyowaauthCurrent (any aspx file in this folder or subfolders)<exchange install path>FrontEndHttpProxyowaauth<folder with version number> (any aspx file in this folder or subfolders)
Administrators should search in the /owa/auth/Current directory for the following non-standard web log user-agents. These agents may be useful for incident responders to look at to determine if further investigation is necessary.
These should not be taken as definitive IOCs:
DuckDuckBot/1.0;+(+http://duckduckgo.com/duckduckbot.html)facebookexternalhit/1.1+(+http://www.facebook.com/externalhit_uatext.php)Mozilla/5.0+(compatible;+Baiduspider/2.0;++http://www.baidu.com/search/spider.html)Mozilla/5.0+(compatible;+Bingbot/2.0;++http://www.bing.com/bingbot.htm)Mozilla/5.0+(compatible;+Googlebot/2.1;++http://www.google.com/bot.htmlMozilla/5.0+(compatible;+Konqueror/3.5;+Linux)+KHTML/3.5.5+(like+Gecko)+(Exabot-Thumbnails)Mozilla/5.0+(compatible;+Yahoo!+Slurp;+http://help.yahoo.com/help/us/ysearch/slurp)Mozilla/5.0+(compatible;+YandexBot/3.0;++http://yandex.com/bots)Mozilla/5.0+(X11;+Linux+x86_64)+AppleWebKit/537.36+(KHTML,+like+Gecko)+Chrome/51.0.2704.103+Safari/537.36
Veloxity observed these user-agents in conjunction with exploitation to /ecp/ URLs:
ExchangeServicesClient/0.0.0.0python-requests/2.19.1python-requests/2.25.1
These user-agents were also observed having connections to post-exploitation web-shell access:
antSword/v2.1Googlebot/2.1+(+http://www.googlebot.com/bot.html)Mozilla/5.0+(compatible;+Baiduspider/2.0;++http://www.baidu.com/search/spider.html)
As with the non-standard user-agents, responders can examine internet information services (IIS) logs from Exchange Servers to identify possible historical activity. Also, as with the non-standard user agents, these should not be taken as definitive IOCs:
POST /owa/auth/Current/POST /ecp/default.fltPOST /ecp/main.cssPOST /ecp/<single char>.js
Volexity has seen attackers leverage the following IP addresses. Although these are tied to virtual private servers (VPSs) servers and virtual private networks (VPNs), responders should investigate these IP addresses on their networks and act accordingly:
103.77.192.219104.140.114.110104.250.191.110108.61.246.56149.28.14.163157.230.221.198167.99.168.251185.250.151.72192.81.208.169203.160.69.66211.56.98.1465.254.43.185.2.69.1480.92.205.8191.192.103.43
Volexity has also provided the following YARA signatures that can be run within your network to assist in finding signs of a compromise.
rule webshell_aspx_simpleseesharp : Webshell Unclassified
{
meta:
author = “threatintel@volexity.com”
date = “2021-03-01”
description = “A simple ASPX Webshell that allows an attacker to write further files to disk.”
hash = “893cd3583b49cb706b3e55ecb2ed0757b977a21f5c72e041392d1256f31166e2”
strings:
$header = “<%@ Page Language=”C#” %>”
$body = “<% HttpPostedFile thisFile = Request.Files[0];thisFile.SaveAs(Path.Combine”
condition:
$header at 0 and
$body and
filesize < 1KB
}
2.
rule webshell_aspx_reGeorgTunnel : Webshell Commodity
{
meta:
author = “threatintel@volexity.com”
date = “2021-03-01”
description = “A variation on the reGeorg tunnel webshell”
hash = “406b680edc9a1bb0e2c7c451c56904857848b5f15570401450b73b232ff38928”
reference = “https://github.com/sensepost/reGeorg/blob/master/tunnel.aspx”
strings:
$s1 = “System.Net.Sockets”
$s2 = “System.Text.Encoding.Default.GetString(Convert.FromBase64String(StrTr(Request.Headers.Get”
// a bit more experimental
$t1 = “.Split(‘|’)”
$t2 = “Request.Headers.Get”
$t3 = “.Substring(“
$t4 = “new Socket(“
$t5 = “IPAddress ip;”
condition:
all of ($s*) or
all of ($t*)
}
3
rule webshell_aspx_sportsball : Webshell Unclassified
{
meta:
author = “threatintel@volexity.com”
date = “2021-03-01”
description = “The SPORTSBALL webshell allows attackers to upload files or execute commands on the system.”
hash = “2fa06333188795110bba14a482020699a96f76fb1ceb80cbfa2df9d3008b5b0a”
strings:
$uniq1 = “HttpCookie newcook = new HttpCookie(”fqrspt”, HttpContext.Current.Request.Form”
$uniq2 = “ZN2aDAB4rXsszEvCLrzgcvQ4oi5J1TuiRULlQbYwldE=”
$var1 = “Result.InnerText = string.Empty;”
$var2 = “newcook.Expires = DateTime.Now.AddDays(”
$var3 = “System.Diagnostics.Process process = new System.Diagnostics.Process();”
$var4 = “process.StandardInput.WriteLine(HttpContext.Current.Request.Form[””
$var5 = “else if (!string.IsNullOrEmpty(HttpContext.Current.Request.Form[””
$var6 = “<input type=”submit” value=”Upload” />”
condition:
any of ($uniq*) or
all of ($var*)
}
A list of web shell hashes have also been provided by Microsoft:
b75f163ca9b9240bf4b37ad92bc7556b40a17e27c2b8ed5c8991385fe07d17d0097549cf7d0f76f0d99edf8b2d91c60977fd6a96e4b8c3c94b0b1733dc026d3e2b6f1ebb2208e93ade4a6424555d6a8341fd6d9f60c25e44afe11008f5c1aad165149e036fff06026d80ac9ad4d156332822dc93142cf1a122b1841ec8de34b5511df0e2df9bfa5521b588cc4bb5f8c5a321801b803394ebc493db1ef3c78fa14edc7770464a14f54d17f36dc9d0fe854f68b346b27b35a6f5839adf1f13f8ea811157f9c7003ba8d17b45eb3cf09bef2cecd2701cedb675274949296a6a183d1631a90eb5395c4e19c7dbcbf611bbe6444ff312eb7937e286e4637cb9e72944
Note: this is not an all-inclusive list of indicators of compromise and threat actors have been known to use short-term leased IP addresses that change very frequently. Organizations that do not locate any of the IOCs in this Alert within your network traffic, may nevertheless have been compromised. CISA recommendations following the guidance located in the Microsoft Advisory to check your servers for any signs of a compromise.
Conduct Forensic Analysis
Should your organization see evidence of compromise, your incident response should begin with conducting forensic analysis to collect artifacts and perform triage. Please see the following list of recommendations on how to conduct forensic analysis using various tools.
Although the following free tools are not endorsed by the Federal Government, incident responders commonly use them to perform forensics.
While collecting artifacts to perform triage, use processes and tools that minimize the alteration of the data being collected and that minimize impact to the operating system itself.
Ideally, during data collection, store the data on removable/external media and, when possible, run the artifact collection tools from the same media.
Key artifacts for triage that should be collected:
- Memory
- All registry hives
- All windows event logs
- All web logs
Memory can be collected with a variety of open source tools (e.g., FTK Imager by AccessData, Ram Capture by Belkasoft).
Registry and Windows Event logs can be collected with a variety of open source tools as well (e.g., FTK_Imager, Kroll Artifact Parser And Extractor [KAPE]).
Web logs can also be collected with a variety of open source tools (e.g. FTK Imager).
Windows Artifact Collection Guide
Execute the following steps in order.
1) Download the latest FTK Imager from https://accessdata.com/product-download/.
- Note: Ensure your review of and compliance with the applicable license associated with the product referenced, which can be found in the product’s User Guide. The United States Government does not endorse any commercial product or service, including any subjects of analysis. Any reference to specific commercial products, processes, or services by service mark, trademark, manufacturer, or otherwise, does not constitute or imply their endorsement, recommendation, or favoring by the United States Government.
2) Collect memory from live system using FTK Imager. See Memory Capture with FTK Imager.pdf for instructions. Note: Download and copy “FTK Imager” folder to an external drive. Run FTK Imager.exe from the FTK Imager folder from external drive. Wait until memory collect is complete before proceeding to step 2.
3) Collect important system artifacts using KAPE. See KAPE Collection Procedure. Note: Download KAPE from a separate system; do not download KAPE to the target system. Run KAPE from external drive.
4) Collect disk image using FTK Imager. See Live Image with FTK Imager.pdf for instructions. Note: Run FTK Imager.exe from the “FTK Imager” folder from external drive.
Memory Capture with FTK Imager
1) Open FTK Imager. Log into the system with Administrator privileges and launch “FTK Imager.”
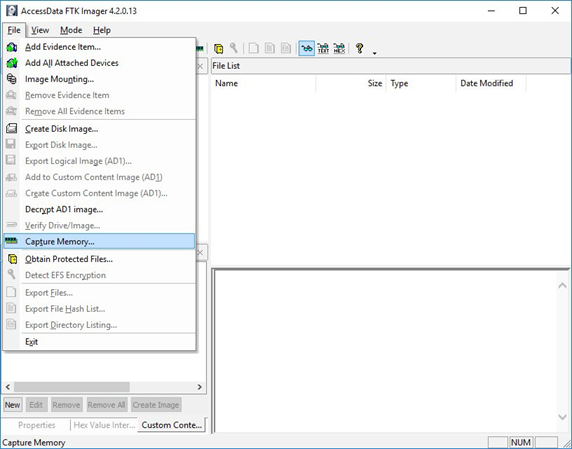
2) Open “Capture Memory.” Select “Capture Memory…” from the File menu.
Figure 1: FTK Imager – Capture Memory Command
3) Select Path and Filenames. On the window that appears, use the “Browse” button to identify the destination of the memory capture. Save the memory capture to an external device and not the main hard drive of the system. Doing so will prevent the saved file from overwriting any dataspace on the system.
- Name the destination file with a descriptive name (i.e., hostname of the system).
- Select the box “Include pagefile” and provide a name of the pagefile that is descriptive of the system.
- Do not select “Create AD1 file.”
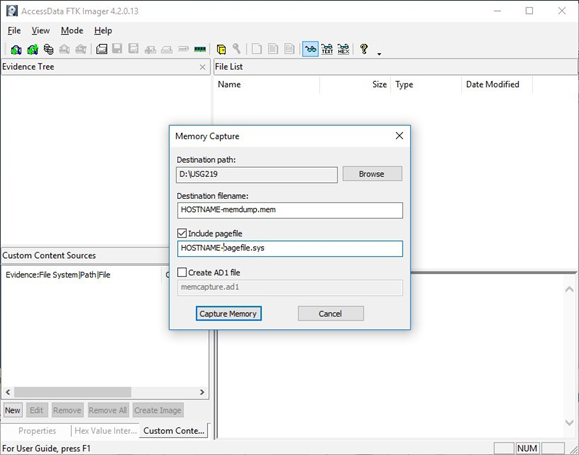
Figure 2: FTK Imager – Memory Capture
4) Capture Memory. Click on “Capture Memory” to begin the capture process. The process will take several minutes depending on the size of the pagefile and the amount of memory on the system.
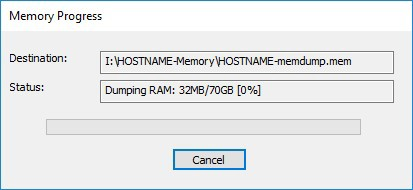
Figure 3: FTK Imager – Memory Capture
KAPE Collection Procedure [1]
1) Download KAPE from https://www.kroll.com/en/services/cyber-risk/investigate-and-respond/kroll-artifact-parser-extractor-kape.
2) Disable any antivirus or host protection mechanisms that prevent execution from removable media, or data loss prevention (DLP) mechanisms that restrict utilization of removable media.
- Enable antivirus and host protection once this process is completed.
3) Unzip Kape.zip and run gkape.exe as admin from your removable media
4) Target source should be the drive on which the OS resides, typically C:.
5) Target destination should be an external drive folder, not the same drive as the Target source. If available, use an external hard drive or flash drive.
- A KAPE execution with these parameters will typically produce output artifacts with a total size of 1-25 GB.
- If you are going to be running KAPE on different machines and want to save to the same drive, ensure the Target destination folder is unique for each execution of KAPE.
6) Uncheck Flush checkbox (it is checked natively).
7) Check Add %d and Add %m checkboxes.
8) Select ALL checkboxes to ensure KAPE will target all available data that it is capable of targeting. This takes some time; use the down arrow and space bar to move through the list quickly.
9) Check Process VSCs checkbox.
10) Select Zip radio button and add Base name TargetOutput.
11) Ensure Deduplicate checkbox is checked (it is checked natively).
- At the bottom you should now see a large Current command line, similar to:
.kape.exe –tsource C: –tdest E:%d%m –tflush –target !BasicCollection,!SANS_Triage,Avast,AviraAVLogs,Bitdefender,ComboFix,ESET,FSecure,HitmanPro,Malwarebytes, McAfee,McAfee_ePO,RogueKiller,SentinelOne,Sophos,SUPERAntiSpyware,Symantec_AV_Logs,TrendMicro,VIPRE, Webroot,WindowsDefender,Ammyy,AsperaConnect,BoxDrive,CiscoJabber,CloudStorage,ConfluenceLogs,Discord, Dropbox, Exchange,ExchangeClientAccess,ExchangeTransport,FileZilla,GoogleDrive,iTunesBackup,JavaWebCache,Kaseya,LogMeIn,Notepad++, OneDrive,OutlookPSTOST,ScreenConnect,Skype,TeamViewerLogs,TeraCopy,VNCLogs, Chrome,ChromeExtensions,Edge,Firefox,InternetExplorer,WebBrowsers,ApacheAccessLog,IISLogFiles,ManageEngineLogs, MSSQLErrorLog,NGINXLogs,PowerShellConsole,KapeTriage,MiniTimelineCollection,RemoteAdmin, VirtualDisks, Gigatribe,TorrentClients,Torrents,$Boot,$J,$LogFile,$MFT,$SDS,$T,Amcache,ApplicationEvents,BCD,CombinedLogs, EncapsulationLogging,EventLogs,EventLogs-RDP,EventTraceLogs, EvidenceOfExecution,FileSystem,GroupPolicy,LinuxOnWindowsProfileFiles,LnkFilesAndJumpLists,LogFiles,MemoryFiles, MOF,OfficeAutosave,OfficeDocumentCache,Prefetch,RDPCache,RDPLogs,RecentFileCache,Recycle, RecycleBin, RecycleBinContent,RecycleBinMetadata,RegistryHives,RegistryHivesSystem,RegistryHivesUser,ScheduledTasks,SDB, SignatureCatalog,SRUM,StartupInfo,Syscache,ThumbCache,USBDevicesLogs,WBEM,WER,WindowsFirewall, WindowsIndexSearch,WindowsNotifcationsDB,WindowsTimeline,XPRestorePoints –vss –zip TargetOutput –gui
- In the bottom right corner hit the Execute! Button.
- Screenshot below shows
gkape.exe during execution, you will also see a command window execute. Note: KAPE usually takes less than 20 minutes to complete on a workstation; if it is taking significantly longer there may be an issue.
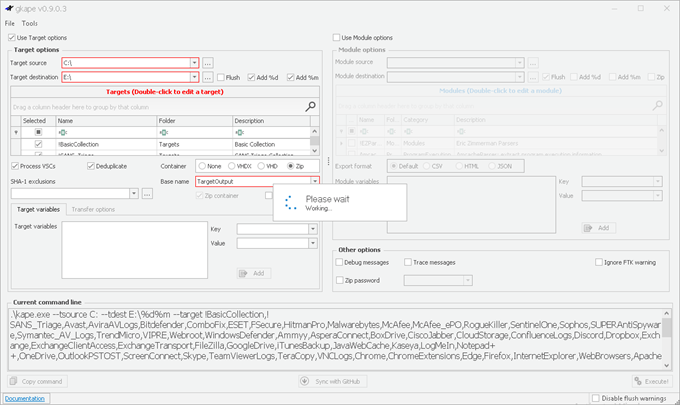
Figure 4: gkape.exe screenshot


Recent Comments