by Contributed | Mar 5, 2021 | Technology
This article is contributed. See the original author and article here.
Azure Information Protection (AIP) unified labeling in Microsoft 365 provides organizations an integrated and consistent approach to creating, configuring, and applying labels and policies to protect information worker data across all locations. Workloads that can leverage unified labeling such as AIP unified labeling client and scanner, Office 365 apps, Office for web, SharePoint, OneDrive, MCAS and many more can apply these policies in a consistent manner. The AIP classic client and label management in the AIP Portal will be deprecated for sovereign clouds on September 30, 2021, therefore it is highly encouraged that administrators move their environment to unified labeling.
AIP unified labeling is generally available to Government Community Cloud High (GCC-H) environments and this release brings data discovery, classification, and protection capabilities to government Microsoft 365 instances.
Activating unified labeling for GCC-H is quite different from commercial and regular GCC environments. Commercial and regular GCC environments require administrators to navigate to the AIP blade in the Azure Portal to activate unified labeling. “Activating unified labeling” is not relevant to GCC-H tenants. All GCC-H tenants are already enabled for unified labeling; therefore, this step is not required.
Once unified labeling is enabled, commercial and GCC clouds can migrate their AIP classic client labels directly to the Security and Compliance Center, whereas this is not applicable to GCC-H tenants. GCC-H tenants require a manual migration of their AIP labels and protection templates to the Security and Compliance Center.
The benefits of migrating your labels from one portal to the next provides continuity and consistency of labels from your AIP classic environment to your Microsoft Information Protection ecosystem. Ideally, your end users will be using the same label name, label template and (optionally) protection template.
This blog gives an end-to-end use case example on how a GCC-H admin can migrate their parent label and sublabel with its corresponding protection template from the AIP Portal to the Security and Compliance Center. Additional information about label migration can be found in our official documentation.
Note: For new GCC-H tenants, label migration is not applicable. Please create new labels directly in the Security and Compliance Center.
Label Migration at a High Level
At a high level, below are the following steps to migrate AIP labels from the AIP Portal to the Security and Compliance Center:
1. Retrieve label(s) properties from the AIP Portal
2. Migrate label(s) from the AIP Classic Portal to the Security Compliance Center
3. Verify labels has been migrated to the Security and Compliance Center
Retrieve Label Properties from the AIP Portal
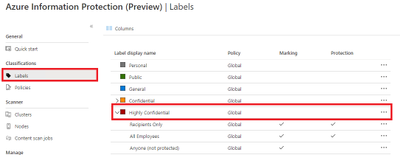
In this exercise, we will be migrating the parent label “Highly Confidential” with its corresponding sub label “All Employees”. First, we will retrieve the label properties and settings from the AIP Portal.
Note: When doing this exercise, administrators can retrieve all labels policies at one time.
Instructions:
- Navigate to the AIP Management Page within the Azure Portal
- Under Classifications, select “Labels”
- Select the parent label that you want to migrate. In this example we are migrating the label “Highly Confidential”
Figure 1: Selecting parent label to migrate
- Document parent label properties and settings using a spreadsheet, notepad, etc. This information will be used later in PowerShell

Figure 2: Parent label properties and settings
Parent Label Property
|
Value
|
Name (internal name; must be unique)
|
Highly Confidential
|
Tooltip
|
Very sensitive business data that would cause damage to the business if it was shared with unauthorized people. Examples include employee and customer information, passwords, source code, and pre-announced financial reports.
|
Display Name (displayed to end users)
|
Highly Confidential
|
Identity
|
06960349-c5b2-465e-8d31-1652e5969da4
|
Parent ID
|
|
EncryptionEnabled
|
|
EncryptionProtectionType
|
|
EncryptionTemplateId
|
|
EncryptionAipTemplateScopes
|
|
Table 1: Parent label settings and properties
- Under Classifications, select “Labels” again
- Select the sub label that you want to migrate. In this example we are migrating sub label “All Employees”

Figure 3: Selecting sub label to migrate
- Document sub label properties and settings using a spreadsheet, notepad, etc. This information will be used later for PowerShell

Figure 4: Sub label properties and settings
- (Optional) If your sub label has encryption, you will need to get the protection ID. Select Protection in your sub label properties.

Figure 5: Sub label protection selection
- (Optional) Document sub label protection template ID using a spreadsheet, notepad, etc. This information will be used later for PowerShell.

Figure 5: Sub label protection template ID
Sub Label Property
|
Value
|
Name (internal name; must be unique)
|
All Employees
|
Tooltip
|
Highly confidential data that allows all employees view, edit, and reply permissions to this content. Data owners can track and revoke content.
|
Display Name (displayed to end users)
|
All Employees
|
Identity
|
d90363e7-f9a6-43b6-b83f-ac66df2c3c01
|
Parent ID
|
06960349-c5b2-465e-8d31-1652e5969da4
|
EncryptionEnabled
|
True
|
EncryptionProtectionType
|
Template
|
EncryptionTemplateId
|
19989161-dacd-409c-ab97-48d1433e1de7
|
EncryptionAipTemplateScopes
|
allcompany@contoso.onmicrosoft.com
|
Table 2: Parent label settings and properties
Migrate AIP Labels to the Security and Compliance Center
In this section, we will be connecting to the Security and Compliance Center PowerShell module to migrate our AIP labels to the new management portal.
- Open PowerShell in administrative mode
- Import Security and Compliance PowerShell Module
Import-Module ExchangeOnlineManagement
- Connect to Security and Compliance Center for GCC-H
Connect-IPPSSession -UserPrincipalName -ConnectionUri https://ps.compliance.protection.office365.us/powershell-liveid/
Example:
Connect-IPPSSession -admin@contoso.onmicrosoft.com -ConnectionUri https://ps.compliance.protection.office365.us/powershell-liveid/
- Migrate parent Label from Azure Portal to Security and Compliance Center using ‘New-Label’ cmdlt in PowerShell
New-Label -Name 'aipscopetest' -Tooltip 'aipscopetest' -Comment 'admin notes' -DisplayName 'aipscopetest' -Identity 'b342447b-eab9-ea11-8360-001a7dda7113'
Example: Migrate parent label “Highly Confidential” from Azure Portal to Compliance Center using the parent label properties.
Parent Label Property
|
Value
|
Name (internal name; must be unique)
|
Highly Confidential
|
Tooltip
|
Very sensitive business data that would cause damage to the business if it was shared with unauthorized people. Examples include employee and customer information, passwords, source code, and pre-announced financial reports.
|
Comment
|
Highly Confidential Parent Label
|
Display Name (displayed to end users)
|
Highly Confidential
|
Identity
|
06960349-c5b2-465e-8d31-1652e5969da4
|
Parent ID
|
|
EncryptionEnabled
|
|
EncryptionProtectionType
|
|
EncryptionTemplateId
|
|
EncryptionAipTemplateScopes
|
|
New-Label -Name 'Highly Confidential' -Tooltip 'Very sensitive business data that would cause damage to the business if it was shared with unauthorized people. Examples include employee and customer information, passwords, source code, and pre-announced financial reports.' -Comment 'High Confidential Parent Label' -DisplayName 'Highly Confidential' -Identity ‘06960349-c5b2-465e-8d31-1652e5969da4'
- Migrate sub label from Azure Portal to Security and Compliance Center using ‘New-Label’ cmdlt in PowerShell
New-Label -Name 'aipscopetest' -Tooltip 'aipscopetest' -Comment 'admin notes' -DisplayName 'aipscopetest' -Identity 'b342447b-eab9-ea11-8360-001a7dda7113' -EncryptionEnabled $true -EncryptionProtectionType 'template' -EncryptionTemplateId 'a32027d7-ea77-4ba8-b2a9-7101a4e44d89' -EncryptionAipTemplateScopes "['allcompany@labelaction.onmicrosoft.com','admin@labelaction.onmicrosoft.com']"
Example: Migrate sub label “All Employees” from Azure Portal to Compliance Center using the sub label properties.
Property
|
Value
|
Name (internal name; must be unique)
|
All Employees
|
Tooltip
|
Highly confidential data that allows all employees view, edit, and reply permissions to this content. Data owners can track and revoke content.
|
Comment
|
Highly Confidential All Employees sub label
|
Display Name (displayed to end users)
|
All Employees
|
Identity
|
d90363e7-f9a6-43b6-b83f-ac66df2c3c01
|
ParentID
|
06960349-c5b2-465e-8d31-1652e5969da4
|
EncryptionEnabled
|
True
|
EncryptionProtectionType
|
Template
|
EncryptionTemplateId
|
19989161-dacd-409c-ab97-48d1433e1de7
|
EncryptionAipTemplateScopes
|
contoso@contoso.onmicrosoft.com
|
New-Label -Name 'Highly Confidential All Employees' -Tooltip ' Highly confidential data that allows all employees view, edit, and reply permissions to this content. Data owners can track and revoke content.' -Comment 'Highly Confidential All Employees sub label' -DisplayName 'All Employees' -Identity 'b342447b-eab9-ea11-8360-001a7dda7113'-ParentId ‘06960349-c5b2-465e-8d31-1652e5969da4’ -EncryptionEnabled $true -EncryptionProtectionType 'template' -EncryptionTemplateId ‘19989161-dacd-409c-ab97-48d1433e1de7' -EncryptionAipTemplateScopes "['allcompany@contoso.onmicrosoft.com']"
Verify labels has been migrated to the Security and Compliance Center
Finally, we will verify that our labels have been migrated from the AIP Portal by navigating to the new label management portal, the Security and Compliance Center.
- Sign in to the Security and Compliance Center for GCC-H
- Go to your Information Protection tab
- Verify your new labels has been created

Figure 6: Security and Compliance Center label management
Note: Policies are not migrated from the AIP Portal to the Security and Compliance Center. Administrators will have to create new label policies in the Security and Compliance Center.
Sunsetting Label Management in the Azure Portal and AIP client (classic)
We have a plan to sunset label management in Azure Portal and AIP client (classic) for Government Cloud Customers. Meanwhile, Government Cloud Customers who own licenses for AIP will receive continued support for the classic client for 12 months after the general availability of unified labeling for Government Cloud. Government Cloud Customers who may need features that are not yet in the latest release of the unified labeling client can ask for additional extended support for the classic client here before September 30, 2021.
Azure Information Protection’s classic client and Label Management in the Azure Portal will be deprecated on September 30, 2021 for Government Community Cloud customers. For information on admin experience post deprecation date, check out this blog.
Note: AIP UL scanner management will still be available on AIP portal and will not be deprecated.
by Contributed | Mar 5, 2021 | Technology
This article is contributed. See the original author and article here.
On February 26 and 27, our Student Ambassadors were invited to join the community for the first virtual Student Ambassador Summit—two days of tech demos, panel discussions, and networking opportunities—all aimed at helping them build their skills and amplify their impact in the program.
Microsoft’s Scott Hanselman (@shanselman), Partner Program Manager, helped kick off the Summit as the first keynote speaker discussing mentorship, sponsorship, and storytelling, while Dona Sarkar (@donasarkar), Principal Cloud Advocate at Microsoft, encouraged everyone to expand their comfort zone. There were an additional 11 hours of live content, covering taking community building to the next level, developing your own workshop, kickstarting your career, building on existing tech skills, and more! All our speakers were incredibly informative and engaging. We also had over 9 hours of purely fun activities including chair yoga, trivia, and a round of Among Us. A special shoutout goes to our Gold Student Ambassadors who created sessions for the community, including Microsoft trivia quizzes, panels about their journeys from the Gold milestone to Microsoft Most Valuable Professionals, speed networking, and a Summit after party!
While the Summit was a special event for our Student Ambassadors, we think all students can benefit from valuable information in our How it started vs. how it’s going: from student to career panel session. This 6-person panel features young Microsoft employees in a range of roles who offer great tips to students curious about managing the transition to a full-fledged career. We hope you find it useful.
Our Student Ambassadors are passionate about learning new skills, solving real-world problems, and building their communities. If this describes you, and you’re not yet a Student Ambassador, we’d love to have you join us! Learn more at StudentAmbassadors.microsoft.com.
by Scott Muniz | Mar 5, 2021 | Security
This article was originally posted by the FTC. See the original article here.
Si usaste MoneyGram para enviarle dinero a un estafador entre el 1 de enero de 2013 y el 31 de diciembre de 2017, es posible que recibas pronto por correo un formulario de reclamación previamente completado. Los formularios de reclamación, de parte del administrador de reclamaciones Gilardi & Co. LLC, son el primer paso para la distribución del dinero del acuerdo resolutorio alcanzado con la FTC en 2018 por $125 millones de dólares. En ese caso, la FTC y el Departamento de Justicia de EE. UU. (DOJ) acusaron a MoneyGram de incumplir con los acuerdos para tomar medidas enérgicas para terminar con el fraude contra consumidores que involucra transferencias de dinero.
Para ser elegible para recibir un reembolso, debes remitir el formulario de reclamación dentro de los 90 días contados a partir de la fecha que figura en
el formulario.
En estos formularios de reclamación pre-completados figuran las pérdidas elegibles expresadas en dólares que se basan en los reportes de fraude presentados por la gente ante MoneyGram y las autoridades competentes. Si recibes un formulario y estás de acuerdo con el monto en dólares que figura como pérdida:
o Firma y fecha el formulario.
o Completa la información que pide el formulario.
o Devuélvelo por correo dentro del sobre que llegó junto con la carta.
Si recibes un formulario pero no estás de acuerdo con el monto en dólares indicado:
o Firma y fecha el formulario.
o Completa la información que pide el formulario.
o Envíalo por correo junto con copias de los documentos que respaldan el monto que reclamas. Puedes enviar copias de los recibos de MoneyGram, de los formularios de envío (“send” forms), o de los reportes de historial de transacciones con un número de control de transferencia de dinero (MTCN) de ocho dígitos. Puedes solicitar un reporte de historial de transacción en el sitio web de MoneyGram.
En el formulario de reclamación debes ingresar tu número de Seguro Social (SSN). Eso se debe a que el Treasury Offset Program, un programa federal de compensaciones, tiene que determinar si le debes dinero al gobierno de EE. UU. antes de que puedas obtener un pago. Y para hacerlo necesita tu número de Seguro Social.
Tú no tienes que pagar para presentar tu reclamación. Tú no necesitas un abogado para presentar una reclamación. No le pagues a nadie que se comunique contigo y te diga que te ayudará a presentar tu reclamación o a recuperar tu dinero.
A partir del 1 de junio de 2021, las personas que no hayan recibido un formulario pre-completado pueden empezar a presentar sus reclamaciones en línea en moneygramremission.com. Cuando presentas un formulario en línea, tienes que dar un número MTCN de MoneyGram. De lo contrario, podrás imprimir el formulario de reclamación y enviarlo por correo junto con copias de los recibos de MoneyGram, los formularios de envío (“send” forms) y los reportes de historial de transacciones. Si prevés presentar tu formulario de reclamación en junio, ya puedes comenzar a juntar tus recibos y demás documentación y hacer las copias necesarias. Una vez que se abra ese proceso, el plazo para presentar las reclamaciones es el 31 de agosto de 2021.
Para más información sobre la elegibilidad, el proceso de reclamación y otros temas relacionados con el caso, visita ftc.gov/moneygram y moneygramremission.com.
Brought to you by Dr. Ware, Microsoft Office 365 Silver Partner, Charleston SC.
by Contributed | Mar 5, 2021 | Technology
This article is contributed. See the original author and article here.
With the 2102 release of Microsoft Endpoint Manager, you can now configure the ability to send threat signals from Microsoft Defender for Endpoint to be used in your App Protection Policies (APP, also known as MAM) on Android and iOS/iPadOS.
Setting up Microsoft Defender for Endpoint for unenrolled devices
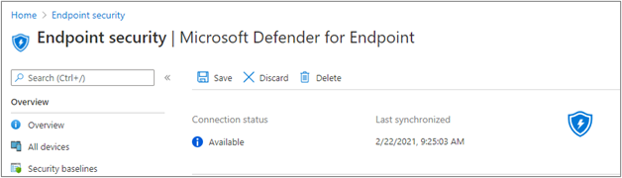
- Set up the connection from your Microsoft Endpoint Manager tenant to Microsoft Defender for Endpoint. This can be done either via Tenant Administration > Connectors and tokens > Microsoft Defender for Endpoint (under Cross platform) or Endpoint Security > Microsoft Defender for Endpoint (under Setup). Once your Connection status is set to Available, proceed. If you have been using Microsoft Defender for Endpoint for device compliance assessment up until now, your connector may already be set up. At present, Microsoft Endpoint Manager supports one Mobile Threat Defense or Microsoft Defender for Endpoint connector per platform.
Microsoft Defender for Endpoint connector status in the MEM admin center
- To send threat signals from Microsoft Defender for Endpoint on targeted devices to APP, turn on the toggles under App Protection Policy Settings for the platforms you wish to configure. These capabilities are available for Android and iOS/iPadOS. Select Save. You should see Connection status is now set to Enabled.
 Microsoft Defender for Endpoint connector status settings in the MEM admin center
Create your App Protection Policy
- After your Microsoft Defender for Endpoint connector setup is complete, navigate to Apps > App protection policies (under Policy) to create a new policy or update an existing one.
- Select which platform, Apps, Data protection, Access requirements settings that your organization requires for your policy.
- Under Conditional launch > Device conditions, you will find the setting Max allowed device threat level. This will need to be configured to either Low, Medium, High, or Secured. The actions available to you will be Block access or Wipe data. You may see an informational dialog to make sure you have your connector set up prior to this setting take effect. If your connector is already set up, you may ignore this dialog.
 Intune APP – Mobile Threat Connector policy settings
- Finish with Assignments and save your policy.
How to deploy the Defender app with this functionality
At present, the Microsoft Defender for Endpoint build on iOS and Android that enables the App Protection Policy scenario are found in TestFlight (for iOS/iPadOS) and beta Google Play store (for Android) as it is in preview.
iOS:
Android:
- Device Admin & Customers who are not enrolled to Intune MEM: Admins will need to create a Google Group (format: <Customername>_DefenderMAM) for users who are participating in the preview.
- Enterprise Admin Customers: Admin will need to send the Organization ID of the Google Play account, which is linked to Managed Google Play store in Intune. Followed by syncing Google Play Account in Intune.
Admin can then send the above Google groups id / Google Play account Organization ID to mdatpmobile@microsoft.com.
Threat detection capabilities
Types of threat detection available through MDE and how to turn it on:
End user experience
Once this policy is targeted to a specific user, the end user will be required to:
- Register their device with Azure Active Directory (Azure AD). This is not a device enrollment into Intune. This simply allows this device to have an Azure AD device ID which is required for this feature. If your organization has already configured Conditional Access for Android/iOS, your end users may already have Azure AD registered mobile devices.
- Install the Microsoft Defender for Endpoint app on their device.
- Activate the Microsoft Defender for Endpoint app in order to pass the condition required to access the app with their corporate account. This will involve signing into the app with corporate credentials, and accepting any required permissions.
Once activation is complete, Microsoft Defender for Endpoint will do a scan of the device to come up with a risk score. If the risk score meets the requirements set by the admin of Low, Medium, High, Secured, then the end user passes the conditions and gets access to their protected apps.
The check for if this device passes the configured conditions happens during App Protection Policy service check-in, or when the end user hits ‘Recheck’ after remediating their device.
More info and feedback
Create and deploy app protection policies
Let us know if you have any additional questions by replying to this post or reaching out to @IntuneSuppTeam on Twitter.
by Contributed | Mar 5, 2021 | Technology
This article is contributed. See the original author and article here.
In this series, Microsoft identity team members share their reasons for loving passwordless authentication (and why you should too!). Pamela Dingle closes the series with a post about the tighter security of passwordless authentication.
Here we are at the last of our Ten Reasons to Love Passwordless blog series! This last reason is more than closing the Ten Reasons blog series, it is about choosing to close a chapter on the past – because passwordless authentication means we can finally say goodbye to the password.
Password authentication has been around for over 60 years and has always been challenging. A password is supposed to act as a key to help the right person access an account while also operating as a security barrier to protect the account from attackers. However, 80% of hacking-related breaches involve either stolen or weak passwords that were easily guessed by the cybercriminals. Phishing, password spray, and credential stuffing attacks are all attacks that don’t involve an attacker using fancy math to get into your account – instead these attacks rely on you as a statistically predictable human. Attackers know that we humans will type our passwords without due care into a web page that looks mostly reputable. That we don’t set a different password at every website we use. That 1 out of 100 of us have easily guessed passwords like Spring2021! protecting a critical account at this very moment. That they can use 30 year old password attack tools and still succeed, because we use 30 year old protocols that are vulnerable to them. Attackers don’t have to be smart to make money from password theft, just opportunistic. Wouldn’t it be great if we could take that opportunity away?
Traditional multifactor authentication (aka MFA) presents a more secure way for users to access their accounts and resources – password plus another factor. Microsoft supports and encourages multiple ways to use MFA! Adding a second factor to your authentication reduces the probability of account compromise by 99.9%, because it ruins the instant effectiveness of password-based attacks. MFA makes user authentication much safer, but it does impact the user experience. MFA also leaves the oh-so-vulnerable password as part of the equation.
Passwordless authentication is a form of multifactor authentication that replaces the password with a secure alternative. One of the underlying principles of passwordless authentication is to eradicate the use of passwords and thereby eliminate their value for attackers. As I hope you have seen in many of our previous blog entries, passwordless authentication methods have protections against the types of attacks that represent easy money for criminals. Replacing passwords with passwordless authentication may not completely prevent all attacks, but we can make successful attacks much more expensive to perpetrate.
Passwordless methods don’t require users to enter their passwords anymore, but what if the account has a password attached to it, from initial setup? That password is less dangerous because it is not in use regularly, which is good, but there is a difference as a user between choosing not to use your password and knowing that nobody else can either. The most secure option would be for the password associated to an account to disappear forever! After all, it is tough to compromise an authentication method that doesn’t exist. You might ask, is there a way to make this happen, other than setting a long random password and forgetting it? There will be soon.
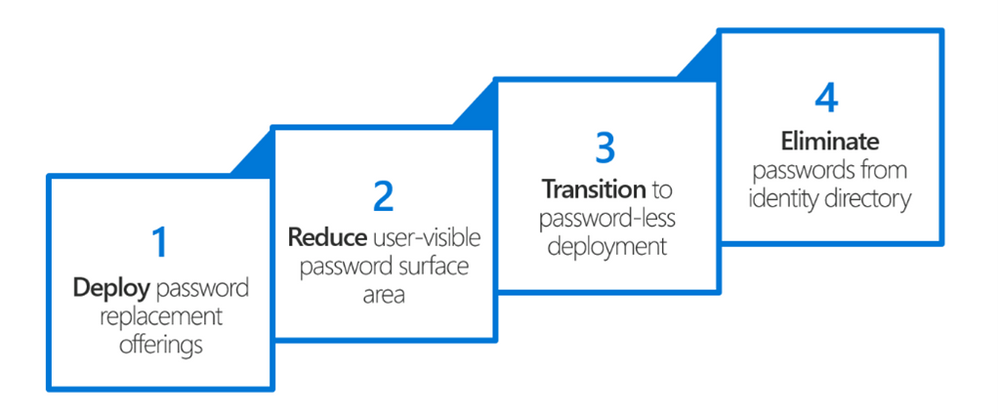
Microsoft has defined a four-step approach to end the era of passwords:
The strategy you see here seems simple, doesn’t it? But let’s just say it has been a journey. It has required singular vision, as well as collaboration both internally across many of our products and externally in our standards-based efforts. We stand today at step #3, and we are on the verge of getting to step #4. Here is a quick taste of where these steps have taken us:
Deploy password replacement offerings:
- Introduced by Microsoft in Windows 10, Windows Hello uses biometric sensors or a PIN to verify a user’s identity when signing into work or personal accounts from a PC.
- The Microsoft Authenticator app generates encrypted messages that allows users to verify their identity with a built-in biometric or a PIN when signing into their work or personal accounts from a mobile phone.
- Via the FIDO2 family of specifications, any website can request a phishing resistant credential from supported Microsoft, Apple, and Google platforms or from certified USB or NFC security keys.
Reduce user-visible password surface area:
- Login experiences across Microsoft transition to an ‘identifier-first’ flow, meaning users are no longer asked for a password at the same time they are asked for their username.
Transition to passwordless deployment:
- Legacy authentication support is replaced with modern authentication support, and hard-coded assumptions about the omnipresence of passwords are found and removed.
- Users sign into their accounts with one of the password replacement technologies and use single sign-on to access all their resources.
Eliminate passwords from identity directory (future):
- Administrators can choose whether passwords are required, allowed or simply don’t exist for a set of users, and users can choose either to not set a password when an account is created, or to remove their existing password from an account.
When Microsoft gets to step 4 in our vision, those of you who are security minded will have the power not only to use more secure authentication methods, but to eliminate less secure authentication methods. In Spring 2021, we will launch the functionality to allow password removal on Microsoft consumer accounts. Choosing to go passwordless means that instead of signing in with the Microsoft account password, users will verify sign in with the Microsoft Authenticator app. Additional forms of passwordless authentication such as Windows Hello and FIDO2 are also available to round out the options.

I can’t tell you how excited I am to see us get to these later stages of our Microsoft passwordless vision, but success in these four steps really just gets us to the starting line when it comes to living without passwords in our daily work, home, and school lives. As passwordless authentication in Azure AD is now generally available, we hope to see meaningful change in adoption rates for multifactor and passwordless authentication. We feel confident now that there are usable, meaningful alternatives to passwords available, and most importantly, the methods you see today are only the beginning. We now have the platform support, the vendor ecosystem, and the standards frameworks needed to foster new innovation and to improve our security posture over time.
I encourage you all to try passwordless authentication on for size, and I hope we have given you 10 really great reasons as to why this journey might be worthwhile. On behalf of all my co-authors, we hope this series has helped you understand passwordless authentication and has provided some useful tips for deploying in your organization. The more we can embrace passwordless as the norm the more we can protect ourselves and our organizations. And – to all of the current and past Microsoft employees who have waited for years to see our vision finally result in real day-to-day usage – we made it!
Check out the other posts in this series:
Learn more about Microsoft identity:

Recent Comments