by Contributed | Mar 10, 2021 | Technology
This article is contributed. See the original author and article here.
Red Hat Linux Manual Deployment
Note: This document is in support of Microsoft Defender for Endpoint (MDE, formerly MDATP) on Red Hat Enterprise Linux (RHEL)
Disclaimer: This may not work on all versions of Linux.
System requirements:
- Linux server distributions and versions: Red Hat Enterprise Linux 7.2 or higher.
- The fanotify kernel option must be enabled.
Instructions to Prepare for MDE/MDATP Installation:
1. Connect to the RedHat server using Putty.
2. Install yum-utils if it isn’t already installed:
sudo yum install yum-utils
[azureuser@redhat ~]$ sudo yum install yum-utils
3. Install the RedHat MDATP Channel.
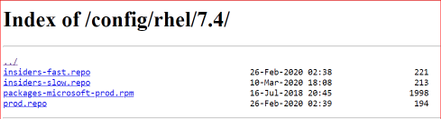
From a web browser go to https://packages.microsoft.com/config/ to select your OS, version, and channel.
4. I have RedHat Version 7.9 and chose the production channel 7.4 which is the highest version without going to the next major version. Copy the link with prod.repo to be included in the next step. For example: https://packages.microsoft.com/config/rhel/7.4/prod.repo
5. Install the Package.
sudo yum-config-manager –add-repo=https://packages.microsoft.com/config/rhel/7.4/prod.repo
[azureuser@redhat ~]$ sudo yum-config-manager –add– repo=https://packages.microsoft.com/config/rhel/7.4/prod.repo
Loaded plugins: langpacks, product-id
adding repo from: https://packages.microsoft.com/config/rhel/7.4/prod.repo
grabbing file https://packages.microsoft.com/config/rhel/7.4/prod.repo to /etc/yum.repos.d/prod.repo
repo saved to /etc/yum.repos.d/prod.repo
[azureuser@redhat ~]$
6. Install the Microsoft GPG public key:
sudo rpm –import http://packages.microsoft.com/keys/microsoft.asc
[azureuser@redhat ~]$ sudo rpm –import http://packages.microsoft.com/keys/microsoft.asc
[azureuser@redhat ~]$
7. Make all the metadata usable for the currently enabled yum repositories:
yum makecache
[azureuser@redhat ~]$ yum makecache
Loaded plugins: langpacks, product-id, search-disabled-repos
(1/5): packages-microsoft-com-prod/primary_db 118 kB 00:00:00
(2/5): packages-microsoft-com-prod/other_db 7.2 kB 00:00:00
(3/5): packages-microsoft-com-prod/filelists_db 341 kB 00:00:00
(4/5): rhui-microsoft-azure-rhel7/filelists 372 B 00:00:00
(5/5): rhui-microsoft-azure-rhel7/other 254 B 00:00:00
rhui-microsoft-azure-rhel7 1/1
rhui-microsoft-azure-rhel7 1/1
rhui-microsoft-azure-rhel7 1/1
Metadata Cache Created
[azureuser@redhat ~]$
Install MDE/MDATP Application:
- Run install command
sudo yum install mdatp
[azureuser@redhat ~]$ sudo yum install mdatp
Loaded plugins: langpacks, product-id, search-disabled-repos
packages-microsoft-com-prod | 3.0 kB 00:00:00
packages-microsoft-com-prod/primary_db 118 kB 00:00:00
Resolving Dependencies
–> Running transaction check
—> Package mdatp.x86_64 0:101.18.53-1 will be installed
–> Processing Dependency: libatomic for package: mdatp-101.18.53-1.x86_64
–> Running transaction check
—> Package libatomic.x86_64 0:4.8.5-44.el7 will be installed
–> Finished Dependency Resolution
Dependencies Resolved
========================================================================
Package Repository Arch Size Version
Installing:
mdatp x86_64 42 M 101.18.53-1 packages-microsoft-com-prod
Installing for dependencies:
libatomic x86_64 51 k 4.8.5-44.el7 rhui-rhel-7-server-rhui-rpms
Transaction Summary
Install 1 Package (+1 Dependent package)
Total download size: 42 M
Installed size: 145 M
Is this ok [y/d/N]: y
Downloading packages:
(1/2): libatomic-4.8.5-44.el7.x86_64.rpm | 51 kB 00:00:00
(2/2): mdatp_101.18.53.x86_64.rpm | 42 MB 00:00:01
——————————————————————————————————————————————
Total 32 MB/s | 42 MB 00:00:01
Running transaction check
Running transaction test
Transaction test succeeded
Running transaction
Installing : libatomic-4.8.5-44.el7.x86_64 1/2
Installing : mdatp-101.18.53-1.x86_64 2/2
Verifying : libatomic-4.8.5-44.el7.x86_64 1/2
Verifying : mdatp-101.18.53-1.x86_64 2/2
rhui-rhel-7-server-dotnet-rhui-rpms/x86_64/productid | 2.1 kB 00:00:00
rhui-rhel-7-server-rhui-extras-rpms/x86_64/productid | 2.1 kB 00:00:00
rhui-rhel-7-server-rhui-rpms/7Server/x86_64/productid | 2.1 kB 00:00:00
rhui-rhel-7-server-rhui-supplementary-rpms/7Server/x86_64/productid | 2.1 kB 00:00:00
rhui-rhel-server-rhui-rhscl-7-rpms/7Server/x86_64/productid | 2.1 kB 00:00:00
Installed:
mdatp.x86_64 0:101.18.53-1
Dependency Installed:
libatomic.x86_64 0:4.8.5-44.el7
Complete!
[azureuser@redhat ~]$
2. List all repositories. Make sure the ones in red are in the repository if you chose prod.repo (production).
yum repolist
[azureuser@redhat ~]$ yum repolist
Loaded plugins: langpacks, product-id, search-disabled-repos
repo name status
packages-microsoft-com-prod packages-microsoft-com-prod 89
[azureuser@redhat ~]$
3. Install the package from the production repository:
sudo yum —enablerepo=packages-microsoft-com-prod install mdatp
[azureuser@redhat ~]$ sudo yum –enablerepo=packages-microsoft-com-prod install mdatp
Loaded plugins: langpacks, product-id, search-disabled-repos
Package mdatp-101.18.53-1.x86_64 already installed and latest version
Nothing to do
[azureuser@redhat ~]$
Download the onboarding package & onboard
Download the onboarding package from Microsoft Defender Security Center from your Workstation:
- In Microsoft Defender Security Center, go to Settings > Device Management > Onboarding.
- In the first drop-down menu, select Linux Server as the operating system. In the second drop-down menu, select Local Script (for up to 10 devices) as the deployment method.
- Select Download onboarding package. Save the file as WindowsDefenderATPOnboardingPackage.zip to your workstation.
From the workstation copy WindowsDefenderATPOnboardingPackage.zip from the workstation to RHEL. Putty must be installed. Here we are using a key to log in and copy the file.
C:>pscp.exe -P 22 -i C:UsersazureuserDownloadsredhat_key.ppk C:usersAzureuserWindowsDefenderATPOnboardingPackage.zip azureuser@ipaddressoflinuxserver:/home/azureuser
WindowsDefenderATPOnboard | 5 kB | 5.6 kB/s | ETA: 00:00:00 | 100%
Connect back to Linux (putty)
[azureuser@redhat ~]$ cd ..
[azureuser@redhat home]$ cd azureuser/
[azureuser@redhat ~]$ ls
WindowsDefenderATPOnboardingPackage.zip
4. Unzip WindowsDefenderATPOnboardingPackage.zip
[azureuser@redhat ~]$ unzip WindowsDefenderATPOnboardingPackage.zip
Archive: WindowsDefenderATPOnboardingPackage.zip
inflating: MicrosoftDefenderATPOnboardingLinuxServer.py
[azureuser@redhat ~]$
5. Check the health of MDATP which should say no license found:
mdatp health –field org_id
[azureuser@redhat ~]$ mdatp health –field org_id
ATTENTION: No license found. Contact your administrator for help.
unavailable
[azureuser@redhat ~]$
6. Run Onboarding script:
MicrosoftDefenderATPOnboardingLinuxServer.py
[azureuser@redhat ~]$ sudo python MicrosoftDefenderATPOnboardingLinuxServer.py
Generating /etc/opt/microsoft/mdatp/mdatp_onboard.json …
[azureuser@redhat ~]$
7. Check the health of MDATP: mdatp health –field org_id
[azureuser@redhat ~]$ mdatp health –field org_id
“5447sdf90-2220-4161-82f7-0dgs2f39h8329-125fd412″
8. Check the MDATP Azure console:


by Contributed | Mar 10, 2021 | Technology
This article is contributed. See the original author and article here.
The SharePoint PnP Community monthly call is our general monthly review of the latest SharePoint and Microsoft 365 PnP topics (news, tools, extensions, features, capabilities, content and training), engineering priorities and community recognition for Developers, IT Pros and Makers. This monthly community call happens on the second Tuesday of each month. You can download recurrent invite from https://aka.ms/sp-call.
Call Summary:
If you’re looking at this blog post, then you are at the new Microsoft 365 PnP Community hub at Microsoft Tech Communities! Please take a moment to look around. The Microsoft 365 Update – Community (PnP) | March 2021is available. In this call, the Top 10 developer and non-developer entries in UserVoice are reviewed and top engineering priorities identified.
Your votes do influence engineering priorities. You are invited to attend the growing list of Sharing is Caring events. Register today. In Episode 117 of PnP Weekly tools and approaches for simplifying the move from Classic to Modern, on-prem to cloud were discussed. Why Modern? Well, one reason – Viva capabilities like the one that will be demonstrated today are available only in Modern. Testing of SPFx v1.12 is on the final stretch. Release expected any day.
Thank you to the 200 + active contributors and organizations actively participating in this PnP Community during February. You are truly amazing. The host of this call was Vesa Juvonen (Microsoft) @vesajuvonen. Q&A took place in the chat throughout the call.
Demo: Getting started with Microsoft Viva Topics – system and tools to help customers manage knowledge within their organizations through a conscious AI assisted strategy of connecting people and actionable knowledge. Content is ultimately rendered through the Topic web part. Topics along with aligned content and SMEs are initially discovered through AI algorithms, then confirmed and curated by humans. Topics draws on capabilities from across Microsoft and can be extended by you.
Actions:
- Register for Sharing is Caring Events
- First Time Contributor Session – March 22nd (EMEA, APAC & US friendly times available)
- Community Docs Session – March
- PnP – SPFx Developer Workstation Setup – March 10th
- PnP SPFx Samples – Solving SPFx version differences using Node Version Manager – March 11th
- PnP – AMA (Ask Me Anything) – SPFx Samples Edition – March 9th
- First Time Presenter – March 24th
- More than Code with VSCode – March 23rd
- Maturity Model Practitioners – March 16th
- PnP Office Hours – 1:1 session – Register
- Download the recurrent invite for this call – https://aka.ms/sp-call.
You can check the latest updates in the monthly summary and at aka.ms/spdev-blog.
This call was delivered on Tuesday, March 9, 2021. The call agenda is reflected below with direct links to specific sections. You can jump directly to a specific topic by clicking on the topic’s timestamp which will redirect your browser to that topic in the recording published on the Microsoft 365 Community YouTube Channel.
Call Agenda:
- UserVoice status for non-dev focused SharePoint entries – 4:10
- UserVoice status for dev focused SharePoint Framework entries – 5:08
- SharePoint community update with latest news and roadmap – 8:57
- Community contributors and companies which have been involved in the past month – 10:40
- Demo: Getting started with Microsoft Viva Topics – Naomi Moneypenny (Microsoft) | @nmoneypenny – 14:26
The full recording of this session is available from Microsoft 365 & SharePoint Community YouTube channel – http://aka.ms/m365pnp-videos.
- Presentation slides used in this community call are found at OneDrive.
Resources:
Additional resources on covered topics and discussions.
Additional Resources:
Upcoming calls | Recurrent invites:
“Too many links, can’t remember” – not a problem… just one URL is enough for all Microsoft 365 community topics – http://aka.ms/m365pnp.
“Sharing is caring”
SharePoint Team, Microsoft – 10th of March 2021
by Contributed | Mar 9, 2021 | Technology
This article is contributed. See the original author and article here.
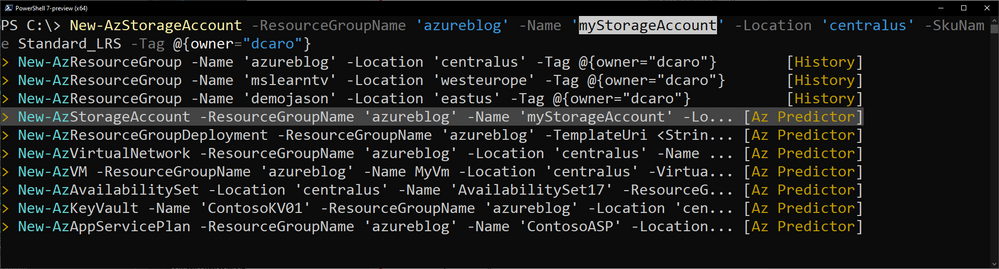
Last November, we announced the first preview of Az Predictor, a PowerShell module for Azure that brings to your fingertips the entire knowledge of the Azure documentation customized to your current session.
Today we are announcing the second preview of Az Predictor and we want to share some clarity on our plans for the next few months.
What did we learn from the first preview?
Since the release of the first preview, we listened to customer feedback and identified some challenges.
- Customers believed that the predictor was not functional. Since the service that is used to deliver the predictions did not support outages, we believe this feedback is caused by the following reasons:
- The module had to be imported manually and several customers either forgot or did not know that they had to import the module.
- The default configuration of PSReadline had to be changed to show the predications from Az Predictor.
- With an accepted suggestion, the navigation through the parameter values can be complicated especially when the list of parameters is long.
- We were not making any suggestions for several modules (for example Az.MySql).
What has changed?
The module now exposes two cmdlets ‘Enable-AzPredictor’ and ‘Disable-AzPredictor’ to automatically import the module and configure PSReadline. The cmdlet also allows users to enable the settings for future sessions by updating the user’s PowerShell profile (Microsoft.PowerShell_profile.ps1).
Az.Tools.Predictor required API changes to the PowerShell engine to improve suggestions (requiring PowerShell 7.2 preview 3).
You can now use dynamic completers to easily navigate through the parameter value with the ‘Alt+A’ combination.
We are continuously improving the model that is serving the predictions displayed on your screen. This is the most important and invisible piece of software that makes the magic! The most recent update of the model now comprises the missing modules.
Getting started with preview 2
If you have installed the first preview:
- Close all your PowerShell sessions
- Remove the Az.Tools.Predictor module
To install the second preview of Az.Tools.Predictor follow these steps:
- Install PowerShell 7.2-preview 3
Go to: https://github.com/PowerShell/PowerShell/releases/tag/v7.2.0-preview.3
Select the binary that corresponds to your platform in the assets list.
- Launch PowerShell 7.2-preview 3 and Install PSReadline 2.2 beta 2 with the following:
Install-Module -Name PSReadLine -AllowPrerelease
More details about PSReadline: https://www.powershellgallery.com/packages/PSReadLine/2.2.0-beta2
- Install Az.Tools.Predictor preview 2
Install-module -name Az.Tools.Predictor -RequiredVersion 0.2.0
More details about Az.Tools.Predictor: https://www.powershellgallery.com/packages/Az.Tools.Predictor/0.2.0
- Enable Az Predictor
Enable-AzPredictor -AllSession
This command will enable Az Predictor in all further sessions of the current user.
Inline view mode (default)
Once enabled, the default view is the “inline view” as shown in the following screen capture:

This mode show only one suggestion at a time. The suggestion can be accepted by pressing the right arrow or you can continue to type. The suggestion will dynamically adjust based on the text that you have typed.
You can accept the suggestion at any time then come back and edit the command that is on your prompt.
List view mode
This is definitely my favorite mode!
Switch to this view either by using the “F2” function key on your keyboard or run the following command:
Set-PSReadLineOption -PredictionViewStyle ListView
This mode shows in the a list down your current prompt a list of possible match for the command that you are typing. It combines suggestions from the history as well as suggestions from Az Predictor.
Select a suggestion and then navigate through the parameter values with “Alt + A” to quickly fill replace the proposed values with yours.

What’s next?
We are looking for feedback on this second preview.
We will continue to improve our predictor in the coming months. Stay tuned for our next update of the module.
Tell us about your experience. What do you like or dislike about Az Predictor?
Further Reading


Recent Comments