by Contributed | Mar 24, 2021 | Technology
This article is contributed. See the original author and article here.
こんにちは SQL Server サポートチームです。
今回は SQL Server 2019 CU2 以降を適用した際に ERRORLOG に記録されるエラーについてご説明します。
■概要
SQL Server 2019 CU2 以降で拡張イベントの”sqlserver.feature_restriction_usage”が廃止されたことにより、
累積的な更新プログラムを適用した後の初回起動時に、下記のエラーが記録されることがあります。
このエラーは更新プログラム適用後の一時的なものであり、無視していただいて問題ありません。
Error: 25623, Severity: 16, State: 1.
The event name, “XXXXXXXXXXXXXXXX.sqlserver.feature_restriction_usage”, is invalid, or the object could not be found
Error: 25710, Severity: 16, State: 1.
Event session “telemetry_xevents” failed to start. Refer to previous errors in the current session to identify the cause, and correct any associated problems.
Error: 25709, Severity: 16, State: 1.
One or more event sessions failed to start. Refer to previous errors in the current session to identify the cause, and correct any associated problems.
■発生条件
SQL Server 2019 CU1 以下のバージョンの SQL Server を使っている環境に対して、SQL Server 2019 CU2 以降の更新プログラムを適用することで発生します。
■影響
このエラーによるお客様のアプリケーションへの影響はありません。
拡張イベントの”feature_restriction_usage”は、SQL Server CEIP サービス に関連して動作する拡張イベントセッション”telemetry_xevents”で使用されています。
SQL Server CEIP サービスは、Microsoft が SQL Server の使用状態に関する情報を収集する内部機能となっており、お客様のすべてのアプリケーションの動作には影響しません。
SQL Server CEIP サービスに関する詳細は下記の公開情報をご確認ください。
SQL Server の使用状況および診断データの収集を構成する (CEIP)
https://docs.microsoft.com/ja-jp/sql/sql-server/usage-and-diagnostic-data-configuration-for-sql-server?view=sql-server-ver15
■注意事項
SQL Server CEIP サービスを停止/無効化している環境や、SQL Server CEIP サービスが”telemetry_xevents”の定義を変更する前に、SQL Server サービスが再起動された場合は引き続きエラーが記録される可能性があります。
SQL Server CEIP サービスの無効化はサポートされないため、起動した状態にする必要があります。
なお、SQL Server CEIP サービスが起動した状態であれば拡張イベントセッションの定義変更は通常数分で完了し、定義変更後は基本的に自動で”telemetry_xevents”が起動するため特に操作は不要です。
by Contributed | Mar 24, 2021 | Technology
This article is contributed. See the original author and article here.
Threat analytics is Microsoft 365 Defender’s in-product threat intelligence (TI) solution designed to help defenders like you to efficiently understand, prevent, identify, and stop emerging threats. It provides a unique combination of in-depth TI analysis and reports from expert Microsoft security researchers, and consolidated data showing your organization’s security posture relative to the threats. Threat analytics helps you respond to and minimize the impact of active attacks.
As part of a unified extended detection and response (XDR) experience in Microsoft 365 Defender, threat analytics is now available for public preview. It includes better data coverage, incident management across security pillars, automatic investigation and remediation, and cross-domain hunting capabilities. Microsoft 365 Defender threat analytics is available for Microsoft Defender for Office 365 and Microsoft Defender for Endpoint users.
If you’re familiar with threat analytics in Microsoft Defender for Endpoint, you’ll be excited to know that the integrated experience you’ll see in Microsoft 365 Defender threat analytics takes your report consumption to another level.
What’s new?
Threat analytics for Microsoft 365 Defender introduces:
- Better data coverage between Microsoft Defender for Endpoint and Microsoft Defender for Office 365, making combined incident management, automatic investigation, remediation, and proactive or reactive threat hunting across-the domain possible.
- Email-related detections and mitigations from Microsoft Defender for Office 365, in addition to the endpoint data already available from Microsoft Defender for Endpoint.
- A view of threat-related incidents that aggregate alerts into end-to-end attack stories across Microsoft Defender for Endpoint and Microsoft Defender for Office 365 to reduce the work queue, as well as simplify and speed up your investigation.
- Attack attempts detected and blocked by Microsoft Defender for Office 365. You can also see data that you can use to drive preventive actions that mitigate the risk of further exposure and increase resilience.
- Enhanced design that puts actionable information in the spotlight to help you quickly identify data to urgently focus on, investigate, and leverage from the reports.

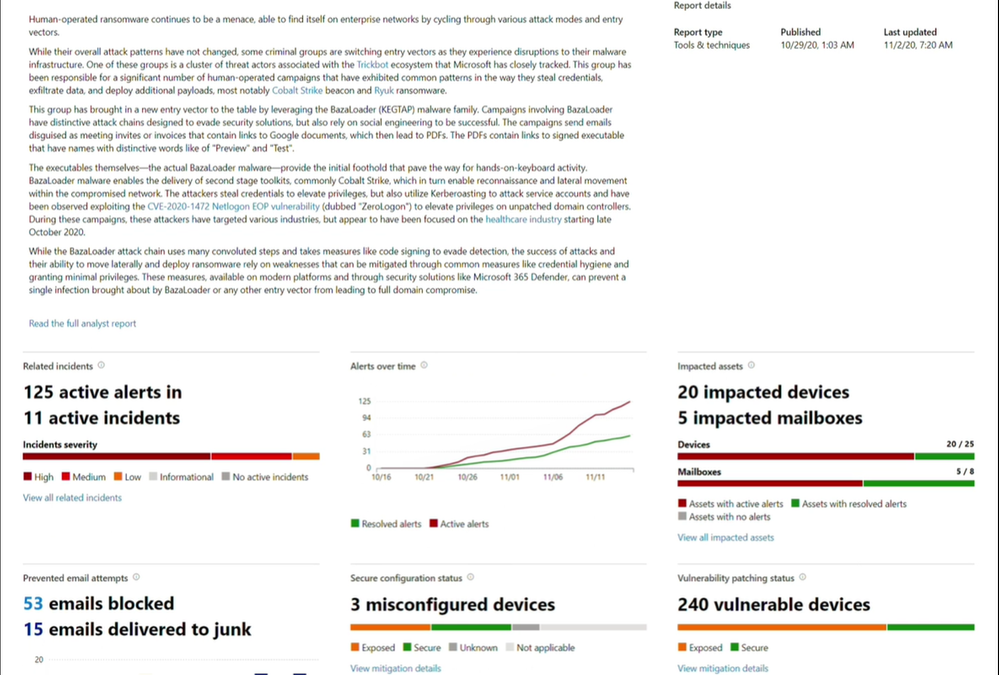
What’s in each report?
With each threat analytics report, you’ll find:
- Detailed analyst report—deep-dive analysis, MITRE techniques, detection details, recommended mitigations, and advance hunting queries that expand detection coverage.
- Active alerts and incidents.
- Impacted assets, including your devices and mailboxes.
- Prevented email attempts, indicating whether you were a target of this threat even if the email has been blocked before delivery or delivered to the junk mail folder.
- Mitigations and their statuses, with options to investigate further and remediate weaknesses using threat and vulnerability management (please note that email related mitigations are found in the analyst report).
How do I get there?
- Threat analytics can be accessed from the Microsoft 365 security center navigation bar.
- When a new threat report is published or updated, you’ll get a badge in the navigation bar.
- A dedicated threat analytics card has also been added to the Microsoft 365 security center dashboard, so you can track the threats that are active on your network.

Ready to check it out? Explore these threat analytics reports.
Solorigate supply chain attack
Microsoft continues to work with partners and customers to expand our knowledge of the threat actor behind the nation-state cyberattacks that compromised the supply chain of SolarWinds and impacted multiple other organizations. Microsoft previously used ‘Solorigate’ as the primary designation for the actor, but moving forward, we want to place appropriate focus on the actors behind the sophisticated attacks, rather than one of the examples of malware used by the actors. Microsoft Threat Intelligence Center (MSTIC) has named the actor behind the attack against SolarWinds, the SUNBURST backdoor, TEARDROP malware, and related components as NOBELIUM. As we release new content and analysis, we will use NOBELIUM to refer to the actor and the campaign of attacks.
This report about the sophisticated attack details how NOBELIUM inserted malicious code into a supply chain development process. A malicious software class was included among many other legitimate classes and then signed with a legitimate certificate. The resulting binary included a backdoor and was then discreetly distributed into targeted organizations. This attack was discovered as part of an ongoing investigation.
Emotet breaks hiatus with spike in cybercrime activity
Understand how Emotet operators have started to ramp up activity starting July 2020. Notable for their involvement in Ryuk ransomware distribution, Emotet operators are back with basically the same goals, utilizing similar lure themes and macro-enabled documents. Despite the recent take-down which has interrupted Emotet, your security operation centers should continuously monitor Emotet-related alerts in your antivirus and EDR solutions. Secondary payloads delivered by Emotet prior to the take-down remain a serious and real threat to your network.
BazaLoader: Foothold for ransomware
Possibly tied to the same cybercriminals leveraging Trickbot infrastructure, these campaigns appear to be part of ongoing attempts to shift to other entry vectors. Started in late October 2020, these campaigns use phishing emails that take recipients through link chains to implant BazaLoader. Unsurprisingly, the new implant brings in potent tools like Cobalt Strike, which make persistent, direct human attack activity possible. Microsoft’s security solutions remain effective against this threat, regardless of the recent BazaLoader activities that we’ve observed this month. Use advanced hunting to proactively hunt for this threat in your Microsoft 365 security portal (Microsoft 365 Defender) or Microsoft Security Center portal (Microsoft Defender for Endpoint).
IcedID’s frosty arrival can lead to data theft
Get your shields up by learning about this modular banking trojan’s modus operandi and how Microsoft 365 Defender can help detect and stop IcedID campaigns at multiple points along the attack chain and across domains, including the very start.

by Contributed | Mar 24, 2021 | Technology
This article is contributed. See the original author and article here.
Microsoft partners like Denodo, Genymobile, and Confluent deliver transact-capable offers, which allow you to purchase directly from Azure Marketplace. Learn about these offers below:
|
Denodo Standard 8.0 (Hourly): Denodo Standard is a new, cost-effective option that helps small to medium-sized organizations get started with Denodo for departmental use cases. Its real-time integrated views can combine your Microsoft Azure data sources with data from on-premises databases and applications. Use Denodo’s modern data virtualization to accelerate your analytics and data services.
|
 |
Genymotion Cloud – Run Android as a VM on Azure: Genymotion Cloud is a suite of Android operating systems based on Microsoft Azure server instances. With Genymotion Cloud, you can access an Android application or environment from any device, just as you would access a remote desktop. This enables mobile threat detection, app testing, content sharing, and more.
|
 |
Apache Kafka on Confluent Cloud: Confluent Cloud lets you harness the power of Apache Kafka without the burden of infrastructure management. The fully managed event-streaming platform helps development teams deliver immediate value with real-time analytics use cases. Start streaming with Confluent Cloud on Microsoft Azure in seconds, with on-demand provisioning of elastically scalable clusters.
|
|
by Contributed | Mar 24, 2021 | Technology
This article is contributed. See the original author and article here.
We are pleased to announce the general availability of Modern Admin Control Panel (MACP), as part of the Skype for Business Server 2019 March 2021 Cumulative Update.
This is a continuation to our earlier released versions of MACP. You can read about previous releases, Phase 2 March 2020 here and Phase 1 in July 2019 here.
We had covered ‘Home’, ‘Users’, ‘Conferencing’ and ‘Federation and External Access’ tabs in earlier releases. In this release we introduce following tabs: ‘Voice Routing’, ‘Voice Features’, ‘Response Group’ and ‘Conferencing (Dial-In-Access Number sub-tab)’
We continue to listen to our customers to prioritize and ship new features and updates. Hence based on your feedback, this release also includes the following enhancements.
- Addition of OAuth (optional) to login into MACP portal
- Support for Simple URL to access MACP portal
Please start using new Control Panel and share feedback and questions via the ‘Give Feedback’ link in the Control Panel. Read on for details.
Installation Instructions
1. Run SSUI
2. Run Bootstrapper.exe
3. Please install the Management OData if not installed using below steps:
a. Open PowerShell in Administrator mode
b. Run command: Add-WindowsFeature ManagementOData
The administrator account must have CsAdministrator role privileges and must be SIP enabled. If the OAuth is set up, administrator is not required to be SIP enabled.
Launching and Using Control Panel
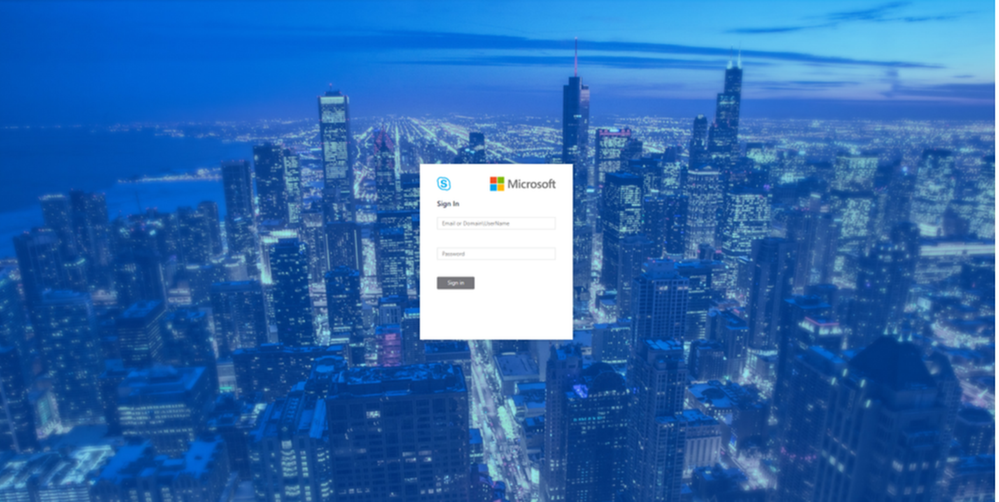
Please put in https://<your pool FQDN>/macp or the configured simple URL https://admin.<your-domain>.com/macp manually in a supported browser, and the Control Panel should open. You can also click on the blue banner at the top of the old Control Panel to launch the new Panel. The login screen looks like the following:
Login screen
Once you hit the login screen, log in with your admin credentials.
Voice Routing
Please create, modify, or delete dial plans in Dial Plan sub-tab as below:
 Dial Plan Home screen
Please create, modify, or delete voice policies in Voice Policy sub-tab as below:
 Voice Policy Home screen
Please create, modify, delete, or change the priority order of routes in the Route sub-tab below:
 Route Home screen
Please view or delete PSTN usages in PSTN Usage sub-tab below. The new PSTN usages can be created under Associated PSTN Usages table in the voice policy form.
 PSTN Usage Home screen
Please create, modify, or delete trunk configurations in Trunk Configuration sub-tab below:
 Trunk Configuration Home screen
Please create, modify, run, or delete test cases in Test Voice Routing sub-tab below:
 Test Voice Routing Home screen
Please try the import/export functionality in Voice Routing sub-tabs. You may export your voice- routing configuration to a file. Also, you may import the voice-routing configuration from the file. This functionality is present in every sub-tab under voice routing as shown below:
 Import/Export Configuration
Similarly, you can import/export voice routing test cases in Voice Routing tabs. Also, you can create test cases. This functionality is also present in all voice routing sub-tab as shown below:
 Import/Export/Create Test Cases
Please try creating and running test cases with this functionality as shown below:
 Create Test Cases
Voice Features
Please try out the scenarios for ‘Call Park’ and ‘Unassigned Number’. You can create various number ranges, edit them, or delete them.
 Call Park home screen
 Unassigned Number home screen
Response Group
Please note that to create or edit a workflow you need to access the page from inside domain network.
 Workflow page in Response Group
If not accessing from inside domain network, then the page displays message as shown below:
 Workflow Access from domain message
Please create, modify, or delete Response Group Queues in Queue page below:
 Queue page in Response Groups
Please create, modify, or delete group agents in Group page below:
 Group page in Response Groups
Conferencing
We have also provided the only remaining page from Conferencing tab – ‘Dial-In-Access Number’.
 Dial-In-Access Number in Conferencing
Setup OAuth to login into MACP portal
The following is the step by step process to setup OAuth for MACP portal.
Minimum OS req and ADFS Server version:
- Windows Server 2016 onwards
Steps to be performed on ADFS Farm machine:
- Ensure that an ADFS farm exists on the topology
- Create a new app for MACP in the ADFS
a. Use the script Configure MACP application in ADFS Farm
b. We suggest you go with default options while running the above script.
Steps To be performed on FE w17 server:
Once you have setup the ADFS farm, execute the following steps.
- Install the latest SSUI in all the FE pool machines
- To enable the ADFS OAuth for MACP across all the pools or selective pools
a. Use the script Configure OAuth for MACP
b. We suggest you review default options while running the above script.
NOTE:
- You need to run the script on just one FE W17 server machine in your topology and it will automatically identify all the FEs in your topology (or the selective pools you have passed to the script).
- Use the same script to disable ADFS OAuth and fallback to web-ticket auth.
- To re-configure any ADFS related details, you must disable ADFS OAuth using Configure OAuth for MACP and then configure the ADFS again.
If OAuth is correctly configured, then you should see login screen as below:

On clicking the Sign in button, you will get a pop-up to enter your username and password.

Setup Simple URL to access the MACP portal
You can also access MACP using the simple URL https://admin.<your-domain>.com/macp
Use the following steps to configure simple URL
1. Install the latest SSUI
2. Configure Simple URL using cmdlet.
Example below shows how a new URL can be added to an existing collection of simple URLs
$urlEntry = New-CsSimpleUrlEntry -Url “https://admin.<your-domain>.com”
$simpleUrl = New-CsSimpleUrl -Component “macp” -Domain “your-domain.com” -SimpleUrlEntry $urlEntry -ActiveUrl “https://admin.<your-domain>.com”
Set-CsSimpleUrlConfiguration -Identity “Global” -SimpleUrl @{Add=$simpleUrl}
3. Run Enable-CsComputer
4. In addition, you must also do such things as
a. create Domain Name System (DNS) records for each URL
b. configure reverse proxy rules for external access
c. add the simple URLs to your Front End Server certificates; and so on.
NOTE:
- Configuring OAuth based authentication for MACP is a prerequisite to use of Simple URL.
Providing Feedback
We always welcomes any feedback and suggestions. Please share feedback and questions via the ‘Give Feedback’ link in the Control Panel. In the top right corner, you’ll see your login name. Click on the adjacent arrow, and you should see a drop-down like the below:

Hit ‘Give Feedback’, and you should see a browser window open with the relevant discussion forum. Please do check the discussions to see if your question has already been addressed. We look forward to hearing from you!
On behalf of the product team,
Ravindra Singh Bisht
Senior Program Manager, Skype for Business Server
by Contributed | Mar 24, 2021 | Technology
This article is contributed. See the original author and article here.
This blog post is part 2 of the three-part series on Microsoft Teams and on-premises Exchange mailboxes.
Microsoft Teams and on-premises mailboxes: Part 1 – How do Teams and Exchange Server interact?
Teams Backend AutoDiscover
The Teams Backend Services use AutoDiscover Version 2 to find a user’s Exchange mailbox on behalf of a Teams client. This AutoDiscover V2 call is an anonymous call for performance reasons to determine the Exchange target URL for the mailbox sought as quickly as possible. As already mentioned in the previous blog post, the Teams Backend Services query the AutoDiscover endpoint of Exchange Online first. If Exchange Online does not host the mailbox, the services receive an HTTP redirect to search for the local Exchange organization’s endpoint.
The detailed steps are:
1. The Teams Backend Services query the Exchange Online AutoDiscover endpoint for the URL for the EWS protocol using an AutoDiscover V2 JSON query
https://outlook.office365.com/autodiscover/autodiscover.json?Email=John.Doe@varunagroup.de&Protocol=EWS
2. Exchange Online verifies the recipient type for the email address contained in the JSON query and replies with one of the following options:
a. RecipientType: Mailbox
https://outlook.office365.com/EWS/Exchange.asmx
The mailbox is an Exchange Online mailbox. No further steps are necessary. The Teams Services have the information they need to access the users’ calendar.
b. RecipientType: MailUser
Exchange Online determines the AutoDiscover endpoint based on the ExternalEmailAddress attribute; in this example autodiscover.varunagroup.de
3. Exchange Online replies with an HTTP 302 redirect to autodiscover.varunagroup.de
4. The Teams Backend Services send an AutoDiscover V2 JSON query for the URL for the EWS protocol
https://autodiscover.varunagroup.de/autodiscover/autodiscover.json?Email=John.Doe@varunagroup.de&Protocol=EWS
5. On-premises Exchange Server replies with an external EWS URL of a virtual Exchange Web Services virtual directory
Example: {“Protocol”:”EWS”,”Url”:”https://mail.varunagroup.de/EWS/Exchange.asmx“}
6. The Teams Backend Services use the received URL to establish a connection to the on-premises Exchange organization
But what do the Teams Backend Services exactly, after receiving the EWS URL? The services perform the following steps:
- Open an HTTPS connection to the on-premises EWS URL and perform an OAuth authentication using the registered services principal
- Send an EWS calendar query
- Receive the Exchange Web Services response
- Send the parsed calendar data to the Teams clients’ calendar app for further use
As you can see, accessing the calendar of a user mailbox hosted in an on-premises Exchange organization is complex. This complexity can lead to errors.
How can you now perform an error analysis for the AutoDiscover process and the subsequent calendar access? Let’s start with AutoDiscover.
Troubleshooting AutoDiscover
Since Microsoft Teams Backend Services perform all AutoDiscover and other client accesses, there are no viable troubleshooting steps on the local Teams client. The client itself must have access to the internet and proper DNS name resolution working.
Because AutoDiscover V2 uses anonymous access, you can test it for any email address. This self-test helps you as an IT administrator check AutoDiscover for a users’ email address that might not work correctly. You can check the AutoDiscover response using PowerShell or with the help of a browser.
PowerShell
Run the Invoke-RestMethod cmdlet with the following Uri-Strings for EWS and REST protocol
Invoke-RestMethod -Uri ‘https://outlook.office365.com/autodiscover/autodiscover.json?Email=John.Doe@varunagroup.de&Protocol=EWS‘
Invoke-RestMethod -Uri ‘https://outlook.office365.com/autodiscover/autodiscover.json?Email=John.Doe@varunagroup.de&Protocol=REST‘
Out-of-Office information and calendar-based presence status requests use the on-premises REST-endpoint.
Ensure that there are no unsupported characters in the Uri.
Browser
You can test and query the AutoDiscover endpoint using the following URLs
https://outlook.office365.com/autodiscover/autodiscover.json?Email=john.doe@varunagroup.de&Protocol=EWS
https://outlook.office365.com/autodiscover/autodiscover.json?Email=john.doe@varunagroup.de&Protocol=REST
For an on-premises mailbox, you receive an AutoDiscover response from your on-premises Exchange Server, like the one shown in the following screenshot.

Perform a Fiddler trace for a more detailed error analysis when executing the HTTPS queries. The trace results help you to identify other possible sources of error, i.e., a failed TLS handshake.
If an error occurs while determining the AutoDiscover information, this does not automatically imply a problem. Check the following options:
- The AutoDiscover query terminates with a timeout
- Is the HTTPS access to your Exchange organization restricted to the remote IP address ranges of Microsoft 365?
- Maybe the Exchange Server systems have a performance problem and cannot respond promptly?
- You receive a “User Not Found”-response
- Is the user account excluded from the Azure AD Connect synchronization and does not exist as a “Mail User” object in Exchange Online?
- The response does not contain the expected EWS or REST URL
- The mailbox is an on-premises mailbox, but the response contains the Exchange Online endpoint
https://outlook.office365.com/EWS/Exchange.asmx
Most likely, the user has an additional mailbox in Exchange Online. Resolve the double mailbox situation.
- The response contains a URL that seems to be an internal URL, i.e.,
https://exch01.varunagroup.local/EWS/Exchange.asmx
The ExternalUrl attribute configuration is not correct for all virtual directories.
- You use bound namespaces, the user mailbox location is AD site EMEA, but the response contains an URL of a different site, i.e.,
https://mail.apac.varunagroup.de/EWS/Exchange.asmx
Expected URL: https://mail.emea.varunagroup.de/EWS/Exchange.asmx
Until March 2021, AutoDiscover V2 is not AD site-aware. The March 2021 cumulative updates for Exchange Server 2016 and 2019 fix this issue. Read more about the updates in this blog post.
- DNS Name resolution fails for the email address target domain
- There is no DNS resource record for AutoDiscover in the internet-facing DNS zone
The next steps to identify connection problems lead us to the on-premises Exchange servers. With a local network trace, you can determine whether there are TLS handshake errors. Please note that your Exchange Server systems must be configured correctly for TLS 1.2. The TLS 1.2 configuration might require manual steps if you use Exchange Server 2016 or Exchange Server 2013.
If there are no errors in the TLS handshake, you must check the Exchange server’s log files. Checking the log files on the local Exchange servers requires several steps. Depending on your local Exchange organization’s size and the number of Exchange Servers, this check can be very complicated.
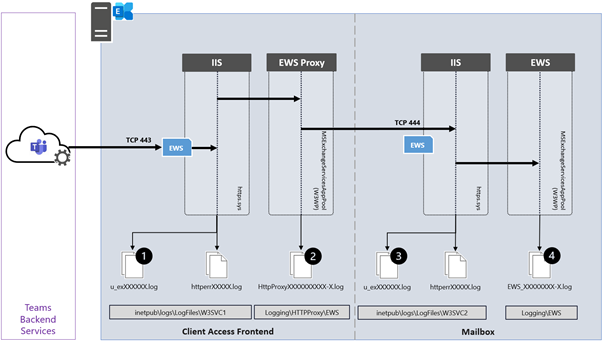
The following diagram shows the participating Exchange Server components of a single Exchange Server for incoming connections from the Teams Backend Services to the Exchange Web Services endpoint.
The IIS Default website receives the incoming HTTPS connection from the Teams Services and passes it to the Frontend Proxy component, i.e., EWS or REST. You find information about those two connections in the W3SVC1 (1) and the HttpProxy logs of the targeted protocol (2). The Frontend Proxy component proxies the connection to the Exchange Backend website of the Exchange Server, where the active database copy containing the user mailbox is mounted. This is not necessarily the same Exchange Server accepting the Frontend connection. You find information about this proxied connection in the W2SVC2 IIS logs (3) and the queried Exchange service (4). Depending on the Exchange protocol you want to troubleshoot, you must check the AutoDiscover, EWS, or REST log files.
Troubleshooting Calendar App
Now that you know how to deal with the AutoDiscover process’s errors, it’s time to take a look at the Teams Calendar app.
Suppose the access to AutoDiscover works without errors. There is a high probability that the access to the Exchange Web Services will also work, and therefore the calendar app in the Teams client will show calendar information.
However, if the Teams client does not display the calendar, check the following:
- Can the EWS URL determined by AutoDiscover, is the hostname resolvable in the domain’s external DNS zone, and can it be reached from the Internet via HTTPS?
- Use a browser to connect to the EWS URL and use Fiddler to identify any connection-based issues
The EWS endpoint must reply with am HTTP 401 status code
- Use the Remote Connectivity Analyzer to perform a Teams Calendar Access Tab Test

http://bit.ly/TeamsCalTest
- Verify the OAuth Authentication configuration
In the next blog post, we will take a closer look at calendar delegate situations.
Links
Thomas Stensitzki is a leading technology consultant focusing on Microsoft messaging and collaboration technologies and the owner of Granikos GmbH & Co. KG. He is an MVP for Office Apps & Services and an MCT Regional Lead. As a user group organizer, he hosts the Microsoft Teams User Group Berlin and the Exchange User Group DACH.
Twitter: https://twitter.com/stensitzki
Blog: https://JustCantGetEnough.Granikos.eu
Teams User Group: https://TeamsUserGroup.berlin
Exchange User Group: https://exusg.de
To write your own blog on a topic of interest as a guest blogger in the Microsoft Teams Community, please submit your idea here: https://aka.ms/TeamsCommunityBlogger

Recent Comments