Consolidate data to one source with Azure SQL Managed Instance | Komatsu
This article is contributed. See the original author and article here.
Modernize your existing data at scale, and solve for operational efficiency with Azure SQL Managed Instance. Azure SQL MI is an intelligent, scalable, cloud database service and fully managed SQL server.
Nipun Sharma, lead data architect, joins Jeremy Chapman to share how the Australian subsidiary of large equipment manufacturer, Komatsu, built a scalable and proactive sales and inventory management and customer servicing model on top of Azure SQL Managed Instance to consolidate their legacy data estate on-premises. See what they did to expand their operational visibility and time to insights, including self-service reporting through integration with Power BI.
QUICK LINKS:
00:30 — Komatsu’s background
03:28 — Komatsu’s modernization path
04:12 — Consolidating data to one source
05:50 — Data migration and consolidation of 3 core systems
08:20 — Example reports
09:49 — Self-service reporting
11:17 — Built-in auto tuning
12:45 — What’s next for Komatsu?
13:45 — Wrap up
Unfamiliar with Microsoft Mechanics?
We are Microsoft’s official video series for IT. You can watch and share valuable content and demos of current and upcoming tech from the people who build it at Microsoft.
- Subscribe to our YouTube: https://www.youtube.com/c/MicrosoftMechanicsSeries?sub_confirmation=1
- Join us on the Microsoft Tech Community: https://techcommunity.microsoft.com/t5/microsoft-mechanics-blog/bg-p/MicrosoftMechanicsBlog
- Watch or listen via podcast here: https://microsoftmechanics.libsyn.com/website
Keep getting this insider knowledge, join us on social:
- Follow us on Twitter: https://twitter.com/MSFTMechanics
- Follow us on LinkedIn: https://www.linkedin.com/company/microsoft-mechanics/
- Follow us on Facebook: https://facebook.com/microsoftmechanics/
Video Transcript:
– Up next, we’re joined by Lead Data Architect Nipun Sharma, to learn how the Australian subsidiary of large equipment manufacturer, Komatsu, built its scalable and proactive sales and inventory management and customer servicing model on top of Azure SQL Managed Instance to consolidate their legacy data estate on premises and drive more self-service reporting with Power BI. So Nipun, welcome to Microsoft Mechanics.
– Thanks for having me here. It’s a pleasure to be on the show.
– And thanks so much for joining us all the way from Australia today. So before we get into this, if you’re new to Komatsu, they’re a leading manufacturer of mining and earth moving equipment for construction around the world. In Australia alone, Komatsu has more than 30,000 machines in daily operation. And as a company, they’re at the forefront of several leading edge solutions in their industry, including smart and autonomous self-driving machinery. Incidentally, the Australian subsidiary spans three different countries in seven regions. So Nipun, with all the expansive area of coverage, what were you trying to solve for?
– So the short answer is operational efficiency. When we started down a modernization path, we were struggling with getting an accurate and timely view of parts, demand, and inventory requirements to meet a customer’s specific needs. Our customers are mainly in mining and construction industries. The uptime of their machines is of critical importance for them and for us. So having the right part at the right place at the right time is vital for operations. From an aftermarket care perspective, to get ahead of inventory requirements we needed more perspective and insight into the drivers behind what customers are requesting. Secondly, on the resource planning side, machine servicing is based on usage. Heavy usage, for example, will accelerate service milestones. At the same time, beyond sourcing the parts needed for servicing, we need to make sure the right skilled technicians are also available. So we wanted to be able to plan those needs more proactively.
– And Komatsu has been around for a long time, but can you tell us what were some of the established systems that were already in play?
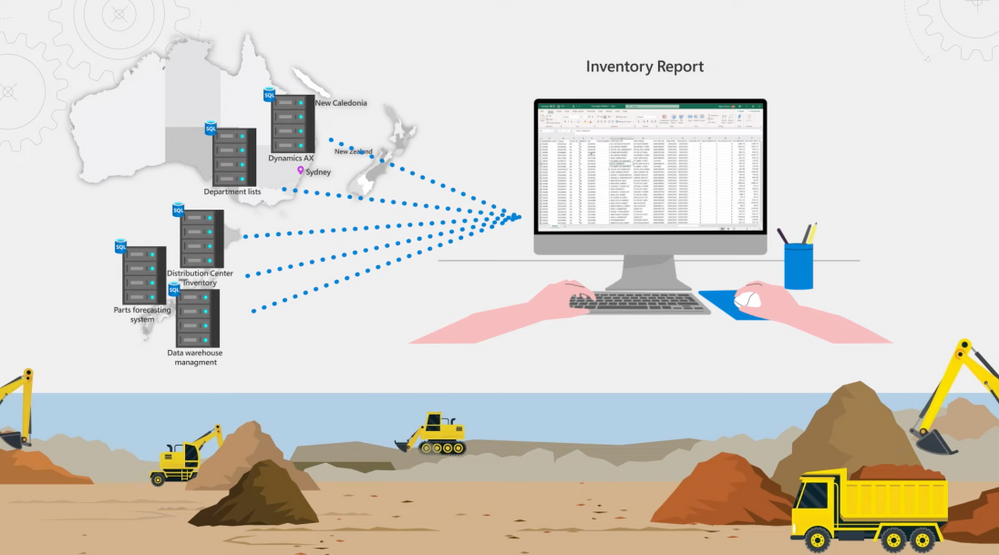
– So yes, this year in fact marks our hundredth anniversary. As you can imagine, we had a blend of legacy and modern applications in our environment used by the business. All systems are fully on-premises. There are around two dozen different source business systems that spans across our Australian subsidiary and our headquarters in Japan. In Japan, we manufacture our machinery. We have systems hosting our satellite telemetry data for our customer machines and other source systems that has component and equipment information, machine contracts, distribution center inventory, and parts ordering systems. Our warehouse management system, including one for stock forecasting and other for planning and logistics is also in Japan. In our Australian subsidiary, we have various ERP systems and customer relationship management systems in use for aftermarket sales and operations. And we have various source systems for field servicing to deploy technicians, local on-board machine systems for diagnostics, branch stock, service meter reading, and more. We maintain a global equipment master system and keep our financial data in SAP. Additionally, when we started there were several dozen Access and SQL server databases in use for file-based source systems. This was managed by our business teams to collate spreadsheets and query volumes of data for weekly snapshot and KPIs.
– Right, that’s a huge amount of data spread across oceans and multiple distributed systems that you were managing.
– Right, we had terabytes of data distributed everywhere, but nothing was connected or available in a consistent manner. People were connecting to data sources through Excel, loading data and files manually for reporting. Pulling a report to get an accurate view of our parts inventory, for example, would require connecting to five different source systems across Japan and our Australian subsidiary, with different schema and different tooling. And the hard part was out-of-date reporting. We were limited to running a batch process once a week. It took 8 to 10 hours. So we ran it on Saturday to avoid impacting our business transactions during the week.
– And these systems were baked into your everyday operations, but what was your approach then that you took for modernizing all of this?
– To move fast, we took a hybrid approach to consolidate our data to a single source of truth across our data estate. We wanted to move to Azure for its data and AI platform capabilities. And we chose Azure SQL Managed Instance for two reasons. The first was compatibility with our SQL implementations. There was almost no code changes, and we were able to leverage the existing skills within the team. We also took advantage of SQL MI VNet support to access the environment from an on-prem network. The second was performance, cost, and dynamic scale. So we could comfortably scale to our needs without any concerns. For example, you can see here, scaling is very easy. We can independently scale, compute and storage. So during our normal business hours, we allocate 16 cores and we can manually scale up for ad hoc needs like data refreshes without interrupting our daily operations. We have also built custom event-based automation in PowerShell. This adds more compute as we load the data for overnight refreshes. It is a simple scripted procedure that we can use on schedule. See, if I do a Get-Command, you’ll see I’m at eight cores. And if I do a set command, you will see it takes a moment to scale up to 24 cores. In our case, we scale up to 24 cores at 9:00 PM each day, so we don’t interfere with business traffic. The data from our source systems is refreshed before the start of the workday, and we scale down in morning at 4:30 AM.
– Okay, so now you had a lot of systems that were in use, but where did you focus then your data migration and consolidation efforts?
– We started by identifying three core systems and we brought this data into Azure SQL MI.
– Okay, so how did these systems then provide an initial foundation for your reporting needs?
– They were instrumental. Our Dynamics AX system holds the key insights for understanding our customer demands for parts. Then our ICT telemetry systems contains satellite data on machine usage, as well as data from onboard systems for specific alerts, events, and warning codes. And it also brings basic time-series data. So based on the hours of usage for a specific machine, we can determine how close it is for specific recommended service milestone. And the actual machine usage shows up in our reports as a Service Meter Reading. Specific events on the machine helps us identify potential failures and proactively support our customers. To add to that, our CMS system, which collects lab data on our oil samples, also provide valuable information about machine health. All this data feeds into our Power BI service via the Power BI gateway, which we set up to provide self-service dashboards, analytics and reporting. And we also use a logic app to refresh our data models once the data is loaded into SQL MI.
– Okay, so how quickly then were you able to expand beyond this kind of core set of services?
– It was radical. Within six to seven months, we started to expand further. We were able to go from almost a working day to pull reports to just 20 minutes with our first iteration. And now by caching the data in Power BI, we can do this in seconds. Since the initial implementation, we have added 17 more business systems without worrying about scaling or performance. We were also able to bring in data from various file sources available only within departments. And we went from 300 gigs to 6 terabytes of data quickly, and from a hundred users to over a thousand consumers of information. In fact, you can see the types of reports the users are generating here. All of these reports were not even possible before. We are streamlining data sets, sources and models so that everyone is working from one source of the truth. We now have around 70 Power BI citizen developers sitting across business teams, building reports around the same data. And we can refresh and pull reports in just a few seconds now.
– Nice, so can we see some of the reports then that you’re now able to build?
– Sure, let me pull up a few for you. Here’s an example. I can see upcoming service milestones by equipment type and location and required parts for the same. If I want to know how many excavators are due for their thousand hour service, I can click here in the excavator bar. Here I can see the regions where the machines are running and the parts required for them. This is something that was not possible before, because the data was either locked into our system or just not available.
– How does this now help with your inventory reporting?
– Oh, we have completely transformed the visibility we had. So let me show you. Here’s an inventory report that our business team were able to create to track parts on hand for customer service requests. The data from this report is sitting across multiple sources and all put together in SQL MI. We can see part stock levels per region represented by DC, Distribution Center values. I can drill into parts available for specific machine type, like excavator, and see quickly the status of this machine. Now the teal color means we’re covered, but doesn’t tell the entire story because some of the parts categories don’t need inventory on hand. If I filter the national demand ranking here to look at the top ranked parts indicated by A, you see we have nothing to worry about, we have a healthy supply.
– And of course, the dashboard is only half the story. So what are you doing then to support this type of self-service reporting?
– Right, the amazing thing for us is having the data in one source. And depending on the question our business is trying to answer, we obviously prep the data and connect the dots at the backend. For example, here’s the backend data model behind these fields that our business users have created linking various tables. Even if you knew where to find the data as a business analyst, most of these tables and the underlying data fields don’t exist. My team implements the business logic to map the data into business semantic layer, to make it more consumable and consistent across the business. Let me give you an example of what goes into this. Here’s SQL Server Management Studio, we build custom views correlating data from different sources. In the first query and tab, we are pulling all the different sources where our inventory currently sits. Main indicates our primary inventory system. Then as I scroll down, you will see we are connecting related data from distribution center and also from branch locations. This paints an accurate picture of inventory across all our repos. Next, in the second tab, this query is all about calculating minimum inventory levels to ensure we have enough stock on hand. You can see here, we are also including incoming deliveries as you see with the items marked on order. This helps ensure that we keep the inventory in line with demand.
– So then, with so much growth then in your data, how were you able to maintain consistency in performance?
– So Azure SQL MI has built-in auto tuning. It will automatically index your main updates and your queries. But there’s also optimizations that you can do to help auto tuning to work better for you. When indexes are created, tables need to be republished. Otherwise the ordering of data on the disk becomes fragmented, impacting your IOPS. To solve this, we update the statistics by prioritizing which tables are most required at the semantic layer for querying. The nice thing with SQL MI is that management is very consistent compared to SQL server running on a physical or a virtual machine. We have a diagnostic script that we can run and list out all big tables and look at the percentage of fragmentation and page counts. If fragmentation is over 80%, we can run another script to fix the fragmentation. To automate this process, we run a stored procedure to defragment the index tables weekly. This is a standard script from Microsoft, and we’ve just added a filter for our biggest schema called DSA for our semantic querying layer. This re-indexes and reformats the table and updates the stats to keep everything under 70% fragmentation. These procedures run every Saturday morning and it takes few hours, but afterwards, all the big tables are tuned for best performance.
– I’m going to say great work from you and the team to really modernize data and the operations at Komatsu. So where do the things then go from here?
– The great thing about being in the cloud is that our implementation grows with us. As you saw, our data has grown 20x and our users 10x, and we have added additional managed instances to support the demand. We also have a great option to grow as we need in Azure. And the next journey is more ad hoc exploration and predictive analytics. We are looking at Azure Synapse Analytics to take advantage of data warehousing as our data footprint grows, especially with our increased investment in IoT and connected machinery at the Edge. Here, you’re seeing the data we have pulled in, and these are the linked services that we are using with Synapse. We have already started experimenting with bringing in our source system data, like SAP HANA, to integrate across data sets and even better insights and data exploration. And we’ll continue to use Azure SQL MI for new apps that we build on Azure.
– Thanks so much Nipun, for joining us today and also sharing Komatsu’s story and implementation for Azure SQL Managed Instance. And also for more hands-on deep dives like this, keep checking back to Microsoft Mechanics. Subscribe to our channel if you haven’t yet, and we’ll see you soon.


Recent Comments