
by Contributed | May 5, 2021 | Technology
This article is contributed. See the original author and article here.
We recently published another new class type. This class type shows how to set up lab with Adobe Creative Cloud for digital arts and media classes.
This class type includes the following information:
- Recommended VM size for the lab.
- How to set up Adobe Creative Cloud with Named User Licensing.
- External storage options.
- Example costs for the class.
Here is where you can find the new Adobe Creative Cloud class type: Set up a lab with Adobe Creative Cloud using Azure Lab Services – Azure Lab Services | Microsoft Docs
Thanks!
Azure Lab Services team

by Contributed | May 5, 2021 | Technology
This article is contributed. See the original author and article here.
Dear IT Pros,
Ransomware acts with accessing to the files, folders and encrypting them, to respond against it, we need to enable the Windows Defender feature named “Controlled Folder Access” – WDCFA and monitor the Windows Defender Guard Events in Windows Event Viewer. The best way is possibly collecting the related activities by Advanced Hunting features of Microsoft 365 Security or Defender for Endpoint.
Could we search for Event ID by running the advanced hunting query or not?
We will discuss the above topic today.
To View or change the list of protected folders
You can use the Windows Security app to view the list of folders that are protected by controlled folder access.
- On your Windows 10 device, open the Windows Security app.
- Select Virus & threat protection.
- Under Ransomware protection, select Manage ransomware protection.
- If controlled folder access is turned off, you’ll need to turn it on. Select protected folders.
- Do one of the following steps:
- To add a folder, select + Add a protected folder.
- To remove a folder, select it, and then select Remove.
Note
Windows system folders are protected by default, and you cannot remove them from the list.
Review controlled folder access events in Windows Event Viewer
The following table shows events related to controlled folder access:
Event ID
|
Description
|
5007
|
Event when settings are changed
|
1124
|
Audited controlled folder access event
|
1123
|
Blocked controlled folder access event
|
You can review the Windows event log and look for events which were created when controlled folder access of Windows Defender had blocked (or reported in audit mode) an app ‘s activity of accessing to the related folders, steps to follow:
- Download the Evaluation Package and extract the file cfa-events.xml to an easily accessible location on the device.
Content of cfa-events.xml is shown in the following lines:

- Type Event viewer in the Start menu to open the Windows Event Viewer.
- On the left panel, under Actions, select Import custom view….
- Navigate to where you extracted cfa-events.xml and select it. Alternatively, copy the XML directly.
- Select OK.

Review controlled folder access events in the Microsoft 365 Security.
M365 Security portal, advanced hunting provides detailed information of Windows Defender events as part of its alert investigation scenarios.
You can query Microsoft 365 Security data by using Advanced hunting. For Controlled Folder Access, if you are enable it audit mode, you can use advanced hunting to see how controlled folder access settings would affect your environment if they were enabled.
To query Controlled Folder Access Events by Powershell, :
DeviceEvents
| where ActionType in ('ControlledFolderAccessViolationAudited','ControlledFolderAccessViolationBlocked')
Advanced Hunting for Controlled Folder Access Events:
Query Table
WDAC- Windows Defender Application Control
|
DeviceEvents
| where Timestamp > ago(7d) and ActionType startswith “AppControl”
| summarize Machines=dcount(DeviceName) by ActionType
| order by Machines desc
|
Monthly report on Vulnerability
|
DeviceTvmSoftwareInventoryVulnerabilities
| project DeviceName, SoftwareName, CveId, SoftwareVersion, VulnerabilitySeverityLevel
| join (DeviceTvmSoftwareVulnerabilitiesKB
| project AffectedSoftware, VulnerabilityDescription , CveId , CvssScore , IsExploitAvailable
)
on CveId
| project CveId , SoftwareName , SoftwareVersion , VulnerabilityDescription , VulnerabilitySeverityLevel, IsExploitAvailable , CvssScore
| distinct SoftwareName , SoftwareVersion, CveId, VulnerabilityDescription , VulnerabilitySeverityLevel, IsExploitAvailable
| sort by SoftwareName asc , SoftwareVersion
|
WD-ASR Event
|
DeviceEvents
| where ActionType == “AsrOfficeChildProcessAudited” and Timestamp > minTime
| project BlockedProcess=FileName, ParentProcess=InitiatingProcessFileName, DeviceName, Timestamp
|
WD-CFA Controlled Folder Access Event
|
DeviceEvents
| where ActionType in (‘ControlledFolderAccessViolationAudited’,’ControlledFolderAccessViolationBlocked’)
|
|
|
- We could not query by Event ID.
Until today, the built-in Defender for Endpoint sensor does not allow raw ETW access using Advanced Hunting nor forwards them.
- In Event Viewer, using XML to filter events related to Windows 10 Defender Guard,
the Event IDs are listed in the following Event Table:
Feature
|
Provider/source
|
Event ID
|
Description
|
Exploit protection
|
Security-Mitigations (Kernel Mode/User Mode)
|
1
|
ACG audit
|
Exploit protection
|
Security-Mitigations (Kernel Mode/User Mode)
|
2
|
ACG enforce
|
Exploit protection
|
Security-Mitigations (Kernel Mode/User Mode)
|
3
|
Do not allow child processes audit
|
Exploit protection
|
Security-Mitigations (Kernel Mode/User Mode)
|
4
|
Do not allow child processes block
|
Exploit protection
|
Security-Mitigations (Kernel Mode/User Mode)
|
5
|
Block low integrity images audit
|
Exploit protection
|
Security-Mitigations (Kernel Mode/User Mode)
|
6
|
Block low integrity images block
|
Exploit protection
|
Security-Mitigations (Kernel Mode/User Mode)
|
7
|
Block remote images audit
|
Exploit protection
|
Security-Mitigations (Kernel Mode/User Mode)
|
8
|
Block remote images block
|
Exploit protection
|
Security-Mitigations (Kernel Mode/User Mode)
|
9
|
Disable win32k system calls audit
|
Exploit protection
|
Security-Mitigations (Kernel Mode/User Mode)
|
10
|
Disable win32k system calls block
|
Exploit protection
|
Security-Mitigations (Kernel Mode/User Mode)
|
11
|
Code integrity guard audit
|
Exploit protection
|
Security-Mitigations (Kernel Mode/User Mode)
|
12
|
Code integrity guard block
|
Exploit protection
|
Security-Mitigations (Kernel Mode/User Mode)
|
13
|
EAF audit
|
Exploit protection
|
Security-Mitigations (Kernel Mode/User Mode)
|
14
|
EAF enforce
|
Exploit protection
|
Security-Mitigations (Kernel Mode/User Mode)
|
15
|
EAF+ audit
|
Exploit protection
|
Security-Mitigations (Kernel Mode/User Mode)
|
16
|
EAF+ enforce
|
Exploit protection
|
Security-Mitigations (Kernel Mode/User Mode)
|
17
|
IAF audit
|
Exploit protection
|
Security-Mitigations (Kernel Mode/User Mode)
|
18
|
IAF enforce
|
Exploit protection
|
Security-Mitigations (Kernel Mode/User Mode)
|
19
|
ROP StackPivot audit
|
Exploit protection
|
Security-Mitigations (Kernel Mode/User Mode)
|
20
|
ROP StackPivot enforce
|
Exploit protection
|
Security-Mitigations (Kernel Mode/User Mode)
|
21
|
ROP CallerCheck audit
|
Exploit protection
|
Security-Mitigations (Kernel Mode/User Mode)
|
22
|
ROP CallerCheck enforce
|
Exploit protection
|
Security-Mitigations (Kernel Mode/User Mode)
|
23
|
ROP SimExec audit
|
Exploit protection
|
Security-Mitigations (Kernel Mode/User Mode)
|
24
|
ROP SimExec enforce
|
Exploit protection
|
WER-Diagnostics
|
5
|
CFG Block
|
Exploit protection
|
Win32K (Operational)
|
260
|
Untrusted Font
|
Network protection
|
Windows Defender (Operational)
|
5007
|
Event when settings are changed
|
Network protection
|
Windows Defender (Operational)
|
1125
|
Event when Network protection fires in Audit-mode
|
Network protection
|
Windows Defender (Operational)
|
1126
|
Event when Network protection fires in Block-mode
|
Attack surface reduction
|
Windows Defender (Operational)
|
5007
|
Event when settings are changed
|
Attack surface reduction
|
Windows Defender (Operational)
|
1122
|
Event when rule fires in Audit-mode
|
Attack surface reduction
|
Windows Defender (Operational)
|
1121
|
Event when rule fires in Block-mode
|
- You could run the queries by using Microsoft 365 Security or Microsoft Defender for Endpoint.

I hope the information is useful, see you next time.
Reference:
by Contributed | May 5, 2021 | Technology
This article is contributed. See the original author and article here.
Sometimes we have a business requirement to get site collections with all the sub-webs so we can achieve the solution easily using PnP Powershell.
Let’s see step-by-step implementation:
Implementation
Open Windows Powershell ISE
Create a new file and write a script
Now we will see all the steps which we required to achieve the solution:
1. We will initialize the admin site URL, username, and password in the global variables.
2. Then we will create a Login function to connect the O365 SharePoint Admin site.
3. Create a function to get all site collections and all the sub-webs
So in the end, our script will be like this,
$SiteURL = "https://domain-admin.sharepoint.com/"
$UserName = "UserName@domain.onmicrosoft.com"
$Password = "********"
$SecureStringPwd = $Password | ConvertTo-SecureString -AsPlainText -Force
$Creds = New-Object System.Management.Automation.PSCredential -ArgumentList $UserName, $SecureStringPwd
Function Login {
[cmdletbinding()]
param([parameter(Mandatory = $true, ValueFromPipeline = $true)] $Creds)
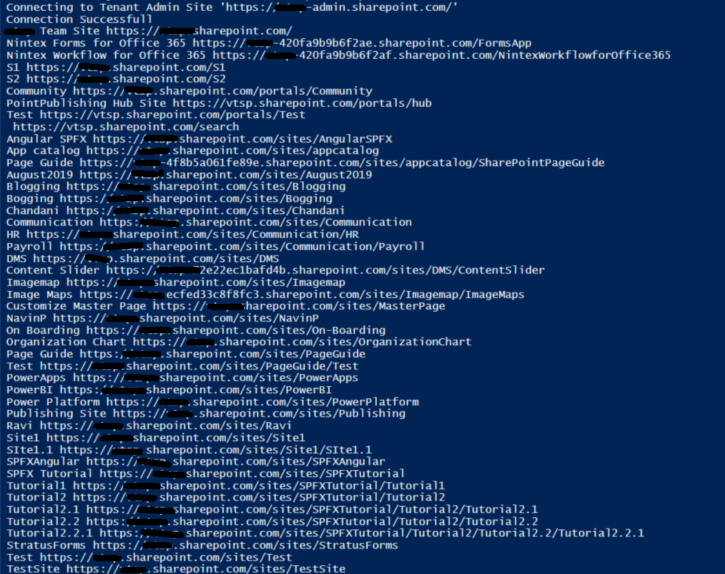
Write-Host "Connecting to Tenant Admin Site '$($SiteURL)'"
Connect-PnPOnline -Url $SiteURL -Credentials $creds
Write-Host "Connection Successfull"
}
Function AllSiteCollAndSubWebs() {
Login($Creds)
$TenantSites = (Get-PnPTenantSite) | Select Title, Url
ForEach ( $TenantSite in $TenantSites) {
Connect-PnPOnline -Url $TenantSite.Url -Credentials $Creds
Write-Host $TenantSite.Title $TenantSite.Url
$subwebs = Get-PnPSubWebs -Recurse | Select Title, Url
foreach ($subweb in $subwebs) {
Connect-PNPonline -Url $subweb.Url -Credentials $Creds
Write-Host $subweb.Title $subweb.Url
}
}
}
AllSiteCollAndSubWebs
Output:
Summary:
In this article, we have seen how to get all the site collections and their subwebs using pnp Powershell.
Hope this helps! If it is helpful to you then share it with others.
Sharing is caring!
by Contributed | May 5, 2021 | Technology
This article is contributed. See the original author and article here.
In this blog post, we are going to have a look at how you can automatically upload files to an Azure Blob storage account using Power Automate Desktop. Power Automate Desktop is a great tool to build automation on your desktop. You can create flows, interact with everyday tools such as email and excel and work with modern and legacy applications.
For example, you can automate tasks like:
- Quickly organize your documents using dedicated files and folders actions
- Accurately extract data from websites and store them in excel files using Web and Excel automation
- Apply desktop automation capabilities to put your work on autopilot.
Now want tasks I want to build some automation is to upload files to an Azure Blob Storage account for long-term storage. These can be small and large files, in my cases I wanted to backup all my large video files to an Azure blob Storage account.
To learn more about Power Automate check out Microsoft Docs.
Preparation
Install Power Automate Desktop (it is free)
You can download Power Automate Desktop from here.
Sign in to the Power Automate Desktop Windows application using one of the following accounts and automate your tedious tasks.
A full comparison of the features included in each account can be found here.
Create an Azure Storage account
Secondly you create a Storage account in Azure. An Azure storage account provides you to host all of your Azure Storage data objects: blobs, files, queues, and tables. For more information about Azure storage accounts, see Storage account overview.
To create an Azure storage account just follow these steps on Microsoft Docs: Create a storage account.
Download AzCopy
Since I am dealing with large files, I decided to use the AzCopy utility. AzCopy is a command-line utility that you can use to copy blobs or files to or from a storage account. Get started with AzCopy.
Create Power Automate Desktop Flow
After we prepared everything, we can now start to create the flow in Power Automate Desktop.
Power Automate Desktop Flow – Upload to Azure Blob Storage using AzCopy
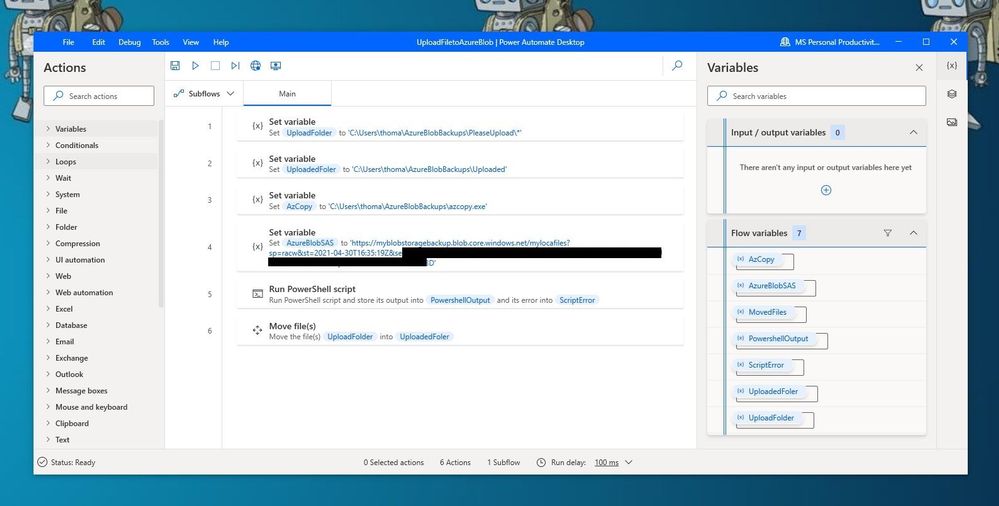
First, I create the following variables within the flow.
- UploadFolder – This is the folder where I place my files, which I want to be uploaded
- UploadedFolder – This is the folder where the file gets moved after it has been uploaded
- AzCopy – This is the path where I saved the azcopy.exe
- AzureBlobSAS – This is the URI for the Azure Blob Storage account including the Shared access signature (SAS) token
To generate the URI with the SAS (Shared access signature) token, go to the Azure Portal to your Azure storage account. Go to containers and create a new container. Open the container and on the and navigate to Shared access signature. Select add, create, and write permission, change the time if needed, and press Generate SAS token and URL. Copy the Blob SAS URL and save it as the variable in the flow.
 Azure Storage Account SAS Token
IMPORTANT: When you add the SAS URL to the variable you will need to make all the % to %% because of how Power Automate Desktops names variables.
Since we want to use the AzCopy utility to copy the files to the Azure Blob storage, you can now add the “Run PowerSheel script” action with the following PowerShell code:
%AzCopy% copy "%UploadFolder%" "%AzureBlobSAS%" --recursive=true
 Run PowerShell script
With the last step, we are going to move the uploaded files to another folder.
 Move Files
Conclusion
I hope this blog post provides you with a quick overview of how you can upload files to an Azure Blob storage account using Power Automate. There are of course other ways on how to do this but the great thing here is that you can easily upload large files and add more actions to your Power Automate Desktop Flow. If you have any questions, feel free to leave a comment below.
by Contributed | May 5, 2021 | Technology
This article is contributed. See the original author and article here.
Would not be cool to engage your Modern Workplace users with content appearing like in your favourite social network? In my latest community sample, I built an SPFx webpart to do so. Here is how I did it, but first, this is how it looks:
SharePoint stories webpart
What we need first, is a SharePoint list that will contain all the “story images”, with the author of that story, and some Text, if we want to show the “show more” option. This list will be something like this:
 SP List
Now it is time to code our SPFx webpart.
Before starting, for all the UI thing, I am using an existing open-source React component called “react-insta-stories”, that you can find in its GitHub repository. This component does most of the hard work with the image slide and so on. In its most simple way, the component just needs an array of images:
 react package
But you can also specify an array of Story objects, where a Story can have the following properties:
 Story object properties
Now that we know how to use the Stories component, the webpart functionality is quite easy. We just need to get the Stories information from the SharePoint list, and compose the proper Stories array.
As usual when developing SPFx webparts, the webpart itself, just loads a React component, passing the information that we need, in this case, for simplicity, I am passing the entire WebPartContext object, but try to avoid this practice, and only pass what you need.
This is the main code in the Render webpart method:
 SPFx Webpart render
Once in the main React component, we are calling the SharePoint REST API to get the sotries from the list. To do so, I am using the endpoint:
/_api/web/lists/GetByTitle('Stories')/RenderListDataAsStream
As this endpoint is given me the Image URL in the format that I need (but pretty sure you can do the same with other endpoints, or using the PnP JS library). The code to do so is:
 componentDidMount
The method “_getStoryFromListItem” will create a Story object for the “react-insta-stories” component, and here we have an interesting challenge. The Story object, has a Header property, aimed to render the Story author information, so you just provide the profile image, and a couple of texts for heading and subheading. Although we could get the Author profile image, username and email using Graph API, it is going to be much easier to make use of the MS Graph Toolkit library, and use the MGT Person component. In order to render the GMT Person component, we cannot use the Story Header property, however, the Story object allow us to specify a custom render function for the entire Story, and in that function, we can use the Person component. This is the relevant code to achieve it:
 Story custom render function
The storyRenderer function is the one responsible for rendering the Story, and there, we use the GMT Person component. As you can see in the code above, we also use a React High Order Component called WithSeeMore, this component is from the react-insta-stories library and is the way to load a specific text when the “See more” link is clicked in the Story. So, if the list item has the Content field filled, we set the “seeMore” property of the Story object. This property is again a function, so you can customize how the content is rendered.
And that´s all!… you can get the full code sample in the PnP GitHub repository
Cheers!

Recent Comments