by Contributed | Nov 7, 2021 | Technology
This article is contributed. See the original author and article here.
Intelligent video applications built using existing cameras or newer smart cameras, and edge gateways are at the core of a massive wave of innovation benefiting our customers.
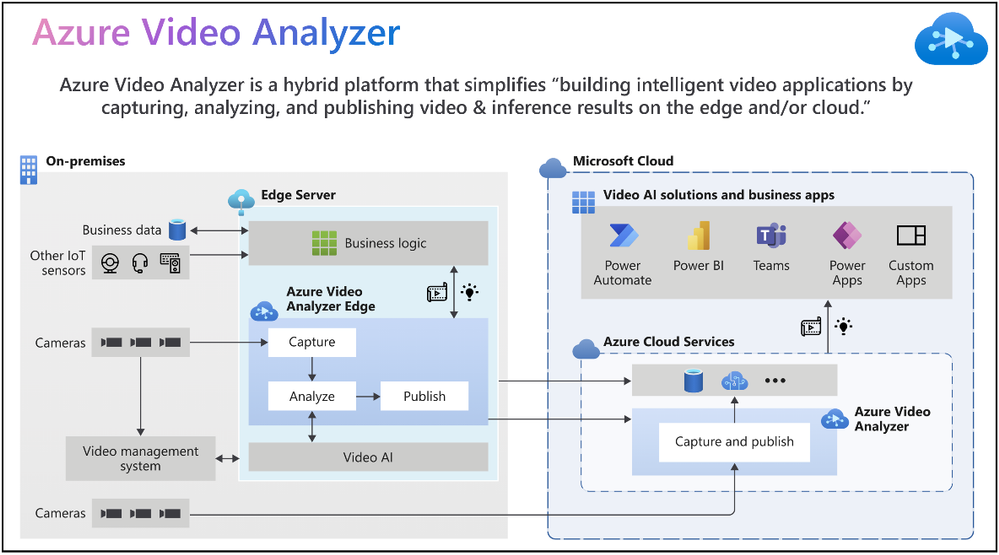
According to the IoT Signals report, the vast majority of companies with a video AI solution strategy see it as an integral part of their IoT solution. Yet, the reality is that building such a solution can be complicated. Azure Video Analyzer is an Azure Applied AI service that greatly reduces the effort needed to build intelligent video applications by capturing, analyzing, and publishing video & inference on the edge or the cloud.
“Vision and AI capabilities on edge devices are helping companies create companies create breakthrough applications,” said Moe Tanabian, Vice President, and General Manager of Azure Edge Devices, Platform & Services, Microsoft. With the latest updates to Azure Video Analyzer, we are making it easier than ever for our customers to build comprehensive AI-powered solutions with actionable insights from videos”
Figure 1: Azure Video Analyzer overview
New Azure Video Analyzer innovations available as of Microsoft Ignite 2021
Since its introduction earlier this year, Azure Video Analyzer capabilities have grown significantly to meet your needs. The Ignite 2021 (November) release provides you with the following new capabilities and enhancements:
- Cloud-native video management solutions
- Visualization of insights from intelligent video applications
- Windows devices optimized for Video AI
The following illustration provides an overview of both existing Azure Video Analyzer capabilities and the new capabilities made available for Ignite 2021.

Figure 2: Azure Video Analyzer capabilities
1. Cloud-native video management solutions
Video Surveillance as a Service (VSaaS) solutions have the convenience of ease of use coupled with the scalability and manageability of cloud computing, making them attractive to enterprises adopting cloud-native solutions. Such solutions offer the same benefits as other cloud services, such as managed infrastructure for IT teams, easy customization, and integration, and remote access from anywhere. Our customers can take advantage of the following features to achieve the desired outcome in these areas.
- Azure Video Analyzer enables you to build a VSaaS system to record, store, view, and export video clips from cameras. You can connect RTSP cameras directly to the cloud or via a lightweight gateway device for network isolation. There’s no need to be on-site to view footage and investigate issues; end users can simply log into a cloud-based dashboard via a web browser or mobile app and view the video stream in near real-time (~2 sec latency).

Figure 3: Camera to Azure Video Analyzer Cloud (with or without gateway)
- Azure Video Analyzer makes it effortless to create actionable events along with video clips that can be shared with relevant end users quickly & securely via the cloud. Customers are always in control of the video by defining access policies to meet regulatory requirements.
- Not every video needs to be processed in real-time at the edge or cloud. With the recent updates to the platform, customers can export a portion of the pre-recorded video stream. This enables scenarios related to long-term storage of relevant snippets, exported clips for AI model training, and video evidence management scenarios.

Figure 4: Azure Video Analyzer low latency video playback
“Safety, security and productivity are essential elements for the growth and sustainability of every society and business. Together Axis Communications and Azure Video Analyzer are empowering developers with the tools to rapidly build and deploy AI-powered solutions that improve operational agility, optimize business efficiency and enhance safety and security” Fredrik Nilsson, Vice President, Americas, Axis Communications
2. Visualization of insights from Intelligent video application
Visualization of AI inference data is necessary to make sense of data generated from Video AI systems. Customers need data visualization to detect anomalies or trends, and so on. With this objective in mind:
- You can use widget player npm (node package manager) to customize and readily embed into Power BI or other business intelligence systems or Power Apps or custom applications.
- It can be time-consuming to obtain coordinates required to build an intelligent video application (i.e., crossing line, zone). The video player widget also provides an easy tool to draw lines and zones.
- This release also marks a significant milestone in our innovations with Azure’s Computer Vision for spatial analysis. Customers can leverage new capabilities like tracking a person’s speed and ground orientation and display them with our widget player.
- During upcoming updates, we will enable customers
- To overlay lines/zones for easy visualization while viewing the video from the camera
- To define user attributes (i.e., vests, helmets, bags) and use them with the spatial analysis AI service.
These product investments in Azure Video Analyzer will enable you to visualize actionable insights quickly.

Figure 5: Azure Video Analyzer insights visualization
“We were impressed with the comprehensiveness of the Azure Video Analyzer to build out solutions quickly. The integrations between the Azure Video Analyzer and Scenera’s Platform as a Service will help our customers gain valuable business insights using the solution’s scene-based event analytics..” Andrew Wajs, CTO & Founder of Scenera
3. Windows devices optimized for Video analytics
Manageability of Windows devices and the necessity to run Linux-based containers are key drivers for our investments with “Edge For Linux On Windows” EFLOW. We now guide our developer ecosystem through the PowerShell experience of running EFLOW with Azure Video Analyzer to strengthen this commitment further.

Figure 6: Azure Video Analyzer + EFLOW powering inventory management solution
Finally, use the following resources to learn more about the overall product and services capabilities.
Please contact the Azure Video Analyzer product team at videoanalyzerhelp@microsoft.com for feedback and deeper engagement discussions.

by Contributed | Nov 6, 2021 | Technology
This article is contributed. See the original author and article here.
We recently announced the preview of Azure Private Link support for the Hyperscale (Citus) option in our Azure Database for PostgreSQL managed service.
Private Link enables you to create private endpoints for Hyperscale (Citus) nodes, which are exhibited as private IPs within your Virtual Network. Private Link essentially brings Hyperscale (Citus) inside your Virtual Network and allows you to have direct connectivity from your application to the managed database service.
With Private Link, communications between your Virtual Network and the Hyperscale (Citus) service travel over the Microsoft backbone network privately and securely, eliminating the need to expose the service to the public internet.
If you’re not familiar, Hyperscale (Citus) is an option in the Azure Database for PostgreSQL managed service that enables you to scale out your Postgres database horizontally. Hyperscale (Citus) leverages the Citus open source extension to Postgres, effectively transforming Postgres into a distributed database.
As with all the other Azure PaaS services that support Azure Private Link, the Private Link integration with Hyperscale (Citus) in our PostgreSQL managed service implements the same battle-tested Azure Private Link technology, provides the same consistent experiences, and has the following features:
- Private access from Virtual Network resources, peered networks, and on-premise networks.
- In-built data exfiltration protection for Azure resources.
- Predictable private IP addresses for PaaS resources.
- Consistent and unified experience across PaaS services.
To learn more about Private Link technology and PaaS services that support Private Link functionality, you can review the general Azure Private Link documentation.
 Figure 1: Architecture diagram depicting the secure and private connectivity to Hyperscale (Citus) in the Azure Database for PostgreSQL managed service—when using Private Link
In this “how to” blog post about the Private Link preview1 for Hyperscale (Citus), you can learn how to bring your Hyperscale (Citus) server groups inside your Virtual Network, by creating and managing private endpoints on your server groups. You will also get to know some of the details to be aware of when using Private Link with Hyperscale (Citus).
Let’s take a walk through these 4 scenarios for using Azure Private Link with Hyperscale (Citus):
Prerequisites
Before you can create a Hyperscale (Citus) server group with a private endpoint—or add a private endpoint for an existing Hyperscale (Citus) server group—you first need to setup a resource group and a virtual network with a subnet that has enough available private IPs:
- The resource group will hold your Hyperscale (Citus) server group.
- The virtual network is used to allocate private IPs for your private endpoints.
How to create a Hyperscale (Citus) server group with a Private Endpoint
As the database admin or owner, you can create a private endpoint on the coordinator node when you are provisioning a new Hyperscale (Citus) server group. For help on how to provision a Hyperscale (Citus) server group, take a look at this tutorial.
In the “Networking” tab (Figure 2 below), select by clicking the “Private access” radio button for the “Connectivity method”.
 Figure 2: Screen capture from the Azure portal showing the option to create a Hyperscale (Citus) server group with private access connectivity
A “Create private endpoint” screen will appear (Figure 3 below). If this screen doesn’t appear, or you close it accidentally, you can manually re-open it by clicking “+ Add private endpoint” in the “Networking” tab showing above.
 Figure 3: Screen capture from the Azure portal showing the “Create private endpoint” screen when “Private access” is selected as the connectivity method
Select appropriate resource group, location, name, and networking values for your private endpoint. If you are just experimenting with Citus on Azure, the default values should work for most cases.
Please pay special attention to the Networking configurations. The networking configurations specify the Virtual Network and Subnet for the private IP from which the new private endpoint will be allocated. For example, you need to make sure there are enough private IPs available in the selected subnet.
The rest of the steps are exactly the same as in the tutorial for creating a Hyperscale (Citus) server group.
How to add a Private Endpoint for an existing server group via the Networking blade
You can also create a private endpoint on a node in an existing Hyperscale (Citus) server group.
In fact, if you need to create a private endpoint on a worker node in a cluster, you must first create the database cluster and then subsequently add the private endpoint to the worker node.
There are two places you can do this, and the first place is through the “Networking” blade for the Hyperscale (Citus) server group.
1. Navigate to the “Networking” blade for the Hyperscale (Citus) server group (Figure 4 below), click “+ Add private endpoint”.
 Figure 4: Screen capture from the Azure portal showing the “+ Add Private Endpoint” button in the Networking blade for Hyperscale (Citus) in the Azure Database for PostgreSQL managed service
2. In the “Basics” tab (Figure 5 below), select the appropriate “Subscription”, “Resource group”, and “Region” information where you want your private endpoint to be created, and enter a meaningful “Name” for the private endpoint, e.g., you can use a naming convention like “ServerGroupName-NodeName-pe”. Select “Next: Resource >”.
 Figure 5: Screen capture from the Azure portal showing the “Basics” tab for the “Create a private endpoint” flow
3. In the “Resource” tab in the screenshot below (Figure 6 below), choose the target node of the Hyperscale (Citus) server group. Generally, “coordinator” is the desired node unless you have reasons to access to the Hyperscale (Citus) worker nodes. (If you need private endpoints for all the worker nodes, you will need to repeat this process for all target sub-resources). Select “Next: Configuration >”.
 Figure 6: Screen capture from the Azure portal showing the “Resource” tab for the “Create a private endpoint” flow
4. In the “Configuration” tab below (Figure 7 below), choose the “Virtual network” and “Subnet” from where the private IP for the private endpoint will be allocated.
It’s not required, but highly recommended to create all your private endpoints for the same Hyperscale (Citus) server group using the same Virtual Network / Subnet.
Select the “Yes” radio button next to “Integration with private DNS zone” to have private DNS integration.
 Figure 7: Screen capture from the Azure portal showing the “Configuration” tab for the “Create a private endpoint” flow
5. Finish the rest of the steps by adding any tags you want, reviewing the settings and selecting “Create” to create the private endpoint.
How to add a Private Endpoint for an existing server group via Private Endpoint resource creation
If you need to create private endpoints for more than one Hyperscale (Citus) server group—or for multiple Azure managed services, perhaps you also manage other databases besides Postgres—you can choose to create a private endpoint using the generic private endpoint creation process provided by the Azure Networking team.
You might also want to use generic private endpoint resource creation if you don’t have access to the Hyperscale (Citus) server group, e.g., you are network admin instead of database admin, or you need to create a private endpoint to a database in another subscription you don’t have access to.
1. From the home page of Azure portal, select the “Create a resource” button and search for “Private Endpoint”. Click “Create” button (Figure 8 below) to start creating a private endpoint.
 Figure 8: Screen capture from the Azure portal showing the “Create” page for “Create a resource” of Private Endpoint
2. All the rest of the steps should be the same as illustrated in the section above, except for the “Resource” tab step (Figure 9 below).
For the “Resource” tab step, you will need to select the “Connection method” based on your permission to the Hyperscale (Citus) server group on which you want to create a private endpoint. You can learn more in the “Access to a private link resource using approval workflow” docs.
- “Connect to an Azure resource in my directory”: if you own or have access to the Hyperscale (Citus) server group (e.g., you are the server group admin), you can choose “Connect to an Azure resource in my directory”. For the “Resource Type” field, please select “Microsoft.DBforPostgreSQL/serverGroupsv2” from the dropdown; for the “Resource” field, you can browse to find the server group on which you want to create a private endpoint.
- “Connect to an Azure resource by resource ID or alias”: if you don’t own or don’t have access to the Hyperscale (Citus) server group, you will need to choose “Connect to an Azure resource by resource ID or alias.” Please obtain the resource ID for the Hyperscale (Citus) server group from the Hyperscale (Citus) server group owner.
 Figure 9: Screen capture from the Azure portal showing the “Resource” tab for the “Create a private endpoint” flow when you are using Private Endpoint resource creation
How to manage a Private Endpoint Connection
As mentioned above, there are different connection and approval methods based on your permission on the Hyperscale (Citus) server group.
- Automatic approval: the private endpoint connection will be approved automatically if you own or have permission on the server group.
- Manual approval: the private endpoint connection request will go through the manual-approve workflow, if you don’t have the permission required and would like to connect to the server group.
As the Hyperscale (Citus) server group owner or admin, you can manage all the private endpoint connections created on your server group.
- Pending connections: if the “Connection state” for a private endpoint connection is “Pending”, you will be able to “Approve”, “Reject”, or “Remove” the connection.
- Approved connections: if the “Connection state” for a private endpoint connection is “Approved”, you will be able to “Reject” or “Remove” the connection.
Just like adding a Private Endpoint for an existing server group, there are two places you as the Hyperscale (Citus) server group admin can manage the private endpoint connections.
The 1st place is again using the Hyperscale (Citus) server group’s “Networking” blade (Figure 10 below).
 Figure 10: Screen capture from the Azure portal showing management options for a Private Endpoint Connection in the Networking blade for Hyperscale (Citus) in the Azure Database for PostgreSQL managed service
The 2nd place you can manage the private endpoint connections is the “Private Link Center”. Search “Private Link” services from the Azure portal, and you will be navigated to the “Private Link Center”.
1. The “Pending connections” blade (Figure 11 below) in the “Private Link Center” lists all the private endpoints that are in “Pending” state. You can filter based on “Subscription”, “Name”, and “Resource Type” to the private endpoints you want to manage.
 Figure 11: Screen capture from the Azure portal showing all “Pending connections” in the “Private Link Center”
2. The “Private endpoints” blade (Figure 12 below) in the “Private Link Center” lists all the private endpoints in all connection state. Again, you can filter based on “Subscription”, “Name”, and “Resource Type” to the private endpoints you want to manage.
 Figure 12: Screen capture from the Azure portal showing all “Private endpoints” in the “Private Link Center”
Private Link is now in preview for Hyperscale (Citus) in our PostgreSQL managed service
With the preview of the Azure Private Link for Hyperscale (Citus), you are now empowered to bring your Hyperscale (Citus) server groups—new or existing—into your private Virtual Network space. You can create and manage private endpoints for any of or all the Hyperscale (Citus) database nodes.
If you want to learn more about using Hyperscale (Citus) to shard Postgres on Azure, you can:
Your feedback and questions are welcome. You can always reach out to our team of Postgres experts at Ask Azure DB for PostgreSQL.
Footnotes
At the time of publication, Private Link is in preview in many Hyperscale (Citus) regions and will be rolling out to the rest of the Hyperscale (Citus) in the upcoming months.
by Contributed | Nov 5, 2021 | Technology
This article is contributed. See the original author and article here.
The recent shift to hybrid and remote work is changing the way organizations manage enterprise devices. Many organizations are moving to modern cloud management solutions. IT Pros tell us that most have become familiar with the Windows servicing model and the deployment of regular feature updates and are using – or planning to use – Windows Update for Business to automate updates. We also hear that application compatibility is less of a concern for most organizations as it was when Windows 10 was introduced.
We’re working to make Windows update readiness insights more accessible with the goal to provide you with the insights you need to confidently deploy Windows without adding any unnecessary complexity. To align our investments with this goal and the shift we have been seeing, we are announcing that we will retire Desktop Analytics on November 30, 2022. Over the next year, we will begin incorporating the types of insights found in Desktop Analytics directly into the Microsoft Endpoint Manager admin center, making them available for PCs that are managed via Intune-only, co-managed, and Configuration Manager with tenant attach.
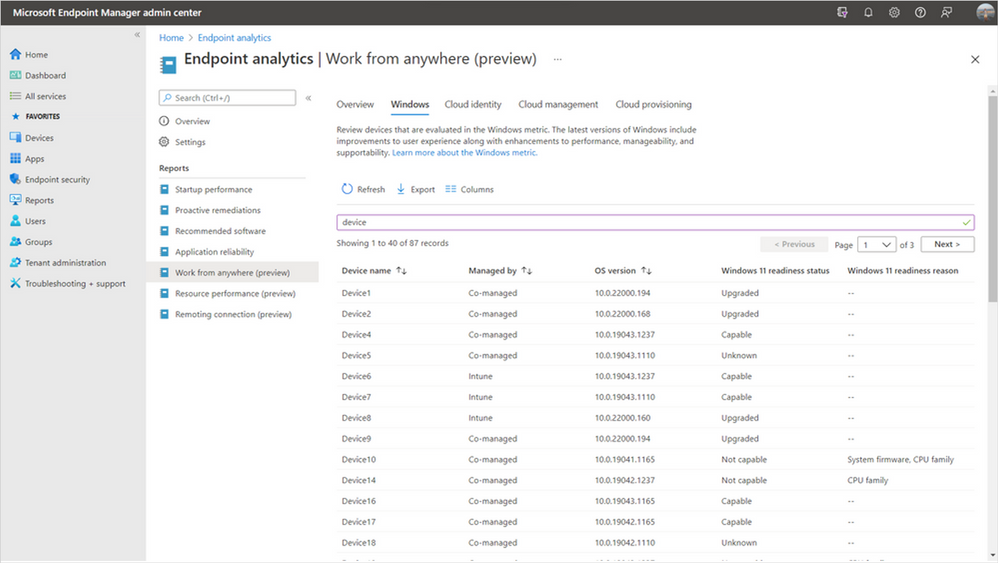
We have already started this work with the addition of Windows 11 hardware readiness insights in Endpoint analytics as a part of Microsoft Endpoint Manager. These insights help you quickly determine which of your managed PCs meet the minimum system requirements for Windows 11 and the top hardware blockers both at the device level and across your organization. By building these insights in Endpoint analytics, they’re now available for Intune-managed and co-managed devices, in addition to Configuration Manager devices with tenant attach enabled.
Device-level Windows 11 readiness details in Endpoint analytics
New Reports in Microsoft Endpoint Manager admin center
In the coming months, we’ll be releasing device-level upgrade and update readiness insights directly in the Reports node of the Microsoft Endpoint Manager admin center, giving you insights for all your Endpoint Manager-managed devices. These reports will tell you if any of your Windows devices have application or driver compatibility risks or Safeguard holds that will prevent an upgrade from Windows 10 to Windows 11 – or a feature update from one version of Windows to another. We will also show you the top compatibility risks across your organization making it easy to see which impact the largest number of devices so that you can prioritize fixes effectively.
We’ll be moving away from the workflow-based model of Desktop Analytics toward a data-first approach. Many IT Pros have provided feedback that the data in Desktop Analytics is what they find most valuable, but the tool comes with a steep learning curve before they can access the data. We’re looking forward to improving this by making compatibility insights simpler and more accessible without the need to manage another workload, while making them ready to use with modern Windows servicing tools.
Additional devices in scope
While the insights in our new reports will be similar to what was available in Desktop Analytics, our approach is evolving based on your feedback and years’ worth of learnings to make Windows updates easier than ever before. We’re committed to helping you adopt a modern management approach for your organization. By making Windows 10 and 11 insights available in the Microsoft Endpoint Manager admin center, they’ll soon be available for all MEM-managed PCs – including Intune-only, co-managed, and Configuration Manager with tenant attach.
Simplified Configuration Manager cloud attach story
This change also allows us to simplify your overall Configuration Manager cloud management strategy. Historically, there have been very similar, but separate processes for configuring Desktop Analytics and tenant attach which created additional overhead. With these new investments, you’ll no longer need to maintain separate configurations. Instead, simply tenant attach or co-manage your devices to take advantage of all the additional cloud-powered capabilities available to you in the cloud console.
Our application compatibility promise
Windows 11 continues Microsoft’s strong commitment to app compatibility. Our goal is to ensure that apps will work after an upgrade to Windows 11, with no changes required. In the years that our App Assure service has been working with organizations to help them resolve app compat issues, they have seen a 99.6% app compatibility rate. For organizations where application compatibility is still a concern, such as those with many highly specialized or custom line of business (LOB) applications, don’t worry! App Assure is ready to assist, and you can also use Test Base for Microsoft 365 to onboard and validate apps for Windows 11 in a Microsoft managed environment. For more information, see Microsoft extends application compatibility promise to Windows 11.
What should I do now?
We’ll have more information about our investments in this area over the next several months. In the meantime, there are several steps you can take today to prepare. First, ensure that your PCs are on a supported version of Windows 10. You’ll be able to leverage Desktop Analytics for Windows 10 feature updates until November 30, 2022. Next, if you’re using Configuration Manager, enable tenant attach and integrate your site with your Azure Active Directory (Azure AD) tenant. You’ll get several immediate benefits – such as access to the cloud console – and this will leave you well-positioned to benefit from our upgrade and update readiness insights as soon as they’re available.
After enabling tenant attach, or if you’re using Intune to manage PCs, onboard to Endpoint analytics to take advantage of Windows 11 hardware readiness insights. Understanding which managed devices meet the minimum system requirements is one of the first steps in planning for a Windows 11 upgrade.
We’re looking forward to helping you along your modern management journey and making it simple for you to upgrade to and manage Windows 11.
Continue the conversation. Find best practices. Visit the Windows Tech Community.
Stay informed. For the latest updates on new releases, tools, and resources, stay tuned to this blog and follow us @MSWindowsITPro on Twitter.
by Contributed | Nov 4, 2021 | Technology
This article is contributed. See the original author and article here.
The volume of security events continues to grow, and the scope and sophistication of attacks are increasing. We can define the known attack scenarios, but how about the emerging and unknown threats in your environment?
We are excited to announce that we are releasing an extended Fusion ML detection capability that can help you find the emerging and unknown threats in your environment by applying extended ML analysis and by correlating a broader scope of anomalous signals, while keeping the alert fatigue low.
This release includes:
- A new set of machine learning algorithms that detect emerging threat patterns automatically to stop attacks at an early stage.
- Extended source signal coverage for all the assets monitored by the SOC team in a Microsoft Sentinel workspace by supporting custom scheduled rules, out-of-the box anomalies, and additional Microsoft products.
- A new configuration UI that allows security analysts to configure source signals and to exclude specific detection patterns that may not be applicable to your environment from Fusion detection to further reduce alert fatigue.
The new set of machine learning algorithms
Available at no additional cost to Microsoft Sentinel customers, Fusion runs at cloud scale and processes billions of signals daily. Fusion uses multiple machine learning algorithms and a probabilistic kill-chain to correlate signals across multiple-clouds, on-premises, and at Edge, to identify sophisticated and novel multistage attacks.
With this extended capability, our ML detections can go beyond the known attack scenarios. The new set of Fusion ML algorithms constantly learn from existing attacks, apply analysis based on how the real security analysts think, and find the threats we have not seen previously from millions of anomalous behaviors and suspicious activities across the kill-chain in your environment to help you stay one step ahead of the attackers.
As you investigate and close Fusion incidents, we encourage you to provide feedback on whether this incident was a True Positive, or a False Positive. Your incident conclusions in Microsoft Sentinel are used as labels in Fusion ML algorithms. The more accurate the conclusion, the better efficacy you get from Fusion in your environment.
Extended detection coverage for your assets
Alerts from the custom scheduled analytics rules
In Microsoft Sentinel, security analysts build KQL-based scheduled rules to monitor the assets in their environment. Oftentimes while investigating an incident triggered by scheduled rule, a security analyst starts with a single alert, runs multiple queries to gather related alerts and anomalies, and then manually associate those alerts and activities with the kill-chain to form a complete picture and the attack path.
Fusion ML algorithms take care of the manual analysis and correlations, making it easy to find a needle in a haystack. Now that Fusion has extended the coverage to all the built-in and custom scheduled rules, the detections can reach every asset monitored by the SOC team in an enterprise, including signals from end points, network, and multi-clouds. With organization and domain knowledge encoded in the custom rules, Fusion can identify the sophisticated emerging threats that are specific to the customer environment.
Identify emerging threats with out-of-the-box anomalies
Rule-based detections are efficient for detecting known attacks, but they do not always adapt to new attack techniques and patterns. With the ML-based out-of-the-box anomalies and the new set of ML algorithms in this release, Fusion can identify novel attacks by associating unusual behaviors in the environment with the learning from known attack patterns, IoCs, past incidents, customer feedback and the Microsoft internal security labels.
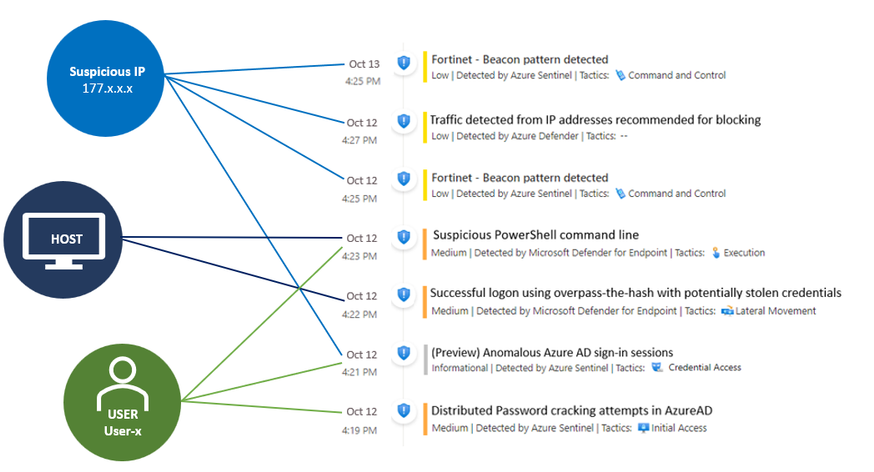
An example
The example below shows a possible attack started with initial access from the Cloud to end point execution, and then moved on to consistent beaconing from an internal IP address to a suspicious external one in roughly 24 hours. The Fusion ML algorithms detected this attack by correlating anomaly (Anomalous Azure AD sign-in sessions), as well as alerts from custom scheduled rules, Azure Defender, and Microsoft Defender for Endpoint.
Customizable data sources and results
The new Fusion configuration UI allows security analysts to fine tune the input and output of Fusion. You can specify the input source signals to define the scope monitored by Fusion and exclude specific detection patterns that may not be applicable to your environment from Fusion detection.

We encourage you to try out the new capabilities and let us know what you think – provide your feedback when you close an incident and share additional insights on your product experience through “Guides & Feedback” in Sentinel. Your feedback is critical to help us shape the product!
For more information:
by Contributed | Nov 3, 2021 | Technology
This article is contributed. See the original author and article here.
A first look at SQL Server 2022 — the latest Azure-enabled database and data integration innovations. See what it means for your hybrid workloads, including first-time bi-directional high availability and disaster recovery between Azure SQL Managed Instance and SQL Server, Azure Synapse Link integration with SQL for ETL free near real-time reporting and analytics over your operational data, and new next-generation built-in query intelligence with parameter sensitive plan optimization. Bob Ward, SQL engineering leader, joins Jeremy Chapman to share the focus on this round of updates.
QUICK LINKS:
00:38 — Overview of updates
02:19 — Disaster recovery
04:26 — Failover and restore example
06:16 — Azure Synapse integration
09:04 — Built-in query intelligence
10:19 — See it in action
12:52 — Wrap up
Link References:
Learn more about SQL Server 2022 at https://aka.ms/SQLServer2022
Apply to join our private preview, and try it out at https://aka.ms/EAPSignUp
Unfamiliar with Microsoft Mechanics?
We are Microsoft’s official video series for IT. You can watch and share valuable content and demos of current and upcoming tech from the people who build it at Microsoft.
Keep getting this insider knowledge, join us on social:
Video Transcript:
– Up next, we’re joined by SQL engineering leader Bob Ward, to tour the latest Azure-enabled database and data integration innovations with a first look at SQL Server 2022 and what it means for your hybrid workloads, including first-time, bi-directional high availability and disaster recovery between Azure SQL Managed Instance and SQL Server, Azure Synapse link integration with SQL for ETL-free, near real-time reporting and analytics over your operational data, and new, next-generation built-in query intelligence with parameter sensitive plan optimization. So Bob, it’s great to have you back on the show.
– I love being on the show, thanks for having me.
– So first, congrats to you and the team and big news today with the announcement of SQL Server 2022. What’s been the focus on this round of updates?
– So with every release we’re optimizing the core SQL engine to give you a consistent database experience from the cloud to on-premises, and even the Edge. As you know, most of the new innovations start in the cloud before coming to SQL Server. And this release really moves a ton of pain points in areas like disaster recovery, where for the first time you can do failover from SQL Server 2022 to Azure SQL Managed Instance in the regions you need. We’re also removing silos between your operational and analytic workloads. In the past, you’d have to ETL your operational data on a schedule to bring it into your analytics system in order to run analytics. That pain now goes away with Azure Synapse link integration for near real-time analytics and reporting. Additionally, you can now get visibility over your SQL Server data in the context of your entire data state with Azure Purview integration. Then for auditing scenarios, we’re introducing SQL Server Ledger, bringing the power of blockchain technology to verify changes by other parties, so that you can retain an immutable record of the data. And one of my favorites, we’re also bringing performance to the next level with built-in query intelligence, like parameter sensitive plan optimization that caches more than one plan for a stored procedure for consistent query performance.
– And these really seem like great updates, especially for hybrid data workloads. But this is Mechanics, though. So let’s unpack these capabilities a bit more and also see them in action.
– Sure, Jeremy, right. And as you saw, there’s a lot we can dig into with SQL Server 2022. So I’m really going to focus on my three favorites: disaster recovery, Azure Synapse integration, and built-in query intelligence.
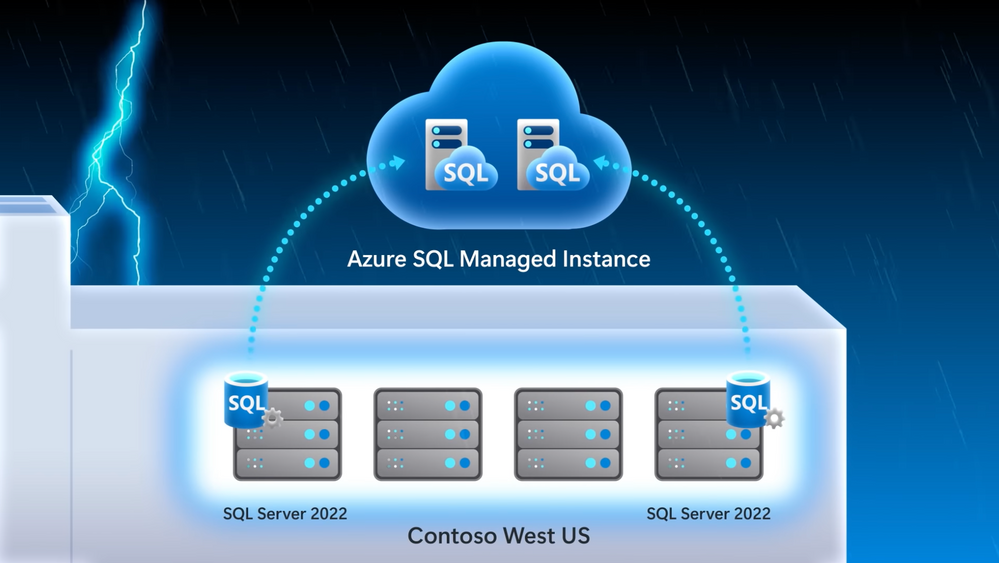
– All right, let’s do it. So starting with disaster recovery, I know this has been traditionally a pain point for people. Today they have to spin up an Azure virtual machine or another SQL on-premises server to failover to. It’s hard to set up everything and really get it all configured and running, though, right?
– That’s true. So now it’s super easy to set up disaster recovery as a managed service with Azure SQL Managed Instance configured for you as your disaster recovery site. In fact, we’ll look at our demo company example, Wide World Importers, who want to implement disaster recovery in an easy way, especially for the email marketing campaign. I’m in SQL Server Management Studio, or SSMS. I’ve connected to my SQL Server, and you can see the Wide World Importers database. We’ve run a query to look for people that have opted into email comms. And you can see five subscribers that have opted in. In this case, I’ve already attached our Azure SQL Managed Instance to our SQL Server. All I had to do was right click the server, go to Azure SQL Managed Instance link and attach my database to the cloud. And by the way, if you’re setting this up for the first time, it will ask you to log into your Azure subscription and choose your target managed instance, and it will seed your database into the managed instance. Next, you can see an availability group and distributed availability group that was deployed and configured for me automatically. And since we’re linked to Azure SQL Managed Instance, we can also view it in the Azure portal. Now, not only is it easier to configure, but because this is a managed service, you no longer have to manage and maintain your DR infrastructure. So now with everything running, I’ll go back into SSMS and we can start to run queries against the managed instance as a read-only endpoint. I’ll set my screen up so SQL Server is in the middle and Azure SQL Managed Instance is on the right. Now, I’ll run the same query to see who’s opted in for emails. And in the results we’ll see that it’s a read-only database, and the same results that we see in SQL Server. And just to show you how quickly everything replicates, we can go back to SQL Server and insert a new subscriber, Isabella Rupp, and now I’ll run the initial query again, and we can see the results reflected in Managed Instance.
– Of course, what you just showed was a great side benefit for read replica. But that said, the main reason why we set this up was for failover. So what does the process then look like to move the active instance then to Azure SQL Managed Instance?
– That’s right, Jeremy. So now let’s take the example of an outage or a hardware upgrade where we need to failover. This time, I’ll navigate to migrate database to the cloud to initiate the failover. That takes me to a wizard to step me through the process. First, I have to sign into Azure and connect to the managed instance I want the failover to. Once I’m connected in cut-over type, I can choose planned or forced to failover. I’ll choose planned because I want to synchronize SQL Server with managed instance one last time before the failover. We’ll skip through our cleanup and summary. And when I click finish, we can monitor the steps. Now this can kind of take a few moments. Once the failover is complete, we can connect to the Azure SQL Managed Instance and add a new subscriber, in this case, Mandy Smith. We can now use managed instance for read and write workloads, whereas before it was read only. You can see from the result that a new row has been inserted.
– That’s great, the read and write capabilities make this pretty useful. Now everything’s up in the cloud, but can you restore everything then back to your SQL Server on prem?
– Jeremy, can you believe this? That’s the great thing. With SQL Server 2022 for the first time ever, you can restore a versionless Azure SQL Managed Instance database back to SQL Server. I’m going to back up the Wide World Importers managed instance database to an Azure blob storage account, using the backup URL. And now if I switch over to SQL Server 2022, I can use good old T-SQL to restore the backup file to my local SQL Server. I’ll give it a new name, like WideWorldImporters_back, so we don’t get confused. Now, when I refresh, I can see the new database has been restored. We can then query the stored database and confirm the new subscriber Mandy Smith was added, and there they are.
– So now disaster recovery is truly hybrid, but why don’t we move on to our next major update with Synapse Link, where SQL Server, now like Cosmos DB and Dataverse, can also be integrated with Azure Synapse.
– This makes a huge difference, by the way; as I mentioned, removing the need for ETL to run analytics over your operational data. So let’s go back to our Wide World Importers example. They’re using Azure Synapse Link with SQL Server to track their fleet of trucks, ETL free. Their trucks have onboard IoT sensors to track engine telemetry with time series data logs sent to Azure Data Lake. And anytime a truck loads or unloads, the onboard cargo data is updated to our SQL Server. As all of this is happening, their business analysts can connect to the analytical data in near real-time and use Power BI to track vehicle location and onboard cargo. Additionally, their data scientists can use the vehicle telemetry data with spark pools to train machine learning models to get ahead of potential issues in each truck that could affect the delivery of goods. Let me show you how this works. Starting in my Synapse workspace, you can see that I’ve established the Synapse Link relationship between the SQL pool in Synapse and my SQL Server. I’ve also already linked the specific tables that I want to link with Synapse. I could add more tables using the plus new here, but for now stick with my two vehicle tables.
– Cool, so now everything is wired up between your SQL Server and Synapse, but what else can you do now that your data is in Synapse?
– Yeah, so Azure Synapse opens up limitless data analytics, and with Synapse Link enabled, this lets me pull out insights in near real time. Now I’m back in my Synapse workspace and here are my two vehicle tables. Just to prove the data’s in sync, I’ll just run a basic top 100 rows query and you’ll see it returns almost instantly. And it gets better, because Power BI visualization is built in to the Synapse workspace, I can quickly visualize my data. And this vehicle data is tracking inventory, or cargo, on our trucks. In Power BI, all of these colored dots here in Texas represent our trucks with their location, and the diameter of each dot indicates the amount of cargo in each. And you can now see they’re all pretty similar. I’m back in SSMS and we just bought a new truck in Dallas and we finished loading our truck in Waco with more cargo. So I’ll write these updates to my SQL Server first. And because this is all linked for near real-time analytics in Synapse, if I head back to my Power BI report in my workspace and refresh it, you’ll see our new truck in Dallas with this green dot here and our Waco truck’s blue dot is larger to reflect all of its added cargo. Additionally, because the IoT devices on our trucks are logging up to our data lake and we’re an Azure Synapse, our data scientists can also build machine learning models using built-in spark pools to detect data anomalies that might put our shipments at risk, as you can see in this notebook.
– And this is really a great example of hybrid HTAP for SQL Server and really rounds out our hybrid updates. Now for all of our hardcore SQL fans who are watching, why don’t we go deeper on the changes that we made to the SQL engine itself?
– Jeremy, I’ve got to say as a longtime SQL professional, the built-in query intelligence is a game changer. It really ensures consistent performance without any code changes. For example, when you run a stored procedure, there are two types of plans possible depending on the amount of data that SQL needs to process and the parameter value pass to the stored procedure. An index seek is great for queries that return a small number of rows and an index scan is great if your query is going to return a lot more data. SQL will choose the best plan based on the scenario. That said, only the first planned run can be cached for the stored procedure. This plan will remain cached unless something evicts it from memory. So if you are the second person to run the store procedure and you need an index seat, but an index scan is in the cache, you were stuck with that plan, which usually means it takes longer to run your query. This problem is commonly known as parameter sniffing. So now instead of constantly tuning your queries, built-in query intelligence takes care of that for you. Instead of one cached plan per store procedure with parameter sensitive plan optimization, SQL can now cache multiple plans against the same stored procedure as multiple queries are run against it.
– It sounds good, but can we see it in action?
– Sure. In this example, I have a database that hosts real estate property listings with agent details in a single table. You can see here in SSMS in these two query windows, the one in the middle is best used with a seek, and the one on the right is best used with a scan. Let’s see an example of these queries in action, simulating a workload of many users. I’ll use Perfmon to track resource usage per CPU and batch requests per second, which is a common way to look at SQL query throughput. Now I’ll use the popular free tool, OStress, to run a workload for the first parameter, which uses an index seek. In fact, this is the script I’ll be running to execute the stored procedure. In Perfmon, we see a healthy use of CPU and a high throughput. You can see the workload only took a few seconds to run. Now let’s run the other workload to simulate a planned cache eviction, and an execution of the query that is best served by index scan. And while that runs, here’s my script. And you can see the first lines evicting the cache plan. Once that happens, and the second line runs, the new scan plan has taken over in cache. So let’s flip back to run our first query in this top window, which runs faster using a seek plan. But now in Perfmon, you’ll see a massive performance degradation compared to the first time we ran it. That’s because it’s forced to use the scan plan from cache. As you’ll remember, with the seek it took just like three seconds. We’re already way past that, so I’m going to cancel this. I’m going to fix this with SQL Server 2022. I don’t need to change any code, though. I’ll just enable DB compat 160, which is the new compat level for SQL Server 2022. Now I’m going to run the same commands to simulate planned cache eviction with the workload that requires a scan, like I did before, just to ensure the scan plan is cached. That’ll run for a few seconds. And normally, that would have crippled the query that prefers the seek plan. Let’s see if it’s still the case. I’ll run the query that prefers a seek plan again. You see it wasn’t slowed down. There was no performance degradation, because both plans were cached. I’m going to prove it. Let’s look behind the scenes using query store. You can see that now I have two plans for the same query statement with the same stored procedure. First, let’s look at the seek plan and then we’ll open up and look at the scan plan. Now each plan can provide the best performance for the same stored procedure based on what the parameter value needs. And the nice thing about these changes at the engine level is that SQL Server and Azure SQL, at this database compatibility level, all benefit from parameter sensitive plan optimization.
– Awesome, it’s so great to see all the updates, and really how they accrue to SQL, no matter where you’re running it. So how do you recommend people get started?
– You can learn more about SQL Server 2022 at aka.ms/SQLServer2022. And if you want to try it out, you can apply to join our private preview at aka.ms/EAPSignUp.
– Thanks Bob and of course, keep checking back to Microsoft Mechanics for all the latest updates. And be sure to subscribe to our channel if you haven’t already. And thanks for watching.

Recent Comments