by Scott Muniz | Aug 19, 2020 | Azure, Microsoft, Technology, Uncategorized
This article is contributed. See the original author and article here.
A fully automated DevOps deployment of CMS WordPress on Azure App Services in a Linux Multi-Container. Setup with services like: App Service, Azure MySQL, Redis Cache (in a container), Azure CDN, Azure Storage and Key Vault (to store the mysqluser password).
The Github repository: https://github.com/pascalvanderheiden/multi-container-wordpress-azure
The multi-container setup is used to host WordPress and Redis Cache in one App Service. This DevOps project is inspired on this tutorial: https://docs.microsoft.com/en-us/azure/app-service/containers/tutorial-multi-container-app
The Docker Compose YML’s are based on these samples: https://github.com/Azure-Samples/multicontainerwordpress
Step by Step installation
Step 1: In the Azure Portal create a Service Principal
In the Azure Cloud Shell (https://shell.azure.com:(
- az ad sp create-for-rbac –name [your-service-principal-name]
Copy the JSON Output! We’ll be needing this information to create the service connection in Azure DevOps.
Step 2: Generate your Azure DevOps Project for Continuous Integration & Deployment with the Azure DevOps Generator
Step 3: In Azure DevOps, create a service connection
- Login with your account Azure DevOps. Go to the Project Settings of the DevOps Project you’ve created in step 2.
- Go to Service Connections*.
- Create a service connection, choose Azure Resource Manager, next.
- Select Service Principal Authentication. Choose the correct Subscription first, then click the link at the bottom: “use the full version of the service connection dialog.”.
- Enter a name for your Service Principal and copy the appId from step 1 in “Service principal client ID” and the password from step 1 in “Service principal key”. And Verify the connection.
- Tick “Allow all pipelines to use this connection.”. OK.
Step 4: In Azure DevOps, update the Variables Group
- Go to Pipelines, Library. Click on the Variable group “Shared Resources”.
- Tick “Allow access to all pipelines.
- Update the variables to match your naming conventions needs. You can leave the Storage Account and CDN empty if you don’t want to use these services. Keep in mind to pick unique naming for exposed services.
- The variable “KVMYSQLPWD” is NOT the MySQL password, but the naming tag in Key Vault for the MySQL password. Leave that as it is: “mysqladminpwd”.
- The variable “MYSQLUSER” cannot be longer than 16 characters.
- Don’t forget to save.
Step 5: In Azure DevOps, update the Build pipeline and Run it
- Go to Pipelines, Pipelines.
- Select “Build Multi-container WordPress on Azure-CI”, Edit.
- In Tasks, select the Tasks which have the explaination mark “Some settings need attention”, and update Azure Subscription to your Service Principal Connection.
- In Variables, update the variables to match your naming conventions needs. In my case I give the App Service Plan and the Resource Group of the Web App a more “generic” name. I want to re-use the App Service Plan for more websites, therefor all websites need to be deployed in the same Resource Group as the App Service plan. Keep in mind to pick unique naming for exposed services.
- Save & queue.
- Click the Agent Job to check the progress. Check if everything is create correctly, because of the unique naming for some services. And because it’s fun :)
- Keep in mind that the CLI scripts will check if the resource is already created, before creating. You can deploy using ARM Templates as well. I choose a bash script, because you are free to use whatever you prefer, right?!
Step 6: In Azure DevOps, add the Key Vault secret to the variables.
- Go to Pipelines, Library. Add Variable group. Give it a name, something like “Key Vault Secrets”.
- Tick “Allow access to all pipelines.
- Tick “Link secrets from an Azure key vault as variables”.
- Update the Azure Subscription to your Service Principal Connection.
- Select the Key vault name. If your build pipeline ran succesfully, you can select your Key vault. Add variables, and it will popup with the secret we’ve created earlier “mysqladminpwd”. Select it, OK. And Save.
Step 7: In Azure DevOps, update the Release pipeline and Run it.
- Go to Pipelines, Releases. Note. Because I’ve enabled continuous deployment in my template, there is a failed release there already. You can ignore that, because we are going to fix the release in the step.
- Select “Release Multi-container WordPress on Azure-CD”, Edit.
- In Tasks, select the Tasks which have the explaination mark “Some settings need attention”, and update Azure Subscription to your Service Principal Connection.
- In Variables, update the variables to match the naming you used in the Build pipeline. The WPDBHOST you can leave empty, because it will be updated in the pipeline.
- In Variables groups, link the “Key Vault Secrets” variable group, by clicking the Link button.
- The TARGET_YML will need to point to the yaml configuration files in repo. This will determine how the App Service is configured. In the DevOps project the TARGET_YML is default set to “docker-compose-mc-wordpress-storage.yml”, which is the most complete config. For inspiration and learning I’ve included 4 configs:
- compose-wordpress.yml (sample multi-container setup with redis, using local (not persistent) storage)
- docker-compose-wordpress.yml (sample multi-container setup with MySQL, using local (not persistent) storage)
- docker-compose-mc-wordpress-storage.yml (multi-container setup with redis, using Azure Storage for wp-content folder)
- docker-compose-mc-wordpress.yml (multi-container setup with redis, using Azure App Service as persistent storage)
- The first 2 yaml’s are more inspirational, the last 2 I would use for my deployment, because persistent storage is a must! Keep in mind that it would be illogical to use the last yaml file, and configure Azure Storage. Just leave the variable empty to skip this installation.
- Save & Create Release.
Step 8: Go to your websites
You need to run the website url one time, to trigger the compose script to download the WordPress image to the persistent storage location. This will take a 2-3 minutes to download.
Redis Object Cache Plugin in WordPress
- In WordPress, the plugin “Redis Object Cache” is already pre-installed on the this image.
- Go to Plugins and Enable the plugin.
CDN Plugin in WordPress
- In WordPress, install the plugin “CDN Enabler”. Or, when you have the wp-content folder mounted in Azure Storage, decompress the plugin from the wordpress-plugins folder in this repo and copy it into the “Plugins” folder using Azure Storage Explorer.
- Go to Plugins and Enable the plugin. Change the settings of the plugin and point it to the CDN Endpoint you’ve created earlier.
- Go to Azure, to your CDN Endpoint, and trigger a purge all to refresh. I’ve included a bash script in the deploy folder to trigger the purge in bash.
by Scott Muniz | Aug 19, 2020 | Azure, Microsoft, Technology, Uncategorized
This article is contributed. See the original author and article here.
Introduction
During the migration journey from SQL Server to Azure SQL Database or Managed Instance, the customers I meet often wondering how to deal with the Integrated Authentication, their applications, especially the legacy ones.
The following tutorial will help you to create a small sandbox based on an Azure SQL Database, an Azure Active Directory synchronized with an OnPremise Active Directory.
This tutorial is, of course, for testing/learning purpose only and is not intended to be used in production or any other environment.
Note that we’ll mainly use the Azure portal, but all of the following actions can be done using Powershell.
Subscriptions
In this example, we’ll use a MSDN subscription, providing an Azure Active Directory Free license. If using a different subscription, ensure that you’ll have sufficient administration rights at the Azure Active Directory level.
If you don’t have a subscription, you can create a free account here
Provisioning Resources
We’ll start by creating the resources required for this sandbox:
1 Windows Server Virtual Machine, playing the role of a Domain Controller
1 Windows Server Virtual Machine, playing the role of an application host
1 Azure SQL Database
To start log on : https://portal.azure.com
Domain Controller
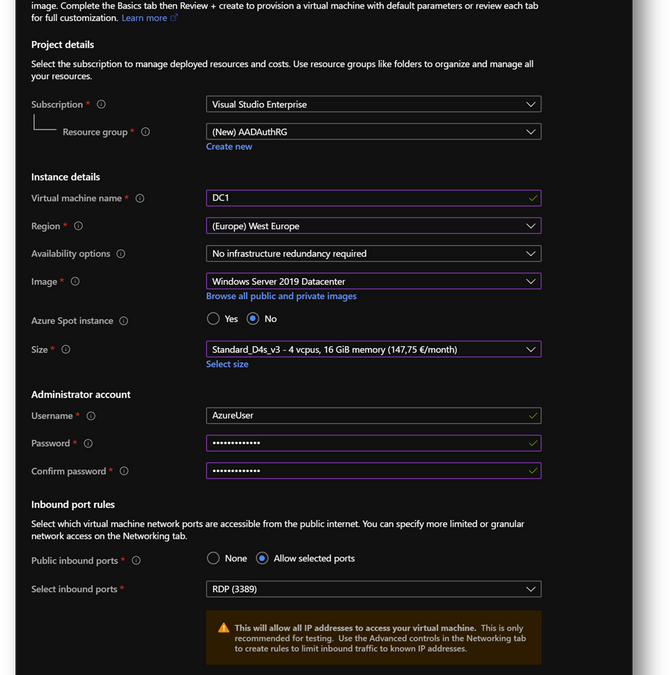
- Create a new virtual machine DC1. Then move to the [Networking] pane. (link)

- No modification required on the [Networking] pane.

- Click on [Review and Create] and then click on [Create]

|
Summary
|
|
Resource Group
|
AADAuthRG
|
|
Virtual Machine Name
|
DC1
|
|
Virtual Machine Size
|
Standard D4s v3
|
|
Vnet Name
|
AADAuthRG-vnet
|
|
Subnet
|
10.0.0.0/24
|
|
Private IP address*
|
10.0.0.4
|
|
Local Administrator
|
AzureUser
|
|
Local Administrator Password
|
Strong Password required
|
*The private IP should be the same. If not, keep yours in mind as it will be required at a later stage.
NB: To find the private IP address of DC1, select your virtual machine and go the [Overview] blade.

Application Host
- Create a new virtual machine Client1 in the same resource group AADAuthRG

- On the [Networking] pane, use the already created virtual network AADAuthRG-vnet

- Click on [Review and Create] and then click on [Create]
|
Summary
|
|
Resource Group
|
AADAuthRG
|
|
Virtual Machine Name
|
Client1
|
|
Virtual Machine Size
|
Standard E2s v3
|
|
Vnet Name
|
AADAuthRG-vnet
|
|
Subnet
|
10.0.0.0/24
|
|
Private IP address*
|
10.0.0.5
|
|
Local Administrator
|
AzureUser
|
|
Local Administrator Password
|
Strong Password required
|
*The private IP may be different. Keep yours in mind as it will be required at a later stage.
- Once Client1 created, select it, go to the [Networking] pane and click on the [Network Interface]

- Click on the [DNS servers] blade, select [Custom] and add the DC1 private IP address. [Save].

- Restart Client1 or connect and execute “ipconfig /renew” in a Command Prompt
Azure SQL Database
We will use an Azure SQL Database (link) but you can use an Azure SQL Managed Instance (link) instead. The provisioning duration will be longer.
- Create a new Azure SQL Database AdventureWorksLT in the same resource group AADAuthRG

- You’ll be asked to create a new server

- On the [Networking] pane
- Select [Public Endpoint]
- Set [Allow Azure services and resources to access this server] to ON
- Set [Add current client IP address] to ON, if you want to access the server from your current computer

- On the [Additional settings] pane, set [Use existing data] to [Sample Data]

- Click [Review and create] and then [Create]
|
Summary
|
|
Resource Group
|
AADAuthRG
|
|
Azure SQL Database server name
|
sqlaadauthsrv
|
|
Azure SQL Database name
|
Standard E2s v3
|
|
Service tier
|
DTU-based – Basic
|
|
Connectivity Method
|
Public Endpoint
|
|
Allow Azure services and resources to access this server
|
On
|
|
Add current client IP address
|
On
|
|
Azure SQL Database server Administrator
|
AzureUser
|
|
Azure SQL Database server Administrator Password
|
Strong Password required
|
Azure Active Directory administrator

- Click on [New User] and name it

- In the [Roles] menu, select [Global administrator]


Configuration
Configure the Domain Controller
To start, we need to install the Active Directory Domain Services feature. Connect to the DC1 Virtual Machine, start a Windows Powershell session and execute the following command:
Install-WindowsFeature -Name AD-Domain-Services -IncludeManagementTools
You should have a Success exit code.
Once done, DC1 must be promoted to domain controller. To do so, start ServerManager

- Click on the flag and then click on [Promote this server to a domain controller]

- Add a new forest. As the domain needs to be verified to be used with Azure Active Directory, we will use the domain already provided within AAD.
- You can also use a custom domain, but this way, we won’t have to create a new TXT or MX record at the domain registrar.

- On the Azure portal, go to [Azure Active Directory] blade, then [Overview]. You’ll find the Primary domain name. Copy it.

- Paste the primary domain name as the [Root domain name]

- Set a strong password and click [Next] until you reach the [Prerequisites Check]

- Click on [Install]

- You can also use this Powershell script
Import-Module ADDSDeployment

Install-ADDSForest `
-CreateDnsDelegation:$false `
-DatabasePath "C:windowsNTDS" `
-DomainMode "WinThreshold" `
-DomainName "***outlook.onmicrosoft.com" `
-DomainNetbiosName "***OUTLOOK" `
-ForestMode "WinThreshold" `
-InstallDns:$true `
-LogPath "C:windowsNTDS" `
-NoRebootOnCompletion:$false `
-SysvolPath "C:windowsSYSVOL" `
-Force:$true
DC1 will restart and you’ll be disconnected. Wait a minute and reconnect.
- [Windows + R] and type “dsa.msc”

- We will now create a domain administrator. Click right on the [Users] folder in your domain and select New User

- Create a user adadmin


- Add this account to the [Domain Admins] group

- We will need at a later stage a synchronizaiton account. We’ll create adsyncuser now

- We will also create a new Security Group containing the applicative account(s).
- Click right on [Users] and select New –> Group and name it MyUsers


- Then create a new user appuser, this account will be used next on the Client1 server.

- Add appuser to the MyUser group


Configure the Applicative host
- Connect to the Client1 virtual machine
- Go to the Control Panel –> System and Security –> System. Click on [Change Settings], then [Change]

- Select [Domain] and enter your domain name

- Use the previously created credentials.

- You’ll be prompt to restart. Click on [Restart later]
- Still in Control Panel –> System and Security –> System, Click on [Remote Settings]

- Click on [Select Users]

- Add the [Domain Users] group

Install ADConnect
- Download ADConnect and install it on DC1. It will start automatically. (More details)
- Installing Azure AD Connect on a Domain Controller is not recommended due to security practices and more restrictive settings that can prevent Azure AD Connect from installing correctly. (Link)
- Check [I Agree to the license terms and privacy policy] and click on [Next]

- Click on [Customize], then [Install]


- Select [Password Hash Synchronization]
- Check [Enable single sign-on] and click on [Next]

- Connect with your Azure Active Directory global administrator aadadmin.

- Click on [Add directory] to connect your directory

- Select [Use existing AD account], use the adsyncuser account and click on [OK]

- Click on [Next]

- Check [Continue without matching all UPN suffixes to verified domain] and click on [Next]

- Select [Sync select domains and OUs] and check [Users] only. Click on [Next]

- Click on [Next]

- Select [Synchronize selected] and enter MyUsers. Click [Resolve], then [Next]

- Click on [Next]

- Click on [Next]. If prompted for Forest Credentials, use adadmin

- Verify [Start the synchronization process when configuration completes] is checked and click on [Install]

- Click on [Exit]

- On the Azure portal, you should now see your appuser in your Azure Active Directory

- Check Seamless Single Sign-on is enable on your forest. To do it, click on the [Azure AD Connect] blade in your Azure Active Directory

- If Seamless Single Sign-on is disable, enable it using the following procedure.
https://docs.microsoft.com/en-us/azure/active-directory/hybrid/tshoot-connect-sso#manual-reset-of-the-feature
Add a GPO
To enable Seamless Single Sign-on, we’ll use a GPO to modify some settings
- On DC1, [Windows + R] and type “gpmc.msc”

- Click right on your domain and select [Create a GPO in this domain, and Link it here…]

- Name it Seamless SSO

- Edit the Seamless SSO GPO

- Go to “User ConfigurationPoliciesAdministrative TemplatesWindows Componentslnternet Explorerlnternet Control PanelSecurity Page” and open “Site to Zone Assignment List”

- Select [Enabled] and click on [Show]

- Enter the following records and click on [OK]

- Then go to “User TemplatesWindows Componentslnternet Explorerlnternet Control PanelSecurity Pagelntranet Zone” and open “Allow updates to status bar via script”
- Select [Enabled] and click on [OK]

- Connect to Client1, launch a Command Prompt and type “gpudate /force”

Configure Azure SQL Database
We’ll now configure the Azure AD authentication with Azure SQL. (link)
- On the Azure portal, go to your Azure SQL Database server sqlaadauthsrv and click on [Active Directory admin] blade.

- Click on [Set admin] and select aadadmin. Then click on [Save]

Note: For this sanbox, I use aadadmin account, which is an AAD Global Administrator, to reduce the number of tasks. However, an account with less privileges should be used for a production environment or any other environment.
- Now, open SSMS and connect to your Azure SQL Database with your aadadmin user using “Azure Active Directory – Password” authentication method.
Only connections established with Active Directory accounts can create other Active Directory users

- Open a new query on AdventureWorksLT and create a database user for appuser
CREATE USER [appuser@***outlook.onmicrosoft.com] FROM EXTERNAL PROVIDER
EXEC sp_addrolemember 'db_datareader', 'appuser@***outlook.onmicrosoft.com';
- Now, connect to Client1 using <Domain>appuser account.
- You should now be able to connect your Azure SQL Database with the “Azure Active Directory – Integrated” authentication method.

- Click on [Options], [Connection Properties] and fill the [Connect to database] field with the database Name AdventureWorksLT.
- Finally click on [Connect]

Hope this helps.
Ryad B
Customer Engineer – Data & AI

by Scott Muniz | Aug 19, 2020 | Uncategorized
This article is contributed. See the original author and article here.
Customer Story: Within this story, I will give you some insights into how user adoption is different between a company comprised of mainly office workers and a company where the main focus is to create, sell and maintain key infrastructure components on a global market.
Customer Background: During the last months, I’ve been working with a customer who’s a “hidden champion” or global player. This company is producing devices responsible for cooling in industrial, transportation, tourism, building and many more sectors. Their headquarters is in Germany.
Due to the focus on creation, sales and production, the number of people sitting behind a desk is just one third of all employees and IT is just something that must work 24×7.
The last component to make it even more difficult is the fact that this company is a holding of multiple single companies, part of the company group over months or even years, but still not (fully) integrated from the IT perspective.
So, let’s start with the hard facts:
- 60 locations worldwide
- Sizes from 3 to 500 people in each office
- Larger ones with standalone IT
- No overall governance or policy to enforce specific technology or trainings
- Small central IT with multiple local supports / admins
- Every country has its own company with a local Director, responsible for IT as well
- Microsoft 365 E5 licenses are available for all desk workers but mostly used for Office suite licensing only
Customer Target: We’ve started with the target to implement Office 365 as “another” IT solution additionally to the local IT like file servers, email systems, Skype for Business, etc.. Some in the cloud and some on-premises.
Over the initial implementation phase, we’ve figured out that Microsoft 365 needs more governance and principals to ensure a secure environment, combined with Azure infrastructures.
The main goal for the project became a M365 full stack implementation with the main driver: Microsoft Teams.
Adoption insights
We’ve started with a small but important step: we’ve involved the central IT and especially the IT Director, responsible for all IT decisions within the whole group and first contact for any IT questions of the local directors. He’s also in direct discussions with the C-Level executives for business decisions like “more cloud” or “less cloud.”
From a general change management perspective, we’ve made our first alliance with the Management level.
The next step was to identify people who are involved in many business processes in the company and willing to help the IT department for the implementation.
We found these people in a special group of persons, distributed in every department and on a global level: the assistants.
These people already had strong experiences by creating global projects and bringing some new digital workstyles into the whole company group like travel management portal. Another benefit is the direct contact of these assistants with the head of departments or even the C-Level itself. These people became the champions for the whole project.
We’ve created a strong relationship with these assistants by creating 2 weekly calls, providing direct trainings, sharing knowledge of the M365 products as well as the current project status for our global rollout.
Anyhow, all of them had different backgrounds for IT, beginning from a person with more knowledge of the manufacturing process as the PC handling, to someone who delivers IT trainings to multiple departments within the customer group.
Our initial idea was to run the following deployment process:
- Creation of the team can be done via Head of Department or Assistance only
- Every user will be enabled for Teams right away and we will announce trainings etc. on a central platform
- Rapid rollout
Within the regular champions call we’ve tried multiple trainings ideas and asked for feedback about them:
- Create an internal knowledge base with know-how articles
- Online articles from Microsoft
- Self-created Training materials
- Self-created training tasks / challenges
- Small references to Microsoft and internal training material to provide help
- Offer open office hours
- Create a test team with full access to create
- Providing showcases with a dedicated trainer
With the experiences of our Champions network, we’ve adjusted our plans. One was an “easy to use” Teams online request form, based on a request template with basic questions for all users AND the other one was the decision to provide more training and start with another rollout approach: activate the users in groups, divided by department with a slower rollout to ensure a good user experience.
Based on these insides we’ve also identified a strong need to create valid personas for different target groups. We also made the decision to separate the persona groups by office worker and production worker.


These different persona groups enforced the whole project to create different rollout plans and different training concepts.
The following onboarding concept has been used for the office workers:
Marketing
- Internal newsletter with the announcement of Microsoft Teams is coming
- Intranet-Posts on the daily startup page in the browser
- Article / extra in the internal news page magazine
Pilots
- Low risk pilots with IT friendly users
- Creating best practices and marketing
- Create a show case to visualize the success
Build up a Champions community
- Create a champions community with interested people
- Clarify the future role as a direct contact during rollout
- Announce these champions directly
Rollout – Communication
- Start with e-mail communication before the rollout starts
- multiple weeks before as announcement
- couple of days before rollout with a description what happens during the rollout
- 1 day before with some reference links to training material
- Send out a welcome Mail and invite to a welcome team with reference and training material as announcement during rollout
- Floor walkers offer a help on migration date
- Multiple open office hours during the whole migration phase
- Provide direct and anonymous feedback via feedback forms
Rollout – Trainings
- Invite for a kick-off when the rollout happens in the background
- Provide mandatory basic trainings
- offer optional advanced trainings
But this was just the on-boarding concept. We also needed a training concept as well.
Based on our experience with the champions and the feedback of the PoC / pilot users, we’ve decided to offer multiple training options, instead of single one. But the key for the rollout kick-off was a classroom training where all user of the migration wave should meet some of the champions and get some first hands-on experiences within the test-team.
Before and during rollout
- Provide training
- materials via internal knowledge base (multi-lingual)
- Know-How videos (multi-lingual)
- Create a Test-Team for each wave
- with welcome message
- specified trainings / hands on experience tasks for testing
- Add Microsoft Teams (and additional) licenses to the users of the current wave 1 day before the kick-off is planned
During Kick-Off Event
- Add these users to the Test-Team
- Present basic, quick enable knowledge during Kick-Off event
Complimentary basic training
- Invitation will be send during Kick-Off event
Optional Offers
- Multiple advanced trainings for new tools and options like Planner, Forms, PowerApps, …
- Open office hours
During all the time we’ve got constant feedback from the champions to create an additional Q&A channel to the new users but also between the champions and the IT department.
Due to multiple projects we’ve been aware of the general approach for office worker but for production worker, we had other needs and requirements. The production worker also has another “relationship” with IT.
For the production users we had the following dependencies:
- Not every worker has an account
- Generic accounts with Internet access are used in “open areas”
- The foreman has a direct account
- No mobile phones in production just customized iPads
With these prerequisites, we’ve identified the following personas:

Unlucky for the integration, but good for the adoption concept: The initial idea to implement shifts for the whole production area was rejected due to the huge invest regarding training and hardware. This decision reduced the change impact to a smaller set of production users: the production lead and the foreman.
Over 2 weeks, we’ve evaluated the original way to work and identified typical business processes where we can bring in some benefits for the target groups.
This knowledge allowed the creation of specific water-proofed handouts and quick-start guides.
We’ve also created another rollout concept with single parts from the concept for desk worker but provide more production specific marketing and training strategies.

by Scott Muniz | Aug 18, 2020 | Azure, Microsoft, Technology, Uncategorized
This article is contributed. See the original author and article here.
In a historic day, Microsoft today announced it has transitioned Azure HDInsight to the Microsoft engineered distribution of Apache Hadoop and Spark, specifically built to drastically improve the performance, improved release cadence of powerful Open Source data analytics frameworks and optimized to natively run at cloud scale in Azure. This transition will further help customers by establishing a common Open Source Analytics distribution across various Azure data services such as Azure Synapse & SQL Server Big Data Clusters.
Starting this week, customers creating Azure HDInsight clusters such as Apache Spark, Hadoop, Kafka & HBase in Azure HDInsight 4.0 will be created using Microsoft distribution of Hadoop and Spark.
As part of today’s release, we are adding following new capabilities to HDInsight 4.0
SparkCruise: Queries in production workloads and interactive data analytics are often overlapping, i.e., multiple queries share parts of the computation. These redundancies increase the processing time and total cost for the users. To reuse computations, many big data processing systems support materialized views. However, it is challenging to manually select common computations in the workload given the size and evolving nature of the query workloads. In this release, we are introducing a new Spark capability called “SparkCruise” that will significantly improve the performance of Spark SQL.
SparkCruise is an automatic computation reuse system that selects the most useful common subexpressions to materialize based on the past query workload. SparkCruise materializes these subexpressions as part of query processing, so you can continue with their query processing just as before and computation reuse is automatically applied in the background — all without any modifications to the Spark code. SparkCruise has shown to improve the overall runtime of a benchmark derived from TPC-DS benchmark queries by 30%.
SparkCruise: Automatic Computation Reuse in Apache Spark
Hive View: Hive is a data warehouse infrastructure built on top of Hadoop. It provides tools to enable
data ETL, a mechanism to put structures on the data, and the capability to query and analyze large data sets that are stored in Hadoop. Hive View is designed to help you to author, optimize, and execute Hive queries. We are bringing Hive View natively to HDInsight 4.0 as part of this release.
Tez View: Tez is a framework for building high-performance batch and interactive data processing applications. When you run a job such as a Hive query Tez, you can use Tez View to track and debug the execution of that job. Tez View is now available in HDInsight 4.0
Frequently asked questions
What is Microsoft distribution of Hadoop & Spark (MDH)?
Microsoft engineered distribution of Apache Hadoop and Spark. Please read the motivation behind this step here
• Apache analytics projects built, delivered, and supported completely by Microsoft
• Apache projects enhanced with Microsoft’s years of experience with Cloud-Scale Big Data analytics
• Innovations by Microsoft offered back to the community
What can I do with HDInsight with MDH?
Easily run popular open-source frameworks—including Apache Hadoop, Spark, and Kafka—using Azure HDInsight, cost-effective, enterprise-grade service for open-source analytics. Effortlessly process massive amounts of data and get all the benefits of the broad open-source ecosystem with the global scale of Azure.
What versions of Apache frameworks available as part of MDH?
|
Component
|
HDInsight 4.0
|
|
Apache Hadoop and YARN
|
3.1.1
|
|
Apache Tez
|
0.9.1
|
|
Apache Pig
|
0.16.0
|
|
Apache Hive
|
3.1.0
|
|
Apache Ranger
|
1.1.0
|
|
Apache HBase
|
2.1.6
|
|
Apache Sqoop
|
1.4.7
|
|
Apache Oozie
|
4.3.1
|
|
Apache Zookeeper
|
3.4.6
|
|
Apache Phoenix
|
5
|
|
Apache Spark
|
2.4.4
|
|
Apache Livy
|
0.5
|
|
Apache Kafka
|
2.1.1
|
|
Apache Ambari
|
2.7.0
|
|
Apache Zeppelin
|
0.8.0
|
In which region Azure HDInsight with MDH is available?
HDInsight with MDH is available in all HDInsight supported regions
What version of HDInsight with MDH will map to?
HDInsight with MDH maps to HDInsight 4.0. We expect 100% compatibility with HDInsight 4.0
Do you support Azure Data Lake Store Gen 2? How about Azure Data Lake Store Gen 1?
Yes, we support storage services such as ADLS Gen 2, ADLS Gen1 and BLOB store
What happens to the existing running cluster created with the HDP distribution?
Existing clusters created with HDP distribution runs without any change.
How can I verify if my cluster is leveraging MDH?
You can verify the stack version (HDInsight 4.1) in Ambari (Ambari–>User–>Versions)
How do I get support?
Support mechanisms are not changing, customers continue to engage support channels such as Microsoft support
Is there a cost difference?
There is no cost or billing change with HDInsight with Microsoft supported distribution of Hadoop & Spark.
Is Microsoft trying to benefit from the open-source community without contributing back?
No. Azure customers are demanding the ability to build and operate analytics applications based on the most innovative open-source analytics projects on the state-of-the-art enterprise features in the Azure platform. Microsoft is committed to meeting the requirements of such customers in the best and fastest way possible. Microsoft is investing deeply in the most popular open-source projects and driving innovations into the same. Microsoft will work with the open-source community to contribute the relevant changes back to the Apache project itself.
Will customers who use the Microsoft distribution get locked into Azure or other Microsoft offerings?
The Microsoft distribution of Apache projects is optimized for the cloud and will be tested extensively to ensure that they work best on Azure. Where needed, the changes will be based on open or industry-standard APIs.
How will Microsoft decide which open-source projects to include in its distribution?
To start with, the Microsoft distribution contains the open-source projects supported in the latest version of Azure HDInsight. Additional projects will be included in the distribution based on feedback from customers, partners, and the open-source community.
Get started
by Scott Muniz | Aug 18, 2020 | Uncategorized
This article is contributed. See the original author and article here.
When collecting data from multiple workbooks, it’s often desirable to link directly to the data. Why? It provides a record of where the data was sourced and, if the data changes, you can easily refresh it. This has made Workbook Link support a highly requested feature for our web users. Today, we are excited to announce that Workbook Link support is beginning to roll out to Excel for the web.
This was previously only available in Excel for Windows and Excel for Mac, and is an important step on our journey to meeting one of our key goals: “Customers can use our web app for all their work and should never feel they need to fall back to the rich client”. You can read more about our web investment strategy in Brian’s recent post.
Creating a new Workbook Link
To create a new Workbook Link, follow these simple steps:
- Open two workbooks in Excel for the web. They should be stored in either OneDrive or SharePoint.
- In the source workbook, copy the range.
- In the destination workbook, “paste links” via the right click menu or via paste special on the home tab.
The gif below provides a brief demonstration.
.gif") Creating Workbook Links
Creating Workbook Links
You can also explicitly reference the workbook using the following reference pattern. =’https://domain/folder/[workbookName.xlsx]sheetName’!CellOrRangeAddress
Opening a workbook that contains Workbook Links
When you open a workbook that contains Workbook Links, you will see a yellow bar notifying you that the workbook is referencing external data.
 Data Connection Warning
If you ignore or dismiss the bar, we will not update the links and instead keep the values from before. If you click the “Enable Content” button, Excel for the web will retrieve the values from all the linked workbooks.
Managing Workbook Links
To help you manage Workbook Links, we’ve added a new Workbook Links task pane. The task pane can be accessed by pressing the Workbook Links button on the Data tab or via the “Manage Workbook Links” button on the yellow bar above.
 Workbook Links button on the Data tab
You can see the task pane below with its menus expanded below.
 Workbook Links Taskpane
The task pane lists all your linked workbooks and provides you with information on the status of each of the linked workbooks. If the link could not be updated, the status will explain the cause. So that you can quickly spot issues, any workbook that cannot be updated will be bubbled to the top of the list.
At a global level you can take the following actions:
Refresh all: This triggers an immediate refresh of all linked workbooks.
Refresh links automatically: When enabled, this causes Excel to periodically check for updated values while you are in the workbook.
Break all links: This removes all the Workbook Links by replacing those formulas with their current values.
At a workbook level you can take the following actions:
Refresh workbook: This triggers an immediate refresh of that linked workbook.
Open workbook: This opens the linked workbook in another tab.
Break links: This removes links to that workbook by replacing those formulas with their values.
Find next link: This selects the next occurrence of a link to that linked workbook. (Great for quickly finding phantom links)
Workbook Links vs External Links
Direct links to external workbooks have historically been referred to simply as “External Links”. As we continue to add more external data sources to Excel, the term “External Links” has become ambiguous. To improve clarity going forward, we will use the term “Workbook Links” instead.
Learn More
You can find additional information about Workbook Links on our help page.
by Scott Muniz | Aug 18, 2020 | Azure, Microsoft, Technology, Uncategorized
This article is contributed. See the original author and article here.
Final Update: Tuesday, 18 August 2020 20:26 UTC
We’ve confirmed that all systems are back to normal with no customer impact as of 8/18, 19:00 UTC. Our logs show the customers would have seen intermittent data gaps when using Workspace Based Application Insights starting on 8/15, 16:45 UTC and that during the 3 days, 2 hours and 15 minutes that it took to resolve the issue, 657 customers of this public preview feature in East US, South Central US, and West US 2 regions experienced the issue.
- Root Cause: A regression in a recent deployment that has been rolled back.
- Incident Timeline: 3 Days. 2 Hours & 15 minutes – 8/15, 16:45 UTC through 8/18, 19:00 UTC
We understand that customers rely on Application Insights as a critical service and apologize for any impact this incident caused.
-Jeff

by Scott Muniz | Aug 18, 2020 | Uncategorized
This article is contributed. See the original author and article here.
Back in March 2020, the main Knowledge Base (KB) articles for Cumulative Updates (CUs) started including inline description for fixes. We call those descriptions “blurbs” and they replace many of the individual KB articles that existed for each product fix but contained only brief descriptions. In other words, the same short one or two sentence description that existed in a separate KB article before, now appears directly in the main CU KB article. For fixes that require longer explanation, provide additional information, workarounds, and troubleshooting steps, a full KB article is still created as usual.
Detail
SQL Server used the Incremental Servicing Model for a long time to deliver updates to the product. This model used consistent and predictable delivery of Cumulative Updates (CUs) and Service Packs (SPs). A couple of years ago, we announced the Modern Servicing Model to accelerate the frequency and quality of delivering the updates. This model relies heavily on CUs as the primary mechanism to release product fixes and updates, but also provides the ability to introduce new capabilities and features in CUs.
Historically, every CU comes with a KB article, and you can take a look at some of these articles in the update table available in our latest updates section of the docs. Each one of these CU main KB articles has a well-defined and consistent format: metadata information about the update, mechanisms to acquire and install the update, and a list of all the fixes (with bug IDs) and changes in the update. In some rare occasions when an issue is found after the CU is released, there might be a section that provides a heads-up to users about a known problem encountered after applying the update, and its scope.
Now imagine a CU with a payload of 50 fixes. If you want to know more about each fix, you’d have to click through 50 child KB articles (one per fix) and we received strong feedback that wasn’t a friendly experience. We all agree that frequent context switching is not efficient – be it computer processing code or human brain reading things. So how do you optimize this experience and still maintain the details provided in the shorter individual articles you used to click and read?
With the concept of “article inlining”! Yes, we borrowed the same concept we use in the SQL Database Engine (e.g. scalar UDF inlining) and computer programming in general (e.g. inline functions).
Why this change?
We will take this opportunity to explain the thought process that went into this change and what data points and decision points we use to drive this change. Besides user feedback, and because we are data-driven after all, we also looked at page views and hit rate from search engines for these individual articles compared to the main CU KB article. We found that usually the page views for the main CU KB articles is measured in the thousands, while the individual fix KB articles are read very few times.
Using blurbs
The normal format used for the individual fix KB article include: Title, Symptoms, Status, Resolution, and References. However, not all fixes are implemented the same way. For example, let us look at SQL Server 2019 CU1 article. The first fix in the table is FIX: Transaction log isn’t truncated on a single node Availability Group in SQL Server, and when you install it, the fix is simply applied and enabled.

Let us click on the link and open this article to understand more details about this fix. Here is what we see:
The only useful information you get from this lengthy article is the Symptoms section. Usually the title of the article provides a summary of the symptoms section. Now look at other sections:
- Status: of course we know this is a problem in the software – otherwise why is a fix needed?
- Resolution: this seems obvious enough – that you need to apply this cumulative update to fix this problem.
By moving the two lines from the Symptoms section in this individual fix KB article to the main CU KB article, then you can avoid extra clicks and context switches.
You can go down the list of fix articles in that KB and find many articles that fit this pattern. Our Content Management team did a study of several past CUs and found that the majority of individual fix KB articles (to the tune of 85%) follow this pattern and can be good candidates to “inlining” the symptom description in the main CU KB article table.
Criteria for creating a full KB Article
However, you can identify KB articles in that list with different patterns of information:
In such scenarios, we carefully evaluate if we can perform inlining and still manage to represent this additional information in the main CU KB article. If not, then these are good candidates to have an individual KB article. For example, FIX: SQL Writer Service fails to back up in non-component backup path in SQL Server 2016, 2017 and 2019 is very detailed, and includes error log snippets and other details that can’t be inlined.
To each their own
In SQL Server 2017 and 2019, product improvements or new capabilities (such as DMV, catalog views, or T-SQL changes) are shipped through CUs, as there are no more SPs. You will find plenty of examples about this in the CU article list we are using as reference. Being improvements or new capabilities, information belongs in the product documentation, not in support KB articles. Otherwise this will cause a disconnect when you look at product documentation. Going forward, this is the pattern you’ll see.
We have used this style of fix lists in the past with service packs. An example is SQL Server 2014 Service Pack 1 release information. Also, many modern products use release notes to convey all pertinent information about that specific update. For example: Release notes for Azure Data Studio and Update Rollup 1 for System Center Service Manager 2019
Going forward
As we mentioned, we started piloting this approach around the March 2020 timeframe. The initial releases we attempted this style for were SQL Server 2016 SP2 CU12 and SQL Server 2019 CU3. Our friends and colleagues called it the “Attack of the blurbs!”. Some folks called it the TL/DR version of KB articles. And while the reactions have been predominantly positive and encouraging, we will constantly fine tune these approaches based on user feedback. As part of this change, we are also improving the content reviews done for the CU articles to ensure they contain relevant and actionable information for users.
One important callout we would like to make sure users understand is about the quality of these fixes. When we stated in the Incremental Servicing Model (ISM) post that “(…) we now recommend ongoing, proactive installation of CU’s as they become available. You should plan to install a CU with the same level of confidence you plan to install SP’s (Service Packs) as they are released. This is because CU’s are certified and tested to the level of SP’s (…)”, we meant it, and are continuously making the process more robust. Irrespective of whether a fix has an individual KB article or an inline reference in the main CU KB article, they go through the same rigorous quality checks. In fact, KB article writing and creating documentation is the last step in the CU release cycle: only after a fix passes the quality gates and is included in the CUs, does the documentation step happen.
by Scott Muniz | Aug 18, 2020 | Azure, Microsoft, Technology, Uncategorized
This article is contributed. See the original author and article here.
Azure Sphere OS version 20.08 Update 1 is now available in the Retail Eval feed. This OS release contains a security update.
Because this change represents a critical update to the OS, the retail evaluation period will be shortened and the final 20.08 release will be published as soon as possible within the next 7 days to ensure systems stay secure. During this time, please continue verifying that your applications and devices operate properly with this retail evaluation release before it’s deployed broadly via the Retail feed. The Retail feed will continue to deliver OS version 20.07 until we publish the final 20.08 release.
For more information
For more information on Azure Sphere OS feeds and setting up an evaluation device group, see Azure Sphere OS feeds.
If you encounter problems
For self-help technical inquiries, please visit Microsoft Q&A or Stack Overflow. If you require technical support and have a support plan, please submit a support ticket in Microsoft Azure Support or work with your Microsoft Technical Account Manager. If you would like to purchase a support plan, please explore the Azure support plans.
by Scott Muniz | Aug 18, 2020 | Uncategorized
This article is contributed. See the original author and article here.
Over the past few years, there has been increasing demand for introductory coursework in artificial intelligence and machine learning. Enrollment in Introduction to Machine Learning classes at universities in the US have grown as much as 12 times in the past decade[1]. These introductory courses play a key role in educating the future of machine learning professionals.
The rest of this post is meant as a follow-up to our press release highlighting our release of DirectML on WSL, NVIDIA CUDA support, and TensorFlow with DirectML package. Learn more
DirectML for Students and Beginners
The DirectML teams wants to ensure that the Windows devices students and beginners use can fully support their coursework. Our solution starts by providing hardware accelerated training on the breadth of Windows hardware, across DirectX 12 based GPU, via DirectML. The DirectML API enables GPU accelerated training and inferencing for machine learning models.
TensorFlow + DirectML
In June 2020, we took our first step to enable future professionals to leverage their current hardware across the breadth of the Windows ecosystem by releasing a preview package of TensorFlow with a DirectML backend.
Through this package, we are meeting students and beginners where they are by providing support for the models they want in a frameworks they use, all while making the most of their existing GPU hardware.
Students and beginners can start with the TensorFlow tutorial models or our examples to start building the foundation for their future.
Engage with our Community

If you try out the TensorFlow with DirectML package and run into issues, we would love to hear your feedback on our DirectML GitHub repo.
We are looking to engage with the community of educators to better understand key scenarios for students and beginners getting into machine learning. Share your thoughts in this survey to shape investments we make with DirectML to provide GPU hardware acceleration to additional ML tools and frameworks.
[1] https://hai.stanford.edu/sites/default/files/ai_index_2019_report.pdf
by Scott Muniz | Aug 18, 2020 | Uncategorized
This article is contributed. See the original author and article here.
Our Microsoft Endpoint Manager “Ask Microsoft Anything” (AMA) series continues tomorrow with a special event dedicated to helping IT administrators managing devices used in education environments.
Early access is now open. Post your questions by visiting the Microsoft Endpoint Manager AMA space and selecting Start a New Conversation. Myself and my colleagues in the Microsoft Endpoint Manager product and engineering teams will be answering questions live tomorrow, Wednesday, August 19th from 8:00 a.m. to 9:00 a.m. Pacific Time.
We’re excited to hear your feedback–and help you provision and manage Windows, Android, iOS, and macOS devices in a streamlined way that is less work for you and more seamless for your students, teachers, and faculty. No question is too simple or complex. We’re here to support you!


Recent Comments