by Contributed | Oct 13, 2020 | Technology
This article is contributed. See the original author and article here.
Azure Information Protection (AIP) Unified Labeling (UL) client allows administrators to enable pop-up messages in Outlook that can warn users before sending an email, ask them to provide justification why they are sending an email, or prevent them from sending an email for either of the following scenarios:
- Their email or attachment for the email has a specific label:
- The attachment can be any file type.
- Their email or attachment for the email doesn’t have a label:
- The attachment can be an Office document or PDF document.
Please review this article to learn more about how to implement this configuration.
Based on our customers’ feedback, in the latest release of the AIP UL (version 2.8.85.0) client, we added the ability to customize pop-up messages. AIP administrators are now able to better align those messages to their company culture, and honor legal, security, and other requirements. Please take a moment to review our official documentation here.
Let’s review examples of those pop-up messages before and after customization.
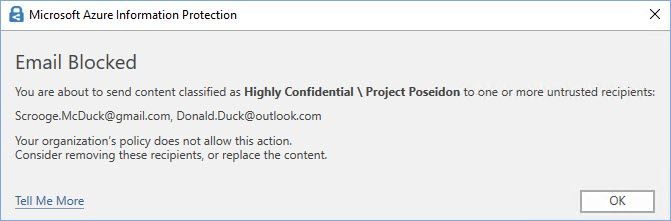
 Figure 1: Default the “Block” pop-up message in Outlook.
 Figure 2: An example of a customized “Block” pop-up message in Outlook.
 Figure 3: Default the “Warn” pop-up message in Outlook.
 Figure 4: An example of a customized “Warn” pop-up message in Outlook.
 Figure 5: Default “Justification” pop-up message in Outlook.
 Figure 6: An example of a customized “Justification” pop-up message in Outlook.
The goal of this article was to use one of the most common scenarios to explain the deployment process in more detail as well as share lessons learned while helping our customers implement these customizations.
Let’s review the implementation process using the following requirements as an example:
- Emails and/or attached documents labeled as Confidential All Employees, Highly Confidential All Employees, and Highly Confidential Project Poseidon cannot be sent to external recipients.
- Emails and/or attached documents labeled as Highly Confidential Project Zeus require user’s consent before sending to external recipients.
- Emails and/or attached documents labeled as Highly Confidential Project Apollo require user’s justification before sending to external recipients.
- Use wording for the pop-up messages provided by the company’s legal team.
- Internal domains contoso.onmicrosoft.com and microsoft.com should be excluded from the detection logic.
We highly recommend creating a dedicated label policy for this configuration as opposed to using one of the existing policies. This will significantly simplify testing and implementation by targeting new configuration to only limited and controlled groups of users. Please make sure that this policy publishes the sensitivity labels you would like to use for your Outlook pop-ups controls.
Important: Once you have enabled customization options, your existing Outlook pop-up configuration will be ignored
and only settings configured in the new customization policy will be evaluated for users and groups this policy
was published to.
 Figure 7: Label policy example for Outlook pop-ups customization in the M365 Compliance center.
First, we need to find out the labels’ GUIDs that we are going to use later. As of this writing (October 2020) you can find this information in the Azure Portal on the label configuration page:
 Figure 8: Label GUID position in the Azure portal.
Alternatively, you may use PowerShell and retrieve all label’s GUIDs at once:
$UserCredential = Get-Credential

$Session = New-PSSession -ConfigurationName Microsoft.Exchange -ConnectionUri https://ps.compliance.protection.outlook.com/powershell-liveid/ -Credential $UserCredential -Authentication Basic -AllowRedirection

Import-PSSession $Session -DisableNameChecking

Get-Label | Format-Table name,guid -AutoSize
 Figure 9: Using PowerShell to see sensitivity labels in the current tenant.
We are going to use a separate policy rule for each action: block, warn, and justify. For each rule we are going to create a corresponding JSON file (you can find downloadable examples in the end of the article).
The general syntax for configuration of these rules is:
$filedata = Get-Content "<Path to json file>"
Set-LabelPolicy -Identity <Policy name> -AdvancedSettings @{<Key> ="$filedata"}
You can name those files whatsoever you want but the <Key> name has to be OutlookCollaborationRule_<#>, where <#> is the serial number used to define the order in which rules are processed.
In our example, the order is going to be: Block, Warn, Justify:
# Pop-up customizations
# Block rule customization.
$filedata = Get-Content "block.json"
Set-LabelPolicy -Identity "Outlook Pop-ups Customization" -AdvancedSettings @{OutlookCollaborationRule_1 ="$filedata"}

# Warn rule customization.
$filedata = Get-Content "warn.json"
Set-LabelPolicy -Identity "Outlook Pop-ups Customization" -AdvancedSettings @{OutlookCollaborationRule_2 ="$filedata"}

# Justify rule customization.
$filedata = Get-Content "justify.json"
Set-LabelPolicy -Identity "Outlook Pop-ups Customization" -AdvancedSettings @{OutlookCollaborationRule_3 ="$filedata"}
And to confirm that the customizations have been added:
(Get-LabelPolicy -Identity "Outlook Pop-ups Customization").Settings
Now we are going to take a close look at these three JSON files because this is where you configure all the conditions and requirements for your rules.
We can’t emphasize enough that the JSON parser in the AIP client is very sensitive to the right syntax, so be very careful with punctuation marks. If in doubt, please consider using one of the free online tools, e.g. Code Beauty or JSONLint.
Block.json:
{
    "type" : "And",
    "nodes" : [
        {
            "type" : "Except" ,
            "node" :{
                "type" : "SentTo",
                "Domains" : [
                    "contoso.onmicrosoft.com",
                    "microsoft.com"
                ]
            }
        },
		{
            "type" : "Or",
            "nodes" : [
                {
                    "type" : "EmailLabel",
                    "LabelId" : "0797a8a8-7aca-428e-a0d8-140906176f07"
                },{
					"type" : "AttachmentLabel",
					"LabelId" : "0797a8a8-7aca-428e-a0d8-140906176f07",
                    "Extensions": [ ".docx", ".doc", ".pptx", ".ppt", ".xlsx", ".xls", ".pdf", ".pfile" ]
				},{
                    "type" : "EmailLabel",
                    "LabelId" : "387bb92f-ffa8-45e2-ba80-e0e91ccd485b"
                },{
					"type" : "AttachmentLabel",
					"LabelId" : "387bb92f-ffa8-45e2-ba80-e0e91ccd485b",
                    "Extensions": [ ".docx", ".doc", ".pptx", ".ppt", ".xlsx", ".xls", ".pdf", ".pfile" ]
				},{
					"type" : "EmailLabel",
					"LabelId" : "e879fc3b-5b12-4796-9775-efb8ece57a79"
				},{
                    "type" : "AttachmentLabel",
                    "LabelId" : "e879fc3b-5b12-4796-9775-efb8ece57a79",
                    "Extensions": [ ".docx", ".doc", ".pptx", ".ppt", ".xlsx", ".xls", ".pdf", ".pfile" ]
                }
			]
		},
        {
            "type" : "Block",
            "LocalizationData": {
                "en-us": {
                    "Title": "Email Blocked",
                    "Body": "Your organization's policy does not allow sharing content classified as <Bold>${MatchedLabelName}</Bold> <br>with external recipients:<br><br>${MatchedRecipientsList}<br><br><br>Consider removing these recipients, or replace the content."
                },
                "es-es": {
                    "Title": "Correo electrónico bloqueado",
                    "Body": "La política de su organización no permite compartir contenido clasificado como <Bold>${MatchedLabelName}</Bold> <br>con destinatarios externos:<br><br>${MatchedRecipientsList}<br><br>Considere la posibilidad de quitar estos destinatarios o reemplazar el contenido."
                }
            },
            "DefaultLanguage": "en-us"
        }
    ]
}
Warn.json:
{
    "type" : "And",
    "nodes" : [
        {
            "type" : "Except" ,
            "node" :{
                "type" : "SentTo",
                "Domains" : [
                    "contoso.onmicrosoft.com",
                    "microsoft.com"
                ]
            }
        },
		{
            "type" : "Or",
            "nodes" : [
                {
                    "type" : "EmailLabel",
                    "LabelId" : "8ffe71cd-04ea-4700-9e5c-30ab2ada2058"
                },{
					"type" : "AttachmentLabel",
					"LabelId" : "8ffe71cd-04ea-4700-9e5c-30ab2ada2058",
                    "Extensions": [ ".docx", ".doc", ".pptx", ".ppt", ".xlsx", ".xls", ".pdf", ".pfile" ]
				}
			]
		},
        {
            "type" : "Warn",
            "LocalizationData": {
                "en-us": {
                    "Title": "Warning",
                    "Body": "Your organization's policy requires your confirmation before sharing content classified <br>as <Bold>${MatchedLabelName}</Bold> with external recipients:<br><br>${MatchedRecipientsList}<br>"
                },
                "es-es": {
                    "Title": "Advertencia",
                    "Body": "La política de su organización requiere su confirmación antes de compartir contenido clasificado <br><Bold>${MatchedLabelName}</Bold> con destinatarios externos:<br><br>${MatchedRecipientsList}<br>"
                }
            },
            "DefaultLanguage": "en-us"
        }
    ]
}
Justify.json:
{
    "type" : "And",
    "nodes" : [
        {
            "type" : "Except" ,
            "node" :{
                "type" : "SentTo",
                "Domains" : [
                    "contoso.onmicrosoft.com",
                    "microsoft.com"
                ]
            }
        },
		{
            "type" : "Or",
            "nodes" : [
                {
                    "type" : "EmailLabel",
                    "LabelId" : "dd52888b-140e-45e1-b2b9-12a7d3631dc5"
                },{
					"type" : "AttachmentLabel",
					"LabelId" : "dd52888b-140e-45e1-b2b9-12a7d3631dc5",
                    "Extensions": [ ".docx", ".doc", ".pptx", ".ppt", ".xlsx", ".xls", ".pdf", ".pfile" ]
                }
			]
		},
        {
            "type" : "Justify",
            "LocalizationData": {
                "en-us": {
                    "Title": "Justification Required",
                    "Body": "Your organization's policy requires justification before sharing content classified as <Bold>${MatchedLabelName}</Bold> <br>with external recipients:<br><br>${MatchedRecipientsList}",
                    "Options": [
                        "I confirm the recipients are approved for sharing this content",
                        "My leadership approved sharing of this content",
                        "Other, as explained"
                    ]
                },
                "es-es": {
                    "Title": "Justificación necesaria",
                    "Body": "La directiva de su organización requiere justificación antes de compartir contenido <br>clasificado como <Bold>${MatchedLabelName}</Bold> con destinatarios externos:<br><br>${MatchedRecipientsList}",
                    "Options": [
                        "Confirmo que los destinatarios están aprobados para compartir este contenido.",
                        "Mi liderazgo aprobó compartir este contenido",
                        "Otro, como se explicó"
                    ]
                }
            },
            "HasFreeTextOption":"true",
            "DefaultLanguage": "en-us"
        }
    ]
}
As you have probably noticed, every file has three main sections. The first one defines domains excluded from the rule. In our example we excluded contoso.onmicrosoft.com and microsoft.com internal domains from all three rules. You can add as many domains to the list as you need. But if you don’t want to make any exceptions, you need to remove the whole “Except” section:
        {
            "type" : "Except" ,
            "node" :{
                "type" : "SentTo",
                "Domains" : [
                    "contoso.onmicrosoft.com",
                    "microsoft.com"
                ]
            }
        },
The next section of the files determines which labels (remember GUIDs we found out earlier) and what attachment types are going to be evaluated while processing the rules.
As of this writing (October 2020), you need to explicitly specify files types you want to add to the detection logic. This might change in future client releases and we will update this post accordingly.
"Extensions": [ ".docx", ".doc", ".pptx", ".ppt", ".xlsx", ".xls", ".pdf", ".pfile" ]
The last section determines an action to take on the email if the rule gets triggered: block, warn, or require justification. It also allows you to configure the wording of those messages in different languages if you need so.
If you would like to inform the user which attachment (they may attach multiple ones classified differently) has triggered a rule, you can use ${MatchedAttachmentName} variable and add it to the pop-up message itself, e.g.:
...
            "type" : "Block",
            "LocalizationData": {
                "en-us": {
                    "Title": "Email Blocked",
                     "Body": "Your organization's policy does not allow sharing content classified as <Bold>${MatchedLabelName}</Bold> <br>with external recipients:<br><br>${MatchedRecipientsList}<br><br>This attachment is classified as <Bold>${MatchedLabelName}</Bold>:<br><br>${MatchedAttachmentName}<br><br><br>Consider removing these recipients, or replace the content."
                },
...
 Figure 10: The “Block” message showing the attachment that triggered the rule.
Our official documentation covers several additional scenarios of how this new feature can be used.
If for any reason you would like to remove customization rules from your policy, you need to run the following commands:
Set-LabelPolicy -Identity "Outlook Pop-ups Customization" -AdvancedSettings @{OutlookCollaborationRule_1 =""}
Set-LabelPolicy -Identity "Outlook Pop-ups Customization" -AdvancedSettings @{OutlookCollaborationRule_2 =""}
Set-LabelPolicy -Identity "Outlook Pop-ups Customization" -AdvancedSettings @{OutlookCollaborationRule_3 =""}
And to confirm that the customizations have been removed:
(Get-LabelPolicy -Identity "Outlook Pop-ups Customization").Settings
Note: As of this writing (October 2020), we do not centrally (AIP Analytics) collect users’ responses to the “Justification” requests for future analysis or investigations. This is something we are considering adding to the next releases. Currently, this information can only be found in the local log files on the client.
While testing this, you might notice that it sometimes takes time for the AIP client to update locally cached policies. If you would like to expedite this process, you may consider forcing the client to do so:
- Close all Microsoft Office applications.
- Delete %LocalAppData%MicrosoftMSIP and %LocalAppData%MicrosoftMSIPC folders.
- Re-launch Outlook. If you get a warning saying AIP can’t apply a label because a template can’t be found, just close Outlook and open it again. This should solve the issue.
P.S. Consider joining our Yammer community where you can be one of the first to learn about MIP news, announcements, preview programs, meet information protection experts from around the world, and get your questions answered.

by Contributed | Oct 13, 2020 | Uncategorized
This article is contributed. See the original author and article here.
Today we mark the end of support for Office 2010 and Office 2016 for Mac, as well as changes to the requirements for connecting to Office 365 services. Learn what’s next and resources to help you remain productive and secure.
The post Support for Office 2010—and Office 2016 for Mac—has ended: Here’s what you need to know appeared first on Microsoft 365 Blog.
Brought to you by Dr. Ware, Microsoft Office 365 Silver Partner, Charleston SC.
by Contributed | Oct 13, 2020 | Technology
This article is contributed. See the original author and article here.
Howdy folks,
Azure AD Conditional Access can ensure that the right people have the access to resources they need from wherever they are. We’ve had a ton of requests for Conditional Access APIs to manage policy at scale. That’s why it is so cool that at Microsoft Ignite, we announced that Conditional Access APIs and named location APIs has reached general availability in Microsoft Graph!
As you progress on your journey with Conditional Access policy governance, you’ll want to shift from manually managing each policy definition in the Azure portal to something more manageable and repeatable at enterprise scale.
Vikas Deora, one of our Identity team program managers, has written a guest blog post with information about the new APIs and how to get started.
As always, we’d love to hear any feedback or suggestions you may have. Please let us know what you think in the comments below or on the Azure Active Directory (Azure AD) feedback forum.
Best Regards,
Alex Simons
Corporate Vice President Program Management
Microsoft Identity Division
——-
Hi everyone,
My name is Vikas Deora. I’m a program manager on the identity team at Microsoft, focused on Azure AD Conditional Access.
At Microsoft Ignite, we announced that Azure AD Conditional Access APIs and named location APIs are now generally available. We have updated the APIs based on your feedback from the private and public previews with:
- Inclusion in the Azure AD PowerShell module
- enabled app-only permissions
- improved error messages
The APIs are documented here. As part of the Microsoft graph, the interactions will be familiar to you – the core policy object lets you specify the conditions, controls, naming data and state for policies.
Get started
Here are some examples for you to get started using these APIs:
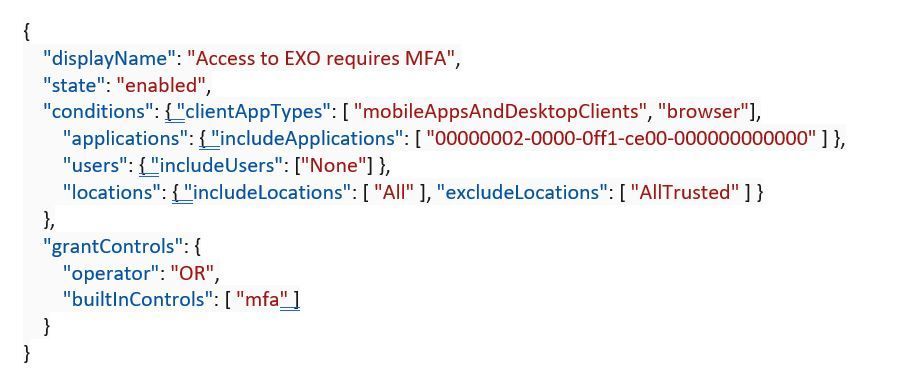
If you want to create a new policy to require MFA when accessing Exchange Online from an un-trusted network:
POST https://graph.microsoft.com/v1.0/identity/conditionalAccess/policies
Content-type: application/json

To list all policies:
GET https://graph.microsoft.com/v1.0/identity/conditionalAccess/policies
Or delete a policy:
DELETE https://graph.microsoft.com/v1.0/identity/conditionalAccess/policies/{id}
Pretty straightforward – but where it gets fun is with the automation you can pull together – read on!
Conditional Access API samples – treating policy just like code
Many of you told us you wanted to be able to treat Conditional Access policies just like code, so we have put together several scripts and tutorials for you to do just that. Here are the steps you can follow:
- Configure policies in your environment using templates like those offered by your favorite IDEs. Check out this tutorial to get you started with some quick-start API templates, and to learn more, check out the conditional access API overview.
- Test the changes in a safe environment before starting an automated safe rollout to production. Try this script that allows you to perform safe rollout of policies from pre-production to production with approval workflow!
- Deploy policies gradually to your user population, allowing you to manage support impact and spot issues early. Start with this script for one-click policy deployment with approval workflow!
- Monitor policy configuration and the usage of policies in your environment. You can use this script to trigger alerts when someone edits key Conditional Access policies. You can choose to update Teams channels, get notifications in email that you can respond to or sign-up for notifications on other channels you prefer.
- Manage: Policies may change over time. Safely make changes to the policy and rollout in your environment. Use this script to back up your policies in Azure or other cloud solutions or even on-premises. Here are a few bonuses – we have published a script that will manage emergency accounts for you, and you can try this script to help you manage resilient security policies that will fail-over in the case of a service issue .
These are just a few key things customers have told us they want to do with the Conditional Access APIs, but we’d love to see a community around this where you can share your best ideas and scripts with each other! We’ve created a for Azure AD conditional access where these conversations can happen.
If you have an interesting scenario and would like to request a sample script to do this, please share on the Azure AD feedback forum.
All the best,
Vikas Deora
Program Manager
Microsoft Identity Division
by Contributed | Oct 13, 2020 | Azure, Technology
This article is contributed. See the original author and article here.
In the second part of this two-part series, Hamish Watson shows us how to use infrastructure as code to deploy an Azure Kubernetes systems cluster. To learn about the many ways to deploy an Azure SQL database, watch part one.
Watch on Data Exposed
View/share our latest episodes on Channel 9 and YouTube!
by Contributed | Oct 13, 2020 | Azure, Technology
This article is contributed. See the original author and article here.
My customer has a large on-premises file share environment based on Windows Server File Shares with petabytes of data. The maintenance and operations of those servers sounds like a simple task – but having this in a large and complex infrastructure can be challenging. If the file shares are run by multiple teams, then the overall SLA could be heavily impacted, and the run cost are very high.
Azure has viable alternatives to host files shares – in this post, I want to compare the different services – we will compare Azure Files (AZF) and Azure NetApp Files (ANF) to make the right choice when we migrate to Azure.
I discussed the scenario with Sebastian Brack – thanks a lot for providing the tables below and providing lots of insights!
Features
Feature | Azure NetApp Files | Azure Files Premium |
Native Azure Service, fully managed | Yes | Yes |
Protocol Compatibility | SMB 2.1/3.0/3.1.1, NFS 3/4.1
Multiprocotol: SMB+NFSv3 | FileREST, SMB 2.1/3.0, NFS 4.1 (Preview) |
Min Size | 4 TiB | 100 GiB |
Max Volume Size | 100 TiB | 100 TiB |
Max File Size | 16 TiB | 4 TiB |
Service Levels / Tiering | Standard 0.124354€/GiB
Premium 0.248091€/GiB
Ultra 0.331198€/GiB | Premium 0.162€/GiB + 0.1375€/GiB Snapshots
|
Shape Capacity/Performance independently | Yes (Manual-QoS) | No |
On-Prem Access (Hybrid) | Yes (Express Route, VPN) | Yes (ExpressRoute, VPN, Internet)
Private Link required (pricing) for VPN/ExpressRoute (Private Peering):
€0.009 per GB In-/Outbound Data Processing
Or ExpressRoute (Microsoft Peering). |
Regional Availability | 22+ regions | 32+ regions |
Regional Redundancy | LRS equivalent (99.99% SLA) | LRS (99.9% SLA)
ZRS* (Asia Southeast, Australia East, Europe North, Europe West, US East, US East 2, US West 2) |
Geo Redundancy | Yes, Cross-Region Replication (Preview) | No |
Storage at-rest encryption | Yes (AES 256) | Yes (AES 256) |
Backup | Incremental Snapshots (4k block), Cross-Region Replication, 3rd party | Incremental Snapshots (file), Azure Backup Integration |
Snapshot Integration into SMB Client | Yes (Previous Versions + ~snapshot) | Yes (Previous Versions) |
Snapshot Integration into NFS Client | Yes (.snapshot) | No |
Snapshot Restore via Portal | Restore to new volume | No |
Integrated Snapshot Scheduling | Yes (Snapshot Policies) | No |
Identity-based authentication and authorization | Azure Active Directory Domain Services (Azure AD DS), On-premises Active Directory Domain Services (AD DS) | Azure Active Directory (Azure AD)
Azure Active Directory Domain Services (Azure AD DS)
On-premises Active Directory Domain Services (AD DS) via AD Connect |
please note: the prices are taken from Azure West Europe region for comparison – they may vary depending on the service/region.
The features table looks quite similar – but the details make this more interesting:
Protocol compatibility is a strength of ANF – more protocols and SMB combined with NFSv3: Some applications require both protocols, especially in an integration scenario. As of writing this, NFS is in Preview for Azure Files.
As of now, you must start with at least 4 TiB for ANF, for AZF it is only 100 GiB – if you only have a small scenario, then AZF scores here.
Hybrid connectivity is another important point for my customer – ANF is fully private with no way to expose it to the internet, AZF is accessible via the internet, privately via Private Link (additional cost!) or via ExpressRoute Microsoft Peering.
Performance, Throughput
Feature | Azure NetApp Files | Azure Files Premium |
Transaction & data transfer prices | Included | Included |
Throughput (single volume/share) | Ultra: 128MiB/s per provisioned TiB (auto) Premium: 64 MiB/s per provisioned TiB (auto) Standard: 16MiB/s per provisioned TiB (auto) | Egress: 60MiB/s + 61.44 MiB/s per provisioned TiB
Ingress: 40MiB/s + 40.96 MiB/s per provisioned TiB |
Shape capacity & performance independently | Yes, Manual-QoS (preview) | No |
IOPS (single volume/share) | Not limited explicitly, dependent on throughput & IO Size (benchmark ~460.000) Example: 1 IOPS @ 64kb per provisioned GiB Premium 16 IOPS @ 4k per provisioned GiB Premium | Baseline: 1 IOPS per provisioned GiB up to 100.000 Burst: 3 IOPS per provisioned GiB up to 100.000 |
File level throughput limit | Unlimited (volume throughput limit) | Egress 300MiB/s Ingress 200MiB/s |
File level IOPS limit | Unlimited (volume throughput limit) | 5000 IOPS |
Volume/Share Size adjustable | Yes | Yes, cooldown for decrease @ 24h |
Service Level changeable | Yes, cooldown for decrease @ 7 days (Preview) | No |
NFS nconnect | Yes (NFSv3) | No |
SMB Multichannel | Yes | No |
Please note: Features and performance may have changed since publishing this post – please verify! For ANF there is a “What’s new page”, for AZF you can check Azure Update.
Now let us look at the service level. ANF is more flexible, file shares can be divided in 3 performance tiers, AZF has two tiers. If you provision large, 100 TB shares with ANF, you get 1600 MiB/s throughput with the standard tier – even for single files (file level throughput depending on volume size or manual quota). The flexibility on the ANF side is a big benefit.
Changing the service level on ANF can be done – please be aware of the cooldown period. Doing the same for AZF is possible, but its not as easy as with ANF.
The last two rows are very important regarding performance – both nconnect and multichannel allow to have multiple connections to the same to ANF drastically improving the bandwidth. Great stuff.
Hybrid Connectivity & Encryption
Feature | Azure NetApp Files | Azure Files Premium |
SMB signing | Yes | |
SMB in-flight encryption | No | Yes |
NFS in-flight encryption | Yes | No |
Active Directory Integration | Yes | Yes |
Azure Active Directory Independent | Yes | No (AD-Connect required) |
AD Kerberos Authentication | Yes (AES 256, AES128, DES) | Yes (AES 256) |
AD LDAP Signing | Yes | |
Comparing the identity aspects, then both integrate into a on-premises Active Directory. AZF requires to have the identities synced to Azure Active Directory (AAD), ANF directly integrates into Active Directory.
Encryption-wise, AZF supports SMB encryption – ANF does not have this yet.
Hopefully, this comparison helps you to make decisions.
Hope it helps,
Max
by Contributed | Oct 13, 2020 | Technology
This article is contributed. See the original author and article here.

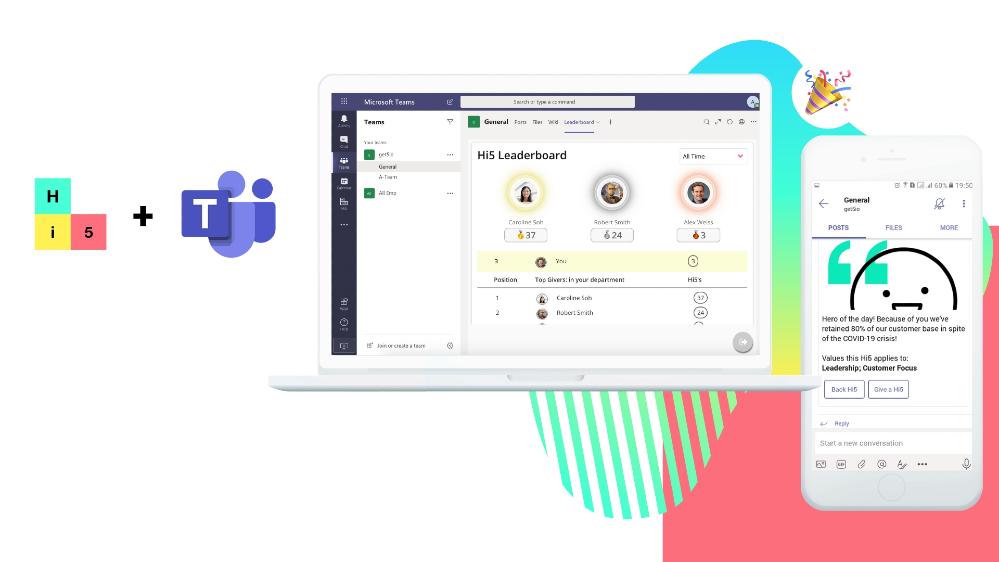
With many organizations already using Microsoft 365 and choosing Microsoft Teams as a platform for collaboration, file-sharing and communication, it only makes sense that there’s a market expectation for Microsoft Teams to offer an employee engagement and recognition platform that enables managers and employees alike to share in company wins and recognize individuals for great work, as well as communicate with their teams and get feedback from them.
Microsoft Teams recently integrated with Hi5, a simple, easy mobile and cloud solution that unlocks the potential of every team member through ongoing recognition and feedback. Customers of Microsoft Teams can download and use Hi5 app to trigger recognitions to one or more co-workers to celebrate and show appreciation when they’ve excelled in their work or represented the company well through key behaviors. This ultimately frees up management and HR teams to focus on qualitative employee engagement to improve company culture.
Onboarding
Once you’ve added Hi5 as an app to your Microsoft Teams account, you’re able to log into your Hi5 account and start giving Hi5’s (if you don’t have a Hi5 company account, you can easily create one and sign up using Microsoft SSO!).
Personalizing Appreciations
You can personalize your Hi5 by adding an image and emoji. If the Admin has added the company’s values to the Hi5 account, you can also tag the company values that a particular Hi5 highlights.
.png")
All Hi5’s given in Microsoft Teams are shared in your designated Teams team channels and allows for Hi5 Backing (acknowledgement or agreement). Each user can access their Hi5 Profile tab to keep track of the recognition they’ve given and received.
Personal Tabs
You can also navigate to your company’s Notice Board tab to stay in the loop with announcements and special events on an easy-to-view calendar.
.png")
Your Hi5 Admins can create Notices and Events within Microsoft Teams and are able to send you notification cards in your personal chat, so that you never miss an important update. Notices are interactive, too: you can clap for notices and leave comments to acknowledge receipts and share your views.
Moreover, you can go to your Pulses tab to complete your performance reviews or participate in surveys to help your team measure company culture and pretty much anything else!
.png")
Hi5 Bot
The Hi5 bot is really helpful! In your Hi5 on Microsoft Teams chat, simply type and send ‘help’ and the bot will show you all the options you have, including adding notifications to your Hi5 chat, logging out, and a quick tour of the features.
.png")
Channel Tab
Want to know who the top recognition givers are in your company? You can add your Hi5 Leader board tab to a channel, which shows the top Hi5 givers within the company in real time. This is also a great tool for nominating great givers for company-wide recognition rewards.
.png")
How to get started
If you haven’t already, install Hi5 from our Microsoft AppSource. For more info and to see how it works, go to https://www.get5.io/features/microsoft-teams-integration. Watch a video to learn about how to use Hi5 in Microsoft Teams:
by Contributed | Oct 13, 2020 | Technology
This article is contributed. See the original author and article here.
We’re happy to announce the role-based learning paths that became available last month on Microsoft Learn. Check out the latest additions to our free, online training that you can work through at your own pace to skill up in a business role or to prepare for a Microsoft Certification. Whether you’re beginning or continuing your journey to build skills and earn certification with Microsoft Learn, take a moment to browse the following new learning paths. Start one today. If you need help figuring out where to begin and which training to take when, check out the landing pages for Microsoft Power Platform and Dynamics 365.
The following learning paths were released in September 2020.
Microsoft Power Platform
WinAutomation
These modules have been migrated from the Softomotive Academy.
Dynamics 365
Business Central
Fraud Protection
Guides
by Contributed | Oct 13, 2020 | Technology
This article is contributed. See the original author and article here.
Getting started with any new technology is hard, and very time-consuming. Node.js being my favorite platform, I’ve always wanted to give something back to this awesome community. That’s why with some awesome friends, we created this series of practical, bite-sized videos about Node.js for beginners, so you can learn the foundations at your own pace.

This series is made from 26 videos, organized in 5 modules. You can either follow all of them as a full course or pick some as you need to complete your skill set.
We choose to focus on the most important tasks and scenarios to make the most of your time. While we won’t cover every single thing to know about Node.js, you’ll get all the essential knowledge you need to get started on your project.
Here’s what you’ll get to learn in these videos:
- Introduction to Node.js:
You’ll learn here what is Node.js and especially why you should learn it. Then we’ll see how to set up your Node.js environment, and run some JavaScript with it. We’ll also set up VS Code with a few recommended plugins.
- Create a new Node.js project and work with dependencies:
Now that you’re ready to code, we see how to create new projects and make use of the rich ecosystem of packages. We’ll also see how to automate your development task and take care of everything around your
- Work with files and directories in a Node.js app:
Whatever programming language you use, you always need to work with the file system at some point. These videos will get you up to speed on this fundamental skill.
- Build a web API with Node.js and Express:
One the main selling point of Node.js is its capability to quickly create web APIs, thanks to many popular libraries. In this section, we’ll cover the most important concepts of the Express web framework to create a web server API.
- Debug Node.js app with built-in and VS Code debuggers:
Being efficient at finding software bugs is an important skill for all developers. Knowing how to use a debugger well can save you a lot of time, so you’ll learn here all you might need as Node.js developer.
Videos are great for visual learning, but having additional forms of content is always helpful.
by Contributed | Oct 13, 2020 | Technology
This article is contributed. See the original author and article here.
Despite being an all-digital conference, this year’s Microsoft Ignite was just as collaborative as our in-person conferences from years past. There were plenty of opportunities for participants to connect with our team, from live Q&A chats in our digital breakouts to dedicated Ask The Expert sessions—and we loved hearing all your ideas, concerns, and questions. We’ve taken a lot of your comments straight to our engineering colleagues for development consideration. As for your questions, this post answers some of the most popular asks.
In case you missed the conference, check out our quick guide to find the sessions related to task management. Here are a couple of highlights:
Now onwards to the questions!
When will Tasks in Microsoft Teams become generally available? And isn’t the app name changing?
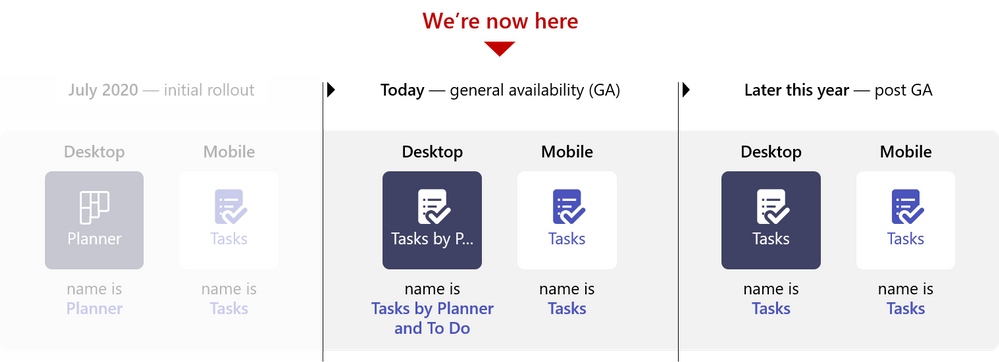
Whoever asked this has a crystal ball. We just announced that Tasks in Teams is now 100% rolled out on desktop and web to everyone with a Microsoft 365 subscription across all non-government tenants last week. Our announcement blog has more information about the name change—hint: the desktop app name is changing to Tasks by Planner and To Do—and update about the mobile app.

Is Tasks in Teams coming for Microsoft government cloud offerings?
It is, and GCC is first in line. Tasks in Teams will be available for GCC in the coming months, with GCC High and DoD following after.
Is Planner getting deprecated?
Absolutely not. Planner is an integral part of the Tasks in Microsoft 365 experience and powers a significant portion of Tasks in Teams. But we can understand why our customers would wonder about the standalone web app. Rest assured, Planner isn’t going anywhere, and we’re continuing to invest heavily in innovative enhancements. We’re actually gearing up for several exciting releases over the coming months, so keep visiting our Tech Community Blogs site to stay up to date.
Can you create a task from a Teams message?
Not yet—but soon! We’re super excited about this feature, which we previewed at Ignite and will formally announce on our Tech Community Blogs site before the end of the year. Stay tuned!
What’s the integration plan for Planner and Microsoft Project for the web?
Planner and Project for the web integration is one of the top requests from our users. We hear you. Our goal is to provide more concrete visibility to you next year through the Microsoft 365 Public Roadmap and Tech Community. Speaking of Tech Community, please be sure to visit the Project blog page for the latest news, including the upcoming rollout of Project for the web in Teams.
What’s the integration plan for Planner and Microsoft Lists?
We are very excited about Lists, a new way to track information and organize your work across Microsoft 365. If this is your first time hearing about Lists, check out this short (and fun) overview video. Like the Project for the web integration, there are no concrete plans for integrating Planner and Lists yet—but it’s fast becoming a popular ask among our customers. For now, you can attach a Lists item as a link on a Planner task card.
Do flagged emails in Microsoft Outlook show up as a task in Microsoft To Do?
They sure do. Flagged Outlook emails appear as tasks in To Do once you turn on the feature, which you can do from Settings in Outlook. Read our support article for more information about this feature.
Is the My Day list from To Do coming to Tasks in Teams?
We definitely have plans to bring the My Day list into Tasks in Teams, but there’s currently no timeline for its release.
Does Tasks in Teams sync with Outlook?
It’s important to understand that Tasks in Teams is powered by Planner and To Do, while the new tasks experience in Outlook is powered by To Do. Therefore, tasks created in Outlook show up in To Do, which means they also show up in Tasks in Teams in most cases. You can create a task in Outlook in a variety of ways, including flagging emails, dragging emails into the My Day pane, and highlighting text in an email. Currently, tasks created from flagged emails do not appear in Tasks in Teams by default—but we’re working on it and will share more information when it’s available. Tasks from dragging emails and highlighting text, which are only available in Outlook for the web, do show up in Tasks in Teams.

today in To Do?
Your Planner tasks are automatically added to the Assigned to me list in To Do and will show up in My Day suggestions based on the due date.
Where do tasks assigned using @mentions in Office docs show up?
Currently, tasks assigned through Word or Excel are only accessible through the comment in which they are assigned. Eventually, those tasks will surface in Planner and Tasks in Teams, but there’s no set schedule for that update.
Can you clone Planner plans?
Yes—and you’ve been able to for a while. Cloning or copying a plan had been a major ask since the inception of Planner and we resolved it with the Copy plan feature in March 2019. You can read the announcement blog post here and a follow-up post here, which announces the release of copy plan to an existing group or team. This enables you to create your own plan templates and copy those templates as needed.

To wrap up this post, we’d like to share the story of how a florist in Miami keep her small business up and running even in the midst of the pandemic with the help of Microsoft 365, including Planner in Teams for managing tasks.
We’re committed to continuously enhancing the Tasks in Microsoft 365 experience, and your questions and ideas from Ignite will help us get there. So, keep sending us your feedback on our various UserVoice sites (Teams, Outlook, Planner, To Do, Word, Excel, PowerPoint). and checking the Tech Community Blogs site for all the latest news and updates.

by Contributed | Oct 13, 2020 | Azure, Technology
This article is contributed. See the original author and article here.
With over two years since general availability of Azure Database for MySQL , we’ve listened and learned a lot from you who use our MySQL managed database service on Azure. As a developer, you appreciate the ease of provisioning, built-in high availability, and manageability of fully managed service. But for some of you, moving to a managed service can be seen as loss of database level control and flexibility when it comes to configuring your MySQL servers—which has prevented you from taking advantage of the benefits of a managed service but hopefully, not anymore.
We in Azure OSS Database engineering team feel extremely excited about our big announcement at Microsoft Ignite where we introduced the preview release of our new Flexible server deployment option for Azure Database for MySQL. We started on this journey more than a year back to re-imagine and design a service architecture that strikes a better balance between the control and flexibility for a managed service.

Now in preview: Introducing Azure Database for MySQL – Flexible Server
We designed the new Flexible server deployment option for MySQL with these goals in mind:
- Simplify developer experiences – Make it easier for you to quickly onboard, connect, and get started.
- Maximize Database Controls – Provide maximum control on your server configurations to provide experiences at par with running your own MySQL deployments.
- More Cost Optimization Controls – Provide more options for you to optimize and save costs.
- Enable Zone Resilient & Aware Applications – Allow you to build highly available, zone resilient and performant applications, with your MySQL database co-located in the same zone, so you can tolerate zone level failures.
Let us now dive into what you can expect from the new Flexible server deployment option on Azure Database for MySQL—as well as a bit about what your experience will be like.
Create a Flexible server with single Azure CLI command
As a developer, you are probably familiar with Azure CLI commands in Azure Cloud Shell. Now, you can create a new Flexible server deployment option for MySQL using a single Azure CLI command, as shown below:
az mysql flexible-server create -l location
 Create a secure flexible server in virtual network using a single Azure CLI command
The output of the command, shows the connection string which you can use in mysql cli client and get started.
As of today, Flexible Servers offering for Azure Database for MySQL is live in following Azure regions:
- East US 2
- West US 2
- North Europe
- Southeast Asia
We plan to release flexible server deployment in 8 new regions in upcoming weeks. You can check our documentation for most up to date information.
Use familiar tools to connect to your server & it just works!
With Flexible Server deployment option for MySQL, you can use familiar tools like MySQL Workbench and drivers to connect and it just works !!!.

If you would like to get a guided quick start, I recommend you start here. Here is the detailed list of commands you can expect.
 Screenshot showing output of — help parameter command in Azure Cloud shell to enumerate list of all the commands supported by az mysql flexible-server cli
You can expect the same level of simplicity and easy of use while provisioning the server using Azure Portal, ARM or Terraform.
More Server Parameter Control with Flexible Server
With Flexible Server, we have exposed 30% more parameters compared to Single server which you can now modify and customize based on the needs and dependencies of your application.
 Screenshot showing Server parameter blade in Azure portal for Azure Database for MySQL – Flexible Server
Network Isolation Control
With Flexible Server on Azure Database for MySQL, you can run and select your server to be in either be in public access mode or secure it in private access mode.
With Private access, you can deploy your Flexible server into your Azure Virtual Network. Azure virtual networks provide private and secure network communication. Resources in a virtual network can communicate through private IP addresses only. Flexible server in private access mode has no public endpoints and cannot be reached from outside the virtual network. In addition, you can create a flexible server in virtual network using a single command show below. The subne t should not have any other resource deployed in it and this subnet will be delegated to Microsoft.DBforMySQL/flexibleServers, if not already delegated. See Networking concepts for more details.
az mysql flexible-server create –subnet /subscriptions/{SubID}/resourceGroups/{ResourceGroup}/providers/Microsoft.Network/virtualNetworks/{VNetName}/subnets/{SubnetName}
By default, SSL is enabled with TLS 1.2 encryption enforced. At this point, you have no control over SSL/TLS configuration, and you cannot change this by yourself in portal. We had a lot of debate over this within the product team and in the end, we chose that as your trusted cloud provider, we would like to enforce right behavior when it comes to security. However, we welcome your feedback on this and if you have concerns or requirements for you to support SSL disabled or TLS < 1.2, I would encourage you to open or vote on this feedback item for Azure Database for MySQL, on the Azure Feedback forum.
 Screenshot showing Networking blade in Azure portal for Azure Database for MySQL – Flexible Server
Control your Planned Maintenance schedule
The service performs automated patching of the underlying hardware, OS, and database engine. The patching includes security and software updates. For MySQL engine, minor version upgrades are also included as part of the planned maintenance release. When managing and running mission critical business application, it is critical for you to be able to control the maintenance schedule as it directly impacts the availability of the database server and application for your business. You may also want to test the impact of the patch on your application behavior and performance. This is where you may want to apply and release the patch on pre-production and test environments first as soon as service releases it to test it and plan to roll out in production at a later schedule. With the new Flexible Server option for Azure Database for MySQL, you can now schedule your maintenance at a time which works best for you. From the Maintenance blade in Azure portal, you can specify the day of the week and 1 hour time window in a month, which works best for you to perform server patching which may involve restarts. For more details, refer Scheduled Maintenance concepts.
 Screenshot showing Maintenance blade in Azure portal for Azure Database for MySQL – Flexible Server to schedule planned maintenance
Start with burstable SKUs starting at $13 per month
This has been one of the long standing asks from many of you looking to use MySQL server for personal projects or development purposes. With Flexible Server on Azure Database for MySQL, you can now start with a burstable SKU if your workload doesn’t need 100% of CPU time all the time. Burstable SKUs are generally preferred for dev/test scenarios. The lowest available burstable compute tier B1S starts at $13 per month. See Compute and Storage sizes in documentation for more details.
 Burstable SKU choices available in Flexible Server on Azure Database for MySQL server
Stop your server when not in use to save cost!
This is again one of the highly requesting asks from many of you who are looking to save compute cost when not in use by simply stopping the server. See Server concepts for more details.
 Stop your Flexible Server from the Overview blade in Azure portal
Build Zone resilient applications with Flexible Server
With Azure Kubernetes Services (AKS) or Virtual Machine Scale sets, you can build and deploy zone resilient application that can tolerate zonal failures. With Flexible server on Azure Database for MySQL, you can now enable zone redundancy for your MySQL database server as well.
When you enable zone redundant high availability for your MySQL server with Flexible server, the service provisions a hot standby server on the secondary availability zone with synchronous replication of data. In case of zonal failures, the MySQL database server will automatically failover to bring the standby server on secondary availability zone online to ensure your applications and database is highly available and fault tolerant to Availability zone level failures. See high availability concepts for more details.
 Zone Redundant HA using synchronous replication for data durability and high availability
Getting Started
You can quickly get started by creating your first server using the quickstarts in our documentation on docs.microsoft.com:
To learn more, you can read our Flexible server documentation for MySQL.
For any questions or suggestions you might have about working with Azure Database for MySQL, you can send an email to the (Ask Azure DB for MySQL. To provide feedback or request new features, we would appreciate it if you could make an entry via UserVoice which can help us to prioritize.
Flexible server is available in preview on Azure Database for MySQL, with no SLAs and hence is not meant for production deployments yet. Single Server deployment option continues to be our enterprise-ready platform, supporting mission critical application and services as I shared in my last service update.
To help you compare Single server and Flexible server for Azure Database for MySQL so you can figure out which deployment option is right for you, we’ve created a handy feature comparison matrix for you in our documentation.

Recent Comments