
by Scott Muniz | Oct 13, 2020 | Assistive Technologies, Microsoft, Technology
Link to closed captioning version: https://www.youtube.com/watch?v=qM7wFZo5yfI&t=175s.
Hi. I’m Jenny Lay-Flurrie, Chief Accessibility Officer at Microsoft. We’re going to talk about accessibility, so first let’s explain what this is. There are lots of examples of accessibility in the world. There’s accessibility of buildings and physical space with ramps, power door openers and more. And there’s also digital accessibility. Rendering websites, software, and games, to be accessible and inclusive for people with disabilities. All this and a lot more are great. Because at the core, accessibility is about creating experiences that are inclusive of the one billion people with disabilities around the world. With accessibility, we have both an opportunity and a responsibility to create inclusive tech that works for all of us. Accessibility is NOT optional. It is a key priority for Microsoft.
Technology can connect people in how they communicate, how they learn, transact and experience the world. And when tech is inclusive, we can connect people and information in amazing ways. On the flip side, if accessibility is not considered and your process does not prioritize accessibility, you have the power to exclude people, which is clearly not what we want to do. So, if we’re really going to lean into our mission to empower every person and every organization on the planet to achieve more, we have to think about accessibility, and embed it into the DNA of Microsoft. It’s an ecosystem. It starts with the people that we hire and empower. Right the way through to our marketing, communications, to the standards to which we hold our suppliers, vendors, and partners, our products, our innovations, and our workplace. Because we have an amazing opportunity to explore the great potential and hard questions, of how to create the next generation of accessible tech and the wave of innovation that comes with it. Just imagine what we can do together.
We’re going to take you on a journey through time and space, and to illustrate some of the common scenarios. Just remember that everyone’s experience is completely different. And we’re going to share just a few stories that will be helpful in understanding accessibility for now and the future. Thank you for investing your time to watch this today.
by Contributed | Oct 13, 2020 | Azure, Technology
This article is contributed. See the original author and article here.
Abstract
Azure services are always misunderstood that, they can be used only with Native Azure offerings. This is not true. It is surprising to see people make this perception so easily. Azure CDN is no exception for this perception. Well, Azure CDN can be used for Azure services and for any other cloud vendors and even for on premises workloads as well.
The common question I get is, “If I have Azure VM hosted website, how can I use Azure CDN on top of it? I am not using/ don’t want to use Azure blob storage. Can I still use CDN for files sources from web application? If yes, how?”
This is the article where we will explore how can you use Azure CDN with IIS hosted sample website on Azure VM and then check the performance of the website using recently wrote approach of Vegeta Attack load test.
Let’s cache!
Origin for Azure CDN
We should be clear what is going to be origin for CDN deployment. Origin simply means source location from where CDN will pickup publicly available static files and contents and, cache it for faster access. In our case the origin is going to be Azure VM and one static image that we will access from CDN. By default, Azure CDN can have native Azure services as Origin as listed below –
- Azure Storage
- Azure App Services – web app
- Azure Cloud Service – Web role deployments
Anything beyond above list must be “Custom Origin”. The sample list of custom origins can be as follows –
Public/ Internet facing content from –
- on Premise hosted Application
- Azure VM hosted application
- AWS hosted applications.
- GCP hosted applications
And so on.
Architecture of implementation
With above understanding of custom origin for Azure CDN let us have a look at the architecture we are trying to implement as a part of this article.
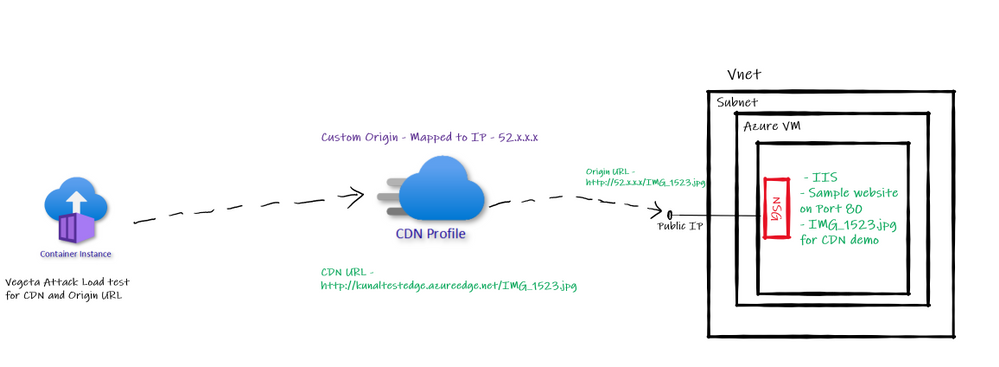
 Custom Origin Architecture
So, we have one Azure VM with IIS default website running on port 80. We will configure the public IP of this Azure VM as “Custom Origin” in Azure CDN. Then run Vegeta Attack load test on Origin based URL and CDN based URL to see the different in performance in terms of latency etc.
Creating Azure CDN with Custom Origin
I already have created Azure VM, subnet, VNET, and configured IIS based default website along with public IP, also added sample image we plan to access through CDN. While creating Azure CDN make sure you select “Custom Origin” option provide public IP of website which we use for accessing it over internet. Refer below –

Notice below screenshot. I have not added “Origin Path” value and kept it empty. Similarly, for hist header it is empty. When I had added “origin path” value Azure CDN URL was throwing error of 404. I removed it and it worked.

After this configuration if I access the CDN URL I see an image being loaded. Similarly, if I access origin URL the same image being loaded. Refer below –

Vegeta Attack on Azure CDN and Origin URL
I am using Vegeta Attack with Azure Container Instances to generate load against both URLs – CDN and Origin URL and below are the results –
Origin Test –

CDN Test –

Clearly CDN based responses are clear win! CDN based responses are not even crossing 1 second where Origin URL is going to 11 seconds sometimes.
Azure CDN with Azure File Storage
This another common question I get for Azure CDN.
“Can I use Azure Files for Azure CDN”?
Answer is: Yes, you can.
However, there is a catch. There is always a catch.
Azure Files is a SMB thing which can’t be accessed directly over internet. It requires “Authentication”. If you access Azure Files base URL there is no way how you can perform the “authentication” to access the Azure Files hosted content.
So, when you want to access Azure Files contents from Azure CDN you need to take care of Authentication while calling from Azure CDN. Therefore, the way we can use Azure Blob public blob/container in Azure CDN; Azure files can’t be accessed directly.
To cater to requirement of authentication to access Azure Files you need to use web application. So, create a web application, use Azure Files authentication inside it to allow access to Azure File Share contents and then refer those contents in Azure CDN. Of course, you will have to use “Custom Origin” in this case mapping to Web application domain or IP address.
Testing Hops
Back in 2011 I wrote two articles on CDN basics – here and here.
One of the articles talks about Hops used for reaching to destination and this test is still valid to learn performance improvement from CDN while using Custom Origin. This is also a very good option to showcase CDN performance boost.
Conclusion
Hope this article gave you good understanding on approach of using Azure CDN with other backends using “Custom Origin” feature.
by Contributed | Oct 13, 2020 | Azure, Technology
This article is contributed. See the original author and article here.
Azure Security Center has a builtin export capability called continuous export, that helps you to export security alerts and recommendations once they are generated to Azure Log Analytics, and/or Azure EventHub. Unfortunately, today there is no builtin capability to continuously export resource exemptions, as well. Now, resource exemptions are a great capability to granularly tune the set of recommendations that apply to your environment, without having to completely disable the underlying security policy. But with great power comes great responsibility, and so customers have been asking for an ability to be notified once there is a new resource exemption created. This is when our latest automation artifact comes into play, which offers the following benefits:
- Logic App integration with Office 365 enables you to send notification emails
- Data can be exported to any service, including Log Analytics, EventHub, Service Now, and others
- The playbook is triggered just in time, instead of using a regular cadence
Notify about new resource exemptions
In my previous article, you learned that once a new resource exemption is created, the status of the underlying security assessment is changed, and it will contain the following properties.status values:
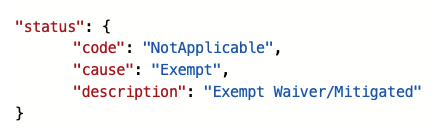
 Figure 1 – status code and cause
There is another capability in Azure Security Center called workflow automation, which allows you to automatically respond to alerts and recommendations. With workflow automation there comes one Logic App trigger type called When an Azure Security Center Recommendation is created or triggered. With this trigger type, your Logic App will run every time there is a new recommendation, or when the status of an assessment changes. That makes it a perfect fit for our purpose. Once the Logic App is triggered, I calculate the subscription ID from the assessment ID that is passed from workflow automation for further use later in the automation.
 Figure 2 – Workflow Automation Trigger
Since the Logic App will run every time a new recommendation is created, or the status of an existing recommendation changes, we need to filter for only these cases when an actual resource exemption has been created. For this, I defined a condition (if…then) in which I make sure that only when properties.status.code is “NotApplicable” and properties.status.cause is “Exempt”, the actual logic is started.
 Figure 3 – define a condition
What follows are two GET requests to the Microsoft.Authentication/PolicySetDefintions and Microsoft.Authorization/policyExemptions APIs. The first call will get all information from the Builtin Azure Security Center default initiative (PolicySetDefinition ID 1f3afdf9-d0c9-4c3d-847f-89da613e70a8), the second will get all policy exemptions that have been created for the subscription with the ID calculated before. As explained in my previous article, resource exemption in Azure Security Center leverages the policy exemption feature. With workflow automation, we can react on assessment changes, but there’s no direct way to pass further information about the exemption itself. What we get is the resource ID the assessment applies to, as well as the policy definition ID in the metadata section:
 Figure 4 – Policy definition ID the ASC assessment relies on
Policy exemptions unfortunately do not contain the policy definition ID. That is because they do not apply to a policy definition, but to assignments. Good news is that a policy exemption contains a list of Policy Definition Reference IDs instead:
 Figure 5 – Policy definition reference IDs in policy exemption
This is when policy set definitions (aka initiative definitions) API comes into play. A policy set definition contains both, policy definition IDs, and policy definition reference IDs. So now, we can make sure to figure out which policy exemption has been created from ASC, and, even better, who and when it was.
Following the workflow, the next step is to compare all policy definition IDs in the policy set definition with the policy definition ID that has been passed from ASC. If both IDs match, we take the corresponding policy definition reference ID and compare it to the IDs in all policy exemptions. If the IDs match, and if also the exemption ID begins with the resource ID that comes from the trigger, we know that we’ve found the policy exemption that has been created using the resource exemption feature in ASC.
What follows is an export of the policy exemption details to a Log Analytics workspace, as well as a notification email that is sent.
How to deploy the automation playbook
You can find an ARM template that will deploy the Logic App Playbook and all necessary API connections in the Azure Security Center GitHub repository, but you can also directly deploy all resources by clicking here. Once you have deployed the ARM template, you will have some manual steps to take before the tool will work as expected.
Make sure to authorize the Office 365 API connection
This API connection is used to send emails once a new resource exemption is created. To authorize the API connection:
- Go to the Resource Group you have used to deploy the template resources.
- Select the Office365 API connection and press ‘Edit API connection’.
- Press the ‘Authorize’ button.
- Make sure to authenticate against Azure AD.
- Press ‘save’.
Authorize the Logic App’s managed identity
The Logic App is using a system assigned managed identity to query information from the resource exemption and policy set definitions APIs. For this purpose, you need to grant it the reader RBAC role on the scope you want it to be used at. It is recommended to give it reader access on the tenant root management group, so it is able to query information for all subscriptions once relevant. To grant the managed identity reader access, you need to:
- Make sure you have User Access Administrator or Owner permissions for this scope.
- Go to the subscription/management group page.
- Press ‘Access Control (IAM)’ on the navigation bar.
- Press ‘+Add’ and ‘Add role assignment’.
- Choose ‘Reader’ role.
- Assign access to Logic App.
- Choose the subscription where the logic app was deployed.
- Choose the Logic App you have just deployed.
- Press ‘save’.
Create a new workflow within Azure Security Center
For the Logic App to be triggered automatically once an assessment is changed, you need to configure a new workflow within Azure Security Center. In Azure Security Center, you just need to navigate to the Workflow Automation control, select + Add workflow automation, and as a trigger condition, you select Security Center recommendations. In the Actions, you select the Logic App that you’ve just deployed.
 Figure 6 – Add workflow in Azure Security Center
What’s next
If you create a new resource exemption, the exemption information is exported to the Log Analytics workspace you’ve defined during your deployment as of now. In addition to that, the recipient address(es) you’ve defined during the deployment will receive a notification email with the following information:
- Created by
- Created at
- Resource ID
- Policy Definition ID
- Policy Definition Reference ID
 Figure 7 – example email generated from the playbook
Now, go ahead, deploy the workflow in your environment, and let us know what you think by commenting on this article.
Acknowledgements
Thanks to Miri Landau, Senior Program Manager in the Azure Security Center engineering team for reviewing this article.
by Contributed | Oct 13, 2020 | Technology
This article is contributed. See the original author and article here.
Azure Security Center has a builtin export capability called continuous export, that helps you to export security alerts and recommendations once they are generated to Azure Log Analytics, and/or Azure EventHub. Unfortunately, today there is no builtin capability to continuously export resource exemptions, as well. Now, resource exemptions are a great capability to granularly tune the set of recommendations that apply to your environment, without having to completely disable the underlying security policy. But with great power comes great responsibility, and so customers have been asking for an ability to be notified once there is a new resource exemption created. This is when our latest automation artifact comes into play, which offers the following benefits:
- Logic App integration with Office 365 enables you to send notification emails
- Data can be exported to any service, including Log Analytics, EventHub, Service Now, and others
- The playbook is triggered just in time, instead of using a regular cadence
Notify about new resource exemptions
In my previous article, you learned that once a new resource exemption is created, the status of the underlying security assessment is changed, and it will contain the following properties.status values:
Figure 1 – status code and cause
There is another capability in Azure Security Center called workflow automation, which allows you to automatically respond to alerts and recommendations. With workflow automation there comes one Logic App trigger type called When an Azure Security Center Recommendation is created or triggered. With this trigger type, your Logic App will run every time there is a new recommendation, or when the status of an assessment changes. That makes it a perfect fit for our purpose. Once the Logic App is triggered, I calculate the subscription ID from the assessment ID that is passed from workflow automation for further use later in the automation.
Figure 2 – Workflow Automation Trigger
Since the Logic App will run every time a new recommendation is created, or the status of an existing recommendation changes, we need to filter for only these cases when an actual resource exemption has been created. For this, I defined a condition (if…then) in which I make sure that only when properties.status.code is “NotApplicable” and properties.status.cause is “Exempt”, the actual logic is started.
Figure 3 – define a condition
What follows are two GET requests to the Microsoft.Authentication/PolicySetDefintions and Microsoft.Authorization/policyExemptions APIs. The first call will get all information from the Builtin Azure Security Center default initiative (PolicySetDefinition ID 1f3afdf9-d0c9-4c3d-847f-89da613e70a8), the second will get all policy exemptions that have been created for the subscription with the ID calculated before. As explained in my previous article, resource exemption in Azure Security Center leverages the policy exemption feature. With workflow automation, we can react on assessment changes, but there’s no direct way to pass further information about the exemption itself. What we get is the resource ID the assessment applies to, as well as the policy definition ID in the metadata section:
Figure 4 – Policy definition ID the ASC assessment relies on
Policy exemptions unfortunately do not contain the policy definition ID. That is because they do not apply to a policy definition, but to assignments. Good news is that a policy exemption contains a list of Policy Definition Reference IDs instead:
Figure 5 – Policy definition reference IDs in policy exemption
This is when policy set definitions (aka initiative definitions) API comes into play. A policy set definition contains both, policy definition IDs, and policy definition reference IDs. So now, we can make sure to figure out which policy exemption has been created from ASC, and, even better, who and when it was.
Following the workflow, the next step is to compare all policy definition IDs in the policy set definition with the policy definition ID that has been passed from ASC. If both IDs match, we take the corresponding policy definition reference ID and compare it to the IDs in all policy exemptions. If the IDs match, and if also the exemption ID begins with the resource ID that comes from the trigger, we know that we’ve found the policy exemption that has been created using the resource exemption feature in ASC.
What follows is an export of the policy exemption details to a Log Analytics workspace, as well as a notification email that is sent.
How to deploy the automation playbook
You can find an ARM template that will deploy the Logic App Playbook and all necessary API connections in the Azure Security Center GitHub repository, but you can also directly deploy all resources by clicking here. Once you have deployed the ARM template, you will have some manual steps to take before the tool will work as expected.
Make sure to authorize the Office 365 API connection
This API connection is used to send emails once a new resource exemption is created. To authorize the API connection:
- Go to the Resource Group you have used to deploy the template resources.
- Select the Office365 API connection and press ‘Edit API connection’.
- Press the ‘Authorize’ button.
- Make sure to authenticate against Azure AD.
- Press ‘save’.
Authorize the Logic App’s managed identity
The Logic App is using a system assigned managed identity to query information from the resource exemption and policy set definitions APIs. For this purpose, you need to grant it the reader RBAC role on the scope you want it to be used at. It is recommended to give it reader access on the tenant root management group, so it is able to query information for all subscriptions once relevant. To grant the managed identity reader access, you need to:
- Make sure you have User Access Administrator or Owner permissions for this scope.
- Go to the subscription/management group page.
- Press ‘Access Control (IAM)’ on the navigation bar.
- Press ‘+Add’ and ‘Add role assignment’.
- Choose ‘Reader’ role.
- Assign access to Logic App.
- Choose the subscription where the logic app was deployed.
- Choose the Logic App you have just deployed.
- Press ‘save’.
Create a new workflow within Azure Security Center
For the Logic App to be triggered automatically once an assessment is changed, you need to configure a new workflow within Azure Security Center. In Azure Security Center, you just need to navigate to the Workflow Automation control, select + Add workflow automation, and as a trigger condition, you select Security Center recommendations. In the Actions, you select the Logic App that you’ve just deployed.
Figure 6 – Add workflow in Azure Security Center
What’s next
If you create a new resource exemption, the exemption information is exported to the Log Analytics workspace you’ve defined during your deployment as of now. In addition to that, the recipient address(es) you’ve defined during the deployment will receive a notification email with the following information:
- Created by
- Created at
- Resource ID
- Policy Definition ID
- Policy Definition Reference ID
Figure 7 – example email generated from the playbook
Now, go ahead, deploy the workflow in your environment, and let us know what you think by commenting on this article.
Acknowledgements
Thanks to Miri Landau, Senior Program Manager in the Azure Security Center engineering team for reviewing this article.
by Contributed | Oct 13, 2020 | Azure, Technology
This article is contributed. See the original author and article here.
Final Update: Tuesday, 13 October 2020 05:42 UTC
We’ve confirmed that all systems are back to normal with no customer impact as of 10/13, 05:25 UTC. Our logs show the incident started on 10/12, 23:55 UTC and that during the 5 hours & 30 minutes that it took to resolve the issue, some customers may have experienced delay in platform metrics delivered to customer storage, customer Event Hub, or Log Analytics via Diagnostic Settings.
- Root Cause: The failure was due to configuration issues with one of our dependent services
- Incident Timeline: 5 Hours & 30 minutes – 10/12, 23:55 UTC through 10/13, 05:25 UTC
Some customers rely on Azure Monitor Essentials as a critical service and apologize for any impact this incident caused.
-Deepika
Initial Update: Tuesday, 13 October 2020 05:17 UTC
We are aware of issues within Azure Monitor Essentials and are actively investigating. Some customer using Azure Monitor may experience delay in platform metrics delivered to customer storage, customer Event Hub, or Log Analytics via Diagnostic Settings across all regions.
- Next Update: Before 10/13 09:30 UTC
We are working hard to resolve this issue and apologize for any inconvenience.
-Rama
by Contributed | Oct 13, 2020 | Azure, Technology
This article is contributed. See the original author and article here.
Initial Update: Tuesday, 13 October 2020 05:17 UTC
We are aware of issues within Azure Monitor Essentials and are actively investigating. Some customer using Azure Monitor may experience delay in platform metrics delivered to customer storage, customer Event Hub, or Log Analytics via Diagnostic Settings across all regions.
- Next Update: Before 10/13 09:30 UTC
We are working hard to resolve this issue and apologize for any inconvenience.
-Rama

by Contributed | Oct 12, 2020 | Technology
This article is contributed. See the original author and article here.
We are excited to partner with NASA to bring you the Day of Data, where you can explore how data powers our astronauts, our space missions, and our world. Celebrate World Spreadsheet Day and 20 years of humans living and working aboard the International Space Station with trivia questions, a visualization challenge, and live events.
Design your Day of Data from several activities:
- Visit the Day of Data discussion space in the Tech Community to find daily trivia questions about space, rockets, and astronauts.
- Share your skills during an Excel visualization challenge (more details below). Vote for your favorite visualizations by “liking” them.
- Join us for two education-themed live events on October 14th at 10am PDT and November 2nd at 10am PST with NASA astronauts and rocket scientists, where they will discuss how they use data and the impact that data has had on their job.
- Introduce your children to data and data visualizations using scaffolded workbooks, or bring your family to a Space Data Camp hosted virtually by the Microsoft Store.
Excel visualization challenge
Show off your visualization skills to the rest of the community! A set of analysis questions will be posted to the Day of Data discussion space on Tech Community on World Spreadsheet Day (October 17th). Choose one (or more) to answer and share with the community by posting your visualization in the discussion space. The winning visualization for each question will be chosen by a combination of a judging panel and popular vote, so also make sure to check back to like your favorites! Watch for a another post on October 17th for more information.
 An astronaut on a space walk.

by Contributed | Oct 12, 2020 | Azure, Technology
This article is contributed. See the original author and article here.
We are pleased to announce that in order to help customers become more secure, we are now offering Azure SQL Data Discovery & Classification free of charge for Azure SQL Database and Azure Synapse Analytics. Azure SQL Data Discovery & Classification provides a set of advanced capabilities to discover, classify and label the sensitive data in your databases.
Originally part of the Azure SQL Advanced Data Security package (now called Azure Defender for SQL), Azure SQL Data Discovery & Classification is now a free feature and is available as a built-in feature for Azure SQL Database and Azure Synapse Analytics.
To identify potentially sensitive data and start classifying it, simply open the Azure portal, select your Azure SQL Database or Azure SQL pool, and navigate to Data Discovery & Classification under Security:

Also available for SQL Server 2012 and later, SQL Data Discovery & Classification is free of charge and can be used through SQL Server Management Studio (SSMS).
Visit Azure SQL Data Discovery & Classification to learn more about the feature.
by Contributed | Oct 12, 2020 | Technology
This article is contributed. See the original author and article here.
This installment is part of a broader series to keep you up to date with the latest features in Azure Sentinel. The installments will be bite-sized to enable you to easily digest the new content.
This blog post is a collaboration with @Cristhofer Munoz
While each specialized security tool has a partial view of the world, a SIEM can utilize its broader outreach to enrich event and alert data and centrally manage allow-lists and watch lists. We are happy to announce the public preview for the Watchlist feature for Azure Sentinel!
What is it?
Azure Sentinel watchlists enables the collection of data from external data sources for correlation against the events in your Azure Sentinel environment. Once created, leverage watchlist in your search, detection rules, threat hunting and response playbooks. For a full list of the functionalities and the step-by-step instructions, refer to the official documentation.
The Watchlist feature can be utilized for the following use cases:
- Investigate threats and respond to incidents quickly with fast import of IP addresses, file hashes, etc. from csv files. Then utilize the watchlist name/value pairs for joining and filtering for use in alert rules, threat hunting, workbooks, notebooks and for general queries.
- Import business data, such as user lists with privileged system access as a watchlist. Then use the watchlist to create allow and deny lists. For example, use a watchlist that contains a list of terminated employees to detect or prevent them from logging in to the network.
- Create allow-lists to reduce alert fatigue. For example, use a watchlist to build an allow list to suppress alerts from only a limited set of IP addresses to do specific functions and thus removing benign events from becoming alerts.
- Use watchlists to enrich your event data with field-value combinations derived from external data sources.
Where do I find it?
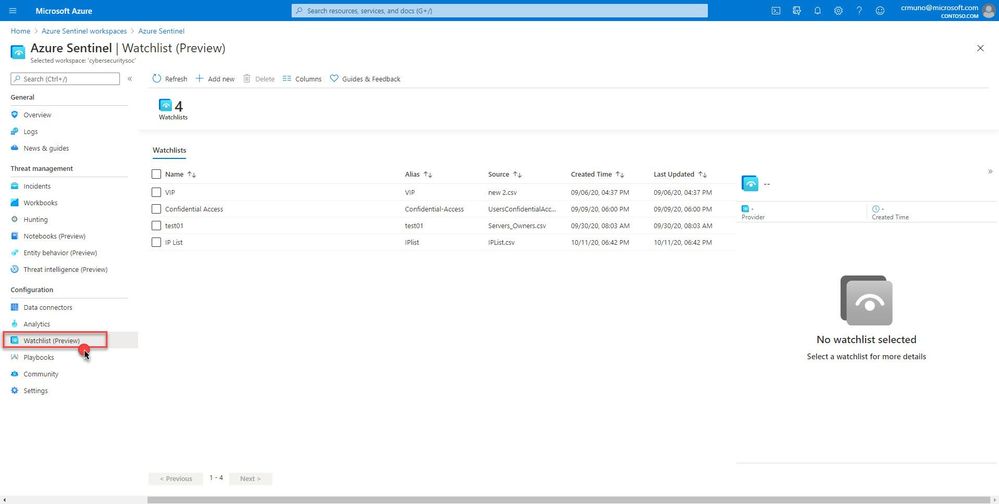
In your Azure Sentinel portal, navigate to Configuration in the left navigation menu and select Watchlist (Preview).

How does it work?
Create a new watchlist by selecting ‘+ Add new’ and follow the steps in the new watchlist wizard. You will receive a notification in the notifications area within in the Azure portal that your watchlist was created. Watchlists are stored to your Azure Sentinel workspace as name value pairs and are cached for optimal query performance and low latency.
How can I use watchlists in my security automation and orchestration?
Check out a couple of example Logic App playbooks you can deploy to your Azure Sentinel workspace to show you what is possible:
https://github.com/Azure/Azure-Sentinel/tree/master/Playbooks/Watchlist-CloseIncidentKnownIPs
https://github.com/Azure/Azure-Sentinel/tree/master/Playbooks/Watchlist-InformSubowner-IncidentTrigger

What’s coming
This is just the beginning, in the near future we will be delivering additional features to enhance the watchlist experience:
- Ability to add and remove items from the watchlist
- Support for larger file uploads (upper limit is currently 3.8MB)
- Logic Apps watchlist connector making it easier to utilize watchlist in automation scenarios
- Built-in watchlists combined with analytics and much more!
Get started today!
We encourage you to try using watchlists now in your analytic rules, playbooks, workbooks and for threat hunting.
Try it out, and let us know what you think!

by Contributed | Oct 12, 2020 | Technology
This article is contributed. See the original author and article here.
 Do you want to be acknowledged as Microsoft Guru?
Microsoft Community Wiki Contest is Back!
WHAT IS MICROSOFT WIKI COMPETITION?
The Wiki contest is a friendly competition between all the new articles which were added to Microsoft’s Community Wiki (formerly known as TechNet Wiki).
The authors who wrote the best articles are selected for glory and adoration! Winners will be announced in a dedicated post at Microsoft official blog and a links will be published at Microsoft community Wiki group on Facebook, and other acknowledgement from the community will follow.
Some of the biggest community voices and many Microsoft MVPs have passed through these halls on their way to fame and fortune.
WHO CAN JOIN THE COMPETITION?
Anyone who has basic knowledge and the desire to share the knowledge is welcome. Articles can appeal to beginners or discuss advanced topics. All you have to do is to add your article to TechNet Wiki from your own specialty category.
HOW TO JOIN THE CONTEST?
- Write an article about Microsoft product or/and services
- Publish your article in the Microsoft community Wiki: https://social.technet.microsoft.com/wiki
- Register your article to the open contest: https://tinyurl.com/y3chtjox
- Add a link to your article at the Community Wiki group on Facebook (Optional but HIGHLY Recommended): https://www.facebook.com/groups/TechNetWikiNinjas/
And you are ready to win the community glory and adoration!
If you have already made a contribution in the forums or gallery or you published a nice blog, then you can simply convert it into a shared wiki article, and register the article for the TechNet Guru Competition.
Note! You can add reference to the original post, which can have a great value to your personal blog.
WHO ARE THE JUDGES?
A team of Microsoft employees and several Microsoft MVPs were volunteered and selected to serve as judges. The quality of the articles are examined according to strict criteria. This is a direct channel to Microsoft products team and top leading experts. The Judges will provide constrictive comments on the articles, allowing the authors to learn and improve their future posts.
If you win,
people will sing your praises online
and your name will be raised as Guru of the Month.
Feel free to ask any questions at Microsoft official community Wiki group on Facebook.

Recent Comments