by Contributed | Oct 22, 2020 | Technology
This article is contributed. See the original author and article here.
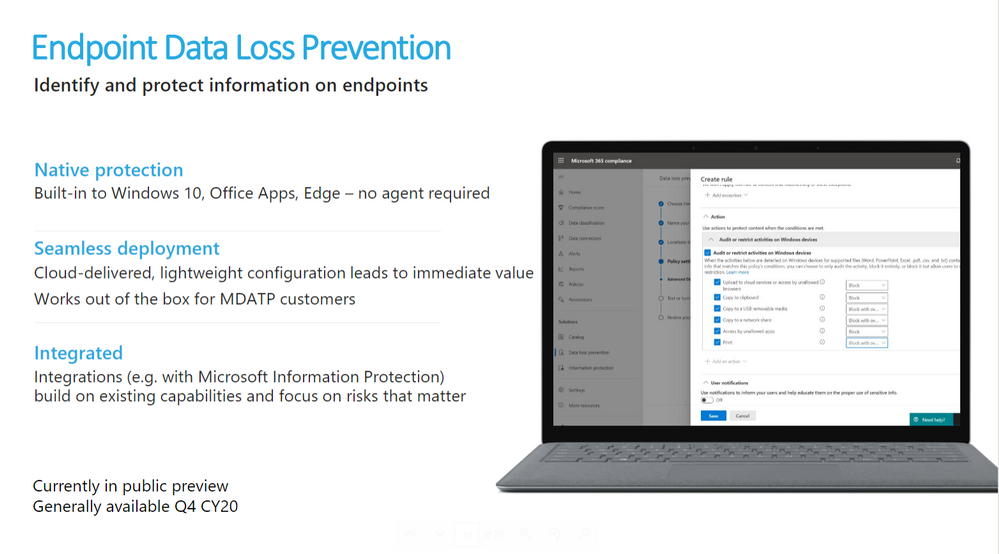
Microsoft Endpoint data loss prevention (Endpoint DLP) is part of the Microsoft 365 data loss prevention (DLP) suite of features you can use to discover and protect sensitive items across Microsoft 365 services.

References:
This webinar was presented on September 9th, 2020, and the recording can be found here.
Attached to this post are:
- The FAQ document that summarizes the questions and answers that came up over the course of both Webinars.
- A PDF copy of the presentation.
Thanks to those of you who participated during the two sessions and if you haven’t already, don’t forget to check out our resources available on the Tech Community.
Thanks!
@LaurenVaughn on behalf of the MIP and Compliance CXE team
by Contributed | Oct 22, 2020 | Technology
This article is contributed. See the original author and article here.
Hi all,
More and more, your digital identity represents the gateway to all the things you care about – from your email to your bank to your favorite TV show (or XBox game – my fave is currently Sea of Thieves), so keeping your account secure is super important. That’s why I’m so excited to announce a redesign of the Microsoft account Security page which is all about making it easier to get your account security to “awesome” and keep it that way. Rachel Teller, a PM in Identity, drove the work and her guest blog below will take you through the highlights.
Check out the team’s work and take advantage of this opportunity to make sure your security info is current – stay safe out there!
-Alex
——–
Hey everyone,
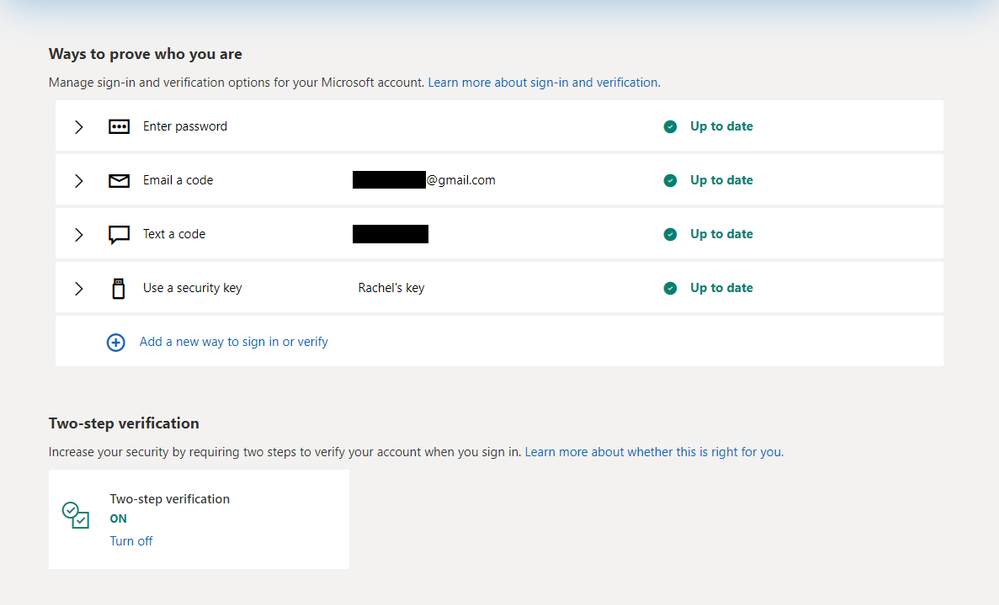
I’m Rachel, a Program Manager in the Identity Division. I’m excited to tell you about the work we did to simplify the security controls for your personal Microsoft account. Here’s a quick overview of the redesign:
Easy management/visibility of enabled sign-in methods.
When you check the security page of your Microsoft account, it’s often because you believe something is wrong– you get an alert about a strange sign-in on your account; one of your other accounts, for which you use the same password, was hacked; your mom calls and explains that you need to enable MFA on every account and sends you into a tizzy. We wanted to make it as easy as possible for you to see what’s happening on your account, make the necessary changes, and be on your way.

Discovery of methods that make your life easier (and secretly more secure).
With the exception security-minded folks like you, most people aren’t on the lookout for new sign-in/recovery methods. When you go to make the necessary changes to your account, we want you to be able to see all the new options available to you, and easily understand how they can simplify your sign-in experience. We do the work of promoting and simplifying the most secure methods, so you don’t have to spend time researching/weighing the pros and cons of what’s available.

Consistent design across consumer and enterprise management.
Now folks who use Microsoft for both personal and work/school accounts can manage their account in the same way. No more separate management for credentials/proofs—just one page that allows you to see what you have and how to change it.


As always, please provide any feedback in the comments section below. We are particularly fond of praise and clap emojis.
Best,
Rachel Teller, Program Manager II
Microsoft Identity Division

by Contributed | Oct 22, 2020 | Uncategorized
This article is contributed. See the original author and article here.
Today, we’re excited to announce the availability of Microsoft Forms for personal use. Forms enables you to create a survey or quiz on any topic and works on any device via the web and the Office mobile app– making it easy to capture the information you need anywhere, anytime. With easy-to-use tools and clear design suggestions, you can gather input and make plans for a variety of activities –survey your neighborhood friends for a…
The post Survey or quiz your friends and family with Microsoft Forms, now available for personal use appeared first on Microsoft 365 Blog.
Brought to you by Dr. Ware, Microsoft Office 365 Silver Partner, Charleston SC.
by Contributed | Oct 22, 2020 | Technology
This article is contributed. See the original author and article here.
With many organizations trying to migrate to Azure, one of the critical and most important tasks is to assess existing on-premise SQL Server instances and identify the right target Azure SQL. Data Migration Assistant (DMA) is a popular tool that helps in assessing SQL Server instance for a specific Azure SQL target and is immensely useful to gauge the readiness of SQL Server databases for migrating to Azure SQL. The capability to upload the DMA assessment results to the Azure Migrate hub to get a centralized readiness view of the entire data estate was already released. In this episode, Rajesh Setlem walks you through the steps for performing assessments at scale using DMA command-line interface (DMACMD).
Watch on Data Exposed
Resources:
View/share our latest episodes on Channel 9 and YouTube!

by Contributed | Oct 22, 2020 | Technology
This article is contributed. See the original author and article here.
Microsoft partners like Ascend, VMware, and Qore Technologies deliver transact-capable offers, which allow you to purchase directly from Azure Marketplace. Learn about these offers below:
 |
Ascend Unified Data Engineering Platform: Evolving beyond traditional extract, transform, and load (ETL), the Ascend Unified Data Engineering Platform revolutionizes how data teams build by introducing autonomous data pipelines that dynamically adapt to changes in data, code, and environment. Ingest, build, run, integrate, and govern enterprise data pipelines with 95 percent less code.
|
 |
CloudHealth Cloud Management Platform: Organizations around the world rely on CloudHealth by VMware to optimize, secure, and govern their Microsoft Azure and multicloud environments. CloudHealth enables enterprises and service providers to deliver higher quality products and solutions faster, while keeping costs under control. Accelerate your global business transformation in the cloud with CloudHealth. |
 |
Qorus Integration Engine 4.1.x on Oracle Linux 7: Qore Technologies drives digital transformation with its low-cost, low-code Qorus Integration Engine on Microsoft Azure. Qorus Integration Engine provides back-office business process automation with automated fault-tolerant execution, transparent operations, and comprehensive data management including GDPR-compliant data processing.
|
|
by Contributed | Oct 22, 2020 | Technology
This article is contributed. See the original author and article here.
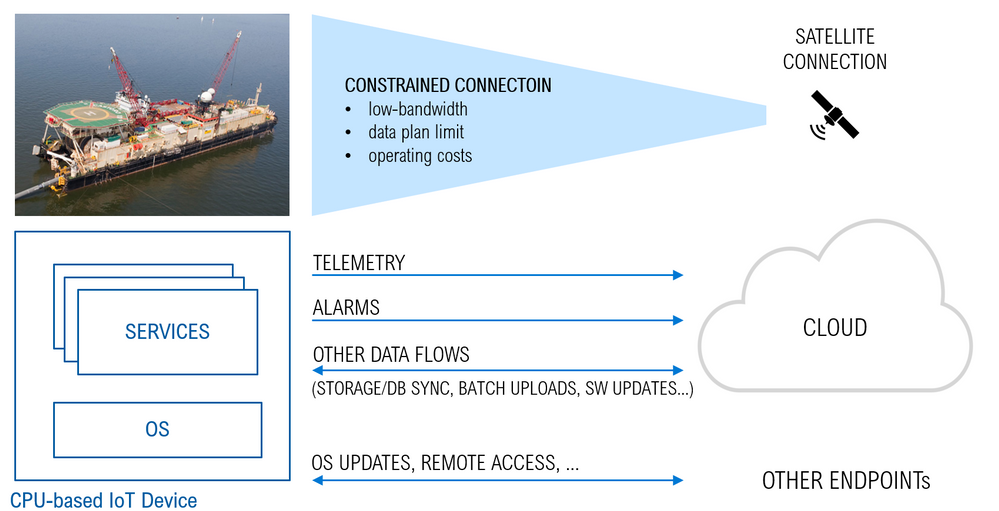
There are cases where IoT devices are connected to the cloud over constrained and metered connections like LPWAN, narrow-band cellular, or satellite connections.
Although such connections are sometimes the only viable option (think of a satellite link for an off-shore vessel), they may underperform in terms of:
- a lower bandwidth and bitrate, leading also to an increased latency
- higher operating-costs
- data plans with lower limits on the traffic volume
If not an issue with simple MCU-based IoT devices sending few data-points per day, those constraints may be a major concern or even a showstopper in the case of CPU-based devices, running a full-fledged Operating System (OS) along with the services and workloads required by the specific use case. The overall traffic in the latter case is significantly bigger, and it includes a variety of data-flows with different characteristics and requirements in terms of frequency, traffic volume and latency. Just to mention a few:
- telemetry (which is a continuous stream, with a low to high traffic volume depending on the specific use case and the latency is usually not critical although important)
- high-priority events like alarms (random events, low volume but latency is critical)
- bulk uploads like file storage and DB syncs, OS and SW updates, container images pull (on a periodic basis or on-demand, usually very high volume, latency is not relevant at all)

Transporting those data-flows over a constrained and metered connection poses several risks: the traffic volume can easily exceed the limit and increase the operating costs, and the low bandwidth makes it challenging to meeting the latency requirements of high-priority messages like alarms.
Possible mitigations of those risks are:
- reducing the traffic volume, in order to comply with data plan limits, to reduce the operating costs, and to reduce the bandwidth footprint
- prioritizing data-flows, in order to comply with the latency requirements
Let’s see how to implement such mitigation strategies.
Reducing the traffic volume
Edge Computing is a valid option to reduce the overall traffic volume. It enables processing and analyzing the raw data close to its source, and transferring only the insights over the connection. Edge Computing adds several other benefits as well, like low-latency control at the edge, increased security/reliability through decentralization, privacy and compliance.
There are various platforms available to implement edge computing securely and in a way that allows control of the workloads from the cloud. Azure IoT Edge is a good example of such platforms.
Prioritizing data-flows
In addition to reducing the traffic volume, we need also a way to prioritize data-flows and control the latency.
Some Edge Computing platforms may embed a mechanism to assign priorities to the data-flows they process. A good example is the “Priority Queues” mechanism implemented in the IoT Edge v1.0.10 and announced in this blog post. Each stream uses a dedicated queue, with individual settings in terms of time-to-live and priority over other streams. That would be used, for instance, to ensure that an alarm is delivered before other telemetry messages already in the queue.
However, such a mechanism cannot be applied to bulk upload of raw data, or to any other data-flow which is out of the scope of edge computing (like OS/SW updates, container image pulls, …). The prioritization of such data-flows needs a different approach.
An easy but effective solution would be to limit the bandwidth that they are allowed to use. That would prevent an OS update or a file upload from saturating the whole available bandwidth, with the risk of interfering with other streams (telemetry, alarms) or even stopping them.
Bandwidth Shaping via Linux Traffic Control
On a Linux system, the kernel’s traffic control subsystem is an effective and quite versatile way of shaping any TCP/IP data-flow.
Such Traffic Control subsystem embeds a packet scheduler and configurable “queueing disciplines” which allow for:
- limiting the bandwidth (with advanced filtering on networks, hosts, ports, directions, …)
- simulating delays, packet loss, corruption, and duplicates (useful to investigate the impact of connection’s constraints on performance and reliability)
The Traffic Control utility, aka ‘tc’, is a command-line tool that gives you full access to the kernel packet scheduler. It is pre-installed in many distros (ex. Ubuntu) or you can easily install it if missing. In case of Debian for instance:
sudo apt-get install iproute2
You can start experimenting with the tc in a shell and create and apply rules that will limit the bandwidth of a service, or simulate packet loss/corruption and network delays. For instance, the following will limit the egress bandwidth of the network interface ‘eth0’ to 1Mbps:
tc qdisc add dev eth0 root tbf rate 1mbit burst 32kbit
You can find more examples here.
Try also tc-config, which is a tc command wrapper (developed in Python) with simpler and more intuitive syntax and parameters.
With a device running Linux, you could remotely SSH onto it and use command lines to configure tc, but that’s not a scalable method if you are dealing with many devices in a production environment. If you are using Azure IoT Edge for edge compute, we have created an open-source module that will help you. With this module, you will be able to configure traffic control through the module twin like you would for any other IoT Edge modules.
The traffic-control-edge-module (github here) is a sample IoT Edge module wrapping the tc-config command-line tool to perform bandwidth limitation and traffic shaping within an IoT Edge device via Module Twins.
Here’s an example showing how you would apply a 50Kbps bandwidth limitation to the data-flow associated to a bulk upload originated by the edge Blob Storage module named “myBlobStorage” running in the IoT Edge device:

The module implements also some simple logic to listen to containers lifecycle events, to detect whether a container has been (re)started and to (re)apply the related rules if any.
Check out the repository for the traffic-control-edge-module (github here) and do not hesitate to let us know what you think, file issues, and contribute
by Contributed | Oct 22, 2020 | Technology
This article is contributed. See the original author and article here.
Addressing customer demands, giving teams a shared view of every customer, and making collaboration and meetings between teams easier is the goal with our collaboration with Salesforce.
We are pleased to announce the availability of the Salesforce in Microsoft Teams pilot. The integration will be offered to Sales and Service Cloud customers with Enterprise or Unlimited edition at no additional cost.
For many teams – including the sales teams present at many organizations – there is no more critical data than customer data, typically stored within a customer relationship management (CRM) application. A close connection between customer information and the conversations around them can improve the productivity for any team that works with customers, which is why we are pleased to see the integration from Salesforce with Microsoft Teams – now you can interweave key customer and case records within your Microsoft Teams.
By connecting Salesforce CRM with Microsoft Teams, our joint customers can now benefit from a close connection of the chat and workspace capabilities of Teams alongside key information and actions from Salesforce – which makes team collaboration more focused and effective.
– Doug Camplejohn, Sales Cloud Executive Vice President and General Manager, Sales Cloud, Salesforce
For sales teams, the integration will help bring sales teams together more easily and help make up for some of the hallway discussions that are now missing from many salespeople’s daily routine in light of the current work-from-home environment. For service teams, the integration will enable better coordination and faster response times to open cases, allowing for more team collaboration both within the service department and outside.
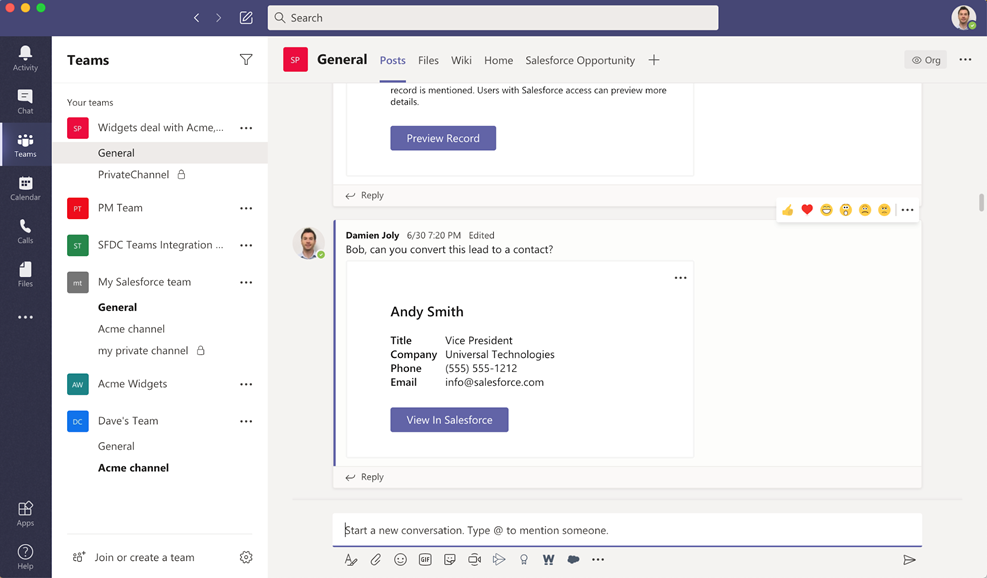
It all starts with the conversations that teams and individuals can have in chat. With a Salesforce message extension integration, now you can integrate key customer details right inline within a conversation, keeping details right in context and alongside your conversations. Relevant details around customer contact information are displayed within the broader chat stream. Administrators can also choose and determine the level of visibility for this information – whether details can be shared within a secured team, or whether they require a Salesforce log-in to display.
 Add connected records inline within your conversations
In addition, you can now pin customer information as a Tab in a channel. Within this Tab, you can see and update key vendor information, related contacts, and view updates and activities all in one place. This facilitates a workflow where you use a team or channel per customer to holistically manage all aspects of that relationship. Add the corresponding Salesforce display as a Tab, and you’ll have an integrated workspace that brings together chat files, and more alongside key customer information stored within the Salesforce CRM.

With these capabilities, it is now possible to design customer-focused workspaces within Microsoft Teams, featuring the Salesforce app and integration.
To get started, Salesforce customers will need to contact their customer success representatives or account executives to have them provision integration capabilities for Microsoft Teams. After this, team owners can add the Salesforce application to their team from AppSource or the Microsoft Teams store. We look forward to seeing more integrations that help you build the ultimate workspace for collaborating around customers.

by Contributed | Oct 22, 2020 | Technology
This article is contributed. See the original author and article here.

Azure Sentinel All in One is a project designed and developed by @Javier Soriano (Senior Program Manager – Microsoft), @Hesham Saad (Sr. CyberSecurity Technical Specialist – Microsoft) & @Sreedhar Ande (Program Manager – Microsoft) that seeks to speed up deployment and initial configuration tasks of an Azure Sentinel environment in just a few clicks!, this is ideal for Proof of Concept , Pilot scenarios and connector onboarding when highly privileged users are needed.
The main script in this repository takes care of the following steps:
- Creates resource group (if given resource group doesn’t exist yet)
- Creates Log Analytics workspace (if given workspace doesn’t exist yet)
- Installs Azure Sentinel on top of the workspace (if not installed yet)
- Enables the following Data Connectors:
- Azure Activity
- Azure Security Center
- Azure Active Directory
- Azure Active Directory Identity Protection
- Office 365 (SharePoint, Exchange and Teams)
- Microsoft Cloud App Security
- Azure Advanced Threat Protection
- Microsoft Defender Advanced Threat Protection
- Threat Intelligence Platforms
- Enables Analytics Rules for enabled Microsoft 1st party products
Implementation
These instructions will show you what you need to now to use Sentinel All in One.
Prerequisites
- PowerShell Core
- Azure user account with enough permissions to enable the required connectors. See table below.
- Some data connectors also require a license to be present in order to be enabled. See table below.
The following table summarizes permissions and licenses needed to enable each Data Connector:
Data Connector |
License |
Permissions |
|---|
Azure Activity |
None |
Reader |
Azure Security Center |
ASC Standard |
Security Reader |
Azure Active Directory |
Any AAD license |
Global Admin or Security Admin |
Azure Active Directory Identity Protection |
AAD Premium 2 |
Global Admin or Security Admin |
Office 365 |
None |
Global Admin or Security Admin |
Microsoft Cloud App Security |
MCAS |
Global Admin or Security Admin |
Azure Advanced Threat Protection |
AATP |
Global Admin or Security Admin |
Microsoft Defender Advanced Threat Protection |
MDATP |
Global Admin or Security Admin |
Threat Intelligence Platforms |
None |
Global Admin or Security Admin |
Usage
Download the project’s package from github repo, follow the usage guide and the below gif:

Get started today!
We encourage you to try it now and leverage the next generation of SIEM world for your environment. You can also contribute new connectors, workbooks, analytics and more in Azure Sentinel. Get started now by joining the Azure Sentinel Threat Hunters GitHub community.
by Contributed | Oct 22, 2020 | Technology
This article is contributed. See the original author and article here.
Customers rely on Microsoft Data Loss Prevention to enforce policies that identify and prevent the risky or inappropriate sharing, transfer or use of sensitive information across cloud, on-premise and endpoints.
Microsoft announces the public preview of a new dashboard to manage DLP alerts. This latest addition to Microsoft’s data loss prevention solution, provides customers with direct visibility into DLP policy enforcement in:
- Exchange
- SharePoint
- OneDrive
- Teams
- Devices
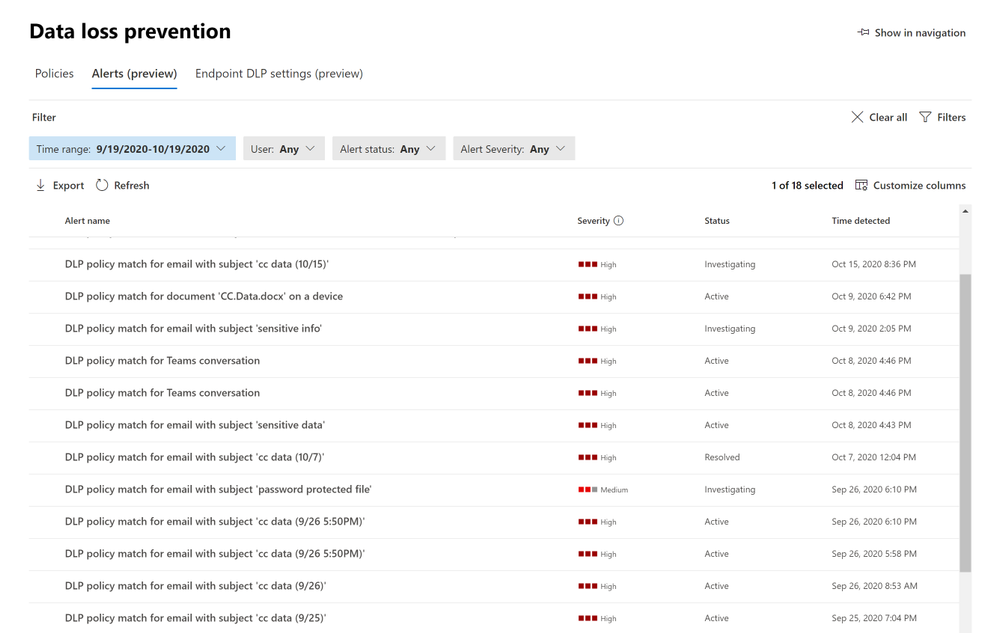
Advanced DLP alert options are configured in the existing DLP policy authoring workflow. These provide eligible DLP customers with the ability to tailor how they organize and display DLP policy enforcement event alerts with the information they need to investigate and address DLP policy violations quickly. Historical workflow information for alerts is available in the Management log.

Figure 1: Data Loss Prevention Event Alerts
Individual alerts provide exhaustive metadata associated with the DLP policy violation, change alert status (Active, Investigating, Dismissed or Resolved), include additional comments and define workflow actions such as assigning alerts to individuals for follow up.

Customers eligible for single event alert configuration options are provided with DLP alerts for individual policy violations.
Customers eligible for aggregated event alert configuration options are offered additional alert flexibility to configure alerts including triggering after a single or specific threshold number of events has occurred, has been exceeded, after a defined number of activities or for a specific volume of data.
Additionally, alerts provide details on the sensitive information types detected in the content and the confidence and event count to further assist DLP reviewers.
Get Started
Microsoft’s DLP solution is part of a broader set of Information Protection and Governance solutions that are part of the Microsoft 365 Compliance Suite. You can sign up for a trial of Microsoft 365 E5 or navigate to the Microsoft 365 compliance center to get started today.
Additional resources:
- For more information on DLP Alerts Management, please this
- For more information on Data Loss Prevention, please see this
- For the latest on Microsoft Information Protection, see this
Thank you,
Maithili Dandige, Principal Group Program Manager, Microsoft Information Protection and Compliance Engineering
Eric Ouellet, Senior Product Marketing Manager, Microsoft Compliance
by Contributed | Oct 22, 2020 | Technology
This article is contributed. See the original author and article here.
Introduction
Azure Virtual Network provides a logical, isolated and secure network boundary inside Azure. As more and more workloads start to get deployed in Azure Virtual Networks, enabling network connectivity across them starts to become challenging. There are multiple options to address these challenges. These options include Virtual Network (VNet) Peering, using VPN gateway between 2 virtual networks, etc.
To address common VNet connectivity challenges, a pattern has evolved over the years. This pattern is referred as “Hub and spoke” network topology in Azure.
Hub and spoke network topology pattern bring multiple benefits and simplifies network connectivity in Azure. Azure has another service called as Azure Virtual WAN (vWAN). Azure vWAN provides *managed hub and spoke topology* facilitating any-to-any connectivity.
This post will compare and contrast Hub and spoke network topology and Azure vWAN to help customers make informed decision.
Scenario
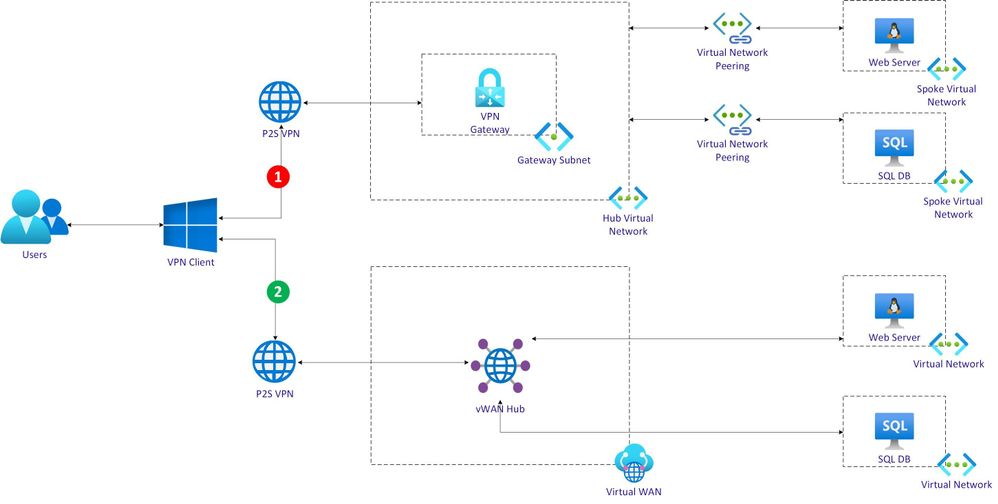
This post will evaluate Hub and spoke network topology and Azure vWAN using a scenario with 2 workflow as depicted below.

Each workflow is described at a high-level as below.
Hub VNet workflow:
- An user uses a Point to Site (P2S) VPN client.
- VPN client connects to Azure VPN Gateway deployed in Hub VNet.
- Hub VNet is peered with a spoke VNet running a web server Virtual Machine (VM).
- Hub VNet is also peered with another spoke VNet running database server VM.
- Web server VM will need to fetch data from database server VM.
- User will invoke web application running on web server VM.
vWAN hub workflow:
- Azure Virtual WAN is deployed with a hub.
- An user uses a Point to Site (P2S) VPN client to connect with vWAN hub.
- A VNet running web server VM is connected with vWAN hub.
- Another VNet running database server VM is also connected with vWAN hub.
- Web server VM will need to fetch data from database server VM.
- User will invoke web application running on web server VM.
Hub VNet workflow
Hub VNet workflow is now discussed in detail below.
Create Hub VNet and configure it with VPN gateway
Use following ARM script to create Hub VNet.
"apiVersion": "2018-04-01",
"type": "Microsoft.Network/virtualNetworks",
"name": "[parameters('hubVnetName')]",
"location": "[resourceGroup().location]",
"properties": {
"addressSpace": {
    "addressPrefixes": [
    "[parameters('hubVnetAddressPrefix')]"
    ]
}
Define a gateway subnet as below
"subnets": [
    {
        "name": "GatewaySubnet",
        "properties": {
            "addressPrefix": "[parameters('gatewaySubnetPrefix')]"
                }
    }
]
Create a VPN client root certificate to be configured with VPN gateway as shown below.
# Create a self-signed root certificate
$rootcert = New-SelfSignedCertificate -Type Custom -KeySpec Signature `
-Subject "CN=makshP2SRootCert" -KeyExportPolicy Exportable `
-HashAlgorithm sha256 -KeyLength 2048 `
-CertStoreLocation "Cert:CurrentUserMy" -KeyUsageProperty Sign -KeyUsage CertSign

# Generate a client certificate
$clientCert = New-SelfSignedCertificate -Type Custom -DnsName makshP2SChildCert -KeySpec Signature `
-Subject "CN=makshP2SChildCert" -KeyExportPolicy Exportable `
-HashAlgorithm sha256 -KeyLength 2048 `
-CertStoreLocation "Cert:CurrentUserMy" `
-Signer $rootcert -TextExtension @("2.5.29.37={text}1.3.6.1.5.5.7.3.2")

# Export client certificate
$myclientpwd = ConvertTo-SecureString -String "<super-secret-password>" -Force -AsPlainText
Export-PfxCertificate -Password $myclientpwd -Cert (get-item -Path Cert:CurrentUserMy$($clientCert.Thumbprint)) -FilePath myp2svpnclientCert.pfx
Get the Base64 encoded raw certificate data to be used in ARM Template by running follwing PS command.
# Get Base64 encoded raw certificate data to be used in ARM Template
$([Convert]::ToBase64String($rootcert.Export('Cert')))
Set the base64 encoded raw certificate data in the parameters file as shown below. Ensure that there is no line breaks in the value.
"clientRootCertData": {
    "value": "<base64-encoded-raw-certificate-data-obtained-above>"
}
Create public IP address to be assigned for VPN gateway as shown below.
{
    "apiVersion": "2018-04-01",
    "type": "Microsoft.Network/publicIPAddresses",
    "name": "[parameters('gatewayPublicIPName')]",
    "location": "[resourceGroup().location]",
    "properties": {
    "publicIPAllocationMethod": "Dynamic"
    }
}
Create VPN Gateway as shown below.
{
    "apiVersion": "2018-04-01",
    "type": "Microsoft.Network/virtualNetworkGateways",
    "name": "[parameters('gatewayName')]",
    "location": "[resourceGroup().location]",
    "dependsOn": [
        ...
    ]
}
Assign the public IP and subnet as shown below.
"ipConfigurations": [
    {
    "properties": {
            "privateIPAllocationMethod": "Dynamic",
            "subnet": {
            "id": "[variables('gatewaySubnetRef')]"
        },
        "publicIPAddress": {
            "id": "[resourceId('Microsoft.Network/publicIPAddresses',parameters('gatewayPublicIPName'))]"
            }
        },
        "name": "vnetGatewayConfig"
    }
]
Configure VPN certificate as below.
"vpnClientConfiguration": {
    "vpnClientAddressPool": {
        "addressPrefixes": [
            "[parameters('vpnClientAddressPoolPrefix')]"
        ]
    },
        "vpnClientRootCertificates": [
        {
            "name": "[parameters('clientRootCertName')]",
            "properties": {
                "PublicCertData": "[parameters('clientRootCertData')]"
            }
        }
    ]
}
Create Web Server VNet and VM
Define the Web Server VNet with following template.
{
    "apiVersion": "2018-04-01",
    "type": "Microsoft.Network/virtualNetworks",
    "name": "[parameters('spoke1VnetName')]",
    "location": "[resourceGroup().location]",
    "dependsOn": [
       ...
    ],
    "properties": {
    "addressSpace": {
        "addressPrefixes": [
        "[parameters('spoke1VnetAddressPrefix')]"
        ]
    },
}
Define a default subnet as shown below.
"subnets": [
    {
        "name": "default",
        "properties": {
            "addressPrefix": "[parameters('spoke1SubnetAddressPrefix')]",
            "networkSecurityGroup": {
                "id": "[resourceId('Microsoft.Network/networkSecurityGroups', 'spoke-vnet1-subnet-nsg')]"
            }
        }
    }
]
Create a Web Server VM as shown below.
{
    "apiVersion": "2017-03-30",
    "type": "Microsoft.Compute/virtualMachines",
    "name": "[parameters('spoke1Vm1Name')]",
    "location": "[resourceGroup().location]",
    "dependsOn": [
        ...
    ],
    "properties": {
        "hardwareProfile": {
        "vmSize": "Standard_A2_v2"
        },
    "osProfile": {
        "computerName": "[parameters('spoke1Vm1Name')]",
        "adminUsername": "spoke1vm1-uid",
        "adminPassword": "<super-secret-password>"
    },
    "storageProfile": {
        "imageReference": {
            "publisher": "MicrosoftWindowsServer",
            "offer": "WindowsServer",
            "sku": "2012-R2-Datacenter",
            "version": "latest"
        },
        "osDisk": {
            "name": "[concat(parameters('spoke1Vm1Name'),'_OSDisk')]",
            "caching": "ReadWrite",
            "createOption": "FromImage"
            }
    },
    "networkProfile": {
        "networkInterfaces": [
                {
                "id": "[resourceId('Microsoft.Network/networkInterfaces', parameters('vm1-spoke1-nic'))]"
                }
            ]
        }
    }
}
Create Network Peering between Hub VNet and Web Server VNet
Configure the peering as shown below in Web Server VNet.
{
    "apiVersion": "2020-05-01",
    "type": "virtualNetworkPeerings",
    "name": "[variables('SpokevNet1toHubvNetPeeringName')]",
    "location": "[resourceGroup().location]",
    "dependsOn": [
        ...
    ],
    "comments": "Peering from Spoke vNet 1 to Hub vNet",
    "properties": {
        "allowVirtualNetworkAccess": true,
        "allowForwardedTraffic": false,
        "allowGatewayTransit": false,
        "useRemoteGateways": true,
        "remoteVirtualNetwork": {
            "id": "[resourceId('Microsoft.Network/virtualNetworks',parameters('hubVnetName'))]"
        }
    }
}
Similarly, configure corresponding peering in Hub VNet as shown below.
{
    "apiVersion": "2020-05-01",
    "type": "virtualNetworkPeerings",
    "name": "[variables('HubvNettoSpokevNet1PeeringName')]",
    "location": "[resourceGroup().location]",
    "dependsOn": [
        ...
    ],
    "comments": "Peering from Hub vNet to Spoke vNet 1",
    "properties": {
        "allowVirtualNetworkAccess": true,
        "allowForwardedTraffic": false,
        "allowGatewayTransit": true,
        "useRemoteGateways": false,
        "remoteVirtualNetwork": {
            "id": "[resourceId('Microsoft.Network/virtualNetworks',parameters('spoke1VnetName'))]"
        }
    }
}
Create Database Server VNet and VM
Follow the same steps as followed in creating Web Sever VNet and VM. Change the configuration values as appropriate for Database VNet and VM.
Create Network Peering between Hub VNet and Database Server VNet
Configure the network peering using same process as followed for Web Server peering. Ensure that configuration values are replaced as appropriate.
At this point, there are 2 VNets which are connected with hub VNet.
Validate connectivity between Web and Database Servers
To validate connectivity between Web and Database servers, connect with the Hub VNet using VPN first. Then using the VPN connectivity, RDP session with either Web or Database server will be established.
To use VPN client, download the client by running following command.
az network vnet-gateway vpn-client generate -n hubvnetGateway `
    --processor-architecture Amd64 `
    -g $rgName
After downloading, launch the appropriate client (Windows (32, 64) or Mac).
Ensure that connection is established successfully after clicking “Connect” button.
Once VPN is connected, use RDP to connect with either Web Server VM or Database Server VM.
Before deploying Database or Web server on these VMs respectively, check if network connectivity is working between them. Easiest option is to do a ping test as shown below.
As can be seen above, there is no connectivity between Web and Database Server VMs.
Connectivity in Hub and spoke network topology
In the context of scenario discussed in this post, connectivity between Web and Database VNets via the Hub VNet is not supported *natively*. This type of connectivity is also referred as *transitive connectivity*. To establish transitive connectivity between 2 VNets, either Azure Firewall or Network Virtual Appliance (NVA) from a Partner will be needed.
vWAN hub workflow
vWAN workflow is now discussed in detail below.
Use following ARM script to create vWAN.
{
    "type": "Microsoft.Network/virtualWans",
    "name": "[parameters('vwanName')]",
    "apiVersion": "2020-05-01",
    "location": "[resourceGroup().location]",
    "properties": {
        "allowVnetToVnetTraffic": true,
        "type": "Standard"
    }
}
Create a vWAN hub as shown below.
{
    "type": "Microsoft.Network/virtualHubs",
    "name": "[parameters('vWanHubName')]",
    "apiVersion": "2020-04-01",
    "location": "[resourceGroup().location]",
    "dependsOn": [
        "[resourceId('Microsoft.Network/virtualWans/', parameters('vwanName'))]",
        ...
    ]
}
Create P2S VPN Gateway and associate it with vWAN hub
Create VPN Server Configuration as shown below to be used in VPN Gateway. Note that the VPN client root certificate is same as used for setting up VNet hub VPN connectivity.
{
    "type": "Microsoft.Network/vpnServerConfigurations",
    "apiVersion": "2020-05-01",
    "name": "vwan-p2s-vpn-config",
    "location": "[resourceGroup().location]",
    "properties": {
        "vpnProtocols": [
            "IkeV2"
        ],
        "vpnAuthenticationTypes": [
            "Certificate"
        ],
        "vpnClientRootCertificates": [
            {
                "name": "[parameters('clientRootCertName')]",
                "publicCertData": "[parameters('clientRootCertData')]"
            }
        ],
        ...
    }
}
Create default route table as shown below to be associated with VPN Gateway.
{
    "type": "Microsoft.Network/virtualHubs/hubRouteTables",
    "apiVersion": "2020-05-01",
    "name": "[concat(parameters('vWanHubName'), '/defaultRouteTable')]",
    "dependsOn": [
        "[resourceId('Microsoft.Network/virtualHubs', parameters('vWanHubName'))]"
    ]
    ...
}
Use the VPN configuration & route table created above and associate it with VPN Gateway as shown below.
{
    "type": "Microsoft.Network/p2sVpnGateways",
    "apiVersion": "2020-05-01",
    "name": "[parameters('vwanP2SVpnGatewayName')]",
    "location": "uksouth",
    "dependsOn": [
        ...
    ],
    "properties": {
                "virtualHub": {
                    "id": "[resourceId('Microsoft.Network/virtualHubs', parameters('vWanHubName'))]"
                },
                "vpnServerConfiguration": {
                    "id": "[resourceId('Microsoft.Network/vpnServerConfigurations', 'vwan-p2s-vpn-config')]"
                },
                ...
                "vpnClientAddressPool": {
                    "addressPrefixes": [
                        "10.10.8.0/24"
                    ]
                }
            }
}
Assign the VPN Gateway to vWAN hub as below.
{
    "type": "Microsoft.Network/virtualHubs",
    "name": "[parameters('vWanHubName')]",
    "apiVersion": "2020-04-01",
    "location": "[resourceGroup().location]",
    "dependsOn": [
        ...
    ],
    "properties": {
        ...
        },
            "p2SVpnGateway": {
            "id": "[resourceId('Microsoft.Network/p2sVpnGateways', parameters('vwanP2SVpnGatewayName'))]"
        },
        ...
 }
Create Web Server and Database Server VNets and VMs
Use the same process as described earlier to create Web Server and Database Server VNets. In this post, 2 additional separate VNets are created.
Connect Web Server and Database Server VNets with vWAN hub
To connect Web Server and Database Server VNets with vWAN hub, configure virtualNetworkConnections as shown below. Each VNet is associated with vWAN hub separately.
{
    "type": "Microsoft.Network/virtualHubs",
    "name": "[parameters('vWanHubName')]",
    "apiVersion": "2020-04-01",
    "location": "[resourceGroup().location]",
    "dependsOn": [
        ...
    ],
    "properties": {
       ...
        "virtualNetworkConnections": [
            {
                "name": "vhub-to-web-server-vnet",
                "properties": {
                    "remoteVirtualNetwork": {
                        "id": "[resourceId('Microsoft.Network/virtualNetworks', parameters('spoke3VnetName'))]"
                    },
                    "allowHubToRemoteVnetTransit": true,
                    "allowRemoteVnetToUseHubVnetGateways": true,
                    "enableInternetSecurity": true
                }
            },
            {
                "name": "vhub-to-database-server-vnet",
                "properties": {
                    "remoteVirtualNetwork": {
                        "id": "[resourceId('Microsoft.Network/virtualNetworks', parameters('spoke4VnetName'))]"
                    },
                    "allowHubToRemoteVnetTransit": true,
                    "allowRemoteVnetToUseHubVnetGateways": true,
                    "enableInternetSecurity": true
                }
            }
        ],
        "sku": "Standard"
    }
}
Configure routes as shown below.
{
    "type": "Microsoft.Network/virtualHubs/hubRouteTables",
    "apiVersion": "2020-05-01",
    "name": "[concat(parameters('vWanHubName'), '/defaultRouteTable')]",
    "dependsOn": [
        "[resourceId('Microsoft.Network/virtualHubs', parameters('vWanHubName'))]"
    ],
    "properties": {
        "routes": [
            {
                "name": "spoke3route",
                "destinationType": "CIDR",
                    "destinations": [
                        "192.168.251.0/24"
                    ],
                "nextHopType": "ResourceId",
                "nextHop": "[resourceId('Microsoft.Network/virtualHubs/hubVirtualNetworkConnections', parameters('vWanHubName'), 'vhub-to-spoke3')]"
            },
            {
                "name": "spoke4route",
                "destinationType": "CIDR",
                    "destinations": [
                        "192.168.252.0/24"
                    ],
                "nextHopType": "ResourceId",
                "nextHop": "[resourceId('Microsoft.Network/virtualHubs/hubVirtualNetworkConnections', parameters('vWanHubName'), 'vhub-to-spoke4')]"
            }
        ],
        "labels": [
            "default"
        ]
    }
}
Validate connectivity between Web and Database Servers in vWAN
Process to validate connectivity between Web and Database servers in vWAN is similar to the one followed in VNet hub. First, connect with the vWAN hub using VPN . Then using the VPN connectivity, RDP session with either Web or Database server will be established.
Download the VPN client from Azure portal as shown below.
After downloading, launch the appropriate client (Windows (32, 64) or Mac).
Click “Connect” button and validate that connection is established successfully.
Use RDP to connect with either Web Server VM or Database Server VM after VPN is connected.
Just like before, check if network connectivity is working between Database and Web servers. Run a ping test as shown below to quickly verify connectivity.
From the screenshot above, connectivity between Web and Database Server VMs is established successfully. Once Database and Web Server software’s are installed on these servers, connectivity will work just fine between them.
Connectivity in vWAN Hub topology
In the context of scenario, vWAN hub based VPN and cross-vNet connectivity works in *default* mode. vWAN hub provides native support for transitive connectivity. This simplifies network management without having to use Partner solution on Azure Firewall just for enabling transitive networking.
Consider following important factors when choosing between either VNet hub and spoke or vWAN hub networking topology.
- Need for cross-VNet transitive connectivity in *default* configuration.
- Need for *any-to-any* connectivity between multiple on-premise sites/branches and Azure.
- Need for supporting large number of VPN clients/branches/sites connectivity with Azure.
- Need for higher aggregated throughput for connectivity with Azure.
Refer to following resources for additional information.


Recent Comments