by Contributed | Oct 27, 2020 | Technology
This article is contributed. See the original author and article here.
If you’re as addicted as I am with SharePoint, you might be glad to know that managing SharePoint is now possible with PowerShell Core!
What is PowerShell Core?
PowerShell is an automation scripting language from Microsoft, which was originally only available on Windows devices, and built on top of the .NET Framework. Since 2016, we also have PowerShell Core which is open-source, cross-platform, and built on top of .NET Core.
The version that ships on Windows devices is called Windows PowerShell (latest is version 5.1), and the cross-platform version is called PowerShell Core (currently version 7) and is also available on Windows.
Why is it important?
Knowing that Windows PowerShell (5.1) is not going to have new features, but only security fixes, we shall see PowerShell Core as the future. Therefore, it was a no brainer that one of the most important platforms should still be manageable with PowerShell.
How did this happen?
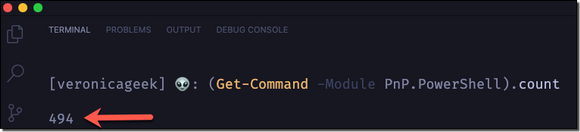
If you’re familiar with PowerShell for SharePoint, there’s a big chance that you’re also familiar a module called PowerShell PnP (or at least heard of). This module was created by Erwin van Hunen (MVP) and is also Community driven. Currently, it has 450+ cmdlets and has been a life saver for many of us!
Are there any changes?
Yes, mainly in the authentication process.
– Classic credential based authentication has changed
– UseWebLogin parameter is not available anymore
Cmdlets will remain the same, so we won’t have to adjust to a different format. It’s PowerShell after all!
What about the new Microsoft Teams cmdlets?
They are still here! So it means you’ll also be able to use the PnP.PowerShell module to manage Teams on PowerShell Core.

Is it available yet?
Yes, in pre-release and any new updates are done during nightly build. I believe December 2020 has been set as a target month for the module to be GA (General Availability).
For more details and a roadmap on PnP.PowerShell (on PSCore), please have a look at Erwin’s blog post.
Important to know
Some decisions needed to be made to have a proficient and maintainable module. Therefore, the current PowerShell PnP like we know it on Windows PowerShell (5.1) will not be worked on from December 2020.
Also, ONLY SharePoint Online will be supported instead of (currently) SP2013, SP2016, and SP2019 with the old module. That’s something important to be aware of.
Contribute to the Github repository
Repo maintainers always welcome new contributions, as small as they may be (i.e.: fix a typo, update documentation, etc…). Go contribute to the PnP.PowerShell module!
Next steps
Your next steps should be to install PowerShell Core on your machine if not already done (Windows, MacOS, or Linux), download the new PnP.PowerShell module, and test it out!
by Contributed | Oct 26, 2020 | Technology
This article is contributed. See the original author and article here.
There are many possible careers in the IT industry, developer, project manager, tester, but also Ops and DevOps. An especially important part of a modern development cycle is managing your Cloud resources. Deployment needs to happen often and accurately, and it requires effective communication between team members but also great processes and tools.
Infrastructure as Code
Infrastructure as Code, IaC is the process of expressing your infrastructure as Code as readable text files over using UIs to configure the same. The benefits of doing so are many. Below are some benefits:
- Dev and Ops can work in the same process. There’s a need for Developers and Ops to work more tightly to innovate faster with speed and accuracy. Developers normally store their code in a version control system like Git. You can now do the same with your templates, text files desribing your Cloud resources.
- Anyone can deploy. When your templates are in version control, anyone on the team can deploy, just use a tool like Azure-CLI or PowerShell to do so. When everyone in a team can deploy it’s important that it can be done reliably.
- You know what’s in the Cloud. Before IaC you were/are using a graphical interface or some tool to manage your resources. It’s easy to loose track of what you have in the Cloud. If you instead express your resources as text files it’s a lot easier to see what’s going on.
- Easier to reproduce elsewhere. In theory at least, it should be a lot easier to recreate your Cloud operation elsewhere if you are looking to expand your company’s business elsewhere.
Azure Resource Manager
Azure Resource Manager, ARM, is one of the ways you can use to implement IaC, the other way is by using Terraform. The idea is to express your cloud resources as JSON files. Then you deploy the files to the Cloud by running either Azure-CLI or PowerShell. Every JSON file is known as a template. A template contains your resources you want to deploy but it also contains different constructs that makes it easy to manage your resources as things gets more complicated. Examples of such constructs are parameters, variables, template functions and outputs.
LEARN path
IaC using ARM is quite a big topic. Therefore myself and some colleagues have authored a 4 part series describing the various constructs and aspects of it.
Here’s a link to the path, an overview page for all the tutorials
https://docs.microsoft.com/en-us/learn/paths/deploy-manage-resource-manager-templates/
Each tutorial contains various aspects of ARM. Below follows a description of each tutorial:
Deploy consistent infrastructure in Azure by using Azure Resource Manager (ARM) templates
https://docs.microsoft.com/en-us/learn/modules/create-azure-resource-manager-template-vs-code/
Write Azure Resource Manager templates by using Visual Studio Code to deploy your infrastructure to Azure consistently and reliably.
- Implement an Azure Resource Manager template by using Visual Studio Code.
- Declare resources and add flexibility to your template by adding resources, parameters, and outputs.
Deploy to multiple Azure environments by using ARM templates
https://docs.microsoft.com/en-us/learn/modules/modify-azure-resource-manager-template-reuse/
Manage multiple Azure environment deployments of your Azure Resource Manager templates by using functions, variables, tags, and parameter files.
- Create an expression for a unique value by using Azure Resource Manager template functions.
- Reuse your expression by storing it in an Azure Resource Manager template variable.
- Organize and track your deployed Azure resources by using resource tags.
- Manage multiple deployment parameters by using Azure Resource Manager template parameter files.
Validate your deployments by using what-if and the ARM template test toolkit
https://docs.microsoft.com/en-us/learn/modules/arm-template-test/
This module teaches two major things, how to preview your changes with the what-if operation and the value of doing so. Secondly it teaches you how to create valid templates and gives you good recommendations that you can follow using the ARM template test toolkit tool.
- Preview what changes will happen before you deploy by using the what-if operation.
- Validate your templates adherence to sound recommendations using ARM template test toolkit.
- Implement domain specific rules for deployments that can be run by ARM template test toolkit.
Deploy modular and reusable ARM templates from the command line and by using GitHub Actions
https://docs.microsoft.com/en-us/learn/modules/deploy-templates-command-line-github-actions/
Learn how to deploy Azure Resource Manager (ARM) templates by using Azure PowerShell, the Azure CLI, and from GitHub Actions. Use linked templates to break down complex templates into templates that are more modular.
- Choose the best way to deploy ARM templates, based on your needs.
- Modularize your templates by using linked templates.
- Learn how to create a GitHub Actions to deploy templates.
by Contributed | Oct 26, 2020 | Technology
This article is contributed. See the original author and article here.
This blog is co-authored by Brian Delaney, Clive Watson, and Jon Shectman – Microsoft.
If you’ve been searching for a simple way to gain insights into your incidents, entities and data, then this is the Workbook for you. Join us on a data journey, in which you investigate your incidents efficiently, gain insights into alerts and entities with ease, and pivot through your data while retaining the ability to broadly search with a single click of your mouse.
Note: this article focuses on how to start using the Investigation Insights Workbook. For detailed instructions on how to set up as well as answers to other questions you may have, head over to the dynamic Help section at maintained at the Azure Sentinel Github Wiki.
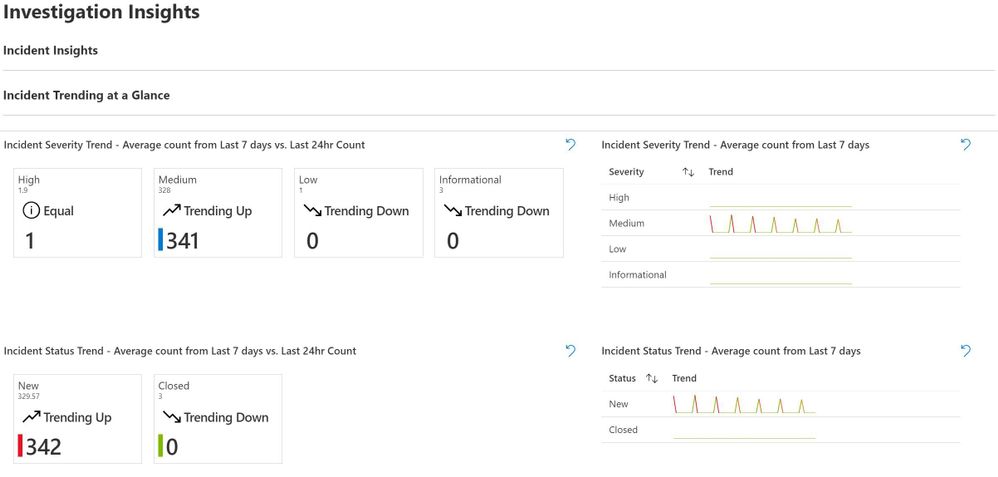
Once you load Investigation Insights, you’ll see several options at the top – Investigate By and Show Incident Trend.

Let’s start by choosing Incident and Yes, respectively. This brings up helpful Incident Trending information at a Glance. For clarity and from the start, there are two ways to use Investigation Insights: Incident Insights and Entity Insights. Incident Insights is the easiest way to get to you data and is where most people will start from. Entity Insights allows you to do the exact same investigation; however, note as you haven’t selected incident information, you may have to enter some details manually.
As we’ll see, Incident Insights will typically lead into Entity Insights; however, if you know an Entity that you’d like to research, you need not always start with an Incident.
There’s Trending data for the last day as compared to the TimeRange you’ve chosen to work in. This is insightful for SOC analysts as well as managers as a point-in-time measurement. To the right is an average count by severity from your TimeRange, and below that is an Average count for New Incidents.

Pay special attention to the trend of Incident Status – a Trend up can warrant additional research with an eye toward Indicators of Compromise in the Incidents; a Trend down may indicate a misconfiguration or problem with the data feed.
Below Incident Trending is the Incident Investigation Section. (Recall that we chose Incident earlier on.) This section aids in easily investigating incidents without having to drill into the GUI or go hunting for data. You can start by viewing all of the incidents in your TimeRange, or you can narrow by using the TimeBrush element. Generally, we suggest you target a slice of time to drill into with the TimeBrush.

Once you’ve narrowed your time scope, you’ll next want to filter by incident severity.

For a bird’s eye view of the data set and environment, it can be useful to start with Show All and then drill down from there.
In the lab example, I can see some important things right away; let’s drill into one of these Incidents to look further — Incident 339917 Data Exfiltration Detected. I can click on that Incident or I can type an incident number that I want to research into the Search bar.

Without routing away, one can also easily drill down and research the constituent Alerts within the Incident. Already populated are alert attributes such as the contributing product and the ProviderName.

Clicking on the example alert from Incident 339917 also expands the Entities that the Alert contains. This information can be critical to researching the Alert and, in turn, the Incident.

So in this Alert, there are two Entities: an account type (“ceo”) and an IP address. Our investigation is gaining momentum and honing in on the entities that have potentially been impacted or compromised. And we’re doing this with few clicks, no navigation, and no code. This leads us to our next section, Entity Insights.
Entity Insights is organized around four types of entities plus the ability to perform a Full Search across all of the Entity data in our set. If you’re coming to Entity Insights from an Incident investigation, chances are that you have discovered a specific Entity in an Alert that you’d like to investigate. In this case, you can start your Entity Investigation by clicking on the entity. For example, I’ll click on the IP address Entity that I discovered, in order to populate it in the appropriate Entity Insights search:

Alternately, I can simply type the entity in the search box of the appropriate type. For example, I’ll click in Investigate Account and type in an account name.

This immediately populates a calculated Distance from Typical Singin Location with a map plotting the data. Clicking on a signin produces a detailed chart of the data, including Conditional Access Status.

I can also navigate to other tabs to view a Computer Logons table for the account:

A Conditional Access Analysis from Azure AD singins

Multiple tables for common Indicators of Compromise – Failed Singins, Password Change Attempts, Disabled MFA singins, and Mailbox Forwarding Rules for the Account:

And finally any other Related Alerts for the account:

Entity Insights can help in researching Host Entity types, too. By populating the FQDN of a host, one can view New Processes on the host as well as Account Logons and Related alerts.

We can also get specific information about the host’s Security Baseline and overall posture.

Updates displays all missing required updates in the latest security check, as well as an update summary.
Security Baseline displays a similar summary of baseline security rules passed and failed for the host, as well as a filterable table of Failed Security Baselines in the latest check. Be sure to try filtering by severity for a quick, detailed view of the host’s security posture:

The Suspicious Changes tab displays three sub-sections that may well comprise indicators of compromise. AuditPolChange displays filterable audit policy changes on the host; SecLogClear details any times that the host’s security log was cleared, and User/Group Changes details Account Creations and Group Changes that have taken place.

Finally, don’t forget to check out the Full Search functionality; this tab provides the ability to perform a String type search across all categories of Entity data in your data set, and then to drill deeper by category. This functionality can be deceptively complex and useful. By simply typing in an Entity string I suspect might be in the log data, I can search across multiple categories to both view results and to understand quickly where I should look for more data.

That completes our brief, high-level overview of the Investigation Insights workbook. If you spend some time with it, let us know what you think and please do share your ideas for improvements in the Office Form here.
Also, be on the lookout for additional functionality and enhancements in the coming weeks — things like the addition of User and Entity Behavioral Analytics tables where appropriate, adding in new Entity types as they become available, and potentially adding in the Normalized Network Schema. Do you have some ideas? Please let us know; we’d love feedback on what we did right and what can be improved, or what we might have missed. We have lots of plans for extra capabilities, so please let us know so we can try and align them with your ideas?
Finally, don’t forget to head over to the detailed Help section (referenced above), if you have more questions. Let us know how you do with Investigation Insights and, until then, happy auditing.
by Contributed | Oct 26, 2020 | Technology
This article is contributed. See the original author and article here.
This post covers retirement of Network Access accounts (NAA) in the internal Microsoft environment, aided by simplified authentication to Management Point and Distribution Points in the form of Enhanced HTTP and related access scenarios.
Network access accounts have been used for several years now in current and past releases of Configuration Manager, as service accounts used by clients to get content from Distribution Points. ConfigMgr Consultants and Support Engineers can likely recite in their sleep the standard best practices of configuring a low rights service account for the NAA and not using the same account for Client Push purposes.
The arrival of Enhanced HTTP was well received by our ops teams as it brought with it the prospect of dropping the NAA in favor of token-based authentication. In a zero–OSD, all Autopilot world, this became one less credential to manage/rotate in our Key Vaults and yet another site-specific setting to no longer configure. It is important to mention this is a secondary benefit, as the ability to secure client communication without the overhead of PKI certs is the core value add of E-HTTP, amongst other benefits. Note: our colleagues on the dev team did caution us about “Run from DP” scenarios in legacy Packages likely not functioning with the absence of the NAA, but as we mainly leverage Applications which use download/execute by default – this was not of much concern.
The docs team has documented in detail the workflow a device follows to authenticate via Azure AD user or device token. But what about devices that cannot leverage AAD/PKI? This scenario is also supported by E-HTTP and the 2002 build extended this further by introducing the concept of an added Management Point issued token that a client can also use for CMG communication. This token can also be bulk provisioned for devices with no corporate network connectivity.
In classic 95/5 (80/20 for Sysadmins :) ), the prospect of NAA removal after enabling E-HTTP in our environment required some validation to ensure that even a pure Workgroup device would not be affected.
In a lab enabled for E-HTTP, with two Site Systems:
MP1 (MP with ConfigMgr SSL Binding)
and MPDP2 (PKI based HTTPS MP/DP)
we see even during client setup (ccmsetup.log) that with no PKI cert, the Workgroup client gets site configuration/DP information from MP1 and uses token-based authentication against the MPDP2 (HTTPS) to get content.
We install the client on the device using this command: ccmsetup.exe SMSSITECODE=CM1 /mp:MP1.sccmtest.loc SMSMP=MP1.sccmtest.loc
Examining log snippets, we see the following:
CCMSetup.log:
Sending location request to 'MP1.sccmtest.loc' with payload '<SiteInformationRequest SchemaVersion="1.00"><SiteCode Name="CM1"/></SiteInformationRequest>'

Host=MPDP2.sccmtest.loc, Path=/CCMTOKENAUTH_SMS_DP_SMSPKG$/CM100002, Port=443, Protocol=https, CcmTokenAuth=0, Flags=0x11304, Options=0xe0
Post client install, we see in ClientIDMgrStartup.log completion of client registration and indication that the self-prove token is now available. This is the build 2002 feature mentioned above:
[RegTask] - Client is registered. Server assigned ClientID is GUID:A-B-C-D-E. Approval status 1

Updated registration hint.

Self-prove token is renewed.
In ClientLocation.log, we see the client also rotating over to the HTTPS Site System (MPDP2), despite the absence of a local PKI cert. At this point the client retrieves the CCM Token:
Getting CCM Token from STS server 'MPDP2.sccmtest.loc'

Getting CCM Token from https://MPDP2.sccmtest.loc/CCM_STS

Host=MPDP2.sccmtest.loc, Path=/CCM_STS, Port=443, Protocol=https, CcmTokenAuth=0, Flags=0x11204, Options=0x5c0
CCM_STS.log on MPDP2 shows entries indicating validation of the PreAuth/SelfProve token:
Incoming request URL: https://MPDP2.sccmtest.loc/CCM_STS

Validated PreAuth SelfProve token. UniqueId: GUID:A-B-C-D-E. ClientKey: XYZ

Validated CCM Auth header for client 'GUID: A-B-C-D-E’

Created SCCM token from self-prove pre-auth token
Now for a Content Request, perhaps for Software Center based app install. CAS.log on the client displays the various DP URLs returned:
Download started for content Content_8811d5c2-6028-4c53-bc15-032c212bc676.1

Location update from CTM for content Content_8811d5c2-6028-4c53-bc15-032c212bc676.1 and request {B10D4C07-1B97-4EDB-9A95-D3ACF97FC97A}

Matching DP location found 0 - http://MPDP2.sccmtest.loc/sms_dp_smspkg$/content_8811d5c2-6028-4c53-bc15-032c212bc676.1 (Locality: SUBNET)

Matching DP location found 1 - http://MPDP2.sccmtest.loc/nocert_sms_dp_smspkg$/content_8811d5c2-6028-4c53-bc15-032c212bc676.1 (Locality: SUBNET)

Matching DP location found 2 - https://MPDP2.sccmtest.loc/ccmtokenauth_sms_dp_smspkg$/content_8811d5c2-6028-4c53-bc15-032c212bc676.1 (Locality: SUBNET)
And ContentTransferManager.log shows client switching over to the correct HTTPS URL and using the CCM token:
CTM job {E97B1E9D-CA16-4E86-82E1-BE6EE5BACB44} (corresponding DTS job {A14CFFE4-C27E-4DB1-B2EB-B9FE4C043994}) started download from 'http://MPDP2.sccmtest.loc/SMS_DP_SMSPKG$/Content_8811d5c2-6028-4c53-bc15-032c212bc676.1' for full content download.

CTM job {E97B1E9D-CA16-4E86-82E1-BE6EE5BACB44} switched to location 'https://MPDP2.sccmtest.loc/CCMTOKENAUTH_SMS_DP_SMSPKG$/Content_8811d5c2-6028-4c53-bc15-032c212bc676.1'

CTM job {E97B1E9D-CA16-4E86-82E1-BE6EE5BACB44} entered phase CCM_DOWNLOADSTATUS_DOWNLOADING_MANIFEST

CTM job {E97B1E9D-CA16-4E86-82E1-BE6EE5BACB44} entered phase CCM_DOWNLOADSTATUS_PROCESSING_MANIFEST

CTM job {E97B1E9D-CA16-4E86-82E1-BE6EE5BACB44} entered phase CCM_DOWNLOADSTATUS_PREPARING_DOWNLOAD

CTM job {E97B1E9D-CA16-4E86-82E1-BE6EE5BACB44} entered phase CCM_DOWNLOADSTATUS_DOWNLOADING_DATA

CTM job {E97B1E9D-CA16-4E86-82E1-BE6EE5BACB44} successfully processed download completion.
Note that in this scenario as well, the PKI based HTTPS DP is used. So, there you have it – evidence that the client leverages E-HTTP at the start and can then even communicate with PKI based Site Systems via token-based authentication.
The inner workings are likely best left for discussions with the dev team at an upcoming AMA/conference, but the log snippets and the previously documented workflow essentially reveal the CCM Token to be the primary identity token for the client. The device/user could present either AAD, bulk registration or self-prove/PreAuth token to the MP and get back the CCM token. Any other content access tokens can be acquired thereafter.
by Contributed | Oct 26, 2020 | Technology
This article is contributed. See the original author and article here.
It is our pleasure to announce the release of version 1.0 of .NET for Apache® Spark™, an open source package that brings .NET development to the Apache® Spark™ platform.
The new 1.0 release of .NET for Apache® Spark™ includes the following:
- Support for .NET applications targeting .NET Standard 2.0 (.NET Core 3.1 or later recommended).
- Support for Apache® Spark™ 2.4/3.0 DataFrame APIs including the ability to write Spark SQL. For example:
var spark = SparkSession.Builder().GetOrCreate();
var tweets = spark.Read().Schema("date STRING, time STRING, author STRING, tweet STRING").Format("csv").Load(inputfile);
tweets = tweets.GroupBy(Lower(Col("author")).As("author"))
               .Agg(Count("tweet").As("tweetcount"))
               .OrderBy(Desc("tweetcount"));
tweets.Write().SaveAsTable("tweetcount");
spark.Sql(@"SELECT * FROM tweetcount").show();
- Ability to write Apache® Spark™ applications using .NET user-defined functions (UDFs.) For example:
// Define and register UDF
var concat = Udf<int?, string, string>((age, name)=>name+age);

// Use UDF
df.Filter(df["age"] > 21).Select(concat(df["age"], df["name"]).Show();
- Provides an API extension framework to add support for additional Spark libraries. Currently this includes Linux foundation Delta Lake, Microsoft OSS Hyperspace, ML.NET, and support for Apache Spark’s MLLib functionality
- Performance work and improving both pickling interop and support of Apache® Arrow for moving data between Spark runtime and .NET UDFs. The following are just a few of the contributions we made to the Open Source projects:
- Apache® Arrow: ARROW-4997, ARROW-5019, ARROW-4839, ARROW-4502, ARROW-4737, ARROW-4543, ARROW-4435, ARROW-4503, ARROW-4717, ARROW-4337, ARROW-5034, ARROW-5887, ARROW-5908, ARROW-6314, ARROW-6972, ARROW-6682, ARROW-7516, ARROW-8505, ARROW-8882, ARROW-10238
- Pyrolite (Pickling Library): Improve pickling/unpickling performance, Add a Strong Name to Pyrolite, Improve Pickling Performance, Hash set handling, Improve unpickling performance
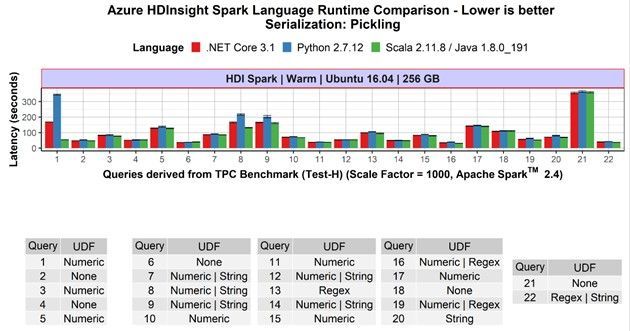
- Competitive performance: .NET for Apache® Spark™ programs that are not using UDFs show the same speed as Scala and PySpark-based non-UDF Spark applications. If the applications include UDFs, the .NET for Apache® Spark™ programs are at least as fast as PySpark programs, often faster. This previous blog post contains more details.

Availability
.NET for Apache® Spark™ is available as an OSS project on the .NET Foundation’s GitHub and can be downloaded from NuGet.
It is built into Azure Synapse Analytics and Azure HDInsight where you can enjoy an out-of-the-box experience. Version 1.0 will be released in these products in the next major release.
.NET for Apache® Spark™ can also be used in other Apache Spark cloud offerings including Azure Databricks and as well as AWS EMR Spark. For on-prem deployments, it offers is multi-platform support for Windows, MacOS, and Linux.
Historical background and how we developed it
About two years ago, we heard an increasing demand from the .NET community for an easier way to build big data applications with .NET instead of having to learn Scala or Python. Thus, we built a team based on members from the Azure Data engineering team (including members of the previous Mobius team) and members from the .NET team and started the “.NET for Apache Spark” open-source project. While we operate the project under the .NET Foundation, we did file Spark Project Improvement Proposals (SPIPs) SPARK-26257 and SPARK-27006 to have the work included in the Apache Spark project directly, if the community decides that is the right way to move forward.
We announced the first public version in April 2019 during the Databricks Spark+AI Summit 2019 and at Microsoft Build 2019, and since then have regularly released updates to the package. In fact we have shipped 12 pre-releases, included 318 pull requests by the time of version 1.0, addressed 286 issues filed on GitHub, included it in several of our own Spark offerings (Azure HDInsight and Azure Synapse Analytics) as well as integrated it with the .NET Interactive notebook experiences.
In addition, we encouraged community participation in the project and have seen a steady increase in both interest in the project and thus the use of .NET with Apache Spark (88 watchers, over 210 forks, and over 180k NuGet downloads) as well as contributions to the project itself, ranging from documentations and samples to providing sophisticated additional capabilities such as Spark’s MLLib integration and Docker images. .
We are deeply grateful to everyone who is helping in making .NET for Apache Spark a success and looking forward to our ongoing collaboration!
Looking into the Future
Of course, shipping version 1.0 is not the end but only the beginning for .NET for Apache® Spark™.
We recently reached out to .NET developers to understand how they use big data and what challenges they face. Most .NET developers want to use languages they are familiar with like C# and F# to build big data projects. It’s clear that support for features like Language Integrated Query (LINQ) is important. The largest obstacles faced include setting up prerequisites and dependencies and finding quality documentation. We’re addressing both, with examples like our community-contributed “ready-to-run” Docker images and a recent wave of updates to the .NET for Spark documentation. We also heard loud and clear that a top priority is supporting deployment options, including integration with CI/CD DevOps pipelines and publishing or submitting jobs directly from Visual Studio. We are continuously updating the project to keep pace with .NET developments, Spark releases, and feature requests such as GroupMap.
What the community is saying
A version 1.0 release would not be complete without some customer testimonials 
I have been working with data and the traditional Microsoft stack for about fifteen years and, over the last three years, have been working with Apache Spark, which meant moving away from C# and towards Scala and Python.
In 2019 when I found out about the .NET for Apache Spark project, I was pretty excited by the thought of bringing the power of Apache Spark to .NET. The project team has welcomed outside contributions to the project, both the documentation, and code from the very start. Due to the way the project team review pull requests and offer guidance, it has been a pleasure to contribute to what I believe will be an exciting project that will help many organizations work effectively with Apache Spark without having to adopt new languages and tooling.
Using functionality from a library like .NET for Apache Spark that you implemented yourself, in a project you are working on always brings a smile to my face. Using .NET for Apache Spark with the full .NET ecosystem and especially unit testing frameworks mean the where I use .NET in a project I can get going faster and concentrate on the actual data processing rather than having to learn Python or Scala and their associated testing and packaging systems.
The rate of change has been really exciting to watch and I am really looking forward to the upcoming v1.0 milestone which is going to help drive adoption of big data within the .NET community, interesting times!
Ed Elliot, Lead Cloud Data Engineer at GFT Group and .NET for Apache® Spark™ contributor
Overall, we enjoy working with Spark.Net. It is easy to learn and new developers do not feel like they are learning yet another new language. We got to write UDF efficiently with our existing .Net library, especially useful when we had to parse and pre-process JSON data. We also modeled our .NET for Spark project with C# programming model such as dependency injection, extension methods and inheritance, making our code much more structured and extensible.
Microsoft Dynamics 365 Commerce, uses .NET for Apache Spark in production to process terabytes worth of data per day
We build ML/Deep models on top of substrate data to infuse intelligence to Office 365 products. Our data resides in Azure Data Lake Storage, which we cook/featurize and in turn feed into our ML models. Given that our business logic e.g., featurizers, tokenizers for normalizing text, are written in C#, .NET for Apache Spark is an ideal candidate for our workloads. We leverage .NET for Spark to run those libraries at scale. Our experiences with .NET for Apache Spark have been very promising and stable. The highly vibrant community helps us iterate at the agility we want.
Microsoft Office 365 Search, Assistant & Intelligence, uses .NET for Apache® Spark™ in production to process ~10s of terabytes worth of data per day
Call to Action
We are looking forward to seeing you develop your Apache Spark programs with .NET on your favorite Spark platform.
Start out with browsing our online .NET for Apache Spark documentation, take the tutorial Get started with .NET for Apache Spark, and submit jobs to run on Azure and analyze data in real-time notebooks using .NET for Apache Spark with Azure Synapse Analytics.
Then let us know about your experience with .NET for Apache® Spark™: If you have feedback and requests or questions you can file them as a Github issue at https://github.com/dotnet/spark/issues. You can also reach out to us on twitter with the hashtag #DotNetForSpark. If you would like your favorite Spark cloud provider to include .NET for Apache® Spark™ out of the box, please point them to the project. We are happy to engage and help them to include it.
Finally, don’t miss our presentation describing this major release in the upcoming .NET Conf 2020: “The Missing Piece – Diving into the World of Big Data with .NET for Apache Spark”!
Acknowledgements
The team responsible for the major release consisted of the following members:
Engineering: Terry Kim, Steve Suh, Niharika Dutta, Andrew Fogarty, Elva Liu, Jon Sequeira, Diego Colombo, Kevin Ransom, Stephen Toub, Eric Erhardt, Prashanth Govindarajan, Rahul Potharaju
Program Managers: Michael Rys, Jeremy Likness, Maria Nagagga, Brigit Murtaugh
Samples & Documentation: Luis Quintanilla
Marketing: Beth Massi, Sarah Cook, Kaiser Larsen
In addition to this, we also had tremendous help from two external community members: Ed Elliot, Martin Kandlebinder.
by Contributed | Oct 26, 2020 | Technology
This article is contributed. See the original author and article here.
Microsoft is a proud sponsor of NurseHack4Health – a 3 day virtual hackathon from Nov. 13-15, 2020 to leverage technology and help improve access to reliable, trusted information. This hackathon is made possible by the collaboration between Microsoft, Johnson & Johnson, SONSIEL, and devup. Read below for more details, and register at https://www.nursehack4health.org/ by Nov. 9 to reserve a spot.
The challenge: Information about the COVID-19 pandemic is rapidly changing, and gaining access to reliable public health information has been challenging, highlighting a need for improved communication and trustworthy resources.
The hackathon: This event presents a rare opportunity to bring together individuals with a diverse set of ideas and skills – nurses, other healthcare professionals, engineers, IT experts and innovators – to problem-solve in a supporting, inspiring and innovative environment. This is an open source hackathon being hosted on Microsoft Teams, and using GitHub for solution repositories.
The participant’s experience: Participants will focus on how technology can be leveraged to create better outcomes for all in the most pressing areas of education and communication. Central ideas of focus may include:
- Ensuring the health and safety of students and teachers in the classroom
- Relaying to the public the importance of vaccines
- Breaking down racial disparities and social inequities
- Sharing best practices across healthcare providers and facilities
- And more
Participants will also:
- Work alongside Microsoft and architects from the dev community
- Bring existing skills around HTML/JavaScript, ASP.NET, Java, SQL or NoSQL
- Have access to free Azure services, Power BI, and Power Apps during the duration of the hackathon
Pre-hackathon training: The hackathon is supported by Microsoft mentors to help answer technical questions. To get a jump start on GitHub, Teams, Power Apps, and Power Virtual Agents bots, join the Cloud Skills Challenge for curated self-learning modules covering these topics. Track your progress against others on the leaderboard.
During the hackathon, the following technologies are expected to surface:
- AI-Driven Software Development
- Progressive Web Apps
- Internet of Things for Healthcare – Connecting Devices, Enhancing Accessibility
- Blockchain
- AR/VR/MR – The Use of Immersive Technologies
- Low/No-Code Development – Development Using GUIs (Power Platform)
All participants are welcomed: Despite the event being called a hackathon, this is not just about coding, it’s about community. Whether you are new to hackathons or a veteran, there are plenty of ways to get involved, and it’s a great opportunity to learn. All participants are welcomed!
Register or learn more about the hackathon at https://www.nursehack4health.org/
by Contributed | Oct 26, 2020 | Technology
This article is contributed. See the original author and article here.
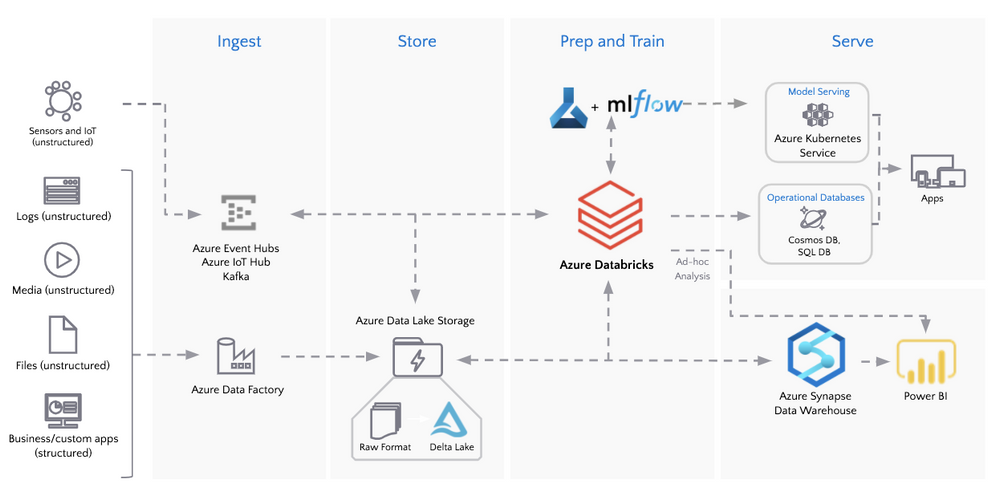
The medallion architecture (as noted in the following diagram) allows for flexible access and extendable data processing. The Bronze tables are for data ingestion and enable quick access (without the need for data modeling) to a single source of truth for incoming IoT and transactional events. As data flows to Silver tables, it becomes more refined and optimized for business intelligence and data science use cases through data transformations and feature engineering. The Bronze and Silver tables also act as Operational Data Store (ODS) style tables allowing for agile modifications and reproducibility of downstream tables. Deeper analysis is done on Gold tables where analysts are empowered to use their method of choice (PySpark, Koalas, SQL, BI, and Excel all enable business analytics at Relogix) to derive new insights and formulate queries.
by Contributed | Oct 26, 2020 | Technology
This article is contributed. See the original author and article here.
We are very pleased to announce that SQL Server 2019 has obtained Common Criteria certification for the Windows and the Linux version.


Overall, SQL Server 2019 is the 7th major release that has successfully completed this security attestation. It started with Yukon in 2005, followed by Katmai (2008) and Denali (2012), and continued with SQL Server 2014, 2016, and 2017. Thanks to several internal and external changes to the process, we were able to accomplish the SQL Server 2019 certification in a much shorter time compared to SQL Server 2017 and earlier versions. SQL Server 2017 was the first version that supports Linux and obtained Common Criteria certification for RHEL. The current certificate for SQL Server 2019 on Linux has now been extended to support RHEL as well as SLES and Ubuntu.
About Common Criteria
The Common Criteria (CC) is an international program which is broadly used as a (cyber) security standard to test and improve the security of commercial IT products for use in National Security Systems (see e.g. EUCSA, NIAP ). As such it serves as a world-wide compliance obligation and procurement requirement across regulated industries and authorities. Competence proven and thus authorized (i.e. accredited) laboratories asses and rate (i.e. evaluate) IT products against pre-defined security specifications called Protection Profiles (PPs). These PPs represent the security functional and assurance requirements for technology classes and are developed and maintained by international Technical Communities (iTCs) made up of CC and technology area experts such as vendors, validation schemes, laboratories, and consultants (see e.g. DBMS-iTC). Under the Common Criteria Recognition Arrangement (CCRA), all signatories, thus current 31 countries, agree to recognize CC certificates produced by any certificate-authorizing participant. Each participating country in the CC operates a certification body that oversees evaluations conducted by accredited commercial evaluation facilities.
The CC Certification process
Each vendor must contract an accredited evaluation laboratory in one of the certificate-authorizing CCRA participant countries and then have the evaluation certified by the governmental certification body of that laboratory. This has been DEKRA TC and CCN for SQL Server 2019. The evaluation then is based on a comprehensive investigation performed by the laboratory on the basis of document reviews for various design representations, independent functional and penetration testing, code analysis, site audit(s) for used development sites, data centers and support sites, and a vulnerability assessment. The scope and rigor of this investigation is basically defined by the security assurance requirements compiled or referenced in the applied PP (DBMS PP for SQL Server 2019). The results obtained by the laboratory are continuously monitored by the certification body in order to confirm their accuracy and to ensure comparability with other independent evaluations of the same product type. In the positive case, a certificate is issued at the end of the CC process. The certificate is typically mutually recognized within the CCRA member countries and published along with a certification report and links to documents or sources that are important for using SQL Server in its certified version, such as the Security Target, the CC user guidance, the installer for login triggers, etc. (see SQL Server 2019 on Windows and SQL Server 2019 on Linux).
The CC certificate validity
The CCRA has approved a resolution restricting the validity of mutually recognized CC certificates over time. This means that a certificate should have a definite period of validity, which is typically set at five (5) years. Nonetheless, a CC certificate states the assurance requirements reached by a product at the time it is issued. As such it is valid for a specific release of the product only, which is SQL Server 2019, CU4 (build version 15.0.4033.1) in our case.
Learn more about CC
Please visit the Common Criteria Portal.
by Contributed | Oct 26, 2020 | Technology
This article is contributed. See the original author and article here.
Final Update: Monday, 26 October 2020 18:28 UTC
We’ve confirmed that all systems are back to normal with no customer impact to query data as of 10/26, 12:10 UTC to 17:50 UTC. Our logs show the incident started on 10/26, 12:10 UTC and that during the 5 hours and 10 mins that it took to resolve the issue 3% of customers experienced Data access issues or delayed/missed Log Search alerts for resources hosted in PRODWUS2.
- Root Cause: The failure was due to instances of a backend service became unhealthy
- Incident Timeline: 10/26,12:10 UTC through 17:50 UTC
We understand that customers rely on Application Insights as a critical service and apologize for any impact this incident caused.
-Arish B
by Contributed | Oct 26, 2020 | Technology
This article is contributed. See the original author and article here.
From the perspective of Day 2 Operations – customers can use the AKS Periscope tool / tooling to collect and export logs after an initial diagnostic run. This projects has recently been released as part of the VS Code extension furthering easing the usage and improving operational efficiency.
What exactly can AKS Periscope do ?
Capture logs and metrics + Generate diagnostic signals
Full feature is here.
AKS Periscope as part of the AKS Extension for VS Code
Here is a quick excerpt on utilizing the AKS Periscope after you have the AKS extension installed.
Source: Link
——–
AKS Periscope
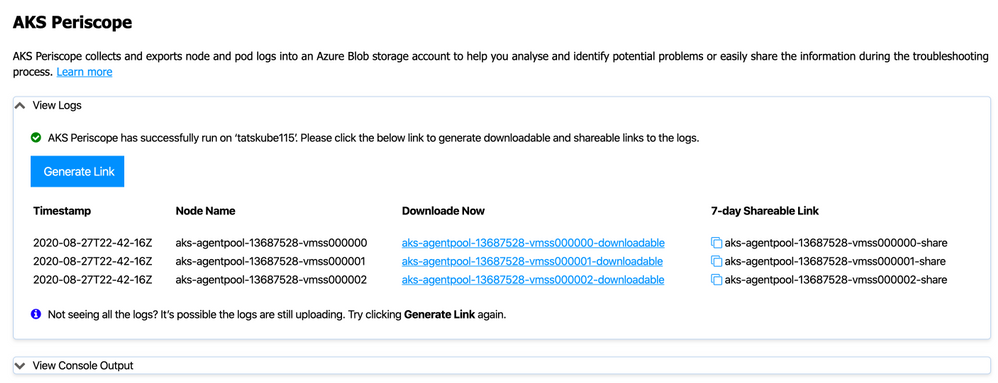
Right click on your AKS cluster and click on Run AKS Periscope to collect node and pod logs for your AKS cluster and to export them to an Azure storage account. Upon selecting the option, a web view will load providing you the option to generate a downloadable link for the collected logs as well as a shareable link with 7-day expiry.

Configuring Storage Account
Running the AKS Periscope requires you to have a storage account associated with the Diagnostic settings of your AKS cluster. If you have only one storage account associated with the Diagnostic settings of your AKS cluster, the collected logs will be stored in the associated storage account by default. If you have more than one storage account associated with the Diagnostics settings of your AKS cluster, then the extension will prompt you to choose the storage account for saving collected logs. If you don’t have a storage account configured in the Diagnostic settings, please follow these instructions to enable it.
Navigate to your AKS cluster in the Azure Portal.
Click on Diagnostic Settings under Monitoring in the left navigation.
Click on Add diagnostic setting.
Enter a name, such as myAKSClusterLogs, then select the option to Archive to a storage account.
Select a storage account of your choice.
In the list of available logs, select the logs you wish to enable.
Note: The incurred cost is subject to your storage account usage and Azure Storage Policy.
When ready, select Save to enable collection of the selected logs.
————


Recent Comments