by Contributed | Oct 27, 2020 | Technology
This article is contributed. See the original author and article here.
by Contributed | Oct 27, 2020 | Technology
This article is contributed. See the original author and article here.
Co-authored by Emma Stephen and Tony Crabbe
There’s not one moment when it all changed. The speed of innovation and connection started as a slow creep with the first telephone call in the 1800s, the first email in the 1960s and dial-up Internet. I can still hear my mum telling me to, “Stop chatting on MSN because I need to use the phone!”. Then suddenly we were catapulted into a world where it’s possible to connect with anyone at a moment’s notice. Boundaries around how we connect have been falling at an intense rate, opening a world of opportunity for connection, education, research, cooperation across nations, businesses, and more.
Technology has toppled boundaries everywhere and we’re certainly feeling that in our now hybrid workplaces. We often see boundaries as undesirable because they mean separation, but boundaries can also be protective of our productivity and well-being. In a world where attention is scarce and the lines between individual and collective productivity are blurring, a key capability is developing boundaries of a protective nature.
Protective boundaries in the workplace keep us at our best, ensuring we can give work and people the attention and care required to succeed in today’s workplace. These protective boundaries fall into three categories: today vs. tomorrow boundaries, access boundaries, and social boundaries. So how do we go about setting up healthy boundaries that protect us and how can the Modern Collaboration Architecture – picking the right technology for the task – support?
The Today vs. Tomorrow Boundary
This boundary is about creating the conditions that remind us of our longer-term goals and keep our focus. They shape our environment to focus us on that big chunk of work due “tomorrow” rather than diverting down “today’s” easier path of consuming email, scanning our phones, or looking at cat pictures. Procrastination can be beneficial until, at some point, we need to just get it done. Getting it done is where these boundaries come into play.
When you start your day or week, think about your priorities, whether that’s a daily highlight or a top three for the week. Try using a custom list in ToDo to create your Highlight or Big 3 Lists – your purpose for the week. This helps keep the focus on some of the bigger items you need to make progress on (and keeps you from getting sucked into busy).
It’s great to make the list but what about making the time? Recent research has shown that for the majority of people, somewhere between 07.00 and 12.00 is when they most easily find Flow. What’s your rhythm and when are you at your best? Whether you use MyAnalytics or a simple, recurring calendar block, schedule focus time into your diary and protect that time. Don’t want to get sucked into emails but still want to see your appointments and focus slots for the day? Use the Advanced settings in Outlook options to make it start-up on the calendar (instead of your inbox).
Ever had good intentions to get started on something but then got distracted as you search for the document you want to work on and something else grabs your attention? Try using Task View in Windows 10 to scroll through your documents from the last days and open them directly from there. Focus Assist is also a helpful way to block out alerts when you don’t want to be disturbed.
The Access Boundary
This boundary is about consciously deciding when we are available online or not – when do we jump to reply and when are we unreachable because we are focused on progressing our priorities? When we don’t set this boundary, we notice a feeling of getting pulled into the whirlwind of business as usual, blasting out emails, and feeling busy.
A few years ago, when you started your day, you didn’t used to run out in your pyjamas and answer all your letters immediately. Why do it with email? Turn on your “Focused” and “Other” inboxes and you can teach Outlook which mails have priority for you. If you are going to try something like inbox opening hours, the trick is awareness – put it in your email signature or chat status – so that people know when they can expect a reply. You can also turn off all Outlook alerts except for calendar reminders which puts another barrier in place to stop you getting sucked into email. Set your status to “Do Not Disturb” or the now available “Offline” status functionality.
What about at the end of the day? Fully closing the workday leaves us to better connect with our families, friends, and hobbies. Setting access boundaries that align with our commitments outside of work sets both a mental boundary and a physiological one. Physiologically, always being “on” increases cortisol – a stress hormone – and with it, the risk of burnout. Mentally, creating a level of segmentation helps us focus and transition into the different roles and responsibilities of our home life.
Take a last look through Microsoft Teams and check if any alerts or @mentions need your attention, check what’s upcoming tomorrow, in short do what works for you. Our most important piece of advice is to build a ritual that helps you step away from work and re-focus your attention on your leisure time. Leverage quiet hours on Microsoft Teams mobile and try building in a virtual commute (coming soon to desktop), a great step to help you switch off at the end of the day regardless of your work setting.

The Social Boundary
This boundary is all about how we work with others and our expectations of others and ourselves. Our digital life needs social boundaries as much as our analogue life. In the work context, this means agreeing how we will collaborate and engage with others.
One of our Microsoft subsidiaries benefited when they did this at the organizational level, setting out six rituals for how they work together. These focused on various topics from being fully present in meetings to ensuring that people had and took time to refresh throughout the day. Whilst this seems like a culture topic, technology can also support at the individual level to set expectations.
Try using your status in Microsoft Teams to make it explicit when you are available and in what time-zone. If you do email on the weekend, save drafts in Outlook and send emails when you get into the office on Monday. Whether you’re working across time-zones or just have different rhythms, leverage the power of co-editing, comments, and chat to work more asynchronously when it suits you. Use meetings to focus on discussion and ideas.
We hope this blog gave some actionable tips that are helpful to you and others you work with. We’re definitely still learning, and we look forward to learning with you. What have you tried? Let us know.
Join us in the next blog with a focus on attention in the context of teamwork.
This blog post is a part of our series on the Modern Collaboration Architecture, developed by @Rishi Nicolai, a Microsoft Digital Strategist with over 25 years of experience in leading organizations through change and improving employee productivity. Blog one and blog two can be found under the links.
About the authors:
Emma Stephen
Emma is a Customer Success Manager at Microsoft and is passionate about bringing the human element into the workplace. She believes technology both enables change and can catalyze wider change efforts if introduced in the right way. Emma is based in Zurich and currently studying for her Masters in Applied Positive Psychology and Coaching Psychology with a hope to leverage this in the organizational context.
Tony Crabbe
Tony Crabbe is a Business Psychologist who supports Microsoft on global projects as well as a number of other multinationals. As a psychologist he focuses on how people think, feel and behave at work. Whether working with leaders, teams or organizations, at its core his work is all about harnessing attention to create behavioral change.
His first book, the international best-seller ’Busy’ was published around the world and translated to thirteen languages. In 2016 it was listed as being in the top 3 leadership books, globally. His new book, ‘Busy@Home’ explores how to thrive through the uncertainties and challenges of Covid; and move positively into the hybrid world.
Tony is a regular media commentator around the world, as well as appearances on RTL, the BBC and the Oprah Winfrey Network.
by Contributed | Oct 27, 2020 | Technology
This article is contributed. See the original author and article here.
As organizations, big and small, across the world rely on Microsoft Teams to help enable hybrid work for all their employees, our goal is to help make sure IT Professionals and Teams admins are up to the task. To help you get ready to deploy and manage Microsoft Teams in your organization and deliver the experiences that meet the needs of your users, we have created new Teams training courses and interactive product how-to guides designed to quickly ramp up your Teams admin knowledge base.
At Microsoft Ignite last month, we introduced a number of new Microsoft Teams role-based learning paths, learning modules, and interactive product experiences that are available at MS Learn.
MS Learn provides free, online training that you can work through at your own pace to build skills and earn certifications. Interactive product how-to guides are a hybrid of traditional hands-on labs and click-thru demos that do not require a sandboxed environment for training.
If you need help figuring out where to start your learning journey or just want to browse the new Teams learning content, check out the new MS Learn landing page for Microsoft Teams and the new interactive product how-to guides for Microsoft Teams admins.
Microsoft Teams Learning paths and modules on MS Learn
Below is a list of the latest Microsoft Teams learning content for administrators. Learning paths are full topic learning solutions, while modules are bite sized learning chunks dedicated around a specific task. These are designed for you to learn at your own pace and even includes bookmarks for you to save your progress.
Microsoft Teams Interactive Product How-to Guides
These guides are designed to simulate the hands-on lab experience to guide you through the specific individual steps needed to complete a task. They include an interactive window to perform tasks and a comprehensive script to follow. This script can also be downloaded as a reference to complete tasks on your own Microsoft 365 and Teams environment.

We will continue to create new learning and training content as Microsoft Teams continues to add great new features and capabilities. We would love to hear from you on how we can help better prepare and support your learning journey. We know that not everyone learns the same, so please let us know how and what your needs are to help us evaluate new and exciting learning content!
by Contributed | Oct 27, 2020 | Technology
This article is contributed. See the original author and article here.
A major version is an opportunity to introduce several improvements that may not be compatible with the scripts that you have developed with a previous version. As always, we recommend that you read the migration guide to measure the impact of this new version on your environment.
Az 5.0 introduces the following fundamental changes:
- Updated authentication
- A security update for Az.KeyVault
- Improved support for ACR (Azure Container Registry) and AKS (Azure Kubernetes Service)
- New default behaviors for Az.KeyVault and Az.Functions
Azure PowerShell is open source. Community contributions are always welcome, but we have not done a good job of recognizing our contributors. Starting with this release, we will add entries to the release notes for PRs merged that were submitted by non-Microsoft employees!
Community contributions
- @atul-ram, Update Get-AzDelegation.md (#13176)
- @dineshreddy007, Get the App Roles assigned correctly in case of Stack HCI registration using WAC token. (#13249)
- @kongou-ae, Update New-AzOffice365PolicyProperty.md (#13217)
- Lohith Chowdary Chilukuri (@Lochiluk), Update Set-AzApplicationGateway.md (#13150)
- Matthew Burleigh (@mburleigh), 6 PRs – Add links to PowerShell cmdlet referenced in the document (#13203, #13190, #13189, #13137, #13204, #13205)
Thank you for your contributions. We’re making Azure PowerShell better together!
Authentication
With Az 5.0, Az.Accounts, the module performing the authentication to Azure, is now using the Microsoft Authentication Library (MSAL).
The only change visible to you is that the default login mechanism changes to interactive from device code for PowerShell 7. The device login mechanism remains available if you want to use it.
MSAL maintains a token cache and refreshes tokens when needed. The cache can be used by other applications also using MSAL, reducing the number of authentications required. You can now share the same authentication among Az PowerShell, Visual Studio 2019, and Azure CLI. (Note: at the time of writing this article, this is only supported with the Azure CLI beta).
When moving from ADAL to MSAL, we will also migrate the existing token making the migration to Az.Accounts 2.0 transparent.
We recommend considering performing the upgrade to Az.Accounts 2.x as soon as possible since some new Azure capabilities like continuous access evaluation will not be compatible with older versions.
Security update
Under certain circumstances, the secret value of a KeyVault secret could be unintentionally displayed in the logs causing a security issue.
We removed the plain text property SecretValueText from the cmdlets that operate on KeyVault secrets. Your scripts will now need to use SecretValue (a SecureString) instead.
Since all Azure PowerShell cmdlets use SecureString or PSCredentials to manage confidential information, this change standardizes KeyVault secrets with other Azure PowerShell cmdlets. This comment indicates different method to convert a secure string to plain text depending on the version of PowerShell: https://github.com/Azure/azure-powershell/issues/12266#issuecomment-701410335.
Improved support for ACR and AKS
To better support customers with container workloads in Azure, we are working to improve the overall experience with the associated services in PowerShell.
With this release, we are introducing several breaking changes in Az.AKS and Az.ContainerRegistry:
- The “Classic” SKU is no longer supported by Azure Container Registry. It has been removed from the list of supported values for ‘New-AzContainerRegistry’ along with the ‘StorageAccountName’ parameter.
- We are changing the following default value to allow the creation of Windows Server containers by default and provide consistent behavior with Azure CLI:
- ‘NodeVmSetType’ from ‘AvailabilitySet to ‘VirtualMachineScaleSets’
- ‘NetworkPlugin’ from ‘None’ to ‘azure’
- We removed the parameter ‘NodeOsType’ for ‘New-AzAksCluster’ since only one value was accepted.
You can help us prioritize the additional improvements we are planning for the coming weeks by logging feature requests in the azure-powershell GitHub repo: https://github.com/Azure/azure-powershell/issues.
New defaults for Key Vault and Functions
Based on customer feedback, Azure services may need to change the default settings over time. This new version of Az introduces the following changes to default values:
- Az.KeyVault: We removed parameters related to soft delete settings in the cmdlets to reflect the service deprecating the ability to opt-out of soft-delete.
- Az.Functions: Following the end of support of PowerShell 6.2, the default runtime version in Functions version 3 is now PowerShell 7; PowerShell 6.2 is no longer a possible choice.
New modules
Our current priority is to add modules for the Azure services that do not have PowerShell support. Since the last major release, we have added the following 17 new modules:
Those modules are still in preview, hence not part of Az. Depending on the feedback we receive, our plan is to GA as many of them as possible in the coming weeks.
Try them out and provide feedback by logging issues in the azure-powershell GitHub repo: https://github.com/Azure/azure-powershell/issues.
Next steps
We are continuing our effort to provide a PowerShell module for all Azure services. This will allow you to manage any Azure resource with PowerShell.
Soon, we will be announcing the preview of a new user interface for Azure PowerShell. The goal of this new interface is to make you more efficient with the Azure related cmdlets and parameters.
Follow our @azureposh Twitter account for continuous updates and interactions with the team.
by Contributed | Oct 27, 2020 | Technology
This article is contributed. See the original author and article here.
Check out the Azure VMware Solution blog article Create a vCenter Content Library on Azure Blob Storage
by Contributed | Oct 27, 2020 | Technology
This article is contributed. See the original author and article here.
I’m wading into treacherous waters here in my series on DevOps for Data Science. Computing terms often defy explanation, especially newer ones. While “DevOps” or Developer Operations has been around for a while, it’s still not as mature a term as, say, “Relational Database Management System (RDBMS)”. That term is well known, understood, and accepted. (It wasn’t when it came out). Whatever definition I give you for DevOps will be contested – and I’m OK with that. Nothing brings out a good flame-war like defining a new technical term.
Regardless of the danger, we have to define the terms we’re using. Andrew Shafer and Patrick Debois used the term first, from what I can tell, in 2008 at a conference on Agile – Agile being a newer term as well. They posited in their talk the breaking down of barriers between developers, operations, and other departments. Since then, the term DevOps has come to mean much more.
Think about getting software in a user’s hands (or another system’s…er, hands). Working sequentially, the process looks something like this:
Design -> Environment Setup -> Code -> Build -> Test -> Package -> Release -> Monitor
With a few exceptions, that’s how software is done. Data Science is usually somewhere in there during the Code phase.
In most cases, there are clearly defined boundaries for what gets done by whom. For instance, developers write the code after the business sends over requirements. The deployment team handles packaging and releasing. And the operations team (Ops) handles monitoring and updating. Maybe it’s a little different in your organization, but in general, each team has an area they are responsible for. And that’s mostly all they focus on.
We’re all busy. I barely have enough time in my day to write code and the commensurate documentation, much less think about other parts of the process. But we have to think about the phases of software development that follow our own.
Imagine if Equifax, as the business owners were requesting the software to be written, had said “And remember, we need to build right into the software things that require the right security to be in place. And let’s make sure we have a plan for when things go wrong.” Imagine if the developers had included a patch-check for the frameworks they use to ensure everything was up to date. Imagine if the Ops team cared that proper security testing is done way back in the development stage. Your identity might still be safe.
And that’s my definition of DevOps: At its simplest, DevOps is including all parties involved in getting an application deployed and maintained to think about all the phases that follow and precede their part of the solution. That means the developer needs to care about monitoring. Business owners need to care about security. Deployment teams need to care about testing. And everyone needs to talk, build the process into their tools, and follow processes that involve all phases of the release and maintenance of software solutions.
That also means DevOps isn’t a tool or even a team – it’s a thought process. Sure, there are tools and teams that help implement it, but if only a few people are part of DevOps, then you don’t have DevOps.
In this series, I’ll cover more about the intersection of DevOps and Data Science, and in particular, the things you need to be careful about in implementing DevOps for Data Science. Use the references below to inform yourself, as a Data Scientist, what DevOps is. I’ll show you how to integrate it into your projects as we go.
For Data Science, I find this progression works best – taking these one step at a time, and building on the previous step – the entire series is listed here – I’ll be working on these articles throughout this series:
- Infrastructure as Code (IaC)
- Continuous Integration (CI) and Automated Testing
- Continuous Delivery (CD)
- Release Management (RM)
- Application Performance Monitoring
- Load Testing and Auto-Scale
In the articles in this series that follows, I’ll help you implement each of these in turn.
(If you’d like to implement DevOps, Microsoft has a site to assist. You can even get a free offering for Open-Source and other projects: https://azure.microsoft.com/en-us/pricing/details/devops/azure-devops-services/)
by Contributed | Oct 27, 2020 | Technology
This article is contributed. See the original author and article here.
Hello bot developers,
I couldn’t wait more to write another blogpost, after my blog on bots: “How bots work“. Today’s subject is an important one, where we should always intend to use, if we want to understand the insights of our bots.
You may already know how to connect your bot to the application insights, don’t you? This will help the “Azure Bot Services” to produce analytics for your bot. To do this, you are locating to your application insights resource get the keys from there, and copy them over to your Bot Resource’s, analytics settings. That simple.. What if you want to go beyond that, and want your bot application to produce Telemetry too? Keep tight: With version 4.2 of Bot Framework SDK, we now have “TelemetryLoggerMiddleware” built into the “Bot.Builder” namespace.
This middleware, simply use “Microsoft.ApplicationInsights.TelemetryClient” libraries to add Telemetry to your application insights project, that you have configured in your “appsettings.json” file. See here, how to wire this middleware up to your bot. You will also notice a switch on “TelemetryLoggerMiddleware” to enable/disable activity logging called “logActivityTelemetry.
Well, It seems easy to use. Let’s check a sample stack below, on how these middleware is calling up other libraries. Below is the sample stack trace, when we receive an activity, and how it calls into “Microsoft.ApplicationInsights.TelemetryClient” classes. I am using this stack for one important reason. First let’s check that stack –>
Microsoft.Bot.Builder.Integration.ApplicationInsights.Core.dll!Microsoft.Bot.Builder.Integration.ApplicationInsights.Core.TelemetryBotIdInitializer.Initialize
Microsoft.ApplicationInsights.dll!Microsoft.ApplicationInsights.TelemetryClient.Initialize
Microsoft.ApplicationInsights.dll!Microsoft.ApplicationInsights.TelemetryClient.Track
Microsoft.ApplicationInsights.dll!Microsoft.ApplicationInsights.TelemetryClient.TrackEvent
Microsoft.Bot.Builder.ApplicationInsights.dll!Microsoft.Bot.Builder.ApplicationInsights.BotTelemetryClient.TrackEvent(string eventName, System.Collections.Generic.IDictionary<string, string> properties, System.Collections.Generic.IDictionary<string, double> metrics)
Microsoft.Bot.Builder.dll!Microsoft.Bot.Builder.TelemetryLoggerMiddleware.OnReceiveActivityAsync()
Microsoft.Bot.Builder.dll!Microsoft.Bot.Builder.TelemetryLoggerMiddleware.OnTurnAsync()
Microsoft.Bot.Builder.Integration.ApplicationInsights.Core.dll!Microsoft.Bot.Builder.Integration.ApplicationInsights.Core.TelemetryInitializerMiddleware.OnTurnAsync()
Microsoft.Bot.Builder.dll!Microsoft.Bot.Builder.MiddlewareSet.ReceiveActivityInternalAsync()
Microsoft.Bot.Builder.dll!Microsoft.Bot.Builder.MiddlewareSet.ReceiveActivityInternalAsync.AnonymousMethod__0()
Microsoft.Bot.Builder.dll!Microsoft.Bot.Builder.BotFrameworkAdapter.TenantIdWorkaroundForTeamsMiddleware.OnTurnAsync()
Microsoft.Bot.Builder.dll!Microsoft.Bot.Builder.MiddlewareSet.ReceiveActivityInternalAsync()
Microsoft.Bot.Builder.dll!Microsoft.Bot.Builder.MiddlewareSet.ReceiveActivityWithStatusAsync()
……
……
So let’s come to that important reason:
The top function on the above callstack “Microsoft.Bot.Builder.Integration.ApplicationInsights.Core.TelemetryBotIdInitializer.Initialize”, has a very important task. It is initializing your telemetry fields, especially: “User” and “Session” which are quite important when you are analyzing your Application Insights. Note that these values are calculated like below. At least for now:
sessionId = StringUtils.Hash(conversationId);
channelId = (string)body[“channelId”];
userId = (string)from[“id”];
telemetry.Context.User.Id = channelId + userId; –> It’s a combination of “ChannelID” + “From” field of an “Activity” Object.
telemetry.Context.Session.Id = sessionId; –> This is has of “conversationID” of the “Activity” Object.
What does all these means?
This means, if you enable Bot Telemetry logger, and check your telemetry on your “Azure Application Insights”, you will see actual Users, and Actual Sessions, where a User represents a “Bot User” on channel, and a Session Represent a “Conversation”.
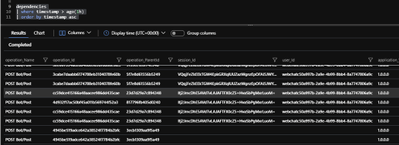
In the below picture, we are getting the contents of “dependencies” table on “Azure Portal” –> “Application Insights Project” –> “Logs” blade. A couple of lines at the bottom, doesn’t include any “Session” / “User ID”, for the dependency. They are generated when we don’t use “Bot Telemetry Logger Middleware”, that is why we cannot associate them to any Conversation. But the “upper lines” are tracked dependencies by Bot Telemetry Logger middleware, which now can be associated to actual “Conversations” and “Users”. I think, this is fantastic!

This way, we can go to “Azure Portal” –> “Application Insights Project” –> “Sessions” blade, to see “Active Sessions”, which represent a conversation and drill into these sessions, to see what conversation has done:


Isn’t it great? Or am I overreacting :)
Likewise, in the “Users Blade” , you can see the actual users, and their timeline:

This is like a summary of a great change, coming up with only 5 lines of code, on Bot Telemetry. And hope you were not aware of this earlier, so that you can feel the same excitement.
Joke aside, that seems to be an important change on our approach to Telemetry.
Hope you like my blogpost,
Stay tuned for the next one,
Mert
by Contributed | Oct 27, 2020 | Technology
This article is contributed. See the original author and article here.
Hello bot developers,
I have recently decided to write blogposts about Bot framework technology to reflect my perspective on the subject, provide ideas on how it works and to troubleshoot common scenarios. The best start for this, is to make a good definition of “Bot Framework SDK”, and in general “Azure Bot Service”, that Microsoft offers.
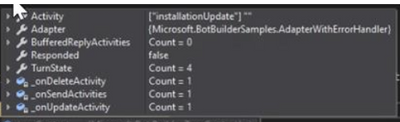
Apart from the fancy description here, a bot can be defined as an application , which uses “Bot Builder” and “Bot Connector” libraries, to communicate through the Connector services and channels. While doing that, the dependent services being used on that bot application, like “LUIS” (Language Understanding Intelligent Service) or “QnA Service“, makes the bot behave like an intelligent entity, since it will be able to understand your intentions easily and reply to them. All the communication between the human and the bot, is packaged into a serializable JSON based objects called “Activity“, and it flows through different channels. “Bot Builder” libraries create a reply “Activity” to these incoming “Activity” objects, considering the state of “Conversations” and “Dialogs”, to provide you meaningful suggestions based on your previous interactions. Most popular type of an “Activity” is a “Message”, but activities can also provide meta information, like adding/removing users to a conversation. When activity reach out to bot, it will be put inside a “TurnContext” object, together with the state information of User and dialog. A Turn context , will be processed by the bot code, and it will be valid until the Turn of the bot is completed. You can find the activity processing stack with a nice diagram here if you want to see more on the activity processing. Note that, these diagrams focus on the bot side of the communication and abstract the channel/connector side.
To get more acquainted with the conversation based Bot communication, I can recommend you to start reviewing the REST API’s documented here. Also, you can surf inside the Bot Builder 4.0 Namespace, to understand what an activity object is, or how a TurnContext object relates with an activity, etc.
We can finish the definition part here and If you want to play around with bots, you can start creating bots, and try understanding how they work. Assuming that you have an active Azure Subscription, you can deploy your bot to Azure or alternatively you can use our “Bot Framework Emulator” tool, to debug to bots locally. For the latter, I can give you a recipe below, to start with:
#1 – Clone the Bot Builder samples repo to get all available samples. In my posts, I will mostly use “dotnet core” based samples, since I am more used to work with that language. But we have other SDK’s available and associated samples with these SDK’s as well.
#2 – Once you clone the samples repo, you can locate to the easiest sample, which is “02.echo-bot” which just echoes back, whatever you write to the bot. In the GitHub article, “To try this sample” section defines how to build and run this sample.
Inside all the bot samples, you will find a folder called “Bots” which contains the bot classes, that are derived from ActivityHandler classes. These classes are injected as a dependency in the “Startup.cs” file. Once you find your bot class you can try putting a breakpoint to “OnMessageActivityAsync()” function which represent the bots turn.
#3- After you run the sample, you can go to “Bot Framework Emulator” and start communicating with your bot. you can visit this article here, if you want to understand how you can define your bot endpoint and connect to your bot using the bot framework emulator. Once you connect, you should be observing that your breakpoint is hit. You can check the contents of “TurnContext” object with your debugger, and try understanding the structure of an activity.

If you check more complex samples, you can see that the bot classes also implement other methods for activity handler class. Ie. one of my favorites “21.corebot-app-insights” sample also implement “OnTurnAsync” method or activity handler class. As you see, my ultimate recommendation for a bot SDK developer in this blogpost is: get more familiar with the samples, since they represent many different use cases for bot development.
What do you think can be the next step? That’s right, you can now consider deploying your bot code to Azure, and start discovering the endless opportunities of cloud technologies :) Here is our standard documentation on deploying your bot to Azure. I think that is all for today. Hope you enjoyed the read.
Tune for the next blogpost,
See you soon,
Mert
by Contributed | Oct 27, 2020 | Technology
This article is contributed. See the original author and article here.
Orphaned transactions and distributed deadlocks happen when there is a session established to the database without any current running requests, but there was a request (one query or more) that holds locking on database object(s).
Orphaned transactions can cause a lot of locking and blocking on the database, and usually it is related to the application and how it is code is written “badly” or in a way that meets the atomicity of the transactions: “commit all or rollback all”.
I will give an example here, trying by it to simplify the idea:
I created a very simple and small table with two rows :
CREATE TABLE [dbo].[testtable](
       [id] [int] IDENTITY(1,1) NOT NULL,
       [name] [varchar](100) NULL,
PRIMARY KEY CLUSTERED
(
       [id] ASC
)WITH (PAD_INDEX = OFF, STATISTICS_NORECOMPUTE = OFF, IGNORE_DUP_KEY = OFF, ALLOW_ROW_LOCKS = ON, ALLOW_PAGE_LOCKS = ON, OPTIMIZE_FOR_SEQUENTIAL_KEY = OFF) ON [PRIMARY]
) ON [PRIMARY]


set identity_insert testtable on
insert into testtable (id,name) values (1, 'row #1'),(2,'row #2')
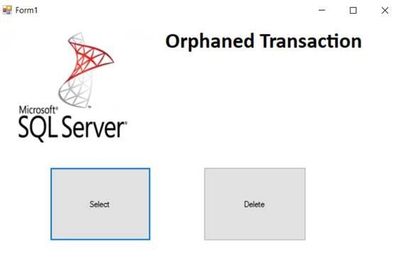
Also, I created a simple C# desktop application, contains two forms: one to search for IDs and the other one is for deleting IDs:


The C# code of the delete button:
private void btnDelete_Click(object sender, EventArgs e)
        {

            System.Data.SqlClient.SqlDataAdapter myadapter = new System.Data.SqlClient.SqlDataAdapter();
           SqlConnection myconn = new SqlConnection("Data Source=xx.windows.net;Initial Catalog=testdb;Persist Security Info=True;User ID=xx;Password=xx");
            myadapter.DeleteCommand = new System.Data.SqlClient.SqlCommand("DELETE FROM[dbo].[testtable] WHERE[id] = '" + txtid.Text + "'", myconn);

           myadapter.DeleteCommand.Connection.Open();//open connection with database
           myadapter.DeleteCommand.Transaction=myconn.BeginTransaction(); //begin transaction

           myadapter.DeleteCommand.ExecuteNonQuery();//the request-the query executed on the database with milliseconds
            DialogResult delbox;
            delbox = MessageBox.Show("are you sure you want to delete?", "delete ID", MessageBoxButtons.OKCancel); //dialog box with Ok Cancel option , the user can wait before deciding what to choose
            if (delbox == DialogResult.OK)
            {
                myadapter.DeleteCommand.Transaction.Commit();//commit the transaction , locking will be released


            }
            else { myadapter.DeleteCommand.Transaction.Rollback();//rollback , locking will be released
             }
            myadapter.DeleteCommand.Connection.Close();


        }
The C# code of the search button:
private void btnsearch_Click(object sender, EventArgs e)
        {
            System.Data.SqlClient.SqlDataAdapter myadapter = new System.Data.SqlClient.SqlDataAdapter();

            SqlConnection myconn = new SqlConnection("Data Source=xx.database.windows.net;Initial Catalog=testdb;Persist Security Info=True;User ID=xx;Password=xxx");
            myadapter.SelectCommand = new System.Data.SqlClient.SqlCommand("select name FROM[dbo].[testtable] WHERE[id] = '" + txtid.Text + "'", myconn);
            System.Data.DataSet mydataset = new DataSet();
            myadapter.SelectCommand.Connection.Open();//open connection


                myadapter.SelectCommand.ExecuteScalar();//the request will be executed on the database , it should take no time for two rows table.

            myadapter.Fill(mydataset);
            txtName.Text = mydataset.Tables[0].Rows[0][0].ToString();

                myadapter.SelectCommand.Connection.Close();//close connection


        }
    }
Now when I run two instances of the application:
Here I want to delete row of ID 1, I wrote the application code with a message box as below snapshot:

while the message box was still there:
I executed dbcc opentran() , and the oldest active transaction was:
Transaction information for database ‘testdb’.
Oldest active transaction:
SPID (server process ID): 104
UID (user ID) : -1
Name : user_transaction
LSN : (1108:112408:2)
Start time : Sep 15 2020 6:44:15:733PM
SID : 0x28bb43e4bdc050459a623ea82e054fa2
DBCC execution completed. If DBCC printed error messages, contact your system administrator.
The oldest active transaction on the database (of SPID 104) did not appear on the sys.dm_exec_requests DMV result:

Meanwhile, with the other instance of the application, I searched for the same row of ID 1:

While I was trying to search for the ID 1, the application thrown a timeout exception as below snapshot:

The timeout error caused by a blocking by the orphaned SPID 104:

the issue persisted, until the user chooses between okay or cancel, in other words between rolling back or commit the delete transaction.
and the result of the dbcc opentran() became different, there was no open transactions:
No active open transactions.
DBCC execution completed. If DBCC printed error messages, contact your system administrator.
This is a simple example, the issue may become a complete chain of blocking with a major impact in some other scenarios.
How can you solve this issue?
One of the ways is to kill the SPID of the transaction during the issue occurrence:

By running the command :
Kill 82
But here , be aware that you are still not able to know what is the transaction itself, what it was doing and what is the impact of the rolling back.
When I killed the process , the deletion failed with error:

The error is : “An existing connection was forcibly closed by the remote host”:
Applications usually use a friendly custom error messages, error page redirection and try catch blocks. But in all cases killing of the process at least will waste the user effort and time spent in filling or updating the data for example.
And killing the SPID sometimes is not the proper solution if the occurrence of the issue is happening frequently.
Please note that in my example here, the delete query will not fail with a query timeout; because it is already executed in milliseconds , and finding it on query store is hard because it may not appear on “consuming resources” queries or on “queries of the high wait time”.
after identifying the issue and where the blocking transactions come from, using read uncommited isolation level or query hints “like with(nolock)” may decrease the impact of it.
but one of the solutions is in changing the application C# code, as below:
        private void btnDelete_Click(object sender, EventArgs e)
        {

            System.Data.SqlClient.SqlDataAdapter myadapter = new System.Data.SqlClient.SqlDataAdapter();
           SqlConnection myconn = new SqlConnection("Data Source=xxxxx.database.windows.net,3342;Initial Catalog=testdb;Persist Security Info=True;User ID=myuser;Password=xxxx;");
            myadapter.DeleteCommand = new System.Data.SqlClient.SqlCommand("DELETE FROM[dbo].[testtable] WHERE[id] = '" + txtid.Text + "'", myconn);


            DialogResult delbox;
            delbox = MessageBox.Show("are you sure you want to delete?", "delete ID", MessageBoxButtons.OKCancel);
            if (delbox == DialogResult.OK)
            {
                myadapter.DeleteCommand.Connection.Open();
                //myadapter.DeleteCommand.Transaction = myconn.BeginTransaction(); //= new SqlTransaction();
                myadapter.DeleteCommand.ExecuteNonQuery();
                //myadapter.DeleteCommand.Transaction.Commit();
                myadapter.DeleteCommand.Connection.Close();


            }


        }
here open and close connection will start and end inside the IF block , only when the user selects “Okay” button of the Dialog Box.

by Contributed | Oct 27, 2020 | Technology
This article is contributed. See the original author and article here.
Scenario:
You want to mount the Azure Blob storage container on Linux VM and access the data using either Managed Identities or Service Principal.
Prerequisites:
Azure storage account
Linux VM
Action:
To mount the Azure Blob storage container as a filesystem on Linux VM, you can make use of Blobfuse which allows you to access the existing data in your storage account through the Linux filesystem.
Mounting of storage account using the Storage account key has been explained in our article:
https://docs.microsoft.com/en-us/azure/storage/blobs/storage-how-to-mount-container-linux
Below are the steps to mount the storage account either using Managed Service Identity or using Service Principal.
Step 1:
Configure the Linux software repository for Microsoft products using the below command:
For Ubuntu:
wget https://packages.microsoft.com/config/ubuntu/18.04/packages-microsoft-prod.deb
sudo dpkg -i packages-microsoft-prod.deb
sudo apt-get update
For RHEL:
sudo rpm -Uvh https://packages.microsoft.com/config/rhel/7/packages-microsoft-prod.rpm
Note: Change the URL accordingly based on the Ubuntu version and RHEL Distribution that you’re using.
Step 2:
Install the blobfuse in your Linux VM.
For Ubuntu:
sudo apt-get install blobfuse
For RHEL:
sudo yum install blobfuse
Step 3:
Blobfuse requires a temporary path in the file system to buffer and cache any open files.
You can make use of SSD disks available on your VMs for blobfuse. You can also make use of ramdisk and create a directory for blobfuse.
To use SSD as a temporary path, below is the command:
sudo mkdir /mnt/resource/blobfusetmp -p
sudo chown <youruser> /mnt/resource/blobfusetmp

Or to use ramdisk for the temporary path, below is the command:
sudo mkdir /mnt/ramdisk
sudo mount -t tmpfs -o size=16g tmpfs /mnt/ramdisk
sudo mkdir /mnt/ramdisk/blobfusetmp
sudo chown <youruser> /mnt/ramdisk/blobfusetmp

Step 4:
Blobfuse requires the authentication methods and credentials to be configured either in a configuration file or as an environment variable.
To create a configuration file and to restrict the access to the file so that no other users can read it, use the below commands:
touch ~/fuse_connection.cfg
chmod 600 fuse_connection.cfg

To mount the storage to the VM, you can make use of either System Assigned Managed Identity or User-assigned managed Identity or Service Principal.
- Using System Assigned Managed Identity
- To use this configuration, please enable ‘System-assigned’ managed identity on the Linux VM that you’re using as shown below:

- Ensure that the Object ID or the system managed identity is given sufficient RBAC role at the storage account level.
Note: Please make sure that you give minimum of ‘Reader’ and ‘Storage Blob Data Reader’ role to the managed identity at the storage account level.
You can assign these roles here: Storage account -> Access Control (IAM) -> Add role assignment and selecting Virtual Machine in ‘Assign access to’ option as shown below:

2. Using User-Assigned Managed Identity
i. If you’re using User assigned managed identity, please add the identity in ‘User assigned’ configuration of your Linux VM as shown below:

ii. Ensure that the managed identity is given necessary RBAC roles at the storage account level as shown below:

For both scenarios, update the configuration file that was created earlier with the storage account credentials and mention authType as ‘MSI’ as shown below:
accountName <storage account name>
authType MSI
containerName <container name>

3. Using Service Principal
i. Ensure that SPN is given sufficient RBAC roles at the storage account level.
ii. Update the configuration file with Storage account details and Service Principal details. Also, the authType for Service Principal authentication would be SPN as shown below:
accountName <storage account name>
authType SPN
servicePrincipalClientId <Client ID or Application ID of the Service Principal>
servicePrincipalTenantId <Tenant ID of the Service Principal>
containerName <container name>

iii. The client secret for your application or the Service Principal must be saved as an Environment Variable and should not be mentioned in the configuration file. It will be saved as AZURE_STORAGE_SPN_CLIENT_SECRET. Please save it in /etc/environment in the below format:
AZURE_STORAGE_SPN_CLIENT_SECRET=”your client secret”

Step 5:
Create an empty directory for mounting using the below command:
mkdir ~/mycontainer
Step 6:
To mount the blob storage using blobfuse, run the below command which will mount the specified container in the configuration file onto the empty directory that we created:
sudo blobfuse ~/mycontainer –tmp-path=/mnt/resource/blobfusetmp –config-file=/path/to/fuse_connection.cfg -o attr_timeout=240 -o entry_timeout=240 -o negative_timeout=120

Note: To allow access to all users, please use the switch -o allow_other while mounting.
Once the container is mounted, you can access the blobs using the regular file system APIs in your Linux VM.

Hope that helps!

Recent Comments