by Contributed | Nov 23, 2020 | Technology
This article is contributed. See the original author and article here.
Hello everyone, this is Ingmar Oosterhoff, a Modern Workplace Customer Engineer at Microsoft. In an earlier series of posts we set up our environment to do batch sequencing using App-V. In this blog I will explain how we can set up our machine so we can do batch conversion of our application installers into MSIX packages
We will be using the Bulk conversion scripts from the MSIX Toolkit.
In my example below I will be using Hyper-V VMs on my laptop, but it is also a possibility to use remote machines to do the heavy lifting.
A benefit of using Hyper-V VMs on my machine is that the Bulk conversion scripts can utilize the checkpoint functionality, so it nicely reverts the VMs to a clean state to be re-used for the next app.
Let us start by preparing the host machine, my laptop.
The shopping list:
The MSIX Packaging Tool can be installed from the Microsoft Store, so that is an easy step.
Enabling Hyper-V is not that much more difficult.
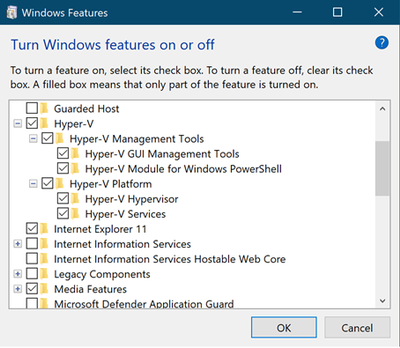
Via Control PanelPrograms we go to “Turn Windows features on or off”
When I scroll a bit down, I can enable Hyper-V on my machine.
After enabling Hyper-V, I needed to restart my machine, and I am good to go!
|
 Turn Windows features on Turn Windows features on
|
(I could have used PowerShell to enable Hyper-V)
Enable-WindowsOptionalFeature -Online -FeatureName Microsoft-Hyper-V -All
More on enabling Hyper-V: https://docs.microsoft.com/en-us/virtualization/hyper-v-on-windows/quick-start/enable-hyper-v
Signing Certificate
I need to sign the newly created MSIX packages with a certificate, so on my laptop I’ve created a folder MSIX on my C: drive, in which I have created a folder Signing, and this folder contains the certificate I am going to use to sign the packages, and signtool.exe, which is part of the Windows 10 SDK. (Have a look at our earlier post on how to set that up)
|
|
 |
All done.
The host machine, my laptop, is prepared!
Note:
If I want to use remote machines, the shopping list would be a little longer, as I would have to enable PowerShell Remoting, and, if the remote machine is not in the same domain as my machine, or just in a workgroup, add the name(s) or IP address(es) of the remote machine(s) to WinRM Trusted Host.
Some VMs
Now I am ready to create some Virtual machines on my laptop.
I would recommend using the Hyper-V Quick Create “MSIX Packaging Tool Environment” template to be used, as it is already pre-configured to meet all requirements.
To do so, start the Hyper-V Manager, right click on your machine name, and click Quick Create…
If you are not going to use the Quick Create template, make sure to install the MSIX Packaging Tool driver.
|

|
Top of the list you find MSIX Packaging Tool Environment
|

|
The default name of this VM (virtual machine) will be MSIX Packaging Tool Environment, but since I want to utilize multiple machines for my batch conversion to speed thing up, I am renaming this first one to MSIX01 by clicking More options and changing MSIX Packaging Tool Environment to MSIX01 in the Name field.
Once the first one has been created, repeat these steps to create another VM. This one I am naming MSIX02.
It will not download the image again, instead re-use what was downloaded earlier and creates the second VM.
Memory wise my machine would not be able to run more than 3VMs at the same time, so I am going to do the conversion using 3 machines.
Every time Quick Create is ready with creating the machine, it shows the window above.
Click Edit settings… and uncheck the box in front of Use automatic checkpoints
Here you can also change the amount of memory the VM will use. I am going to leave that as it is.
Click Ok to save your changes, and click the blue Connect button.
The window of your VM shows up, and you can start the VM by clicking the start button.

After going through the region and keyboard choices, I went for Domain Join instead, and created a user (Larry) and a password (kensentme). (definitely going to delete these machines afterwards…)
I am setting up all 3 VMs the same, running Windows Updates, rebooting the machines until they are all good to go.
Installers
Right!
Now I have the VMs ready, it is time to prepare a location where the VMs can get the installers from. On my file server I have created a folder named Installers, to store the installers I want to convert. 
Open File Explorer on the 3 VMs, and go to the created folder, HOSTRepositoryinstallers in my example. Windows Security will prompt for name and password, which I will enter, and I am making sure to check the box to remember my credentials.
When the Batch Conversions scripts be executed, reaching the installers should be no problem this way.
|

|
VMs: check! Installers: check! Signing Certificate: check! Sign tool: check!
Let us get to work on those Batch Conversion scripts.
The Scripts
Batch_convert.ps1
Contains the functions that will create the template for the MSIX packager to execute, and the conversion jobs. No changes are needed to this file.
Entry.ps1
This file contains all the parameters for the conversion jobs.
We will start on line 10 by specifying the names of the VMs we have created.

Since I am not going to use remote machines, I have uncommented line 15.
Line 18 to 43 contains conversion parameters.
This holds all the info of the applications you want to convert. Out of each entry a template is going to be created, which will be execute by the MSIX packaging tool. A great description of the different parameters can be found at
https://docs.microsoft.com/en-us/windows/msix/toolkit/msix-toolkit-msixbatchconversion#conversionsparameters
The one that seems the most challenging to fill is the PublisherName parameter. The documentation states:
PublisherName = ”CN=YourCompany”; Certificate Publisher information - must match signing certificate
A straightforward way of getting the exact PublisherName is by PowerShell.
 $certfile = "C:MSIXSigningNameOfYourCertificate.cer"
(Get-PfxCertificate $certfile).Subject
We can now turn our attention to the ConversionParameters.
We can now modify the examples In the entry.ps1 script to what we need.
The example reads:
$conversionsParameters = @(
    @{
        InstallerPath = "PathToYourInstallerYourInstaller.msi";
        PackageName = "YourApp";
        PackageDisplayName = "Your App";
        PublisherName = "CN=YourCompany";
        PublisherDisplayName = "YourCompany";
        PackageVersion = "1.0.0.0"
    },
    @{
       InstallerPath = "PathToYourInstallerYourInstaller2.msi";
       PackageName = "YourApp2";
       PackageDisplayName = "Your App2";
       PublisherName = "CN=YourCompany";
       PublisherDisplayName = "YourCompany";
       PackageVersion = "1.0.0.0"
    },
    @{
       InstallerPath = "PathToYourInstallerYourInstaller3.msi";
       PackageName = "YourApp3";
       PackageDisplayName = "Your App3";
       PublisherName = "CN=YourCompany";
       PublisherDisplayName = "YourCompany";
       PackageVersion = "1.0.0.0"
    }
)
After changing this to the installers I want to run, and providing the additional parameters it reads:
$conversionsParameters = @(
    @{
        InstallerPath = "host.b77.ingmaro.netRepositoryinstallersRDCman.msi"
        PackageName = "RDCman";
        PackageDisplayName = "Remote Desktop Connection Manager";
        PublisherName = "CN=Contoso Software (FOR LAB USE ONLY), O=Contoso Corporation, C=US";
        PublisherDisplayName = "Microsoft";
        PackageVersion = "1.0.0.0"
    },
    @{
       InstallerPath = "host.b77.ingmaro.netRepositoryinstallersDynamics365-USD-4.1.1.1397-amd64.exe"
       PackageName = "Dynamics365USD";
       PackageDisplayName = "Dynamics365USD";
       PublisherName = "CN=Contoso Software (FOR LAB USE ONLY), O=Contoso Corporation, C=US";
       PublisherDisplayName = "Microsoft";
       PackageVersion = "1.0.0.0"
 InstallerArguments = "install Shortcut=n /S"
    },
    @{
       InstallerPath = "host.b77.ingmaro.netRepositoryinstallersPBIDesktopSetup_x64.exe"
       PackageName = "PowerBIDesktop";
       PackageDisplayName = "Microsoft PowerBI Desktop";
       PublisherName = "CN=Contoso Software (FOR LAB USE ONLY), O=Contoso Corporation, C=US";
       PublisherDisplayName = "Microsoft";
       PackageVersion = "1.0.0.0"
InstallerArguments = "-q -norestart ACCEPT_EULA=1 INSTALLDESKTOPSHORTCUT=0"
    }
)
As you can see, I am using the UNC paths to the installers that I have placed into the Installers folder earlier.
For the MSI installer I do not need to specify any additional install switches. For the .Exe file I have added the InstallerArguments parameter, so I can provide the correct switches for a silent install of the application during the conversion.
Save the file after making the changes.
RunJob.ps1
This file contains the actual conversion action.
Line 8 ,9,16,17,18 and 19 are commented out, but this is the part that creates the checkpoints, and makes sure the VM rolls back to the clean snapshot, prior to execution a conversion job on the VM

Removing the #’s from these lines brings this back into action.
Below is the result after the changes.

Save the file after making the changes.
Sign_deploy_run.ps1
This file contains the signing part of the batch conversion.
In this file we need to specify the path to the signing certificate, and signtool.exe.

Change line 5 and 8 to point to your certificate, and the location of the signtool.exe.

As you can see, I’ve also added /p “notreallythecertificatepassword“, as the signtool needs the password to be able to use the certificate for signing.
Save the file after making the changes.
Al the changes have been made, let’s start the Batch Conversion.
Open a PowerShell window, and change to the BatchConversion folder in which we have created the PowerShell scripts.
Then. Run .entry.ps1

You will be prompted to enter the credentials to use for the VMs. Enter them and click OK
The first Job will now commence by creating a check point of the VM, and then start the conversion of the first app.

Once it is done, it will create an “after” snapshot of the VM, using the name of the job, roll back to the “before” snapshot, and inform you that the job is done.
(Press any key to exit this window should read hit enter to close this window, as that only seems to work)
Once all installers have been converted, the MSIX packages are going to be signed, and the packages are added to my machine so I can test the results.
The created MSIX packages are stored is a subfolder OutMSIX.
Happy converting! Let me know how it went!
Ingmar Oosterhoff and Matthias Herfurth

by Contributed | Nov 23, 2020 | Dynamics 365, Microsoft 365, Technology
This article is contributed. See the original author and article here.
Today, more than ever, your organization needs to adapt to changing business conditions with incredible speed and efficacy. Whether you’re shifting to digital sales or streamlining your supply chain, Dynamics 365 plays a pivotal role in digital transformation initiatives by bringing customers and business priorities together with the next generation of CRM and ERP applications.
Underpinning many of these successful initiatives is FastTrack for Dynamics 365, a Microsoft engineering powered customer success program that enables organizations to accelerate Dynamics 365 implementations and go live with confidence.
Available at no incremental cost to our customers, FastTrack for Dynamics 365 features learnings and experiences from over 3,000 cloud deployments through Success by Design, the prescriptive guidance (approaches and recommended practices) for designing, building, and deploying a Dynamics 365 solution. It’s no surprise that the program predictably delivers a measurable impact for our customers and partners.
“Intimidator is implementing a full range of ERP capabilities within Dynamics 365. With FastTrack, we were able get the help we needed to go from zero tech to state-of-the-art tech faster than we ever imagined.”Tim Gryder, Project Manager and System Administrator, Intimidator 4×4 Utility Vehicles
To enable more organizations to benefit from the program, we’re expanding and enhancing the FastTrack for Dynamics 365 program. Effective January 1, 2021, the updated program will serve more customers with a streamlined, partner-aligned execution and nomination model.
Expanded to serve more customers
Previously limited to customers with an annual Dynamics 365 investment of $300,000 or more, the program will now serve customers with a lowered minimum annual Dynamics 365 investment of $100,000 as well as provide new self-serve resources for all.
Customers who invest between $100,000 and $300,000 on Dynamics 365 on an annual basis can now, in partnership with a qualified implementing partner, take advantage of Success by Design as well as benefit from the assurance that Microsoft engineering is monitoring and engaging as needed throughout the implementation.
FastTrack for Dynamics 365 continues to offer the full privileges of the program, which includes a comprehensive set of Microsoft-governed implementation reviews and assistance by a designated Microsoft solutions architect, to customers who invest $300,000 or more on Dynamics 365 on an annual basis.
For all customers, particularly those in the early stages of their adoption of Dynamics 365 with an annual investment of less than $100,000, self-serve FastTrack resources are available, which include on-demand Success by Design training, product TechTalks, and go-live readiness for select Dynamics 365 applications.
Streamlined partner-aligned execution and nomination
Partners have traditionally been a cornerstone for delivering FastTrack for Dynamics 365-related services. Given the importance of partners in ensuring customer success, the program will now exclusively be delivered in collaboration with qualified Microsoft partners. Therefore, customers who wish to benefit from the program must work directly with a qualified partner.
To qualify, partners who implement FastTrack for Dynamics 365 must have Gold or Silver status in the Cloud Business Applications competency and must complete Success by Design live training and on-demand Microsoft Learn path. Standardizing and accelerating partner competency ensures that our customers predictably receive a high-quality experience in accelerating their Dynamics 365 implementations with FastTrack.
In addition, qualified partners are now empowered to directly nominate eligible customersthose with an annual spend of $100,000 or morefor FastTrack for Dynamics 365. The new unified customer nomination process for partners and Microsoft ensures that eligible customers can be more efficiently identified and served.
Learn more and get started
We value the trust and investment that our customers put into Dynamics 365 and FastTrack for Dynamics 365 program. The program changes referenced reflect the continued commitment by Microsoft to ensure customer success while strengthening our collaboration with partners.
You are invited to learn more about the guidance on implementation, best practices, and tools offered by FastTrack for Dynamics 365, and connect with your Microsoft account team or partner to discuss how you can take advantage of the FastTrack for Dynamics 365 program.
The post Accelerate implementations with the expanded FastTrack for Dynamics 365 appeared first on Microsoft Dynamics 365 Blog.
Brought to you by Dr. Ware, Microsoft Office 365 Silver Partner, Charleston SC.
by Contributed | Nov 23, 2020 | Technology
This article is contributed. See the original author and article here.
Howdy folks,
Firstline Workers have been at the forefront of our economy over the past several months as they perform critical jobs like maintaining critical supply chains, serving as first responders, and caring for the most vulnerable. It is more important than ever to empower these workers with tools and technology designed to support their unique scenarios.
One example of a specific Firstline scenario is the need be able to share tablets or mobile devices between shifts while maintaining security and compliance. In April, we announced the preview of shared device sign-out for Android and iOS. Once a device is provisioned into a shared device mode, Firstline Workers can sign out of all web browser sessions and applications that have been configured to support this feature, such as Microsoft Teams, with a single click.
So today I am excited to announce three new preview capabilities that make it easier to set up and customize how Firstline Workers use shared devices.
- Provisioning shared devices at scale with Microsoft Endpoint Manager – Microsoft Intune and Configuration Manager are now part of a unified management platform known as Microsoft Endpoint Manager. You can choose to enroll your Android Enterprise (AE) dedicated devices into Microsoft Intune with Azure AD shared mode automatically configured.
 Pick the enrollment profile in Intune console for “Android Enterprise dedicated device with Azure AD shared mode
 Pick up a new device (or factory reset) and just get started on enrollment. Just following a few on-screen steps, you can complete the enrollment.
- Device-based Conditional Access for shift workers – You can now enforce Zero Trust security policies using device compliance to secure corporate data for users signing in and out of apps on shared devices.

- Customized sign-in experience with Microsoft Managed Home Screen – You can now use Managed Home Screen to provide a simple sign-in and sign-out experience across all apps, including Microsoft Teams, that participate with shared device sign-out. Customize a single screen for users to easily sign-in, configure a session PIN for the duration of the shift, and configure timers for automatic sign-out for added security. To see the full list of configurations available with Managed Home Screen, see the documentation.
 Customize the device sign-in experience for any Firstline Worker.
Check out our documentation on how to enroll in shared device mode to get started today.
As always, we hope you’ll try out the new features and share feedback through the Azure Forums or by following @AzureAD on Twitter.
Best regards,
Alex Simons (@Alex_A_Simons)
Corporate Vice President of Program Management
Microsoft Identity Division
Learn more about Microsoft identity:
by Contributed | Nov 23, 2020 | Dynamics 365, Microsoft 365, Technology
This article is contributed. See the original author and article here.
Most sales organizations understand the value of maintaining an accurate sales forecast. However, many are still tracking forecasts with a time-consuming spreadsheet. This blog post provides some best practices for using forecasting capabilities in Dynamics 365 Sales to help simplify creating accurate forecasts, even during rapidly changing conditions.
Benefits of sales forecasting
Sales forecasting is a projection of the sales that your organization expects to make within a set timeframe. Having current and accurate sales forecasting empowers you to better allocate your resources, modify your strategy to address unforeseen circumstances, and provide critical coaching support to sellers that need it. Dynamics 365 Sales forecasting simplifies the bottoms-up method of sales forecasting and leverages the collective knowledge of the people closest to the field your sales team.
Here are our best tips for maximizing forecasting capabilities
Start with a template: You might think that building your forecast from scratch is the best approach, but we’ve heard from people that they spent a lot of time doing this only to realize later that they could’ve saved time by using one of the pre-built templates:
- Org chart forecasting allows you to roll-up your forecast values through your organization’s reporting structure.
- Product forecasting allows you to base the forecast on the products you expect to sell.
- Territory forecasting aggregates values through the geographical territories that your company does business in. Configuring a territory forecast requires setting up territories in a hierarchy, assigning territories to individuals, and assigning accounts to territories.
Want more details? Check out our doc: Select a template for a forecast.
Use a descriptive name: Be sure to include the timeframe and other clearly identifiable details in your forecast name so that it’s easier to find later. For example, North America Widget Forecast Q2 2020.
Roll up the hierarchy to the right person: Keeping in mind that you’ll probably want to share your forecasting with your management chain, be sure to put that person’s name at the top of the forecast hierarchy. It’s straightforward to do this just select the right entity type when you set up the forecast and see a quick preview to ensure you made the right selection. We won’t go into the steps now, but check out our docs for details.
Pick the right forecast timeframe (or timeframes): With Dynamics 365 Sales, you can configure multiple forecasts each with different timeframes, which is handy to address different reporting period needs such as monthly or quarterly. We recommend picking either 12 periods for monthly and four periods for quarterly.
Tune the forecast for your organization: Although the templates provide an end-to-end forecast, you may want to modify the forecast so that it works just right. As an example, perhaps you want your finance team to see the whole forecast, you can grant them access through the security tab. For steps on how to do this and more, make sure to read the documentation.
Forecast categories are an important part of the forecast and we’ve provided the most used sales categories out-of-the-box. Deals are segmented into these categories based on the sellers’ confidence level that they will close. The pipeline, best case, and committed categories denote deals that are high, medium, and low confidence, respectively. You’re free to modify these categories to create forecast columns that make the most sense for your organization. Check out the docs for more details.
Keep your team accountable: In the template, we’ve labeled the committed forecast as an adjustable column. This means that your managers and sellers can submit their own forecast outcomes. Coupled with quotas, which we recommend you upload through Excel in the activation step, you’ll be able to inspire more accountability from your team.
Iterate, iterate, iterate: There are many more useful capabilities like filters, snapshots, and drill-downs so even if you later discover that you need to tune up your forecast, no problem. Templates allow you to quickly build a new forecast to tailor fit the experience to your sellers’ needs.
Tips for sales forecasting during a crisis or unpredictable event
Encourage your sales team to keep their sales data up to date more frequently: During uncertain times, sales managers need clear visibility into the rapidly changing pipeline to make the best decisions about where to focus their time and resources. Asking your sales team to input their data as soon as they learn it will help you spot trends in time to mitigate unforeseen outcomes.
Run your forecasts more often: Just as your sales team should be extra vigilant when keeping their sales data up to date, sales managers should run their forecasts more frequently too a couple times a day during a crisis isn’t too often. Because the data may be changing rapidly, running a forecast can help you identify issues more quickly.
Don’t be afraid to step away from your forecast temporarily to focus on building relationships: Forecasting can be difficult when unexpected events happen, and it may be more productive for your sales team to focus on maintaining customer relationships until circumstances become more predictable. Nurturing relationships now will no doubt help you plan later when the time is right, and circumstances become more favorable to projecting sales.
Next steps
You can learn more about sales forecasting in these posts:
Driving accountability with advanced forecasting in Dynamics 365 Sales
Predictive Sales Forecasting in Dynamics 365 Sales
The post Tips for setting up sales forecasting in Dynamics 365 Sales appeared first on Microsoft Dynamics 365 Blog.
Brought to you by Dr. Ware, Microsoft Office 365 Silver Partner, Charleston SC.
by Contributed | Nov 23, 2020 | Azure, Microsoft, Technology
This article is contributed. See the original author and article here.
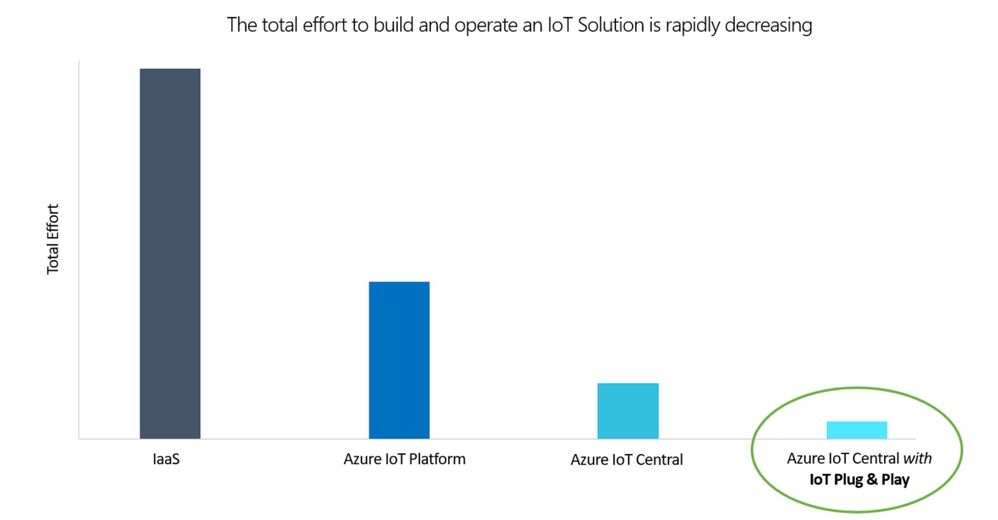
Democratizing IoT for mainstream adoption is a core mission of Microsoft Azure IoT. While Azure IoT Central already simplifies IoT solution development, the recent addition of support for IoT Plug and Play and the introduction of a new Azure IoT Central pricing tier allows for the streamlined integration of devices into IoT solutions with an expanded set of scenarios.

Common IoT solution development challenges
IoT solution development typically starts by defining the device capabilities required for a solution. These are often solution specific and involve custom development on both the device and in the cloud. Device developers write code specific to the requirements, while cloud developers build corresponding cloud software to process and visualize the device data specific to the solution. This tight coupling (between device and cloud software) often results in little or no code reuse, preventing solutions from being future proof and generating cross dependencies that require close collaboration between device and cloud developers. In addition to software development challenges, hardware sourcing, integration, and ramping to production can take months, leading to long and expensive timelines.
IoT Plug and Play offers new approach to solution development
IoT Plug and Play introduces a new approach to building IoT solutions by decoupling the software on the device and solution in the cloud. With IoT Plug and Play, device developers describe the device capabilities using a declarative model. The type and shape of data the devices send to the cloud, as well as the interaction patterns for cloud to device communications, are modeled with the Digital Twin Definition Language (DTDL), an open-source language for describing models for IoT digital twins. The device model serves as a contract between the device and the IoT solution. Device developers can now build their device software independently of solutions. While solution developers can now build standard visualizations and experiences that can be reused across solutions. And as new IoT Plug and Play devices become available, these devices are easy to connect to existing solutions without any additional development
IoT Plug and Play support in Azure IoT Central
With IoT Plug and Play now supported in Azure IoT Central, solution builders can build end-to-end production-grade IoT solutions without having to write new code on the cloud or the device. Start by selecting/buying ready-to-use devices found in the Azure Certified Device Catalog. These devices can be provisioned in Azure IoT Central in minutes as their capabilities are described in the catalog and programmatically understood.

It gets even easier, as solution developers can start using simulated devices complete with rich dashboards and visualizations derived from the DTDL device model. Once devices are added, it’s just a few clicks to add monitoring, alerting, device management jobs, and more. Additionally, ISVs and partners building Line of Business (LOB) applications can easily package devices into turnkey solutions for specific verticals—e.g., retail, health, manufacturing, smart buildings, energy—by pairing Azure IoT Central solution templates with IoT Plug and Play-enabled devices, making it easy to scale to multiple deployments.

IoT Plug and Play accelerates solution development by pairing ready to use IoT Plug and Play-certified devices with ready to use IoT platforms like Azure IoT Central, eliminating the need to write embedded code and reducing the overall integration time from weeks/months to days/hours. As a result, IoT becomes easier, faster and more predictable when you start with IoT Plug and Play in Azure IoT Central.
$1 per year per device
Additionally, we’re excited to be announcing the introduction of a new pricing tier for Azure IoT Central. Customers have made it clear that Azure IoT Central’s simplified pricing model is a fantastic way to streamline budgeting for large deployments and deliver predictable monthly costs for IoT solutions. However, the existing pricing tiers don’t meet the needs of devices sending just a few messages per day. To address this, we are introducing a new pricing tier in December 2020 at less than $1 per year per device. This new tier, named ST0, is designed for devices sending messages as frequently as every two hours. This new flexibility enables new scenarios such as fleet management, smart metering, smart appliances, smart buildings, as well as the breadth of asset and condition monitoring or predictive maintenance. Look for details to show up on Azure IoT Central pricing in the week ahead.
|
Standard Tier 0
|
Standard Tier 1
|
Standard Tier 2
|
Use case
|
For devices sending a few messages per day
|
For devices sending a few messages per hour
|
For devices sending a message every few minutes
|
Price per device per month
|
$0.08
|
$0.40
|
$0.70
|
Monthly device message allocation
|
400
|
5,000
|
30,000
|
Include free quantities per application
|
2 free devices (800 included messages)
|
2 free devices (10,000 included messages)
|
2 free devices (60,000 included messages)
|
Overage pricing per 1K messages
|
$0.070
|
$0.015
|
$0.015
|
Additional resources include


 for Teams.png")


.png")


.png")
.png")
.png")
.png")
.png")
.png")
.png")
.png")
.png")
.png")
.png")
.png")
.png")
.png")
.png")
.png")
.png")
.png")
.png")
.png")
.png")
.png")
.png")
.png")


 2 hour sessions.png")


Recent Comments