by Contributed | Dec 9, 2020 | Technology
This article is contributed. See the original author and article here.
Over the last couple of years, the use of PowerShell became more and more important. I remember running my first commands and building my first automation using Windows PowerShell back in 2006. Since then, PowerShell became one of my daily tools to build, deploy, manage IT environments. With the release of PowerShell version 6 and now PowerShell 7, PowerShell became cross-platform. This means you can now use it on even more systems like Linux and macOS. With PowerShell becoming more and more powerful (you see what I did here ;)), more people are asking me how they can get started with PowerShell. Luckily we just released a new module called “Introduction to PowerShell” on Microsoft Learn.
In this module, you will learn about the basics of PowerShell. This cross-platform command-line shell and scripting language is built for task automation and configuration management. You’ll learn basics like what PowerShell is, what it’s used for, and how to use it.
After you have completed this module, you will be able to understand what PowerShell is and what you can use it for, explore different cmdlets, construct a sequence of cmdlets in a pipeline, and apply sound filtering and formatting principles to your commands.
The Introduction to PowerShell module includes 9 units:
I hope this helps you get started with PowerShell! If you have any questions feel free to leave a comment!
by Contributed | Dec 8, 2020 | Technology
This article is contributed. See the original author and article here.
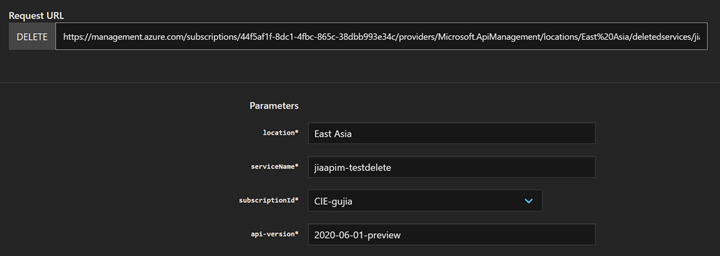
In November 2020, we released a new feature that allows Users to restore the accidentally deleted API Management service using the corresponding REST APIs. Users shall use these new APIs to restore an accidentally deleted service only if the API Management service has been deleted with REST API version 2020-06-01-preview or higher.
Currently if user deletes their API Management service from Azure Portal under “All Resources” page or if they delete the Resource Group where API Management service exists, Azure Resource Manager will send a DELETE request to API Management service with API version 2020-06-01-preview. In this case, the service will be placed in a “soft deleted” state. We are planning to make all the “delete API Management” operation consistent with API version 2020-06-01-preview throughout Azure portal soon.
Purge API Management Service at “soft deleted” state
If you accidentally delete the API Management Service with the API version before 2020-06-01-preview, the deleted API Management service name will be immediately release and you will be able to re-create a new service with same name. if you want to restore the services, please contact support.
If the API Management service was deleted with API version 2020-06-01-preview or higher, then the API Management service will be left in a “soft deleted” state and you will be able to restore the service yourself. However, you cannot create an APIM with the same name immediately, if you want to create a new APIM service with same name, you can purge the “soft deleted” state APIM, please note that we cannot undelete a purged API Management service.
Please see examples below and I will use my APIM “jiaapim-testdelete” as an example.
Purge the APIM by using API: Deleted Services – Purge (Azure API Management) | Microsoft Docs
The response will return the deleted service name and the date that the APIM service was purged.

Prerequisites of restore APIM
Please see examples below and I will use my APIM “jiaapim-external” as an example.
A deleted API Management service can be restored by yourself ONLY if the following conditions are TRUE:
- The API Management service was deleted with API version 2020-06-01-preview or higher and currently in a “soft deleted” state. When the API Management service is deleted, we keep the service in a “soft deleted” state for 2 days. This is subject to change without notice.
- We can use “List deleted services by subscription” REST API to check if the deleted APIM services are in “soft deleted” state, it will also returned the date when the API Management service is going to be purged.

- We can use “Check Name Availability” REST API to tell if the hostname of soft-deleted API management service is released or not

- The resource group where the original service resided at the time of being deleted still exists in your subscription. If you had deleted the resource group, you must re-create it with the same name for the restore operation to be successful.
Please note that we CANNOT:
- Restore a service that has been permanently deleted (the service is no longer in “soft deleted” state)
- Restore only certain entities of a given service. For example, if a user accidentally deletes an API or Operation from a service, we cannot restore those entities. We can only restore a deleted service.
- Rename the service upon or during restore, move it to a different resource group or a subscription. The service will always be restored with the same name, to the same resource group and in the same subscription.
Restore APIM services
After going the prerequisites of restoring APIM above, then let’s see how to restore an API Management service at “soft deleted” state. You can simply use this API Api Management Service – Create Or Update (Azure API Management) | Microsoft Docs. The request URL should contain the original APIM service name, resource group name. The request body should contain the retore property and setting it to true
Example of request body shown below:
{
“properties”: {
“publisherEmail”: “gujia@microsoft.com”,
“restore”: true
},
“sku”: {
“name”: “Premium”,
“capacity”: 1
},
“location”: “australia east”

Response payload returned means the API Management service is being restored. Please see example below:

Additional Considerations
The Public VIP (I.P. Address) of the service will change after the restore. If your backend service was configured to only allow traffic from certain I.P. addresses, you may have to change the configuration to allow the new I.P. address (I.P. address can be obtained from the “Overview” blade of the Azure Portal).

If the service was in an external/internal VNET and the VNET/subnet has also been deleted, the service will be restored as if it is not in a VNET (this operation may fail, retry will help). If you need to add this restored API Management service to a VNET, then you will need to create a new VNET and add the restored APIM service to the VNET.

by Contributed | Dec 8, 2020 | Technology
This article is contributed. See the original author and article here.
On the Surface Marketing team we’re often asked for a concise highlight of features and functionalities of our products. With all the new things rolling out for Surface Hub 2S — Proximity Join, Coordinated Meeting with Microsoft Teams Room, the latest Windows 10 Team 2020 Update, the upcoming arrival of the Surface Hub 2S 85″ and running Windows 10 Pro on Surface Hub 2S — we decided to create a Top 5 feature list. We also tried to make it as light hearted as possible and have some fun with it.
So check it out and let us know what you think…
by Scott Muniz | Dec 8, 2020 | Security, Technology
This article is contributed. See the original author and article here.
Original release date: December 8, 2020
OpenSSL has released a security update to address a vulnerability affecting all versions of 1.0.2 and 1.1.1 released before version 1.1.1i. An attacker could exploit this vulnerability to cause a denial-of-service condition.
The Cybersecurity and Infrastructure Security Agency (CISA) encourages users and administrators to review the OpenSSL Security Advisory and apply the necessary update.
This product is provided subject to this Notification and this Privacy & Use policy.
by Contributed | Dec 8, 2020 | Technology
This article is contributed. See the original author and article here.
Enabling remote secure remote work has never been as vital as it is today. This past year, the Microsoft Teams Engineering team, helped customers with a record number of net new deployments in the Microsoft Cloud. With the inevitable need to have end-users collaborate with agencies, partners, and customers remotely, security became paramount.
Moving beyond reliance on simple allow/deny access controls towards continuous monitoring of activities and contextual risk is a proven Zero Trust methodology that has been quintessential to Microsoft commitment towards a Zero Trust strategy, needed to enable the necessary environment needed to empower new ways to work.
Join a group of Security and Teams experts in a round-table that will cover how Microsoft Teams is enabling the future of work, remotely and securely for private and public sectors.
Register for more: Microsoft Event (mktoevents.com)
by Contributed | Dec 8, 2020 | Technology
This article is contributed. See the original author and article here.
We are always excited to participate in SAP TechEd, especially because of the unique partnership we share with SAP to jointly help our customers migrate ERP to the cloud. For example, we recently enabled Walgreens Boots Alliance (WBA) to migrate its massive SAP landscape (an estimated 100 terabytes) to Azure, making it one of the largest SAP S/4HANA scale-out configurations in the public cloud.
As an SAP TechEd 2020 Gold Sponsor, Microsoft will be leading a session that covers our new migration offerings, and we’ll co-present with SAP on our latest developments on simplifying a customer’s journey from SAP ERP on-premises to S/4 HANA on Azure. Additionally, there are several sessions run by SAP teams globally that cover planning and analysis with new add–ins for Microsoft Office, running SAP Cloud Platform on Azure, RPA for common scenarios combining SAP and Microsoft Office, and deploying and protecting SAP software in the cloud with Azure NetApp files. You can find these sessions in the course catalogue here.
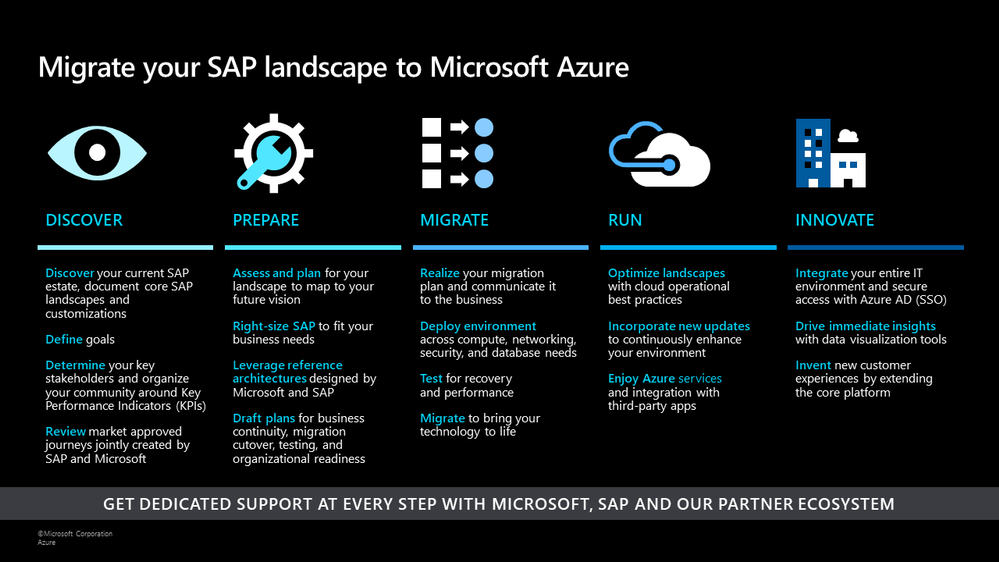
Earlier this year, we announced offerings to help customers optimize costs and increase agility by running their SAP workloads on Azure. At Microsoft Ignite, we shared a migration framework to help customers achieve a secure, reliable, and simplified path to the cloud. Today, we continue to deliver on that promise with additional product updates that will further streamline a customer’s migration journey, drive improved price/performance, and provide simplified management.
SAP on Azure Migration Framework
Drive improved price/performance
As customers move their SAP landscapes to Azure, we want to ensure that they can benefit from new generations of hardware and processors to achieve improved price/performance ratios. We recently launched the new Ddsv4 and Edsv4 VM families based on the 2nd generation Intel Xeon Platinum 8272CL (Cascade Lake). . We have also certified a subset of the Edsv4 VMs for SAP HANA. These new VMs deliver up to , the Dv3 and Ev3 VMs, depending on the workload. Customers can also seamlessly transition to these VMs by simply resizing their VMs from the predecessor versions. Learn more about this update here.
Save costs and reduce storage requirements with the new Azure premium storage bursting capability
We continue to innovate on existing technologies such as premium storage to reduce the total cost of ownership for our customers. With the disk bursting capability of our premium storage disks, customers no longer have to size storage configurations at a higher level to account for short-lived peak workloads. Customers can instead rely on premium storage disk bursting to cover such peak demand periods. With this new capability, customers can lower their storage costs substantially across configurations for database management systems such as SAP HANA, Oracle, and SQL Server. Customers can refer to our updated SAP HANA Azure virtual machine storage configurations guide to take advantage of the updated storage size recommendations based on disk bursting. In addition, our new guide Azure Storage types for SAP workload helps customers evaluate the right storage type options for their SAP workloads.
Simplify deployment with the SAP on Azure Deployment Automation Framework
Earlier this year, we introduced We have evolved the framework and expanded a modular workflow to provide rapid and consistent deployments. With the automation framework, customers can deploy the Azure infrastructure to support and run an SAP system in minutes, in a repeatable fashion, to support multiple use cases. We also introduced extended functionality such as support for Azure Key Vault, Azure , and AnyDB support.
We have already made these capabilities available to a set of private preview customers. Today, we are announcing that these building blocks will be available more broadly in our GitHub Open-Source repository (sap-hana) as (v2.3) for SAP on Azure Deployment Automation soon. The automation solution is based on the best practices specified by Microsoft and SAP as part of our reference architectures for SAP. You can read more about the automation framework in our blog. You can also learn more about the scenarios supported in our GitHub repository.
Azure Backup for SAP HANA now supports incremental backups to save time and reduce costs
With Azure Backup, Azure’s native Backint certified backup solution, customers can protect their SAP HANA deployments in Azure VMs with zero backup infrastructure. We are excited to announce the public preview of support for HANA incremental backups, which allows customers to create cost-effective backup policies catering to their RPO and RTO requirements. To try out this preview offering refer to our documentation and check out this tutorial. To learn more about backups for SAP HANA databases in Azure, explore supported scenarios and FAQs.
SAP and Microsoft partner to deliver supply chain and Industry 4.0 solutions in the cloud
Today, we have further expanded our partnership with SAP to enable customers to design and operate intelligent digital supply chain and Industry 4.0 solutions in the cloud and at the edge. You can read more about how SAP and Microsoft are collaborating closely to shape the future of supply chain and manufacturing here.
SAP TechEd is an amazing opportunity to learn and gain new career skills. After the event, explore the free SAP on Azure learning resources on Microsoft Learn and consider getting certified – Azure is the only cloud vendor that offers an SAP cloud certification.
We look forward to seeing you during our sessions at SAP TechEd!
by Contributed | Dec 8, 2020 | Technology
This article is contributed. See the original author and article here.
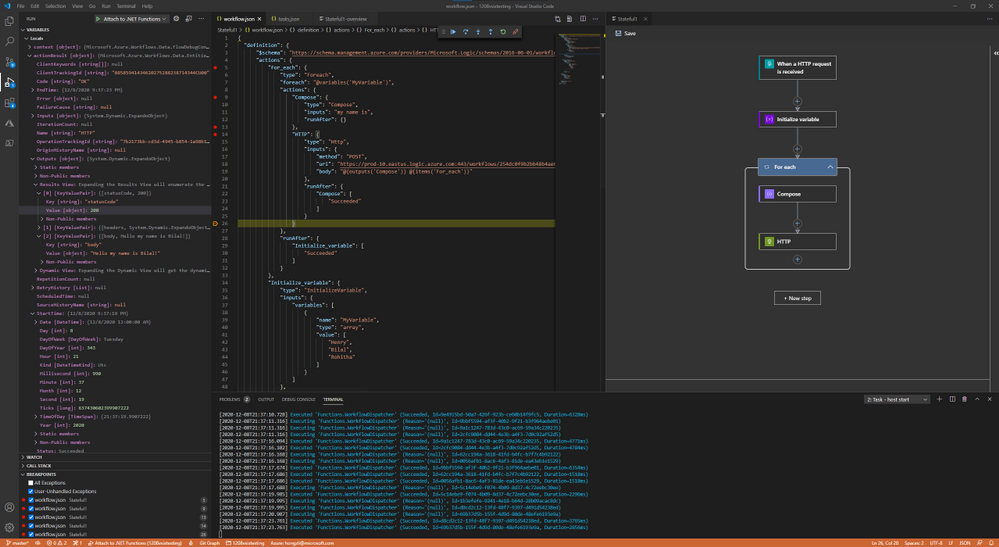
Breakpoint Debugging
You’ve been asking about better debugging support, and it is now available with the new runtime. When running Logic Apps locally, it’s possible to set breakpoint before and after an action, and exam the input and output during workflow executions.
New Layout Engine for Designer
Since the initial release of Logic Apps, we see customers’ implementation grow in complexity: more actions, parallel branches, extensive use of control flows and advanced configurations. After the visual refresh for the workflow designer we recently released, we decided it’s time to update the layout engine to better render more complex workflows. This refresh includes only the initial work to move to a new layout engine, more improvements will come in the coming months.
Custom Connector Extension
Integration Account Support
Many of the Integration Account capabilities are now built-in. You can upload maps and schemas directly to the new Logic Apps resource, and perform XM validation, transformation, and Liquid operations without needing an Integration Account.
– Derek, on behalf of the entire Logic Apps Team
by Contributed | Dec 8, 2020 | Technology
This article is contributed. See the original author and article here.
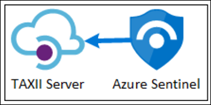
Bring threat intelligence from Sixgill using TAXII Data Connector
As discussed in the blog Bring your threat intelligence to Azure Sentinel, Azure Sentinel provides various ways to import threat intelligence into the ThreatIntelligenceIndicator log analytics table from where it can be used in various parts of the product like hunting, investigation, analytics, workbooks etc.
One of the ways to bring threat intelligence into Azure Sentinel is using the Threat Intelligence – TAXII Data connector. This data connector in Azure Sentinel uses the TAXII protocol for sharing data in STIX format which is one of the most widely adopted standard for sharing threat intelligence across the industry. This data connector supports pulling data from TAXII 2.0 and 2.1 servers. The Threat Intelligence – TAXII data connector enables a built-in TAXII client in Azure Sentinel to import threat intelligence from TAXII 2.x servers.
Today we are announcing the availability of the Sixgill TAXII Server which allows you to get threat intelligence data from Sixgill into Azure Sentinel using the Threat Intelligence – TAXII Data connector.
Sixgill + Microsoft Azure Sentinel Solution
The Sixgill and Azure Sentinel integration makes it easy to gain deeper visibility and advanced context of IOCs from the deep and dark web — providing an enhanced level of detection and protection for your organization. With Sixgill Darkfeed, Azure Sentinel users can proactively protect against threats with automated intelligence in real-time. Darkfeed is the most comprehensive, automated IOC solution, powered by Sixgill’s data lake of underground threat intelligence. It delivers contextual insights in real-time – straight from the Azure Sentinel dashboard.
Microsoft Azure Sentinel benefits with Sixgill Darkfeed:
Incident response security teams can automatically receive IOCs from Darkfeed (machine-to-machine) and gain unparalleled context with essential explanations of IOCs. Malware researchers can hunt for malicious indicators of compromise in organizational networks and conduct deep analysis of malware available for download on the deep and dark web. Users can then pivot to the Sixgill Investigative Portal to further investigate threat actors and contexts in order to protect their organization’s most critical assets.
This blog will walk you through the process of connecting the Sixgill TAXII Server to Azure Sentinel.

Connecting Azure Sentinel to Sixgill TAXII Server
To connect Azure Sentinel to Sixgill TAXII Server, obtain the API Root, Collection ID, Username and Password from Sixgill. To obtain access to Sixgill Darkfeed via Azure Sentinel, please contact Sixgill at “azuresentinel@cybersixgill.com”.
Enable the Threat Intelligence – TAXII data connector in Azure Sentinel
To import threat intelligence indicators into Azure Sentinel from the Sixgill TAXII Server follow these steps:
- Open the Azure Portal and navigate to the Azure Sentinel service.
- Choose the workspace where you want to import threat intelligence indicators from the Sixgill TAXII Server.
- Select Data Connectors from the Configuration menu.
- Select Threat Intelligence – TAXII from the list of the data connectors and click the Open Connector page button.
- Now enter a Friendly name for the TAXII Server collection. This will be stamped on all the indicators as the Source of the indicator.
- Now enter the API Root, Collection ID, Username and Password that you obtained from the steps mentioned above from Sixgill portal.
- Click the Add button.

You should now see a confirmation on the notification dialog that the connection was established successfully. The TAXII Server will now show up in the List of the configured TAXII Servers.

View imported indicators from Sixgill TAXII Server in Azure Sentinel
Now that threat intelligence indicators from the Sixgill TAXII Server are being imported into Azure Sentinel, you can view them in one of the two below mentioned ways in Azure Sentinel:
a. The ThreatIntelligenceIndicators table in Log analytics.
- Open the Azure portal and navigate to the Azure Sentinel service.
- Choose the workspace where you’ve imported threat indicators from Sixgill using the Threat Intelligence – TAXII Data connector.
- Select Logs from the General section of Azure Sentinel.
- The ThreatIntelligenceIndicator table is located under the SecurityInsights group.
- Use the following query to find indicators from Sixgill:
ThreatIntelligenceIndicator
| where SourceSystem == “Friendly name of the TAXII Server”
b. Threat Intelligence blade under the Threat Management menu.
- Open the Azure portal and navigate to the Azure Sentinel service.
- Choose the workspace where you’ve imported threat indicators from Sixgill using the Threat Intelligence – TAXII Data connector.
- Select Threat Intelligence from the Threat management section of Azure Sentinel.
- You can filter the indicators according to the Source to view the ones that you imported from Sixgill. To do so, select the friendly name of the Sixgill TAXII Sever you used from the Source pill filter.
Use imported indicators from Sixgill TAXII Server in Azure Sentinel
Now that you have imported the indicators into Azure Sentinel you can use them for matching against log sources. This can be done using the Azure Sentinel out-of-the-box analytics rules by modifying them or by creating new rules from scratch. The set of out-of-the-box analytics rule used to match threat indicators with your event data all have names beginning with, ‘TI map’ under the Analytics section in Configuration menu. All these rule templates operate similarly with the only difference being what type of threat indicators are used (domain, email, file hash, IP address, or URL) and which event type to match against.

With this Sixgill and Azure Sentinel integration, you can now use the IOC’s from the deep and dark web for advanced detection and hunting threats in your organization. You can also receive additional context about the IOC’s from Sixgill Darkfeed. This feed can be used by researchers to hunt for malicious IOCs in the dark web and use them for analysis and investigation to protect their organizations.
by Contributed | Dec 8, 2020 | Technology
This article is contributed. See the original author and article here.
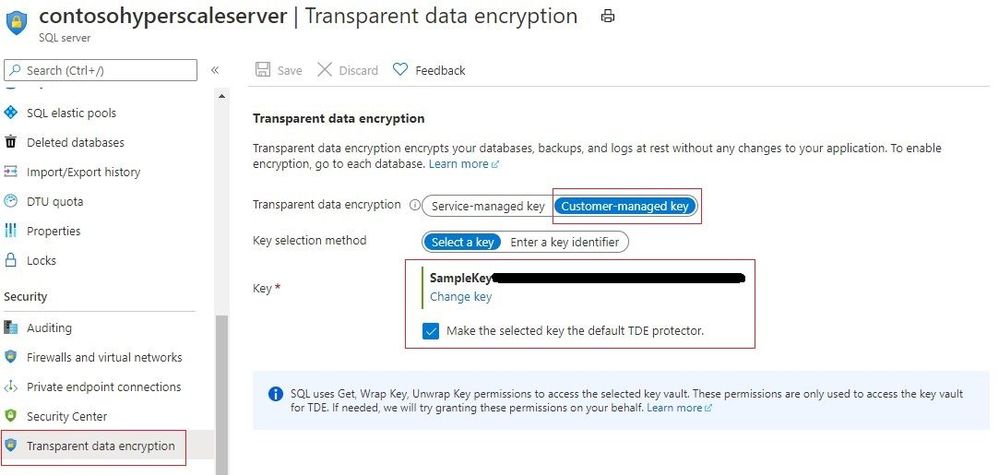
Transparent data encryption (TDE) in Azure SQL helps protect against the threat of malicious offline activity by encrypting data at rest. Customers using Azure SQL Database Hyperscale can now use a key stored in Azure Key Vault (AKV) as the TDE Protector for their server.
What new functionality is available as part of this announcement
With Bring Your Own Key (BYOK) support for TDE now available for Hyperscale databases, the TDE Protector that encrypts the Database Encryption Key can be stored in a customer-owned and managed Azure Key Vault (Azure’s cloud-based external key management system). The TDE Protector can be generated in AKV or transferred to it from the customer’s on-premise security vault. The logical SQL server in Azure must be given to access the key stored in AKV.
The existing TDE with service-managed keys option will continue to be available and TDE encryption mode can be switched between service-managed or customer-managed keys.
Note – TDE BYOK functionality is already available for other service tiers in Azure SQL.
What are the benefits provided by TDE BYOK for HyperScale
- TDE with customer-managed keys improves on service-managed keys by enabling central management of keys in Azure Key Vault, giving customers full and granular control over usage and management of the TDE protector
- Users can control all key management tasks including key creation, upload, rotation, deletion, key usage permissions, key backups, along with enabling auditing/reporting of all operations performed on the TDE protectors
- Organizations can use TDE BYOK to implement separation of duties between management of keys and data to help meet compliance with security policies
- Azure Key Vault (AKV) provides a higher level of security assurance for government and financial customers and sensitive workloads via optional FIPS 140-2 Level 2 and Level 3 validated hardware security modules
Steps to enable TDE BYOK for a HyperScale database
Below are the steps needed to enable TDE with customer-managed keys for Hyperscale database(s).
- Assign Azure AD identity to your logical SQL server hosting the Hyperscale database
- Create (or use existing) key vault and key. Refer this tutorial for doing this through the Portal. Follow the requirements for configuring AKV and for TDE Protector keys.
- Grant permissions to your server to access the keys stored in Key Vault
- Add the Key Vault key to the server and set it as the TDE protector. This updates the server to use TDE with customer-managed key.
- Turn on TDE for the HyperScale database (if not already enabled).
For a comprehensive step-by-step tutorial on enabling TDE BYOK using Azure PowerShell or CLI, please refer our documentation.
Learn More
We hope TDE BYOK will provide Hyperscale customers with an enhanced experience for managing the encryption at rest keys for their data.
by Contributed | Dec 8, 2020 | Technology
This article is contributed. See the original author and article here.
This is a look back at a blog post from Nonki…
Originally written on 08/28/2017.
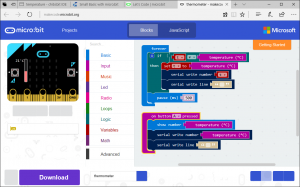
BBC micro:bit is a small board computer for kids. Today I’d like to introduce two programs that communicate between a micro:bit and a PC.
The micro:bit side program is thermometer which is programed with JavaScript Blocks Editor. This program shows temperature at A button clicked and sends temperature to serial port when the temperature changed.
The PC side program is Thermometer.sb which receives temperature from serial port and shows it graphically. The picture below shows Device Manager, Thermometer.sb and chibi:bit (a micro:bit compatible board).
.jpg")
Before running Thermometer.sb, please check the port number in Ports (COM & LPT) such like COM3 with Device Manager. And modify line 88 of Thermometer.sb. Then push reset button and push A button of micro:bit.
Have fun with Small Basic and micro:bit!
See Also


Recent Comments