
by Contributed | Dec 10, 2020 | Dynamics 365, Microsoft 365, Technology
This article is contributed. See the original author and article here.
With the global disruption of the pandemic, healthcare organizations are particularly challenged to promote telehealth services and engage patients and providers while adhering to strict compliance and security regulations. Marketing automation and customer relationship management (CRM) tools such as Microsoft Dynamics 365 Marketing and Microsoft Dynamics 365 Customer Insights are expanding the ways in which healthcare organizations can create communications that are personalized and relevant while respecting those regulations.
A centralized system must be secure and speedy
Sharing information across its health network is at the center of Healthdirect Australia’s mission. The nonprofit helps a population of more than 25 million Australians access the right healthcare at the right time by providing government-funded telehealth services through helplines, video calls, an online symptom checker, and a mobile app. It also delivers information to other health organizations about benefits for their customers, including service enhancements, product launches, and other advances.
To build a reliable and flexible engagement platform that could distribute information while maintaining data privacy, Healthdirect Australia chose to move to Dynamics 365 Marketing.
“We needed a centralized system to help us improve consistency and remove the risk of content duplication,” said James Harris, Marketing Manager of Healthdirect Australia. With that system now in place, the organization is further extending its value, as Dynamics 365 Marketing is being used to increase productivity by bringing HealthdirectAustralia’s data together in one place.
“Before using Dynamics 365 Marketing, we couldn’t adequately scale our communications,” says Harris. “Now, we can scale as required to share information and quickly provide Primary Health Networks with the latest messaging about our services. Our speed of delivery has gone from weeks to days [and] we’re able to get our message out to the right contacts much more quickly than we could before. When COVID-19 hit, we used Dynamics 365 Marketing to communicate with the Primary Health Networks, which then distributed that information to health workers on the front line.”
One industry, many concerns
The complexities, dynamics, and regulatory concerns of healthcare organizations are increasingly finding solutions in powerful marketing automation and CRM products.
Microsoft is moving quickly and strongly to meet the demands and requirements of healthcare’s fast-tracked transition to digital. Although many organizations were focused on digital transformation even before the global health crisis of 2020, the pandemic drove rapid innovation from solution providers. Dynamics 365 Marketing and Dynamics 365 Customer Insights increased their focus on the unique needs of healthcare in extraordinary circumstances.
Perhaps the most impact will come from Microsoft‘sfirst industry-specific cloud offering, Microsoft Cloud for Healthcare. This initiative willenhance patient engagement, empower health team collaboration, improve clinical and operational insights, and make it faster and easier to provide more efficient care. Significantly, Microsoft Cloud for Healthcareis designed with the regulatory guidelines that healthcare is bound by in mind. It helps ensure the end-to-end security, compliance, and interoperability of health data.
Commitment to compliance
Whenever an organization is dealing with people’s healthcare information, security and compliance are top-of-mind concerns. Those organizations should know that Dynamics 365 Marketing helps them meet HIPAA-compliance at the highest level. Microsoft Dynamics 365, along with other Dynamics 365 apps and Microsoft solutions, has received certification for the HITRUST CSF as Microsoft is one of the first hyperscale cloud service providers to receive this certification.
At the company level, this means one large concern is a checked box.
“Because Microsoft helps keep Dynamics 365 Marketing compliant with data protection standards in the Australian Government Information Security Manual, we have complete peace of mind that its data security meets our requirements.”Paul Noone, Office 365 Administrator and Developer, Healthdirect Australia
Stop the siloing: information-sharing made secure
Complying with patient record confidentiality while striving for more personalized in-patient communications is a key challenge of the digital transformation of healthcare, due to the sensitivity of the personal information being handled, including patient demographics and medical histories.
Like many healthcare providers, Dayton Children’s Hospital in Dayton, Ohio used a siloed approach, storing clinical information in one system, managing call logs in another, and handling web registrations and marketing contacts in another.
However, the separation of information hampered both the care teams and the marketing team. Dayton Children’s Hospital decided to address the situation using Dynamics 365 Customer Insights to close the gap and establish a scalable, highly-secure, and HIPAA-compliant data foundation that spanned both clinical and marketing information.
Now, the Dynamics 365 Customer Insights foundation allows the marketing team to easily create new dynamic segments based on patient age, guarantor’s address, and other relevant personal activity information such as sports-related injuries. Those segments can then be pushed to Dynamics 365 Marketing for marketing campaigns.
As a result, Dayton Children’s Hospital has gained the ability to give its marketing campaigns the information to create personalized messaging while being fully confident of its HIPAA compliance: a closed-loop marketing process between Dynamics 365 Marketing and Dynamics 365 Customer Insights.
A successful healthcare organization has information management challenges as part of its ongoing operations. Optimizing all its information to communicate and serve patients while providing safeguards for privacy is a delicate balance that is readily achievable using Dynamics 365.
Learn more
The post How healthcare organizations can share information securely appeared first on Microsoft Dynamics 365 Blog.
Brought to you by Dr. Ware, Microsoft Office 365 Silver Partner, Charleston SC.
by Contributed | Dec 10, 2020 | Technology
This article is contributed. See the original author and article here.
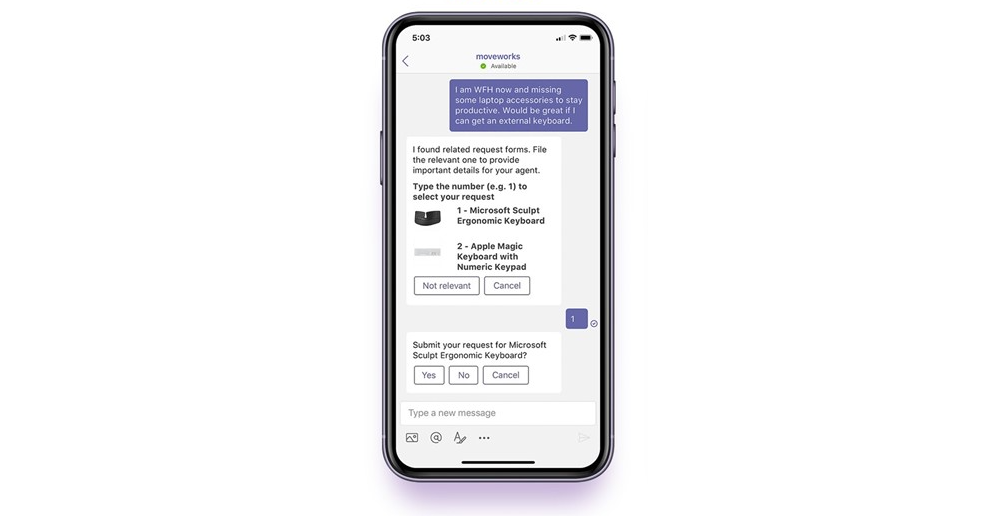
Microsoft Teams is excited to announce that AppSource now includes Moveworks, the world-leader in AI-powered IT support.
Moveworks is a conversational AI chatbot that allows employees to resolve their tech issues directly in Teams, instantly and autonomously, with no involvement from your IT team. Unlike conventional chatbots, Moveworks leverages advanced natural language understanding, or NLU, to determine exactly what employees are requesting—no matter how they phrase those requests.
“By helping to quickly resolve employees’ IT issues within Microsoft Teams, Moveworks allows companies to work faster. And in a world that now relies on technology to collaborate, it’s never been more critical to provide real-time, location-agnostic tech help.”
— Mike Ammerlaan, Director, Microsoft 365 Ecosystem, Microsoft
Behind the scenes, Moveworks takes action and retrieves knowledge by integrating with other enterprise systems, such as Active Directory, SharePoint, and Microsoft 365. These deep integrations enable the Moveworks bot to deliver end-to-end resolution for a wide range of IT issues:
- Provisioning and deprovisioning software licenses
- Unlocking accounts and resetting passwords
- Creating and editing distribution lists
- Serving up answers to troubleshooting questions
- Ordering devices and accessories for the home office
- …And much more.
Before Moveworks became available on AppSource, fully deploying the bot still took just eight weeks. But by downloading Moveworks at the click of a button, you can shrink that time-to-value even further—thanks to these added capabilities:
- Rapidly roll out the bot to your workforce
- Access the latest Moveworks features on Teams faster
- Build your custom bot avatar, alongside Moveworks’ design team
- Easily contact Moveworks Support for rapid assistance
For enterprise Teams customers like Equinix, Moveworks has significantly enhanced the Teams platform in two distinct ways. First, Moveworks allows Equinix employees already using Teams to fix their tech problems—from accessing software to editing email lists to unlocking accounts—via quick, painless conversations with the AI chatbot. And second, Moveworks intercepts IT issues submitted through other channels and then resolves those issues on Teams, bringing new users to the platform.
You can read Equinix’s success story here.

Reimagining your virtual workplace
Particularly in this new normal of remote work, the ability to remain productive anywhere and anytime defines successful employees. But without a physical office or access to in-person help, these employees often don’t know where to find critical resources.
With Microsoft Teams, however, every key team member, workflow, and file is consolidated in a single place. And by adding Moveworks to Teams, getting IT support is just as simple.
“Microsoft Teams is a powerful platform, and Moveworks makes it even more valuable. It’s a symbiotic relationship.”
— Greg Ogle, VP of Global IT Infrastructure, Equinix
by Contributed | Dec 10, 2020 | Technology
This article is contributed. See the original author and article here.
Today’s urgent need to optimize and transform service desk support across internal departments such as IT, HR, and Sales has led to a dynamic new partnership between Microsoft Teams and Aisera’s AI Service Desk. The agile technologies of Conversational AI, NLU, Cognitive Search, Unsupervised NLP, and Conversational RPA combined with Teams’ ability for employees to connect and collaborate seamlessly, underscores the growing trend of work from anywhere.
Service desks were previously unable to meet the demands of offering a five-star employee experience—bogged down by manual processes, lack of self-service and automation, and long waits to resolve support requests. Previously, employees had to wait an average of three days to get their internal IT or HR issues resolved, as support desks were stretched thin and unable to meet business Service-Level Agreements (SLAs). This problem was amplified during the pandemic, leaving many internal support organizations unprepared.
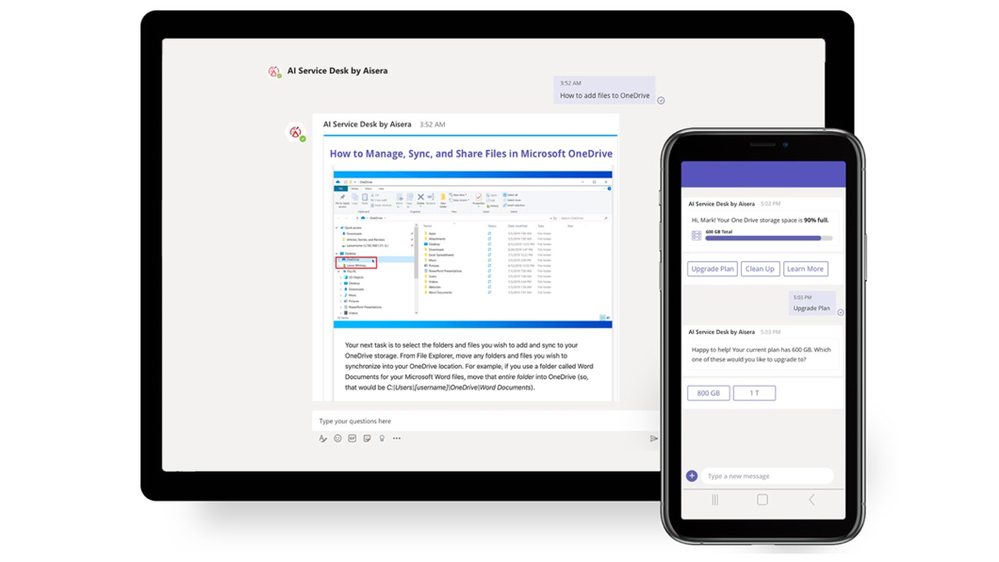
Aisera’s AI Service Desk, integrated with Microsoft Teams, takes advantage of cutting-edge AI collaboration technology and dramatically improves employee support experience. Now, employees are freed from long wait times that once characterized the service desk. Aisera on Teams provides instant resolutions of employee requests, thus making employees more productive.
Auto-resolve support requests in seconds, not days
With the growing emergence of Teams as a preferred channel for employee communication, Aisera’s integration fits perfectly into IT service desk environments for ITSM automation. Aisera serves as a go-to IT and HR channel for employees that don’t force users to log into service desk environments and portals. Here, using AI, their requests are auto-resolved in seconds.
Building the ultimate support hub
The convenient central interface created by unifying Aisera with Teams has propelled employee productivity to unprecedented levels. Aisera’s agility in resolving issues is founded on a virtual assistant using Conversational AI, NLU, Cognitive Search, Unsupervised NLP, and Conversational RPA in a scalable, cloud-native AI technology platform. Moreover, Aisera’s conversational RPA technology acts as the AI-driven workflow automation engine, which enables MS Teams with automation for user workflows and tasks.
Employees can leverage pre-built integrations to Microsoft products from Active Directory, Office 365, SharePoint, Knowledge Bases, Dynamics 365, and leading ticketing systems, including Service Now, JIRA Service Desk, and BMC.
Teams adoption rates soar with Aisera’s Conversational AI
The ability of MS Teams integration to transform self-service has been instrumental in automating internal services and boosting service desk productivity. Customers have reported an increase in user engagement, with proactive notifications and a substantial decrease in tickets created through Teams via AI-powered auto-resolution. The results? Employee satisfaction has improved by 70 percent, agent productivity has doubled—and average resolution rates improved by 90 percent in many cases—a significant key performance indicator of Service Desk efficiency.
by Contributed | Dec 10, 2020 | Technology
This article is contributed. See the original author and article here.
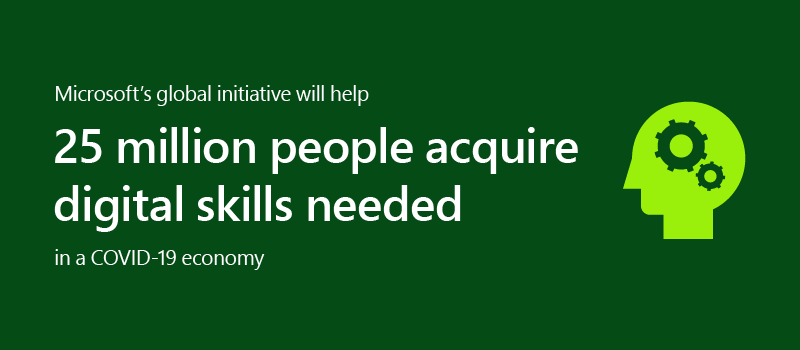
Resilience is a theme that has emerged from all over the world as we find ways to cope, learn, and grow through these unusual times. We have good news for people who would like to start a career or who already work in technology: Research shows that the pandemic has accelerated digitization to the tune of a projected 149 million new jobs in tech by 2025.1
In-demand tech jobs by 2025:
- 98M new jobs projected in software development
- 23M in cloud and data roles
- 20M in data analysis, machine learning, and AI
- 6M in cyber security
- 1M in privacy and trust
In contrast, since 2008 employer-paid training has declined steadily.2 So how can you keep up with the training and certifications you need to grow into these high-demand roles? This is an encouraging opportunity to take charge of your own career growth through available training resources. Recently, we launched an initiative to help people worldwide acquire the digital skills needed in a COVID-19 economy.
It’s the right time to get skilled
Where are you in your career stage? Maybe you’re happily employed and the pandemic has not significantly impacted your career path. If so, this is a good opportunity to keep your skills relevant with training or explorations in new areas to ensure you’re current. Maybe you’re actively looking for a new role. Do you need to strengthen skills to be a prime candidate? Perhaps you’re a recent graduate and want to build specific skills for a role you’re interested in. Or maybe you’re growing in your career and want to take the next steps to become an expert in your field. Wherever you are in your current career stage, using this time of change to improve your skills can help you stay ahead.
Get role-based tech training
We’ve been building a portfolio of technical role-based training and certifications designed to help you stay current and be future-ready. Role-based training focuses on department objectives rather than product knowledge. For example, training and certification for a cloud administrator covers a broad set of products including data management and analytics, system properties and provisioning rules, VMs and even resource management, just to name a few. This helps provide a valuable set of skills to be successful in a job role, and in turn, makes you valuable as an employee or partner.
Learn in the style that fits best
Everyone learns differently. To meet people where they are, Microsoft Learn provides a range of learning modalities, often combined to create a personalized experience. This method empowers you to grow in a way that fits you best:
- Self-paced learning on Microsoft Learn helps build practical jobs skills with free, step-by-step, bite-sized tutorials and modules. Learning paths offer interactive coding environments right in the browser.
- Training events provide unique upskilling experiences, combining presentations with demonstrations, discussions, and hands-on workshops virtually and/or in person.
- Instructor-led training with Learning Partners, using Microsoft Official Courses taught by Microsoft Certified Trainers, brings customized training plans and dedicated personal attention and support to quickly advance technical expertise.
Keep moving forward
Continuous learning is a key signal of resilience and staying ahead. Just as Microsoft training is aligned with roles, Microsoft Certifications are designed to validate that those in-demand talents exist. Microsoft Certification validates technical knowledge and the ability to demonstrate real-world skills, recognition that can help you aim for your next career step. Continue learning and growing, even during a pandemic. Explore Microsoft Learn to find your path forward.
Related post:
1 Microsoft Data Science, utilizing LinkedIn Data. Methodology and assumptions can be found in the white paper “Methodology: Digitization Capacity of the World Economy.”
2 Council of Economic Advisers calculations of data from Census Bureau, Survey of Income and Program Participation. Microsoft CELA Data Science and Analytics.

by Contributed | Dec 10, 2020 | Technology
This article is contributed. See the original author and article here.
Join Microsoft’s Scott Murray and special guest Derek Peter for this month’s security webcast as they address Insider Risk Management. During this webcast they will present, and answer your questions, around the workings of Insider Risk Management within the Microsoft 365 Compliance stack.
- When: 12/16/2020 at 10am Central/11am Eastern
- Who: Microsoft’s Scott Murray and special guest Derek Peter
- Where: Microsoft Team Live Event online
Thanks for visiting – Michael Gannotti LinkedIn | Twitter
 Michael Gannotti
by Contributed | Dec 10, 2020 | Technology
This article is contributed. See the original author and article here.
With the announcement of general availability (GA) for Azure Stack HCI, we would like to share how the CPPE (Customer Program and Partner Ecosystem) team worked to drive the product features and quality of the release and bring out the voice of the customer in our engineering effort. CPPE has established deep co-engineering relationships with more than 30 customers to deploy and test the early software releases that helped us get to this GA milestone. Along the way, we tracked hundreds of bugs, countless enhancement requests, and learned how customers intend to utilize Azure Stack HCI in their production environments.
Early adopter customers ranged in size from a few clusters in a handful of geographic locations to large, complex datacenters with thousands of branch locations across the world. From manufacturing to retail to financial services, core requirements are common to many customers including:
- the desire for a single control plane to manage cloud and on-premises resources with a global view of cluster from health and monitoring to resource provisioning
- the ability to provide disaster recovery and business continuity (BC/DR) across sites without manual intervention to fail over clustered resources
- the need for resilient branch offices that can run traditional virtual machine-based applications alongside modern containerized applications
- support for a variety of server hardware options with a range of form factors, mounting options, noise levels, ambient temperature ranges and connectivity options (WiFi/5G) in branch and remote offices where often there is no datacenter infrastructure or IT staff
Leveraging these customer insights, the Azure Stack HCI engineering team collaborated with our server hardware partners to create an aligned deployment and operations experience that addresses the primary customer requirements above. Also, in large datacenter deployments with high node count in the clusters it became obvious that an integrated systems offering from our partners would be beneficial due the complexity of rack, stack and integration. This improves time to value for these large deployments.
At the feature level, we’ve built the following into Azure Stack HCI based on the insights above:
- a new Azure-based control plane leveraging Azure Arc to manage clusters from the Azure portal
- an integrated Stretch Clustering engine with a simple setup from a web-based UI
- enhanced 2-node features to enable quick and easy deployment of resilient branch offices at a very affordable price including industry-leading cloud and file quorum witnesses
- support for leading edge server hardware innovation in a variety of form factors and price points from 1 processor / 4 core up to multi-processor / 32 core systems
Looking at vertical insights, we work with retail in consumer goods and grocery which share specific needs for POS and store security. With low numbers of virtual machines running per store (between 8 and 12), Azure Stack HCI with true 2 node deployment with local resiliency is an ideal fit in terms of size, capability, and pricing. With the pricing model of USD $10 per physical core, per month, these customers can choose the right core count server in the Azure Stack HCI catalog and get just the right amount of compute power to meet their needs.
Another important facet of Azure Stack HCI that is appreciated from all our customers is that their expertise in Hyper-V, the Azure hypervisor and other Microsoft tools, such as PowerShell and System Center are directly transferable making the learning curve for this new technology very simple. In many cases, customers can also reuse 3rd party ISVs that they were using for particular in-house processes. The ability of Azure Stack HCI to leverage the Windows Server partner ecosystem plays an important role to simplify deployment and integration.
Now that we’ve reached GA, we would like to expand customer insights to a broader audience. Please download Azure Stack HCI from http://azure.com/hci and give us feedback through the Azure Stack HCI UserVoice. If you are interested in engaging directly with Engineering on our EAP (Early Adopter Program) for future iterations of Azure Stack HCI, complete this survey.

by Contributed | Dec 10, 2020 | Technology
This article is contributed. See the original author and article here.
Feature flags is a concept meaning that you switch features on and off via a flag. Why would you want to do that?
Here’s some good reasons:
- Early integration. Usually you work on a feature in a branch. The longer the feature takes to complete, the more trouble you will have with merging/rebasing, once you are done with the feature. Being able to integrate the feature into your main branch early means less of that kind of hassle. The effect of this is that you can ship a feature to production before it’s ready for public use. This type of deployment is also called dark deployment.
- A/B testing. A known pattern for trying out new, or changed features, is A/B testing. In A/B testing you want to answer a question, is A better than B. A represents one version of your app and B the other. To find this out, you create different versions of an app. Then you decide to filter your incoming user traffic so that different users ends up on different versions. You can then measure different things such as conversion rates, if you are an e-commerce, or maybe if more users click a certain button and more. One way you can use to create different versions of a site, is to ensure that different features are activated. On a website this can mean that different flags are set in localStorage, or you use parameters in the URL or it’s decided via data from the backend.
- Flighting. Flighting is a term that means that a certain percentage of users gets a new feature. It can be almost the same mechanisms at play as with A/B testing. Instead of trying to answer whether A is better than B, you try to deliver a new feature to a subset of users to see if they can use a feature without issue. If there’s an issue, you can always roll back.
References
Using feature flags
Depending on if you are working on a mobile app, a webapp or some other type of software, how you implement feature flags might differ. The flow of how a feature flag is applied is roughly the same though:
- Create the flag. Create the flag with suitable name and namespace and give it a value.
- Evaluate the flags value. This means that somewhere there’s a line of code looking roughly like so:
   if (flag) {

      // render A, else B

   }
Code like that might be baked into a tag component, so you might not have to write it. (That’s just what it is in .NET Core)
- Render different experiences. As a result of the previous bullet you end up doing something differently, either you render/don’t render a certain portion of a page. Or, you redirect from one route to another route and so on. The exact details of this process is up to you, but the steps are the same.
No recompile, No redeploy
Above is Jean Claude Van Damme in the movie, No retreat, no surrender. The only way to beat the bad guy (Van Damme) was by a superior technique, taught to a young fighter by the ghost of Bruce Lee. You might not have a ghost handy, but you can make sure that the way you manage your feature flags is done with a minimum of interruption – No recompile, no redeploy.
You can have the flag as a variable within your code. Depending on what it’s set to, the feature is either on or off. This has a weakness though, it forces you to change the code, recompile and redeploy it. That can work for you but oftentimes you want a different behavior, you want to be able to enable/disable flags with no compilation or redeploy. So how do you do that? You move the mechanism for managing the flags outside of your source code. There’s a couple of ways to do that, and we will explore both ways:
Configuration file. By specifying the flags and their value in a configuration file and have your app read from said file, you accomplish a decoupling of flag management and app.
Configuration service. A configuration service is a service endpoint, reachable by for example an HTTP request. Such a service can be placed in your companies network or in the cloud.
Let’s look at how you can implement feature flags in .NET Core next, with both the mentioned approaches.
Example usage, .NET Core App
It’s possible to work with feature flags locally by using a built-in functionality in ASP .NET Core that uses a JSON file appsettings.json. Using said JSON files you can define what flags you have and their values. Then you can rely on decorators and built-in tags in Razor to display differently depending on the value of the flags.
You’ll start by trying out the configuration file scenario first and then move to use the App Config store in Azure.
Create flags and configure your project to use them
- Create an ASP .NET Core project with the following command:
dotnet new mvc –no-https –output TestFeatureFlags
The command will create an MVC project in a sub directory TestFeatureFlags.
- Navigate into your project:
- Add the following NuGet packages with the following command:
   dotnet add package Microsoft.Azure.AppConfiguration.AspNetCore

   dotnet add package Microsoft.FeatureManagement.AspNetCore
- Locate
Startup.cs and add the following using statement at the top:
using Microsoft.FeatureManagement;
- In the same file, locate
ConfigureServices() method and add row:
services.AddFeatureManagement();
- By default .NET Core reads from a
FeatureManagement section of the config file appsettings.jsoon. You can override that my specifying your own name like so in ConfigureService() method:
   services.AddFeatureManagement(options =>

   {

      options.UseConfiguration(Configuration.GetSection(“MyFeatureFlags”));

   });
It’s up to you if you want to do this change or not, we will however continue with the default, so we need to specify a FeatureManagement section in appsetting.json.
- Open appsetting.json and add the following JSON configuration:
   “FeatureManagement”: {

     “FeatureA”: true,

     “Beta”: true,

     “FeatureB”: false,

     “FeatureC”: {

        “EnabledFor”: [

            {

                “Name”: “Percentage”,

                “Parameters”: {

                    “Value”: 50

                }

            }

        ]

     }

   }
Above, you introduce the features FeatureA, Beta, FeatureB and FeatureC. Note how FeatureC is nested.
Render the content
Next you will see how you can use the Razor tag feature and render a portion if the correct flag is enabled.
- Locate the Index.cshtml file under
Views/Home. At the top of the file add the following row:
@addTagHelper *, Microsoft.FeatureManagement.AspNetCore
This line will let you use the feature tag.
- In the same file, change the HTML content to this text:
   <div class=“text-center”>

    <h1 class=“display-4”>Welcome</h1>

    <p>Learn about <a href=“https://docs.microsoft.com/aspnet/core”>building Web apps with ASP.NET Core</a>.</p>

    <feature name=“Beta”>

      <div class=“nav-item”>

        <a class=“nav-link text-dark” asp-area=“” asp-controller=“Beta” asp-action=“Index”>Beta</a>

      </div>

    </feature>

   </div>
Note above the usage of the feature tag:
   <feature name=“Beta”>

      <div class=“nav-item”>

        <a class=“nav-link text-dark” asp-area=“” asp-controller=“Beta” asp-action=“Index”>Beta</a>

      </div>

    </feature>
What you are saying is, if the flag Beta is set to true, then render this portion. Consulting your appsettings.json you can see the flag Beta is true, so it should work. Let’s build and run our project next.
- Run the following command to build and run your project:
dotnet build && dotnet run
You see an output similar to the below:
   info: Microsoft.Hosting.Lifetime[0]

      Now listening on: http://localhost:5000

   info: Microsoft.Hosting.Lifetime[0]

      Application started. Press Ctrl+C to shut down.
- Open a browser and navigate to
http://localhost:5000. You should see the following:

- Next, open up your appsetting.json and set the
Beta flag to false, like so:
Save the file and refresh the browser. You should now see the following:

Congrats, you’ve managed to set up feature flags locally and control its usage via appsetting.json file. However, if your app is deployed to a cloud service like Azure, it’s somewhat impractical to go into the deployment files, open up a file and save it. I mean you can, but it feels clumsy, or even worse, change the file locally and redeploy the whole thing, yikes !
A better approach is to rely on a configuration service. For Azure you can use something called Azure Config Store. Let’s leverage that service next.
Adding Azure Config Store
Before we add the cloud service the review the steps we are about to take:
Set up secrets storage. A good way of moving configuration and keys, during development, is to use the secrets storage. The secrets storage is tool that associates keys to a specific .NET Core project. Moving your app to the cloud though, you would need to use the App Configuration tab to place your secrets in or even better, Azure Key Vault.
Provision Azure Config Store. Provision the config store is straight forward. Here we will provision the store and add a feature flag that will mirror what we have in the appsettings.json.
Configure App to use Config Store. Finally we will configure our app to use the Config store. That’s done by pointing out the connection string of the config store and one code line of configuring.
Set up secrets storage
- To set up the secrets storage, run the command
dotnet user-secrets init:
You now have a new entry in your project file ending with .csproj, something similar to this:
<UserSecretsId>9dcd0c7b-e32d-407d-aabd-d34c644ecaaf</UserSecretsId>
We will return to secrets management once we need to persist the connection string from our cloud resource.
Provision Azure Config Store
To provision an Azure Config Store, head to portal.azure.com.
Select Create a resource, from the top left menu.
In the Search the Marketplace box, enter App Configuration and select Enter.
Select App Configuration from the search results, and then select Create.
On the Create App Configuration pane, enter the following settings:

- Select Review + create to validate your settings.
- Select Create
Get connection string
Once the resource has finished provisioning, head to the resource page.
Select Settings > Access keys.
Make a note of the primary read-only key connection string.
Create a feature flag
Select Operations > Feature manager > Add.
In the Add pane:
- check Enable feature flag
- For Feature flag name, enter Beta
- Select Apply, to create the feature flag
Configure App to use Config Store
- In a terminal, in your project root, run
dotnet user-secrets set”:
Ensure you replace “<your connection string>” with the connection string you made a note of in the Azure Portal.
dotnet user-secrets set ConnectionStrings:AppConfig “<your_connection_string>”
This will set a secret in the secrets manager that you will be able to retrieve via code next.
- Open the file Program.cs, locate the method
CreateHostBuilder() and replace it with the following code:
   public static IHostBuilder CreateHostBuilder(string[] args) =>

    Host.CreateDefaultBuilder(args)

        .ConfigureWebHostDefaults(webBuilder =>

            webBuilder.ConfigureAppConfiguration(config =>

            {

                var settings = config.Build();

                var connection = settings.GetConnectionString(“AppConfig”);

                config.AddAzureAppConfiguration(options =>

                    options.Connect(connection).UseFeatureFlags());

            }).UseStartup<Startup>());
What you did was calling the ConfigureAppConfiguration() method on the webBuilder instance. It takes an Action delegate where you retrieve the AppConfig value from the section ConnectingStrings. Then you use the result string value and call AddAzureAppConfiguration() that connects to the Config store and instructs it to use feature flags. Next, let’s rebuild and run your app and see if it works :)
- Run the app with this terminal command:
dotnet build && dotnet run
You should now see your app rendered like this:

This time, the feature flag value is read from Azure instead of from appsettings.json
Let’s uncheck the flag:
- Return back to the Azure portal and the App Config resource page:
- Select Operations > Feature manager
- Uncheck the checkbox for the Beta feature flag.
- Restart the app by running
Ctrl-C followed by dotnet run.
This time, you should see the following image, with the Beta text gone.

Summary
First you learned about what feature flags are and in what scenarios they make sense to use. Then you learned some weird movie trivia about Van Damme, sorry ;) . After that you learned how to set up feature flag locally using the appsettings.json file. Finally, you learned how to use Azure App Config service and not only store your feature flags there but read their values from your app. Hopefully, this got you more interested in using the App Config service, cause there’s more to learn :)
by Scott Muniz | Dec 10, 2020 | Security
This article was originally posted by the FTC. See the original article here.
On the 5th day of Consumer Protection, you get an email or text message that’s supposedly from UPS or FedEx, complete with one of their logos — and it seems legit. It says your item is ready to ship but you need to update your shipping preferences. But here’s the lump of coal: the message is bogus and there is no package.
Brought to you by Dr. Ware, Microsoft Office 365 Silver Partner, Charleston SC.
by Contributed | Dec 10, 2020 | Technology
This article is contributed. See the original author and article here.
Today, I am please to share with you a new episode of Azure Unblogged. I chat to Yuri Diogenes, Principal Program Manager at Microsoft C+AI Security. Yuri and I discuss Azure Security Centre, get to the bottom of what Azure Defender is. Yuri also shares some information about his latest book and some tips for passing the AZ-500 exam.
You can watch the full video here or on Microsoft Channel 9.
I hope you enjoyed the video if you have any questions feel free to leave a comment and if you want to check out some of the resources Yuri mentioned please check out the links below:
by Contributed | Dec 9, 2020 | Technology
This article is contributed. See the original author and article here.
By Pallavi Joshi – Program Manager | Microsoft Endpoint Manager – Intune
This article talks about using Role-based Access Control (RBAC) in Microsoft Intune to setup separate helpdesk roles for Desktop teams who manage Windows device estate and for Mobile teams who manage mobile device estate. RBAC in Intune helps you manage who has access to your organization’s resources and what they can do with those resources.
With the rise in remote working, an increasing number of organizations are now managing their employees’ mobile and Windows devices using Microsoft Endpoint Manager. This requires the helpdesk teams to work securely and productively to enable end users with their daily workings.
Many customers that we work with have dedicated teams for managing Windows and mobile devices. The helpdesk admins, part of Windows team, manage Windows devices only, but do not manage mobile devices, and vice-versa. By the end of this blog, you will be able to provide access to the relevant workloads to these helpdesk teams so they get a customized view of the devices they need to manage, and also prevent access to devices outside their scope.
Steps to configure RBAC for Windows and Mobile Device Helpdesk team:
- Create Azure AD device groups for Windows and Mobile Devices
- Create Azure AD user groups for Windows and Mobile Helpdesk Admins
- Create scope tags and assign device groups
- Create Windows helpdesk admin role and add assignments
- Create Mobile helpdesk admin role and add assignments
Step 1 – Create Azure AD device groups for Windows and Mobile Devices
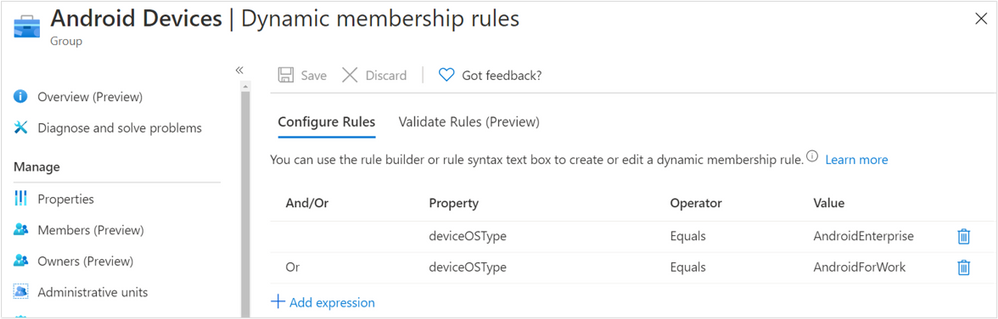
The first step to setup RBAC is to create separate Azure AD device groups based on device OS type.
As an example, I have created three Azure AD dynamic device groups based on the property deviceOSType – Android Devices, iOS Devices, and Windows Devices:
Android Dynamic membership rules
 iOS Dynamic membership rules
 Windows Dynamic membership rules
Step 2 – Create Azure AD user groups for Windows and Mobile Helpdesk Admin
The second step is two create two user groups, one for Windows Helpdesk Admins who manage Windows devices, and the other for Mobile Helpdesk Admins who manage mobile devices.
As an example, I have created two Azure AD user groups – Windows – Helpdesk Admins, Mobile – Helpdesk Admins and added helpdesk admins to each of these groups:
 Azure AD group
Step 3 – Create scope tags and assign device groups
The third step is to create separate scope tags, one for each Operating System. The device groups created in step 1 need to be assigned to the respective scope tags.
As an example, I have created three scope tags – Apple, Android and Windows. I have assigned the Android Devices group to Android scope tag, and so on. This ensures that all the devices part of the
Android Devices group will automatically get the Android scope tag assigned to them. Similarly, devices part of Windows Devices group will automatically get the Windows scope tag assigned to them, and so on.
The scope tags would be used in future steps to control the visibility of devices and other workloads for Helpdesk Admins.
 Helpdesk admin Scope tags
Step 4 – Create Windows helpdesk admin role and add assignments
The fourth step is to create a custom role for Windows helpdesk admin and provide the permissions required by the helpdesk admin.
As an example, I have created Windows Helpdesk role, given Read permissions for all the workloads, and Wipe and Sync Device permissions under Remote Tasks. You can update the permissions based on your requirements.
 Windows Helpdesk permissions
Once the permissions are added and role is created, assignments need to be added to the role using the groups and scope tags created in the previous steps.
As an example, for the Windows Helpdesk role, I am adding Windows Assignment. The Members of this assignment are Windows – Helpdesk Admins created in Step 2, the Scope (Groups) has Windows Devices group created in Step 1 and Scope tags is defined as Windows created in Step 3.
 Windows Helpdesk assignment properties
This ensures that users part of Windows – Helpdesk Admins group can assign policies, configurations and apps only to devices part of Windows Devices group, if they have permissions for the same. In this case, we have not provided assign permissions to helpdesk because we do not want them to be able to add or update assignments. This step also ensures that users who are part of Windows – Helpdesk Admins can view only the objects which have scope tag as Windows.
You can watch my Ignite session on Deep Dive into RBAC in Intune for deeper understanding on the topic.
Step 5 – Create Mobile helpdesk admin role and add assignments
The last step is to create a role for Mobile helpdesk admin and provide the permissions required by the helpdesk admin. The process is similar to Step 4, we just need to select different groups and permissions as per the requirements of mobile device team.
As an example, I have created Mobile Helpdesk role, given Read permissions for all the workloads, and Sync Device permissions under Remote Tasks. Based on my customer interactions, I have not given Wipe permission for this role for mobile helpdesk team. You can update the permissions as per your requirements.
 Mobile Helpdesk properties
This document contains information about creating custom role in Microsoft Endpoint Manager.
Once the permissions are added and role is created, assignments need to be added to the role using the groups and scope tags created in the previous steps.
As an example, for the Mobile Helpdesk role, I am adding Android & iOS Assignment. The Members of this assignment are Mobile – Helpdesk Admins created in Step 2, the Scope (Groups) has Android Devices and iOS Devices group created in Step 1 and Scope tags is defined as Android and Apple created in Step 3.
 Mobile Helpdesk assignment properties
This ensures that users part of Mobile – Helpdesk Admins group can assign policies, configurations and apps only to devices part of Android Devices and iOS Devices group, if they have permissions for the same. In this case, we have not provided assign permissions to helpdesk. This also ensures that users part of Mobile – Helpdesk Admins can view only the objects which have scope tag as Android and Apple.
Once the configuration is complete, you will notice that Windows Helpdesk Admins can view only Windows devices. They are unable to view mobile devices. They can sync and wipe Windows devices remotely. Similarly, Mobile Helpdesk Admins can view Android and iOS devices, sync these devices remotely, and are unable to view Windows devices.
Note – For the scenarios where a helpdesk admin is part of both Mobile Helpdesk and Windows Helpdesk roles, they will be able to perform specific actions on devices defined in the relevant role.
In the above example, if a helpdesk admin is part of both Windows – Helpdesk Admins and Mobile – Helpdesk Admins groups, then they will be able to view both Windows and mobile devices. They would be able to sync and wipe Windows devices as defined in Windows Helpdesk role, but only sync mobile devices as defined in Mobile Helpdesk role.
This configuration ensures that you have created a boundary for your Desktop and Mobile Device helpdesk team to operate in, thus providing strong security. You are also able to customize their view, so they see only relevant devices, thus ensuring their productivity. Also, the automatic scope tag assignment and role assignments ensure that no manual tasks are required, ensuring scalability of the solution across your departments.
We hope this helps you in setting up RBAC for your helpdesk teams in Microsoft Endpoint Manager and enables them to work effectively.
If you have any questions on this post, just let us know by commenting back You can also ask quick questions at @IntuneSuppTeam out on Twitter.

Recent Comments