by Contributed | Jan 28, 2021 | Technology
This article is contributed. See the original author and article here.
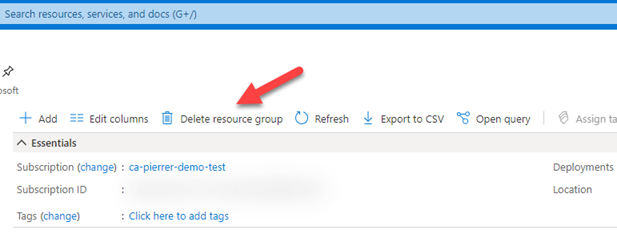
I know this not a new feature, but this saved my proverbial behind earlier this week. I was cleaning out demo subscriptions and resource groups that I’m no longer using or that need to be reset for new demos. Well… It did not take long for me to pick one that I needed to keep and hit the “Delete resource group”.
And like any situation where you know you’ve screwed up. I knew the second I saw the notification.


Turns out this Resource Group was where stored all the recorded demos I regularly use…. #Facepalm
This is also when I remembered I had enable blob soft delete on that storage account.
Blob soft delete is available for both new and existing general-purpose v2, general-purpose v1, and Blob storage accounts (standard and premium). But only for unmanaged disks, which are page blobs under the covers, but is not available for managed disks.
If you have not enabled this on storage accounts where you have important data…. DO IT NOW!!
1. In the Azure portal, navigate to your storage account, and in the left-side menu find the “Data Protection” option under the “Blob service” section.

2. Check the box for “Turn on soft delete for blob”, then specify how long soft-deleted blobs are to be retained by Azure Storage, and finally save your configuration.

That’s it! You are now protected. Anyway, I was still looking at how I was going to recover my data. I deleted the Resource Group!! Not just the storage account or just the blob container… started looking for documentation. And found the one I was looking for. Recover a deleted storage account.
I followed the steps that were simple, even when you’re restoring a storage account from a deleted resource group.
1. Create a Resource Group with the EXACT SAME NAME you just deleted. Once it’s created, navigate to the overview page for an existing storage account in the Azure portal. ANY existing storage account. And in the Support + troubleshooting section, select Recover deleted account.

2. From the dropdown, select the account to recover. If the storage account that you want to recover is not in the dropdown, then it cannot be recovered. Once you have selected the account, click on recover button.

Once the process is complete, your storage account will have been restored in its original spot. This really saved my bacon. I know it can potentially save yours.
Hopefully this can potentially save you some grief as well.
Cheeers!
Pierre
by Contributed | Jan 28, 2021 | Technology
This article is contributed. See the original author and article here.
Hello, dear readers! Here is Hélder Pinto again, now writing about a topic that came out of my experience in one of my customers, who decided to stop using the Azure Diagnostics Extension in their virtual machine estate but had a massive challenge: how to remove the extension across 1000s of VMs and be sure that the diagnostics data was removed from Azure Storage and, by the way, save more than 10K euros per month? Let’s see how we did it.
Introduction
The Azure Diagnostics extension is an agent that collects monitoring data from the guest operating system of Azure virtual machines. With this extension, you can collect guest metrics and many types of logs and then send it to Azure Storage (default sink), Azure Monitor metrics or even to Azure Event Hubs (to be ingested by a third-party sink). No matter the additional sinks you may configure, the Azure Diagnostic extension always collects data into an Azure Storage account, using mostly Table storage*.
If, for some reason, you decide to stop collecting logs and metrics with the Azure Diagnostics extension, doing it could be as simple as uninstalling the extension from your VMs. But wait! You’re likely need to also get rid of all the data the agent collected over time. What if the Storage Accounts used by the extension are shared with other services? Will you still be able to identify those Storage Accounts after the extension is removed? The mission is not as simple as it seemed! :smiling_face_with_smiling_eyes: Let’s see below how we can do it effectively (and efficiently!).
Azure Diagnostics extension and data cleanup guide
If you need to remove the Azure Diagnostics extension at scale from your Azure virtual machine estate and finally clean the data that it generated, at least the largest one that lives in Azure Storage Tables, then you have here a complete procedure and scripts that will help you successfully achieve your goals.
The procedure is divided into three steps:
- Assess which Azure Storage accounts are being used as a sink for the Diagnostics extension – carefully keep the generated CSV, because we will need this list for the last step.
- Uninstall at scale the Diagnostics extension from your virtual machines.
- Remove at scale the Azure Storage tables that were generated by the Diagnostics extension – we will use here the list extracted in the first step.
Requirements
Step 1 – Extract the list of Storage Accounts containing Azure Diagnostics data
In a PowerShell prompt, run the Export-VmDiagnosticsStorageAccounts.ps1 script:
.Export-VmDiagnosticsStorageAccounts.ps1 [-Cloud <AzureCloud | AzureChinaCloud | AzureGermanCloud | AzureUSGovernment>]
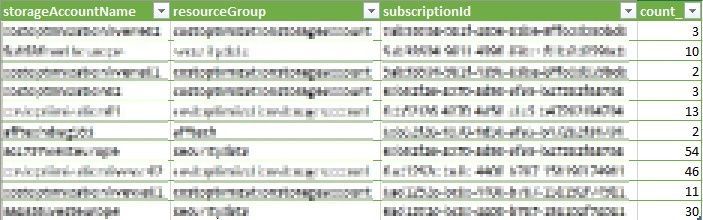
This will generate a CSV file containing a list of all the Storage Accounts that are being used by the Azure Diagnostics extensions (see sample content below). Save this file, as we will need it for the last step.
CSV output containing the Storage Accounts use by the Azure Diagnostics extension
The magic behind this script is an Azure Resource Graph (I LOOOVE this service) query that quickly returns what you need:
resources
| where type =~ 'microsoft.compute/virtualmachines/extensions' and tostring(properties.type) in ('LinuxDiagnostic', 'IaaSDiagnostics')
| extend storageAccountName = iif(isempty(tostring(properties.settings.StorageAccount)),tostring(properties.settings.storageAccount),tostring(properties.settings.StorageAccount))
| project id, storageAccountName
| join kind=inner (
    resources
    | where type =~ 'microsoft.storage/storageAccounts'
    | project storageAccountName = name, resourceGroup, subscriptionId
) on storageAccountName
| summarize count() by storageAccountName, resourceGroup, subscriptionId
Step 2 – Uninstall at scale the Diagnostics extension from virtual machines
In the same PowerShell prompt, run the Uninstall-VmDiagnosticsExtensionAtScale.ps1 script. The script is prepared to deal with the following scenarios:
- Deallocated virtual machines – it will start them, remove the extension, and shut them down again (only VMs with the extension will be started).
- Virtual machines that have a resource lock – it will remove the lock, remove the extension, and re-add the exact same lock – this requires you to have the Owner role for those virtual machines.
- Target a specific resource group or subscription.
- Make a dry run of the process with the Simulate switch.
Here is the full script syntax:
.Uninstall-VmDiagnosticsExtensionAtScale.ps1 [-Cloud <AzureCloud | AzureChinaCloud | AzureGermanCloud | AzureUSGovernment>] [-TargetSubscriptionId <subscription Id>] [-TargetResourceGroup <resource group name>] [-RemoveLocks] [-StartVMs] [-Simulate]
With some examples
.Uninstall-VmDiagnosticsExtensionAtScale.ps1 -RemoveLocks -StartVMs -Simulate – this will simulate an execution, starting deallocated VMs and removing resource locks before uninstalling the extension (of course, VMs won’t be started nor locks removed)
.Uninstall-VmDiagnosticsExtensionAtScale.ps1 -TargetSubscriptionId aaaaaaaa-bbbb-cccc-dddd-eeeeeeeeeeee -StartVMs – this will uninstall the extension only for the aaaaaaaa-bbbb-cccc-dddd-eeeeeeeeeeee subscription, starting deallocated VMs if needed.
 Sample output of the script that removes the extensions at scale while dealing with locks and stopped VMs
The script will on-the-fly get the list of VMs to uninstall the extension from and will complete quickly, as the uninstallation is run asynchronously. At the end, you will get a CSV file containing the results of each uninstallation try, e.g., whether the VM was running or not, it had resource locks, or the extension was uninstalled. You must give at least 30 minutes for the process to finish. After this period, you can run the following query in Resource Graph Explorer, to check how successful the process was:
resources
| where type =~ 'microsoft.compute/virtualmachines/extensions' and tostring(properties.type) in ('LinuxDiagnostic', 'IaaSDiagnostics')
| project id, name
| extend vmId = substring(id, 0, indexof(id, '/extensions/'))
| join kind=inner (
    resources
    | where type =~ 'microsoft.compute/virtualmachines'
    | project vmId = id, vmName = name, resourceGroup, subscriptionId, powerState = tostring(properties.extended.instanceView.powerState.code)
) on vmId
| project-away vmId, vmId1
| order by id asc
And here a sample output of the CSV file generated by this script:
 Sample CSV output of the script that removes the Diagnostics extension, with the details about the process
If, for some reason, there is some extension that does not remove successfully, refer to the troubleshooting documentation. Nevertheless, you can proceed with no fear to the final step – removing Azure Storage Tables. Those zombie Diagnostics extensions will recreate and continue writing into the Storage tables, but at least you’ll have reduced your problem to a fraction of the dimension it had before. After fixing the extension issues, you can repeat steps 2 and 3.
Step 3 – Remove the Azure Storage Tables used by the Diagnostics extension
In this final step, you’ll use the CSV generated in step 1 and order the removal of all the Azure Storage Tables that are fed by the Diagnostics extension. The Remove-VmDiagnosticsTables.ps1 script is very simple to use. If needed, you can target a specific subscription instead of the whole tenant.
.Remove-VmDiagnosticsTables.ps1 -StorageAccountsCsvPath <path to the storage account list CSV generated in step 1> [-Cloud <AzureCloud | AzureChinaCloud | AzureGermanCloud | AzureUSGovernment>] [-TargetSubscriptionId <subscription Id>]
 Example of the PowerShell invocation of the script that removes the Diagnostics Tables from the Storage Accounts
The script removes only the Storage Tables used by the Azure Diagnostics extension, leaving untouched all the remaining data that exist in the Storage Account, such as blobs or other tables used by other applications.
In the next day, you’ll likely notice a drop in your Azure Storage Table costs. Happy cleanup!
* Metrics and logs stored in Azure Tables do not have a retention mechanism, therefore your data (and Storage costs) keep growing over time.

by Scott Muniz | Jan 28, 2021 | Security
This article was originally posted by the FTC. See the original article here.
Today is National Data Privacy Day, when many organizations and government agencies, including the FTC, join together to raise awareness about privacy issues and to offer tips and information. As more and more of our devices are connected and share information about us, privacy is increasingly important.
There are things you can do to help protect your privacy and limit how you share your information with others. National Data Privacy Day is the perfect time to review some of those steps you can take:
- Know what’s on your device. Do an inventory of all the applications that are on your devices. Consider deleting what you don’t use.
- Check the privacy settings. It’s a good idea to check the privacy settings of apps, devices, and online accounts periodically. You could, for example, review privacy settings when you get a notice from a company telling you that their privacy policies have changed.
- Make sure any software and applications are up to date. This includes your apps, web browsers, and operating systems. Set updates to happen automatically.
- Check the security of your home router. Make sure you’re using a router that has WPA2 or WPA3 encryption to protect the information you share over your wireless network. Public Wi-Fi is not secure, so take precautions if you need to use a public Wi-Fi hotspot.
Check out the FTC’s resources on
privacy and online security for more tips and information. You can also follow the conversation on social media by searching the hashtag #DataPrivacyDay.
If you own a business, you can find information on how to protect your customers’ and employees’ privacy
in this blog series.
Brought to you by Dr. Ware, Microsoft Office 365 Silver Partner, Charleston SC.

by Contributed | Jan 27, 2021 | Technology
This article is contributed. See the original author and article here.
To usher in the new year, we are happy to announce a change in the blog name to Microsoft 365 Defender Ninja Training to coincide with the product name change.
Also, in addition to several updates to Microsoft 365 Defender Ninja training, we’ve included a dedicated section focusing on the Solorigate cyberattack to help you defend your environment against this and future supply chain attacks.
If you want to refresh your knowledge and get updated, here is what has been added since the last update:
Legend:
Product videos
|
 Webcast recordings Webcast recordings
|
 Tech Community Tech Community
|
 Docs on Microsoft Docs on Microsoft
|
 Blogs on Microsoft Blogs on Microsoft
|
 GitHub GitHub
|
⤴ External
|
 Interactive guides Interactive guides
|
|
Module (ordered by roles SecOps & SecAdmin)
|
What’s new
|
Security Operations Fundamentals
Module 1. Technical overview
|
|
Security Operations Fundamentals
Module 2. Getting started
|
|
Security Operations Fundamentals
Module 3. Investigation – Incident
|
|
Security Operations Intermediate
Module 2. Investigation
|
|
Security Operations Intermediate:
Module 3. Advanced hunting
|
|
The following is not part of the Ninja training, but definitely worth a read:
![[Guest Blog] Humans of Mixed Reality: It Is No Longer A Science Fiction](https://www.drware.com/wp-content/uploads/2021/01/large-1218)
by Contributed | Jan 27, 2021 | Technology
This article is contributed. See the original author and article here.
This article was written by Mixed Reality and Azure Ranger consultant Adityo Setyonugroho, as part of our Humans of Mixed Reality Guest Blogger Series. Adityo, who is based in Indonesia, shares about his path to Mixed Reality in addition to the community impact of Mixed Reality solutions.
“Science fiction” is probably the most common term most people think of when it comes to holograms. Growing up, I really loved movies and games that featured a lot of hologram-like technology that provided main characters with superpowers to solve challenges and fight their enemies. Who was not amazed by the holographic calls featured on Star Wars or Star Trek movies? Just the thought of being able to look at your friends who live so far away, and see their presence as whole person – not just a headshot – in holographic form just through a call. We knew it was just science fiction back then, but lo and behold, it’s REAL now. This technology exists! I vividly recall how excited I was when I experienced viewing holograms for the very first time, using Mixed Reality technology on the first edition of HoloLens.
So, if this technology did not exist before, you might be wondering how I started my journey in the Mixed Reality in the first place. I trace it back to a time where my interest in the transformation of Human Computer Interaction was sparked. While in university, I was excited to have a chance to explore and play around with the Microsoft Kinect v2. I was fascinated by how we can use our body movements and interface with our physical environment to interact with digital assets in various applications. Within that time, I learned more about how we can begin connecting our physical world with the digital world. Through yet more learning and exploring, I then began to learn more about AR and VR, where I tried to develop my first app centered around virtual fitting rooms. It was certainly amusing to be able to see a full suit of (digital) armor overlay on top of my body on the screen.
Here’s what it looked like in the early days of experimentation – seems rudimentary, I know:
Trial and error building AR dressing app
Later on, during my final year in university, I remember watching a Microsoft Windows 10 event and was so amazed by the first HoloLens announcement by Alex Kipman. The concept and implementation of Mixed Reality on HoloLens was really impressive. Many demos were shown: a designer working side-by-side with their working model being displayed around her desk. A woman calling for help to fix her bathroom, making the repair process much more efficient with real-time holographic guidance from an expert over a video call. There was also another HoloLens demo where a woman built a drone inside a holographic workshop, and was then able to 3D-print the model instantly. With time, I found more and more upcoming concepts, use case scenarios and information on the internet about how HoloLens can help various industries to do more with Mixed Reality.
My big learning was this: Mixed reality has augmented and enhanced our capabilities as humans. Just like in those early Sci-Fi movies, it was like having superpowers. REAL superpowers.
 Hololens demo by Alex Kipman and Lorraine Bardeen
That really inspired me to learn as much as I could about mixed reality, and personally try out the HoloLens experience at that time. Sadly, due to limited product availability, it was difficult for many developers in my region (Indonesia) to get a chance to be hands-on and try such cutting edge technology for themselves. Regardless – I was undeterred, and thankfully the Microsoft HoloLens team made the HoloLens development toolkit and emulator available for us developers to start learning and playing around with HoloLens – all before even owning the actual device! Later on, I joined the global HoloLens Community that created and met with other awesome developers and experts around the world including Jesse McCulloch, Sean Ong, Rene Schulte, Alexander Meijers, Stephen Hodgson, and others, to name a few. These fellow community members really helped spur my learning and growth.
After a year exploring and learning through the emulator while working more stuff on Kinect projects, I finally got a chance to get hands-on experience and development using a real HoloLens! I was amazed by the various Mixed Reality applications that users like me can try, such as the Galaxy Explorer, Fragment, HoloStudio, RoboRaid, and others. The seamless blending of physical and digital worlds never fails to impress me the most – Mixed Reality helps us create game experiences based on real environments and overlay the digital assets interacting with them. Imagine a robot that can show up by breaking your wall, hiding behind your table and couch and getting a real environment effect digitally by shooting around the environment. Games will never be the same again!
 Roboraid is a Mixed Reality game experience
Thereafter, I started to explore Mixed Reality scenarios into real industries beyond just games. I wanted to show customers how Mixed Reality can help them achieve true digital transformation impact. I began working with my friends to start sharing and developing showcases for several industries in Indonesia. My first real customer project was in the construction industry, where we helped them create a Mixed Reality app experience for their BIM data. It is always a joy to see everyone’s reaction during their first Mixed Reality experience. There are so many positive points and ideas that keep coming up on how we can help them transform their work.
Here’s a photo from our first industry project:
 My first Mixed Reality project involving BIM MR experience
I truly believe that Mixed Reality creates tangible positive impact to the world on how we can solve many issues faster and more efficiently than before. It enables us to transform and unlock potential use cases across multiple line of business within each industry. Mixed Reality combined with other technologies such as cloud computing, AI, IoT, and others can collectively result in more advanced solutions, transforming daily operations. Mixed reality can be used in healthcare, manufacturing, mining, education, and more. For example, a frontline worker in a manufacturing company might have detected an issue on the manufacturing equipment and needs to resolve urgently. But, this user might not have the right skills to resolve such a specialized issue, and needs help directly from an expert. However, the expert might be not on the site or working remotely — what can the user do then?
This is why Mixed Reality comes in.
By using real-time expert collaboration powered by mixed reality through Microsoft Dynamics Remote Assist. This way, the user can get help by having a holographic view of essential documents and real-time guidance by the expert while continuing to work heads-up and hands-free on the HoloLens.
Mixed Reality can also enhance the employee onboarding experience, and enable them to upskill more quicker in an immersive manner. There are many other solutions that can be built using Azure cloud to create scalable and connected mixed reality applications.
 Immersive and connected Mixed Reality solution
 Connected with remote expert with Remote Assist
The most important thing in my journey within the Mixed Reality space is Community!
Connecting with fellow developers, business makers, industry experts, and others is probably the best part of the journey. Together, we can brainstorm creative ideas and collaborate to make Mixed Reality more impactful to ALL humans around the world. I am so thankful to the global community that has helped me learn, build and scale. We can do so much more when we share ideas with one another!
It also inspired me to continue expanding the Mixed Reality community in my hometown of Indonesia and the greater Asia region. My dream is to partner with my friends in the Mixed Reality space to build an entire MR ecosystem and help transform businesses everywhere. We often hold meetups, sharing sessions, hangout discussions, university collaborations to help local communities grow confidence in mixed reality technologies so that they can start to use it as well.
 MIxed Reality Community Indonesia at Global MR Bootcamp 2019
 Community x University collaboration on sharing knowledge about MR
This is my story so far, but I know my journey in mixed reality is only beginning! I’d love to connect and collaborate with you and others here in the Mixed Reality Community as well. Let’s do great things together!
Explore mixed reality and learn more:
Microsoft Mixed Reality Docs: Mixed Reality documentation – Mixed Reality | Microsoft Docs
Mixed Reality Global Community: https://aka.ms/holodevelopers
#HumansofMixedReality #Community #DigitalTransformation
by Contributed | Jan 27, 2021 | Technology
This article is contributed. See the original author and article here.
TL;DR – Template Specs is a new resource type for storing ARM templates in your resource groups for faster sharing, deployment, and role-based access control (RBAC) on those Templates shared within an organization. Template Specs addresses today’s biggest challenges around ARM template management, storage, and access.
The Problem: Sharing ARM templates across an organization is challenging, requiring more management steps of the external or internal storage from which they are shared.
- Sharing: ensuring the right teams within your organization have access becomes very tedious as you cannot leverage Azure RBAC on the ARM templates you want to share.
- Management: providing teams with the latest ARM templates in a consistent and versioned way.
Why Template Specs?
As a native solution, Template Specs will enable users to bring all their ARM templates to Azure as a resource and securely store and share them within an Azure tenant.
The Solution: 1st Party secure storage and management of ARM templates within Azure.
- Sharing: Who can access a Template Spec can be defined using Azure RBAC.
- Management: Template Specs can be versioned within the same resource, ensuring users can always access the latest iterations of an ARM template (or templates) stored in a Template Spec.
Template Spec Reference and Docs:
Note: Below references show how Template Specs can be created with an ARM template, but we strongly recommend using Portal, PowerShell or CLI for creating Template Specs.
Creating and Deploying a Template Spec Resource
A Template Spec is a resource that contains an array of Template Spec versions which consists of a root template and any number of linked templates. A Template Spec can be created using the Portal, PowerShell, Azure CLI, REST API, or ARM Template. To help visualize a Template Spec create, here are some examples of what it would look like in the Azure CLI:
Creating a Template Spec using Azure CLI
To create a Template Spec, use the az ts create command to package an ARM into the Template Spec resource.
az ts create --name webAppSpec --version "1.0" --resource-group rgName --location "westus2" --template-file "azuredeploy.json"
Required properties:
- –name: The name for the Template Spec resource.
- –version: The version number or name of the version being created.
- –location: The Azure region for the Template Spec resource.
- –template-file: The ARM template to be packaged into a template spec.
Creating and Deploying a Template Spec with Linked Templates using Azure CLI
To create a Template Spec with artifacts inside it, we need the following:
- Create main template (e.g. azuredeploy.json) that deploys linked templates, to be passed into the az ts create command as a template file.
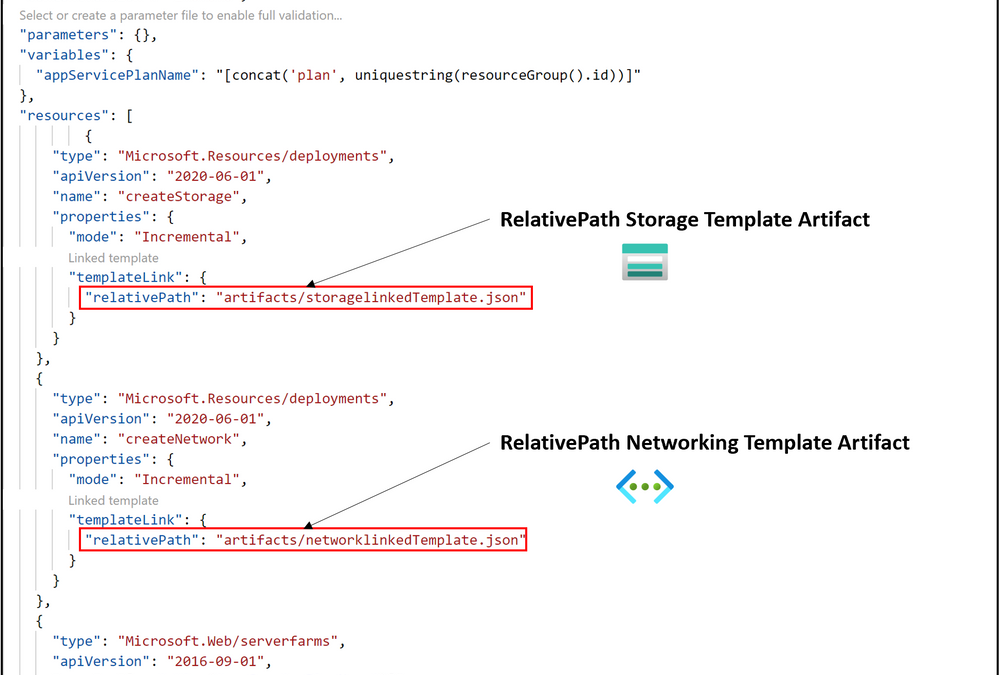
- Create N number of deployment resources with linked templates referenced using the relativePath property within the templateLink object.

In this example the linked templates are stored in a subfolder called artifacts, which is in the same path as the main template file. The relativePath property is relative to the template file where relativePath is declared. The relativePath property can take any of the following values:
- ./artifacts/storagelinkedTemplate.json
- /artifacts/storagelinkedTemplate.json
- artifacts/storagelinkedTemplate.json
Note: relativePath can also be used deploy remote linked templates given all template files are staged together and available via remote URI, such as GitHub or Azure storage. The main template is called by using URI and all linked templates referenced as relative to that main template will have a URI constructed using the main template URI and the relativePath specified. This feature requires api version 2020-10-01 or greater. To learn more about this feature, please refer to Link templates for deployment – Azure Resource Manager | Microsoft Docs.
Run the az ts create command to create or update a template spec version. This command packages the linked templates added via templateLink as artifacts in your Template Spec version.
az ts create --name webAppSpec --version "1.0" --resource-group rgName --location "westus2" --template-file "azuredeploy.json"
This command packages the template file azuredeploy.json into the main template of the Template Spec version webAppSpec-1.0 and all linked templates specified into the artifacts[] array of the Template Spec object.
Deploy the Template Spec by passing in its resource ID using the az deployment group create command. First, we need to get the ID of the Template Spec resource created, and this can be done easily in the Azure CLI by using the az ts show command:
id=$(az ts show --name webAppSpec --version "1.0" --resource-group rgName --query "id")
- Verify the contents of a Template Spec by running the az ts export command that downloads a specified Template Spec version into an –output-folder in your local file system.
az ts export --output-folder "C:exported-template-specs" -s "template-spec-version-ID"
This command exports the specified Template Spec’s main template (e.g. webAppSpec.JSON) and an artifacts folder with all of its corresponding template artifacts. You can also view the contents of a Template Spec version can also be seen using the Azure Portal.

Deploying a Template Spec as Linked Template using ARM Template with ID Reference
A Template Spec resource can also be referenced using the templateLink property and specifying the id of the template spec:

References and Docs
We look forward to feedback and seeing you succeed on Azure with ARM Template Specs. Please feel free to reach out with any questions at angperez@microsoft.com on Twitter, or GitHub.
by Contributed | Jan 27, 2021 | Technology
This article is contributed. See the original author and article here.
We are pleased to announce general availability of Azure Database Migration Service support for online (minimal downtime) migrations of PostgreSQL to Azure Database for PostgreSQL – Hyperscale (Citus). Azure Database Migration Service provides a single service that customers can use to migrate data from different database engines to Azure, all with built-in resiliency and robustness.
With online migrations, businesses can migrate their databases to Azure while the databases continue to be operational. This means that migrations can be completed with minimum downtime for critical applications, limiting the impact to service level availability and inconvenience their end customers.
Additional updates to the PostgreSQL to Azure Database for PostgreSQL migration scenario with this release include support for:
- All PostgreSQL versions from 9.4 through 11.
- Migrating to a higher version of PostgreSQL; there is no longer a requirement that minor versions of PostgreSQL match on the source and target.
- Migrating from an AWS RDS Aurora Postgres version 10.6 or later database.
- The BSON and ENUM data types.
We’ve also removed the:
- Superuser privilege requirement; now, only the replication privilege is required.
- Password string limitation regarding use of curly braces.
For more information about using Azure Database Migration Service to migrate data to Azure Database for PostgreSQL, see the following tutorials:
Azure Database for PostgreSQL – Hyperscale (Citus)
Azure Database for PostgreSQL – Hyperscale (Citus) transforms your Postgres database into a database that can scale up and down as well as scale out horizontally. Powered by the Citus extension, the service provides you with all the native capabilities of Postgres, including rich JSON support, powerful indexing, an array of datatypes, full text search, geospatial support, and much more. Because Citus is an extension to Postgres and doesn’t fork from the main project, you can stay current with your Postgres versions without worry about your infrastructure gradually fading into legacy mode.
For more information about Azure Database for PostgreSQL – Hyperscale (Citus), see the related service documentation.

by Contributed | Jan 27, 2021 | Technology
This article is contributed. See the original author and article here.
The ADX Web Explorer results grid is not just our way to display your query results, but it is a powerful data exploration tool set, that allows you to create various views of your data and quickly draw insights.
Become more productive today! Read this article to learn how it works.
In this article you’ll learn how to use the following result grid productivity tools:
- Expand cell and JSON format
- Expand row
- Column grouping
- Column filters
- Cell to query filter
- Pivot mode
- Cell statistics
Get set, ready, go!
Expand Cell
When dealing with long strings or dynamic fields such a JSON, cell expand functionality comes in handy.
Double clicking a cell opens an expanded view that allows you easily read long strings, and provides a JSON formating for dynamic data.
You can choose between 3 reading pane modes for expanded view, inline (like in above picture), right pane, and bottom pane. Use the icon on the top right of the result grid to switch reading pane modes.

The expanded mode is dynamic, allowing you to expand and collapse array items, and supports full in cell search. to search in a dynamic cell, expand it and hit ctrl+f to search it’s contents (in the image below expanded view is opened in right pane mode):

Expand Row
When approaching a table with dozens of columns it can save you time to expand the entire row for a single glance overview of the different columns and their content. I can assure you it beats endless scrolling to the right.
Click on the arrow (>) on the left of every row to expand it.
Expand row view is optimal when used with right reading pane mode.

Column grouping
Column level grouping allows you to run a quick on-the-fly analysis on your query results by grouping the results table by distinct values of the selected column.
To use column grouping mouse-over a column, select the menu, and select Group by <column name>.

The table will be grouped by distinct values of the selected column. Double-click a group or click on the arrow (>) on the right of each group to expand the grouping to display related records.

This feature is great for exploratory analysis.
To reset the grid to its original state mouse-over the Group column, then select Reset columns.

Column filters
The ADX column filter feature introduces a powerful set of multi condition filters to allow you create complex filter logic on your pre-rendered results.
To use column filters mouse-over a column, select the menu, and then select the filter icon.

In the filter builder select the desired operator:

Now type in the expression you’re wish to filter the column on (note that the filter is not case sensitive)
To create a multi-condition filter select a boolean operator to add additional condition

Results are filtered as you type in.
To remove the filter simply delete the text from your first filter condition.
Cell content to query filter
Another easy way to filter the grid, is to add a filter operator to the query directly from the grid.
Select a cell with content you wish to create a query filter for.
Right click to open the cell actions menu. Select Add selection as filter

A query clause will be added to your query in the query editor:

Pivot mode
Pivot mode feature is somewhat similar to Excel’s pivot table, enabling you to do advanced analysis in the grid itself.
Pivoting allows you to take a columns values and turn them into columns. For example you can pivot on State to make columns for Florida, Missouri, Alabama, etc.
Pivoting only makes sense when mixed with aggregation. If you turn a column into a pivot column, you must have at least one aggregation (value) active for the configuration to make sense. For example, if pivoting by State, you must provide something you are measuring such as ‘DamageProperty’ per state.
To enable it click on the Columns menu on the right

Now select Pivot Mode and drag and drop columns into the appropriate fields below:
- Row Groups – allows grouping by different columns.
- Values – aggregated data (supports SUM operator).
- Column labels – allows turning column values into columns and enables another level of grouping.

The result should look like the following pivot table;
Sum of all damage to property grouped by event type and displayed per country:

Search in results
Search in results enables you to look for a specific expression within the entire results table.
Click on the Search button on the right and type in the expression you’re looking for.

All mentions of your searched expression are now highlighted in the table. You can navigate between them by clicking Enter to go forward or Shift+Enter to go backward, or you can use the up and down buttons next to the search box.

Cell statistics
Cell statistics helps you to run quick calculations on numeric data in your grid.
Calculations such as MIN, MAX, AVG, SUM and COUNT.
To use this feature, select a few numerical cells. The grid allows you to select multiple rows, columns, and cells.
The calculated statistics will appear on bottom left of the grid.

Want to learn more about the ADX Web Explorer and have a hands on experience?
Use this guide to learn more.
by Contributed | Jan 27, 2021 | Technology
This article is contributed. See the original author and article here.
Azure’s AI portfolio has options for every developer and data scientist, and we’re committed to empowering you to develop applications and machine learning models on your terms. Azure enables you to develop in your preferred language, environment, and machine learning framework, and allows you to deploy anywhere – to the cloud, on-premises, or the edge. We help improve your productivity regardless of your skill level, with code-first and low code/no code options which can help you accelerate the development process. We’re also devoted to empowering you with resources to help you get started with Azure AI and machine learning, grow your skills, and start building impactful solutions.
Announcing new AI & ML resource pages for developers and data scientists
Today we’re excited to announce new resources pages on Azure.com, with a rich set of content for data scientists and developers. Whether you’re new to AI and ML, or new to Azure, the videos, tutorials, and other content on these pages will help you get started.
- Learn how your peers around the world are using Azure AI to develop AI and machine learning solutions on their terms to solve business challenges.
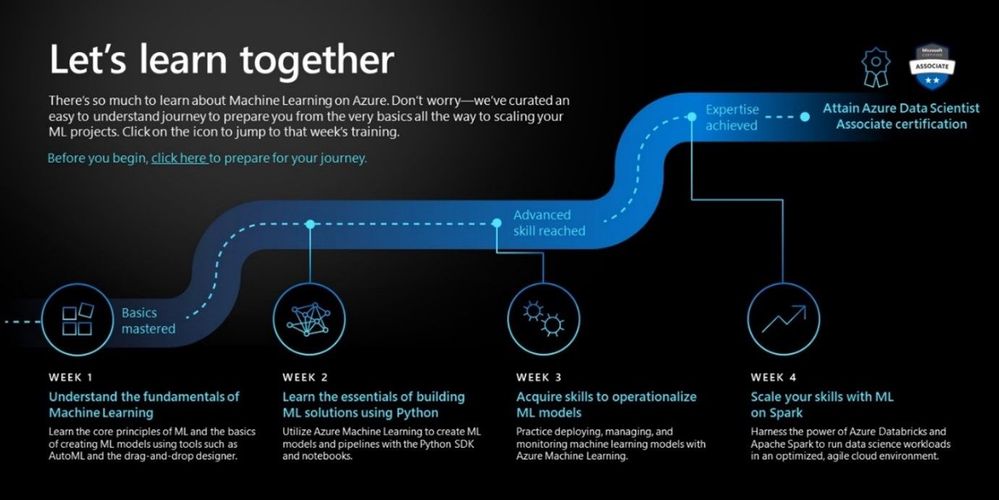
- Grow your skills with curated learning journeys to help your skill up on Azure AI and Machine Learning in 30 days. Each learning journey has videos, tutorials, and hands-on exercises to help prepare you to pass a Microsoft certification in just 4 weeks. Upon completing the learning journey, you’ll be eligible to receive 50% off a Microsoft Certification exam.
- Engage with our engineering teams and stay up to date with the latest innovations on our AI Tech Community, where you’ll find blogs, discussion forums, and more.
Pictured above: ML learning journey for developers and data scientists.
Register for the Azure AI Hackathon
Finally, put your skills to the test by entering the Azure AI Hackathon, which starts today and will run through March 22nd, 2021. Winners will be announced in early April. The most innovative and impactful projects will win prizes up to $10,000 USD. We look forward to seeing what you build with Azure AI.
Get started today
Check out the pages to get started with your 30-day learning journey, and register for the hackathon:
by Contributed | Jan 27, 2021 | Technology
This article is contributed. See the original author and article here.
In this video, we look at how to use Cloud Partner Portal CPP API for managing “Virtual Machine” offers in Azure Marketplace.
The document called “Cloud Partner Portal API Reference” describes seemingly older API that existed with the previous version of the publisher portal called Cloud Partner Portal or CPP.
If you had used CPP in the past, you know that in 2019–2020 all offers were migrated to the new Microsoft Partner Center. Therefore, we might expect that all offer types should now be manageable via some new API exposed by the Partner Center. However, as the note in the doc above says, “Cloud Partner Portal APIs are integrated with and will continue working with Partner Center” for many of the offer types including Virtual Machines. While, the newer Partner Center Ingestion API only supports “Azure Application” (i.e. solution template and managed app) offer types (see this related article).
In this video walkthrough, we look at how to use Postman to invoke a few REST methods of the Cloud Partner Portal CPP API to view and update a Virtual Machine offer and see the changes reflect in the Partner Center UI.
You can download my Postman collection here.
Note: This video is specifically about the “Virtual Machine” offer type. If you are looking at how to manage “Azure Application” offers, please see “Using Partner Center Ingestion API for managing Azure Application offers in Azure Marketplace”.
Video Walkthrough
Tip: Play the video full screen to see all of the details.
So, should we use Partner Center API or Cloud Partner Portal CPP API?
Answer: It depends on the “offer type”
- VM Offers (and a few other types): cloudpartner.azure.com (described in this article)
- Azure Application Offers: api.partner.microsoft.com/ingestion/v1 (described in the related article)
Originally published at https://arsenvlad.medium.com/using-cloud-partner-portal-cpp-api-for-managing-virtual-machine-offers-in-azure-marketplace-90c3787c21c4 on September 10, 2020.


Recent Comments