by Contributed | Feb 3, 2021 | Technology
This article is contributed. See the original author and article here.
This blog was written in collaboration with @Sebastien Molendijk , thank you for all of your hard work!
Security teams today are inundated with alerts and information from a growing number of siloed point solutions. Furthermore, manual processes and cross-team handoffs hinder the security team’s ability to efficiently respond to attacks.
Security teams are in dire need of workflows that can shorten the response cycle by enabling automated workflow actions so analysts can focus on remediation and effectively managing the lifecycle of security incidents. PagerDuty is an agile incident management platform that works with IT Operations and DevOps teams to improve operational reliability and agility.
In this installment, we will cover the process to integrate and centralize your security response in Azure Sentinel with PagerDuty.
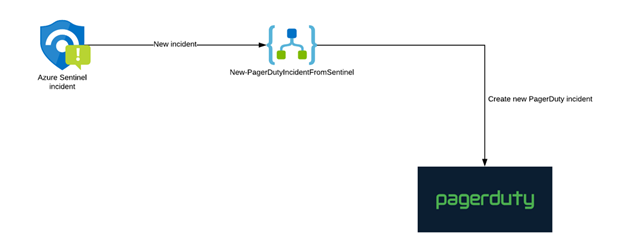
Figure 1: High Level flow to integrate Azure Sentinel with PagerDuty
Configuration steps
In PagerDuty
- The first step is to create a REST API key. (This API key will be used by Azure Logic Apps to communicate with PagerDuty).
Go to the “Apps” menu and click on “API Access”.
 Figure 1: PagerDuty Configuration2. On the API Access page, select Create New API Key.
 Figure 2: PagerDuty Configutation
3. In the dialog that pops up, you’ll be prompted to enter a Description for your key. You will also have the option to create the key as Read-only; leave this box unchecked as a full-access API key is required.
Select the Create Key button to generate the new API key.
 Figure 3: PagerDuty Configuration
4. Once the key is generated, you will see a dialog displaying your key and confirming the options you filled in on the previous step.
 Figure 4: PagerDuty Configuration
Important: Make sure to copy this key and save it in a secure place, as you will not have access to the key after this step. If you lose a key that you created previously and need access to it again, you should remove the key and create a new one.
In Azure
We now have to import the Logic App creating the incidents in PagerDuty.
- Go to GitHub and select the Deploy to Azure button.
 Figure 5: Azure Configuration
2. Provide the required parameters, the Azure Sentinel connection name and Resource Group.
 Figure 6: Azure Configuration
3. Once the deployment is complete, go to the resource group to configure the Logic App.
 Figure 7: Azure Configuration
4. Click on the Edit button to access to the designer.
 Figure 8: Azure Configuration
5. In the Logic App, configure the API token value, as well as the PagerDuty service ID.
Note: to increase security, you could store the API token in a Key Vault.

Test your Logic App
To validate that our solution is working as expected, go to Azure Sentinel and open an incident.
- In the incident, on the Alerts tab, go to the right of the blade and click on View playbooks
 Figure 9: Azure Configuration
2. Search for the Logic App you just created and click on the Run button.

3. Once the execution successfully complete, a new comment with a link to PagerDuty will be added (you might need to click on the refresh button in the incident).

4. Click on the link in the comment. It will open the incident in PagerDuty.

Putting it all together
In this installment, we demonstrated the process to integrate and centralize your security reponse in Azure Sentinel with PagerDuty. This integration will ensure comprehensive mapping of details in the alert to Security Incident artifacts and trigger playbooks in PagerDuty to orchestrate, triage, investigate and response actions. Additionally, it will enable quality and consistency of security investigations and scales security incident teams.
by Contributed | Feb 3, 2021 | Technology
This article is contributed. See the original author and article here.
(part 2 of my series of articles on security principles in Microsoft SQL Servers & Databases)
The Need-to-know security principle
This principle states that a user shall only have access to the information that their job function requires, regardless to their security clearance level or other approvals.
In other words: a User needs permissions AND a Need-to-know. And that Need-to-know is strictly bound to a real requirement for the User to fulfill its current role.
As you might be able to tell by the choice of words the Need-to-know principle is typically enforced in military or governmental environments.
Sometimes, in non-military scenarios, you will also find a slightly different description which states in weaker terms that access to data must be regularly reviewed to ensure that users only access data they strictly needed for legitimate reasons. This is enforcement by regulation or rule rather than permissions and can be sufficient in the private sector.
In information technology the Need-to-know can be implemented by using mandatory access control (MAC)* as well as discretionary access control (DAC)* in conjunction with a secondary control system.
*links to further reading below this article
Background
SQL Server uses a discretionary access control, as owners of objects (and the highest “owner” is the sa-account) can pass permissions to individuals. A MAC-based system is traditionally based on a multilevel security (MLS) operating environment working with Classifications of assets and security-clearance of Users and can be extended to require other mandated factors such as a Need-to-know.
In the Windows world a Multiple single-level (MSL) approach is often used: essentially keeping different levels of data (i.e. Secret and “Top Secret” on different servers or even within different environments.
For the secondary control system there is no specific type that needs to be used. Anything that can enforce this principle is good.
If no secondary control system is available, Auditing of access can be used to control adherence to the Need-to-Know protocols in place. Auditing does not prevent breach, but it can make sure it does not go undetected and without consequences, whichever those may be.
Note
The Need-to-know principle may require much more diligence and particularly different procedures than the often used discretionary or role-based access control – as under Windows Server, the Azure RBAC system or SQL Server. This depends on the exact implementation of the Need-to-know factor within the system. When a user changes job roles it needs to be ensured that the Need-to-know is adjusted immediately.
Generic example scenario
A database contains data of technical specifications of all products the company produces worldwide.
Data can be classified as “Public ,“Internal” or “Restricted”.
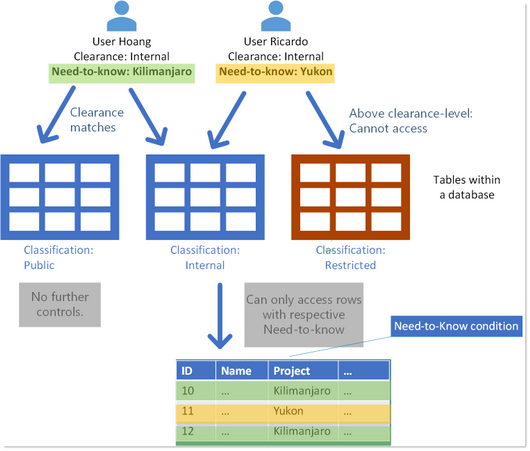
A User, Hoang, has been granted read-permission to all tables that contain data for his job function. He has clearance for anything “Internal” – including anything below, which is this case is “Public”. In effect, that he cannot read tables which are classified “Restricted”.
In addition to that, he has a Need-to-know for data only concerning Data of a certain project: “Kilimanjaro”.
So while many other project details are considered “Internal”, with the Need-to-know he can only see those belonging the project he is assigned to: “Kilimanjaro”.
Other users with the same clearance may have a different Need-to-know, according to their specific job function. Like User Ricardo in the below image.
NeedToKnow_Example1_DatabaseTables
Tip
A simple way to depict the Need-to-know principle is thinking about it adding basically a filter on a secondary axis, in addition to the existing access-control-system. The exact mechanics are subject to implementation.
This simple example assumes that individual data objects within a database are classified differently.
Note
The additional control via a Need-to-know on data which is classified “public”, or some equivalent does not make sense.
Example scenario military use case
The above example may look strange if you are familiar with for example military environments. In such, “Top Secret” Data will never be located even within the same environment even as “Secret” data, let alone “Unclassified” data.
A simplified scenario which is somewhat more realistic in such environments is depicted below. A given user Nathan may have “Top Secret” Clearance, but according to his Need-to-know would only ever get to see data concerning “Alpha”.

Or, in other words: just because Nathan has a Top Secret clearance, does not mean he can see Top Secret data. He must have a Need-to-know (and in fact additional add-on’s). Otherwise, all such data would be redacted.
Need-to-know in the SQL realm
SQL Server does not have a native security feature strictly built to enforce a Need-to-know concept. The SQL engine does not have a MAC system integrated at this time. The permission system of SQL Server is based on user identities and owners who can grant permissions and thus considered a DAC system (discretionary access control).
But this is not the end of the line. There are ways to extend this to a Need-to-know system.
Using encryption
One technique is to use Cell-Level encryption: One can encrypt values in specific cells either on columns and or row-axis (using custom logic), and the Decryption key can be made accessible for multiple personae and exclude others.
In the code-snippets below we can see that 2 doctors are assigned the same minimal privileges on a table named “Patients” – simply by putting them into the same database role (as a general best practice).
 NeedToKnow_Encryption_1
In the next step we can see that each doctor will have one which is the protector of one symmetric key – one distinct key per certificate.
 NeedToKnow_Encryption_2
This is what the system then contains:
 NeedToKnow_Encryption_3
Now each doctor needs to have access to just “his” personal key. For this the VIEW DEFINITION permission is sufficient.
 NeedToKnow_Encryption_4
As a result, each doctor can only decrypt the data that has been encrypted with his own key.
 NeedToKnow_Encryption_5
Note
The NULL-values in the “Symptoms”-column are returned for those columns where the DecyptByKey-Function cannot decrypt the data with the currently loaded key(s).
This columns data essentially is only accessible on a Need-to-know basis.
It is also possible to enable multiple personae to use the same keys. This can be done by adding encryption by additional certificates to the same symmetric key as shown here.
 NeedToKnow_Encryption_6
The complete example is available as a download below this article.
In theory also the Always Encrypted feature can be used to enforce a Need-to-know system, by assigning different keys for different columns. The principle is that different users can be granted the same permissions (SELECT, INSERT, UPDATE and or DELETE) on the table while accessing the tables via different Since the keys ache cached within the driver though, this separation is not straightforward to implement and would only work in scenarios where different machines and applications with separate drivers are utilized.
Security-Note
Can’t say this enough: more often than one may wish for I see examples of Credit Cards or Social Security Numbers being stored in a way that leaves the last 4 digits in clear-text. (Famous question for call-center Agents but also bad actors!) Do not do that. Those last digits are the random pieces of those important numbers. The first blocks are fairly static and not personalized.
Here you can read more on how those can be abused: How Apple and Amazon Security Flaws Led to My Epic Hacking | WIRED, What Can A Scammer Do With the Last 4 Digits of Your Social Security Number? | Consumer Boomer
Using Row level security for the Application
There is another feature within SQL that can help implementing a Need-to-know system: When access can be restricted to use certain Applications (and users cannot directly connect to the database), Row Level Security (RLS) can be used to implement such a system.
The concept here is to store information in the database that can be looked up by a special table valued function and uses information from the currents’ user context to apply a filter on the query. This is all done without requiring a rewrite of the calling statement as this function is bound to the table that requires the filtering, by the means of a security function.
Security-Note
Row Level Security is not a security feature but a programmability feature which can be used to implement security mechanisms when it can be ensured that users cannot query the database directly. It is important to enforce this. Also, it cannot be used to protect against Database Administrators or even Developers on the same database.
Here is how such a function and security policy can look like:
 NeedToKnow_RLS1
When querying the table, in this case “Patients”, SQL Server will change the query plan and join the function and apply the filtering in this case based on the current users’ SID, which is stored in a table “StaffDuties”.
 NeedToKnow_RLS2
This means that only staff that is working in the same wing as the patient is residing, can access the patient’s data – no matter the overall access-permissions again as depicted below.
 NeedToKnow_RLS3
You can find code-examples in the online-documentation: Row-Level Security – SQL Server | Microsoft Docs.
Similar can be done by using custom stored procedures with respective logic inside. Here the same applies: it can only be seen as an application-level convenience but not as the foundation of a Need-to-know system.
It can perfectly make sense, to combine RLS and Always encrypted to enforce Need-to-know even in case of Admin-access.
Again, these are just some examples on how the Need-to-Know principle can be implemented. As I said there is no one golden rule about this.
Happy securing
Andreas
Thank you to my Reviewers:
Adrian Rupp, Senior Program Manager in SQL Security with special knowledge in military scenarios
Jakub Szymaszek, Principal Program Manager in SQL Security on the encryption parts
Rohit Nayak, Senior Program Manager in SQL Security
Dilli Dorai Minnal Arumugam, Principal Software Engineer in Data-Governance
Resources
by Scott Muniz | Feb 3, 2021 | Security, Technology
This article is contributed. See the original author and article here.
Google has released Chrome version 88.0.4324.146 for Windows, Mac, and Linux. This version addresses multiple vulnerabilities that that an attacker could exploit to take control of an affected system.
CISA encourages users and administrators to review the Chrome Release and apply the necessary updates.
by Contributed | Feb 3, 2021 | Technology
This article is contributed. See the original author and article here.
(part 1 of my series of articles on security principles in Microsoft SQL Servers & Databases)
The Principle of Least Privilege (POLP)
The first security principle that I am going to discuss is one that most System Administrators are familiar with: the “principle of least privilege” (short: POLP). It demands that the required permissions for a task shall only grant access to the needed information or resources that a task requires. When permissions are granted, we shall grant the least privileges possible.
POLP is so crucial because initially it is the privileges that any attacker is targeting. When developing an application, using a least-privileged user account (LUA) is the first rule of engagement.
Note
User Account Control (UAC) in Windows is a feature that Microsoft developed to assist administrators in working with least-privileges by default and elevate to higher permission only when needed.
You may also know that Microsoft recommends separating service accounts. This security best practice is generally referred to as service account isolation and is related to POLP: Using distinct service accounts prevents increased privileges, which happens easily when you share an account to be used for multiple purposes and as a consequence, the privileges are merged. – This would violate the principle of least privilege.
Both POLP and service account isolation help reducing the attack surface (aka attack surface reduction).
– Read more on this topic here: SQL Server security – SQL Server | Microsoft Docs
and here: Surface Area Configuration – SQL Server | Microsoft Docs
Service account isolation also prevents lateral movement between services if an attacker gained access to one service. You see how one thing is connected to another in Security?
Note
Lateral movement is a common attack strategy to move from one target to the next: If the main target (for example the database server) cannot be breached into directly, attackers try to gain foothold in some other server in the system within the same network and then launch other attacks to try to get to the final goal, server by server or service by service.
Principle of Least Privilege in the SQL realm
Let’s look at some examples within the SQL Server engine (applying to on-prem as well as our Azure SQL-products):
Example 1, read-access to data
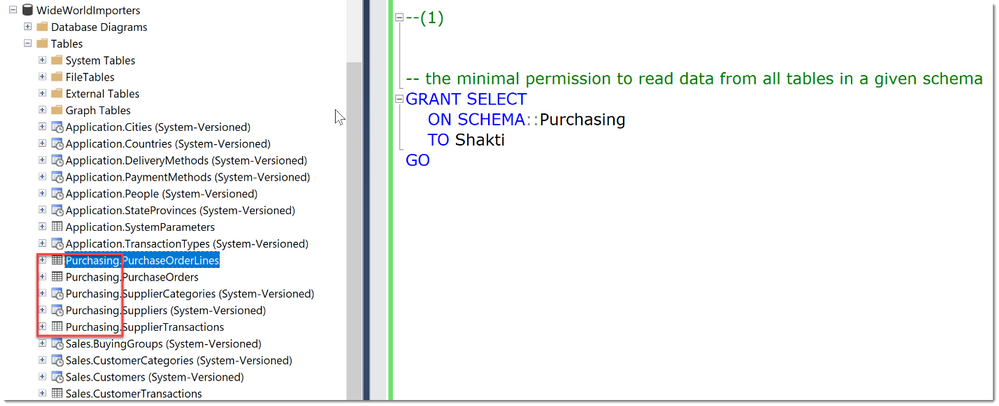
A typical example within SQL Server would be: To allow a User to only read data from a small set of tables, ideally defined by a schema-boundary, we have the SELECT-Permission, grantable at the schema- (or even table-) level. There is no need to grant SELECT at the whole database, or to grant anything other than SELECT.
In the code-snippet below we see that there are many tables in different schemas (Application, Purchasing, Sales) within the database WideWorldImporters. Instead of granting Select in the whole database, we chose to grant the user Shakti the permission at the schema scope. As long as this schema really contains only objects that Shakti needs access to, this is a best practice as it greatly reduces the management and reporting overhead compared to granting permissions at the object-level.
Tip
An alternative is to use stored procedures for all data access, which would allow even better control and completely hide the schema from Users.
That was easy, wasn’t it?
Example 2, creating user accounts
Unfortunately, not everything is implemented to always ensure POLP.
Let’s take another example:
You want to delegate the ability to create new Logins in SQL Server.
The minimal permission available is ALTER ANY LOGIN. Ok, so now this person can create new Logins, and maybe also Dropping them is ok.
But: With this permission comes the ability to change the password of any SQL Login (“ALTER LOGIN … WITH PASSWORD=’NewPassword’).
This can be an unwanted scenario as this would enable this person to essentially take over other accounts.
Note
This would not work if the Account were a Windows Domain or Azure Active Directory account. This is where a separation of the authenticating system from SQL Server has a real advantage. (This is a great example of Separation of Duties btw.)
Example 3, changing table structures
What about the following?
Say you want to allow a developer to add a set of new columns to the existing tables. (For example, for logging purposes, you need to include the timestamp of any new row.)
The minimal permission to change tables/add new columns is the ALTER-permission on each individual table (it cannot be done on schema-level).

In my example you can see that adding new columns works fine, also dropping the table is not allowed.

But:
Instead of adding new columns this user could also drop existing columns. This is covered under the same least permission/privilege:

Or: You want them to only create new tables but disallow to change existing tables. Since the required permissions for that are: CREATE TABLE on Database + ALTER on the schema, they could also drop tables. With permissions alone this cannot be solved. This is a common reason for the use of DDL Triggers as a preventative control. (I demonstrated an example of a DDL Trigger in this Blog-Article: Logging Schema-changes in a Database using DDL Trigger, which can easily be adjusted to prevent certain statements altogether by rolling them back.)
Conclusion
The more you dive into this subject and real-world implementation, the more you will realize that this apparently basic security principle is much tougher than you may initially have expected.
The permission system of SQL Server is very granular, vast, and continuously growing. (SQL Server 2019 provides 248 permissions and Azure SQL Database exposes 254 permissions as of December 2020.)
While some of the examples above are reasonable, we need to balance every decision for every new permission and look at it from multiple angles whenever a new functionality or command is implemented. For example:
- Which other commands and tasks are covered under the same permission?
- How do they relate to the functionality at hand?
- Is the use of the new functionality/command alone a common scenario?
Having permissions on parts of Table-structures, like adding columns but not dropping them, would increase the complexity of the permission-system and hence the compromise to have just one ALTER-permission on table DDL was made.
That said, I know there are examples where the balance is not right, and SQL Server can be improved, like TRUNCATE TABLE requiring ALTER on the table as well and others.
Feel free to let me know where you believe that POLP is seriously unbalanced, and more granularity is required to reach compliance.
Happy securing
Andreas
Resources
by Contributed | Feb 3, 2021 | Technology
This article is contributed. See the original author and article here.
Final Update: Wednesday, 03 February 2021 11:30 UTC
We’ve confirmed that all systems are back to normal with no customer impact as of 02/03, 11:10 UTC. Our logs show the incident started on 02/03, 08:45 UTC and that during the 2 hours and 25 minutes that it took to resolve the issue some customers using Azure Monitor service may have experienced difficulties ingesting ,querying resource data and data ingestion latency in West Europe and South East Australia. Additionally, customers may also have experienced false positive and/or missed alerts in these regions. Service management operations on workspaces may also have failed, retries may have been successful.
- Root Cause: The failure was due to faulty deployment in one of our dependent service.
- Incident Timeline: 2 Hours & 25 minutes – 02/03, 08:45 UTC through 02/03, 11:10 UTC
We understand that customers rely on Azure Monitor Service as a critical service and apologize for any impact this incident caused.
-Mohini

by Contributed | Feb 3, 2021 | Technology
This article is contributed. See the original author and article here.
We’re happy to announce an update to the Yammer Data Export API! Yammer Data Exports now include new columns that map Azure Active Directory IDs for Users and Groups with their corresponding Yammer Users and Groups IDs.
The new columns “Office User ID” and “Office Group ID” are added to Users.csv and Groups.csv files. This update aims to make it easy for our customers and partners to use the Microsoft Graph API and correlate Azure Active Directory users and groups IDs with their Yammer IDs for networks in Native Mode.
In this blog we’re sharing steps on how to list Azure Active Directory Group Members through Microsoft Graph and easily correlate them with Yammer Users.
First, get Azure Active Directory User and Group IDs with the Yammer Data Export API.
- Use the Yammer Data Export API to incrementally export content from Yammer. https://developer.yammer.com/docs/data-export-api
- In the export, the Users.csv file now has a new field “Office_user_id” that contains the Azure Active Directory User ID which is mapped to its corresponding Yammer User ID.
- Also, the Groups.csv file now has a new column “Office_group_id” that contains the Azure Active Directory Group ID which mapped its Yammer Group ID.

- Use the Office_user_id and Office_group_id fields to correlate Azure Active Directory Users and Groups with their corresponding Yammer Users and Group IDs.
Next, use the List Members API to get a group’s direct members.
- Create or update your Azure Active Directory Application. See this quick start guide for more information https://docs.microsoft.com/en-us/azure/active-directory/develop/quickstart-register-app
- Enable the permissions Group.Read.All in the Azure Active Directory App Registrations section.

- Follow the Microsoft Graph guidelines to support authentication in your application/service. For more info, please see https://docs.microsoft.com/en-us/graph/auth/
- Get a List of Members in a Group using the Microsoft Graph List Members API


The response displays the list of Group members with many attributes such as the user’s “id”, “userPrincipalName”, “displayName”, etc.
Make a note of the “id” value – this value is now mapped in the Users.csv and Groups.csv files from the Yammer Data Export API.
If there are more than 100 members, then Microsoft Graph returns a @odata.nextLink property in the response that contains a URL to the next page of results. Learn more about the List Members API here.
And that’s it! Now you can easily correlate Azure Active Directory User IDs from the Microsoft Graph API with their corresponding Yammer User and Group IDs from the Yammer Data Export API.
Resources:
- Microsoft Graph Explorer: https://developer.microsoft.com/en-us/graph/graph-explorer
- Microsoft Graph API: https://docs.microsoft.com/en-us/graph/overview
- List Members API: https://docs.microsoft.com/en-us/graph/api/group-list-members
- Yammer Native Mode: https://docs.microsoft.com/en-us/yammer/configure-your-yammer-network/overview-native-mode
- Yammer Data Export API: https://developer.yammer.com/docs/data-export-api
by Contributed | Feb 3, 2021 | Technology
This article is contributed. See the original author and article here.
Intro
Brad Watts here to explore monitoring of your Network Security Groups (NSGs). I was approached recently by a customer wanting to better understand changes being made to the many NSGs in their environment. Working with them, we came up with an Azure Workbook that provides a centralized view of both current settings on your NSGs along with any changes that have been made.
Sneek Peak
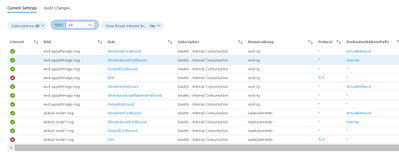
Before we jump into implementation let’s look at the result. Our Workbook has two tabs. The first tab is “Current Settings” and uses Azure Resource Graph to pull in current NSG settings.
On the “Audit Settings” tab we are focusing on the changes made to NSGs

If you select one of the changes from the “NSG Changes” table, it will show you what NIC/Subnet it’s connected to along with all the changes over the last 90 days.

Prerequisites
If your interested in implementing this Workbook you need to be aware of a few requirements:
- Whoever is using the Workbook will need at least read access to the NSGs they are wanting to monitor. This is because we are using Azure Resource Graph to pull this information.
- For the “Audit Change” tab to work you need to send you’re Azure Activity Logs to a Log Analytics Workspace.
Azure Activity log – Azure Monitor | Microsoft Docs
- Whoever is using the Workbook will need to be able to read the data in the Log Analytics workspace that you sent the Azure Activity Logs to.
Implementing
Hopefully, everyone is still interested and want to take a look at this in your environment. Well lets walk through importing the workbook!
Step 1: Get the Workbook
You can find a copy of this workbook in my Github repo. You just need to copy the content of this JSON file to import it.
https://raw.githubusercontent.com/bwatts64/AzureMonitor/master/Workbooks/NSGWorkbook.json
Step 2: Create a Workbook
In the Azure Portal bring up Azure Monitor by searching for Monitor

In Azure Monitor select the “Workbook” tab and choose “New”

This will open a Workbook in Edit mode. Do to the “Advanced Editor” (</>)

In the “Advanced Editor” paste the content of the JSON file from my GitHub repo and click on “Apply”

That’s it. You know have the Workbook to test in your environment. Make sure you “Save” the workbook and also click on the “Done Editing” to get the full experience.

Summary
Being able to easily visualize both you’re current NSGs along with any changes made to them over time is essential for anyone managing NSGs in Azure. In this solution we are using an Azure Workbook along with Log Analytics and Azure Resource Graph to give you that centralized view. I hope this makes your life easier and please suggest improvements to the Workbook. I always consider these things works in progress! A similar Workbook for Azure Firewalls is in progress.
by Contributed | Feb 2, 2021 | Technology
This article is contributed. See the original author and article here.
Background information:
Sometimes we found unexpected results of resource compliance status for some policies. To troubleshoot these kinds of problems, we first need to understand how Azure Policy evaluates resource.
Internally, there are two types of Policy evaluation(actions):
- The first kind can be referred as Policy enforcement, is triggered synchronously, while the user is sending a PUT or PATCH request (create or update a resource). Policy engine will examine the request body/payload for evaluation and take action (append, modify, deny etc.) accordingly.
- The other kind can be referred to as policy scan or compliance scan, is executed asynchronously by Azure Policy engine, based on a GET request to the ARM cache or resource provider and evaluates the existing resource based on the response payloads. Therefore, we can get the payload of resource GET calls and examine the payload with the policy rule to understand evaluation results.
And in this article, we will be discussing more about the troubleshooting steps for second type (compliance scan).
Problem scenario
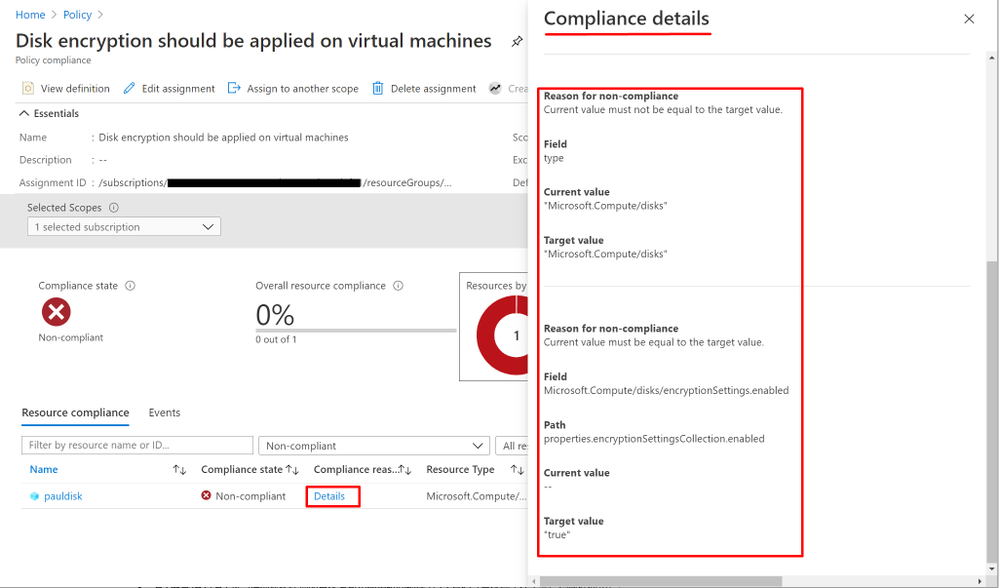
A custom policy enforces Disk encryption marks virtual machine OS disk with encryption enabled as non-compliant.
Troubleshooting steps
- First step is, to check the “Compliance details” for clues for why the resource is being “non-compliant” from the Policy compliance page on the Azure portal as shown below:
- Get the target Policy definition from Policy page on Azure Portal.
“policyRule”: {
“if”: {
“allOf”: [{
“field”: “type”,
“equals”: “Microsoft.Compute/disks”
}, {
“field”: “Microsoft.Compute/disks/encryptionSettings.enabled”,
“notequals”: “true”
}
]
},
“then”: {
“effect”: “audit”
}
- Run a REST API List/Get call and get the target resource payloads.
a. To find the right REST API, run a search with keyword as “Azure REST API list/get <resource type>”

b. Run the REST API using “Try It” feature shown as below:

c. the payload of the resource will be in the response body of the REST API call shown as below:

- Examine the resource payload with the policy definition.
In this scenario, you can see from the resource payload above, it does not contain a property named “Microsoft.Compute/disks/encryptionSettings.enabled” and has a property called “encryption.type” instead. The actual response payload doesn’t match the policy rule and that is why the policy would evaluate it as non-compliant.
- Modify policy definition accordingly to meet your business requirement.
In the scenario, if the resource payload has a value for “encryption.type” then it indicates the disk is encrypted. So, we can modify the policy rule as below to solve the issue:
{
“mode”: “All”,
“policyRule”: {
“if”: {
“allOf”: [
{
“field”: “type”,
“equals”: “Microsoft.Compute/disks”
},
{
“field”: “Microsoft.Compute/disks/encryption.type”,
“equals”: “”
}
]
},
“then”: {
“effect”: “audit”
}
}
}
**The troubleshooting approach above applies to other policy compliance issues as well.
by Contributed | Feb 2, 2021 | Technology
This article is contributed. See the original author and article here.
We’re changing the location of the readiness file that is downloaded by the Microsoft 365 Apps Upgrade Readiness dashboard in Microsoft Endpoint Configuration Manager (version 1906 or later). This dashboard helps you determine which devices are ready to update to Microsoft 365 Apps.
Note: If you don’t use the Microsoft 365 Apps Upgrade Readiness dashboard, you can ignore this information.
Old location: https://contentstorage.osi.office.net/sccmreadinessppe/sot_sccm_addinreadiness.cab
New location: https://omex.cdn.office.net/mirrored/sccmreadiness/SOT_SCCM_AddinReadiness.CAB
When will this happen?
The new location for the readiness file will take effect on March 2nd 20201 After that date, the old location will no longer be used.
How this will affect your organization
Your top-level site server for Configuration Manager needs to be able to access the new location of the readiness file to be able to download the file.
If your top-level site server can’t access the new location, the Microsoft 365 Apps Upgrade Readiness dashboard won’t have access to the most up-to-date readiness data. If a version of the readiness file was downloaded previously from the old location, the dashboard will keep working but will be using readiness data that is out-of-date.
What you need to do to prepare
You need to make sure that your top-level site server can access the new location of the readiness file. If your organization restricts network communication with the internet using a firewall or proxy device, make sure to allow this endpoint:
- omex.cdn.office.net to support the evaluation of Office add-in readiness.
For more information about the endpoints used by Configuration Manager when managing Microsoft 365 Apps, see Manage Microsoft 365 Apps.
For more information about the Microsoft 365 Apps Upgrade Readiness Dashboard, see Office 365 Client Management dashboard.

by Contributed | Feb 2, 2021 | Technology
This article is contributed. See the original author and article here.
Over the next few weeks, the Microsoft Identity team will share 10 reasons to love passwordless and why you should consider changing how you (and your users) login every day. Kicking off the series is Pamela Dingle.
I love passwordless authentication because of the amazing flexibility and choice that come with strong authentication standards like Fast IDentity Online – also known as FIDO. Before sharing how FIDO has helped make my life easier, let’s talk a little about passwordless.
Passwordless authentication means living a daily digital life where you never type a password. Instead, you use more secure ways to authenticate such as a fingerprint reader built into your Windows laptop, face unlock on your Android device, or a push notification you respond to on your iPhone. The best part is you can set up just one or all of these passwordless identity mechanisms. That means there is a passwordless option no matter where you are or what you are doing. For me, this has huge benefits: 1) Less typing, 2) Less remembering of stupid passwords that make me angry, 3) Less retyping of the passwords because I got them wrong the first time, and 4) Wow is it more secure.
Back to my favorite part about passwordless authentication at Microsoft – the fact that we offer open standards-based options via the FIDO family of protocols. FIDO lets a website request a secure credential in a vendor-agnostic way. This means no lock-in! In the past, in order for a website to support secure login mechanisms like fingerprint or facial recognition, the website developer would need to write proprietary code, possibly for many types of computer hardware,operating systems, or smartphone implementations – it was just a mess. If you used a product that wasn’t on the supported list, you were out of luck. Now, the website can just use a protocol called W3C Web Authentication to ask for a FIDO credential. This eliminates a ton of proprietary code, so it is less expensive to maintain for the website, and it is more likely to work in the real world. When you couple the breadth of FIDO-compliant solutions in the ecosystem with our other passwordless options, like our authenticator app, there are a lot of flexible options.
FIDO support for passwordless authentication has made my life easier by reducing vendor lock-in. When working on my Lenovo laptop, I use the built-in fingerprint reader to login without typing. Since I’m now home all the time, I prefer to use my Apple Mac mini for work. Normally, switching to a different hardware manufacturer would be a big barrier, plus the Mac mini does not have a fingerprint reader! Luckily, I have a roaming authenticator (called a security key) registered with Azure Active Directory (along with my laptop fingerprint). With that security key plugged into my USB port, I can login passwordlessly on ANY computer that I want. I can move my security key from my Mac mini to a laptop and never type anything.
When I travel, my laptop’s built-in authenticator is the most convenient authentication option.. At home, I prefer the plugged-in security key. A bunch of awesome FIDO2 vendors offer different form factors. I can pick the vendor and form factor that works best for me. FIDO2 earrings, anyone? This set of authenticators works really well for me but what is best for you and each of your users could be different! Really, that is the crux of why we enable so many options with FIDO2, Windows Hello, and the Authenticator – we want you to go passwordless your way.
Upcoming passwordless posts
There is so much more to learn about why passwordless authentication is the future, and about how you can find a passwordless factor (or two) to make your world better. My Microsoft identity colleagues are all going to try to outdo this reason with their own takes on why passwordless is so awesome – stay tuned for the next two segments in this series:
- Alex Weinert on why biometrics and passwordless are a dream combination
- Sue Bohn on how passwordless makes your logins 3x faster

Learn more about Microsoft identity:

Recent Comments