This article is contributed. See the original author and article here.
Hey everybody! My name is Brandon McMillan and I am a Microsoft Endpoint Configuration Manager (ConfigMgr) CE at Microsoft. ConfigMgr Current Branch has been the standard service-based model since December 2015 with the release of version 1511. You may have noticed that with the continuous improvements, your antivirus exclusions also need to be kept up to date. I hope this will provide you with important antivirus exclusions you could consider implementing within a Current Branch environment.
This blog will provide a comprehensive list of the following referenced Microsoft Support and Microsoft Docs articles we have released along with other recommendations you could consider for your environment. Please reference the following articles for further guidance.
822158: Virus scanning recommendations for Enterprise computers that are running currently supported versions of Windows – Last Review: Jan 12, 2021
Docs Article: Recommended antivirus exclusions for Configuration Manager Site Servers, Site Systems, and Clients – Last Review: Jan 12, 2021
309422: How to choose antivirus software to run on computers that are running SQL Server – Last Review: Jan 25, 2021
Docs Article: Antivirus software that is not cluster-aware may cause problems with Cluster Services – Last Review: Oct 24, 2020
Docs Article: A 0-byte file may be returned when compression is enabled on a server that is running IIS – Last Review: Mar 30, 2020
900638: Multiple symptoms occur if an antivirus scan occurs while the Wsusscan.cab file or the Wsusscn2.cab file is copied – Last Review: Jan 25, 2021
Update: Feb 2, 2021
Added PowerBI Report Server paths and recommendations under SQL Reporting Services Exclusions.
Correction on UpdateServicesDBFiles path under WSUS Exclusions. Many thanks to @JFD84 for the feedback.
Review/updated antivirus references and links.
IMPORTANT: Antivirus real-time protection can cause many problems on Configuration Manager site servers, site systems, and clients. We recommend to always test before implementing any of these changes in a production environment. We strongly encourage you to evaluate the risks that are associated with implementing these changes. We recommend that you temporarily apply these procedures to evaluate a system. If you choose to implement these changes in your environment, ensure you take any additional precautions necessary. Please refer to your antivirus vendor’s documentation for further guidance and recommendations.
The recommendations for each section are separated between “Operational” and “Performance” levels. Operational recommendations are highly encouraged to be added to your exclusions list. Performance recommendations should only be considered if you are experiencing such issues that may be a result of your antivirus product.
The following information will cover what could be recommended for your environment.
Details on the variables referenced:
<InstallDrive> can be multiple drives in some environments, so it is best to use a wildcard if possible for the antivirus solution you have deployed throughout your environment. Please refer to your vendor’s documentation for further instructions.
<InstanceName>is the name of the SQL instance you are using in your environment. Please be aware if you use any named SQL instances or the default, “MSSQLServer”.
<SQL Version> is the version of SQL you are using in your environment. This may also differ between each SQL service referenced between versions SQL Server 2005-2008 R2 and SQL Server 2012 or higher. Please be aware of what version you have installed. KB309422 and the article below can provide you with more details.
For further information regarding recommended exclusions for server roles such as a Domain Controller, DFS, DHCP, or DNS, please refer to the article below.
The following recommendations are dependent on the state of the system when the Management Point role is assigned. Please review the current state of your environment to determine which of the following paths should be excluded.
WSUS Offline Scanning Exclusions – Microsoft Baseline Security Analyzer (MBSA)
There are four distinctive methods to choose when using MBSA and WSUS offline scanning. Method 1 has the least amount of risk. If this method does not work for you, we recommend you use Method 2. Methods 3 and 4 may increase your security risk. We recommend that you use Methods 3 or 4 only if required and ensure you please take necessary precautions.
Method 1:
Exclude the following files from scanning:
Wsusscan.cab
Wsusscn2.cab
Method 2:
Exclude all *.cab files from scanning
Method 3:
Exclude all archived files from antivirus scanning
%windir%SoftwareDistributionScanFile
Method 4:
Exclude the folder where the Wsusscan.cab file or the Wsusscn2.cab file is located
Exclude the path of the Wsusscan.cab file or the Wsusscn2.cab file on the local computer
MBSA was largely used in situations where neither Microsoft Update nor a local WSUS/ConfigMgr server was available, or as a compliance tool to ensure that all security updates were deployed to a managed environment. While MBSA version 2.3 introduced support for Windows Server 2012 R2 and Windows 8.1, it has since been deprecated and no longer developed. MBSA 2.3 is not updated to fully support Windows 10 and Windows Server 2016.
The following script may help you as an alternative to MBSA’s patch-compliance checking with later versions of Windows:
I received numerous feedback on this post and I wanted to highlight the contributions from the following individuals: Max Baldt, David Coulter, Aaron Ellison, Julie Andreacola, and Klaus Kreyenberg.
Special thanks to Kevin Kasalonis, Cameron Cox, Clifton Hughes, Rushi Faldu,and Santos Martinez.
Disclaimer: The information on this site is provided “AS IS” with no warranties, confers no rights, and is not supported by the authors or Microsoft Corporation. Use of any included script samples are subject to the terms specified in the Terms of Use.
This article is contributed. See the original author and article here.
In this post, the technology we will be examining is the Azure Monitor HTTP Data Collector API, which enables clients, such as the NXLog Enterprise Edition agent, to send events to a Log Analytics workspace, making them directly accessible using Azure Sentinel queries.
We will present two examples of sending logs to Azure Sentinel: in the first one, we send Windows DNS Server logs and in the second one, Linux kernel audit logs. Both of these log sources are of interest from a security perspective.
Proactive monitoring of DNS activity can help network administrators quickly detect and respond to attempted security breaches in DNS implementations that might otherwise lead to data theft, denial-of-service, or other service disruptions related to malicious activity.
In comparison, Linux Audit has a much wider scope and could arguably be called the most comprehensive tool for monitoring and reporting security events on Linux distributions.
About NXLog Enterprise Edition
If you aren’t familiar with the NXLog Enterprise Edition, it is a full-featured log processing agent with a small footprint. It can read and write all standard log formats and integrates with over 70 third-party products. It offers many additional features not found in the free Community Edition. To evaluate the configurations presented in this post, download the appropriate trial edition for your platform. For more information on supported platforms and how to install an agent, see the NXLog Deployment chapter of the NXLog EE User Guide.
Collecting DNS Server logs via Windows Event Tracing
Event Tracing for Windows (ETW) provides not only efficient logging of both kernel and user-mode applications but also access to the Debug and Analytical channels that are not available through Windows Event Log channels (which also contains some DNS Server logs).
Authentication
The pivotal part of sending secure HTTPS requests to Azure is the authentication process. Azure validates the values of two custom HTTP headers, Authorization and x-ms-date along with the length of the data payload to determine if the request is authentic. The value assigned to the Authorization header is dynamically generated using a cryptographic hash. For details, see the Azure Monitor Authorization section in the Microsoft documentation.
To allow easy integration with the NXLog HTTP(s) (om_http) module that sends events to REST API endpoints, NXLog provides a Perl script that regenerates the single-use authorization string for each new batch of events to be sent.
Capturing ETW events – The input side
NXLog can natively collect ETW logs without the need to capture the trace into an .etl file. Configuring an NXLog agent to capture Windows DNS Server events using the Event Tracing for Windows (im_etw) input module is fairly straightforward as illustrated here:
The default location for the NXLog configuration file on Windows isC:Program Filesnxlogconfnxlog.conf. This file is used to configure as many inputs, outputs, and routes as needed for a host. For more information on configuring NXLog in general, see theConfiguration Overviewin theNXLog User Guide.
Please note that the first (opening) line of theInputblock defines the name of this instance as DNS_Logs. The output module for sending events to Azure uses this name for creating the Azure Sentinel table that will collect these events.
TheExecstatement on line 4 of theDNS_Logsinput instance above invokes theto_json()procedure, which converts the Windows events to JSON records, as required by Azure’sHTTP Data Collector API.
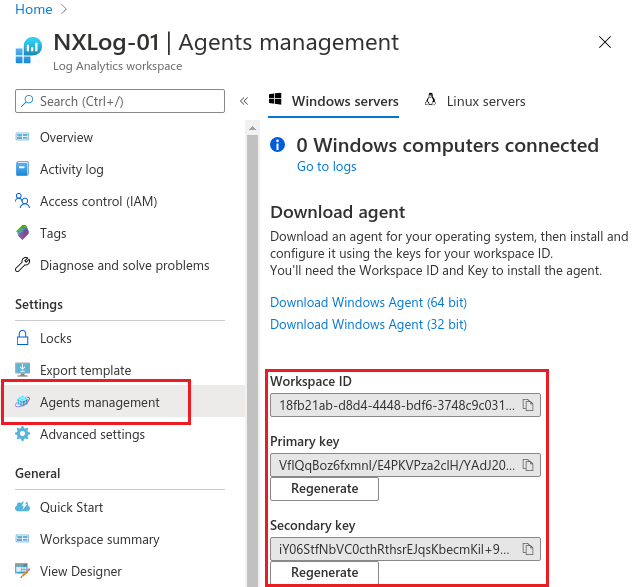
Sending ETW events – The output side The output module is the part that connects directly to Azure. The first step in configuring the output instance is retrieving the Workspace ID and either the Primary key or the Secondary key (also referred to as the shared key). These keys can be found by navigating in the Azure portal to Log Analytics workspace > Settings > Agents management. The same set of keys can be viewed under either the Windows servers or Linux servers tab.
The next step is to add this information to thenxlog.conffile asconstants (see the following code example)making them accessible to the output instance.
TheSUBDOMAIN,RESOURCE, andAPIVERare used to construct the complete URL. The value forSIZELIMITcan be tuned to your needs. It represents the maximum size in bytes of the data payload for each batch of events.65000is the upper limit. The higher values mean better network efficiency. Lower values mean events can be received faster because they are not waiting for a large buffer to be full before they can be sent.
When looking at the entire output instance that uses theHTTP(s) (om_http)module, you can see how batches of events are buffered and then flushed:
nxlog.conf (Section: DNS_Logs output instance)
<Extension plxm>
    Module              xm_perl
    PerlCode            %INSTALLDIR%modulesextensionperlsentinelauth.pl
</Extension>

<Output AzureHTTP>
    Module              om_http
    URL                 https://%WORKSPACE%.%SUBDOMAIN%/%RESOURCE%?%APIVER%
    ContentType         application/json
    HTTPSAllowUntrusted TRUE
    HTTPSCAFile         %INSTALLDIR%certca-certificates.crt
    <Exec>
        create_stat('ec', 'COUNT');
        create_stat('bc', 'COUNT');
        create_var('batch');
        create_var('nextbatch');
        add_stat('ec',1);

        #---BEGIN--- the enrichment of this event with any new fields:
        # The following can be used for debugging batch mode if needed:
        # $BatchNumber = get_stat('bc');
        # $EventNumber = get_stat('ec');
        # to_json();
        #---END--- the enrichment of this event

        if (size(get_var('batch')) + size($raw_event) + 3) > %SIZELIMIT%
        # Flush this batch of events
        {
            set_var('nextbatch', $raw_event);
            $raw_event = '[' + get_var('batch') + ']';
            add_stat('bc',1);
            set_var('batch',get_var('nextbatch'));
            $Workspace = "%WORKSPACE%";
            $SharedKey = "%SHAREDKEY%";
            $ContentLength = string(size($raw_event));
            $dts = strftime(now(),'YYYY-MM-DDThh:mm:ssUTC');
            $dts_no_tz = replace($dts,'Z','');
            $parsedate_utc_false = parsedate($dts_no_tz,FALSE);
            $x_ms_date = strftime($parsedate_utc_false, '%a, %d %b %Y %T GMT');
            plxm->call("genauth");
            add_http_header('Authorization',$authorization);
            add_http_header('Log-Type',$SourceModuleName);
            add_http_header('x-ms-date',$x_ms_date);
        }
        else
        {
            $delimiter = get_stat('ec') == 1 ? '' : ",n";
            set_var('batch', get_var('batch') + $delimiter + $raw_event);
            drop();
        }
    </Exec>
</Output>
The values for the three HTTP headers Authorization, Log-Type, and x-ms-date are set using the add_http_header procedure as shown above on lines 41-43. Log-Type is dynamically set to $SourceModuleName, the name of the input instance we chose at the beginning. Since all REST API events are categorized by Azure Monitor as Custom Logs, Azure appends _CL to the value of Log-Type in order to prevent naming conflicts with other Azure tables thus the name we originally chose, DNS_Logs, appears in Azure Sentinel as DNS_Logs_CL.
By leveraging $SourceModuleName for defining Log-Type, we have created a completely generic output instance that can be used with any other log sources.
Configuration checklist To prepare for testing, let’s run through the steps needed to ensure success:
Use the output instance in this example nxlog.conf configuration in your current C:Program Filesnxlogconfnxlog.conf NXLog configuration file.
Ensure that you have changed the values of WORKSPACE and SHAREDKEY to match those of your Log Analytics workspace.
Download the sentinelauth.pl Perl script. Copy it to the location defined by the PerlCode directive in the xm_perl instance (plxm, lines 1-4 above) and rename it to sentinelauth.pl.
Read about the Windows requirements for Perl in the Perl (xm_perl) in the NXLog Reference Manual.
Once the Perl requirements for Windows have been met, restart the nxlog service via Windows Services.
To test DNS Server logging of audit events, we added an A record for R04LRC13.example.com and reloaded the example.com zone. This logs an event with EventID 515 (Record Create) and another one with EventID 561 (Zone Reload).
Now it’s time to log into the Azure Log Analytics workspace that was defined in the DNS_Logs output instance and open Logs. After expanding Custom Logs the DNS_Logs_CL table should be visible. With a simple query, the newly ingested events are visible.
Expanding the first event’s details shows the complete set of fields and their values:
Temporary output instance
For testing purposes, you may want to add a temporary output instance for validating the integrity of your configuration. This lets you compare the events and their fields with what Azure Sentinel is ingesting. As you can see here, by adding a new output instance named TempFile as an additional destination to the route, this allows you to view the events in JSON format that will be stored in the file defined by the File directive.
nxlog.conf (Section: file output instance and modified route)
The presence of a conflicting copy of perl528.dll located in C:Program Filesnxlog that will need to be deleted
Can’t locate lib.pm in @INC (you may need to install the lib module) (@INC contains:) at C:Program Filesnxlogmodulesextensionperlsentinelauth.pl line 1.

BEGIN failed–compliation aborted at C:Program Filesnxlogmodulesextensionperlsentinelauth.pl line 1.

2020-07-30 10:25:39 ERROR [xm_perl|plxm] the perl interpreter failed to parse C:Program Filesnxlogmodulesextensionperlsentinelauth.pl
Make sure the input instance is correctly configured and that events are actually being captured by adding an additional output instance for logging them to a local temporary file as demonstrated in the Temporary output instance section above.
Including DNS Server analytical logs captured with ETW If analytical event logging is enabled, you can capture and view DNS Sever analytical events having EventIDs ranging from 256 to 286. Technically, no further changes are needed for logging and viewing both audit and analytical events in Azure Sentinel. However, there is one enhancement you might want to implement:
Enrich the schema with a new attribute:DNS_LogType. If you need to frequently differentiate between audit and analytical DNS Server events, querying for a range of values on a regular basis is not only tedious and makes queries less readable, but it can also be slower on large data sets. This is as simple as replacing the original Exec to_json(); with an Exec block that sets the new $DNS_LogType field to either Audit or Analytical depending on the value of EventID before calling the to_json() which will then enrich the schema with this new field.
nxlog.conf (DNS_Logs input instance)
<Input DNS_Logs>
    Module              im_etw
    Provider            Microsoft-Windows-DNSServer
    <Exec>
        if $EventID >= 256 and $EventID <= 286 $DNS_LogType = 'Analytical';
        if $EventID >= 512 and $EventID <= 596 $DNS_LogType = 'Audit';
        to_json();
    </Exec>
</Input>
Collecting Linux Audit logs In this section we examine Linux Audit logs and how they can be sent to Azure Sentinel. Since the prerequisites of data format (JSON), transport (HTTPS REST API with some special headers), and authentication (single-use cryptographic hash) are the same for sending Linux log sources to Azure Sentinel, we are now free to focus on the log source itself and the minor differences between a Windows deployment and a Linux deployment.
The Linux Audit system provides fine-grained logging of security related events. These logs can also provide a wealth of security information: changes to DNS zone files, system shutdowns, attempts to access unauthorized files, and other suspicious activity. The NXLog Enterprise Edition includes the im_linuxaudit module for directly accessing the kernel component of the Audit System. With this module, NXLog can be configured to build Audit rules and collect logs without requiring auditd or any other user-space software.
Capturing Linux Audit events – The input side Let’s take a look at the configuration file to see how the input module is configured and how the rules are defined.
The default location for the NXLog configuration file on Linux is/opt/nxlog/etc/nxlog.conf.
Instead of defining a small set of audit rules within a Rules block directly in the LinuxAudit input instance, we use the LoadRule directive to load a more comprehensive collection of rules in an audit rule file which is based on the ruleset maintained by the Best Practice Auditd Configuration project.
The xm_resolver module is needed for the ResolveValues directive in the audit input instance, where it is used for resolving some of the numeric values to more human-readable string values.
Sending Linux Audit events – The output side It should be noted that there are some configuration differences between Linux and Windows as the NXLog directory structure is slightly different, thus the PerlCode path is as follows:
Also, the first line of Perl scripts on Linux needs to point to the location of the perl binary.
sentinelauth.pl
#!/usr/bin/perl
use strict;
use warnings;
use Log::Nxlog;
use MIME::Base64
Since the Linux configuration files exhibit only minor differences when compared to their Windows counterparts displayed in the ETW section, we won’t display them here. Instead, you can download them using these links:
Once these changes have been implemented and the NXLog service has been restarted, events should be sent to the LinuxAudit_CL Azure Sentinel table based on the name given to the input module, LinuxAudit. The following JSON event was triggered and captured according to the very last line in the im_linuxaudit.rules file.
Pretty-printed JSON of the captured Linux Audit event record
Upon successful receipt in the Log Analytics workspace by Azure Monitor, events are further processed and finally ingested by Azure Sentinel where they can be viewed via user-defined queries.
After expanding the following event to reveal its columns and their values, it can be verified against the JSON-formatted event shown above that was sent via the REST API.
Summary
Given the configuration samples and use cases presented here, you should now possess the basic information needed to benefit from these additional security monitoring opportunities in your own enterprise. To recap, the main advantages are:
Event Tracing for Windows (ETW) offers better performance because it doesn’t need to capture the trace into an .etl file and provides access to Debug and Analytical channels
The native NXLog Linux Audit input module that works out of the box without the need to install auditd and when coupled with the NXLog Resolver extension module can resolve IP addresses as well as group/user IDs to their respective names, making Linux audit logs more intelligible to security analysts
A general-purpose output configuration enabling Azure Sentinel to ingest events from multiple, diverse log sources simultaneously, from any host in your enterprise having outbound access to Azure
With thanks to @Ofer_Shezaf for his assistance in understanding Azure Sentinel’s integration capabilities, as well as my colleagues at NXLog, Botond Botyanszki and Tamás Burtics, for their comments, feedback, and encouragement to write this article.
This article is contributed. See the original author and article here.
Today, I worked on a service request that our customer asked to compress data because they are reaching the limit of the database size and they don’t want to scale up to the next database tier to have more available space.
Besides the multiple things that we have to reduce the size and as our customer needs to have a quick solution and the CPU usage is not too much, we suggested to use compression.
In this situation, we have a table that has a XML column that is using the almost space of the database and we put focus to try to compress the data.
In my first proof of concept before sending this recomendation, I saw a thing that we need to know before compressing the data when you have a LOB data types.
SQL Server will not compress data when the size of the data takes more than the maximum size of data page (8096 bytes), so, for this reason, we need to analyze if this solution applies. Let me show you an example:
We have two tables Compressed and NotCompressed with this layout:
create table Compressed
(ID INT IDENTITY(1,1), DETAILS XML )

create table NotCompressed
(ID INT IDENTITY(1,1), DETAILS XML )

ALTER TABLE Compressed REBUILD PARTITION = ALL
WITH (DATA_COMPRESSION = PAGE);
GO
ALTER TABLE NotCompressed REBUILD PARTITION = ALL
WITH (DATA_COMPRESSION = PAGE);

INSERT INTO Compressed (details) values(replicate('x',900))
INSERT INTO Compressed (details) values(replicate('x',9000))

INSERT INTO NotCompressed (details) values(replicate('x',9000))
INSERT INTO NotCompressed (details) values(replicate('x',90000))

-- Run multiple times the following queries --
INSERT INTO Compressed (details) Select details FROM Compressed
INSERT INTO NotCompressed (details) Select details FROM NotCompressed
After running multiple times the INSERT INTO…SELECT we could see the rows with more than 8096 bytes are not compressed. My suggestion is to use the sp_estimate_data_compression_savings for knowing the savings that you are going to have.
In this situation, it is important, to know how much data that you have in your table. Also, if you are using replication, for example, from OnPremise-Azure or Azure-OnPremise please review the following details
This article is contributed. See the original author and article here.
Today, we’re introducing an updated OneDrive for Android home screen experience, plus support for Samsung Motion Photos and 8K video. Let’s get right to it.
Now, you can pick up where you left off on recent and offline files, and easily re-discover memories from the past with the updated OneDrive for Android home screen.
The new home screen experience on OneDrive for Android shows recently accessed files, files downloaded for offline use, and “On This Day” photos.
If you have a personal OneDrive account, you will see three main sections in the updated home screen: recently accessed files, files downloaded for offline use, and “On This Day” photos. If you have a OneDrive for work or school account, you will see recent files, shared libraries, and offline files. This new experience replaces the previous home screen which showed a root view of your files. You can still navigate to the root view by tapping the Files tab, which appears beside the Home tab.
The updated home experience now appears on both OneDrive for Android and, as previously announced, on OneDrive for iOS. It’s available for OneDrive work, school and home accounts. To get the new home experience on your Android device, you will need Android version 6.0 or higher and OneDrive for Android version 6.21 or above.
Store and play Samsung Motion Photos on OneDrive
We’re also thrilled to announce that we are now rolling out playback for Samsung Motion Photos. OneDrive has always saved your Samsung Motion Photos, and now you’ll be able to view them in all their moving glory. When you take a Samsung Motion Photo, you capture a still image along with several seconds of video leading up to the shutter release. You can now relive these memories with full motion and sound by playing them on your web browser using OneDrive.com, and soon you’ll be able to play them on OneDrive for Android.
Samsung Motion Photos playback is currently rolling out worldwide on OneDrive for Android. It is only supported for OneDrive personal accounts and requires Android version 6.0 or higher and OneDrive for Android version 6.23 or above. It is not enabled for OneDrive work or school accounts. Motion Photos storage requires capable Samsung Device types, see list here. At this time, Motion Photo playback is not supported on OneDrive for iOS or OneDrive sync. When you view a Motion Photo in either of these places you will see its still photo representation.
Sharing a Motion Photo When you share a Samsung Motion Photo in OneDrive, your recipient will be able to play back the Motion Photo if they are viewing it on the OneDrive for Android or on OneDrive.com. Recipients who view the Motion Photo from OneDrive for iOS or OneDrive sync will see a still photo.
Editing a Motion Photo in OneDrive Editing of Motion Photos is not currently supported in OneDrive. If you change a Motion Photo by performing a rotate, markup, crop, or other edit, OneDrive will save the edits as a still photo. If you would like to revert these changes and restore the photo to the original Motion Photo, you can do this on OneDrive.com by clicking on the Version History command for the photo and then clicking “Restore” on the previous version. Note, previous versions are kept in version history for 30 days.
Store and play Samsung 8K videos on OneDrive
You’ve always been able store Samsung 8K videos with no loss or compression on OneDrive, and now you can play them back as well. This month we are rolling out playback of Samsung 8K videos from Samsung Galaxy S20 and S21 phones. While most mobile device screens do not yet support full-resolution playback of 8K video, there are many reasons, beyond saving local storage space, that you might want to store your 8K video in OneDrive. For example, you might want to create crystal-clear still images from your videos, or upload the videos as 8K files to YouTube, or store them for later downloading to a video editing software, or play them in their full 8K clarity on a capable TV, monitor or VR headset. And now that OneDrive supports file sizes of up to 250GB, you can record without worrying that your file size might get too large to upload to OneDrive.
How to store 8K video in OneDrive
If you have an 8K capable Samsung phone, you will first need to enable 8K video from within your camera settings. The 8K video that you capture can be uploaded to OneDrive manually or by connecting your Samsung Gallery app to OneDrive or via the OneDrive camera-roll backup feature. Note: when you play 8K video on a phone or device that does not support the full 8K pixel resolution of your video, the device will display the video at your current device resolution setting.
To learn about more OneDrive features and tips see OneDrive Tips for Beginners & Pros. As always, we welcome your suggestions for improving OneDrive, which you can submit via UserVoice.
This article is contributed. See the original author and article here.
As Microsoft Defender for Endpoint evolves, we are continuously expanding threat and vulnerability management to cover additional devices, OS platforms, and channels to inform customers. Today, we’re excited to share the latest updates.
Threat and vulnerability management for macOS is now generally available
Vulnerability assessment for macOS devices is now generally available to all customers. This capability expansion enables organizations to discover, prioritize, and remediate both software and operating system vulnerabilities on devices running macOS.
After onboarding your macOS devices to Microsoft Defender for Endpoint, you’ll get the latest security recommendations, review recently discovered vulnerabilities in installed applications, and issue remediation tasks, just like you can with Windows devices.
Support for Windows 8.1 devices in public preview
As we continue to enrich threat and vulnerability management with new features and capabilities, we are committed to help all customers running a variety of platforms to protect their organizations and resolve vulnerabilities.
We’re excited to announce that we’re extending vulnerability assessment and security configuration assessment capabilities to devices running the Windows 8.1 operating system. This has been an ask from some of our top customers and we’re happy to be able to deliver the capability. In public preview as of today, customers will see Windows 8.1 devices contribute to Microsoft Secure Score for Devices and be included in threat and vulnerability dashboards such as Security recommendations, Software inventory, Remediation, Weaknesses, and Event timeline. Windows 8.1 devices will be included in prioritized recommendations and customers can kick off remediation actions like they can with Windows 10 devices. You can see detailed information about threat and vulnerability management support for operating systems versions and platforms in the documentation.
To get started with Microsoft Defender for Endpoint public preview capabilities, we encourage customers to turn on preview features in Microsoft Defender Security Center.
Introducing email notifications for vulnerability events in public preview
Security admins need to stay up to date on the exposure level of their organization and be informed of any new threat that affects the security posture and compliance of their devices.
Threat and vulnerability management continuously monitors your devices and provides real-time information on new threats affecting your organization. These vulnerable events, like new public exploits, are available today through the recently added Event timeline feature.
We’ve introduced the ability to set up email notification rules in threat and vulnerability management, so that all appropriate stakeholders will immediately be informed of these new vulnerability events by email.
Follow these steps to create an email notification rule:
Set the vulnerability events that trigger notifications and specify device groups.
Add specific recipients who’ll be informed immediately when vulnerability events occur so they can act accordingly.
Recipients who receive the email notification can view basic information about the vulnerability event. There will also be links to filtered views of the threat and vulnerability management Security recommendations and Weaknesses pages so they can further investigate. For example, they could get a list of all exposed devices or get additional details about the vulnerability.
Threat and vulnerability management takes a disruptive, risk-driven approach to help organizations reduce and remediate software vulnerabilities and system misconfigurations. Threat and vulnerability management is one of many Microsoft Defender for Endpoint capabilities that empowers organizations to reduce their cybersecurity threat exposure and accelerate the maturity of their vulnerability management program.
This article is contributed. See the original author and article here.
Azure Security Center continually assesses your subscriptions to identify resources and provide security recommendations for them.
For the large organizations with many subscriptions, it is recommended to manage access and policies using Azure Management Groups to organize their subscriptions according to the business needs. By moving multiple subscriptions under that management group, you can create one Azure role assignment on the management group level, which will inherit that access to all the subscriptions. Every directory is given a single top-level management group called “Root” management group. This root management group is built into the hierarchy to have all management groups and subscriptions fold up to it. Similarly, when organizations need to enable Azure Security Center across different subscriptions that have different workloads and therefore different assessment needs, it is also common that they want to customize its policies and control it in the Management Group level rather than in the subscription level to maintain centralized policy management in Azure Security Center. Refer to this article if you haven’t already thought of this approach.
With the above understanding of Management Groups and visibility across multiple subscriptions, is important to always be aware of scenarios that a new subscriptions is created and by default stays in the Root Management Group. It is a common scenario for organizations provision new subscriptions on the daily basis and since those subscription will be added to the root management group, it creates a challenge to maintain them in the correct Management Group. This also creates a problem of monitored vs non-monitored subscriptions. In this blog, I’m introducing you to a workflow automation that helps you to identify subscriptions that are not monitored and take an action to fix the problem.
Prerequisites
The automation uses User Assigned Managed Identity to be able to query the Root management group. Please follow the below step by step instructions:
Once User-assigned managed identity is created, make sure to assign Reader Permissions to the Root Management Group (Please refer the section ‘Authorize the Tenant Root Group and Logic App’s managed identity’ for step-by-step instructions)
Enable and add the above created User assigned Identity to the Logic App. Follow the instructions here to assign the User assigned identity to the Logic App or refer the section ‘Authorize the Tenant Root Group and Logic App’s managed identity’ for step-by-step instructions.
How to deploy the automation playbook
You can find an ARM template that will deploy the Logic App Playbook and all necessary API connections in the Azure Security Center GitHub repository. Once you have deployed the ARM template, you will have some manual steps to take before the tool will work as expected.
Make sure to authorize the Office 365 API connection
This API connection is used to send emails weekly. To authorize the API connection:
Go to the Resource Group you have used to deploy the template resources.
Select the Office365 API connection and press ‘Edit API connection’.
Press the ‘Authorize’ button.
Make sure to authenticate against Azure AD.
Press ‘Save’.
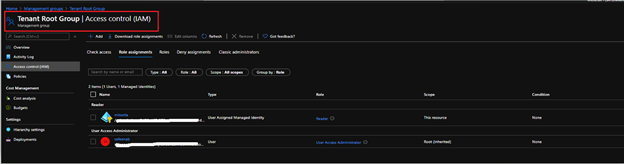
Authorize the Tenant Root Group and Logic App’s managed identity
The Logic App is using a user assigned managed identity. For this purpose, you need to grant it the Reader role on tenant root management group, so it is able to query all the subscriptions.
Make sure you have User Access Administrator or Owner permissions for this scope.
Go to the Management groups page.
Click on the details in the ‘Tenant root group’
Press ‘Access Control (IAM)’ on the navigation bar.
Press ‘+Add’ and ‘Add role assignment’.
Choose ‘Reader’ role.
Assign access to User assigned managed identity.
Choose the subscription where the logic app was deployed.
Select the name of the User assigned identity.
Press ‘Save’.
Make sure you assign the User assigned managed identity to Logic App.
Choose the logic app
Select Identity under Settings
Choose User assigned
Click on ‘Add’ and select the User assigned managed identity you created in the pre-requisite section
How it works
By default this automation runs weekly and queries the Root Management group to identify any new subscription(s) that are directly assigned to the root management group. If one or more subscriptions are found in the Root management group, the Logic App will send an email with the following details: Subscription Name, Subscription ID, Action, Status of the subscription (If ASC is enabled or disabled). Image 1 has an example of how this email look like:
Image 1: Email Notification of subscription(s) assigned to Root Management Group
Make sure to add the subscription(s) to the Management Groups in order to start monitoring using Azure Security Center. The automation artifact also creates a Storage account with a table storage in it during the deployment of the template. If the intent of assigning the subscription to the root management group was on purpose, you could exclude the subscription from being displayed in the email on next run by just clicking on the hyperlink ‘Exclude <subscriptionname>’ under the Action column of Image 1. When you click on the hyperlink, the subscription name will be added to the table storage of the storage account. The successful addition to the exclusion list will be confirmed in the browser as shown in Image 2.
Image 2: Confirmation of subscription addition to Storage account’s Table Storage (Exclusion List)
With the help of Microsoft Azure Storage Explorer, you can connect to the storage account to confirm the subscription has been added successfully in the above step. Refer to the example in Image 3.
Image 3: Storage Explorer view
By doing so, during the next run of the logicapp, it queries the exclusion list (table storage) and incase the result matches to the subscription(s) already in the exclusion list, the logicapp does not alert you for that subscription(s) as it understands the assignment to the root management group was on purpose. This process makes it easy to the security admins to deal with monitored vs un-monitored subscriptions.
An example of next run is shown in the example screenshot Image 4 (Notice how ‘Azure Subscription 1’ is excluded and not notified in the email).
Image 4: Logic App next run result
It is very important to notice the ASC Enabled field and make sure the subscription is monitored with the help of Azure Security Center so that Security Center is able to assess your environment and enables you to understand the status of the resources and eventually help you increase your organization’s secure score.
Go ahead, deploy the workflow in your environment to prioritize monitoring security hygiene. Make sure to let us know what you think by commenting on this article.
This logic app as well as many other can be found here:
Special Thanks to ‘Nicholas DiCola, Principal Director’ & ‘Gilad Elyashar, Principal Group Program Manager’, for envisioning this wonderful automation idea.
Special Thanks to ‘Yuri Diogenes, Principal Program Manager’ in the CxE ASC Team for reviewing this article and for the inputs.
This article is contributed. See the original author and article here.
The recent 21.01 Azure Sphere SDK release includes a new version of the azsphere CLI that is easier to use in your shell and in your scripts. This CLI v2 is in Beta right now, but it will soon become the long-term stable version. Make sure you subscribe to notifications to find out when this happens. At that point, the current v1 CLI will be deprecated before being fully retired after a few further months. So it’s well worth familiarizing yourself now with how the CLI v2 can help you better develop and deploy with Azure Sphere devices. Let’s look at what this CLI offers:
The CLI v2 supports tab completion. This works for command names and parameter names in Powershell on Windows (you’ll need to configure it first) or in bash on Linux. Just type the first character or two, and press Tab and/or CTRL-Space as appropriate for your shell. (We’re working on making completion happen more quickly.)
The CLI v2 can be run in any shell. On Windows, it doesn’t require a dedicated Azure Sphere Developer command prompt—instead azsphere is already in your path. On Linux, you can choose to add it to your path during installation or you can just invoke it directly.
The CLI v2 supports more flexible output. You can more easily automate CLI commands by writing scripts that consume JSON or yaml output. You can separate this “stdout” output from “stderr” related error and informational messages. You redirect it or paginate it with your favorite tools. And you can filter, modify, and sort it using the new –query option. Only some commands currently support these new output options: let us know via “azsphere feedback” if we’re missing a command that you need to script.
The CLI v2 offers back-compatibility. It does have some differences from the CLI v1that are worth noting. However, in each subsequent release, we aim to maintain back-compatibility for both its input—command names, parameter names, parameter values—and its output in JSON and yaml. Or, if we ever can’t do this, we aim to provide at least six months’ notice of deprecation.
The CLI v2 provides simplified object identification. Objects such as tenants, products, and device groups are now always identified via a single consistently named parameter (e.g. –product) with values that can be either an ID or a friendly name.
The CLI v2 aligns better with the Azure CLI for managing other Azure products. If you’re familiar with one of these CLIs, you’ll be right at home with the other. Look for this alignment to increase further in future releases.
We hope the CLI v2 makes it easier for you to work with Azure Sphere. Please let us know what more you’d like to see. Just run “azsphere feedback” to see the options available to ask questions, get support, and make suggestions.
This article is contributed. See the original author and article here.
One of my favorite quotes about design comes from Mad Men. This quote says a lot about how we think of site headers for SharePoint Online and how we create layouts.
“Make it simple, but significant.” – Don Draper, Mad Men, Season 4, Episode 6, “Waldorf Stories”
Hand holds open a color swatch book displaying multiple colors.
Branding your site header is an easy way to provide impact and expression to your SharePoint sites. Over the years we have heard great feedback from our customers that they would like more options for site headers. With this feedback in mind, we recently introduced 2 new site header layouts – Minimal and Extended. But this is not all we heard, so we added more header configuration options giving you more control over the elements in your headers. These simple and small changes can have a big impact on the look of your site. Each header can be used for different reasons and we want to go through a few of these options and recommendations with you.
By combining site logos, site headers, footers, and themes you can make striking changes to emphasize your brand within each site. Picking the right combination of options amongst the site header layouts and configuration options can emphasize or minimize the impact and focus of the brand and content.
When you begin to think about your site header, it is important to first understand what information is available to be included in the header. With this knowledge you can make informed choices about the layout and configuration options to truly make your brand shine on each site.
Content can be included in site headers:
Element
Description
Site Type
Recommendations
Site Logo
Larger logo that can be non-square and transparent based off design uploaded
All
Size: 192 px width 64 px height
Format: PNG, JPEG, SVG (svg not allowed for Group connected sites)
Site Logo Thumbnail
A square logo thumbnail that is used if no site logo is uploaded or in places that a square format is required
This element is required.
All
Size: 64 px width; 64 px height
Format: PNG, JPEG, SVG (svg not allowed for Group connected sites)
Site Title
Text displayed for the site title.
This element is required.
All
Avoid repeating text in the site logo and site title if both are desired to be displayed
Extended Layout Site Logo
The extended header layout has an extended site logo width.
All
Size: 300px wide x 64px height
Format: jpeg, png, svg
Extended Layout Background image
A new background image that can be utilized with the extended header.
All
Size: 2560px wide x 164px height
Format: jpeg, png
Horizontal Site Navigation
Navigation specific to the site in either Mega Menu or Cascading format
Communication
Vertical Site Navigation/Quick Launch
Navigation specific to the site that appears on the left side of the site
Team
Site Label (4 types)
1. Site Classification sets a label on a SharePoint site to protect and identify the content within the site.
2. Sensitivity labels are used across containers and can be applied to SharePoint sites as well as other Microsoft 365 products consistently.
3. Information Barriers indicator if configured and applied to the site.
4. Privacy Setting is a setting applied to the M365 Group for the site.
All
The type of site label is defined by what is configured for your tenant and type of site. This can vary from site to site based off your organizations policies.
Following
An indicator of whether the user has followed the site or not.
All
Share
A quick action icon to easily share the site with other users.
All *except private channel sites connected to Teams
Membership
A count of the current members of a site/group are displayed if available.
Group connected team sites *except private channel sites connected to Teams
Multilingual Picker/Language
A language selector for the page if multilingual has been configured for the site.
All where configured
With all these potential items that could be included in your site header, you will need to decide for each site how you want to present the content and intended use of your site. With these factors in mind, you can make the right choices for layout and configuration. For many sites, the focus might be the brand or showcasing a new concept, while for others the focus might be the contents of the site and information on the pages. Each header layout can assist in promoting the intent of your site and highlight your brand at the same time.
Let us start with the common header elements, once you determine the purpose of your site and select the theme that you wish to utilize, you can look towards the site header to provide information and impact for the site. The theme selected is an important related factor for your site header as it will determine the colors utilized in the header. You will make these selections through the Change the Look panel accessed through the Settings gear.
An expanded view of the Change the Look panel for Headers.
The site logo is one of the first visual elements that a user will interact with and view on your site. You can use this logo to highlight your brand, create a wayfinding element, or provide information about the site. In the past you could utilize a non-square transparent logo or the provided square icon.
However, we heard feedback that many people would like to utilize the non-square transparent logo and control how their site logo appeared in the square aspect ratio utilized in some SharePoint features. With this in mind, we are introducing the site logo thumbnail. The site logo thumbnail is required for every site and upon site creation we provide an icon that is autogenerated using an Office color and the initials of the site title.
In addition to the site logo thumbnail, we also have the site logo. This optional logo allows the upload of a non-square, transparent logo that will be displayed in the site header and other SharePoint features not utilizing the square aspect ratio.
The next visual element that a user will interact with in the site header is the site title. The site title is a required element in a SharePoint site, but is often repeated as text displayed within the site logo. As we heard from our customers, this repetition has a negative impact to the users. With the understanding of the value of having a text site title for uses within SharePoint, we have included the option of hiding the visibility of the site title text in the site header.
Once you have made decisions about the site title and the site logo, you will want to shift your attention to exactly how these elements will be presented on the site. The site header layout options will give you multiple options for combining all the possible elements into a single presentation. SharePoint now has 4 different site header layout options, each with advantages and potential visual impact for your site.
Minimal Header
SharePoint Minimal site header
The Minimal Header layout option is our smallest site header and will work best for sites where you want to provide a clear focus on the content or the hub navigation. This header utilizes the smallest height and the smallest site logo size possible. With the minimal nature of this header, it provides the least visual weight and impact on your site.
To best create a minimal header, we have minimized the content that is included in this header layout, you will find additional content in the overflow menu to the right of the header, including the multilingual language selector. The minimal header should be used very strategically on sites where this restricted content in the header will work best.
It is important to note that if you choose to use this minimal header layout for a multilingual sites the language selector is included in the ellipsis overflow menu.
Compact Header
SharePoint Compact site header
If you use the site header layout of Compact, you will see an increase in the height of the site header and a single line of content across the header area. This layout option is best suited for most of your communication and team sites, allowing you to optimize the space afforded for your site content with a smaller height that includes the most information. Due to the flexibility of the compact header, it is the default header layout provisioned with each site.
With the compact layout you can provide additional wayfinding and identifying information by uploading a site logo. The site header background color, you can also add visual impact to your header with a header background color from your selected site theme.
Standard Header
SharePoint Standard site header
The standard header layout increases the height of the site header and splits the site information into multiple lines for display purposes. This header layout is a good choice if you have a site not connected to a hub and have additional room to allow for the larger height.
You can also optimize the standard site header with a header background color from your site theme and site logo to highlight the site and give emphasis to site specific wayfinding.
Extended Header
SharePoint Extended site header
The extended header layout is the largest layout option that introduces a secondary area to provide a separate area for a background image or color. This layout should be utilized for sites that want to provide impact or become a showcase site for your organization brand or concept within your organization. For additional visual weight we have increased the maximum width site logo that can be included to provide additional impact and introduced the ability to align the logo left, center or right within the header. The site information and navigation (depending on site type) are moved below to a separate site theme colored bar for increased accessibility on these items.
There are some notable exceptions in behavior based on site type for the extended header. If your site is a Hub site and has been designated as Home, and you are utilizing the Extended Header, the site navigation will be removed. For these Hub + Home sites the Hub navigation bar will move to the bottom of the background image as the only navigation presented. If you are utilizing a team site template, you will notice that the navigation will continue to be presented on the left as the quick launch and not in the site header.
As you begin to explore using the extended header, there are a few design recommendations for how you should think about and design the extended header background images. These images will need to scale to fit both wide and small screens, without conflicts and introducing accessibility issues for the site logo and site title. We encourage you to think about these header background images in 3 distinct categories:
Brand Pattern:
By utilizing a pattern that is related to your brand in either shapes or colors, you can create a design that is visually appealing, while maintaining the appropriate open spaces for the site logo to avoid conflicts and potential accessibility issues with the site logo. These patterns will add great visual detail to your site.
Tips for creating brand patterns for your site headers:
Use colors that are a part of your brand and related to the site theme.
Repeating shapes, colors, and details can provide interest and simplicity.
Keep your pattern simple.
Brand Pattern samples for extended SharePoint site header
Brand Photography:
A picture speaks a thousand words as they say, however photography is especially challenging in reduced height spaces like the site header that will need to scale for large and small width screens. Utilizing photography tied to your brand allows you to be specific on the items included in the photographs so that it relates to the content within the site, while also controlling the amount of visual focal draws within the image to keep clear focus on the site logo and site title.
Tips for picking photography for your site headers:
Avoid the introduction of numerous visual elements.
Keep colors to a minimum.
Be aware of color contrasts.
Provide clear open space for your site logo and site title.
Brand photography samples SharePoint extended site header
Brand Illustration:
By creating an illustration for your site header, you can tie the content of the header to the visual elements of your image in a noticeably clear way. By custom tailoring an illustration for your brand and the site contents, you are able to increase the connection impact of your visual elements to the subject of the site.
Tips for brand illustrations in your site header:
Minimize colors utilized in your illustration.
Create or use illustrations that reinforce the content or focus of your site.
Brand Illustration samples SharePoint extended site header
Brand can play a vital role in your portals and sites; these options will allow you to create the perfect introduction of your site to your users. As you can see, all these changes to site headers really took Don Draper’s advice to heart. While they are simple, they are significant.
No matter if you want to make a big splash, or provide minimal interruption, you cannot go wrong with any of these site header options. The additional configuration options for the site title and site logo thumbnail allow you to control the presentation of the visual and text elements for your site and brand throughout the SharePoint features. With these great options for site headers, we are excited to see the great ways that you use each of these layouts to enhance your SharePoint portals and experiences.
Want to learn even more about designing beautiful SharePoint sites, watch a full session in the Video
This article is contributed. See the original author and article here.
Administrators who want to limit the app access to a specific set of mailboxes can create an application access policy. Application access policy support for Microsoft Graph was released in 2019. Today, we are announcing that we are adding support for application access policies to Exchange Web Services (EWS) in response to customer feedback, and as a mechanism to ease customer transition from using EWS to using Graph. With EWS support for application access policies, you can now provide users with a more secure experience.
Background
Some apps make calls into EWS using their own identity and not on behalf of a user. These are usually background services or daemon apps that run on a server without requiring a signed-in user. These apps use OAuth 2.0 client credentials to authenticate, and they are configured with application permissions that enable such apps to access all mailboxes in an Exchange Online organization. Providing more granular EWS permission scopes is a common request from our EWS partners.Application Access Policy
Using an application access policy, EWS administrators can now limit an app’s access to a specific set of mailboxes by specifying an inclusion or exclusion list. Administrators who want to limit third party app access to a specific set of mailboxes can use New-ApplicationAccessPolicy PowerShell cmdlet to configure access control. For more information about application access policies, see Scoping application permissions to specific Exchange Online mailboxes.
Other Investments in EWS
EWS support for application access policies was added to address customer security concerns. As we announced in 2018, we won’t be adding new features to EWS. We strongly recommend migrating from EWS to Graph for access to Exchange Online data, as well as the latest features and functionality. For more information on how to transition, see:
While EWS and Graph have overlapping functionality, there are some differences. If you rely on an EWS API that does not have a Graph counterpart, let us know via UserVoice.
Basic Authentication
This is also a good time to remind everyone that we are retiring Basic Authentication in Exchange Online. If you are using EWS (or any other email access protocol like POP, IMAP, EAS) in combination with Basic Auth, you need to make sure you are using OAuth and not Basic Auth. Furthermore, we strongly recommend that you modernize your apps and move to Graph.
This article is contributed. See the original author and article here.
Have you ever wondered what happens when you type your password into Windows? With the cloud becoming a major part of our world, we find ourselves having to talk to both on-premises and cloud-native resources, which dramatically affects what happens when you do type your password into Windows. Follow along as Steve Syfuhs gives a guided tour of how Windows handles logons internally and secures your authentication in a hybrid world.
Speaker:
Steve Syfuhs, Senior Developer
This session includes:
02:11 Logging on to Windows 03:36 Types of logins 06:33 The Logon UI 09:39 Local Security Authority 21:53 Logon UI Part II 23:42 Local Security Authority Part II 25:14 Kerberos in Windows 35:35 Logon Sessions including Azure Active Directory 38:09 Local Security Authority Part III 43:53 Oauth in Windows – Types of credentials 45:55 Windows Hello Logon 53:34 FIDO Logon 56:32 Local Security Authority Part IV 1:01:08 Azure AD Join 1:05:14 Community Q&A – How long do we need to keep on-premises AD around? 1:09:39 How can we enable MFA/FIDO keys for normal AD Login and not only for Apps that support Modern Auth? 1:12:44 When will we get rid of passwords once and for all?


Recent Comments