
by Contributed | Feb 11, 2021 | Technology
This article is contributed. See the original author and article here.
According to the US Government Accountability Office, about 200,000 members of the military transition to civilian life every year.1 The question is, how do we help them make the move to civilian employment and life, so they can enhance and leverage their skills for tomorrow’s competitive job market?
Microsoft Software and Systems Academy (MSSA) gives veterans a launch pad into the modern workforce that builds on their military skills, experience, and strengths – both soft and hard – with a wide variety of technical training and professional development. It’s a 17-week program that prepares veterans for high-demand careers in cloud development or cloud administration.
MSSA graduates get the opportunity to interview for a full-time job at Microsoft or one of our over 600 hiring partners, including some of the world’s most well-known and prestigious technology firms. The program provides a centralized training hub focused on preparing service members – often before their discharge – to transition seamlessly from the military to a solid career path.
New veterans might be surprised by how well their skills and experiences align with what most private sector employers are looking for, especially with technology. Veterans are uniquely qualified for some of the most in-demand and under-filled roles – and often already have the security clearances companies need. MSSA offers technical training, leveraging Microsoft instructor-led training courses and Microsoft Certification, to skill individuals with in-demand specialties such as cloud computing. It enables graduates to align their training with skills in demand, custom-fitting themselves to the roles they desire – either while still on active duty or after discharge. As a MSSA graduate and current Microsoft data center technician lead, Darren Braun explains, “I’m fortunate that the military has this MSSA program, because I was able to take time on my active-duty contract to do something about the next steps in my life.”
A faster track to a better career: Lauren’s story
Lauren Capers’ military skillset makes her an excellent candidate for a range of technology or engineering firms. Over six years in the U.S. Army, she trained and worked as a helicopter mechanic; then transferred to specialize in electronic warfare. She loved her time in the Army and felt she was leaving with great skills for a successful career. While going to college for computer science, Lauren found work as a mail carrier for the U.S. Postal Service until her husband told her about MSSA. That’s when she made the decision to enroll. It was a choice that changed and accelerated her career trajectory.
Lauren had already been out of the service for two years when she tested and was accepted for MSSA. Once in the program, she became fascinated with Microsoft Azure and the vast possibilities of cloud computing. She focused on particular server and networking skills, taking the tests for such topics as Windows Server, storage, networking, and others. Through her studies and work she also earned a number of Microsoft Certifications including the Microsoft Certified: Azure Fundamentals and the Microsoft Certified: Azure Administrator Associate. These certifications enabled her to focus on building skills needed to be successful in a role and begin her career at Microsoft as an Azure Support Engineer.
Lauren soon learned that the initiative-taking, limit-pushing, and leadership she’d developed in the military was extremely useful at Microsoft. As she puts it, “MSSA gives you the tools and tells you what you need to do to succeed. Then it’s up to you to push your skills to the limit.” With that attitude and her MSSA training, she’s found a new level of freedom at Microsoft that was enhanced by both her time in service and her experience with MSSA.

Developing skills beyond technology: Darren’s story
Darren Braun, the Iowa-based data center tech lead received both technology training and soft skills from his MSSA experience. He discovered the program while still on active duty as a U.S. Marine, and enrolled before discharge to prepare for the transition.
Like Lauren, Darren came out of the military with years of leadership experience and training. As a satellite communications technician, he had worked on a number of systems – his career being defined by increasing responsibility and trust from his colleagues. While in the Marines, Darren had gained a confident engineer’s outlook that he could fill any role in the field. Now, as a former Marine in the world of private enterprise, he brings a valuable, fresh perspective to any team, making a direct impact on projects and culture.
Darren found himself drawn to cybersecurity as a specialty in MSSA, but with his background in communications, he also had strong technology knowledge and interest. As he says, “I was kind of in the middle.” He had IT experience, but it was more hardware-based than in networking. This broader field of knowledge and experience gave him a number of options for specialization, from which he chose the IT path that led him to his current position as data center lead tech.
Having made a choice he was excited about, Darren realized he had some work to do on his professional life skills. While on active duty, he wore his uniform and never had to think about what to wear in an office setting. He never had to worry about paying bills or how to write a compelling resume. Through MSSA, Darren developed these soft skills and learned how to market himself most effectively to companies that receive thousands of applications a day. Mentorship was key to helping Darren develop these kinds of life skills. These lessons have greatly contributed to his success.
“At the end of the day,” says Darren, “no one is going to care for you more than you care for yourself. And that was something that my mentors always drove on me.” In addition to expanding on his skillset through MSSA, he also learned to be strategic about how he expanded it; to be mindful about how he went about the learning, what steps he took, and how to ensure impact against his goals. For that, Microsoft Learn is an excellent resource throughout the learning journey.
It’s largely because of this holistic transition process with MSSA (and his considerable personal qualities) that Darren is, at 23 years old, one of the youngest data center leaders – not only in his region – but in the Americas region as well. He credits MSSA for this achievement, “I would 100% say that if I didn’t join the MSSA, I would not be in the same position that I’m in now.”
Transforming skills for post-military success
Since its inception seven years ago, MSSA has been highly successful, with a 90% completion rate.2 Those graduates have gone on to successful careers as software engineers, sales support, and service engineers just to name the top three. Even as COVID-19 hit in 2020, the MSSA program has been able to find opportunities within the pandemic by making remote classes a more central part of the program – opening it up to participants from Seattle to Italy to Okinawa.
Microsoft Software and Systems Academy (MSSA) is one of many ways Microsoft is helping a diverse population find more rewarding and successful careers. Explore our other tools, strategies, and resources for education and advancement at Microsoft Learn.
Related posts:
˃ Deepening our investment in the military community: Why we’re fully funding Microsoft Software and Systems Academy
˃ Staying resilient with continuous learning
˃ Level up with Microsoft Certified: Azure Database Administrator Associate
Source: 1GAO, “Transitioning Servicemembers: Information on Military Employment Assistance Centers”, June 2019
by Contributed | Feb 11, 2021 | Technology
This article is contributed. See the original author and article here.
We can see a a lot of JSON in our Power Automate flow run history, and if you wonder, how you can parse JSON to make Dynamic Content (which is selectable) out of it so you can more easily make use of an object, then this post is made for you.
If you want to know what exactly is JSON and what you need to know about it, please read this great article by Bob German in the Microsoft 365 PnP Community at TechCommunity or watch this cool video by April Dunnam first, I will just wait here for you.
a little use case
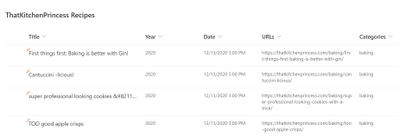
Back again? Cool. Now that you know what JSON is, here is a little use case. Let’s say we wanted to post a random item from a SharePoint list to twitter each day using Power Automate. This is a screenshot of my list:
and this is the overview of the flow that we are going to build:

Trigger
First things first, our trigger needs to be the Recurrence trigger, in which we specify, in which rhythm this flow shall run.
SharePoint Get Items
Now our flow needs to get all items from the list that we want to randomly pick one item from.
Compose
We need to do some magic so we get a random item, I used the following expression for that:
body(‘Get_items’)?[‘value’][rand(1,length(body(‘Get_items’)?[‘value’]))]
We use the rand() expression to get a random list item from that list. The arguments inside of the expression 1,length(body(‘Get_items’)?[‘value’]) mean that our flow needs to pick a random number between 1 and (as this value could change over time) the amount of list items (which is expressed by our length(body(‘Get_items’)?[‘value’]))expression. The output of this Compose action will reflect a random list item.
Parse JSON
Now to the interesting part of this flow: We want to exactly post this random list item but we if we look into our Dynamic Content, it gives us only content from the Get items action, but that is before we get a random list item, and as we do’t want to tweet ALL list items, this isn’t a good idea. How do we solve this now? Well, we parse JSON, which means that we turn the code into objects again and those objects are then reflected in the Dynamic Content in Power Automate.
Before we add the Parse JSON action, we need to find out, WHICH JSON we need to parse. As already mentioned, we can see the JSON code in our run history, which is why we save our unfinished flow and let it run. Then we open the run history, and have a look at the Outputs of the Compose action and copy everything inside of that box.

Now we edit our flow again, add the Parse JSON action, add the Outputs from our Compose Action as Inputs to that action and click the Generate from sample button. We will now paste the copied JSON into the Insert a sample JSON Payload box and click Done. What we did with that is telling the flow which objects it needs to parse. If we now look at this action, we can see the JSON inside of our Parse JSON action, but all values from the run history are replaced by placeholders: “string” (if it was text), “boolean” (if it was a yes/no), etc.
Now that this action knows what to parse, we can proceed with the next action
Send a tweet
We can now see a lot of new Dynamic Content which comes from our Parse JSON action.
We can now select all values we need in that tweet, plus some more or less generic hashtags (Pro’s will add hashtags into a dedicated column in SharePoint.) If we now save and run our flow, it will first GET all items from the list, then identify a random list element and send out a tweet with the Title and URL auf exactly that list item.

Conclusion & What’s next?
The Parse JSON action can help you turn Outputs from previous actions into Dynamic Content which you can then use in your flow. I’d love to know what you do with Parse JSON, let me know!
If you are now hungry because of recipes in the list: ThatKitchenPrincess.com
First published on m365princess.com
by Contributed | Feb 11, 2021 | Technology
This article is contributed. See the original author and article here.
At Microsoft Ignite 2020, we announced the preview of support for Linux and Windows PowerShell Core in Exchange Online management using EXO V2 Module. Today, we are delighted to announce general availability of this feature along with the support for macOS.
Officially supported distribution of Linux is Ubuntu versions 18.04 or above. For macOS, supported versions are Mojave, Catalina & Big Sur. Read more in the detailed release notes here.
In addition to cross platform support, we added support for longer session timeouts in interactive scripting scenarios. The module is now more secure with real time policy and security enforcement in all interactive cases with the help of Continuous Access Evaluation provided by Azure AD.
Version 2.0.4 of EXO V2 module is available at PowerShell Gallery and we recommend all Exchange Admins start using this version of the module. Read more about how to install or update EXO V2 module here.
The Exchange Online Admin Team

by Scott Muniz | Feb 11, 2021 | Security
This article was originally posted by the FTC. See the original article here.
You’ve heard of romance scams. But do you know how they happen? They start when scammers create fake profiles on dating apps or social media. Then, those scammers strike up a relationship with their targets and work to build trust. Sometime later, they make up a story and ask for money.
So how do you spot a romance scammer? Here are some things to watch for:
- Any love interest who asks you to give them money on a gift card, by money transfer, or cryptocurrency is a scammer. Period.
- Romance scammers profess love quickly. They might say they can’t meet you because they’re overseas for business or military service — but, during the pandemic, they might just say they’re locked down.
- Romance scammers might try to lure you off the dating site.
- Scammers will find a reason to ask you for money — maybe to buy a phone card to keep chatting, maybe to help with a “medical emergency,” or maybe something else.
- Romance scammers sometimes build interesting dating profiles. But try a reverse-image search of the profile pictures. Are any photos associated with another name, or with details that don’t match up? That’s just more proof that it’s a scam.
If you’ve spotted any of these signs of a scam, tell the online dating app or social media platform right away. And then tell the FTC at ReportFraud.ftc.gov
Share these graphics with your family, friends, and social networks. You probably know someone who could use the reminder.


Brought to you by Dr. Ware, Microsoft Office 365 Silver Partner, Charleston SC.
by Contributed | Feb 11, 2021 | Technology
This article is contributed. See the original author and article here.
How do you export QRadar offenses to Azure Sentinel?
Special thanks to @Hesham Saad from our Cybersecurity Technical Solutions Specialist team for collaborating on this blog post with me!
Customers are frequently inquiring on how to migrate smoothly from their current SIEM solution to Azure Sentinel.
A couple of weeks ago, we started with a solution to export data from Splunk to Azure Sentinel. Highly recommended to check out the blog post by our colleague @yokhaldi (How to export data from Splunk to Azure Sentinel), a logical sequence to his blog post is a walk-through explaining how to consume security telemetry data directly from QRadar to Azure Sentinel.
One of the key challenges in migrating to another SIEM is the intermediate phase. In this phase, both SIEMs are running side by side until the migration is complete. To keep a good overview (single pane of glass) of all the incidents in your deployment from both SIEMs, it is of utmost importance to have all your alerts and incidents in one place.
This blogpost will describe how you can forward all your QRadar offenses to your Azure Sentinel environment.
Let’s get started!
As highlighted in @Alp Babayigit’s post “Azure Sentinel Side-by-Side with QRadar”, there are many reasons why enterprises are using multiple SIEM products simultaneously. You can use various SIEM solutions at once as a permanent measure, for example, to correlate with available data sources while using Azure Sentinel as the single pane of glass to centralize all incidents). However, most of the time, the side-by-side architecture is used during a transition period for migrating from one SIEM to our SIEM and SOAR solution, Azure Sentinel.
Why do so many enterprises transition to Azure Sentinel?
The current trend in many businesses is the consumption of more and more cloud services, hence the huge ask for cloud-native SIEMs. This is where Azure Sentinel comes to the rescue with the following advantages:
- Easy collection from cloud sources
- Effortless infinite scale
- Integrated automation capabilities
- Continually maintained cloud and on-premises use cases enhanced with Microsoft TI (Threat Intelligence) and ML (Machine Learning)
- Github community
- Microsoft research and ML capabilities
- Avoid sending cloud telemetry downstream (send cloud data to on-premise SIEM)
There are several best practice integration options to operate Azure Sentinel Side-by-Side:
|
Alerts
|
Events
|
Upstream to Azure Sentinel
|
CEF
Logstash
Logic Apps
API
|
CEF
Logstash
API
|
Downstream from Azure Sentinel
|
Security Graph Security API
Powershell
Logic Apps
API
|
API
Powershell
|
This blog post will explain how to ingest QRadar offense data into an Azure Sentinel workspace. The solution will use the QRadar API and can be adapted to query event data from the QRadar event logs. That said, there is another solution for ingesting QRadar event log data: use routing rules and forwarding destinations in QRadar.
Scenario description
As mentioned, this blog post will focus on getting offenses from QRadar into Azure Sentinel as our primary SIEM.
There are two routes we can take to get offense data into Azure Sentinel:
- QRadar can notify us when a new offense is created, and as a response, we can pull the offense data into our log analytics workspace.
- Another route is to schedule the pulling of the QRadar offense data.
In this blog post, we will detail the second option’s implementation: Let’s assume that your SOC team wants to collect offense data from QRadar according to a specific schedule/timeframe. Azure functions will schedule API calls to QRadar to pull the desired data into our workspace. The response format when requesting data from QRadar via the API is in JSON.
The following guide will explain the process step by step.
Onboard Azure Sentinel
We assume the onboarding Azure Sentinel is completed.
If not; I would like to forward you to the following links for a quickstart on onboarding Azure Sentinel:
QRadar environment configuration
We also assume that you have an up and running QRadar environment.
(For those who want to replicate this walkthrough in a lab environment, here is a guide on how to install QRadar in Azure: Configuring a Console on Microsoft Azure (IBM) )
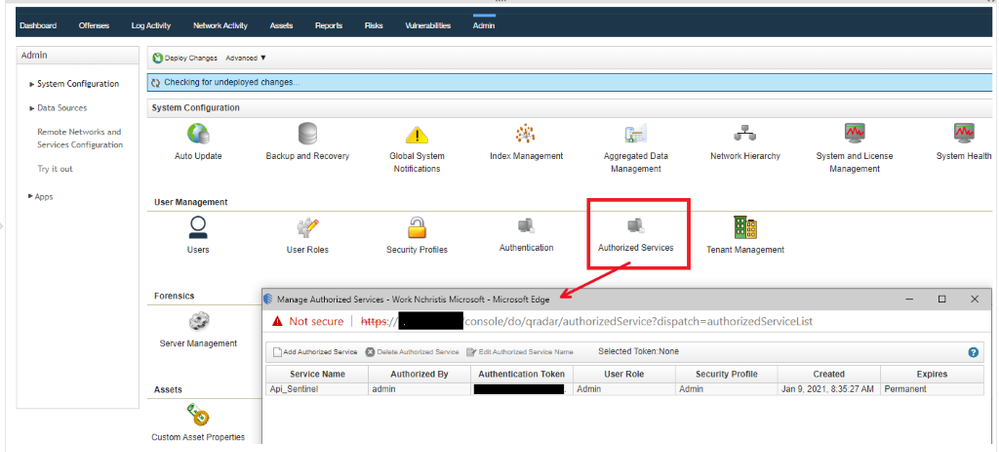
To accomplish the exporting of offense data from QRadar, we will invoke GET requests from the QRadar API. You will need an authentication token to authenticate the API calls that the Azure Function will make. To create an authentication token in QRadar, go to the “Manage Authorized Services” window and create a new token.
You also have to make sure the Azure Function (which we will create in a couple of steps) has HTTP access to the QRadar system to make the API calls. A guide on how to determine which IP addresses will be used by your Azure Function can be found here.
Let’s walk-through which QRadar API calls we used for this blogpost:
Use your https://<management_ip>/api_doc link to get to the interactive QRadar API documentation to access technical details for the QRadar RESTful API and then look under /siem/offenses for our get request for the offense data:

In the following screenshot, you can see which fields you can filter on in your GET request or specify the fields you want to retrieve as a response.
This blog post will not specify specific fields to retrieve; we will retrieve them all. We will, however, set a filter parameter in the API calls.

As we previously mentioned, we will schedule requests to get the offenses from QRadar into our Azure Sentinel environment. To make it more efficient (less data overhead), we will only ask for the offenses generated since the last scheduled request.
For example, we will schedule our Azure Function to perform an API request every 24 hours, and we will only retrieve the offenses created in the last 24 hours in QRadar.
We will filter on start_time: “The number of milliseconds since epoch when the offense was started”.
(Side note: you can also change the code to retrieve the offenses updated in the last 24 hours; you need to filter on last_updated_time in the API request instead of start_time).
PowerShell code
To export offense data from QRadar and import it into Azure Sentinel, we create a scheduled Azure Function invoking a GET request to the QRadar API via PowerShell code.
In the PowerShell code, we will perform the following steps:
- First, specify all the required inputs:
- QRadars management ip
- QRadar authentication token
- Azure Sentinel workspace id and shared key
- Trust the certificate of QRadar / ignore the certificate.
if ("TrustAllCertsPolicy" -as [type]) {} else {
        Add-Type "using System.Net;using System.Security.Cryptography.X509Certificates;public class TrustAllCertsPolicy : ICertificatePolicy {public bool CheckValidationResult(ServicePoint srvPoint, X509Certificate certificate, WebRequest request, int certificateProblem) {return true;}}"
        [System.Net.ServicePointManager]::CertificatePolicy = New-Object TrustAllCertsPolicy
}
Set-ExecutionPolicy -Scope Process -ExecutionPolicy Bypass
- Calculate the number of milliseconds since epoch when the offense was started
- Create the API call to QRadar to get all the offenses.
$headers = @{}
$headers.add("Version","12.0")
$headers.add("Content-Type","application/JSON")
$Headers.add("SEC",$token)
$url = ""https://" + $consoleIP + "/api/siem/offenses?filter=start_time%3E" + $unixTime
$OffenseInfo = Invoke-RestMethod -Method GET -Headers $headers -Uri $url
- Translate the received JSON response from QRadar to JSON allowed input for the Azure Sentinel API call
- Send the translated JSON information via API call to Azure Sentinel.
You can find the complete script code on Github.
Azure Function
The last step in this whole procedure is to run the PowerShell script in an Azure Function that will run on a schedule and push the QRadar offense data into our Azure Sentinel workspace.
In the following screenshot, you can see the configuration of the Azure Function:

Logs in Azure Sentinel
The logs will go to a custom Azure Sentinel table ‘QRadar_Offense_CL’ (if you specified the table as QRadar_Offense like in our code) as shown in the screenshot below.

And this example corresponds to the following fictional offense in QRadar:

Deploy this solution to your environment
An ARM template to automate the onboarding of the Azure Function can be found on Github.

Summary
To export offenses from QRadar and import to Azure Sentinel, we created a scheduled Azure Function that will invoke a GET request to the QRadar API via PowerShell and push the data into your Azure Sentinel workspace. We encourage you to try it yourself and leverage the next generation of SIEM for your environment. You can also contribute your new connectors, workbooks, analytics, and more in Azure Sentinel. Get started now by joining the Azure Sentinel Threat Hunters GitHub community.
by Scott Muniz | Feb 11, 2021 | Security, Technology
This article is contributed. See the original author and article here.
This Valentine’s Day, before you go looking for love in all the wrong chat rooms, CISA reminds users to be wary of internet romance scams. At first, cyber criminals promise the reward of romance after adopting an alias to appear as a potential partner. Once your heart is hooked on hope, they turn the tables. The scammer with the illusive identity will ask for money, making promises of phony matrimony, as they finagle funds from you as a fake fiancée.
If you don’t know who you are doting on when you are dating, be cautious with your cash and keep it.
For more information, review CISA’s Tip on Staying Safe on Social Networking Sites. If you believe you have been a victim of a romance scam, file a report with:
by Contributed | Feb 11, 2021 | Technology
This article is contributed. See the original author and article here.
A short video that demonstrates how easy it is to create a case for investigation right from Communication Compliance.
Not shown in this video specifically, but the same can also be done from our Insider Risk Management solution as well.
Feedback and comments are always welcome!
Thank you, Shashank for creating this!
@Sashankkumar
by Contributed | Feb 11, 2021 | Technology
This article is contributed. See the original author and article here.
Intro
The Microsoft 365 PnP Community is the virtual home for everyone who wants to extend Microsoft 365 beyond the standard. We want to share knowledge, learn from each other and achieve more together.
This hub will be a part of the Microsoft 365 Patterns and Practices community and will complement our existing initiatives under the PnP umbrella, such as our open–source projects and Community Docs, where we explain how the different features of Microsoft 365 work and offer guidance on how to use them.
Mission:
Our mission is to create a single inclusive and welcoming place for everyone who wants to build on Microsoft 365.
Goals:
We do not want to distinguish between so-called developers and citizen developers or spend much energy putting people into boxes. We want to provide guidance, knowledge, and reusable patterns and practices for everyone who wants to build on top of Microsoft 365, regardless of their profession, role, technical background, approach, or skill level. By living our Sharing is Caring mission, everyone will benefit.
Having one community as a virtual home for everyone who wants to extend Microsoft 365 will break down information silos and broaden everyone’s horizon, which will lead to better outcomes and more connected solutions. Sharing ideas across products using no code, low-code, and coded solutions in one single place will bring our communities closer together.
We want to let our community grow and get new people involved, so we want to also cater to people who are not in that community right now and lower entry barriers. Helping everyone getting started rather than gatekeeping is one of our primary goals.
Appreciating people from all backgrounds and with different expertise will ensure inclusiveness and improve our ability to step outside of our comfort zones and respect diverse perspectives. Learning that there is no pecking order of power users, makers, and developers but that we will be most successful when we focus on a bettertogether approach will make a huge difference.
What can you expect in this community?
We learned that people build solutions that span multiple Microsoft products with varying degrees of complexity, and we shouldn’t compartmentalize communities. We like to bring people together by guiding and sharing knowledge and listening to understand people’s needs. Please expect blog posts, videos, and open discussion on all kinds of topics around building on Microsoft 365. We are here to help.
How can you get involved?
This community doesn’t have any entry barriers; it’s made for everyone who extends Microsoft 365, including no-code, low-code, or coded solutions.
- Join us for our community calls [link]
- Let us know what you’d like to know more about, please don’t be shy, all feedback is welcome.
- If you create (blog, vlog, code on GitHub) let us know where so that we can share it with others
- If you’d like to show your work, let us know and we’ll get you a slot on the community call
- Meanwhile, explore what we have to offer
#SharingIsCaring ❤
by Contributed | Feb 11, 2021 | Technology
This article is contributed. See the original author and article here.
It seems like JSON is everywhere these days. Adaptive cards, Microsoft Teams app manifests, and SharePoint list formats are all written in JSON. And JSON is the de-facto standard for REST APIs like Microsoft Graph; you can’t make a call without it. Power Apps, Power Automate, and Power BI can all handle JSON too. It really is everywhere except, it seems, in older products which were written when XML was king.
The intent of this article is to teach you what you need to know to use JSON in typical IT, low-code, or JavaScript development scenarios. It’s organized in order from simple to complex; if you don’t need some sections, just skip over them; you can always come back and read them later!
Working with JSON in the Adaptive Card Designer
What is JSON?
JSON is a standard format for representing structured data as text. JSON is commonly used to store data in text files and to exchange data between programs over a network. JSON files usually have a .json filename extension.
Geek Note: JSON serves more or less the same purpose as XML (eXtensible Markup Language) but it’s shorter and easier to read. CSV format serves a similar purpose as well, but it’s not a standard so the details tend vary, and it can only store tables (rows and columns) of data.
JSON data is organized as “objects” which contain name/value pairs. This simple example is the first step toward building a profile for Parker, the PnP mascot, who has kindly agreed to share personal information for this article.
JSON objects always begin with { and end with }; the very shortest valid JSON, {}, represents an empty object. This JSON contains a single name/value pair; the name is name and the value is “Parker”. As you can see, the name and value are separated by a :. Names are case sensitive and need to be enclosed in double quotes. In this case, since “Parker” is a text value, it’s enclosed in double quotes as well. Spaces, tabs, and newlines are ignored in JSON, but are helpful for readability.
The values can be simple things like text strings or numbers, collections of values (arrays), or more objects containing their own name/value pairs.
If you want to put more than one name/value pair in your JSON, separate them with commas like this:
{

  “name“: “Parker“,

  “species“: “porcupine“

}
Note that the order of the name/value pairs doesn’t matter; this JSON is equivalent to the one above:
{

  “species“: “porcupine“,

  “name“: “Parker“

}
The values don’t need to be text like “Parker”; they can also be numbers, booleans, collections, or more JSON objects. This allows you to have objects within objects.
Here’s a more complete description of the Quilled Crusader that uses all of the JSON data types:
{

  “name“: “Parker“,

  “species“: “porcupine“,

  “occupation“: “mascot“,

  “motto“: “Sharing is caring“,

  “centimeters“: 75,

  “kilograms“: 28.5,

  “quills“: 3.0e+4,

  “friendly“: true,

  “bossy“: false,

  “nicknames“: [

    “Quilled Crusader“,

    “Spike“

  ],

  “classification“: {

    “kingdom“: “animalia“,

    “phylum“: “chordata“,

    “class“: “mammalia“,

    “order“: “rodentia“,

    “suborder“: “hystricomorpha“,

    “infraorder“: “hystricognathi“

  },

  “dnaSequence“: null

}
These are all name/value pairs, but there are several kinds of values; the next few sections will explain each of them.
Geek note: Turning data objects into JSON is called “serialization”; turning JSON back into data objects is called “parsing” or sometimes “deserialization”.
Strings (Text)
Strings are just text that’s part of the data, such as “Parker” or “rodentia”, and they need to be enclosed in double quotes. That seems simple enough, but what if your string has a double quote in it? “Parker says “Sharing is caring”” is not valid JSON because the parser thinks the “ before Sharing is the end of the string, and then it gets really confused. (Computers are dumb, aren’t they?) So to put a “ within a string, you need to “escape” it by preceeding it with a
{

  “name“: “Parker“,

  “action“: “Parker says “Sharing is caring““

}
As you might expect, this escaping thing is a bit of a slippery slope, as the parser may now be confused by the
{

  “name“: “Parker“,

  “home“: “C:UsersParker“

}
While “ and
{

  “name“: “Parker“,

  “mood“: “?“

}
Numbers
Numeric values don’t get quotes around them. For example, Parker’s length and weight are expressed as numbers.
{

  “name“: “Parker“,

  “centimeters“: 75,

  “kilograms“: 28

}
Note that 75 is not the same as “75”; the quotes would indicate the characters 7 and 5 rather than a number.
Numbers are in decimal, and can contain a sign, decimal point, and exponent such as:
{

  “quills“: 3.0e+4,

  “damage“: -10

}
Boolean (True or False)
For boolean values, just use true and false with no quotes.
{

  “name“: “Parker“,

  “friendly“: true,

  “bossy“: false

}
Objects (name/value pairs)
All the JSON examples in this article so far have consisted of one JSON object with name/value pairs enclosed in a set of curly braces. But you don’t need to limit yourself to one object! You can have as many objects as you want as values inside other objects. This nesting allows you to create a hierarchy.
{

  “name“: “Parker“,

  “classification“: {

    “kingdom“: “animalia“,

    “phylum“: “chordata“,

    “class“: “mammalia“,

    “order“: “rodentia“,

    “suborder“: “hystricomorpha“,

    “infraorder“: “hystricognathi“

  }

}
The top-level object has two name/value pairs, “name” and “classification”, and the value of “classification” is itself an object with several name/value pairs of its own. This is very convenient for organizing the data and, when combined with arrays, allows creating lists, tables, and all sorts of other data structures.
Arrays (collections)
An array is an ordered set of values enclosed in square braces [ and ] and separated by commas, such as:
{

  “name“: “Parker“,

  “nicknames“: [

    “Quilled Crusader“,

    “Spike“

  ]

}
or, more succinctly,
{

  “name“: “Parker“,

  “nicknames“: [ “Quilled Crusader“, “Spike“ ]

}
Mascots could have any number of nicknames or none at all, and an array allows you to list them. Parker’s sister Penny doesn’t have any nicknames.
{

  “name“: “Penny“,

  “nicknames“: []

}
Arrays of objects are especially useful. For example, suppose you wanted to compile a list of Microsoft developer mascots:
{

  “mascots“: [

    {

      “name“: “Bit“,

      “species“: “raccoon“,

      “team“: “Microsoft Developer Advocates“

    },

    {

      “name“: “G-raffe“,

      “species“: “giraffe“,

      “team“: “Microsoft Graph“

    },

    {

      “name“: “Parker“,

      “species“: “porcupine“,

      “team“: “Microsoft 365 PnP“

    }

  ]

}
Remember that spaces, tabs, and newlines are ignored, so this the same data could be written more compactly like this. Suddenly it starts to look a little bit like a table!
{

  “mascots“: [

    { “name“: “Bit“, “species“: “raccoon“, “team“: “Microsoft Developer Advocates“ },

    { “name“: “G-raffe“, “species“: “giraffe“, “team“: “Microsoft Graph“ },

    { “name“: “Parker“, “species“: “porcupine“, “team“: “Microsoft 365 PnP“ }

  ]

}
MIND THE COMMAS! There must be exactly one (1) comma between name/value pairs and array elements. It’s really easy to misplace a comman in JSON, especially if you’re copying and pasting. Some people like to leave an extra comma after the last name/value pair or array element to make it easier to re-arrange things, but that’s cheating; it’s not part of the JSON standard and some applications won’t accept it.
Dates and other things
Unfortunately, there is no standard way to express a date in JSON. In practice, dates are passed in string values, but different applications use different date formats, which can be a bit maddening at times. The Microsoft Graph API uses ISO 8601 format.
Images and other binary objects are rarely included in JSON, but if you wanted to do that you’d need to turn them into strings somehow, perhaps by Base64 encoding them.
Null
To indicate an empty value, use null. For example, Parker hasn’t had his DNA sequenced, so there is no value for that in his profile.
{

  “name“: “Parker“,

  “dnaSequence“: null

}
Note that [], an empty array, and {}, an empty object, are different than null. They’re empty containers whereas null is really nothing at all.
Comments
If only JSON supported comments, we could write much more readable code! Officially there are no comments in JSON, but some products (like the SharePoint Framework) seem to encourage using JavaScript style comments in JSON. It seems harmless but it’s not proper JSON, and most applications will choke on them.
One trick that’s usually OK is to just add a few extra name/value pairs in lieu of comments; most software will simply ignore the extra data. For example:
{

  “name“: “Parker“,

  “classification“: {

    “comment“: “This is the biological taxonomy“,

    “kingdom“: “animalia“,

    “phylum“: “chordata“,

    “class“: “mammalia“,

    “order“: “rodentia“,

    “suborder“: “hystricomorpha“,

    “infraorder“: “hystricognathi“

  }

}
While it’s not recommended, it is legal to have duplicate names in a JavaScript object, so you could have more than one “comment” if you’re daring. This is valid JSON:
{

  “name“: “Parker“,

  “comment“: “Great mascot but gets a bit prickly at times“,

  “comment“: “Check out “Parker’s Place“ online apparel shop“

}
Tools
There are a lot of web sites out there that will format and validate your JSON; this one does both.
NOTE: Remember to remove any personal or confidential data before using online JSON tools!
Schema support
It’s often helpful to impose some structure on your JSON, specifying which name/value pairs are required and what value types they should contain. That’s the role of JSON Schema. This allows validating the JSON and offering features such as intellisense.
A JSON Schema describes a specific JSON structure. For example, all animal mascots need to have a name and zero or more nicknames with an optional value for quills, such as:
{

  “name“: “Parker“,

  “nicknames“: [

    “Quilled Crusader“,

    “Spike“

  ],

  “quills“: 30000

}
This would be expressed in JSON Schema as:
{

	“definitions“: {},

	“$schema“: “http://json-schema.org/draft-07/schema#“,

	“$id“: “https://example.com/object1607485037.json“,

	“title“: “Root“,

	“type“: “object“,

	“required“: [

		“name“,

		“nicknames“

	],

	“properties“: {

		“name“: {

			“$id“: “#root/name“,

			“title“: “Name“,

			“type“: “string“,

			“default“: ““,

			“examples“: [

				“Parker“

			],

			“pattern“: “^.*$“

		},

		“nicknames“: {

			“$id“: “#root/nicknames“,

			“title“: “Nicknames“,

			“type“: “array“,

			“default“: [],

			“items“:{

				“$id“: “#root/nicknames/items“,

				“title“: “Items“,

				“type“: “string“,

				“default“: ““,

				“examples“: [

					“Quilled Crusader“

				],

				“pattern“: “^.*$“

			}

		},

		“quills“: {

			“$id“: “#root/quills“,

			“title“: “Quills“,

			“type“: “integer“,

			“examples“: [

				30000

			],

			“default“: 0

		}

	}

}
If this looks complicated, don’t worry; there are many tools that will generate a schema from sample JSON. This is built into Power Apps and Power Automate, and you can generate a schema online using the JSON Schame Validator and Generator; it was used to generate the schema above.
Why bother with a schema? Well once you have one, you can get syntax checking and intellisense in tools like Visual Studio Code. Power Apps and Power Automate use schemas to determine what name/value pairs to expose as properties in your project, and what data types they should be.
You can add a property to your JSON to indicate the URL of the JSON schema; for example, to indicate that a file is a Microsoft Teams manifest, include this schema URL:
{

  “$schema“: “https://developer.microsoft.com/en-us/json-schemas/teams/v1.2/MicrosoftTeams.schema.json“

}
When a $schema property is present, Visual Studio and Visual Studio Code will validate your JSON automatically and provide Intellisense. There are a ton of schemas available at https://www.schemastore.org/json/ for you to reference. You can even reference a JSON schema in your own project by just specifying a relative path:
{

  “$schema“: “./myschema.json“

}
OData
You may notice some name/value pairs in your JSON which look kind of odd and begin with @odata. For example, here’s the beginning of the data returned by the Microsoft Graph call https://graph.microsoft.com/v1.0/me/messages (returns messages in the user’s inbox):
{

  “@odata.context“: “https://graph.microsoft.com/v1.0/$metadata#users(‘19671429-1359-457f-bfc1-1be1ee65d4d9’)/messages“,

  “@odata.nextLink“: “https://graph.microsoft.com/v1.0/me/messages?$skip=10“,

  “value“: [

      {

          “@odata.type“: “#microsoft.graph.eventMessage“,

          “@odata.etag“: “W/“DQAAABYAAADcd/V5PKGOSLpB9pjjNuVqAALT5+Dw““,

          “id“: “AAMkADIxMjk0NDNjLTJmNWItNDYzNy04MmQ2LTQyMjhkM2FjOWE3MQBGAAAAAAA7bH43fGymSJWqX6oeXPByBwDcd-V5PKGOSLpB9pjjNuVqAAAAAAEMAADcd-V5PKGOSLpB9pjjNuVqAALV0JNVAAA=“,

          “createdDateTime“: “2020-12-16T00:14:19Z“,

          …
OData is a standard for doing Create, Read, Update, and Delete (CRUD) operations on tabular data using a REST web service, and the Microsoft Graph uses it where appropriate. A folder of email messages is easily expressed as tabular data, so it’s no surprise that the Graph uses OData to work with them.
The name/value pairs beginning with @odata. are OData control information used to control the flow of data. For example the value of @odata.nextLink is the URL to retrive the next set of rows in a large dataset. You can find details on all the OData Control Information here in the OData documentation.
JSON and JavaScript
Although JSON stands for “JavaScript Object Notation”, and was inspired by the format JavaScript uses for object literals, they are not the same. Indeed, JSON is intended to be language independent. Some major differences between JSON and JavaScript are:
- In a JavaScript object literal, the names only need to be enclosed in quotes if they are reserved words like
for or if in JavaScript. Furthermore, you can use either single or double quotes. In JSON, names always need to be enclosed in double quotes.
- JavaScript strings can be contained in single or double quotes; JSON strings must be contained in double quotes
- JavaScript numbers can be in octal (using a leading 0) or hexadecimal (using a leading 0x) as well as decimal; JSON numbers must be in decimal.
- JavaScript objects can contain values such as dates, regular expressions, and HTML elements, whereas JSON values are limited to strings, numbers, boolean, objects, arrays, and null.
- JavaScript allows comments; JSON does not.
Bottom line: all JSON objects are valid JavaScript object literals but not all JavaScript object literals are valid JSON.
To convert between JSON and objects, use the JSON object that’s built into JavaScript. This is preferable to using eval which is prone to security issues.
To convert JSON to a JavaScript object:
var json = ‘{“name”: “Parker”}’;

var o = JSON.parse(json);
console.log(o.name); // Parker
To convert a JavaScript object to JSON:
var o = new Object();

o.name = “Parker”;

var json = JSON.stringify(o);
console.log(json);  // {“name”:”Parker”}
When you make a REST call, you end up using JSON as well. Here’s a call to the Microsoft Graph:
// Assume Parker has logged in and a variable called accessToken contains

// a valid Azure AD access token for Parker to call the Microsoft Graph

const response = await fetch(“https://graph.microsoft.com/v1.0/me/”,

    {

        method: ‘GET’,

        headers: {

            “accept”: “application/json”,

            “authorization”: “bearer “ + accessToken,

        }

    });
if (response.ok) {

    const profile = await response.json();

    const name = profile.displayName;   // Parker

}
Notice that to ask the service for a JSON response, the HTTP header is set to accept “application/json”, which is the MIME type for JSON. And the response object returned by fetch() has a json() function built right in to turn the returned JSON into a JavaScript object.
Conclusion
Learning to work with JSON is an important skill for both low-code and full stack developers, as well as for many IT Pro tasks. Here’s hoping this article has helped you to understand and use JSON in your next project!
(This article is cross-posted here on the author’s blog)

by Contributed | Feb 11, 2021 | Technology
This article is contributed. See the original author and article here.
Hello dear digital technology enthusiast. I heard you would like to find out what Adaptive Cards are? In this article I will help you to understand what Adaptive Cards technology is, how it works and how you can use it. Follow me through the next chapters and I will try to explain it as clear as possible.
In short words – Adaptive Cards is a technology, that lets you to focus on content and layout, not how it will be displayed on a specific device or browser. What you are responsible for is to prepare what you would like to show and how it should be organized, e.g. should there be any tables, images, columns. However, the display side is taken care by the host. The host is an application, that displays Adaptive Card. It controls the colors, fonts, specific parts of layout, buttons’ shapes, backgrounds and almost everything that makes the Card to look, once displayed, as if this is just another piece of the user interface.
Like a YouTube video in Facebook Messenger conversation. You see how seamlessly it displays within other chat messages? This is an example of a similar cards’ technology too.
In Microsoft landscape we do have Adaptive Cards already in various places. Have you known it? You can find them when you talk to Cortana.
They are also in Windows Timeline (access it by pressing Win+Tab).

You can find them in your Outlook when you receive a message containing an interactive form inside.

And what is the most obvious – they are also present are very commonly used in Microsoft Teams – this is the platform on which I will focus in this article.
Apart from the places I mentioned, Adaptive Cards are also present in multiple services from Microsoft, like Microsoft Search, Microsoft GraphAPI explorer, Azure Bot Framework and many more. This technology however is not limited and exclusively used only by Microsoft. Cisco is using it to display cards in their Webex Teams and Adaptive Cards’ SDK (Software Development Kit – set of tools used to build and run software) is open-source and hosted on github, therefore anyone can use it in their development own projects, for example when building apps for Android or custom web sites with JavaScript or .NET.
How does Adaptive Cards work?
Adaptive Card is a technology that uses JSON (JavaScript Object Notation – structured method to describe information, learn more from Bob German here: https://techcommunity.microsoft.com/t5/microsoft-365-pnp-blog/introduction-to-json/ba-p/2049369) to declare how the final card should look like. The defined code is then parsed by the host that has Adaptive Cards SDK installed. Using SDK and JSON schema (schema defines what information can be used by authors in their cards) for the specific version translates code into valid HTML that is being displayed to users.

Thanks to this approach, creation of user interface using Adaptive Cards is not only fast (no need to design separate card for desktop and mobile, for Android and iOS etc.), but also secure, since if part of JSON code that is used in card does not exist in SDK, it will not be rendered, so no malicious code can be then executed at user side.
All right. Now that we know what they are and how they work, let me tell you how to create them.
Adaptive Cards authoring
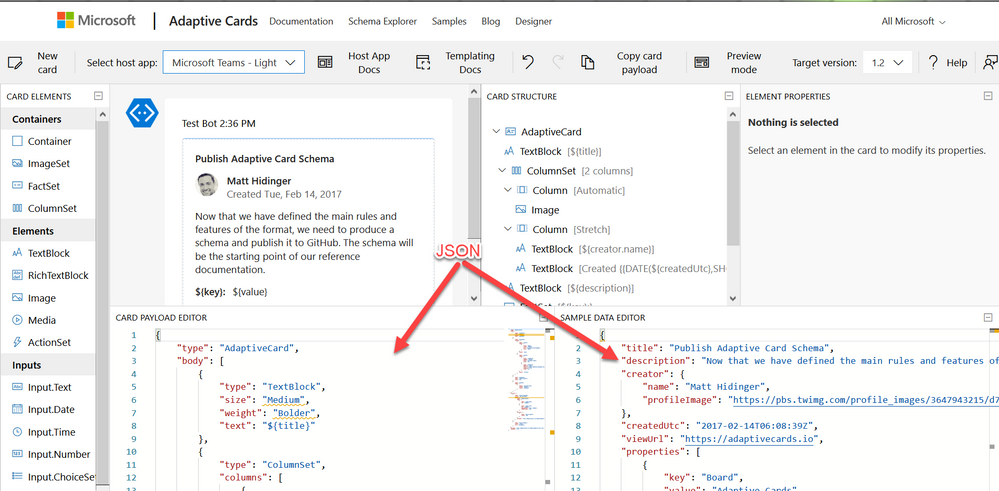
The best place to start authoring your first (and every next) Adaptive Card is the designer, that you can find at https://adaptivecards.io/designer. There you can, following drag&drop visual designing approach create Adaptive Card and then configure all required properties. The designer is built from the following functionalities:

- New card – allows to create a card from a blank canvas or to start using one from existing templates.
- Select host app – is used to switch between hosts. Remember what I wrote at the beginning? Host control how the card is going to be displayed. Just experiment for example by choosing Microsoft Teams – Dark and Light host. See the differences.
- Target version. Each host has different version of Adaptive Cards implemented. Therefore, once you select host, the version will be automatically selected for you. Version determines what functionalities can be used.
- Card elements are the building bricks of the card. Here you need to choose between:
- Containers – they define the layout, like imageSet will be displayed as a gallery, whereas FactSet as a table with two columns.
- Elements – those are the pieces used to display the information like text or image. Why ActionSet is here? Good question. This container is lets you to define actions within any place of the card.
- Inputs – with their help card can not only be used for displaying data, but also for its collecting. With inputs authors can build rich forms and request information from users.
- Main canvas – here you can, following drag&drop method, place elements and build final card’s interface.
- Card structure displays hierarchy of elements. Like TextBlock will be always below a container etc.
- Element properties – here authors define parameters specific per each element. Like font size, align, id, values and much more.
- Payload editor displays working JSON code, that author can simply copy and paste e.g. in Power Automate to display the card in Microsoft Teams.
- Data editor is used to bind data placeholders in card with specific values from data object. This is called Adaptive Cards Templating and since is not yet supported in Microsoft Teams will not be explained in this article.
What are the Actions?
Actions can be added to the card via the ActionSet or simply defined at the bottom of the main container.

There are four types of actions that author can choose from:
- OpenUrl – lets to open an external URL. Like hyperlink.
- Submit – sends back data from the card and inputs back to the host. Host is then responsible for the data processing and further operations.
- ShowCard – displays or hides sub-card – like a card within a card.
- ToggleVisibility – shows or hides defined elements on the card.
Adaptive Cards in Microsoft Teams
In Microsoft Teams the host that displays Adaptive Cards is called Flow Bot. This is a bot built using Azure Bot Framework technology. Its job is not only to display custom cards, but also Power Automate Approvals and some more.
Today there is just one option to display Adaptive Cards in Microsoft Teams without a need to develop custom bots. This is through Power Automate. How? Flow sends Adaptive Cards JSON code to the Flow Bot which renders it and display in Microsoft Teams conversation.
In Power Automate there are several actions that allows to generate Adaptive Cards in MS Teams, however each has significantly different purpose.

 | 1. Post a choice of options as the Flow bot to a user – action allows to send an Adaptive Card in a pre-defined layout, where author can define message and options – that will be displayed as button. After card is sent, flow is paused for up to 30 days waiting for user’s response.
This action can be used in simple approval/ collecting feedback scenarios, where no fancy layout is expected. |
 | 2. Post an Adaptive Card to a Teams user and wait for a response – allows to send custom built Adaptive Card to a specific Microsoft Teams user and to pause the flow for up to 30 days while waiting for response.
3. Post an Adaptive Card to a Teams channel and wait for a response – the same as above, but Adaptive Card is sent to a channel.
|
 | 4. Post a message as the Flow bot to a user – sends a pre-defined Adaptive Card to a chosen user but does nothing more. Author cannot embed here custom JSON code.
5. Post a message as the Flow bot to a channel – the same as above, but message is sent to a channel. |
 | 6. Post your own adaptive card as the Flow bot to a user – allows author to send custom Adaptive Card to a user, however it is not waiting for the response so in case card contains form, Action.Submit results in error. 7. Post your own adaptive card as the Flow bot to a channel. As above, however the card is sent to a channel. The above two actions simply allow to send the card, but they do not offer any way to collect feedback. They are a good choice if you are planning to simply send informative card, without forms. |
Exercise!
Now it is your turn. Build an easy flow, that is triggered manually and all it does is posting an Adaptive Card to a Teams channel (of your choice), using “Post your own adaptive card as the Flow bot to a channel” action.

Then copy paste the following Adaptive Card JSON code and paste as “Message” inside the action:
{
    "$schema": "http://adaptivecards.io/schemas/adaptive-card.json",
    "type": "AdaptiveCard",
    "version": "1.2",
    "body": [
        {
            "type": "TextBlock",
            "text": "Hey @{triggerOutputs()['headers']['x-ms-user-name']}! Here are some cool cats photos",
            "size": "Large",
            "wrap": true
        },
        {
            "type": "TextBlock",
            "text": "I hope you like them ;)",
            "size": "Medium",
            "weight": "Lighter",
            "wrap": true
        },
        {
            "type": "ImageSet",
            "imageSize": "medium",
            "images": [
                {
                    "type": "Image",
                    "url": "https://4.bp.blogspot.com/-XkviAtJ1s6Q/T3YFb2RUhDI/AAAAAAAAAVQ/EHomLZlFMKo/s1600/small+cat.jpg",
                    "size": "Medium"
                },
                {
                    "type": "Image",
                    "url": "https://images4.fanpop.com/image/photos/18500000/Kitten-cats-18565791-1024-768.jpg",
                    "size": "Medium"
                },
                {
                    "type": "Image",
                    "url": "https://tse2.mm.bing.net/th?q=Funny+Cats&pid=Api&mkt=en-US&adlt=moderate&t=1",
                    "size": "Medium"
                },
                {
                    "type": "Image",
                    "url": "https://tse3.mm.bing.net/th?q=Grumpy+Cat&pid=Api&mkt=en-US&adlt=moderate&t=1",
                    "size": "Medium"
                }
            ]
        }
    ]
}
Now save and test your flow. You should see the below cool Adaptive Card in Microsoft Teams channel:

Further learning
Adaptive Cards is not just a simple technology. It is also the community that is behind. If you are interested in learning more about it, check the assets under the links below:
- https://adaptivecards.io – here is the documentation, JSON schema explorer to tell you what is possible and what is not plus several samples.
- https://adaptivecards.io/designer – the already known visual designer.
- https://aka.ms/acroadmap – here is the roadmap, release log and user voice, where you can submit your ideas.
- https://madewithcards.io/ – the repository of community built Adaptive Cards examples, ready to use.
- https://aka.ms/adaptivecardscommunitycall – add monthly, community call about Adaptive Cards to your calendar and be up to date with the latest ideas the team behind is planning.
- https://github.com/microsoft/AdaptiveCards – the official github repository for Adaptive Cards code, where you can find the latest SDK if you plan to begin your journey as a developer.
Wrap up
Adaptive Cards is a modern technology built by Microsoft to help content creators author parts of user interface much faster and with less issues, due to device-specific aspects.
Knowledge about JSON code is useful, however it is not mandatory to successfully design cards.
With the easy to use designer and intuitive actions in Power Automate, anyone can easily create and use Adaptive Cards for communication purposes and to enrich user experience in processes taking place inside Microsoft Teams.
The technology can be used for many scenarios, that turns Microsoft Teams powered with Power Automate into a real digital workplace, where users can take part in the processes directly from conversations or chats, not being disturbed by the need to navigate between different systems.
I encourage you to try it right away.

Recent Comments